截止到目前,vim稳定版本已经到了8.2+,ycm(YouCompleteMe的简称)最新版本与几年前的安装配置截然不同了。之前网上很多教程也教不得法,生搬硬套,没有讲透彻。所以,才下定决心写一篇自认为史上最简单、史上最全的教程出来。
一、准备工作
1、安装python(ycm需要使用python3.6以上的版本,这里选择python3.8.5):
1.1、进入download目录:cd download
1.2、下载python3.8.5:wget https://www.python.org/ftp/python/3.8.5/Python-3.8.5.tar.xz
1.3、解压: xz -d Python-3.8.5.tar.xz && tar -xvf Python-3.8.5.tar
1.4、进入Python-3.8.5目录:cd Python-3.8.5
1.5、配置:./configure –prefix=/usr –enable-shared –enable-optimizations –with-ssl
1.6、构建及安装:make -j 8 && sudo make install #构建完成后,会安装在/usr/bin目录
1.7、测试:在命令行输入python –version或python3 –version
二、安装vim8.2+
1、下载vim8.2:git clone https://github.com/vim/vim.git
2、进入目录:cd vim
3、切换到最新的tag:git checkout v8.2.1522 #可使用git tag查看所有的tag
4、配置:./configure –prefix=/usr –enable-luainterp=yes –enable-mzschemeinterp –enable-perlinterp=yes –enable-python3interp=yes –enable-tclinterp=yes –enable-rubyinterp=yes –enable-cscope –enable-terminal –enable-autoservername –enable-multibyte –enable-xim –enable-fontset –with-modified-by=shlian –with-compiledby=shlian –with-python3-command=python3
如果上述配置命令配置、编译后,vim一直不能支持python3,则建议尝试一下下面的命令:
./configure –prefix=/usr –enable-luainterp=yes –enable-mzschemeinterp –enable-perlinterp=yes –enable-python3interp=yes –enable-tclinterp=yes –enable-rubyinterp=yes –enable-cscope –enable-terminal –enable-autoservername –enable-multibyte –enable-xim –enable-fontset –with-modified-by=shlian –with-compiledby=shlian –with-python3-config-dir=/usr/lib/python3.8/config-3.8-x86_64-linux-gnu
#上面的–with-python3-config-dir的目录视机器的不同而不同,建议在自己的机器上查找具体的配置目录并修改。
说明:
1、标红的非常关键, vim8.2以后的版本,在配置的时候,不用再指定python的config目录了(网上很多很多指定python的config目录的教程,只能说已经过时了,详见:./configure –help)
2、注意:vim8.2不支持同时使用python2和python3,所以千成不可以在上述命令中指定:–enable-pythoninterp=yes,否则python3不会被vim支持的
3、如果发现了错误,则安装不存在的依赖包:
3.1 yum install perl-devel #让vim支持perl解释器
3.2 yum install perl-ExtUtils-Embed #安装包解决:找不到EXTERN.h文件的问题
3.3 yum install ruby-devel #让vim支持ruby解释器
3.4 如果系统已经有自带的python3.6及以上版本了,建议先安装一下python3-devel(ubuntu:sudo apt-get install python3-dev)
5、构建及安装:make -j 8 && sudo make install
6、查看vim是否支持python3:
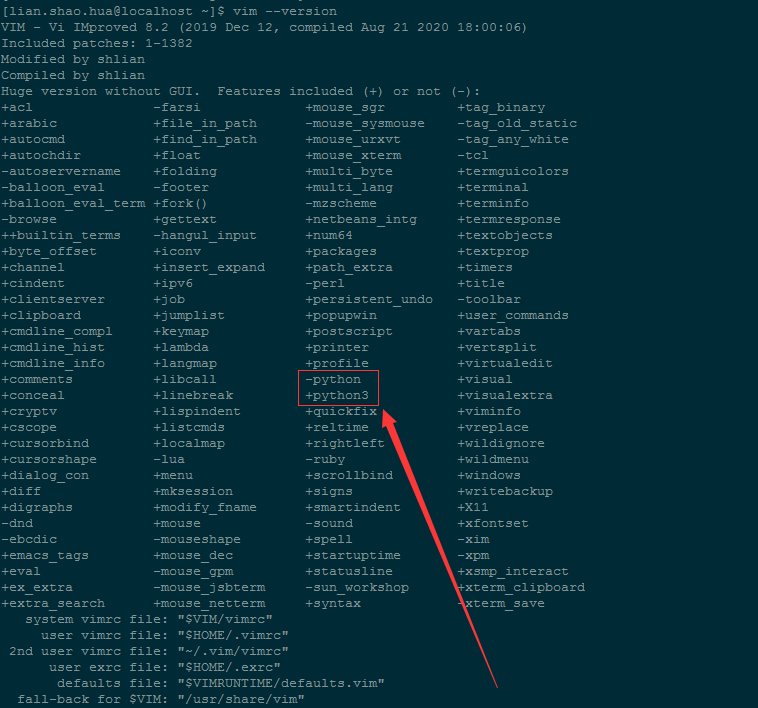

带+号的说明已经支持了,所以,已经成功安装了支持python3的vim
三、安装vim辅助插件
1、下载管理插件的插件——vundle
新建目录: mkdir -p ~/.vim/bundle
clone代码:git clone https://github.com/VundleVim/Vundle.vim.git ~/.vim/bundle/Vundle.vim
2、在home目录,新建一个.vimrc文件,并输入以下内容:
set nocompatible              " be iMproved, required
filetype off                  " required

" set the runtime path to include Vundle and initialize
set rtp+=~/.vim/bundle/Vundle.vim
call vundle#begin()

" let Vundle manage Vundle, required
Plugin 'VundleVim/Vundle.vim'

" All of your Plugins must be added before the following line
call vundle#end()            " required
filetype plugin indent on    " required
3、安装
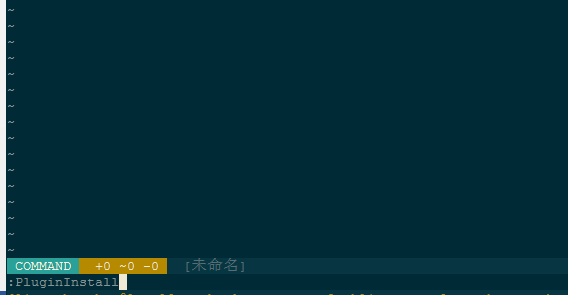
使用vim打开.vimrc文件 : vim .vimrc
按键”shift+;”进入命令模式,输入:PluginInstall,然后回车即可完成安装
4、配置.vimrc,是一项很复杂的工作,我配置好的如下(已经安装了很多插件了,如:文件搜索、注释、doxygen、drawit、buffer、winmanager+taglist+tagbar等等):
"/**
"* @file .vimrc
"* @brief vimrc
"* @author shlian
"* @version 1.1.0
"* @date 2020-09-01
"*/

set nocompatible " 关闭 vi 兼容模式
set smartindent "当在大括号中间回车的时候,他会智能缩进,因为他知道括号中间要缩进
set tabstop=4
set shiftwidth=4
set expandtab
syntax on " 自动语法高亮
set number " 显示行号

"设置代码参考线
highlight ColorColumn ctermbg=darkgray
set colorcolumn=140

" 高亮显示当前行
set cursorline
  "red(红),white(白),black(黑),green(绿),yellow(黄),blue(蓝),purple(紫),gray(灰),brown(棕),tan(褐色),syan(青色)
hi CursorLine   cterm=NONE ctermbg=darkgray ctermfg=NONE
"hi CursorColumn cterm=NONE ctermbg=darkred ctermfg=white

set ruler " 打开状态栏标尺
set shiftwidth=4 " 设定 << 和 >> 命令移动时的宽度为 4
set softtabstop=4 " 使得按退格键时可以一次删掉 4 个空格
set tabstop=4 " 设定 tab 长度为 4
set nobackup " 覆盖文件时不备份
"set autochdir " 自动切换当前目录为当前文件所在的目录
set backupcopy=yes " 设置备份时的行为为覆盖
set ignorecase smartcase " 搜索时忽略大小写,但在有一个或以上大写字母时仍保持对大小写敏感
"set nowrapscan " 禁止在搜索到文件两端时重新搜索
set incsearch " 输入搜索内容时就显示搜索结果
set hlsearch " 搜索时高亮显示被找到的文本
set noerrorbells " 关闭错误信息响铃
set novisualbell " 关闭使用可视响铃代替呼叫
set t_vb= " 置空错误铃声的终端代码
set showmatch " 插入括号时,短暂地跳转到匹配的对应括号
" set matchtime=2 " 短暂跳转到匹配括号的时间
set magic " 设置魔术
set hidden " 允许在有未保存的修改时切换缓冲区,此时的修改由 vim 负责保存
set guioptions-=T " 隐藏工具栏
set guioptions-=m " 隐藏菜单栏
set smartindent " 开启新行时使用智能自动缩进
set backspace=indent,eol,start
" 不设定在插入状态无法用退格键和 Delete 键删除回车符
set cmdheight=1 " 设定命令行的行数为 1
set laststatus=2 " 显示状态栏 (默认值为 1, 无法显示状态栏)
set statusline=\ %<%F[%1*%M%*%n%R%H]%=\ %y\ %0(%{&fileformat}\ %{&encoding}\ %c:%l/%L%)\

" 设置在状态行显示的信息
set foldenable " 开启折叠
"set foldmethod=syntax " 设置语法折叠************************
set foldcolumn=0 " 设置折叠区域的宽度
setlocal foldlevel=1 " 设置折叠层数为
"set foldclose=all " 设置为自动关闭折叠
nnoremap <space> @=((foldclosed(line('.')) < 0) ? 'zc' : 'zo')<CR>
" 用空格键来开关折叠

" return OS type, eg: windows, or linux, mac, et.st..
function! MySys()
    if has("win16") || has("win32") || has("win64") || has("win95")
        return "windows"
    elseif has("unix")
        return "linux"
    endif
endfunction

" 用户目录变量$VIMFILES
if MySys() == "windows"
    let $VIMFILES = $VIM.'/vimfiles'
elseif MySys() == "linux"
    let $VIMFILES = $HOME.'/.vim'
endif

" 设定doc文档目录
let helptags=$VIMFILES.'/doc'

" 设置字体 以及中文支持
if has("win32")
    set guifont=Inconsolata:h12:cANSI
endif

" 配置多语言环境
if has("multi_byte")
" UTF-8 编码
set encoding=utf-8
set termencoding=utf-8
set formatoptions+=mM
set fencs=utf-8,gbk

if v:lang =~? '^\(zh\)\|\(ja\)\|\(ko\)'
    set ambiwidth=double
endif

if has("win32")
    source $VIMRUNTIME/delmenu.vim
    source $VIMRUNTIME/menu.vim
    language messages zh_CN.utf-8
endif
else
    echoerr "Sorry, this version of (g)vim was not compiled with +multi_byte"
endif

" Buffers操作快捷方式!
"nnoremap <C-RETURN> :bnext<CR>
"nnoremap <C-S-RETURN> :bprevious<CR>

" Tab操作快捷方式!
"nnoremap <C-TAB> :tabnext<CR>
"nnoremap <C-S-TAB> :tabprev<CR>

"关于tab的快捷键
" map tn :tabnext<cr>
" map tp :tabprevious<cr>
" map td :tabnew .<cr>
" map te :tabedit
" map tc :tabclose<cr>

"窗口分割时,进行切换的按键热键需要连接两次,比如从下方窗口移动
"光标到上方窗口,需要<c-w><c-w>k,非常麻烦,现在重映射为<c-k>,切换的
"时候会变得非常方便.
nnoremap <C-h> <C-w>h
nnoremap <C-j> <C-w>j
nnoremap <C-k> <C-w>k
nnoremap <C-l> <C-w>l

" set fileformats=unix,dos,mac
 nmap <leader>fd :se fileformat=dos<CR>
 nmap <leader>fu :se fileformat=unix<CR>

" use Ctrl+[l|n|p|cc] to list|next|previous|jump to count the result
" map <C-x>l <ESC>:cl<CR>
" map <C-x>n <ESC>:cn<CR>
" map <C-x>p <ESC>:cp<CR>
" map <C-x>c <ESC>:cc<CR>


" Python 文件的一般设置,比如不要 tab 等
autocmd FileType python set tabstop=4 shiftwidth=4 expandtab
autocmd FileType python map <F12> :!python %<CR>

" 选中状态下 Ctrl+c 复制
"vmap <C-c> "+y

"十六进制显示文件
nmap <leader>H :%!xxd<CR>
"二进制显示文件
nmap <leader>B :%!xxd -r<CR>

"******************************************************************************************************************

set rtp+=~/.vim/bundle/Vundle.vim

call vundle#begin()
	filetype plugin indent on    " 必须加载vim自带和插件相应的语法和文件类型相关脚本

	"vim包管理工具
	Plugin 'gmarik/Vundle.vim'

	"文件目录增加git 状态
	Plugin 'Xuyuanp/nerdtree-git-plugin'

	"tab智能补全
	Plugin 'ervandew/supertab'

	"代码可视化缩进块
    Plugin 'yggdroot/indentline'
        let g:indentLine_enabled = 1
        let g:indentLine_color_term = 230
        "let g:indentLine_char_list = ['|', '¦', '┆', '┊','|'] 会出现光标的错行,慎用
        let g:indentLine_char_list = ['|', '¦', '¦', '¦']


	"彩虹括号
	Plugin 'kien/rainbow_parentheses.vim'

	"真彩色
	Plugin 'tpope/vim-sensible'

	"git左边栏增删改提示
	Plugin 'airblade/vim-gitgutter'

    Plugin 'altercation/solarized'
	Plugin 'altercation/vim-colors-solarized'  "solarized
	    let g:solarized_termtrans  = 1         " 使用 termnal 背景
	    let g:solarized_visibility = "high"    " 使用 :set list 显示特殊字符时的高亮级别

	    " GUI 模式浅色背景,终端模式深色背景
	    if has('gui_running')
			set background=light
	    else
			set background=dark
	    endif
	    " 主题设置为 solarized
		"colorscheme solarized

	"文件目录分屏
	Plugin 'scrooloose/nerdtree'
		let NERDTreeHighlightCursorline = 1       " 高亮当前行
		let NERDTreeShowLineNumbers     = 1       " 显示行号
		" 忽略列表中的文件
		let NERDTreeIgnore = [ '\.pyc$', '\.pyo$', '\.obj$', '\.o$', '\.egg$', '^\.git$', '^\.repo$', '^\.svn$', '^\.hg$' ]
		" 启动 vim 时打开 NERDTree
		"autocmd vimenter * NERDTree
		" 当打开 VIM,没有指定文件时和打开一个目录时,打开 NERDTree
		"autocmd StdinReadPre * let s:std_in = 1
		"autocmd VimEnter * if argc() == 0 && !exists("s:std_in") | NERDTree | endif
		"autocmd VimEnter * if argc() == 1 && isdirectory(argv()[0]) && !exists("s:std_in") | exe 'NERDTree' argv()[0] | wincmd p | ene | exe 'cd '.argv()[0] | endif
		" 关闭 NERDTree,当没有文件打开的时候
		"autocmd bufenter * if (winnr("$") == 1 && exists("b:NERDTreeType") && b:NERDTreeType == "primary") | q | end

		" <leader>nt 打开 nerdtree 窗口,在左侧栏显示
		map <leader>nt :NERDTreeToggle<CR>
		" <leader>tc 关闭当前的 tab
		map <leader>tc :tabc<CR>
		" <leader>to 关闭所有其他的 tab
		map <leader>to :tabo<CR>
		" <leader>ts 查看所有打开的 tab
		map <leader>ts :tabs<CR>
		" <leader>tp 前一个 tab
		map <leader>tp :tabp<CR>
		" <leader>tn 后一个 tab
		map <leader>tn :tabn<CR

    "tagbar
    Plugin 'majutsushi/tagbar'
        let g:tagbar_ctags_bin = 'ctags' " tagbar 依赖 ctags 插件
        let g:tagbar_width     = 30      " 设置 tagbar 的宽度为 30 列,默认 40 列
        let g:tagbar_autofocus = 1       " 打开 tagbar 时光标在 tagbar 页面内,默认在 vim 打开的文件内
        let g:tagbar_left      = 1       " 让 tagbar 在页面左侧显示,默认右边
        "let g:tagbar_sort      = 0       " 标签不排序,默认排序

        " <leader>tb 打开 tagbar 窗口,在左侧栏显示
        map <leader>tb :TagbarToggle<CR>

    "taglist
    Plugin 'vim-scripts/taglist.vim'

        let Tlist_Show_One_File           = 1    " 只显示当前文件的tags
        let Tlist_GainFocus_On_ToggleOpen = 1    " 打开 Tlist 窗口时,光标跳到 Tlist 窗口
        let Tlist_Exit_OnlyWindow         = 1    " 如果 Tlist 窗口是最后一个窗口则退出 Vim
        let Tlist_Use_Left_Window         = 1    " 在左侧窗口中显示
        let Tlist_File_Fold_Auto_Close    = 1    " 自动折叠
        let Tlist_Auto_Update             = 1    " 自动更新

        " <leader>tl 打开 Tlist 窗口,在左侧栏显示
         map <leader>tl :TlistToggle<CR>

    "winmanager
    Plugin 'vim-scripts/winmanager'
        let g:NERDTree_title="[NERDTree]"
        "let g:winManagerWindowLayout="TagList|NERDTree"
        let g:winManagerWindowLayout='FileExplorer|TagList'

        function! NERDTree_Start()
            exec 'NERDTree'
        endfunction
        function! NERDTree_IsValid()
            return 1
        endfunction

        nmap wm :WMToggle<CR>

    "powerline fonts
    Plugin 'powerline/powerline-fonts'

    "状态栏
    Plugin 'vim-airline/vim-airline'
    Plugin 'vim-airline/vim-airline-themes'

        let g:airline_powerline_fonts = 1   " 使用powerline打过补丁的字体
        if !exists('g:airline_symbols')
            let g:airline_symbols = {}
        endif

        " 关闭当前 buffer
        "noremap <C-x> :w<CR>:bd<CR>
        "<leader>1~9 切到 buffer1~9
        map <leader>1 :b 1<CR>
        map <leader>2 :b 2<CR>
        map <leader>3 :b 3<CR>
        map <leader>4 :b 4<CR>
        map <leader>5 :b 5<CR>
        map <leader>6 :b 6<CR>
        map <leader>7 :b 7<CR>
        map <leader>8 :b 8<CR>
        map <leader>9 :b 9<CR>

        "Vim 在与屏幕/键盘交互时使用的编码(取决于实际的终端的设定)
        set encoding=utf-8
        set langmenu=zh_CN.UTF-8
        " 设置打开文件的编码格式
        set fileencodings=ucs-bom,utf-8,cp936,gb18030,big5,euc-jp,euc-kr,latin1
        set fileencoding=utf-8
        " 解决菜单乱码
        source $VIMRUNTIME/delmenu.vim
        source $VIMRUNTIME/menu.vim
        " 解决consle输出乱码
        "set termencoding = cp936
        " 设置中文提示
        language messages zh_CN.utf-8
        " 设置中文帮助
        set helplang=cn
        " 设置为双字宽显示,否则无法完整显示如:☆
        set ambiwidth=double
        " 总是显示状态栏
        let laststatus = 2
        let g:airline_theme='solarized'      " 设置主题,simple、dark、solarized、bubblegum 详见.vim/bundle/vim-airline-themes

        " 开启tabline
        let g:airline#extensions#tabline#enabled = 1      "tabline中当前
        let g:airline#extensions#tabline#left_sep = ' '   "buffer两端的分隔字符
        let g:airline#extensions#tabline#left_alt_sep = '|'      "tabline中
        let g:airline#extensions#tabline#buffer_nr_show = 1      "buffer显示编号

        let g:airline_left_sep = ' '
        let g:airline_left_alt_sep = '▶'
        let g:airline_right_sep = ' '
        let g:airline_right_alt_sep = '◀'
        let g:airline_symbols.crypt = '?'
        let g:airline_symbols.linenr = '¶'
        let g:airline_symbols.maxlinenr = '㏑'
        let g:airline_symbols.branch = '⎇'
        let g:airline_symbols.paste = 'ρ'
        let g:airline_symbols.spell = 'Ꞩ'
        let g:airline_symbols.notexists = 'Ɇ'
        let g:airline_symbols.whitespace = 'Ξ'

        " 映射切换buffer的键位
        nnoremap [b :bp<CR>
        nnoremap ]b :bn<CR>
        " 设置字体
        set guifont=Powerline_Consolas:h14:cANSI

    Plugin 'enricobacis/vim-airline-clock'
        "let g:airline#extensions#clock#auto = 0  关闭
        let g:airline#extensions#clock#format = '%H:%M:%S'


    ""代码动态检查(使用YCM自带的即可)
    "Plugin 'w0rp/ale'
    "    let g:ale_lint_on_text_changed       = 'normal'                     " 代码更改后启动检查
    "    let g:ale_lint_on_insert_leave       = 1                            " 退出插入模式即检查
    "    let g:ale_sign_column_always         = 1                            " 总是显示动态检查结果
    "    "let g:ale_statusline_format = ['✗ %d', '⚡%d','✔  OK']
    "    let g:ale_sign_error                 = '>>'                         " error 告警符号
    "    let g:ale_sign_warning               = '--'                         " warning 告警符号
    "    let g:ale_echo_msg_error_str         = 'E'                          " 错误显示字符
    "    let g:ale_echo_msg_warning_str       = 'W'                          " 警告显示字符
    "    let g:ale_echo_msg_format            = '[%linter%] %s [%severity%]' " 告警显示格式
    "
    "    " C 语言配置检查参数
    "    let g:ale_c_gcc_options              = '-Wall -Werror -O2 -std=c11'
    "    let g:ale_c_clang_options            = '-Wall -Werror -O2 -std=c11'
    "    let g:ale_c_cppcheck_options         = ''
    "    " C++ 配置检查参数
    "    let g:ale_cpp_gcc_options            = '-Wall -Werror -O2 -std=c++14'
    "    let g:ale_cpp_clang_options          = '-Wall -Werror -O2 -std=c++14'
    "    let g:ale_cpp_cppcheck_options       = ''
    "
    "    "使用clang对c和c++进行语法检查,对python使用pylint进行语法检查
    "    let g:ale_linters = {  'c++': ['clang', 'gcc'] }
    "    " <F9> 触发/关闭代码动态检查
    "    map <F9> :ALEToggle<CR>
    "    "普通模式下,ak 前往上一个错误或警告,aj 前往下一个错误或警告
    "    nmap ak <Plug>(ale_previous_wrap)
    "    nmap aj <Plug>(ale_next_wrap)
    "    " ad 查看错误或警告的详细信息
    "    nmap ad :ALEDetail<CR>

    "模糊查找文件,ctrl+p
    Plugin 'ctrlp/ctrlp.vim'

    "git log与code对应
    "Plugin 'vim-fugitive'

    "显示文件修改痕迹
    Plugin 'chrisbra/changesPlugin'


    "Plugin 'bufexplorer'

    "浏览最近打开的文件
    Plugin 'vim-startify'

    "撤销
    Plugin 'Gundo'
    nnoremap <leader>u :GundoToggle<CR>

    "恢复上次关闭时所打开的文件
    "Plugin 'Sessionman'
    "set sessionoptions=blank,buffers,curdir,folds,tabpages,winsize
    "nmap <leader>sl :SessionList<CR>
    "nmap <leader>ss :SessionSave<CR>
    "nmap <leader>sc :SessionClose<CR>

    "Plugin 'Powerline'
    "Plugin 'rainbow_parentheses'

    Plugin 'ludovicchabant/vim-gutentags'
        "gutentags搜索工程目录的标志,碰到这些文件/目录名就停止向上一级目录递归

        let g:gutentags_project_root = ['.root', '.svn', '.git', '.project']

        " 所生成的数据文件的名称 "
        let g:gutentags_ctags_tagfile = '.tags'

        " 将自动生成的 tags 文件全部放入 ~/.cache/tags 目录中,避免污染工程目录 "
         let s:vim_tags = expand('~/.cache/tags')
         let g:gutentags_cache_dir = s:vim_tags
         " 检测 ~/.cache/tags 不存在就新建 "
         if !isdirectory(s:vim_tags)
            silent! call mkdir(s:vim_tags, 'p')
         endif

            " 配置 ctags 的参数 "
        let g:gutentags_ctags_extra_args = ['--fields=+niazS', '--extra=+q']
        let g:gutentags_ctags_extra_args += ['--c++-kinds=+pxI']
        let g:gutentags_ctags_extra_args += ['--c-kinds=+px']

    Plugin 'skywind3000/gutentags_plus'
        " gutentags搜索工程目录的标志,碰到这些文件/目录名就停止向上一级目录递归
        " let g:gutentags_project_root = ['.root', '.svn', '.git', '.project']

        " 所生成的数据文件的名称 "
        let g:gutentags_ctags_tagfile = '.tags'

        " 将自动生成的 tags 文件全部放入 ~/.cache/tags 目录中,避免污染工程目录
        let s:vim_tags = expand('~/.cache/tags')
        let g:gutentags_cache_dir = s:vim_tags
        " 检测 ~/.cache/tags 不存在就新建 "
        if !isdirectory(s:vim_tags)
           silent! call mkdir(s:vim_tags, 'p')
           endif

           " 配置 ctags 的参数 "
           let g:gutentags_ctags_extra_args = ['--fields=+niazS','--extra=+q']
           let g:gutentags_ctags_extra_args += ['--c++-kinds=+pxI']
           "let g:gutentags_ctags_extra_args += ['--c-kinds=+px']

    "json viewer
    Plugin 'elzr/vim-json'

    " vim script library 用法详见src
    Plugin 'L9'


    "在needtree中显示文件图标
    Plugin 'ryanoasis/vim-devicons'

    "c++ 语法高亮
    Plugin 'octol/vim-cpp-enhanced-highlight'
        "let g:cpp_class_scope_highlight = 1
        "let g:cpp_member_variable_highlight = 1
        "let g:cpp_class_decl_highlight = 1
        "let g:cpp_posix_standard = 1
        "let g:cpp_experimental_simple_template_highlight = 1
        "let g:cpp_experimental_template_highlight = 1
        "let g:cpp_concepts_highlight = 1
        "let g:cpp_no_function_highlight = 1

    "switch .h <->.cpp
    "Plugin 'a.vim'

    "查找文件
    Plugin 'junegunn/fzf'
        ":FZF 从当前目录查找
        ":FZF ~ 从home目录查找
        nmap <leader>f :FZF ~<CR>
        nmap <leader>F :FZF<CR>

    "查找
    Plugin 'FuzzyFinder'
        ":FufBuffer|       - Buffer mode (|fuf-buffer-mode|)
        ":FufFile|         - File mode (|fuf-file-mode|)
        ":FufCoverageFile| - Coverage-File mode (|fuf-coveragefile-mode|)
        ":FufDir|          - Directory mode (|fuf-dir-mode|)
        ":FufMruFile|      - MRU-File mode (|fuf-mrufile-mode|)
        ":FufMruCmd|       - MRU-Command mode (|fuf-mrucmd-mode|)
        ":FufBookmarkFile| - Bookmark-File mode (|fuf-bookmarkfile-mode|)
        ":FufBookmarkDir|  - Bookmark-Dir mode (|fuf-bookmarkdir-mode|)
        ":FufTag|          - Tag mode (|fuf-tag-mode|)
        ":FufBufferTag|    - Buffer-Tag mode (|fuf-buffertag-mode|)
        ":FufTaggedFile|   - Tagged-File mode (|fuf-taggedfile-mode|)
        ":FufJumpList|     - Jump-List mode (|fuf-jumplist-mode|)
        ":FufChangeList|   - Change-List mode (|fuf-changelist-mode|)
        ":FufQuickfix|     - Quickfix mode (|fuf-quickfix-mode|)
        ":FufLine|         - Line mode (|fuf-line-mode|)
        ":FufHelp|         - Help mode (|fuf-help-mode|)

    "doc
    Plugin 'DoxygenToolkit.vim'
        ":Dox
        ":DoxAuthor
        ":DoxBlock
        ":DoxLic

    "draw txt graph
    Plugin 'DrawIt'
        "\di start
        "\ds stop

    ""bookmarks
    "Plugin 'mattesgroeger/vim-bookmarks'
    "    highlight BookmarkSign ctermbg=NONE ctermfg=160
    "    highlight BookmarkLine ctermbg=NONE ctermfg=NONE
    "    let g:bookmark_sign = '♥'
    "    let g:bookmark_highlight_lines = 1
    "    nmap <leader><leader> <Plug>BookmarkToggle
    "    nmap <leader>i <Plug>BookmarkAnnotate
    "    nmap <leader>a <Plug>BookmarkShowAll
    "    nmap <leader>j <Plug>BookmarkNext
    "    nmap <leader>k <Plug>BookmarkPrev
    "    nmap <leader>c <Plug>BookmarkClear
    "    nmap <leader>x <Plug>BookmarkClearAll
    "    nmap <leader>kk <Plug>BookmarkMoveUp
    "    nmap <leader>jj <Plug>BookmarkMoveDown
    "    nmap <leader>g <Plug>BookmarkMoveToLine


    "highlighting for Google's Protocol Buffers
    "Plugin 'uarun/vim-protobuf'

    "显示所有的leader映射
    Plugin 'hecal3/vim-leader-guide'
       ":LeaderGuide '\'

    "cmake
    Plugin 'jansenm/vim-cmake'

    "Plugin 'ihacklog/hicursorwords'
    "    let g:HiCursorWords_delay = 200
    "    let g:HiCursorWords_hiGroupRegexp = ''
    "    let g:HiCursorWords_debugEchoHiName = 0

    ""语法检查(使用YCM自带的即可)
    "Plugin 'scrooloose/syntastic'
    "    set statusline+=%#warningmsg#
    "    set statusline+=%{SyntasticStatuslineFlag()}
    "    set statusline+=%*
    "    let g:syntastic_always_populate_loc_list = 1
    "    let g:syntastic_auto_loc_list = 0
    "    let g:syntastic_check_on_open = 1
    "    let g:syntastic_check_on_wq = 0
    "    let g:syntastic_cpp_checkers = ['gcc']
    "    let g:syntastic_cpp_compiler = 'g++'
    "    let g:syntastic_cpp_compiler_options = '-std=c++11 -stdlib=libc++'
    "    "if !exists('g:syntastic_cpp_compiler_options')
    "    "    let g:syntastic_cpp_compiler_options = ' -std=c++11 -lstdc++ '
    "    "endif

    "注释
    Plugin 'scrooloose/nerdcommenter'
        "\cc 注释
        " Add spaces after comment delimiters by default
        let g:NERDSpaceDelims = 1

        " Use compact syntax for prettified multi-line comments
        let g:NERDCompactSexyComs = 1

        " Align line-wise comment delimiters flush left instead of following code indentation
        let g:NERDDefaultAlign = 'left'

        " Set a language to use its alternate delimiters by default
        let g:NERDAltDelims_java = 1

        " Add your own custom formats or override the defaults
        let g:NERDCustomDelimiters = { 'c': { 'left': '/**','right': '*/' } }

        " Allow commenting and inverting empty lines (useful when commenting a region)
        let g:NERDCommentEmptyLines = 1

        " Enable trimming of trailing whitespace when uncommenting
        let g:NERDTrimTrailingWhitespace = 1

        " Enable NERDCommenterToggle to check all selected lines is commented or not
        let g:NERDToggleCheckAllLines = 1


    "Plugin 'tpope/surround-vim'

    "Plugin 'Valloric/YouCompleteMe'
        "往前跳和往后跳的快捷键为Ctrl+O以及Ctrl+I
        let g:ycm_key_list_select_completion=['<c-n>']
        let g:ycm_key_list_previous_completion=['<c-p>']

        set completeopt=menu  "关闭preview window
        "let g:ycm_add_preview_to_completeopt =0
        "let g:ycm_autoclose_preview_window_after_completion=1
        "let g:ycm_autoclose_preview_window_after_insertion=1
        "let g:ycm_always_populate_location_list = 0

        let g:ycm_confirm_extra_conf=0 "关闭加载.ycm_extra_conf.py提示
        let g:ycm_collect_identifiers_from_tags_files=1 " 开启 YCM 基于标签引擎
        let g:ycm_min_num_of_chars_for_completion=1 " 从第1个键入字符就开始罗列匹配项
        let g:ycm_cache_omnifunc=0 " 禁止缓存匹配项,每次都重新生成匹配项

        let g:ycm_seed_identifiers_with_syntax=1 " 语法关键字补全
         nnoremap <F5> :YcmForceCompileAndDiagnostics<CR> "force recomile with syntastic
        "nnoremap <leader>lo :lopen<CR> "open locationlist
        "nnoremap <leader>lc :lclose<CR>    "close locationlist

        "inoremap <leader><leader> <C-x><C-o>
        let g:ycm_complete_in_comments = 1 "在注释输入中也能补全
        let g:ycm_complete_in_strings = 1 "在字符串输入中也能补全
        let g:ycm_collect_identifiers_from_comments_and_strings = 0 "注释和字符串中的文字也会被收入补全

        let g:ycm_max_num_identifier_candidates = 50
        let g:ycm_auto_trigger = 1

        let g:ycm_error_symbol = '>>'
        let g:ycm_warning_symbol = '>'

        "sub commands
        "YcmCompleter RefactorRename :重命名
        "YcmCompleter GoToSymbol

        nnoremap <leader>go :YcmCompleter GoTo<CR> "跳转
        nnoremap <leader>gd :YcmCompleter GoToDefinitionElseDeclaration<CR> "跳转到定义或声明
        nnoremap <leader>gt :YcmCompleter GetType<CR> "get类型

        nmap gi :YcmCompleter GoToInclude<CR>   "跳转到include、声明或定义
        nmap gm :YcmCompleter GoToImprecise<CR> "跳转到实现
        nmap gr :YcmCompleter GoToReferences<CR> "跳转到引用
        nmap fi :YcmCompleter FixIt<CR> "根据Ycm的建议修复错误

        nnoremap <F6> :YcmForceCompileAndDiagnostics<CR> "重新编译和诊断
        "nmap <F4> :YcmDiags<CR>  "F4进行诊断

        "nnoremap <leader>gl :YcmCompleter GoToDeclaration<CR> "跳转到声明
        "nnoremap <leader>gf :YcmCompleter GoToDefinition<CR>  "跳转到定义


        "highlight Pmenu ctermfg=4 ctermbg=0 guifg=#ffffff guibg=#000000  "提示不再是粉红色(pink)
        highlight Pmenu ctermfg=4 ctermbg=8 guifg=#ffffff guibg=#000000  "提示不再是粉红色(pink)


call vundle#end()
保存后,重新打开vim,执行 vundle的安装命令:PluginInstall,如下图所示:
至此,完成了vim常用插件的安装,接入来安装号称最复杂的插件ycm。
四、安装和配置ycm
1、进入插件目录:cd ~/.vim/bundle
2、下载ycm:git clone https://github.com/ycm-core/YouCompleteMe.git
3、更新依赖模块:git submodule update –init –recursive
4、安装:./install.py –clangd-completer # –all 安装所有支持的补全(目前最新版本的YCM已经不需要额外下载llvm+clang来编译了),编译完成后的结果如下图所示:
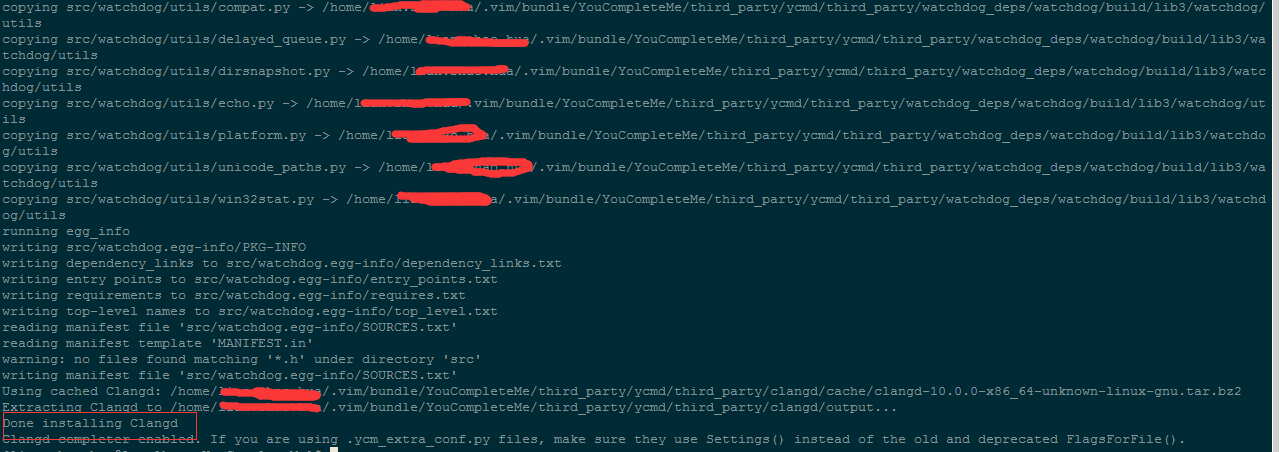
比以前方便了很多,clang已经放到了.vim/bundle/YouCompleteMe/third_party/ycmd/third_party/clangd/output/bin目录了,并且已经启用了,不需要再配置复杂的.ycm_extra_conf.py文件了
关于YCM的说明、配置都在:https://github.com/ycm-core/YouCompleteMe#c-family-semantic-completion
你可以找到任何关于ycm的信息,不过可能需要花一点时间。
5、在vim中安装ycm插件:
打开.vimrc文件,找到”Plugin ‘Valloric/YouCompleteMe’ #把前面的”删除,然后重新安装:PluginInstall
6、打开的时候可能会报错:
1、YouCompleteMe unavailable: unable to load Python.
解决办法:sudo yum install vim-gtk-syntax 安装完成后,重新启动vim即可解决(如果解决不了请联系我)
2、找不到ctags
解决办法:sudo yum install ctags
3、_socket.cpython-38-x86_64-linux-gnu.so: undefined symbol: PyFloat_Type
分析:这不是vim的问题,也不是ycm的问题,而是python的问题,在命令行运行python3,然后import ctypes必然会报错。
解决办法:
1、安装:yum install libffi-devel gcc gcc-c++ zlib zlib-devel readline-devel openssl-devel bzip2-devel sqlite-devel
2、返回第一步,重新安装python,在命令行打开python3,然后import ctypes #如果不报错,那就解决了。
至此,ycm插件安装完成了,比前几年安装简单太多了。
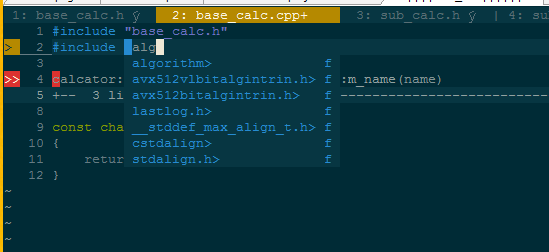
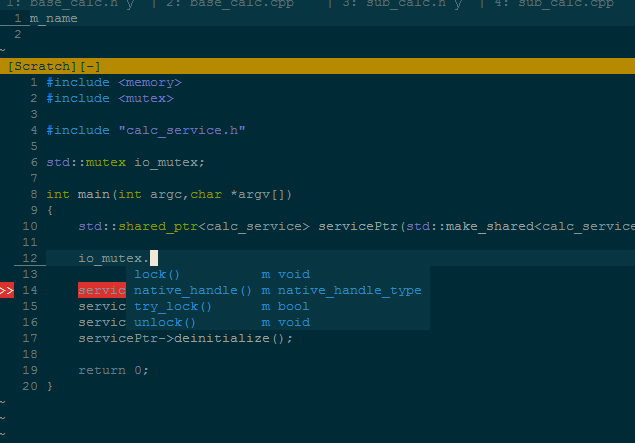
其实,到这一步,如果没有错误的话,vim+ycm已经可以支持代码补全了(只是部分的补全哟,目前还补全不了c++工程中的基础库、依赖的第三方库,如:boost、libevent等)
五、让vim支持语议补全——补全工程上下文、补全第三方依赖库
1、介绍一下ycm补全的实现及功能:YCM的补全功能,使用的是clangd(clangd与libclang完全不同,请自行百度)的基于语义分析来进行补全的,如下文:
Advantages of clangd over libclang include:

1、Project wide indexing: Clangd has both dynamic and static index support. The dynamic index stores up-to-date symbols coming from any files you are currently editing, whereas static index contains project-wide symbol information. This symbol information is used for code completion and code navigation. Whereas libclang is limited to the current translation unit(TU).
2、Code navigation: Clangd provides all the GoTo requests libclang provides and it improves those using the above mentioned index information to contain project-wide information rather than just the current TU.
Rename: Clangd can perform semantic rename operations on the current file, whereas libclang doesn’t support such functionality.
3、Code Completion: Clangd can perform code completions at a lower latency than libclang; also, it has information about all the symbols in your project so it can suggest items outside your current TU and also provides proper #include insertions for those items.
Signature help: Clangd provides signature help so that you can see the names and types of arguments when calling functions.
4、Format Code: Clangd provides code formatting either for the selected lines or the whole file, whereas libclang doesn’t have such functionality.
Performance: Clangd has faster reparse and code completion times compared to libclang.

In order to perform semantic analysis such as code completion, GoTo and diagnostics, YouCompleteMe uses clangd, which makes use of clang compiler, sometimes also referred to as llvm. Like any compiler, clang also requires a set of compile flags in order to parse your code. Simply put: If clang can't parse your code, YouCompleteMe can't provide semantic analysis.
上文中最后一句:Simply put: If clang can’t parse your code, YouCompleteMe can’t provide semantic analysis.非常重要,如果clangd不能分析你的代码,YCM就不能提供基于语议的补全
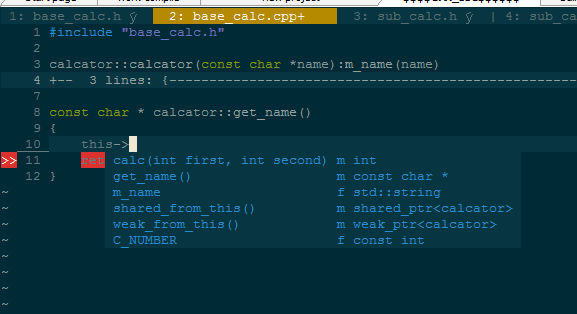
当安装了vim(+python3)+YCM+clangd时,使用vim打开工程的.h、.cpp时,clangd会根据打开的文件进行语议猜测,然后进行提示,但是,”猜测”一般是不可靠的,所以:
There are 2 methods which can be used to provide compile flags to clang:

Option 1: Use a compilation database
The easiest way to get YCM to compile your code is to use a compilation database. A compilation database is usually generated by your build system (e.g. CMake) and contains the compiler invocation for each compilation unit in your project.

For information on how to generate a compilation database, see the clang documentation. In short:

If using CMake, add -DCMAKE_EXPORT_COMPILE_COMMANDS=ON when configuring (or add set( CMAKE_EXPORT_COMPILE_COMMANDS ON ) to CMakeLists.txt) and copy or symlink the generated database to the root of your project.
If using Ninja, check out the compdb tool (-t compdb) in its docs.
If using GNU make, check out compiledb or Bear.
For other build systems, check out .ycm_extra_conf.py below.
If no .ycm_extra_conf.py is found, YouCompleteMe automatically tries to load a compilation database if there is one.

YCM looks for a file named compile_commands.json in the directory of the opened file or in any directory above it in the hierarchy (recursively); when the file is found before a local .ycm_extra_conf.py, YouCompleteMe stops searching the directories and lets clangd take over and handle the flags.
clangd支持多种生成”补全数据库“的方式,如上面提到的,基于cmake、Ninja、GNU make;
如果使用的是cmake的构建方式,则有两种生成”补全数据库“的方式:
第一种:在工程根目录执行:cmake -DCMAKE_EXPORT_COMPILE_COMMANDS=1 -DCMAKE_BUILD_TYPE=Debug
执行完成后,就会在工程根目录生成“compile_commands.json”文件。
然后使用vim重新打开工程中的文件(只要你的CMakeLists.txt配置正确),就不会报找不到第三库、依赖库的错误了
第二种:在工程的顶层CMakeLists.txt中,增加配置:set( CMAKE_EXPORT_COMPILE_COMMANDS ON )
即可在reload 或构建的时候,自动生成compile_commands.json文件”
*********************本人选用的是第二种模式,构建的时候会自动生成compile_commands.json文件。********************
更详细的请参见:
1、http://clangd.llvm.org/installation.html
2、https://github.com/ycm-core/YouCompleteMe#c-family-semantic-completion
如果没有使用CMake、Ninja、GNU Make,则需要使用.ycm_extra_conf.py文件配置flags了,(曾经配置过,个人不建议使用这种方法,并且效率也不高,在ycm官网的文档中有说明,所以不作介绍了)
Option 2: Provide the flags manually
If you don't have a compilation database, or aren't able to generate one, you have to tell YouCompleteMe how to compile your code some other way.

Every C-family project is different. It is not possible for YCM to guess what compiler flags to supply for your project. Fortunately, YCM provides a mechanism for you to generate the flags for a particular file with arbitrary complexity. This is achieved by requiring you to provide a Python module which implements a trivial function which, given the file name as argument, returns a list of compiler flags to use to compile that file.

YCM looks for a .ycm_extra_conf.py file in the directory of the opened file or in any directory above it in the hierarchy (recursively); when the file is found, it is loaded (only once!) as a Python module. YCM calls a Settings method in that module which should provide it with the information necessary to compile the current file. You can also provide a path to a global configuration file with the g:ycm_global_ycm_extra_conf option, which will be used as a fallback. To prevent the execution of malicious code from a file you didn't write YCM will ask you once per .ycm_extra_conf.py if it is safe to load. This can be disabled and you can white-/blacklist files. See the g:ycm_confirm_extra_conf and g:ycm_extra_conf_globlist options respectively.

This system was designed this way so that the user can perform any arbitrary sequence of operations to produce a list of compilation flags YCM should hand to Clang.

NOTE: It is highly recommended to include -x <language> flag to libclang. This is so that the correct language is detected, particularly for header files. Common values are -x c for C, -x c++ for C++, -x objc for Objective-C, and -x cuda for CUDA.

To give you an impression, if your C++ project is trivial, and your usual compilation command is: g++ -Wall -Wextra -Werror -o FILE.o FILE.cc, then the following .ycm_extra_conf.py is enough to get semantic analysis from YouCompleteMe:

def Settings( **kwargs ):
  return {
    'flags': [ '-x', 'c++', '-Wall', '-Wextra', '-Werror' ],
  }
As you can see from the trivial example, YCM calls the Settings method which returns a dictionary with a single element 'flags'. This element is a list of compiler flags to pass to libclang for the current file. The absolute path of that file is accessible under the filename key of the kwargs dictionary. That's it! This is actually enough for most projects, but for complex projects it is not uncommon to integrate directly with an existing build system using the full power of the Python language.

For a more elaborate example, see ycmd's own .ycm_extra_conf.py. You should be able to use it as a starting point. Don't just copy/paste that file somewhere and expect things to magically work; your project needs different flags. Hint: just replace the strings in the flags variable with compilation flags necessary for your project. That should be enough for 99% of projects.

You could also consider using YCM-Generator to generate the ycm_extra_conf.py file.

Errors during compilation
If Clang encounters errors when compiling the header files that your file includes, then it's probably going to take a long time to get completions. When the completion menu finally appears, it's going to have a large number of unrelated completion strings (type/function names that are not actually members). This is because Clang fails to build a precompiled preamble for your file if there are any errors in the included headers and that preamble is key to getting fast completions.

Call the :YcmDiags command to see if any errors or warnings were detected in your file.
六、最终的效果图
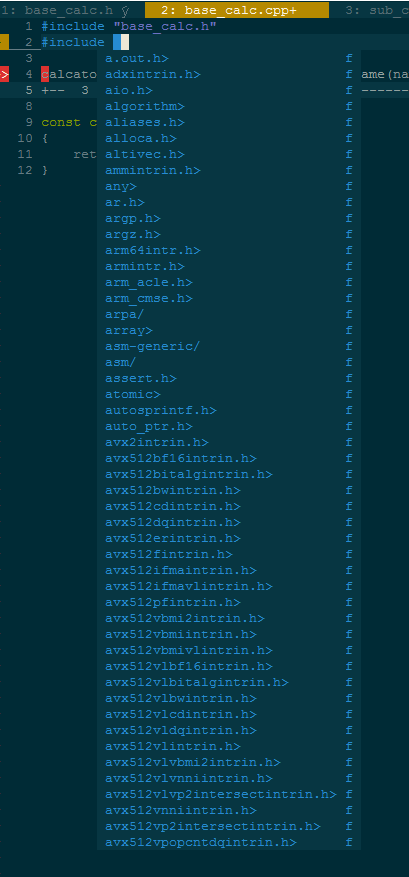
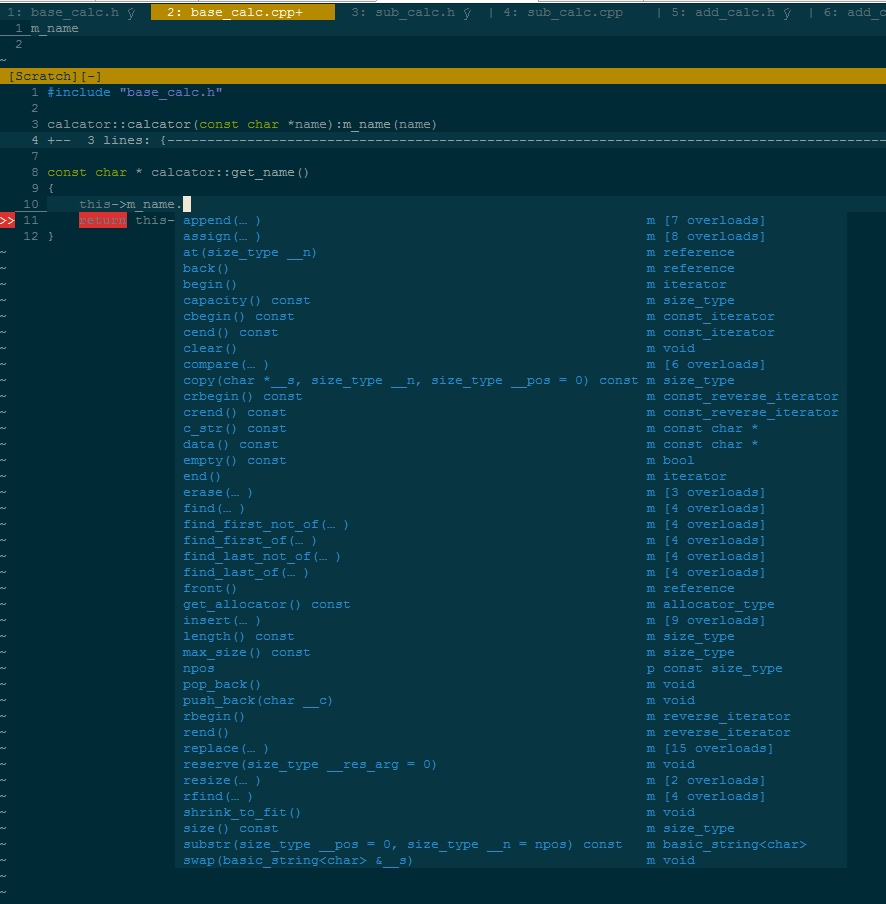
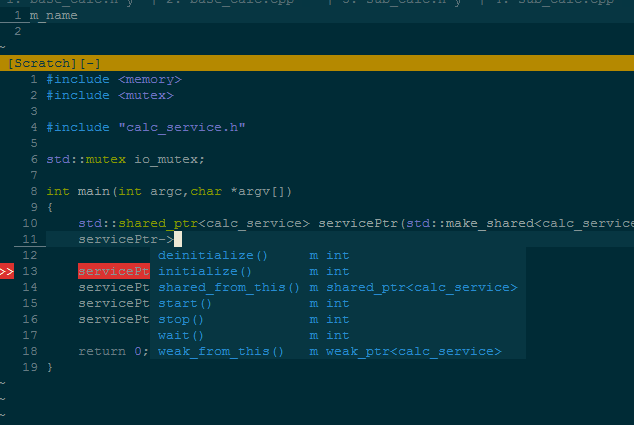
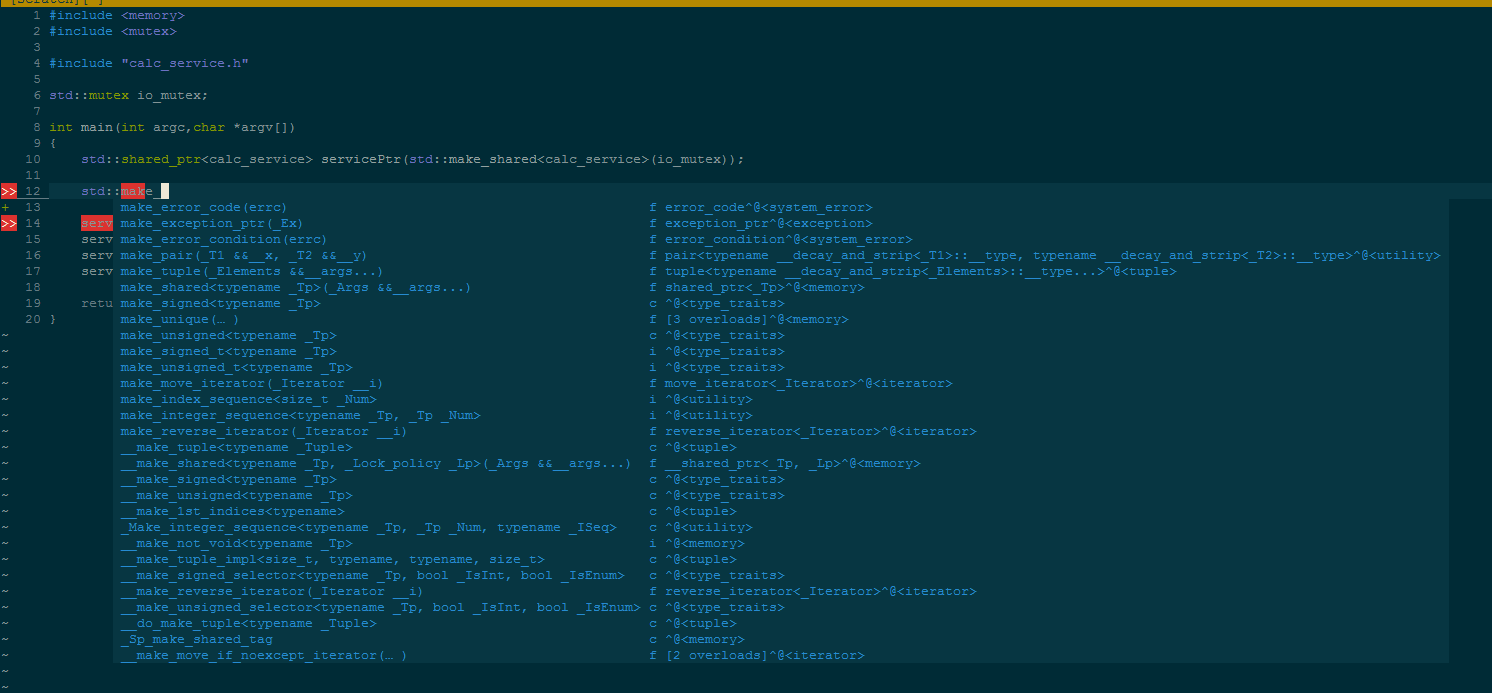
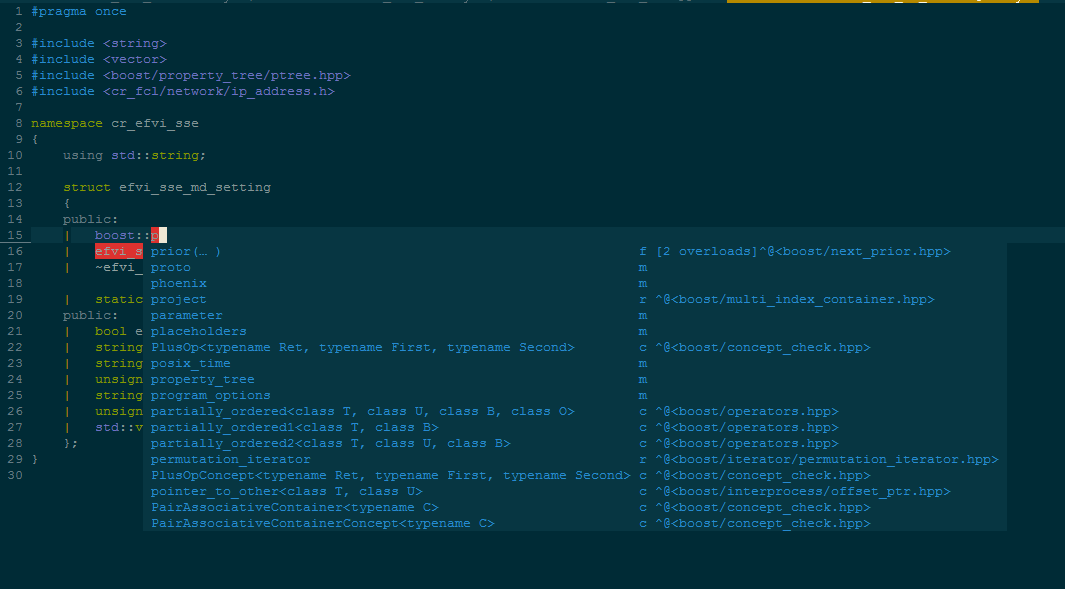
下面是关于第三方库的补全:
七、最终的vim配置文件 :
"/**
"* @file .vimrc
"* @brief vimrc
"* @author shlian
"* @version 1.1.0
"* @date 2020-09-21
"*/
set nocompatible " 关闭 vi 兼容模式
set smartindent "当在大括号中间回车的时候,他会智能缩进,因为他知道括号中间要缩进
set tabstop=4
set shiftwidth=4
set expandtab
syntax on " 自动语法高亮
set number " 显示行号
"设置代码参考线
highlight ColorColumn ctermbg=darkgray
set colorcolumn=140
set t_ti= t_te=     "关闭vim后,vim的内容依然显示在terminal上

" 高亮显示当前行
set cursorline
  "red(红),white(白),black(黑),green(绿),yellow(黄),blue(蓝),purple(紫),gray(灰),brown(棕),tan(褐色),syan(青色)
hi CursorLine   cterm=NONE ctermbg=darkgray ctermfg=NONE
"hi CursorColumn cterm=NONE ctermbg=darkred ctermfg=white
set ruler " 打开状态栏标尺
set shiftwidth=4 " 设定 << 和 >> 命令移动时的宽度为 4
set softtabstop=4 " 使得按退格键时可以一次删掉 4 个空格
set tabstop=4 " 设定 tab 长度为 4
set nobackup " 覆盖文件时不备份
"set autochdir " 自动切换当前目录为当前文件所在的目录
set backupcopy=yes " 设置备份时的行为为覆盖
set ignorecase smartcase " 搜索时忽略大小写,但在有一个或以上大写字母时仍保持对大小写敏感
"set nowrapscan " 禁止在搜索到文件两端时重新搜索
set incsearch " 输入搜索内容时就显示搜索结果
set hlsearch " 搜索时高亮显示被找到的文本
set noerrorbells " 关闭错误信息响铃
set novisualbell " 关闭使用可视响铃代替呼叫
set t_vb= " 置空错误铃声的终端代码
set showmatch " 插入括号时,短暂地跳转到匹配的对应括号
" set matchtime=2 " 短暂跳转到匹配括号的时间
set magic " 设置魔术
set hidden " 允许在有未保存的修改时切换缓冲区,此时的修改由 vim 负责保存
set guioptions-=T " 隐藏工具栏
set guioptions-=m " 隐藏菜单栏
set smartindent " 开启新行时使用智能自动缩进
set backspace=indent,eol,start
" 不设定在插入状态无法用退格键和 Delete 键删除回车符
set cmdheight=1 " 设定命令行的行数为 1
set laststatus=2 " 显示状态栏 (默认值为 1, 无法显示状态栏)
set statusline=\ %<%F[%1*%M%*%n%R%H]%=\ %y\ %0(%{&fileformat}\ %{&encoding}\ %c:%l/%L%)\

" 设置在状态行显示的信息
set foldenable " 开启折叠
"set foldmethod=syntax " 设置语法折叠************************
set foldcolumn=0 " 设置折叠区域的宽度
setlocal foldlevel=1 " 设置折叠层数为
"set foldclose=all " 设置为自动关闭折叠
nnoremap <space> @=((foldclosed(line('.')) < 0) ? 'zc' : 'zo')<CR>
" 用空格键来开关折叠
" return OS type, eg: windows, or linux, mac, et.st..
function! MySys()
    if has("win16") || has("win32") || has("win64") || has("win95")
        return "windows"
    elseif has("unix")
        return "linux"
    endif
endfunction

" 用户目录变量$VIMFILES
if MySys() == "windows"
    let $VIMFILES = $VIM.'/vimfiles'
elseif MySys() == "linux"
    let $VIMFILES = $HOME.'/.vim'
endif
" 设定doc文档目录
let helptags=$VIMFILES.'/doc'

" 设置字体 以及中文支持
if has("win32")
    set guifont=Inconsolata:h12:cANSI
endif
" 配置多语言环境
if has("multi_byte")
" UTF-8 编码
set encoding=utf-8
set termencoding=utf-8
set formatoptions+=mM
set fencs=utf-8,gbk
if v:lang =~? '^\(zh\)\|\(ja\)\|\(ko\)'
    set ambiwidth=double
endif
if has("win32")
    source $VIMRUNTIME/delmenu.vim
    source $VIMRUNTIME/menu.vim
    language messages zh_CN.utf-8
endif
else
    echoerr "Sorry, this version of (g)vim was not compiled with +multi_byte"
endif
" Buffers操作快捷方式!
"nnoremap <C-RETURN> :bnext<CR>
"nnoremap <C-S-RETURN> :bprevious<CR>

" Tab操作快捷方式!
"nnoremap <C-TAB> :tabnext<CR>
"nnoremap <C-S-TAB> :tabprev<CR>
"关于tab的快捷键
" nnoremap tn :tabnext<cr>
" nnoremap tp :tabprevious<cr>
" nnoremap td :tabnew .<cr>
" nnoremap te :tabedit
" nnoremap tc :tabclose<cr>
"窗口分割时,进行切换的按键热键需要连接两次,比如从下方窗口移动
"光标到上方窗口,需要<c-w><c-w>k,非常麻烦,现在重映射为<c-k>,切换的
"时候会变得非常方便.
nnoremap <C-h> <C-w>h
nnoremap <C-j> <C-w>j
nnoremap <C-k> <C-w>k
nnoremap <C-l> <C-w>l

" set fileformats=unix,dos,mac
 nnoremap <leader>fd :se fileformat=dos<CR>
 nnoremap <leader>fu :se fileformat=unix<CR>
" use Ctrl+[l|n|p|cc] to list|next|previous|jump to count the result
" nnoremap <C-x>l <ESC>:cl<CR>
" nnoremap <C-x>n <ESC>:cn<CR>
" nnoremap <C-x>p <ESC>:cp<CR>
" nnoremap <C-x>c <ESC>:cc<CR>


" Python 文件的一般设置,比如不要 tab 等
autocmd FileType python set tabstop=4 shiftwidth=4 expandtab
autocmd FileType python map <F12> :!python %<CR>
" 选中状态下 Ctrl+c 复制
"vmap <C-c> "+y

"十六进制显示文件
nnoremap <leader>H :%!xxd<CR>
"二进制显示文件
nnoremap <leader>B :%!xxd -r<CR>

"******************************************************************************************************************
set rtp+=~/.vim/bundle/Vundle.vim
call vundle#begin()
	filetype plugin indent on    " 必须加载vim自带和插件相应的语法和文件类型相关脚本

	"vim包管理工具
	Plugin 'gmarik/Vundle.vim'
	"文件目录增加git 状态
	Plugin 'Xuyuanp/nerdtree-git-plugin'

	"tab智能补全
	Plugin 'ervandew/supertab'
	"代码可视化缩进块
    Plugin 'yggdroot/indentline'
        let g:indentLine_enabled = 1
        let g:indentLine_color_term = 230
        "let g:indentLine_char_list = ['|', '¦', '┆', '┊','|'] 会出现光标的错行,慎用
        let g:indentLine_char_list = ['|', '¦', '¦', '¦']
	"彩虹括号
	Plugin 'kien/rainbow_parentheses.vim'

	"真彩色
	Plugin 'tpope/vim-sensible'
	"git左边栏增删改提示
	Plugin 'airblade/vim-gitgutter'

    Plugin 'altercation/solarized'
	Plugin 'altercation/vim-colors-solarized'  "solarized
	    let g:solarized_termtrans  = 1         " 使用 termnal 背景
	    let g:solarized_visibility = "high"    " 使用 :set list 显示特殊字符时的高亮级别
	    " GUI 模式浅色背景,终端模式深色背景
	    if has('gui_running')
			set background=light
	    else
			set background=dark
	    endif
	    " 主题设置为 solarized
		"colorscheme solarized

	"文件目录分屏
	Plugin 'scrooloose/nerdtree'
		let NERDTreeHighlightCursorline = 1       " 高亮当前行
		let NERDTreeShowLineNumbers     = 1       " 显示行号
		" 忽略列表中的文件
		let NERDTreeIgnore = [ '\.pyc$', '\.pyo$', '\.obj$', '\.o$', '\.egg$', '^\.git$', '^\.repo$', '^\.svn$', '^\.hg$' ]
		" 启动 vim 时打开 NERDTree
		"autocmd vimenter * NERDTree
		" 当打开 VIM,没有指定文件时和打开一个目录时,打开 NERDTree
		"autocmd StdinReadPre * let s:std_in = 1
		"autocmd VimEnter * if argc() == 0 && !exists("s:std_in") | NERDTree | endif
		"autocmd VimEnter * if argc() == 1 && isdirectory(argv()[0]) && !exists("s:std_in") | exe 'NERDTree' argv()[0] | wincmd p | ene | exe 'cd '.argv()[0] | endif
		" 关闭 NERDTree,当没有文件打开的时候
		"autocmd bufenter * if (winnr("$") == 1 && exists("b:NERDTreeType") && b:NERDTreeType == "primary") | q | end

		" <leader>nt 打开 nerdtree 窗口,在左侧栏显示
		nnoremap <leader>nt :NERDTreeToggle<CR>
		" <leader>tc 关闭当前的 tab
		nnoremap <leader>tc :tabc<CR>
		" <leader>to 关闭所有其他的 tab
		nnoremap <leader>to :tabo<CR>
		" <leader>ts 查看所有打开的 tab
		nnoremap <leader>ts :tabs<CR>
		" <leader>tp 前一个 tab
		nnoremap <leader>tp :tabp<CR>
		" <leader>tn 后一个 tab
		nnoremap <leader>tn :tabn<CR

    "tagbar
    Plugin 'majutsushi/tagbar'
        let g:tagbar_ctags_bin = 'ctags' " tagbar 依赖 ctags 插件
        let g:tagbar_width     = 30      " 设置 tagbar 的宽度为 30 列,默认 40 列
        let g:tagbar_autofocus = 1       " 打开 tagbar 时光标在 tagbar 页面内,默认在 vim 打开的文件内
        let g:tagbar_left      = 1       " 让 tagbar 在页面左侧显示,默认右边
        "let g:tagbar_sort      = 0       " 标签不排序,默认排序

        " <leader>tb 打开 tagbar 窗口,在左侧栏显示
        nnoremap <leader>tb :TagbarToggle<CR>

    "taglist
    Plugin 'vim-scripts/taglist.vim'
        let Tlist_Show_One_File           = 1    " 只显示当前文件的tags
        let Tlist_GainFocus_On_ToggleOpen = 1    " 打开 Tlist 窗口时,光标跳到 Tlist 窗口
        let Tlist_Exit_OnlyWindow         = 1    " 如果 Tlist 窗口是最后一个窗口则退出 Vim
        let Tlist_Use_Left_Window         = 1    " 在左侧窗口中显示
        let Tlist_File_Fold_Auto_Close    = 1    " 自动折叠
        let Tlist_Auto_Update             = 1    " 自动更新

        " <leader>tl 打开 Tlist 窗口,在左侧栏显示
         nnoremap <leader>tl :TlistToggle<CR>

    "winmanager
    Plugin 'vim-scripts/winmanager'
        let g:NERDTree_title="[NERDTree]"
        "let g:winManagerWindowLayout="TagList|NERDTree"
        let g:winManagerWindowLayout='FileExplorer|TagList'

        function! NERDTree_Start()
            exec 'NERDTree'
        endfunction
        function! NERDTree_IsValid()
            return 1
        endfunction

        nnoremap wm :WMToggle<CR>

    "powerline fonts
    Plugin 'powerline/powerline-fonts'
    "状态栏
    Plugin 'vim-airline/vim-airline'
    Plugin 'vim-airline/vim-airline-themes'

        let g:airline_powerline_fonts = 1   " 使用powerline打过补丁的字体
        if !exists('g:airline_symbols')
            let g:airline_symbols = {}
        endif
        " 关闭当前 buffer
        "noremap <C-x> :w<CR>:bd<CR>
        "<leader>1~9 切到 buffer1~9
        nnoremap <leader>1 :b 1<CR>
        nnoremap <leader>2 :b 2<CR>
        nnoremap <leader>3 :b 3<CR>
        nnoremap <leader>4 :b 4<CR>
        nnoremap <leader>5 :b 5<CR>
        nnoremap <leader>6 :b 6<CR>
        nnoremap <leader>7 :b 7<CR>
        nnoremap <leader>8 :b 8<CR>
        nnoremap <leader>9 :b 9<CR>

        "Vim 在与屏幕/键盘交互时使用的编码(取决于实际的终端的设定)
        set encoding=utf-8
        set langmenu=zh_CN.UTF-8
        " 设置打开文件的编码格式
        set fileencodings=ucs-bom,utf-8,cp936,gb18030,big5,euc-jp,euc-kr,latin1
        set fileencoding=utf-8
        " 解决菜单乱码
        source $VIMRUNTIME/delmenu.vim
        source $VIMRUNTIME/menu.vim
        " 解决consle输出乱码
        "set termencoding = cp936
        " 设置中文提示
        language messages zh_CN.utf-8
        " 设置中文帮助
        set helplang=cn
        " 设置为双字宽显示,否则无法完整显示如:☆
        set ambiwidth=double
        " 总是显示状态栏
        let laststatus = 2
        let g:airline_theme='solarized'      " 设置主题,simple、dark、solarized、bubblegum 详见.vim/bundle/vim-airline-themes

        " 开启tabline
        let g:airline#extensions#tabline#enabled = 1      "tabline中当前
        let g:airline#extensions#tabline#left_sep = ' '   "buffer两端的分隔字符
        let g:airline#extensions#tabline#left_alt_sep = '|'      "tabline中
        let g:airline#extensions#tabline#buffer_nr_show = 1      "buffer显示编号

        let g:airline_left_sep = ' '
        let g:airline_left_alt_sep = '▶'
        let g:airline_right_sep = ' '
        let g:airline_right_alt_sep = '◀'
        let g:airline_symbols.crypt = '?'
        let g:airline_symbols.linenr = '¶'
        let g:airline_symbols.maxlinenr = '㏑'
        let g:airline_symbols.branch = '⎇'
        let g:airline_symbols.paste = 'ρ'
        let g:airline_symbols.spell = 'Ꞩ'
        let g:airline_symbols.notexists = 'Ɇ'
        let g:airline_symbols.whitespace = 'Ξ'

        " 映射切换buffer的键位
        nnoremap [b :bp<CR>
        nnoremap ]b :bn<CR>
        " 设置字体
        set guifont=Powerline_Consolas:h14:cANSI

    Plugin 'enricobacis/vim-airline-clock'
        "let g:airline#extensions#clock#auto = 0  关闭
        let g:airline#extensions#clock#format = '%H:%M:%S'

    ""代码动态检查(使用YCM自带的即可)
    "Plugin 'w0rp/ale'
    "    let g:ale_lint_on_text_changed       = 'normal'                     " 代码更改后启动检查
    "    let g:ale_lint_on_insert_leave       = 1                            " 退出插入模式即检查
    "    let g:ale_sign_column_always         = 1                            " 总是显示动态检查结果
    "    "let g:ale_statusline_format = ['✗ %d', '⚡%d','✔  OK']
    "    let g:ale_sign_error                 = '>>'                         " error 告警符号
    "    let g:ale_sign_warning               = '--'                         " warning 告警符号
    "    let g:ale_echo_msg_error_str         = 'E'                          " 错误显示字符
    "    let g:ale_echo_msg_warning_str       = 'W'                          " 警告显示字符
    "    let g:ale_echo_msg_format            = '[%linter%] %s [%severity%]' " 告警显示格式
    "
    "    " C 语言配置检查参数
    "    let g:ale_c_gcc_options              = '-Wall -Werror -O2 -std=c11'
    "    let g:ale_c_clang_options            = '-Wall -Werror -O2 -std=c11'
    "    let g:ale_c_cppcheck_options         = ''
    "    " C++ 配置检查参数
    "    let g:ale_cpp_gcc_options            = '-Wall -Werror -O2 -std=c++14'
    "    let g:ale_cpp_clang_options          = '-Wall -Werror -O2 -std=c++14'
    "    let g:ale_cpp_cppcheck_options       = ''
    "
    "    "使用clang对c和c++进行语法检查,对python使用pylint进行语法检查
    "    let g:ale_linters = {  'c++': ['clang', 'gcc'] }
    "    " <F9> 触发/关闭代码动态检查
    "    map <F9> :ALEToggle<CR>
    "    "普通模式下,ak 前往上一个错误或警告,aj 前往下一个错误或警告
    "    nmap ak <Plug>(ale_previous_wrap)
    "    nmap aj <Plug>(ale_next_wrap)
    "    " ad 查看错误或警告的详细信息
    "    nmap ad :ALEDetail<CR>
    "模糊查找文件,ctrl+p
    "Plugin 'ctrlp/ctrlp.vim'
    Plugin 'kien/ctrlp.vim'

    "git log与code对应
    "Plugin 'vim-fugitive'

    "显示文件修改痕迹
    Plugin 'chrisbra/changesPlugin'


    "Plugin 'bufexplorer'

    "浏览最近打开的文件
    Plugin 'vim-startify'
    "撤销
    Plugin 'Gundo'
    nnoremap <leader>u :GundoToggle<CR>

    "恢复上次关闭时所打开的文件
    "Plugin 'Sessionman'
    "set sessionoptions=blank,buffers,curdir,folds,tabpages,winsize
    "nnoremap <leader>sl :SessionList<CR>
    "nnoremap <leader>ss :SessionSave<CR>
    "nnoremap <leader>sc :SessionClose<CR>

    "Plugin 'Powerline'
    "Plugin 'rainbow_parentheses'

    Plugin 'ludovicchabant/vim-gutentags'
        "gutentags搜索工程目录的标志,碰到这些文件/目录名就停止向上一级目录递归

        let g:gutentags_project_root = ['.root', '.svn', '.git', '.project']

        " 所生成的数据文件的名称 "
        let g:gutentags_ctags_tagfile = '.tags'
        " 将自动生成的 tags 文件全部放入 ~/.cache/tags 目录中,避免污染工程目录 "
         let s:vim_tags = expand('~/.cache/tags')
         let g:gutentags_cache_dir = s:vim_tags
         " 检测 ~/.cache/tags 不存在就新建 "
         if !isdirectory(s:vim_tags)
            silent! call mkdir(s:vim_tags, 'p')
         endif

            " 配置 ctags 的参数 "
        let g:gutentags_ctags_extra_args = ['--fields=+niazS', '--extra=+q']
        let g:gutentags_ctags_extra_args += ['--c++-kinds=+pxI']
        let g:gutentags_ctags_extra_args += ['--c-kinds=+px']
    Plugin 'skywind3000/gutentags_plus'
        " gutentags搜索工程目录的标志,碰到这些文件/目录名就停止向上一级目录递归
        " let g:gutentags_project_root = ['.root', '.svn', '.git', '.project']

        " 所生成的数据文件的名称 "
        let g:gutentags_ctags_tagfile = '.tags'

        " 将自动生成的 tags 文件全部放入 ~/.cache/tags 目录中,避免污染工程目录
        let s:vim_tags = expand('~/.cache/tags')
        let g:gutentags_cache_dir = s:vim_tags
        " 检测 ~/.cache/tags 不存在就新建 "
        if !isdirectory(s:vim_tags)
           silent! call mkdir(s:vim_tags, 'p')
           endif

           " 配置 ctags 的参数 "
           let g:gutentags_ctags_extra_args = ['--fields=+niazS','--extra=+q']
           let g:gutentags_ctags_extra_args += ['--c++-kinds=+pxI']
           "let g:gutentags_ctags_extra_args += ['--c-kinds=+px']
    "json viewer
    Plugin 'elzr/vim-json'

    " vim script library 用法详见src
    Plugin 'L9'
    "在needtree中显示文件图标
    Plugin 'ryanoasis/vim-devicons'

    "c++ 语法高亮
    Plugin 'octol/vim-cpp-enhanced-highlight'
        "let g:cpp_class_scope_highlight = 1
        "let g:cpp_member_variable_highlight = 1
        "let g:cpp_class_decl_highlight = 1
        "let g:cpp_posix_standard = 1
        "let g:cpp_experimental_simple_template_highlight = 1
        "let g:cpp_experimental_template_highlight = 1
        "let g:cpp_concepts_highlight = 1
        "let g:cpp_no_function_highlight = 1
    "switch .h <->.cpp
    "Plugin 'a.vim'
    "查找文件
    Plugin 'junegunn/fzf'
        ":FZF 从当前目录查找
        ":FZF ~ 从home目录查找
        nnoremap <leader>f :FZF ~<CR>
        nnoremap <leader>F :FZF<CR>

    "查找
    Plugin 'FuzzyFinder'
        ":FufBuffer|       - Buffer mode (|fuf-buffer-mode|)
        ":FufFile|         - File mode (|fuf-file-mode|)
        ":FufCoverageFile| - Coverage-File mode (|fuf-coveragefile-mode|)
        ":FufDir|          - Directory mode (|fuf-dir-mode|)
        ":FufMruFile|      - MRU-File mode (|fuf-mrufile-mode|)
        ":FufMruCmd|       - MRU-Command mode (|fuf-mrucmd-mode|)
        ":FufBookmarkFile| - Bookmark-File mode (|fuf-bookmarkfile-mode|)
        ":FufBookmarkDir|  - Bookmark-Dir mode (|fuf-bookmarkdir-mode|)
        ":FufTag|          - Tag mode (|fuf-tag-mode|)
        ":FufBufferTag|    - Buffer-Tag mode (|fuf-buffertag-mode|)
        ":FufTaggedFile|   - Tagged-File mode (|fuf-taggedfile-mode|)
        ":FufJumpList|     - Jump-List mode (|fuf-jumplist-mode|)
        ":FufChangeList|   - Change-List mode (|fuf-changelist-mode|)
        ":FufQuickfix|     - Quickfix mode (|fuf-quickfix-mode|)
        ":FufLine|         - Line mode (|fuf-line-mode|)
        ":FufHelp|         - Help mode (|fuf-help-mode|)

    "doc
    Plugin 'DoxygenToolkit.vim'
        ":Dox
        ":DoxAuthor
        ":DoxBlock
        ":DoxLic

    "draw txt graph
    Plugin 'DrawIt'
        "\di start
        "\ds stop
    ""bookmarks
    "Plugin 'mattesgroeger/vim-bookmarks'
    "    highlight BookmarkSign ctermbg=NONE ctermfg=160
    "    highlight BookmarkLine ctermbg=NONE ctermfg=NONE
    "    let g:bookmark_sign = '♥'
    "    let g:bookmark_highlight_lines = 1
    "    nnoremap <leader><leader> <Plug>BookmarkToggle
    "    nnoremap <leader>i <Plug>BookmarkAnnotate
    "    nnoremap <leader>a <Plug>BookmarkShowAll
    "    nnoremap <leader>j <Plug>BookmarkNext
    "    nnoremap <leader>k <Plug>BookmarkPrev
    "    nnoremap <leader>c <Plug>BookmarkClear
    "    nnoremap <leader>x <Plug>BookmarkClearAll
    "    nnoremap <leader>kk <Plug>BookmarkMoveUp
    "    nnoremap <leader>jj <Plug>BookmarkMoveDown
    "    nnoremap <leader>g <Plug>BookmarkMoveToLine


    "highlighting for Google's Protocol Buffers
    "Plugin 'uarun/vim-protobuf'

    "显示所有的leader映射
    Plugin 'hecal3/vim-leader-guide'
       ":LeaderGuide '\'

    "cmake
    Plugin 'jansenm/vim-cmake'
    "Plugin 'ihacklog/hicursorwords'
    "    let g:HiCursorWords_delay = 200
    "    let g:HiCursorWords_hiGroupRegexp = ''
    "    let g:HiCursorWords_debugEchoHiName = 0
    ""语法检查(使用YCM自带的即可)
    "Plugin 'scrooloose/syntastic'
    "    set statusline+=%#warningmsg#
    "    set statusline+=%{SyntasticStatuslineFlag()}
    "    set statusline+=%*
    "    let g:syntastic_always_populate_loc_list = 1
    "    let g:syntastic_auto_loc_list = 0
    "    let g:syntastic_check_on_open = 1
    "    let g:syntastic_check_on_wq = 0
    "    let g:syntastic_cpp_checkers = ['gcc']
    "    let g:syntastic_cpp_compiler = 'g++'
    "    let g:syntastic_cpp_compiler_options = '-std=c++11 -stdlib=libc++'
    "    "if !exists('g:syntastic_cpp_compiler_options')
    "    "    let g:syntastic_cpp_compiler_options = ' -std=c++11 -lstdc++ '
    "    "endif

    "注释
    Plugin 'scrooloose/nerdcommenter'
        "\cc 注释
        " Add spaces after comment delimiters by default
        let g:NERDSpaceDelims = 1

        " Use compact syntax for prettified multi-line comments
        let g:NERDCompactSexyComs = 1

        " Align line-wise comment delimiters flush left instead of following code indentation
        let g:NERDDefaultAlign = 'left'

        " Set a language to use its alternate delimiters by default
        let g:NERDAltDelims_java = 1

        " Add your own custom formats or override the defaults
        let g:NERDCustomDelimiters = { 'c': { 'left': '/**','right': '*/' } }

        " Allow commenting and inverting empty lines (useful when commenting a region)
        let g:NERDCommentEmptyLines = 1

        " Enable trimming of trailing whitespace when uncommenting
        let g:NERDTrimTrailingWhitespace = 1

        " Enable NERDCommenterToggle to check all selected lines is commented or not
        let g:NERDToggleCheckAllLines = 1


    "Plugin 'tpope/surround-vim'
    "代码版段,详见~/.vim/bundle/vim-snippets/UltiSnips/cpp.snippets
    Plugin 'SirVer/ultisnips'
    Plugin 'honza/vim-snippets'
        " Trigger configuration. Do not use <tab> if you use https:
        let g:UltiSnipsSnippetDirectories = ['~/.vim/bundle/vim-snippets/UltiSnips', 'UltiSnips']
        let g:UltiSnipsExpandTrigger = "<c-b>"
        "let g:UltiSnipsJumpForwardTrigger = "<c-n>"
        "let g:UltiSnipsJumpBackwardTrigger = "<c-p>"
    Plugin 'Valloric/YouCompleteMe'
        "往前跳和往后跳的快捷键为Ctrl+O以及Ctrl+I
        let g:ycm_key_list_select_completion=['<c-n>']
        let g:ycm_key_list_previous_completion=['<c-p>']

        set completeopt=menu  "关闭preview window
        "let g:ycm_add_preview_to_completeopt =0
        "let g:ycm_autoclose_preview_window_after_completion=1
        "let g:ycm_autoclose_preview_window_after_insertion=1
        "let g:ycm_always_populate_location_list = 0
        let g:ycm_confirm_extra_conf=0 "关闭加载.ycm_extra_conf.py提示
        let g:ycm_collect_identifiers_from_tags_files=1 " 开启 YCM 基于标签引擎
        let g:ycm_min_num_of_chars_for_completion=1 " 从第1个键入字符就开始罗列匹配项
        let g:ycm_cache_omnifunc=0 " 禁止缓存匹配项,每次都重新生成匹配项
        let g:ycm_seed_identifiers_with_syntax=1 " 语法关键字补全
         nnoremap <F5> :YcmForceCompileAndDiagnostics<CR> "force recomile with syntastic
        "nnoremap <leader>lo :lopen<CR> "open locationlist
        "nnoremap <leader>lc :lclose<CR>    "close locationlist
        "inoremap <leader><leader> <C-x><C-o>
        let g:ycm_complete_in_comments = 1 "在注释输入中也能补全
        let g:ycm_complete_in_strings = 1 "在字符串输入中也能补全
        let g:ycm_collect_identifiers_from_comments_and_strings = 0 "注释和字符串中的文字也会被收入补全
        let g:ycm_max_num_identifier_candidates = 50
        let g:ycm_auto_trigger = 1
        let g:ycm_error_symbol = '>>'
        let g:ycm_warning_symbol = '>'
        "sub commands
        "YcmCompleter RefactorRename :重命名
        "YcmCompleter GoToSymbol

        nnoremap <leader>go :YcmCompleter GoTo<CR> "跳转
        nnoremap <leader>gd :YcmCompleter GoToDefinitionElseDeclaration<CR> "跳转到定义或声明
        nnoremap <leader>gt :YcmCompleter GetType<CR> "get类型
        nnoremap gi :YcmCompleter GoToInclude<CR>   "跳转到include、声明或定义(向回跳转:Ctrl+o)
        nnoremap gm :YcmCompleter GoToImprecise<CR> "跳转到实现
        nnoremap gr :YcmCompleter GoToReferences<CR> "跳转到引用
        nnoremap fi :YcmCompleter FixIt<CR> "根据Ycm的建议修复错误
        nnoremap <F5> :YcmDiags<CR>  "F4进行诊断并显示诊断列表
        nnoremap <F6> :YcmForceCompileAndDiagnostics<CR> "重新编译和诊断

        "nnoremap <leader>gl :YcmCompleter GoToDeclaration<CR> "跳转到声明
        "nnoremap <leader>gf :YcmCompleter GoToDefinition<CR>  "跳转到定义
        "highlight Pmenu ctermfg=4 ctermbg=0 guifg=#ffffff guibg=#000000  "提示不再是粉红色(pink)
        highlight Pmenu ctermfg=4 ctermbg=8 guifg=#ffffff guibg=#000000  "提示不再是粉红色(pink)


call vundle#end()
八、可能遇到的问题及解决方案
1、启动的时候报错:Taglist: Exuberant ctags (http://ctags.sf.net) not found in PATH. Plugin is not loaded.
解决方案:安装ctags(yum install ctags或apt-get install ctags)
2、Cannot set language to “zh_CN.UTF-8”
需要修改vimrc的配置或把linux的locate修改为zh_CN.utf-8(sudo vim /etc/default/locate )
发布者:全栈程序员-用户IM,转载请注明出处:https://javaforall.cn/2124.html原文链接:https://javaforall.cn
【正版授权,激活自己账号】: Jetbrains全家桶Ide使用,1年售后保障,每天仅需1毛
【官方授权 正版激活】: 官方授权 正版激活 支持Jetbrains家族下所有IDE 使用个人JB账号...
