大家好,又见面了,我是你们的朋友全栈君。如果您正在找激活码,请点击查看最新教程,关注关注公众号 “全栈程序员社区” 获取激活教程,可能之前旧版本教程已经失效.最新Idea2022.1教程亲测有效,一键激活。
Jetbrains全系列IDE使用 1年只要46元 售后保障 童叟无欺
文章目录
一、前言
上文聊了 SpringBoot中SpringApplication是如何构建的(《SpringBoot启动流程二》:七千字源码分析SpringApplication构造阶段)?从这篇文章开始,进入到SpringApplication的运行阶段(核心过程),我们分三个部分来讨论,分别为:SpringApplication准备阶段、ApplicationContext启动阶段、ApplicationContext启动后阶段。
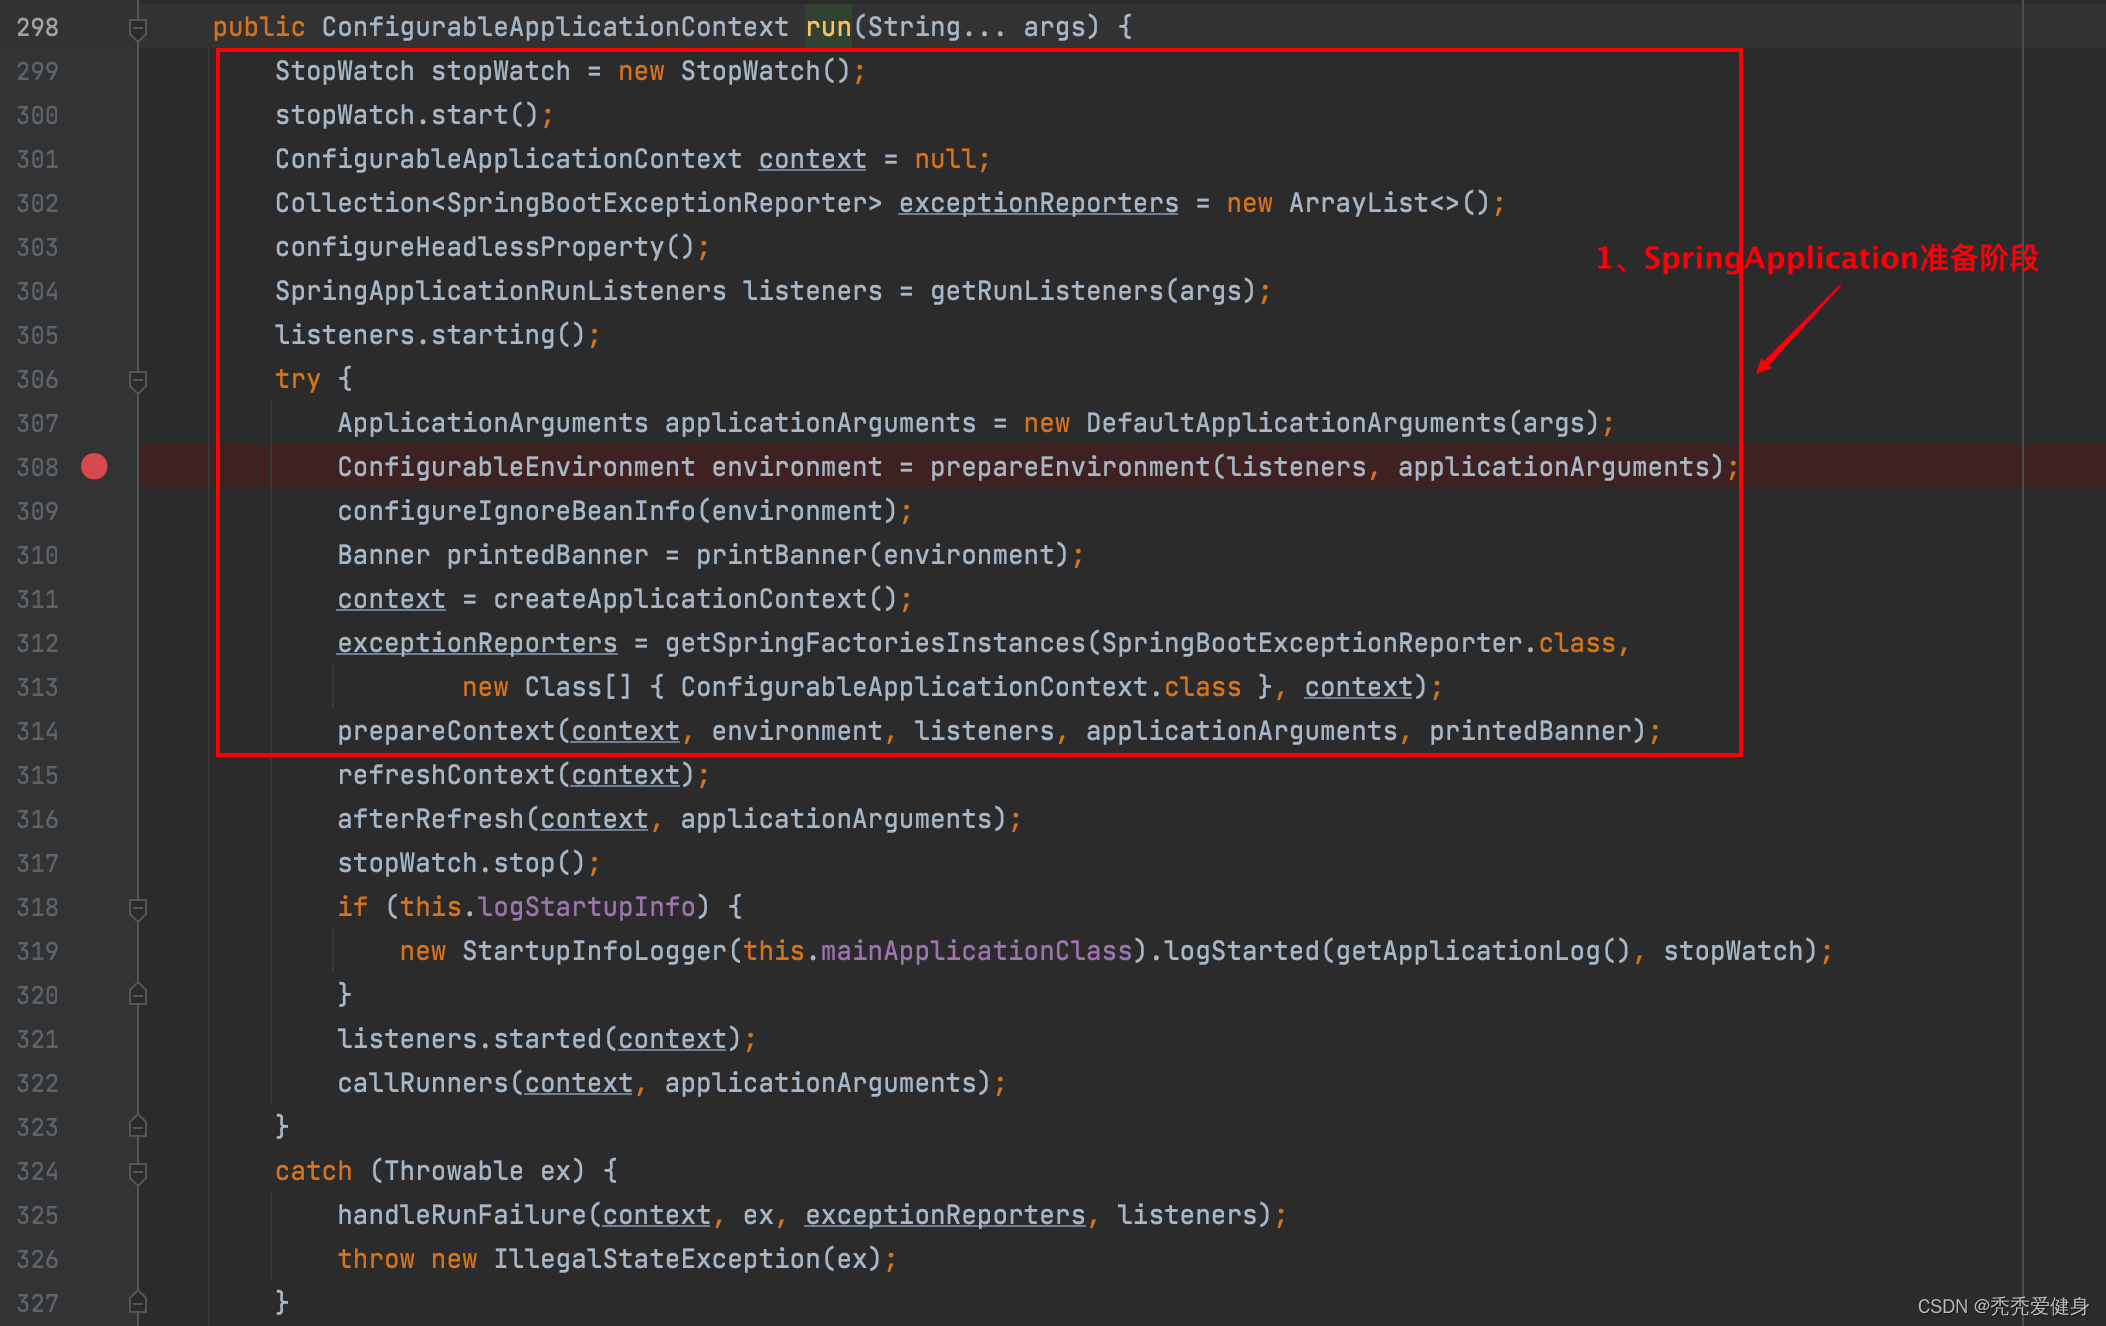
其中SpringApplication的准备阶段是从run(String…)方法调用开始 到 refreshContext(ConfigurableApplicationContext调用前)。

注:Spring Boot版本:2.3.7
二、SpringApplication准备阶段
除初始化StopWatch等少数无足轻重的对象外,该过程会依次准备核心对象:SpringApplicationRunListeners、ApplicationArguments、ConfigurableEnvironment、Banner、ConfigurableApplicationContext 和 SpringBootExceptionReporter集合。其中ConfigurableApplicationContext 可能我们最熟悉,为了加深对它们的理解,下面逐一讨论。
我在看源码的时候喜欢将各个逻辑按步骤,一步步拆分再汇总。针对Spring Boot运行阶段我大致分为十五步,其中SpringApplication准备阶段占了十步。
整体流程如下:

1、准备一些无伤大雅的对象
在整体流程图的第一步、第二步、第六步准备了一些无伤大雅的对象,比如:开启计时器StopWatch、设置一些系统属性。
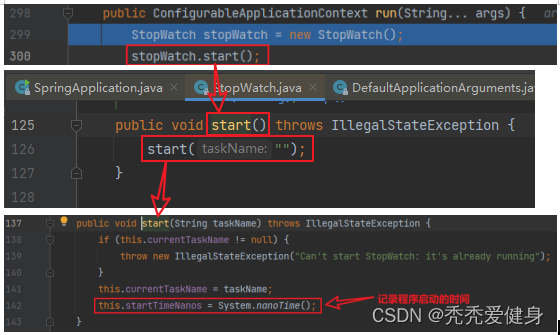
1)第一步:开启计时器StopWatch
第一步只是开启计时器,并设置程序启动的开始时间
StopWatch stopWatch = new StopWatch();
stopWatch.start();
代码的整体调用如下,其中taskName默认为空字符串””,记录程序启动的时间为运行stopWatch.start()方法的当前时间。
就整个程序的启动时间而言,其实并不精确,因为构建SpringApplication的时间并没有算进去,其中也包含了两次从spring.factories文件中读取信息的IO操作。
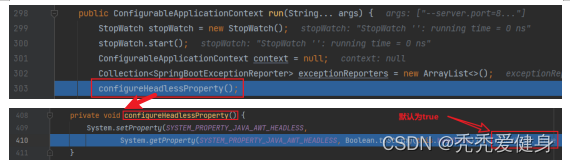
2)第二步:设置系统属性java.awt.headless
第二步只是设置一个系统属性java.awt.headless,默认为true;用于运行headless服务器,进行简单的图像处理;此外,其多用于在缺少显示屏、键盘或者鼠标时的系统配置,很多监控工具如jconsole,需要将该值设置为true。
configureHeadlessProperty();
整体代码执行流程:
如果设置了
java.awt.headless参数,则将其赋值给java.awt.headless系统属性,否者将true赋值给java.awt.headless系统属性。
private static final String SYSTEM_PROPERTY_JAVA_AWT_HEADLESS = "java.awt.headless";
3)第六步:设置系统属性spring.beaninfo.ignore
第六步也只是设置一个系统属性spring.beaninfo.ignore,保证某些bean不会添加到准备的环境中。
configureIgnoreBeanInfo(environment);
整体代码执行流程:
默认设置
spring.beaninfo.ignore系统属性为true(一般不会该这个,无需关注)

下面,我们进入一些核心对象、和核心执行流程的讨论。
2、第三步:加载运行时监听器SpringApplicationRunListeners
加载运行时监听器SpringApplicationRunListeners主要做两个操作:
- 从所有依赖jar包的META-INF/spring.factories文件中获取
SpringApplicationRunListener接口所有的实现类。- 将获取到的实现类通过构造函数赋值到
SpringApplicationRunListeners类的List类型的成员变量listeners上。
SpringApplicationRunListeners listeners = getRunListeners(args);
从代码逻辑上来看,SpringApplicationRunListeners是由getRunListeners(String[])方法创建的。
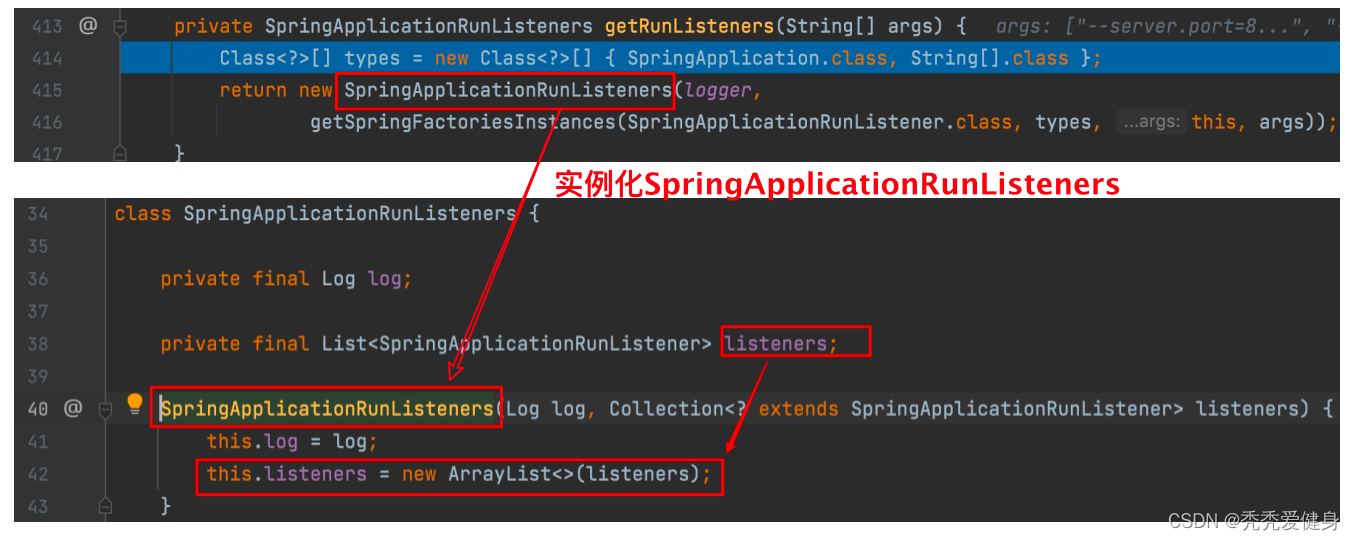
其中SpringApplicationRunListener 属于 组合模式的实现,其内部关联了SpringApplicationRunListner集合。

而getSpringFactoriesInstances(SpringApplicationRunListener.class, types, this, args)方法只会获取到一个EventPublishingRunListeners对象,此对象会贯穿整个应用程序启动的过程,用于发布各种事件给到各个Spring事件监听器。
针对getSpringFactoriesInstance()方法是如何从spring.factories文件中获取到执行SpringApplicationRunListener接口的所有实现类的,我们在博文:《SpringBoot启动流程一》:万字debug梳理SpringBoot如何加载并处理META-INF/spring.factories文件中的信息中详细聊过;
1)浅谈SpringApplicationRunListner
上面说道,我们会把所有SpringApplicationRunListner的实现类赋值到SpringApplicationRunListeners类的List类型的成员变量listeners上。那么SpringApplicationRunListner有什么用?
SpringApplicationRunListner是Spring Boot应用运行时监听器,而不是Spring Boot事件监听器;其监听方法被SpringApplicationRunListeners阶段性的执行,在SpringApplication的运行阶段涉及的方法如下:
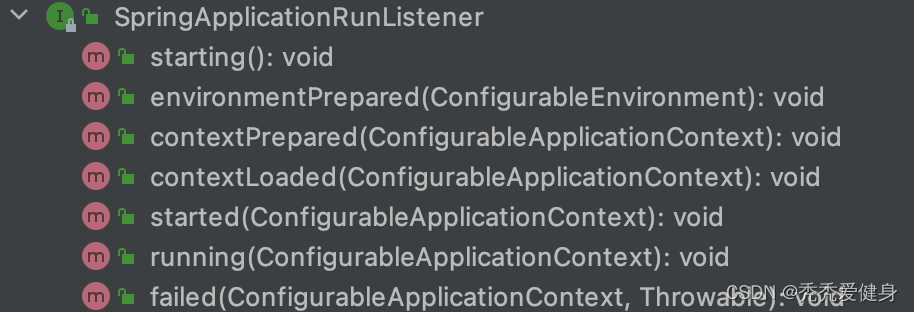
具体每个方法对应哪些Spring Boot事件、哪些Spring Boot事件监听器会执行,放在<SpringBoot事件和事件监听器在整个SpringBoot启动流程中具体是如何运作的?(具体到每个事件对应的每个事件监听器都做了什么)>一文中详细讨论,敬请期待。后期写完自动补充到这里(todo)。
2)第三.2步:发布应用启动事件ApplicationStartingEvent
在加载完运行时监听器SpringApplicationRunListeners之后,紧接着会通过其发布一个starting事件;

按F7 debug往里跟:

这里可以注意到,starting()方法中直接遍历this.listeners,而listeners是在初始化运行时监听器SpringApplicationRunListeners赋值的,并且其中只有一个对象:EventPublishingRunListeners。
所以我们接下来进入EventPublishingRunListeners#starting()方法。

从multicastEvent的命名推测,EventPublishingRunListeners通过其内部的initialMulticaster成员广播事件。
1> 那么initialMulticaster成员是什么初始化的?
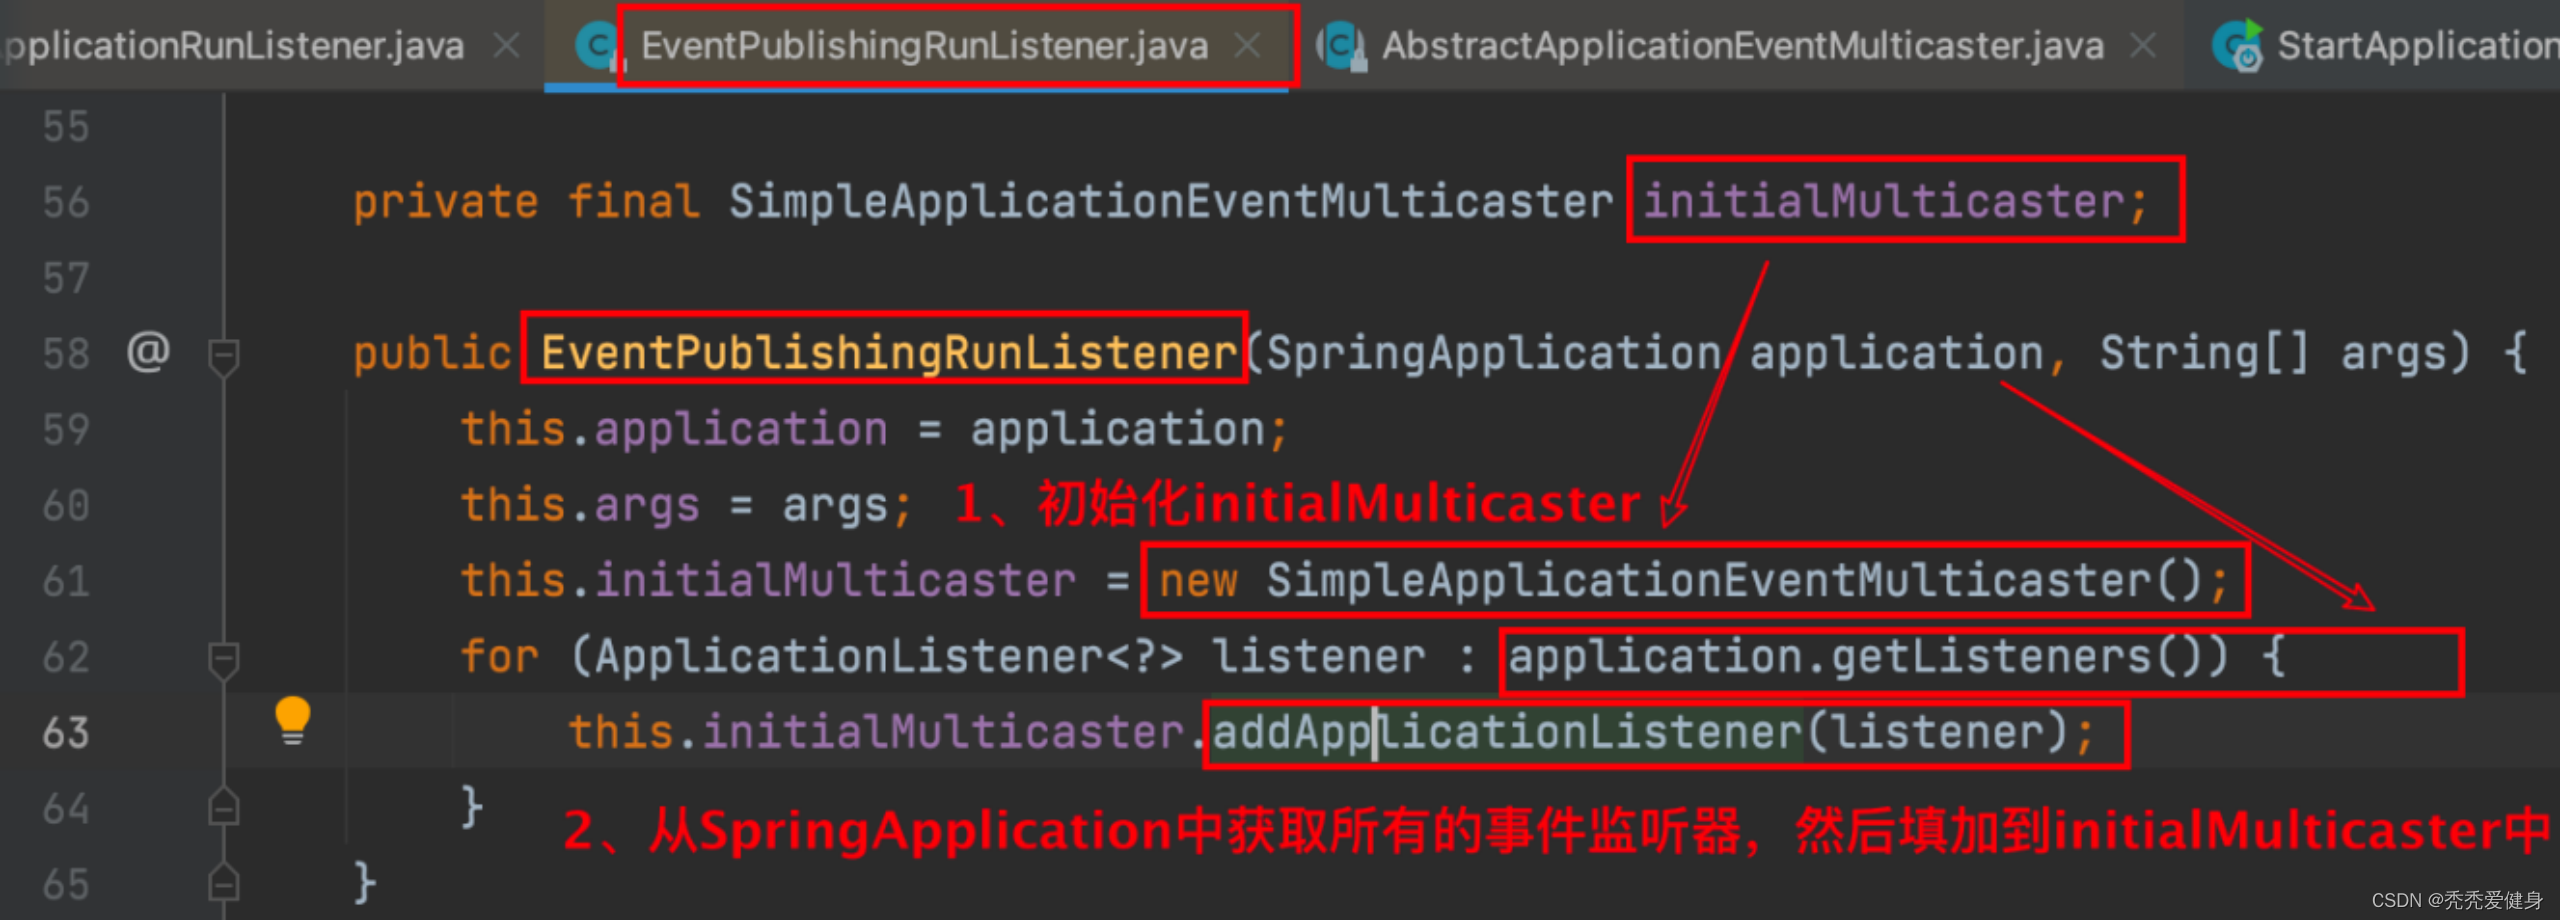
在初始化EventPublishingRunListener(即在调用EventPublishingRunListener构造函数)的同时会初始化initialMulticaster,并将SpringApplication中的11个Spring事件监听器添加到initialMulticaster中。
再看SimpleApplicationEventMulticaster的类图:
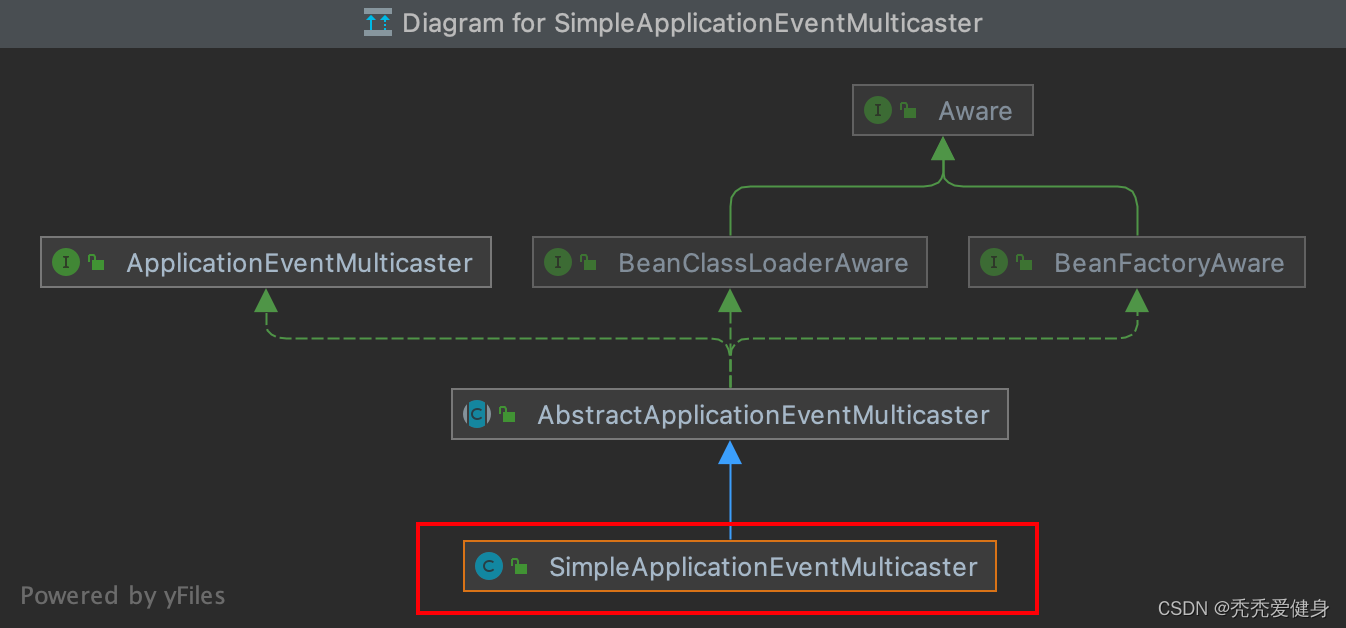
其继承自AbstractApplicationEventMulticaster,而其自身并没有addApplicationListener(ApplicationListener)方法,但其父类AbstractApplicationEventMulticaster有,所以进入到AbstractApplicationEventMulticaster#addApplicationListener(ApplicationListener)方法:
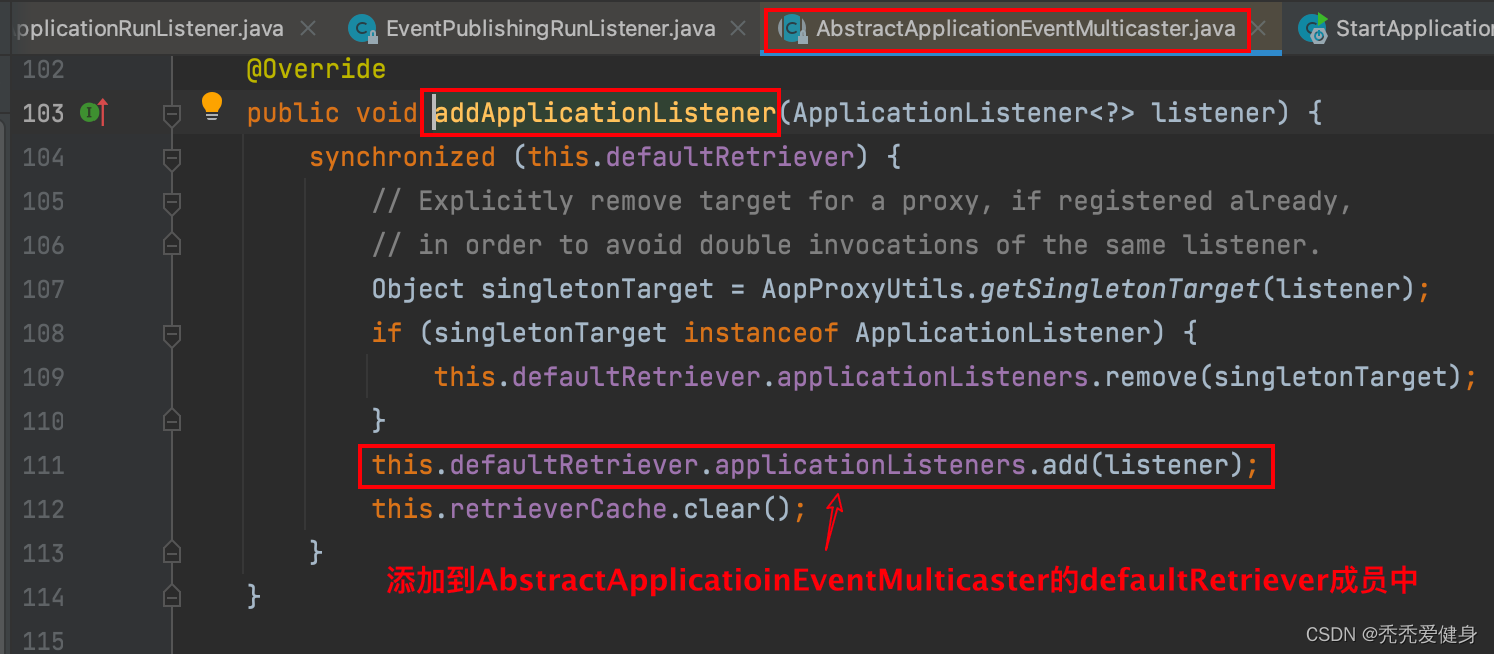
方法中先对defaultRetriever成员变量加锁,保证可以线程安全的操作defaultRetriever变量,其次将传入的Spring事件监听器listener添加到defaultRetriever对象的List类型的applicationListeners成员中。
public abstract class AbstractApplicationEventMulticaster
		implements ApplicationEventMulticaster, BeanClassLoaderAware, BeanFactoryAware {


	private final DefaultListenerRetriever defaultRetriever = new DefaultListenerRetriever();

    ....

	private class DefaultListenerRetriever {


		public final Set<ApplicationListener<?>> applicationListeners = new LinkedHashSet<>();

        ....
    }

    ....
}
2> 回到this.initialMulticaster.multicastEvent()继续看是如何发布事件的?
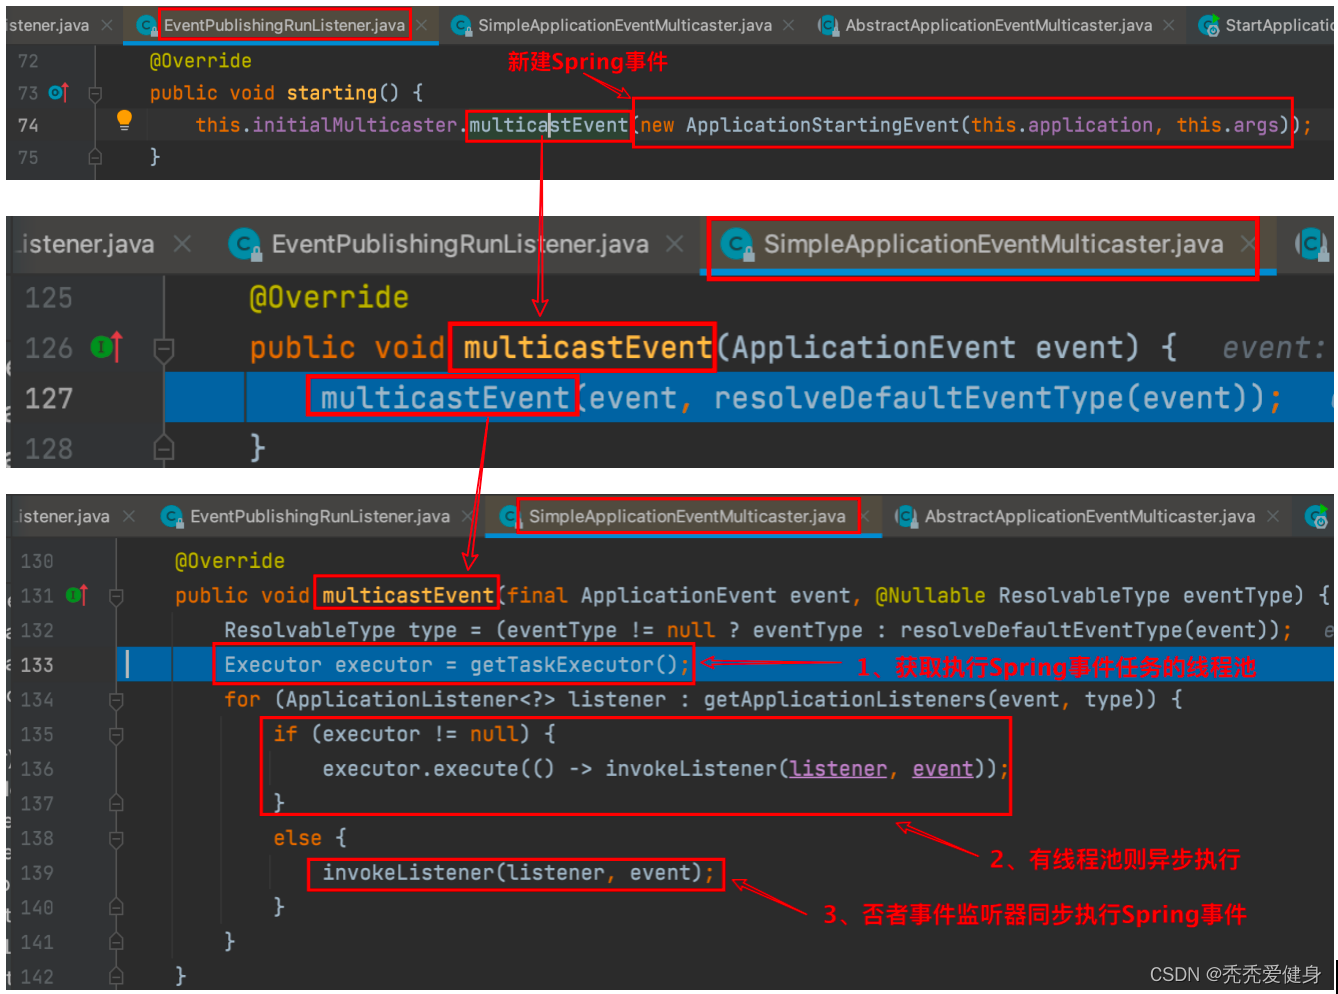
EventPublishingRunListener将Spring事件的发布委托给它SimpleApplicationEventMulticaster类型的成员initialMulticaster。即:SimpleApplicationEventMulticaster出自 Spring Framework,其中关联了ApplicationListener,并负责广播ApplicationEvent。
3> ApplicationEvent对应哪些ApplicationListener?
以ApplicationStartingEvent事件为例,发布这个事件之后,应该通知哪些Spring事件监听器ApplicationListener?AbstractApplicationEventMulticaster#getApplicationListeners(ApplicationEvent,ResolvableType)方法给了我们答案。
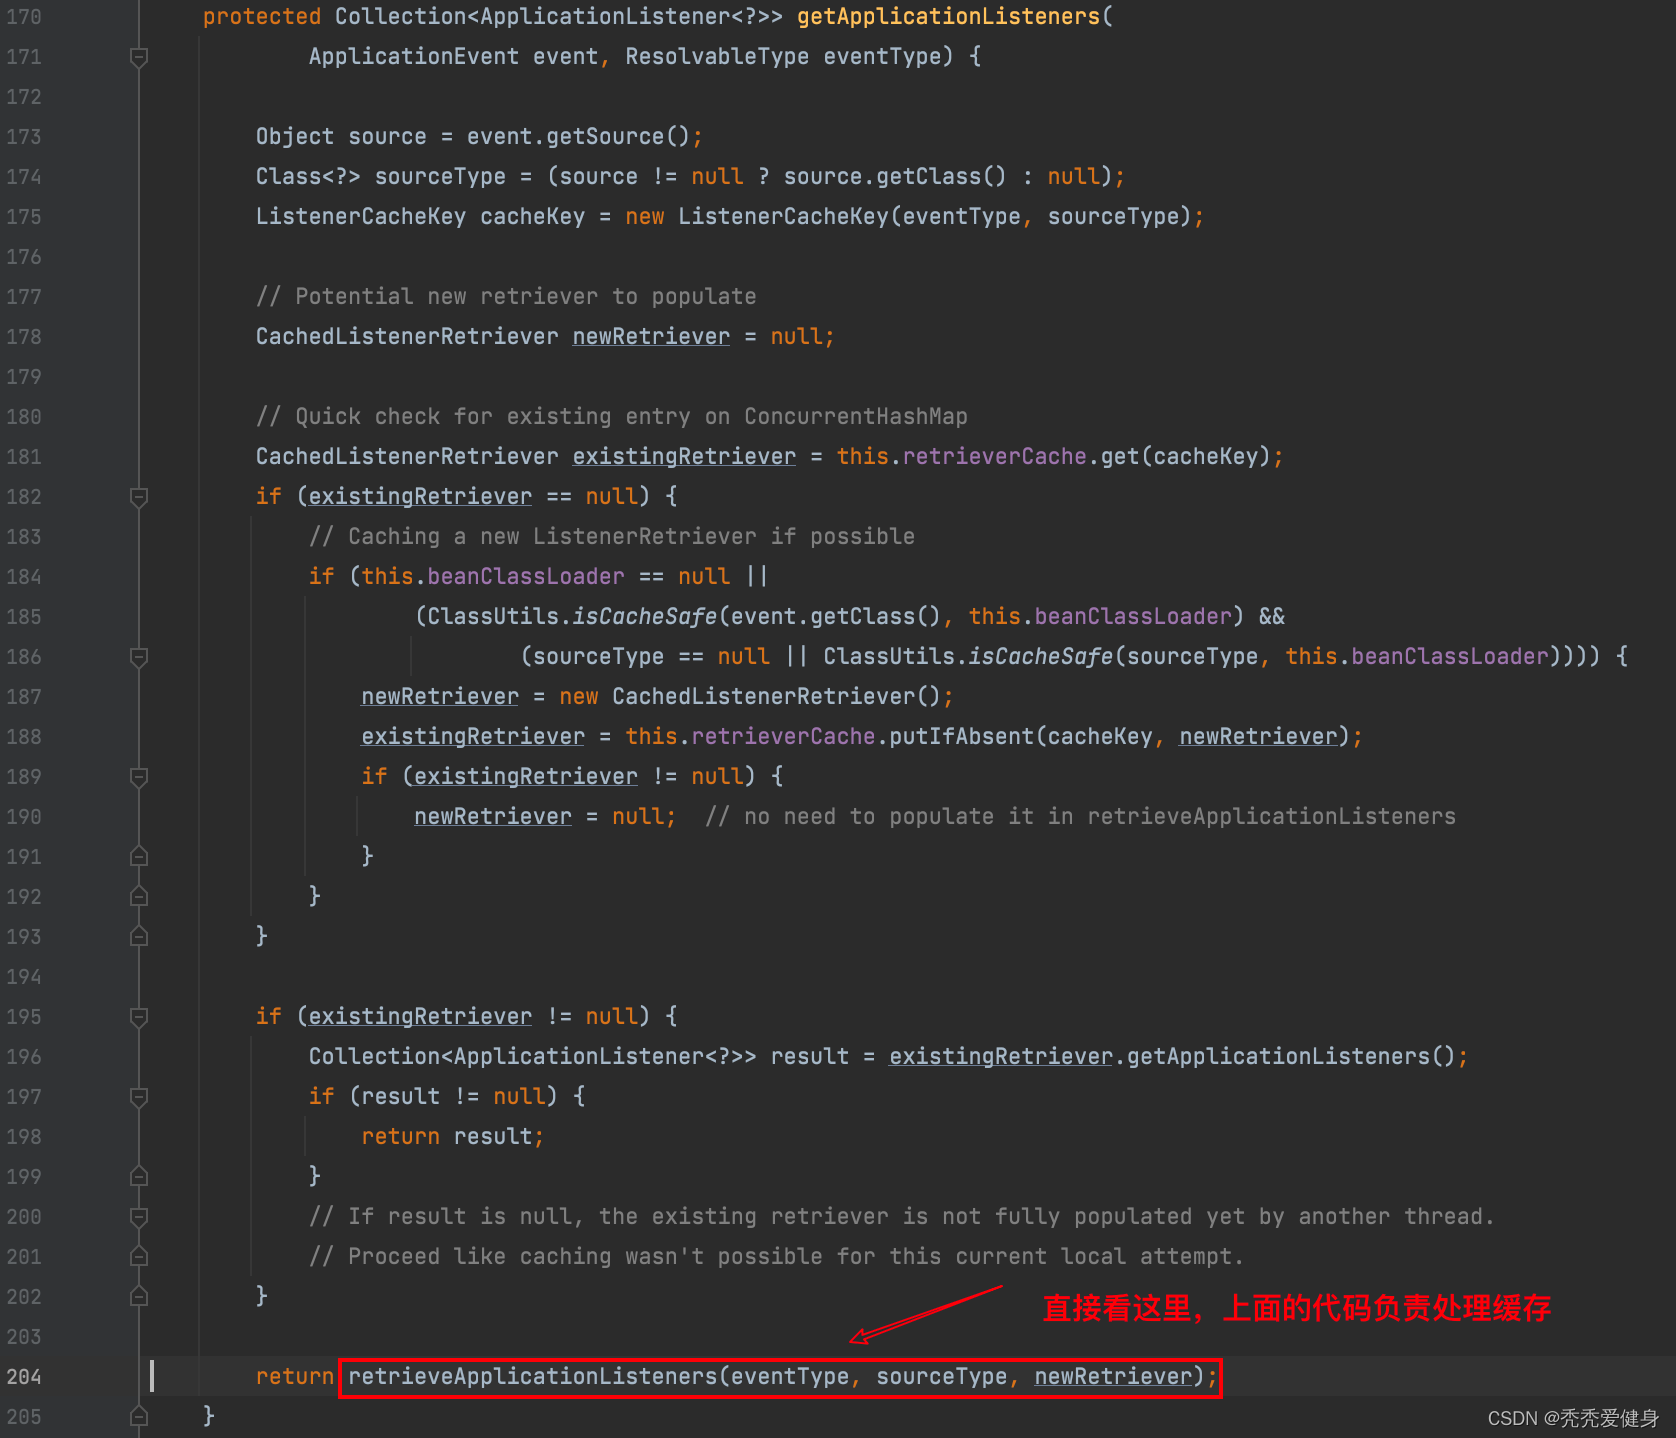
进入到retrieveApplicationListeners()方法,主要逻辑如下:
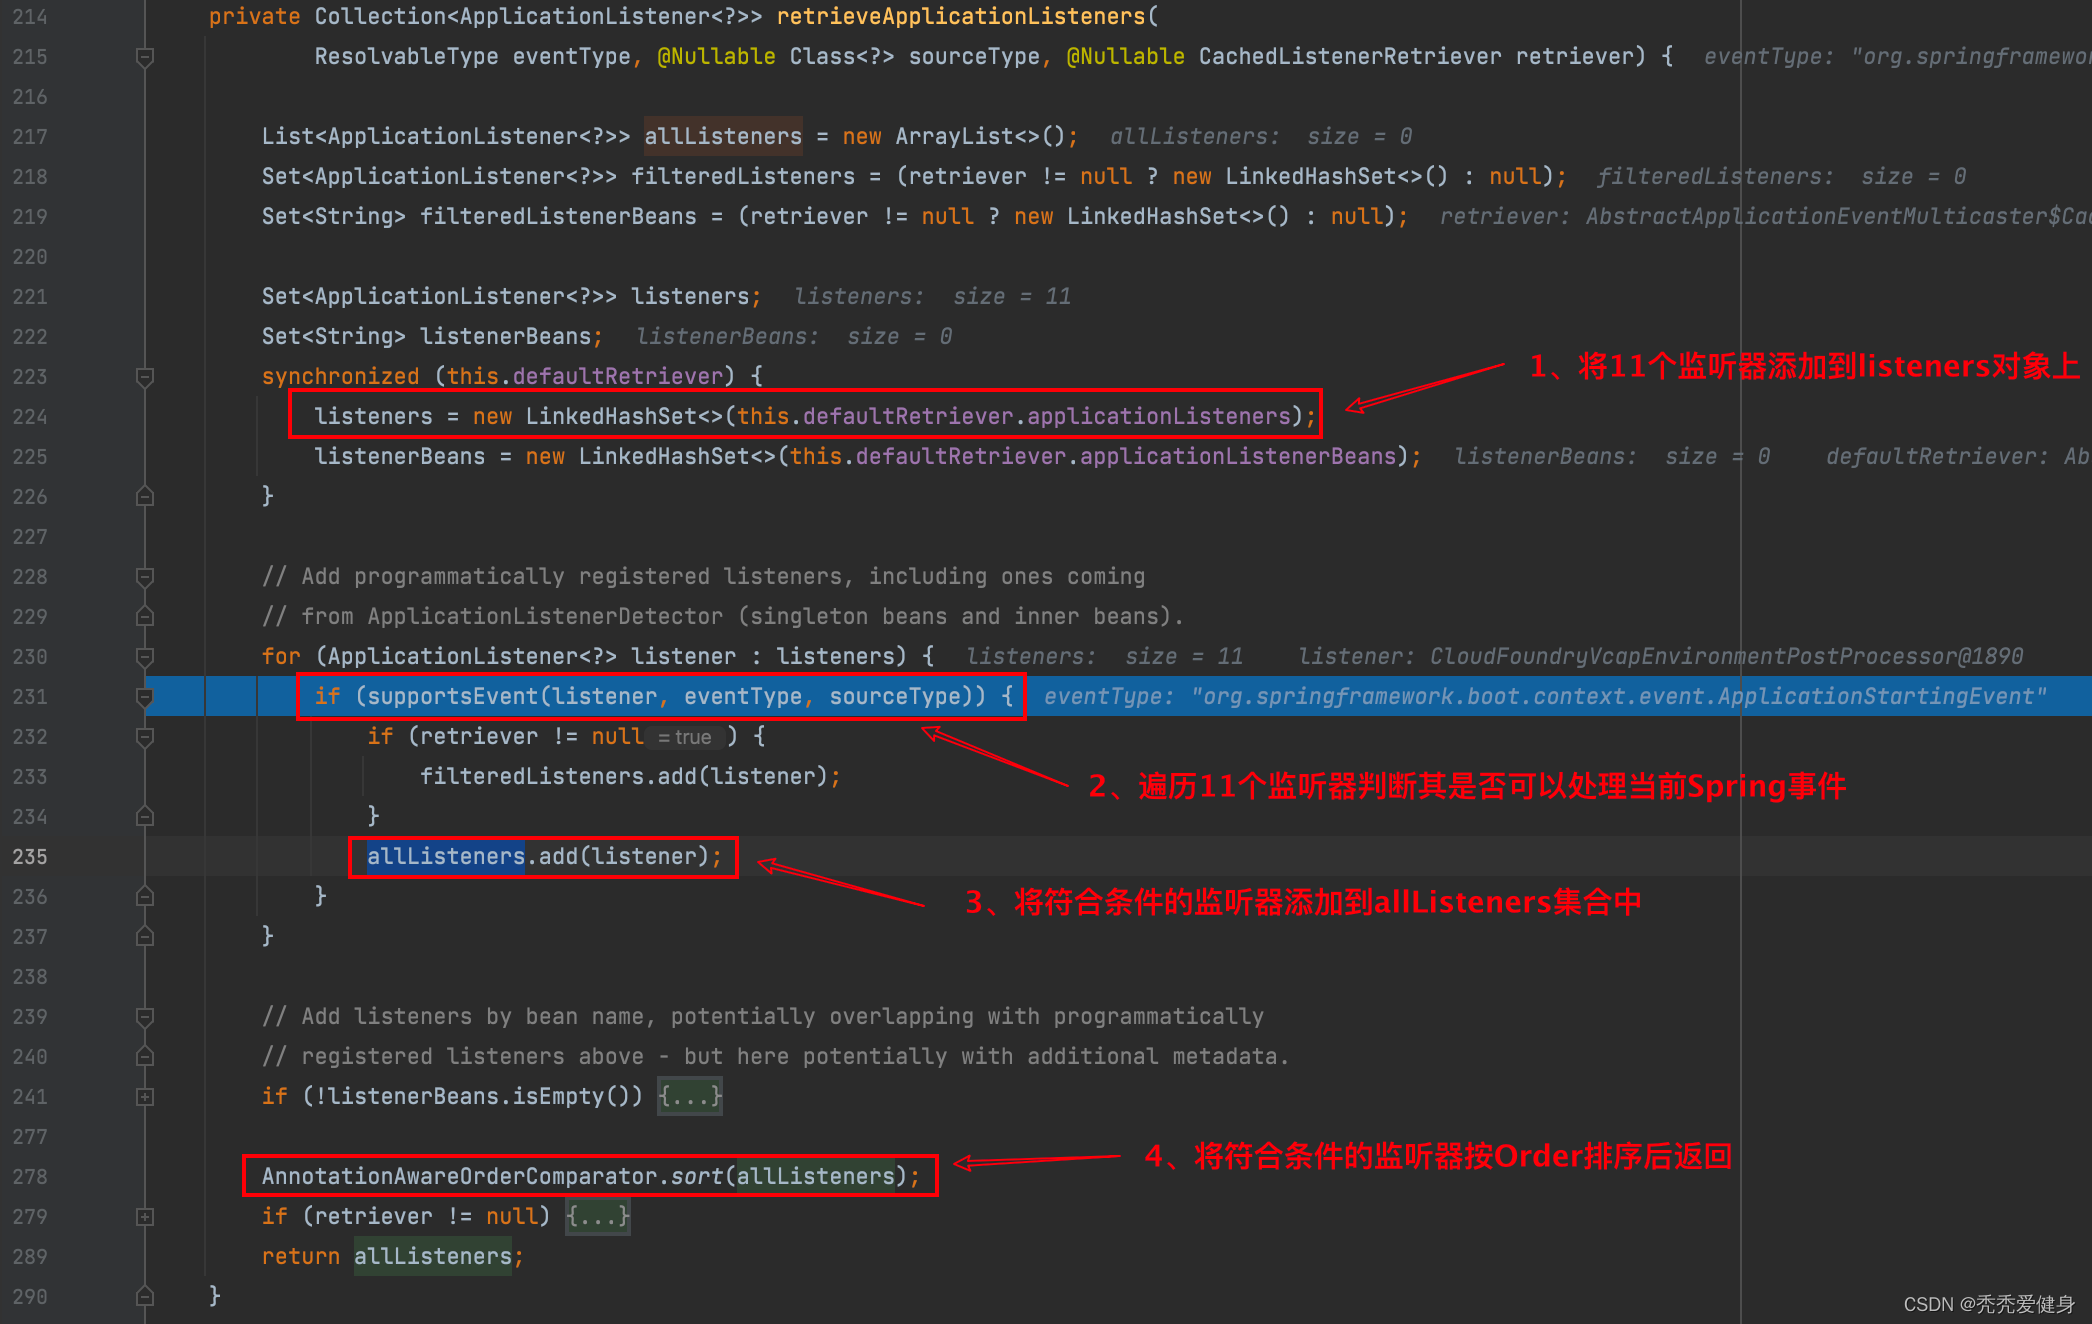
- 对AbstractApplicationEventMulticaster类的
defaultRetriever对象加锁,防止期间别的线程对defaultRetriever对象修改。加锁成功后,将defaultRetriever.applicationListeners赋值到listeners变量上。而defaultRetriever.applicationListeners我们在上文中提到过:其是在EventPublishingRunListener初始化的时候赋值的,里面包含11个监听器。- 遍历
listeners,使用supportsEvent()方法判断每个监听器是否可以监听当前事件,将可以监听当前事件的监听器添加到allListenersList集合中,排序后返回。
我们再看一下supportsEvent()方法是如何判断某个Spring事件监听器是否可以处理某个Spring事件的?
以这里的ApplicationStartingEvent事件和CloudFoundryVcapEnvironmentPostProcessor事件监听器为例;
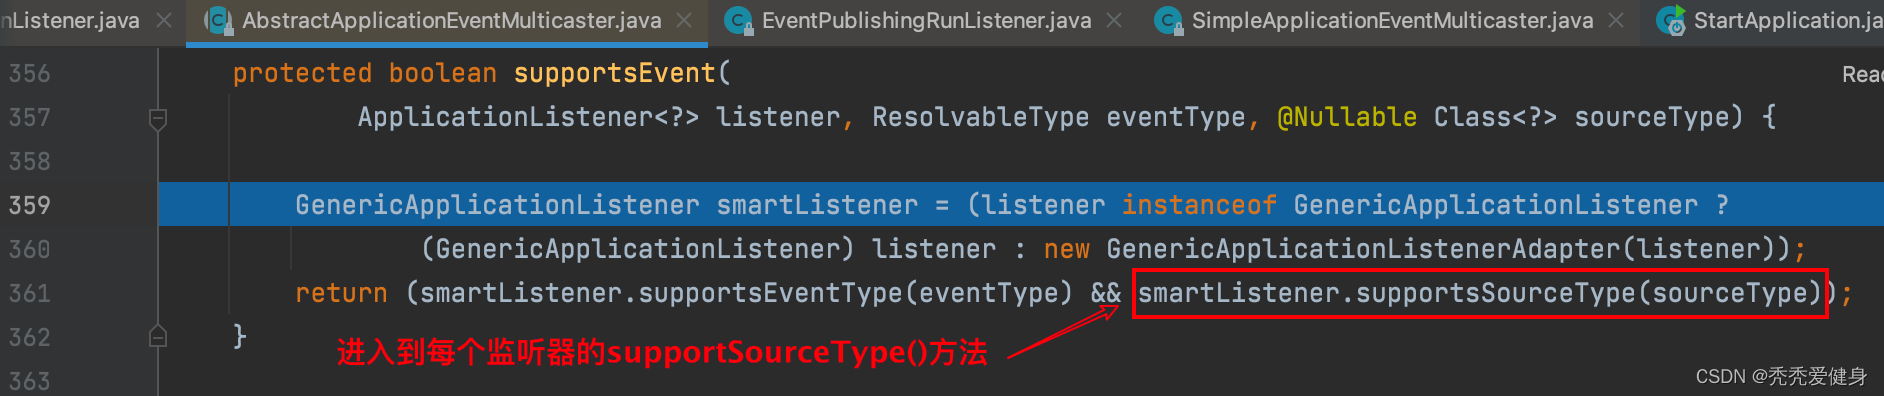
<1> 首先将Spring事件监听器封装为GenericApplicationListenerAdapter对象,然后调用GenericApplicationListenerAdapter对象的supportsSourceType(Class)方法判断是否支持监听传入的事件类型。

<2> 如果当前事件监听器的类型是SmartApplicationListener,则直接调用当前事件监听器的supportsEventType()方法,否则进一步调用declaredEventType.isAssignableFrom()方法判断。
看到这里也就够了,大家不要再深入了。里面太细了,博主会放在<SpringBoot事件和事件监听器在整个SpringBoot启动流程中具体是如何运作的?(具体到每个事件对应的每个事件监听器都做了什么)>一文中详细讨论,敬请期待。后期写完自动补充到这里(todo)。后续文章中牵扯到的Spring事件细节都放在另一博文中详细讨论,次博文只给出结论。
说了这么多,发布应用启动事件ApplicationStartingEvent之后,其实只有LoggingApplicationListener 和 BackgroundPreinitializer做了事情; 其中:
LoggingApplicationListener中获取了日志系统loggingSystem,并做了日志系统的beforeInitialize()操作。BackgroundPreinitializer中做了一些后台功能的初始化,比如:转换服务、校验服务、Jackson、Charset字符集初始化。
3、第四步:加载并解析命令行的参数到ApplicationArguments对象中
当执行完SpringApplicationRunListeners#starting()方法后,SpringApplication进入到装配ApplicationArguments逻辑:
ApplicationArguments applicationArguments = new DefaultApplicationArguments(args);
ApplicationArguments的实现类DefaultApplicationArguments的底层实现是基于Spring Framework中的命令行配置源SimpleCommandLinePropertySource。
代码整体执行流程如下:
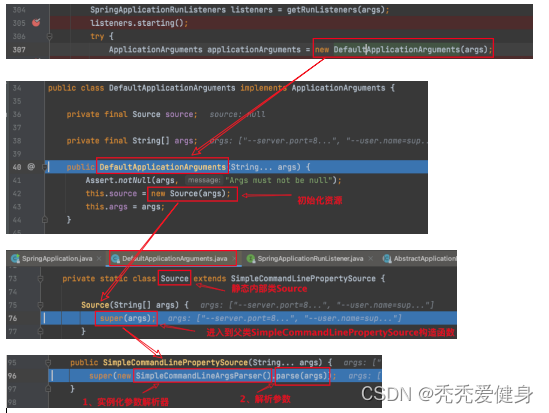
SimpleCommandLinePropertySource将命令行参数分为两组,分别为:
- “选项参数”,选项参数必须以“
--”为前缀。- “非选项参数”,非选项参数是未包含“
--”前缀的命令行参数。
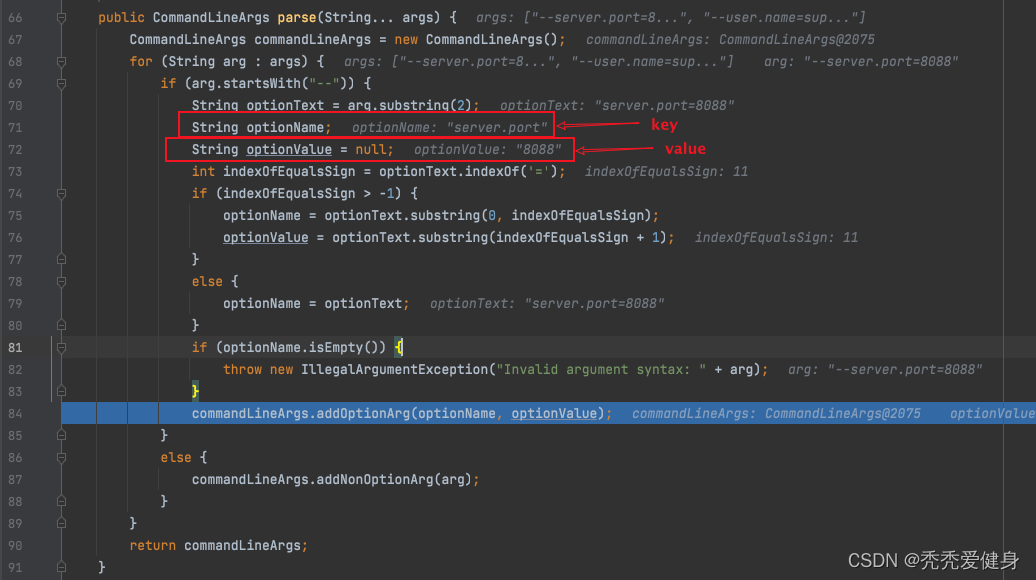
而命令行参数的解析由SimpleCommandLineArgsParser来完成,具体体现在其parse()方法中:
class SimpleCommandLineArgsParser {


	/** * Parse the given {@code String} array based on the rules described {@linkplain * SimpleCommandLineArgsParser above}, returning a fully-populated * {@link CommandLineArgs} object. * @param args command line arguments, typically from a {@code main()} method */
	public CommandLineArgs parse(String... args) {

		CommandLineArgs commandLineArgs = new CommandLineArgs();
		// 1. 选项参数
		for (String arg : args) {

			if (arg.startsWith("--")) {

				String optionText = arg.substring(2);
				String optionName;
				String optionValue = null;
				int indexOfEqualsSign = optionText.indexOf('=');
				if (indexOfEqualsSign > -1) {

				    // 1.1 从字符串中截取出key
					optionName = optionText.substring(0, indexOfEqualsSign);
					// 1.2 从字符串中截取出value
					optionValue = optionText.substring(indexOfEqualsSign + 1);
				}
				else {

					optionName = optionText;
				}
				if (optionName.isEmpty()) {

					throw new IllegalArgumentException("Invalid argument syntax: " + arg);
				}
				// 1.3 以key-value对的形式将参数 和 其对应的值添加到CommandLineArgs对象的Map类型成员optionArgs中。
				commandLineArgs.addOptionArg(optionName, optionValue);
			}
			// 2. 非选项参数
			else {

				commandLineArgs.addNonOptionArg(arg);
			}
		}
		return commandLineArgs;
	}

}
根据以上规则,命令行参数--server.port=8088被SimpleCommandLineArgsParser解析为“server.port : 8088”键值属性,加入到CommandLineArgs中。
这里看完,给人的感觉只是将参数解析为key:value键值形式添加到DefaultApplicationArguments对象中,具体什么时候会用呢?
4、第五步:准备当前应用程序的环境ConfigurableEnvironment
当ApplicationArguments实例准备完毕后,SpringApplication进入到准备应用程序环境ConfigurableEnvironment的阶段。
ConfigurableEnvironment environment = prepareEnvironment(listeners, applicationArguments);
prepareEnvironment()方法中的内容比较多,大致可以分为6步:
- 获取当前环境,如果不存在,则根据应用类型来创建对应的环境。
比如:SERVLET应用类型创建StandardServletEnvironment、REACTIVE应用类型创建StandardReactiveWebEnvironment,否者创建StandardEnvironment。另外:StandardReactiveWebEnvironment 继承自 StandardEnvironment,两者内容完全一样,只是StandardReactiveWebEnvironment又实现了ConfigurableReactiveWebEnvironment接口,虽然其中没做方法的重写。- 配置当前环境
将类型转换器和格式化器添加到环境中、将命令行参数内容(SimpleCommandLinePropertySource {name=‘commandLineArgs’})添加到环境的propertySources成员变量中、给环境设置activeProfiles。- 如果propertySources中没有
configurationProperties则将ConfigurationPropertySourcesPropertySource {name='configurationProperties'}加入到propertySources中,有的话先移除,然后再加。- ,广播ApplicationEnvironmentPreparedEvent事件,通知监听器,当前引用环境准备好了。在这里ConfigFileApplicationListener会解析我们的外部配置文件xx.properties、xxx.yml
- 绑定应用环境到
spring.main,将应用环境ConfigurableEnvironment转换为相应应用类型的环境。- 防止对环境转换时有问题,这里再重新配置当前环境。
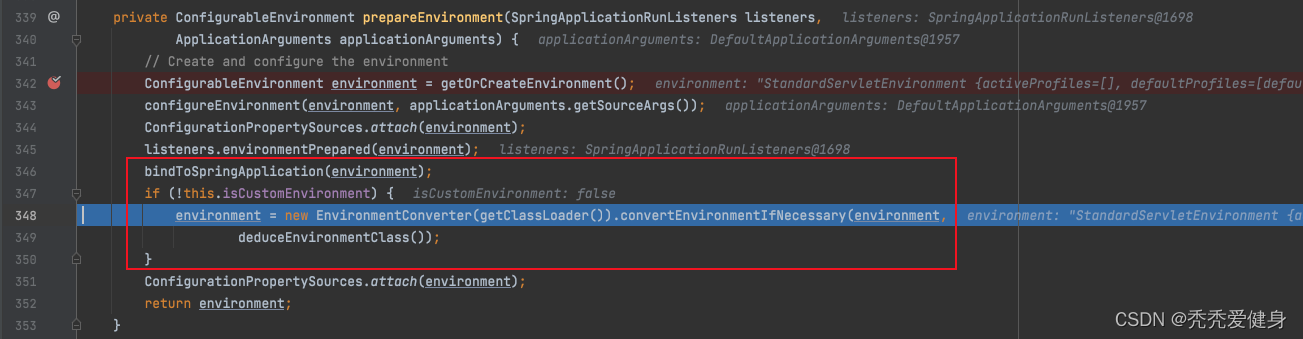
private ConfigurableEnvironment prepareEnvironment(SpringApplicationRunListeners listeners,
		ApplicationArguments applicationArguments) {

	// 1、获取或者创建应用环境(创建时会根据应用类型判断)
	ConfigurableEnvironment environment = getOrCreateEnvironment();
	// 2、配置应用环境,配置propertySource和activeProfiles
	configureEnvironment(environment, applicationArguments.getSourceArgs());
	// 如果propertySources中没有`configurationProperties`则将`ConfigurationPropertySourcesPropertySource {name='configurationProperties'}`加入到propertySources中。
	// 有的话先移除,然后再加。
	ConfigurationPropertySources.attach(environment);
	// 3、监听器环境准备,广播ApplicationEnvironmentPreparedEvent事件
	// 这里会处理我们自定义的配置文件内容--见ConfigFileApplicationListener
	listeners.environmentPrepared(environment);
	// 4、绑定应用环境,不用往里深跟
	bindToSpringApplication(environment);
	if (!this.isCustomEnvironment) {

		// 将应用环境转换为相应应用类型的环境,比如:StandardServletEnvironment、StandardReactiveWebEnvironment、StandardEnvironment
		environment = new EnvironmentConverter(getClassLoader()).convertEnvironmentIfNecessary(environment,
				deduceEnvironmentClass());
	}
	// 5、防止对环境转换时有问题,这里再重新配置propertySource和activeProfiles
	ConfigurationPropertySources.attach(environment);
	return environment;
}
下面,我们将这6步拆开细看一下。
1)获取或者创建应用环境getOrCreateEnvironment()
private ConfigurableEnvironment getOrCreateEnvironment() {

	if (this.environment != null) {

		return this.environment;
	}
	switch (this.webApplicationType) {

	case SERVLET:
		return new StandardServletEnvironment();
	case REACTIVE:
		return new StandardReactiveWebEnvironment();
	default:
		return new StandardEnvironment();
	}
}
从方法的命名来看,这里的意思是获取或创建环境。
- 首先尝试获取应用环境,如果环境不存在,则根据应用类型来创建对应的环境。
- SERVLET应用类型创建StandardServletEnvironment、
- REACTIVE应用类型创建StandardReactiveWebEnvironment,
- 否者创建StandardEnvironment。
另外:StandardReactiveWebEnvironment 继承自 StandardEnvironment,两者内容完全一样,只是StandardReactiveWebEnvironment又实现了ConfigurableReactiveWebEnvironment接口,虽然其中没做方法的重写。

2)配置应用环境configureEnvironment()
configureEnvironment(environment, applicationArguments.getSourceArgs());
protected void configureEnvironment(ConfigurableEnvironment environment, String[] args) {


	// 加载转换器和格式化器
	if (this.addConversionService) {

		ConversionService conversionService = ApplicationConversionService.getSharedInstance();
		environment.setConversionService((ConfigurableConversionService) conversionService);
	}
	// 配置property sources, 将“SimpleCommandLinePropertySource {name='commandLineArgs'}”添加到ConfigurableEnvironment的propertySourceList。
	configurePropertySources(environment, args);
	// 配置profiles
	configureProfiles(environment, args);
}
configureEnvironment()方法中会做三件事:加载类型转换器和初始化器、配置propertySources、配置profiles。
1> 加载类型转换器和初始化器

默认会将ConversionService赋值到environment中。
2> 配置propertySources
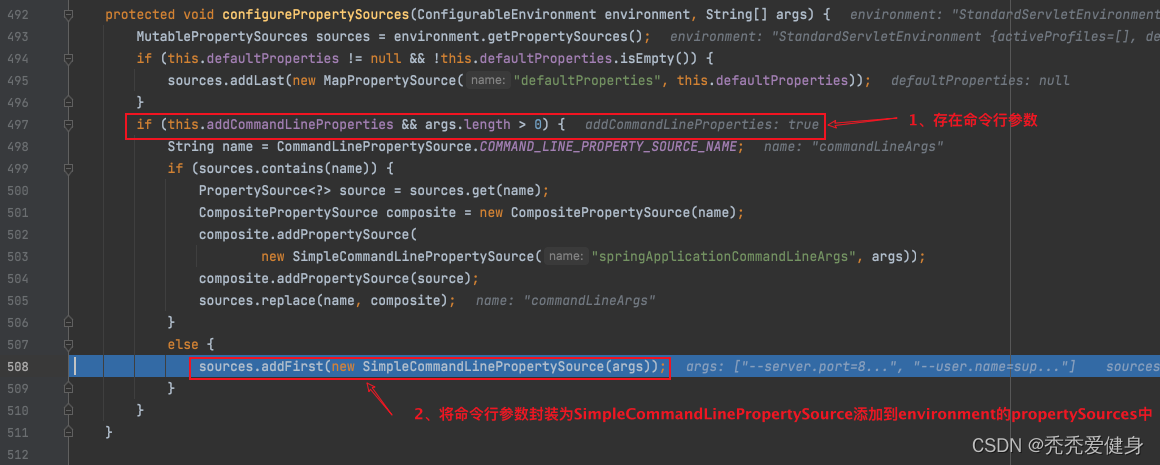
如果存在命令行参数,则将命令行参数封装为SimpleCommandLinePropertySource添加到环境的propertySources成员变量中。这里和第四步:加载并解析命令行的参数到ApplicationArguments对象中是一样的操作。
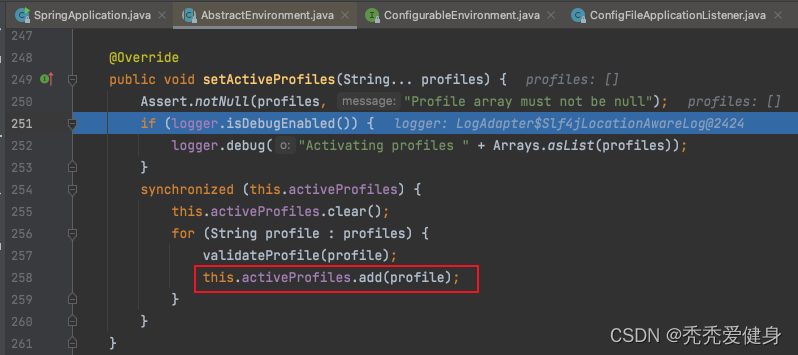
3> 给环境设置activeProfiles

这里就是单纯的获取所有的additionalProfiles和当前环境active的Profile,最后合并添加到environment的activeProfiles成员变量上。
3)环境的propertySources中添加configurationProperties
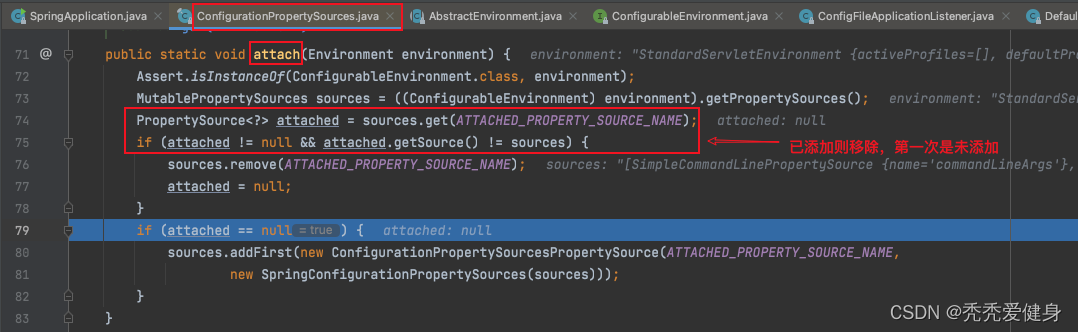
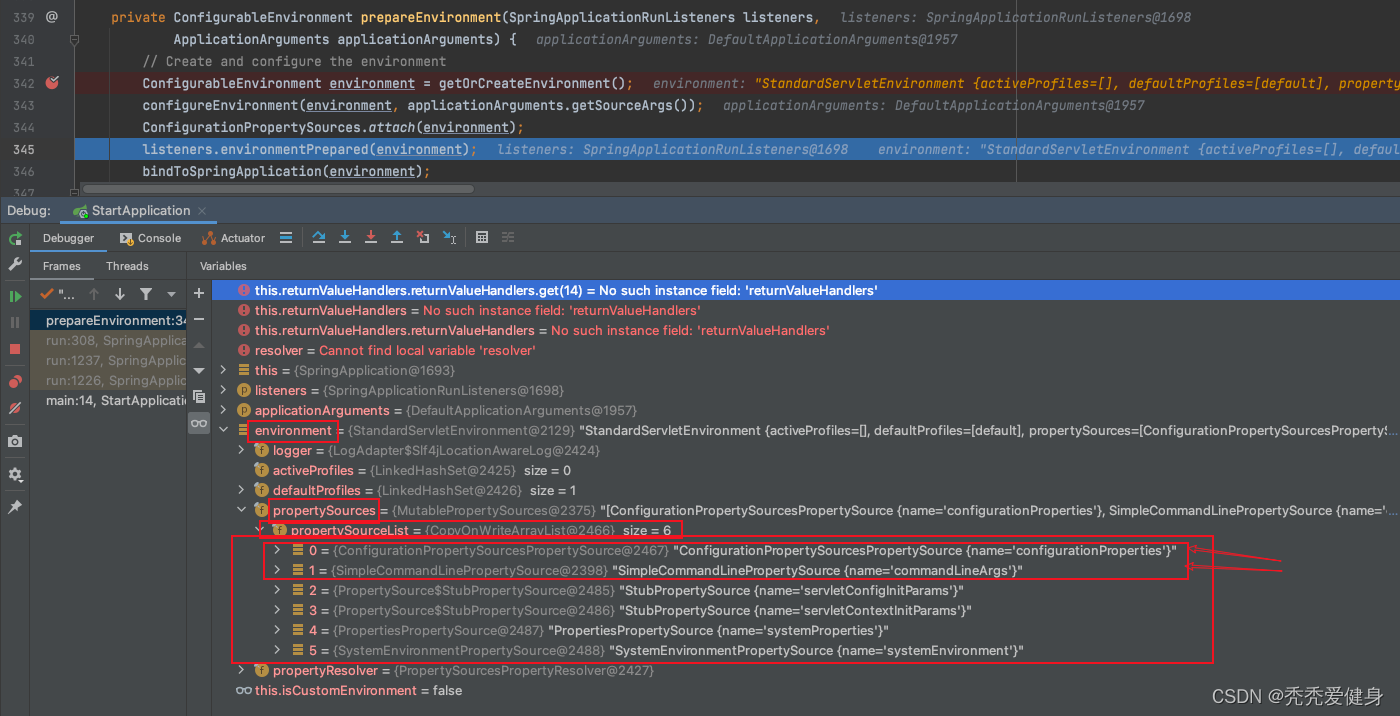
走到这里时,从sources中获取到的configurationProperties为null,所以会初始化一个ConfigurationPropertySourcesPropertySource并添加到environment的propertySourceList中。
此时,可以看到environment的propertySources中有6个对象,即比最初多个两个对象(commandLineArgs、configurationProperties):
4)发布事件listeners.environmentPrepared()
当应用程序的环境准备之后,EventPublishingRunListener发布一个ApplicationEnvironmentPreparedEvent事件。
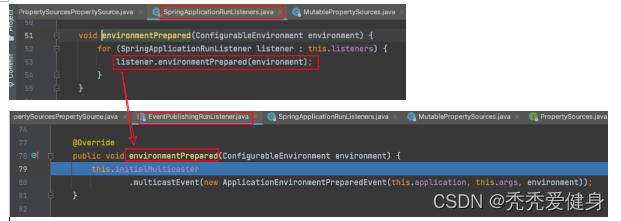
EventPublishingRunListener将Spring事件的发布委托给它SimpleApplicationEventMulticaster类型的成员initialMulticaster。具体细节和上文聊的第三.2步:发布应用启动事件ApplicationStartingEvent是一样的,参考其往里追即可。
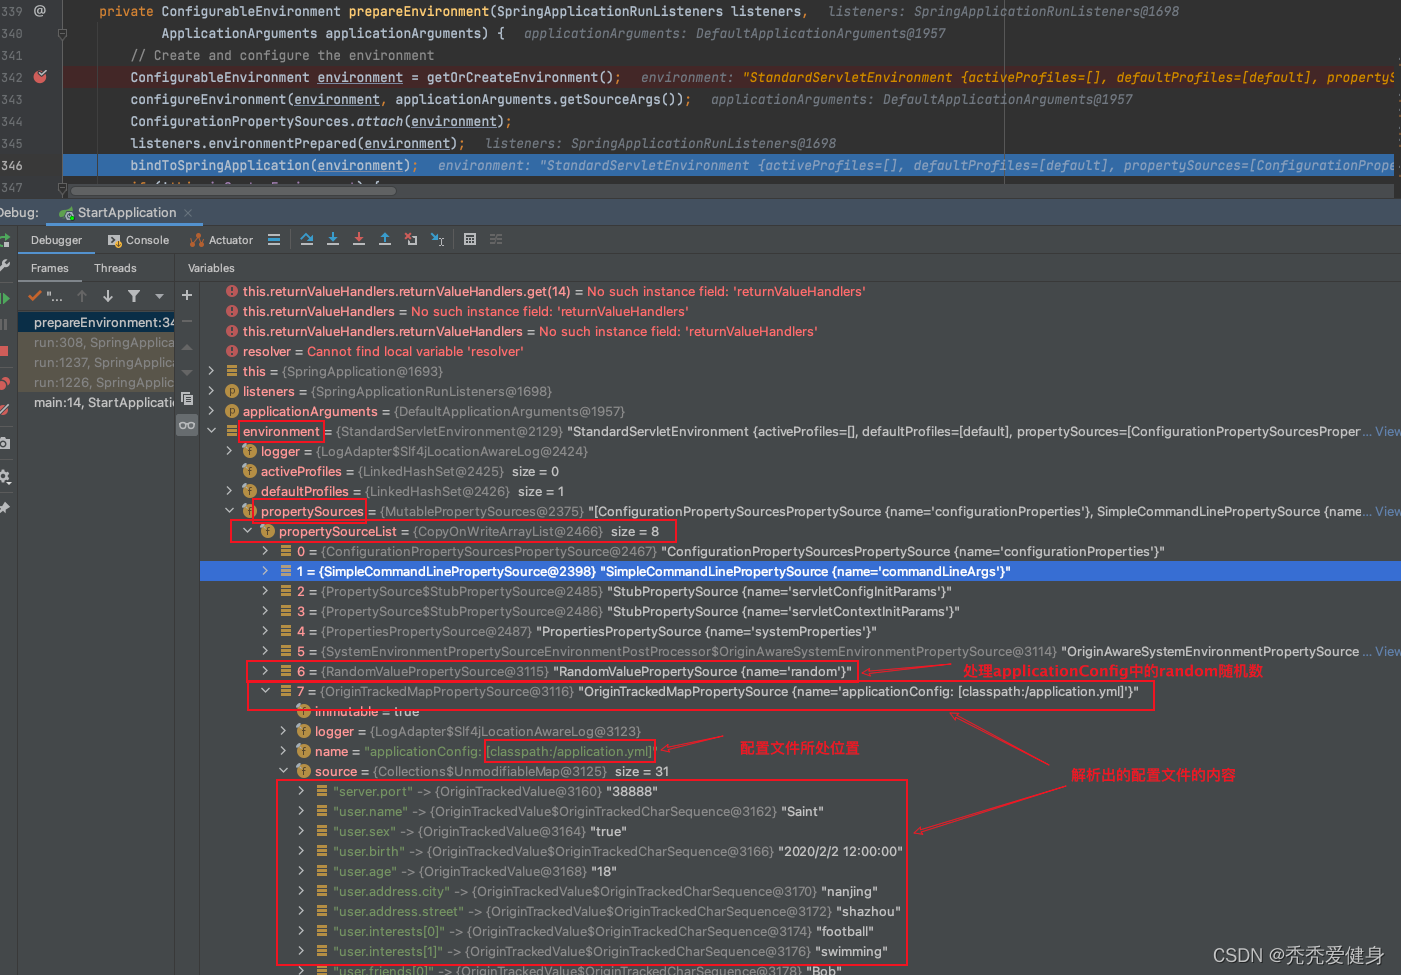
在这个阶段,ConfigFileApplicationListener事件监听器会进行yaml/properties配置文件的加载;LoggingApplicationListener事件监听器会进行日志系统的初始化;细节另出博文总结。
此时,再看environment的propertySources中有8个对象,即比上一阶段6个对象多个两个对象(random、applicationConfig:[classpath:/application.yml]):
5)绑定应用环境到spring.main
绑定应用环境到spring.main;

将应用环境ConfigurableEnvironment转换为相应应用类型的环境;

6)再次向环境的propertySources中添加configurationProperties
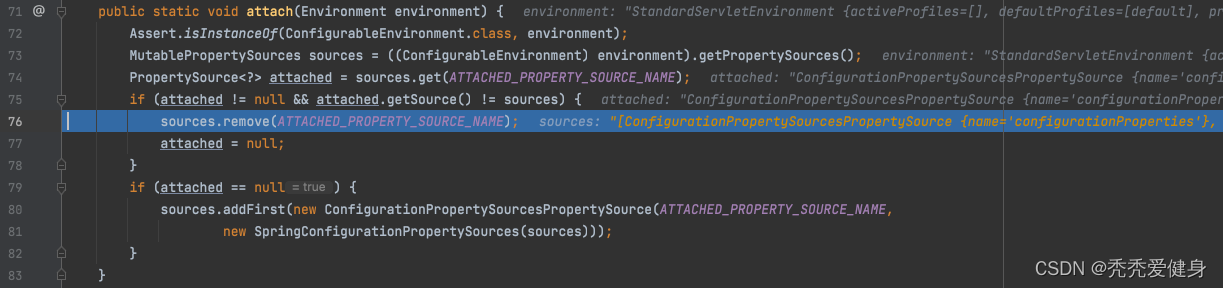
先将configurationProperties从environment的propertySources中移除,然后再将其添加到propertySources的头部。

至此,ConfigurationEnvironment准备完毕,后面日志中开始输出banner信息。
5、第七步:打印banner
Banner printedBanner = printBanner(environment);
private Banner printBanner(ConfigurableEnvironment environment) {

	// bannerMode默认为CONSOLE
	if (this.bannerMode == Banner.Mode.OFF) {

		return null;
	}
	// 获取resourceLoader,默认为:DefaultResourceLoader
	ResourceLoader resourceLoader = (this.resourceLoader != null) ? this.resourceLoader
			: new DefaultResourceLoader(getClassLoader());
	SpringApplicationBannerPrinter bannerPrinter = new SpringApplicationBannerPrinter(resourceLoader, this.banner);
	if (this.bannerMode == Mode.LOG) {

		return bannerPrinter.print(environment, this.mainApplicationClass, logger);
	}
	// 打印Banner日志,然后返回
	return bannerPrinter.print(environment, this.mainApplicationClass, System.out);
}
具体流程如下:
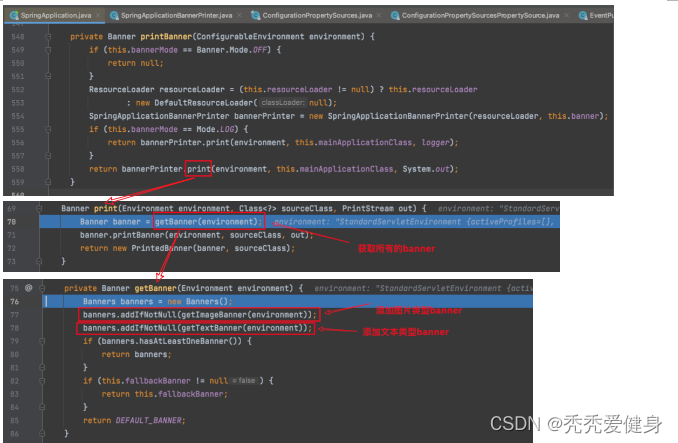
获取banner的逻辑如下:
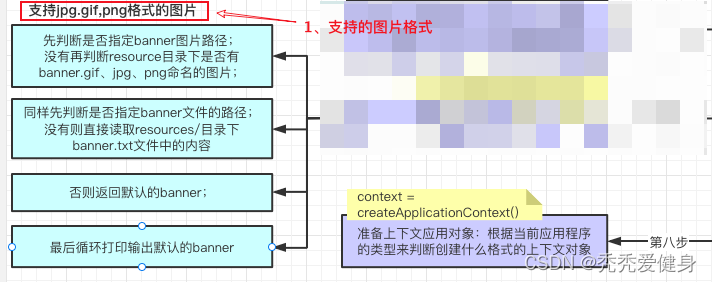
走完banner.printBanner(environment, sourceClass, out);逻辑之后,Console日志输出如下:
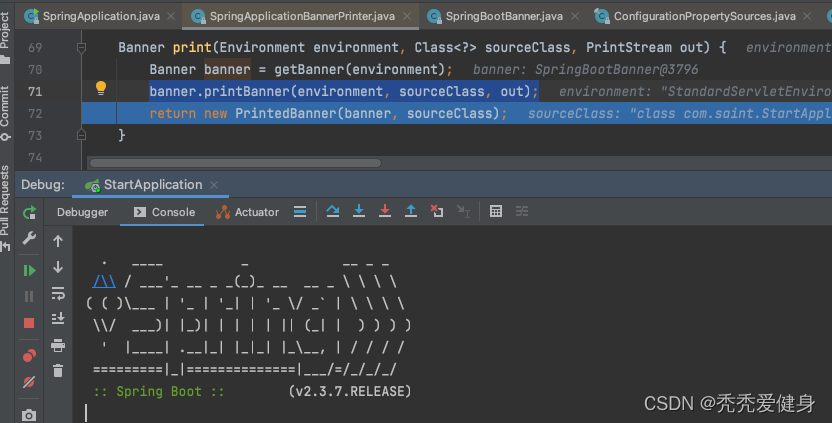
这里的Banner是默认的,博主没有添加任何自定义的banner;
自定义Banner可以参考博文:趣味篇:SpringBoot自定义Banner。
至此,banner打印完毕,进入创建Spring应用上下文阶段。
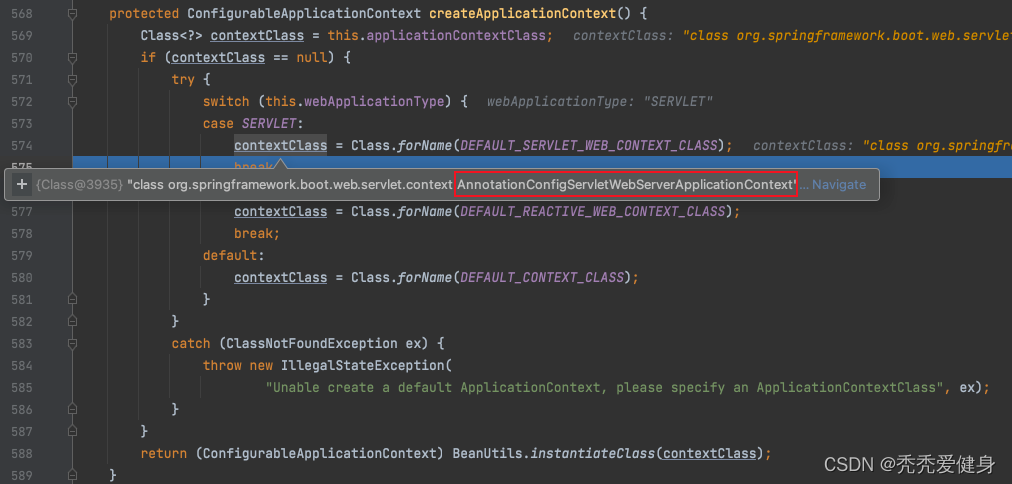
6、第八步:创建Spring应用上下文
根据应用类型利用反射创建Spring应用上下文,可以理解为创建一个容器;就SERVLET而言:实例化AnnotationConfigServletWebServerApplicationContext。
7、第九步:加载异常报告器SpringBootExceptionReporter
加载异常报告器SpringBootExceptionReporter,用来支持报告关于启动的错误
exceptionReporters = getSpringFactoriesInstances(SpringBootExceptionReporter.class,
					new Class[] {
    ConfigurableApplicationContext.class }, context);
**具体逻辑:**从”META-INF/spring.factories”文件中读取SpringBootExceptionReporter类的实例名称集合,然后进行Set去重、利用反射实例化对象,最后按照Order排序。排序后的Set集合赋值到Collection类型的exceptionReporters对象上。

getSpringFactoriesInstances(Class)详细过程,见博文:《SpringBoot启动流程一》:万字debug梳理SpringBoot如何加载并处理META-INF/spring.factories文件中的信息。
8、第十步:Spring应用上下文运行前准备
Spring应用上下文运行前的准备工作由SpringApplication#prepareContext方法完成,根据SpringApplicationRunListener的生命周期回调又分为“Spring应用上下文准备阶段” 和 “Spring应用上下文装载阶段”。
prepareContext(context, environment, listeners, applicationArguments, printedBanner);
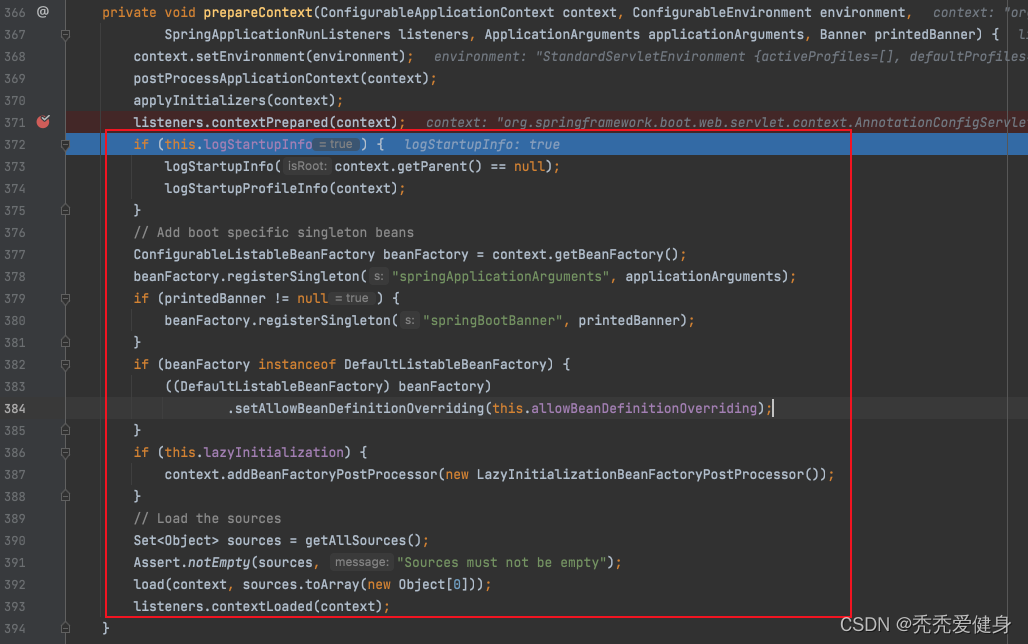
private void prepareContext(ConfigurableApplicationContext context, ConfigurableEnvironment environment,
		SpringApplicationRunListeners listeners, ApplicationArguments applicationArguments, Banner printedBanner) {

	// 设置应用上下文的environment
	context.setEnvironment(environment);
	// 应用上下文后置处理,默认只会将ConversionService添加到context的beanFactory中
	postProcessApplicationContext(context);
	// 应用一些初始化器,执行ApplicationContextInitializer,将所有的初始化对象放到context对象中。
	applyInitializers(context);
	// 发布 应用上下文初始化完成事件ApplicationContextInitializedEvent
	listeners.contextPrepared(context);
	if (this.logStartupInfo) {

		// 打印启动信息
		logStartupInfo(context.getParent() == null);
		// 打印active profile的信息
		logStartupProfileInfo(context);
	}
	// Add boot specific singleton beans
	// 注册启动参数bean,将容器指定的参数封装成bean,注入容器
	ConfigurableListableBeanFactory beanFactory = context.getBeanFactory();
	beanFactory.registerSingleton("springApplicationArguments", applicationArguments);
	// 设置banner
	if (printedBanner != null) {

		beanFactory.registerSingleton("springBootBanner", printedBanner);
	}
	if (beanFactory instanceof DefaultListableBeanFactory) {

		((DefaultListableBeanFactory) beanFactory)
				.setAllowBeanDefinitionOverriding(this.allowBeanDefinitionOverriding);
	}
	if (this.lazyInitialization) {

		context.addBeanFactoryPostProcessor(new LazyInitializationBeanFactoryPostProcessor());
	}
	// Load the sources
	// 加载所有资源(指的是启动器指定的参数)
	Set<Object> sources = getAllSources();
	Assert.notEmpty(sources, "Sources must not be empty");
	// 核心所在!!将我们自己的启动类bean、自动装配的内容 加载到上下文中
	load(context, sources.toArray(new Object[0]));
	// 发布 应用已准备好事件ApplicationPreparedEvent
	listeners.contextLoaded(context);
}
1)Spring应用上下文准备阶段
本阶段的执行从prepareContext()方法开始,到SpringApplicationRunListener#contextPrepared()运行截止;
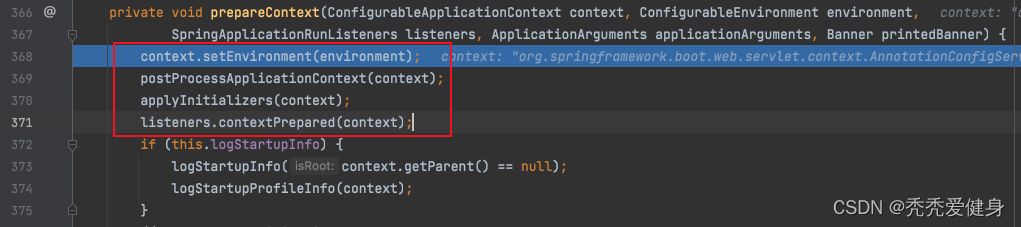
该阶段,
1> 首先context.setEnvironment(environment);将environment设置到Spring应用上下文中;
2> 其次postProcessApplicationContext(context);会做一些上下文后置处理,默认只会将ConversionService添加到context的beanFactory中
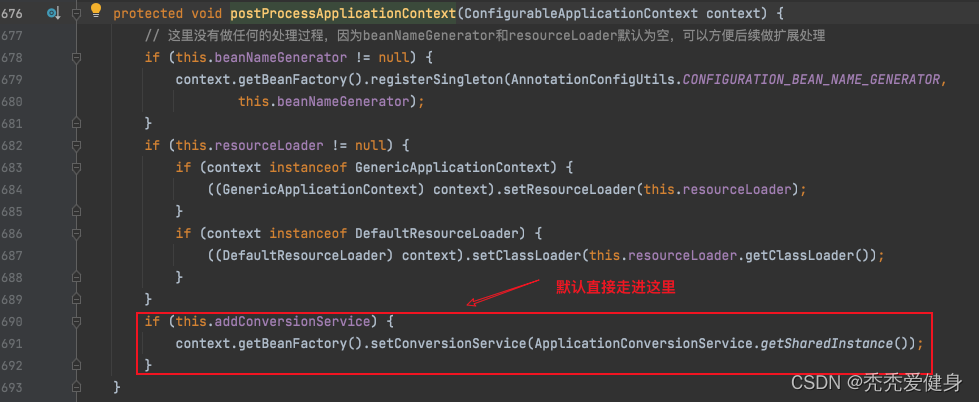
3> 接着applyInitializers(context);应用一些初始化器ApplicationContextInitializer,将所有的初始化器对象的相关内容放到Spring上下文context对象中。

其中getInitializers()方法直接从SpringApplication的initializers成员中获取7个初始化器,而initializers的初始化发生在SpringApplication构建阶段,参考博文:《SpringBoot启动流程二》:七千字源码分析SpringApplication构造阶段。

每个初始化器做的具体工作如下:
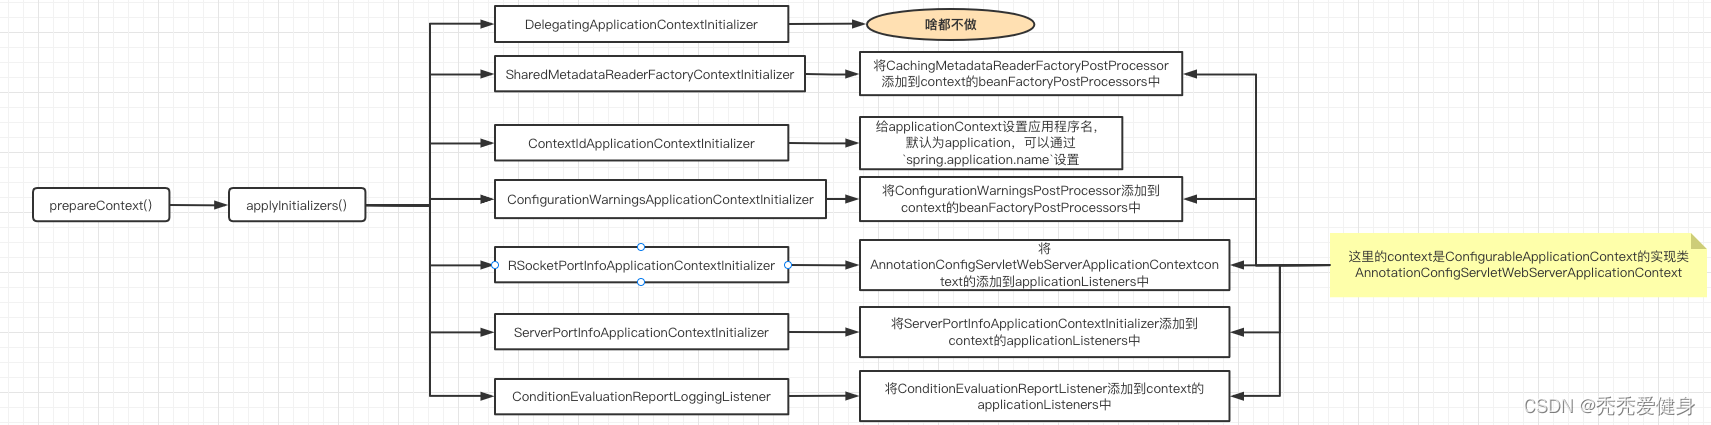
4> 接着listeners.contextPrepared(context);发布Spring上下文已经初始化完成事件ApplicationContextInitializedEvent
此处只有BackgroundPreinitializer和DelegatingApplicationListener两个事件监听器会处理ApplicationContextInitializedEvent事件,然而它俩处理逻辑中什么都没做。
至此,Spring应用上下文准备阶段内容全部结束,紧接着进入到Spring应用上下文装载阶段。
2)Spring应用上下文装载阶段
prepareContext()方法中的剩余逻辑全部为Spring应用上下文装载阶段。
本阶段又可划分为四个过程,分别为:“注册Spring Boot Bean”、“合并Spring应用上下文配置源”、“加载Spring应用上下文配置源” 和 “发布应用已准备好但未刷新事件ApplicationPreparedEvent”。
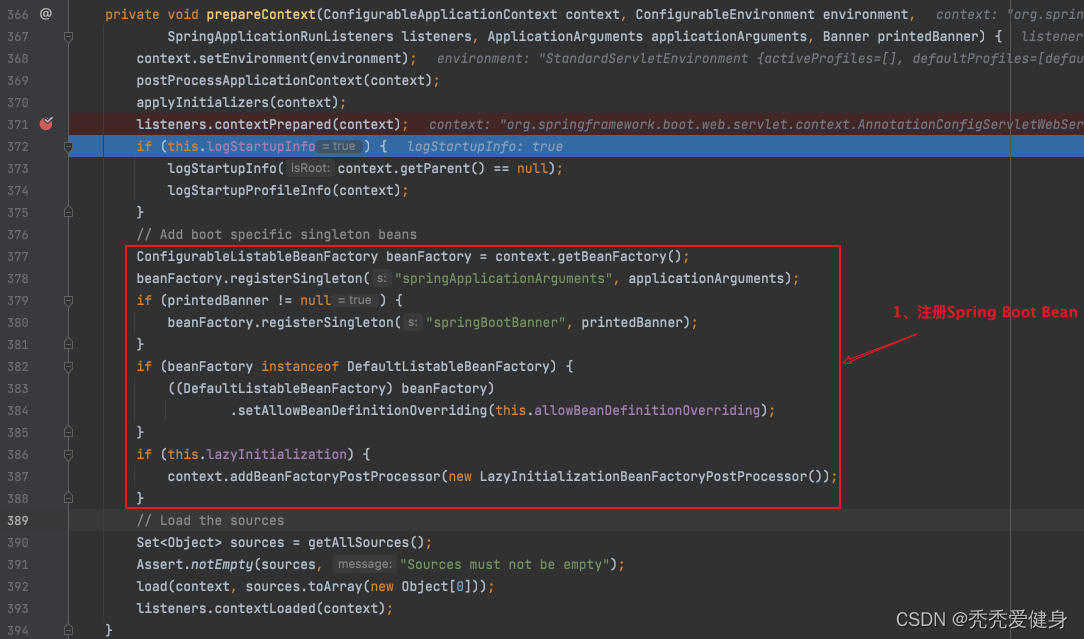
1> 注册Spring Boot Bean
SpringApplication#preparedContext()方法会将之前创建的ApplicationArguments对象和可能存在的Banner实例注册为Spring 单例Bean。
2> 合并Spring应用上下文配置源
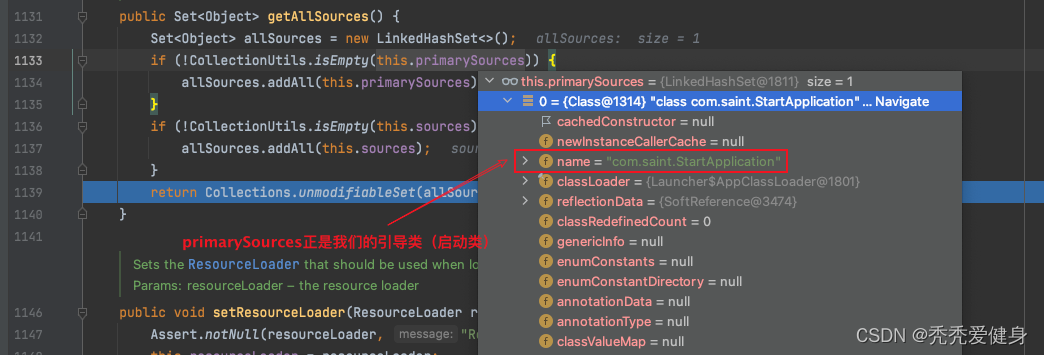
合并Spring应用上下文配置源的操作由getAllSources()方法实现。
Set<Object> sources = getAllSources();
public Set<Object> getAllSources() {

	Set<Object> allSources = new LinkedHashSet<>();
	// primarySources来自于SpringApplication构造器参数
	if (!CollectionUtils.isEmpty(this.primarySources)) {

		allSources.addAll(this.primarySources);
	}
	// sources来自于setSource(Set<Object>)方法
	if (!CollectionUtils.isEmpty(this.sources)) {

		allSources.addAll(this.sources);
	}
	return Collections.unmodifiableSet(allSources);
}
getAllASources()方法返回值是一个只读Set,它由两个子集合组成:属性primarySources和sources;前者来自来自于SpringApplication构造器参数、后者来自setSource(Set)方法。
3> 加载Spring应用上下文配置源
load(ApplicationContext, Object[])方法将承担加载Spring应用上下文配置源的职责:
load(context, sources.toArray(new Object[0]));
protected void load(ApplicationContext context, Object[] sources) {

	if (logger.isDebugEnabled()) {

		logger.debug("Loading source " + StringUtils.arrayToCommaDelimitedString(sources));
	}
	// 获取bean对象定义的加载器
	BeanDefinitionLoader loader = createBeanDefinitionLoader(getBeanDefinitionRegistry(context), sources);
	if (this.beanNameGenerator != null) {

		loader.setBeanNameGenerator(this.beanNameGenerator);
	}
	if (this.resourceLoader != null) {

		loader.setResourceLoader(this.resourceLoader);
	}
	if (this.environment != null) {

		loader.setEnvironment(this.environment);
	}
	// 实际执行load的是BeanDefinitionLoader中的load方法
	loader.load();
}
Spring应用上下文 Bean的装载任务SpringApplication委托给了BeanDefinitionLoader来完成。进入BeanDefinitionLoader#load()方法。
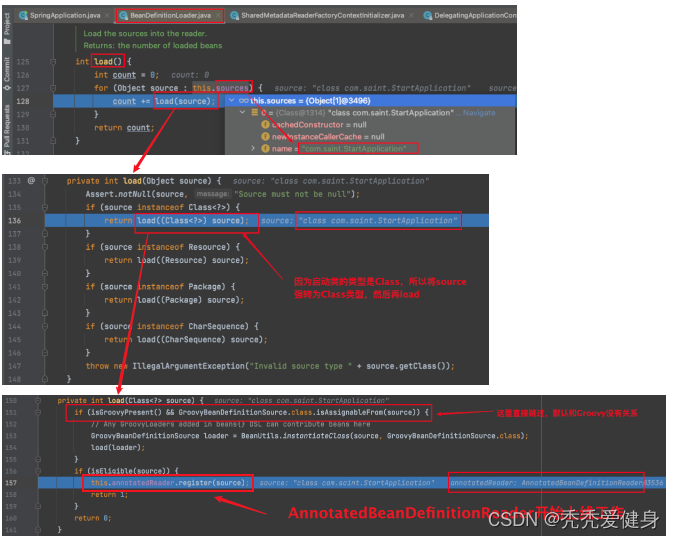
AnnotatedBeanDefinitionReader和ClassPathBeanDefinitionScanner配合使用,形成AnnotationConfigApplicationContext扫描和注册配置类的基础,并将配置类解析为Bean定义BeanDefinition。
我们接着跟AnnotatedBeanDefinitionReader#register()方法:
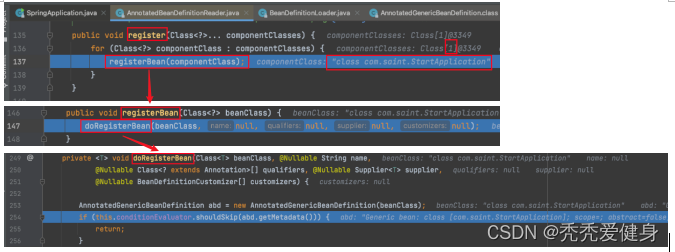
最后进入到doRegisterBean(Class,String,Class,Supplier,BeanDefinitionCustomizer[])方法,里面有些东西我们会很熟悉。
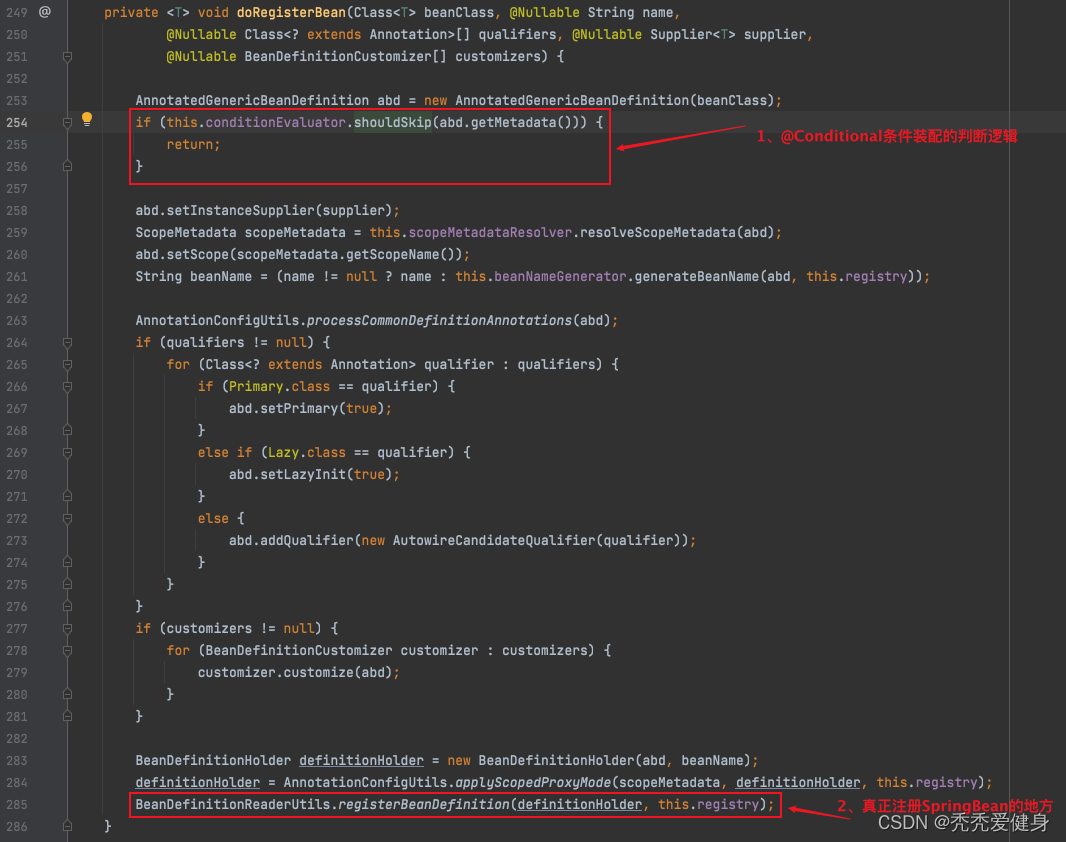
ConditionEvaluator.shouldSkip(AnnotatedTypeMetadata)方法会判断当前要注册的类有没有被@Conditional注解标注?是否应该跳过它的注册逻辑?
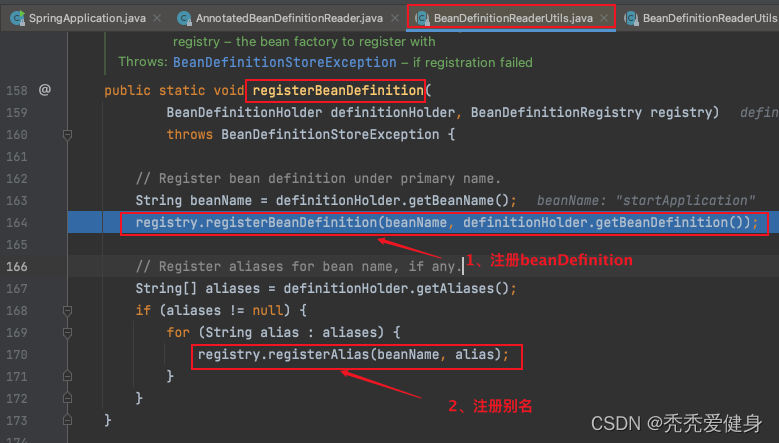
BeanDefinitionReaderUtils.registerBeanDefinition(BeanDefinitionHolder, BeanDefinitionRegistry);方法中真正将当前启动类注册为BeanDefinition,并且其中会涉及到Alias别名的处理。
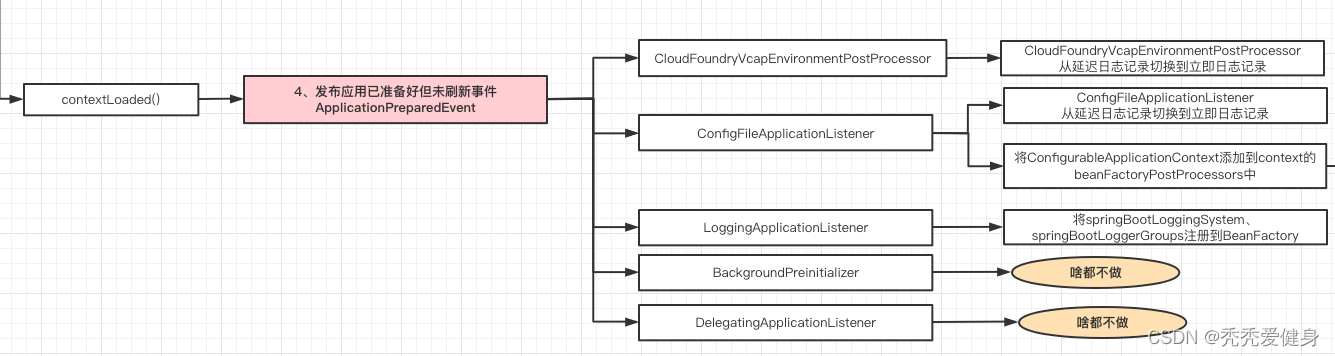
4> 发布应用已准备好但未刷新事件ApplicationPreparedEvent
listeners.contextLoaded(context);
当应用上下文准备之后,EventPublishingRunListener发布一个ApplicationPreparedEvent事件。
和前面发布事件的方式一样EventPublishingRunListener将Spring事件的发布委托给它SimpleApplicationEventMulticaster类型的成员initialMulticaster。具体细节和上文聊的第三.2步:发布应用启动事件ApplicationStartingEvent是一样的,参考其往里追即可。
在这个阶段,各个监听器做的内容如下:
三、next
当SpringApplicationRunListener#contextLoaded()方法执行完成后,Spring应用上下文(ConfigurableApplicationContext)运行前准备的各个操作都执行完毕。写一篇博文,我们把Spring应用上下文启动阶段、和启动后阶段做一个讨论。
发布者:全栈程序员-用户IM,转载请注明出处:https://javaforall.cn/195700.html原文链接:https://javaforall.cn
【正版授权,激活自己账号】: Jetbrains全家桶Ide使用,1年售后保障,每天仅需1毛
【官方授权 正版激活】: 官方授权 正版激活 支持Jetbrains家族下所有IDE 使用个人JB账号...
