大家好,又见面了,我是你们的朋友全栈君。如果您正在找激活码,请点击查看最新教程,关注关注公众号 “全栈程序员社区” 获取激活教程,可能之前旧版本教程已经失效.最新Idea2022.1教程亲测有效,一键激活。
Jetbrains全系列IDE使用 1年只要46元 售后保障 童叟无欺
注:语言只是工具,都是为了帮助我们更好地实现具体场景中的流程。JavaScript作为前端的脚本语言,非常容易简单上手。本博客较为简练地描述了其基本功能,并没有书写很详细。有C语言基础的同学(很多和C语言的语法相似)看起来非常易懂。
概述
- 所有的代码必须写在<script type=“text/javascript”> 当中。如果需要引用外部的js文件,格式为 <script type=“text/javascript” src=“XXXXX”></script> src为链接的外部地址 而此时所有的代码必须为外部文件,写在其中的代码无效。
- 每一句js语句后面都要跟上分号
- 为了语法规范,script标签应该写在head标签当中,且可以引入多个script标签表示不同功能块
- <可以表示为<, >可以表示为>,不然程序不能输出<script> 需要进行替换(注意,不要忘记后面的分号)
- 注释的快捷键依然是ctrl+/
基本语法
数据类型
- 基本数据类型
- 数字 number 100
- 字符串 string “hello world”
- 布尔值 boolean ture/false
- 特殊数据类型 null空 undefined未声明(在参与运算的时候,null转变为0, undefined转变为Nan)
任何数据类型数据和字符串进行相加运算时,都是拼接运算。
任何数据类型数据和字符串进行其他运算的时候,会先转化为数字,否则转化为Nan。例如:
1-'2' = 1-2=-1
1-"2a" = Nan
强制数据类型转换
Boolean()强制转化为布尔值
alert(Boolean(1))
alert(Boolean(0))// null和undefined转化为布尔值都是false


Number()将别的数据类型强制转化为数字
1.布尔值 true->1 flase->0
2.字符串 纯数字字符串->对应的数字 否则Nan
2.特殊数据类型 null->0 undefined->Nan

parseInt()除了转化为数字,还有取整的功能
alert(parseInt("20a")) //这个可以转化为数字20 Number("20a")则不可以转化
alert(parseInt(3.14)) //这个可以转化为数字20 Number("20a")则不可以转化

parseFloat()转化为浮点型
alert(parseFloat("3.14"))
声明变量:
var age = 18, height = 175;//可以声明多个变量,中间用,隔开
alert(typeof age)//可以输出变量类型
运算符
算数运算符:加+ 减- 乘* 除/ 取余% 自增++ 自减- – *= /=
关系运算符:等于== 不等于!= 大于> 小于< 大于等于>= 小于等于<=
逻辑运算符:&&与 ||或 非!
三目运算:
alert(1>2?"1大":"2大");//如果1大输出“1大”,否则输出"2大"
流程控制
顺序执行
选择执行
if-else if-else
<!DOCTYPE html>
<html>
	<head>
		<meta charset="utf-8">
		<title></title>
		<script type="text/javascript" >
			var a = 50;
			if(a>=90 && a<=100){

				alert("优秀");
			}else if(a>=80 && a<90){

				alert("良好");
			}else if(a>=60 && a<80){

				alert("合格");
			}else{

				alert("不合格");
			}

		</script>
	</head>
	<body>
	</body>
</html>
switch
<!DOCTYPE html>
<html>
	<head>
		<meta charset="utf-8">
		<title></title>
		<script type="text/javascript" >
			var a =3;
			switch(a){

				case 1:
					alert("1");
					// break;
				case 2:
					alert("2");
					break;
				default:
					alert("not all!")
					break;
			}

		</script>
	</head>
	<body>
	</body>
</html>
循环执行
while do…while… for循环都和C一样。
continue break都和C一样。
函数
fuction 函数名(形参1, 形参2,…){
代码(也带有返回值)
}//形参不需要指定数据类型
<!DOCTYPE html>
<html>
	<head>
		<meta charset="utf-8">
		<title></title>
		<script type="text/javascript" >
			function add_num(num1, num2){

				a = num1+num2
				return a
			}
			alert(add_num(2,3))
		</script>
	</head>
	<body>
	</body>
</html>
arguement:在不确定有多少个形参的情况下,用这个对象(数组)来接受所有的传入的数据。
<!DOCTYPE html>
<html>
	<head>
		<meta charset="utf-8">
		<title></title>
		<script type="text/javascript" >
			function add_num(){

				alert(arguments.length);
				var sum=0;
				for(var i=0; i<arguments.length; ++i){

					sum += arguments[i];
				}
				alert(sum);
			}
			add_num(1,2, 3,4,5)
		</script>
	</head>
	<body>
	</body>
</html>
数组
语法:
1.var a = new Array(1,2,'Hello world!');
2.var a =  Array(1,2,'Hello world!');
3.var a = [1,2,'Hello world!']; //其中第三种较为常用
数组的遍历
var a = []
for(var i=0; i<10; ++i){

	a[i]=Math.random()
}
alert(a);

或者用for...in...
var a = ["blue", "red", "purple"];
for(var idx in a){

	document.write(a[idx]+"<br />");
}
栈方法
a.push():在末尾添加元素,返回值是新的数组
a.pop():移除末尾的最后一个元素,返回值是移除的元素
a.shift():取下头部的一个元素,返回值是移除的元素
a.unshift(元素1,元素2,…):在数组的头部插入任意个元素,返回值是新的数组的个数。
a.concat(b):将两个数组合并为一个新的数组,原来的数组并不会被改变。
a.slice(start, end):切片
a.splice(pos,num):表示在第pos位置,删除之后的num个元素
a.splice(pos,0,元素1,元素2,…),表示在pos后面,插入多个元素
a.aplice(pos, num, 元素1,元素2,…)表示先删除num个元素,然后插入多个元素。
var a = ["blue", "red", "purple"];
a.splice(1,1,"插入1", "插入2")
alert(a)
a.indexOf(b, startindex):从startindex之后开始查找b在a中的索引
forEach():遍历数组
var x = [11, 2, 3, 4, 5]
x.forEach(function(item, index, array){

		alert(item + "," + index + "," + array)
})
map遍历数组
var a = [10, 20, 30]
var newArr = a.map(function(item, index, array){

	return item + 2;
})
alert(newArr)
reduce归并
var a = [10, 20, 30, 40, 50];
var res = a.reduce(function(pre, next, index, array){

	alert(pre+","+next);
	return pre + next;
})
alert(res);
/* pre指上一次的值,next指这一次的值。 然后将两次的值相加,作为新的pre 最后的返回值,是所有元素之和。 */
filter过滤
var a = [10, 20, 30, 40, 50];
			var res = a.filter(function(item, index, array){

				return item>30
			})
			alert(res);
some:判断ruturn的判断式是否成立,如果是返回true,否则为false
var a = [10, 20, 30, 40, 50];
var res = a.some(function(item, index, array){

	return item == 60
})
alert(res);
//判断是否存在60这个数。只要有些成立就好了。并不需要全部一旦有一个匹配了,后面就不会执行。
every:判断每一个都一样
var a = [60, 60, 60, 60, 60];
var res = a.every(function(item, index, array){

	return item == 60
})
alert(res);
a.join(连接符)
二维数组
var a = [];
var count=1;
for(var i=0; i<5; ++i){

	tmp = [];
	for(var j=0; j<5; ++j){

		tmp.push(count++);
	}
	a.push(tmp);
}
alert(a);
for(var i=0; i<a.length; ++i){

	for(var j=0; j<=i; ++j){

		document.write(a[i][j]+" ");

	}
	document.write("<br>")
}
排序
系统提供了:
a.reverse():从大到小
a.sort():从小到大(这个是按照字符序,而不是数字大小,例如15比5小)
冒泡排序:
两个相邻的元素依次比较,如果前一个小于后一个,则进行交换(从大到小排列的话),那么此时最后一个元素一定是最小的。
然后不管最后一个位置,其余位置重复步骤一即可。

var a = [1,4,6,4,8,9,0,-1]
var flag=0
for(var i=a.length-1; i>0; --i){

	flag=0;
	for(var j=1; j<=i; ++j ){

		if (a[j] < a[j-1]){

			var tmp = a[j-1];
			a[j-1]=a[j];
			a[j] = tmp;
			flag=1;
		}
	}
	if(flag==0){

		break;
	}// 如果在某一次都没有发生交换,证明已经是有序的。
}
alert(a);
选择排序
从第0个位置开始,依次和后面元素比较,将最大的值放在a[0]
从第1个位置开始,依次和后面元素比较,将第二大的值放在a[1]
以此类推…
var a = [1,4,6,4,8,9,0,-1]
for(var i=0; i<a.length-1; ++i){

	var max = i
	for(var j=i+1; j<a.length; ++j){

		if(a[j]>a[max]){

			max = j
		}
	}
	var tmp = a[i]
	a[i] = a[max]
	a[max] = tmp
}
alert(a);
引用数据类型
/* 所有的复合数据类型不直接存储在函数中,二是存储在内存的堆栈中。函数中保留的只是地址 函数运行的内容空间是实现分配好的,不能进行改变(因此函数运行结束,内存就被释放了,值就不会保留住) 但是在堆栈中,我们需要多少内存,就可以重新划分多少内存 所有的复合数据类型,存储的都是地址,因此也叫引用数据类型(例如数组) */


// var a = 10
// function show_1(a){

// a = 5;
// alert(a)
// }
// alert(a)
// show_1(a)
// alert(a)

var a = [1,2,3]
function show(a){

	a.push(1,2)
	alert(a)
}
alert(a)
show(a)
alert(a)
字符串
语法
1.var a = new String("hello")
2.var a = String("hello")
3.var a = "hello world"
字符串的值不能被更改。
a.charCodeAt(下标):返回对应下标元素的ASCII码
String.fromCharCode(97, 98, 99) :返回对应ASCII码对应的字符(返回的是字符串)
a.concat(b):拼接操作,但是用+号会更加方便。
a.indexOf(b):b在a中第一次出现的位置
a.lastIndexOf(b):b在a中最后一次出现的位置
a.replace(b,c):将a中的b用c替换。可以用正则表达式需要两边加斜杠:/正则表达式/
<html>
<body>

<script type="text/javascript">

var str="Welcome to Microsoft! ";
str=str + "We are proud to announce that Microsoft has ";
str=str + "one of the largest Web Developers sites in the world.";
document.write(str.replace(/Microsoft/g, "W3School"));
//g表示全局匹配,i表示忽略大小写
</script>

</body>
</html>
a.substring(start, end):切片
a.split(分隔符) : 分隔符可以是空格等 a.split(“”):会分割为单独的字母
a.toLowerCase:全部小写
a.toUpperCase:全部大写
user strict
math对象
alert(Math.round(3.5));//四舍五入 4
alert(Math.random());//0-1之间随机数
alert(Math.max(10,20,30));//返回较大数 30
alert(Math.min(10,20,30));//返回较小数 10
alert(Math.abs(-10));//返回绝对值 10
alert(Math.ceil(3.1));//向上取整 4
alert(Math.floor(3.9));//向下取整 3
alert(Math.pow(2, 5));//32
alert(Math.sqrt(4));//开平方 2
//Math.sin()/cos()/tan() //正弦/余弦/正切 参数得是弧度制
alert(Math.sin(30 * Math.PI / 180));
alert(Math.cos(60 * Math.PI / 180));
日期对象
创建日期对象
var d = Date(); //如果不传参数,系统默认是我们当前的时间
var d =  new Date("2021/04/22")
var d = new Date("2015-04-22")
var d = new Date(2015, 4, 22, 12, 35, 55) //时分秒
var d = new Date(1000) //单位是毫秒,1000毫秒=1秒
alert(d)
日期对象的方法
var a = new Date()
alert(a.toDateString())// Sat May 08 2021
alert(a.toTimeString()) // 00:23::30 GMT+0800
alert(a.toLocaleDateString()) // 2021年8月8日
alert(a.toUTCString()) //Fri, 07 May 2021 16:26:15 GMT
alert(a.getDate()) // 8
alert(a.getDay()) // 6
alert(a.getMonth()) // 4 外国是0-11月
alert(a.getFullYear()) // 2021
alert(a.getHours()) // 0
alert(a.getMinutes()) // 29
alert(a.getSeconds()) //25
alert(a.getMilliseconds()) // 425 毫秒
alert(a.getTime()) // 返回1970年1月1日至今的毫秒数(1970是unix被创造的时间)
alert(a.getTimezoneOffset()) // -480 与格林威治标准时间GMT的分钟差
/*注意:所有的get表示获取时间,同样可以改为set,表示设置时间 例如:a.setDate()*/
alert(Date.parse("2015-08-22")) // 返回1970年1月1日至某个日期的毫秒数
小例子
//输出当前的时间
function showDate(){

var a = new Date()
year = a.getFullYear() //年
month = a.getMonth() + 1 //月
day = a.getDate() //
week = a.getDay()
if(week==0)week="日"

hour = a.getHours()
minute = a.getMinutes()
second = a.getSeconds()
alert(year + "年" + month + "月" + day + "日" + " 星期" + week + " " + hour
+ ":" + minute + ":" + second
)

}
showDate()
定时器
/* 格式:setInterval(函数,毫秒数) 每隔所传参数的毫秒数,就调用一次所传的函数 返回值:当前页面上对于该定时器的唯一标识,即定时器的ID clearInterval(ID):取消定时器 */
var i=0;
setInterval(function printNum(){

	document.write(i++ + "<br />");
},1000)
innerHTML
获取标签中的所有内容
<!DOCTYPE html>
<html>
	<head>
		<meta charset="utf-8">
		<title></title>
		<script type="text/javascript" >


			//innerHTML获得标签间的所有内容

			window.onload = function(){

				var oBtn = document.getElementById("btn");
				var oDiv = document.getElementById("div1");
				oBtn.onclick = function(){

					alert(oDiv.innerHTML);
				}
				oDiv.innerHTML = "<h1>我是替换后的内容</h1>"
			}


		</script>
	</head>
	<body>
		<div id="div1">
			<em>目前的内容</em>
		</div>
		<input type="button" name="" id="btn" value="按钮" />

	</body>
</html>
小例子,秒表的实现
<!DOCTYPE html>
<html>
	<head>
		<meta charset="utf-8">
		<title></title>
		<script type="text/javascript" >
			//将查找标签节点的操作简化
			function $(id){

				return document.getElementById(id);
			}
			function show(count){

				if(count<10){

					return '0' + count;

				}else{

					return count;
				}
			}
			window.onload = function(){

				var count=0;
				var timer=null;
				$("start").onclick = function(){

					timer = setInterval(function(){

						count++;
						//需要改变页面上的时分秒
						$("id_S").innerHTML = show(count % 60);
						$("id_M").innerHTML = show(parseInt(count / 60) % 60);
						$("id_H").innerHTML = show(parseInt(count / 3600));
					}, 100)
				}

				$("pause").onclick = function(){

					clearInterval(timer)
				}

				$("stop").onclick = function(){

					clearInterval(timer);
					count=0;
					$("id_S").innerHTML = "00";
					$("id_M").innerHTML = "00";
					$("id_H").innerHTML = "00";
				}
			}
		</script>
	</head>
	<body>
		<div id="div1">
			<div id="count">
				<span id="id_H">00</span>:
				<span id="id_M">00</span>:
				<span id="id_S">00</span>
			</div>
			<input type="button" name="" id="start" value="开始" />
			<input type="button" name="" id="pause" value="暂停" />
			<input type="button" name="" id="stop" value="停止" />
		</div>

	</body>
</html>
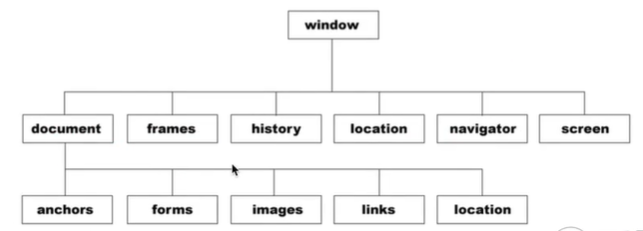
BOM
BOM: browser object model 就是浏览器的对象模型
windows对象:整个浏览器
方法:警告框
//普通警告框
window.alert("警告框")
// 带有确认和取消的警告框,如果选择确定,返回值是true,否则为false
window.confirm("警告框")
// 带有输入信息的警告框,第一个参数为警告框显示的内容,第二个是输入框中默认的内容
//点击确认,返回值是输入的内容,点击取消,返回值是null
window.prompt("警告框", "默认值")
方法:window.open()
opener.document.write(“”) : opener可以在子窗口打开父窗口,然后进行控制。
//一个参数
// window.onload = function(){

// var oBtn = document.getElementById("btn")
// oBtn.onclick = function(){

// window.open("http://www.baidu.com")
// }
// }
//如果是两个参数,一位置该窗口名字固定,重新点击按钮的时候不会打开新的窗口
// window.onload = function(){

// var oBtn = document.getElementById("btn")
// oBtn.onclick = function(){

// window.open("http://www.baidu.com", "百度")
// }
// }
//第三个参数可以规定打开的窗口的大小
// window.onload = function(){

// var oBtn = document.getElementById("btn")
// oBtn.onclick = function(){

// window.open("http://www.baidu.com", "百度", "width=400, height=400, top=200, left=200")
// }
// }
location对象:指的浏览器上的地址栏
基本属性:
/* url构成形势: url: protocal(协议):host(主机名):port(端口号)/pathname(路径名)?search(查询字符串)#hash(锚点) http://www.baidu.com:8080/code/xxx.html?uername=xxx&age=18#1 */
alert(location.hash) // 锚点
alert(location.host) // IP地址+端口号
alert(location.hostname) //域名或者IP
alert(location.href) //加载了整个页面
alert(location.pathname) //路径名
alert(location.port) //端口号
alert(location.protocol) //协议
alert(location.search) // 跟在?后边的部分
一个关于search的例子,获取?后面的用户信息
function search(express, key){

	var start = express.indexOf(key)
	if(start == -1){

		return ;
	}else{

		var end = express.indexOf("&")
		if(end==-1){

			end = express.length
		}
	}
	target = express.substring(start, end)

	alert("键:" + target.split("=")[0] + "值:" + target.split("=")[1])
}
url = "?id=huang&age=18";
search(url, "id")
常用方法
window.onload = function(){

	var oBtn = document.getElementById("btn")
	oBtn.onclick = function(){

		// location.assign("http://www.baidu.com") // 在当前页面加载一个新的页面, 注意可以退回
		// location.replace("http://www.baidu.com") // 在当前页面加载一个新的页面, 注意不可以退回
		location.reload("http://www.baidu.com") //重新加载一个页面
	}
}
history对象
history是window对象的属性,表示用户的上网记录。
window.onload = function(){

	var oBtn = document.getElementById("btn");
	oBtn.onclick = function(){

		//历史记录的条数。手动在网址上添加#1, #2, #3增加访问记录
		alert(history.length)
	}

	var oforward = document.getElementById('forward');
	oforward.onclick = function(){

		history.forward()
	}

	var obackward = document.getElementById('backward');
	obackward.onclick = function(){

		history.back()
	}
	// go:
	// 参数:0 重载当前页面,
	// 参数:正数 前进对应的页面数,
	// 参数:负数 后退对应的页面数

	var ogo = document.getElementById('go');
	ogo.onclick = function(){

		history.go(1)
	}
}
DOM
DOM:document object model
HTML:网页结构
CSS:页面样式
JavaScript:页面的操作行为
- BOM:浏览器对象
- DOM:对html文档的操作的API接口
- ECMAScript:规定了JavaScript的语法
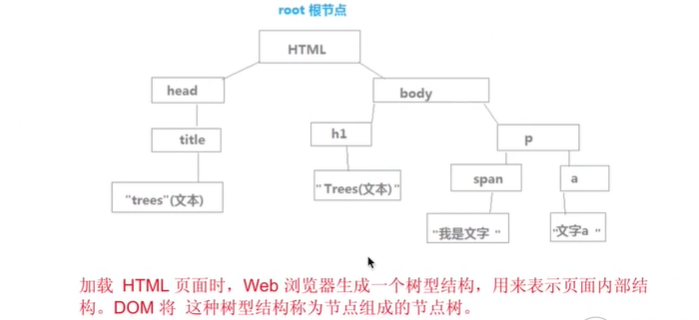
DOM中,一共有三类节点:
例如一条语句:<div title=“china”>我是中国人</div>
元素节点:<div></div>
属性节点:title=“china”
文本节点:我是中国人
元素节点
获取元素节点可以用document.getElementById()获得
.tagName:标签名
.innerHTML:标签间的内容
还可以访问html的一些标签属性,例如title, style,className等。
<!DOCTYPE html>
<html>
	<head>
		<meta charset="utf-8">
		<title></title>
		<script type="text/javascript" >

			window.onload = function(){

				var odiv = document.getElementById('div1')
				alert(odiv)
				alert(odiv.tagName)
				alert(odiv.innerHTML)
				alert(odiv.className) //不用直接用class,要用className
				alert(odiv.title)
				alert(odiv.style.height)
				alert(odiv.style.width)
				alert(odiv.style.backgroundColor)//把斜杠去掉,然后color的首字母大写
			}

		</script>
	</head>
	<body>
		<div id="div1" class="box" title="china" style="width: 200px; height: 200px; background-color: red;">111	</div>

	</body>
</html>
document.getElementsByTagName()也可以获得元素节点
<!DOCTYPE html>
<html>
	<head>
		<meta charset="utf-8">
		<title></title>
		<script type="text/javascript" >

			//访问全部的li
			// window.onload = function(){

			// var li_content = document.getElementsByTagName("li")
			// alert(li_content.length)
			// for(var i=0; i<li_content.length; ++i){

			// alert(li_content[i].innerHTML)
			// }

			// }

			//访问第一组li
			window.onload = function(){

				var li_content = document.getElementById('ul1')
				var ul_content = li_content.getElementsByTagName('li')
				for(var i=0; i<ul_content.length; ++i){

					alert(ul_content[i].innerHTML)
				}
			}

		</script>
	</head>
	<body>
		<ul id="ul1">
			<li>1</li>
			<li>2</li>
			<li>3</li>
			<li>4</li>
		</ul>
		<ol>
			<li>5</li>
			<li>6</li>
			<li>7</li>
			<li>8</li>
		</ol>

	</body>
</html>
document.getElementsByName()也可以获得元素节点,但是这个只支持从document查,不支持从某一个节点开始查。
document.getElementsByClassName() 查找class
注意:document.getElementsByClassName() 在低版本下不支持,可以采用一个封装的函数来查找
function elementByClass(parent, classStr){

	var nodes = parent.getElementsByTagName('*') //用通配符找到所有的内容
	var result = [];
	for(var i=0; i<nodes.length; ++i){

		if(nodes[i].className = classStr){

			result.push(nodes[i])
		}
	}
	return result
}
//先找到所有的标签,然后去匹配对应的标签
获取当前样式
<!DOCTYPE html>
<html>
	<head>
		<meta charset="utf-8">
		<title></title>
		<style type="text/css">
			div{

				background-color: green;
				width: 300px;
			}
		</style>
		<script type="text/javascript" >

		/* 注意:这样的写法只能获得行间的样式,如果吧width写在了head的style中,这种获取, 当前样式的方法就不行. window.onload = function(){ var odiv = document.getElementById('div1'); alert(odiv.style.width) } */
	   /* 在Chrome中使用 window.onload = function(){ var odiv = document.getElementById('div1'); alert(getComputedStyle(odiv)["width"]) } */
	  /* 在IE浏览器中使用 window.onload = function(){ var odiv = document.getElementById('div1'); alert(odiv.currentStyle["width"]) } /* 二者兼容 */

	  function getStyle(elem, atter){

		  return elem.currentStyle ? elem.currentStyle[atter] : getComputedStyle(elem)[atter]
	  }
	  window.onload = function(){

	  		   var odiv = document.getElementById('div1');
	  		   alert(getStyle(odiv, "width"))
	  }
		</script>
	</head>
	<body>
		<div id="div1" class="box" style="height: 300px;">

		</div>

	</body>
</html>
修改和增加属性值
<!DOCTYPE html>
<html>
	<head>
		<meta charset="utf-8">
		<title></title>
		<style type="text/css">
			div{

				background-color: green;
				width: 300px;
			}
		</style>
		<script type="text/javascript" >

		/*方法1:可以采用 . 的方式进行修改 window.onload = function(){ var odiv = document.getElementById('div1'); odiv.className = "Huang" }*/

		/* set/get/removeAttribute() */
		window.onload = function(){

			var odiv = document.getElementById('div1');
			odiv.setAttribute("self", "XXX") // 可以自定义一些属性,方法1不行
			odiv.setAttribute('class', 'china') // 方法1用的是className
			alert(odiv.getAttribute('class'))

		}
		</script>
	</head>
	<body>
		<div id="div1" class="box" style="height: 300px;">
		</div>

	</body>
</html>
获取子节点元素
<!DOCTYPE html>
<html>
	<head>
		<meta charset="utf-8">
		<title></title>
		<style type="text/css">
			div{

				background-color: green;
				width: 300px;
			}
		</style>
		<script type="text/javascript" >
		/* 节点可以分为元素节点、属性节点和文本节点,而这些节点又有三个非常常见的属性: 节点类型 nodeName nodeType nodeVaule 元素节点 元素名称 1 null 属性节点 属性名称 2 属性值 文本节点 #text 3 文本内容 */
		window.onload = function(){

			odiv = document.getElementById('div1')
			alert(odiv.childNodes) //获取所有的子节点
			alert(odiv.childNodes.length) //获取多少个子节点

			//可以获取的odiv中的元素可以分成两类:元素节点和文本节点
			//元素节点
			alert(odiv.childNodes[0].nodeName) //EM
			alert(odiv.childNodes[0].nodeType) //1
			alert(odiv.childNodes[0].nodeValue) //null

			//文本节点
			alert(odiv.childNodes[1].nodeName) //#text
			alert(odiv.childNodes[1].nodeType) //3
			alert(odiv.childNodes[1].nodeValue) //文本内容

			//其他
			alert(odiv.firstChild.nodeName)
			alert(odiv.lastChild.nodeName)
		}
		</script>
	</head>
	<body>
		<div id="div1"><em>斜体</em>文本内容<strong>粗体</strong></div>

	</body>
</html>
删除子空白的文本节点
<script type="text/javascript" >
alert(/^\s+$/.test("1 "))  //正则表达式用来半盘左侧是不是空白字符串

function removeSpaceNode(nodes){

	var res = [];
	for(var i=0; i<nodes.length; ++i){

		if(nodes[i].nodeType == 3 && /^\s+$/.test(nodes[i].nodeValue)){

			continue;
		}else{

			res.push(nodes[i]);
		}
	}
	return res
}
window.onload = function(){

	var odiv = document.getElementById('div1');
	alert("未操作之间的节点数" + odiv.childNodes.length)
	res = removeSpaceNode(odiv.childNodes)
	alert("操作之后的节点数" + res.length)
}
</script>
属性节点
<!DOCTYPE html>
<html>
	<head>
		<meta charset="utf-8">
		<title></title>
		<style type="text/css">
			div{

				background-color: green;
				width: 300px;
			}
		</style>
		<script type="text/javascript" >
		window.onload = function(){

			var odiv = document.getElementById('div1');
			alert(odiv.parentNode.nodeName) //找到父节点
			alert(odiv.nextSibling.nodeName) //同级的上一个节点
			alert(odiv.previousSibling.nodeName) //同级的下一个节点
			alert(odiv.attributes) //是所有属性的集合,没有顺序,不能通过下标查找
			alert(odiv.attributes.length)
			alert(odiv.attributes.getNamedItem('id')) //这样就得到了属性节点
			alert(odiv.attributes["id"])//这样就得到了属性节点 ,作用同上


			alert(odiv.attributes["id"].nodeType) //属性节点的类型代号
			alert(odiv.attributes["id"].nodeName) //属性节点的名称
			alert(odiv.attributes["id"].nodeValue)//属性节点的值
		}
		</script>
	</head>
	<body>
		</div><div id="div1" title="chine" class="box"><em>斜体</em>文本内容<strong>粗体</strong></div>
	</body>
</html>
元素节点的操作
创建节点:document.createElement(“”)
插入节点:parent.appendChild(newNode) 在父节点下进行插入,放在最后
插入文本节点:document.createTextNode(“文本内容”)
在某个节点元素之前插入:parent.insertBefore(要插入的节点,旧节点)
替换节点:parent.replace(nexNode, oldNode)
克隆新节点:node.cloneNode()返回值是新的节点。参数默认是false,如果是true,就会复制其原节点的innerHTML
<!DOCTYPE html>
<html>
	<head>
		<meta charset="utf-8">
		<title></title>
		<style type="text/css">

		</style>
		<script type="text/javascript" >

		window.onload = function(){

			var obtn = document.getElementById('btn') //获取按钮元素对象
			var odiv= document.getElementById('div1') // 获取父元素对象
			obtn.onclick = function(){

				var node = document.createElement("span") //创建了元素节点
				var insert_before_node = document.createElement("前增节点") //这个是需要插入的节点
				var insert_after_node = document.createElement("后增节点") //这个是需要插入的节点
				var otext = document.createTextNode("需要增加的文本内容") //创建了文本节点
				node.appendChild(otext) // 将文本的内容加入到
				odiv.appendChild(node) //将子元素节点插入父元素节点
				odiv.insertBefore(insert_before_node, node)
				odiv.appendChild(insert_after_node) //因为这里已经是最后一个节点了,直接appendchild即可。如果不是,则需要:odiv.nextSibling.insertBefore
				/* 注意,没有insertAfter这种节点,如果需要添加,可以先找到下一个节点 然后用下一个节点的上一个节点来表示: */
			}
		}
		</script>
	</head>
	<body>
		<div id="div1"></div>
		<input type="button" name="" id="btn" value="按钮" />
	</body>
</html>
事件
JavaScript事件是由访问Web页面的用户引起的一系列操作。可以分为:鼠标事件、键盘事件、HTML事件。所有的事件处理函数可以由两部分组成:on+事件名称
常用事件
- onclick :鼠标点击
- onmousedown:点击鼠标
- onmouseup:松开鼠标
- onmouseover:鼠标滑过
- onsubmit:提交表单
- onfocus:鼠标单击文本框
- onblur:失去焦点,例如没有点击文本框了
- onchange:文本框内容发生了变化
- oninput: 输入了内容,每输入一个字符,就触发一次
- onkeypress:按下字符键触发
- onkeydown:按下任意键触发
	<!DOCTYPE html>
	<html>
		<head>
			<meta charset="utf-8">
			<title></title>
			<style type="text/css">
				#div1{

					width: 200px;
					height: 200px;
					background-color: red;
				}
			</style>
			<script type="text/javascript" >
				window.onload = function(){

					var odiv = document.getElementById('div1')

					odiv.onclick = function(){

						console.log("onclick")
					}
					odiv.onmousedown = function(){

						console.log("onmousedown")
					}
					odiv.onmouseover = function(){

						console.log("onmouseover")
					}
					odiv.onmouseup = function(){

						console.log("onmouseup")
					}

					var oform = document.getElementsByTagName("form")[0];
					var oinput = document.getElementsByTagName("input")[0];

					oform.onsubmit = function(){

						console.log("submit")
						return false;
					}
					oinput.onfocus = function(){

						console.log("onfocus")
					}
					oinput.onblur = function(){

						console.log("onblur")
					}
					oinput.onchange = function(){

						console.log("onchange")
					}
					oinput.oninput = function(){

						console.log("oninput") //
					}

				}

			</script>
		</head>
		<body>
			<div id="div1">

			</div>
			<form>
				<input type="text" value=""/>
				<input type="submit" name="" id="" value="submit" />
			</form>
		</body>
	</html>
事件对象
输出有关于一些event的属性
<script type="text/javascript" >
	window.onload = function(e){

		console.log(e || window.event)	//这里是为了浏览器兼容问题
	}
</script>
- offsetX, offsetY:对立当前对象的位置(考虑滚轮)
- clientX, clientY:距离有效区域的位置(考虑滚轮)
- pageX,pageY:距离整个页面的位置(考虑滚轮)
- screenX, screenY:距离整个页面的绝对位置(不考虑滚轮)
<!DOCTYPE html>
<html>
	<head>
		<meta charset="utf-8">
		<title></title>
		<style type="text/css">
			html, body{

				margin: 0; padding: 0;
			}
			#div1{

				width: 200px;
				height: 3000px;
				border:1px black solid;
				margin: 10px;

			}
			span{

				white-space: pre;
			}
		</style>
		<script type="text/javascript" >
			window.onload = function(){


				var odiv = document.getElementById("div1");
				var ospan = odiv.getElementsByTagName("span")[0];

				odiv.onclick = function(e){

					var evt = e || window.event;

					ospan.innerHTML = "x_client:" + evt.clientX + ' ' + "y_client:" + evt.clientY  + '\n'//距离页面的有效区域(空白区域)的距离
										+ "x_offset:" + evt.offsetX + ' ' + "y_offset:" + evt.offsetY + '\n' //距离这个盒子边框的距离
										+ "x_screen:" + evt.screenX + ' ' + "y_screen:" + evt.screenY + '\n' //距离整个网页的左边距,和上边距
										+ "x_page:" + evt.pageX + ' ' + "y_page:" + evt.pageY + '\n' //距离整个网页的左边距,和上边距(注意,因为有滑动的标记,因此还要加,具体看数据)
				}
				odiv.onmouseout = function(){

					ospan.innerHTML = ""
				}

			}
		</script>
	</head>
	<body>
		<div id="div1">
			<span></span>
		</div>

	</body>
</html>
- altKey:判断键盘上的alt键是否按下
- ctrlKey:判断键盘上的ctrk键是否按下
- shiftKey:判断键盘上的shift键是否按下
- keyCode:判断键盘上任意某一个键是否按下
window.onload = function(){

	document.onkeydown = function(e){

		var evt = e || event
		console.log(evt.altKey, evt.ctrlKey, evt.shiftKey)
	}

}
一个小案例:当往文本框中输入内容的时候,添加到上面的大文本框中
<!DOCTYPE html>
<html>
	<head>
		<meta charset="utf-8">
		<title></title>
		<style type="text/css">
			html, body{

				margin: 0; padding: 0;
			}
			#div1{

				width: 200px;
				height: 200px;
				border:1px black solid;
				margin: 10px;

			}

		</style>
		<script type="text/javascript" >
			window.onload = function(){

			//方式1,当按下buttom按钮的时候,文字被添加到大box中
				var odiv = document.getElementById('div1');
				var oinput = document.getElementsByTagName('input');

				// oinput[1].onclick = function(e){

				// odiv.innerHTML += oinput[0].value;
				// }
			//方式2, 当按下ctrl+cnter键的时候,文字被添加到大box中;
				oinput[0].onkeydown = function(e){

					var evt = e || event;
					if(evt.ctrlKey && evt.keyCode==13)
						odiv.innerHTML += oinput[0].value;
				}
			}
		</script>
	</head>
	<body>
		<div id="div1"></div>
		<input type="text" name="" id="" value="" />
		<input type="button" name="" id="" value="bottom" />

	</body>
</html>
事件流程
参考链接
cookie
cookie:缓存在本地客户端的数据
cookie的常用四个操作:增、删、改、查
<script>
		// 查询cookie
		console.log(document.cookie);
		//设置cookie
		var oDate = new Date()
		oDate.setDate(oDate.getDate() + 3) //在现在的时间基础上加上三天,打开Application中的cookie就能看到到期时间。
		document.cookie = "username = huang; expires=" + oDate;
		//修改cookie:同名cookie会自动进行覆盖
		//删除cookie: 可以把一个日期设置为过期的时间,那么就自动清楚了


	</script>
cookie的封装
<script>

		//添加cookie
		function setCookie(key, value, expire_value){

			var oDate = new Date();
			oDate.setDate(oDate.getDate() + expire_value);
			document.cookie = key + "=" + value + ';expires=' + oDate
		}
		setCookie("name1", "Huang", 3);
		setCookie("name2", "Liu", 3);

		//获取对应的cookie值
		function getCookie(key){

			var cookieAll = document.cookie;

			var cookieList = cookieAll.split("; "); //注意这里;后面还有个空格,因为字符串连接会有空格加入。

			for(var i=0; i<cookieList.length; ++i){

				if(key == cookieList[i].split("=")[0]){

					return cookieList[i].split("=")[1]
				}
			}
		}
		var value = getCookie("name2")
		console.log(value);


		//删除cookie
		setCookie("name1", "Ma", -100);

	</script>
一个小案例:保留用户名+密码7天
<!DOCTYPE html>
<html>
	<head>
		<meta charset="utf-8">
		<title></title>
		<style type="text/css">
		</style>

	</head>
	<body>
		用户名:<input type="text" name="" id="" value="" /><br />
		密码:<input type="text" name="" id="" value="" /> <br />
		<label><input type="checkbox" name="" id="" value="" />七天免登录</label>
		<input type="button" name="" id="" value="登录" />
	</body>
	<script>

		//添加cookie
		function setCookie(key, value, expire_value){

			var oDate = new Date();
			oDate.setDate(oDate.getDate() + expire_value);
			document.cookie = key + "=" + value + ';expires=' + oDate
		}

		//获取对应的cookie值
		function getCookie(key){

			var cookieAll = document.cookie;
			var cookieList = cookieAll.split("; "); //注意这里;后面还有个空格,因为字符串连接会有空格加入。
			for(var i=0; i<cookieList.length; ++i){

				if(key == cookieList[i].split("=")[0]){

					return cookieList[i].split("=")[1]
				}
			}
		}

		//记录了cookie值
		var aInput = document.getElementsByTagName('input');
		aInput[3].onclick = function(){

			var usename = aInput[0].value;
			var password = aInput[1].value;
			if(aInput[2].checked){
    //如果此时复选框被选中,就记录下cookie;
				setCookie("usename", usename, 3);
				setCookie("password", password, 3);
			}

		}
		//单击复选框的时候,出现保留的用户名和密码;
		aInput[2].onclick = function(){

			aInput[0].value = getCookie("usename");
			aInput[1].value = getCookie("password")
		}


	</script>
</html>
正则语法基础
常用方法:
<!DOCTYPE html>
<html>
	<head>
		<meta charset="utf-8">
		<title></title>
		<style type="text/css">
		</style>

	</head>
	<body>

	</body>
	<script>

		//设置正则表达式
		var reg = /abc/
		var reg = new RegExp("abc") //和上面的正则表达式有同样的意思。
		console.log(reg.test("abCde")) //正则表达式.test(需要测试的字符串)

		var reg1 = /abc/ig //i表示忽略大小写,g表示全局匹配
		console.log(reg1.test("abCdeabCdeabc"))

		console.log("abCdeabCdeabc".match(reg))
		console.log("abCdeabCdeabc".match(reg1))

		console.log("abCdeabCdeabc".search(reg)) //只是返回匹配的第一个位置
		console.log("abCdeabCdeabc".search(reg1))

		console.log("abCdeabCdeabc".split(reg))
		console.log("abCdeabCdeabc".split(reg1))

		console.log("abCdeabCdeabc".replace(reg, '*'))
		console.log("abCdeabCdeabc".replace(reg1, "*"))

		//这个地方有点奇怪,虽然都是一句相同的话,但是因为正则匹配是全局的,因此会一个个找下来。
		console.log(reg1.exec("abCdeabCdeabc"));
		console.log(reg1.exec("abCdeabCdeabc"));
		console.log(reg1.exec("abCdeabCdeabc"));

	</script>
</html>
ES6新特性
let const var区别
参考内容1
参考内容2
解构赋值
<script>
	//数组
	let [a, b, c]  = [1, 3, 3];
	console.log(a, b, c)

	let[a1=1, b1, c1] = [2,3]
	console.log(a1, b1, c1) // 是对应位置的匹配,因为a1虽然有默认值,但是被后面的覆盖上来了。

	//对象
	let {
   a2, b2} = {
   a2:111, b2:222}
	console.log(a2, b2)

	let{
   a3, a4=5} = {
   a3:111}
	console.log(a3, a4)
</script>
模板字符串
<script>
	//原先做法
	var obj = {
   "name":"huang", "age":17};
	var name = obj.name;
	var age = obj.age;
	console.log(name+"的年龄是"+age);

	//ES6新特性(以下两种写法都可以)
	var obj = {
   "name":"huang", "age":17};
	var{
   name,age}=obj;
	console.log(`${
     obj.name}的年龄是${
     obj.age}`);
	console.log(`${
     name}的年龄是${
     age}`);
</script>
箭头函数
<script>
	//返回一个确定的值
	let foo = () =>1;
	console.log(foo())

	//传入一个参数,返回一个值
	let foo1 = (a) => a;
	console.log(foo1(10))

	//有一些函数内部的操作
	let foo2 = (a) =>{

		let b = 2;
		return a + b;
	}
	console.log(foo2(10))

</script>
this指向问题
<script>
	var name = "window"

	//这里的对象指示:window
	var foo = () => {

		console.log(this.name)
	}
	foo()

	//这里的对象指示obj
	var obj = {

		"name":"黄",
		"foo":function(){

			console.log(this.name)
		}

	}
	obj.foo()

	//这里的对象指示window
	var obj1 = {

		"name":"黄",
		"foo1":()=>{

			console.log(this.name)
		}

	}
	obj1.foo1()
	/* 注意:这里的第二种,和第三种很相似,一个用function表示,另个一个箭头函数表示。 function可以直接指向对象,但是箭头函数却不可以。 this指向定义时的作用域,而不是执行时的作用域 简单地记忆:this包再function,可以指向对象。而箭头函数不可以。 */
</script>
set结构/map结构
set知识
<script>
	//定义set
	let set = new Set([1,2,3,3,4])
	console.log(set)

	//将set转变为列表(在set前面加上...,并用[]包裹起来)
	console.log([...set])

	//遍历set,这里不是索引,而是一个个值
	for(var i of set){

		console.log(i)
	}

	//常用方法
	console.log(set.size)
	console.log(set.add(100))
	console.log(set.delete(100))
	console.log(set.has(1))
	// console.log(set.clear())

	console.log('-----------------')
	//set的键

	for(let i of set.keys()){

		console.log(i)
	}

	//set的值
	for(let i of set.values()){

		console.log(i)
	}
	//键值对
	for(let [key, value] of set.entries()){

		console.log(key, value)
	}

	//for each
	set.forEach((value, key	)=>{
   console.log(key*2, value*2)})


</script>
map知识
<script>
	//定义一个map
	map = new Map([["name","huang"], ["age",17]])
	console.log(map)

	//往map里追加数据
	map.set("name", 'huang')
	console.log(map)

   //其他的方法同map。可以通用,具体参考set
</script>
生成器函数
<script>

	//不带参数
	function* foo(x){

		yield x+1; //yield有暂停的意思,然后输入结果,知道遇到下一个next
		yield x+10;
		return x+100;
	}

	var f = foo(10)
	console.log(f.next()) //11 = 10 + 1
	console.log(f.next()) //20 = 10 + 10
	console.log(f.next()) // 110 = 10 + 100

	//带参数
	function* foo1(x){

		var y  = 2*(yield(x+1));
		var z = yield(y/3);
		return (x+y+z);
	}

	var f1 = foo1(5)
	console.log(f1.next(3)) //6 = 5 + 1
	console.log(f1.next(12)) //8 = 2 * 12 / 3 因为此时输入的参数是12,则代表上一步yield(x+1) = 12,则 2*12 = 24
	console.log(f1.next(13)) // 42 = 5 + 24 + 13 本来上一次yield的返回值是8,但是这里改变了上一次的值,为13,因此z = 13


	//斐波那契数列
	function* feiBo(n){

		let a = 0;
		let b = 1;
		for(let i=0; i<n; ++i){

			yield a;
			let tmp = a + b;
			a = b;
			b = tmp;
		}

	}
	var f2 = feiBo(10)
	for(var i of f2){

		console.log(i)
	}

</script>
类class
<script>
	class Person{

		initName(name){

			this.name=name
		}
		sayHello(){

			console.log(this.name)
		}
	}
	person1 = new Person()
	person1.initName("Frank")
	person1.sayHello()
</script>
发布者:全栈程序员-用户IM,转载请注明出处:https://javaforall.cn/194186.html原文链接:https://javaforall.cn
【正版授权,激活自己账号】: Jetbrains全家桶Ide使用,1年售后保障,每天仅需1毛
【官方授权 正版激活】: 官方授权 正版激活 支持Jetbrains家族下所有IDE 使用个人JB账号...
