大家好,又见面了,我是你们的朋友全栈君。如果您正在找激活码,请点击查看最新教程,关注关注公众号 “全栈程序员社区” 获取激活教程,可能之前旧版本教程已经失效.最新Idea2022.1教程亲测有效,一键激活。
Jetbrains全系列IDE使用 1年只要46元 售后保障 童叟无欺
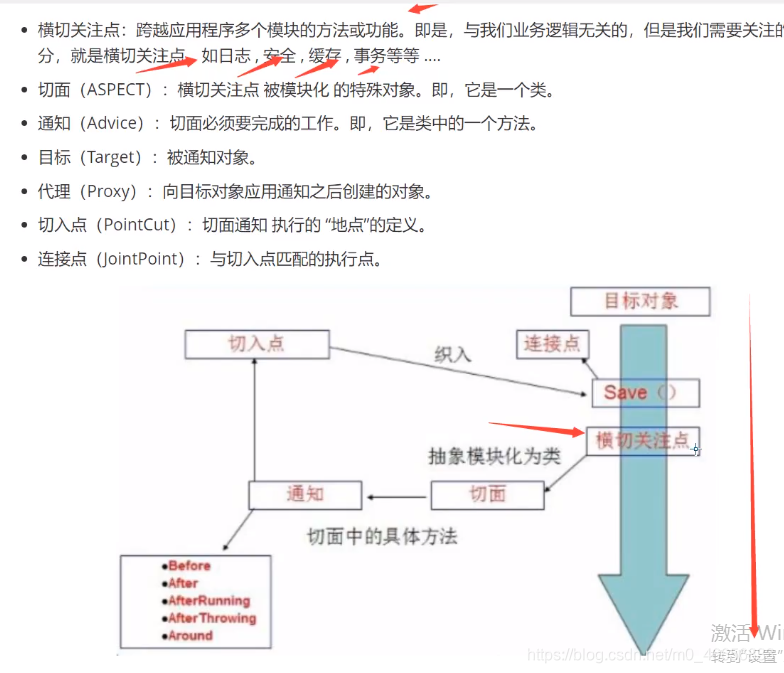
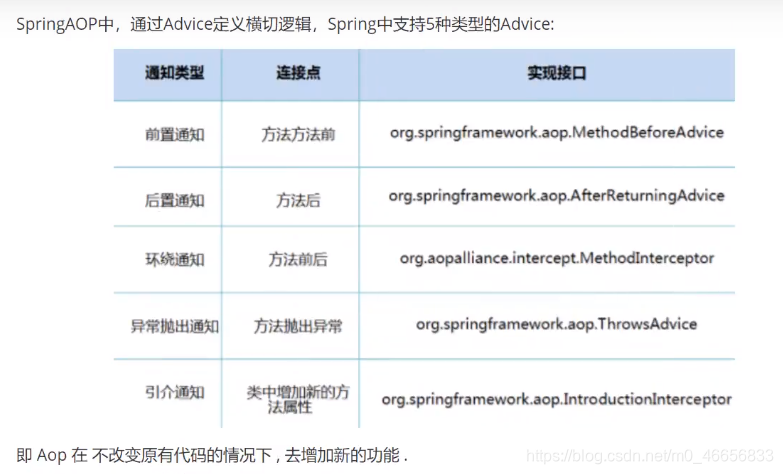
AOP
用Spring需要导入包
<dependency>
      <groupId>org.aspectj</groupId>
      <artifactId>aspectjweaver</artifactId>
      <version>1.9.4</version>
</dependency>

方式一:使用Spring接口
- 编写java
package com.kuang.log;

import org.springframework.aop.MethodBeforeAdvice;

import java.lang.reflect.Method;

public class Log implements MethodBeforeAdvice {

    //method 要执行的目标对象的方法
    //args 参数
    //target 目标对象
    public void before(Method method, Object[] args, Object target) throws Throwable {

        System.out.println(target.getClass().getName() + "的" + method.getName() + "被执行了");
    }
}
package com.kuang.log;

import org.aspectj.lang.annotation.AfterReturning;
import org.springframework.aop.AfterReturningAdvice;

import java.lang.reflect.Method;

public class AfterLog implements AfterReturningAdvice {


    public void afterReturning(Object returnValue, Method method, Object[] args, Object target) throws Throwable {

        System.out.println("执行了" + method.getName() + "返回结果为:" + returnValue);
    }
}
- 编写xml文件
<?xml version="1.0" encoding="UTF-8"?>
<beans xmlns="http://www.springframework.org/schema/beans" xmlns:xsi="http://www.w3.org/2001/XMLSchema-instance" xmlns:context="http://www.springframework.org/schema/context" xmlns:aop="http://www.springframework.org/schema/aop" xsi:schemaLocation="http://www.springframework.org/schema/beans https://www.springframework.org/schema/beans/spring-beans.xsd http://www.springframework.org/schema/context https://www.springframework.org/schema/context/spring-context.xsd http://www.springframework.org/schema/aop https://www.springframework.org/schema/aop/spring-aop.xsd">
    <!--注册bean-->
    <bean id="userService" class="com.kuang.service.UserServiceImpl"/>
    <bean id="log" class="com.kuang.log.Log"/>
    <bean id="afterLog" class="com.kuang.log.AfterLog"/>

    <!--方式一:使用原声Spring API接口-->
    <!--配置opp:需要导入opp的约束-->
    <aop:config>
        <!--切入点:expression:表达式,execution(要执行的位置!* * * * *)-->
        <aop:pointcut id="pointcut" expression="execution(* com.kuang.service.UserServiceImpl.*(..))"/>

        <!--执行环绕增加-->
        <aop:advisor advice-ref="log" pointcut-ref="pointcut"/>
        <aop:advisor advice-ref="afterLog" pointcut-ref="pointcut"/>
    </aop:config>
</beans>
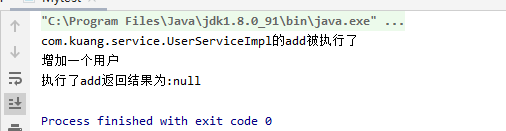
编写测试类
import com.kuang.pojo.User;
import com.kuang.service.UserService;
import org.springframework.context.support.ClassPathXmlApplicationContext;

public class Mytest  {

    public static void main(String[] args) {

        ClassPathXmlApplicationContext context = new ClassPathXmlApplicationContext("beans.xml");

        UserService userService = (UserService)context.getBean("userService");
        userService.add();
    }
}
方式二:使用自定义类来实现AOP
package com.kuang.diy;

public class DiyPointCut {

    public void before(){

        System.out.println("===========方法执行前==========");
    }

    public void after(){

        System.out.println("===========方法执行后==========");
    }

}
xml配置文件
<?xml version="1.0" encoding="UTF-8"?>
<beans xmlns="http://www.springframework.org/schema/beans" xmlns:xsi="http://www.w3.org/2001/XMLSchema-instance" xmlns:context="http://www.springframework.org/schema/context" xmlns:aop="http://www.springframework.org/schema/aop" xsi:schemaLocation="http://www.springframework.org/schema/beans https://www.springframework.org/schema/beans/spring-beans.xsd http://www.springframework.org/schema/context https://www.springframework.org/schema/context/spring-context.xsd http://www.springframework.org/schema/aop https://www.springframework.org/schema/aop/spring-aop.xsd">

    <!--方式二:自定义类-->
    <bean id="diy" class="com.kuang.diy.DiyPointCut"/>
    <aop:config>
        <!--自定义切面,ref要引用的类-->
        <aop:aspect ref="diy">
            <!--切入点-->
            <aop:pointcut id="point" expression="execution(* com.kuang.service.UserServiceImpl.*())"/>
            <!--通知-->
            <aop:before method="before" pointcut-ref="point"/>
            <aop:after method="after" pointcut-ref="point"/>
        </aop:aspect>
    </aop:config>
</beans>
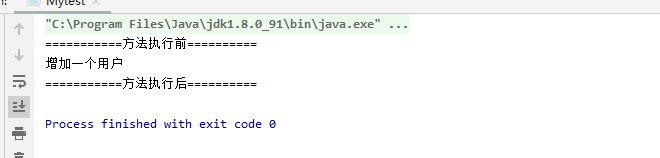
测试
import com.kuang.pojo.User;
import com.kuang.service.UserService;
import org.springframework.context.support.ClassPathXmlApplicationContext;

public class Mytest  {

    public static void main(String[] args) {

        ClassPathXmlApplicationContext context = new ClassPathXmlApplicationContext("beans.xml");

        UserService userService = (UserService)context.getBean("userService");
        userService.add();
    }
}
方式三:使用注解实现
xml配置
<?xml version="1.0" encoding="UTF-8"?>
<beans xmlns="http://www.springframework.org/schema/beans" xmlns:xsi="http://www.w3.org/2001/XMLSchema-instance" xmlns:context="http://www.springframework.org/schema/context" xmlns:aop="http://www.springframework.org/schema/aop" xsi:schemaLocation="http://www.springframework.org/schema/beans https://www.springframework.org/schema/beans/spring-beans.xsd http://www.springframework.org/schema/context https://www.springframework.org/schema/context/spring-context.xsd http://www.springframework.org/schema/aop https://www.springframework.org/schema/aop/spring-aop.xsd">
    <!--注册bean-->
    <bean id="userService" class="com.kuang.service.UserServiceImpl"/>

    <bean id="diy" class="com.kuang.diy.DiyPointCut"/>
    <!--方式三:自定义类-->
    <!--开启注解支持-->
    <aop:aspectj-autoproxy/>
</beans>
package com.kuang.diy;
import org.aspectj.lang.ProceedingJoinPoint;
import org.aspectj.lang.Signature;
import org.aspectj.lang.annotation.After;
import org.aspectj.lang.annotation.Around;
import org.aspectj.lang.annotation.Aspect;
import org.aspectj.lang.annotation.Before;
@Aspect
public class DiyPointCut {
@Before("execution(* com.kuang.service.UserServiceImpl.*(..))")
public void before(){
System.out.println("===========方法执行前==========");
}
@After("execution(* com.kuang.service.UserServiceImpl.*(..))")
public void after(){
System.out.println("===========方法执行后==========");
}
//在环绕增强中,我们可以传入一个参数,代表我们要获取处理切入的点
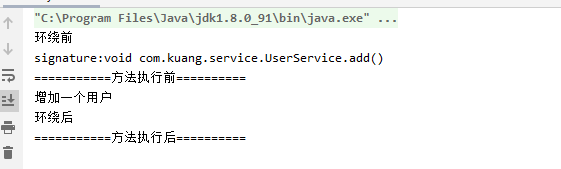
@Around("execution(* com.kuang.service.UserServiceImpl.*(..))")
public void around(ProceedingJoinPoint jp) throws Throwable {
System.out.println("环绕前");
Signature signature = jp.getSignature();//获得签名
System.out.println("signature:" + signature);
Object proceed = jp.proceed();
System.out.println("环绕后");
}
}
测试
import com.kuang.pojo.User;
import com.kuang.service.UserService;
import org.springframework.context.support.ClassPathXmlApplicationContext;

public class Mytest  {

    public static void main(String[] args) {

        ClassPathXmlApplicationContext context = new ClassPathXmlApplicationContext("beans.xml");

        UserService userService = (UserService)context.getBean("userService");
        userService.add();
    }
}
版权声明:本文内容由互联网用户自发贡献,该文观点仅代表作者本人。本站仅提供信息存储空间服务,不拥有所有权,不承担相关法律责任。如发现本站有涉嫌侵权/违法违规的内容, 请发送邮件至 举报,一经查实,本站将立刻删除。
发布者:全栈程序员-用户IM,转载请注明出处:https://javaforall.cn/168806.html原文链接:https://javaforall.cn
【正版授权,激活自己账号】: Jetbrains全家桶Ide使用,1年售后保障,每天仅需1毛
【官方授权 正版激活】: 官方授权 正版激活 支持Jetbrains家族下所有IDE 使用个人JB账号...
