大家好,又见面了,我是你们的朋友全栈君。如果您正在找激活码,请点击查看最新教程,关注关注公众号 “全栈程序员社区” 获取激活教程,可能之前旧版本教程已经失效.最新Idea2022.1教程亲测有效,一键激活。
Jetbrains全系列IDE使用 1年只要46元 售后保障 童叟无欺
加我微信:hz223336,领取pytest视频
文章目录
一:pytest的介绍,安装,框架结构,执行方式
**
1,特点
:1. 简单灵活,容易上手;支持参数化; 测试用例的skip和xfail 处理;
2. 能够支持简单的单元测试和复杂的功能测试,还可以用来做 selenium/appium等自动化测试、接口自动化测试 (pytest+requests);
3. pytest具有很多第三方插件,并且可以自定义扩展, 比较好 用的如 pytest-allure(完美html测试报告生成) pytest-xdist (多CPU分发)等;
4. 可以很好的和jenkins集成;**
5.
**
2,安装
:pytest安装,导入相关依赖库
Pip install –U pytest U表示升级
Pip install sugar
pip install pytest-rerunfailures
Pip install pytest-xdist
Pip install pytest-assume
Pip intall pytest-html …
Pip list查看
Pytest –h 帮助**
3, pytest的框架结构
Pytest框架结构
Import pytest 类似的setup,teardown同样更灵活,还有个session()


模块级 (setup_module/
teardown_module) 不在类中的函数有用
函数级 (setup_function/
teardown_function) 不在类中的函数有用
类级 (setup_class/
teardown_class)只在 类中前后运行一次。
方法级 (setup_method/
teardown_methond) 运行在类中方法始末
4,执行方式
pytest的执行方式
Pytest/py.test(终端,命令行,pycharm可配置pytest方式执行)
- Pytest –v (最高级别信息—verbose)
- pytest -v -s filename 3.Pytest-q (静默)
(输出打印)
多种执行方式
1.pytest将在当前目录及其子目录中运行test _ * .py或* test.py形 式的所有文件。
2.以test_开头的函数,以Test开头的类,以test_开头的方法。所有包 package都要有__init_.py文件。
3.Pytest可以执行unittest框架写的用例和方法
二:Pytest -断言、跳过及运行
1,Pytest -断言、跳过及运行
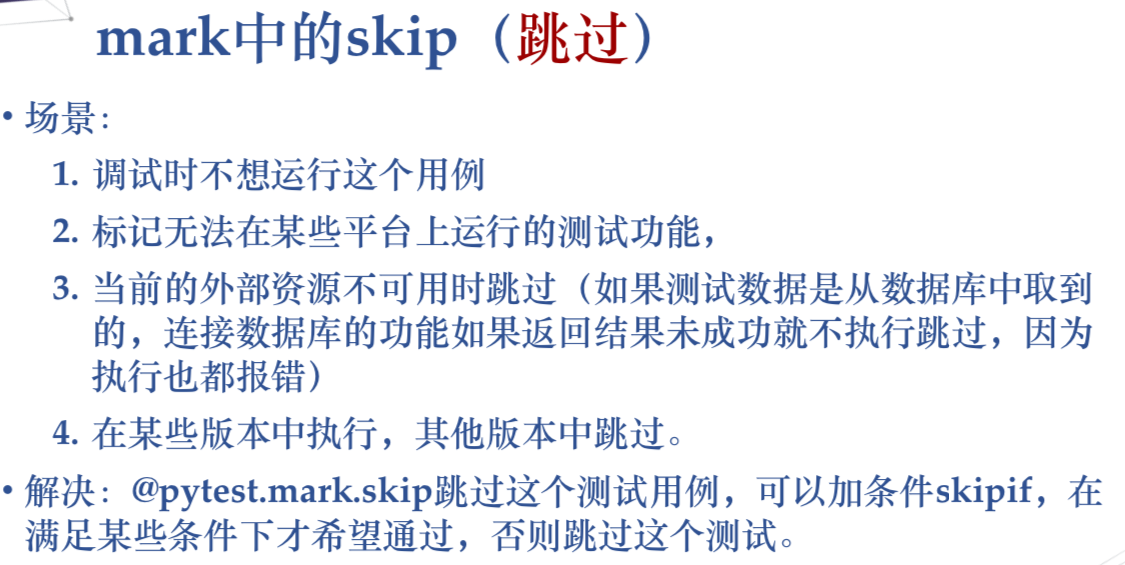
2,mark中的skip(跳过)
3,mark中的xfail(失败)

pytest.xfail()
我们已经掌握了如果跳过执行测试用例,其中有一种方法是在测试函数中用pytest.skip()方法。我们现在要学的pytest.xfail()和pytest.skip()有些相似,只不过他的含义是:将该用例标记成xfail失败,并且该用例中的后续代码不会执行。
老规矩,上荔枝:我们在测试用例中调用pytes.xfail()方法,可以选择传入reason参数表示原因。
#test_Pytest.py文件
#coding=utf-8

import pytest

class Test_Pytest():

        def test_one(self,):
                print("----start------")
                pytest.xfail(reason='该功能尚未完成')
                print("test_one方法执行" )
                assert 1==1

        def test_two(self):
                print("test_two方法执行" )
                assert "o" in "love"

        def test_three(self):
                print("test_three方法执行" )
                assert 3-2==1

if __name__=="__main__":
    pytest.main(['-s','-r','test_Pytest.py','test_Pytest.py'])
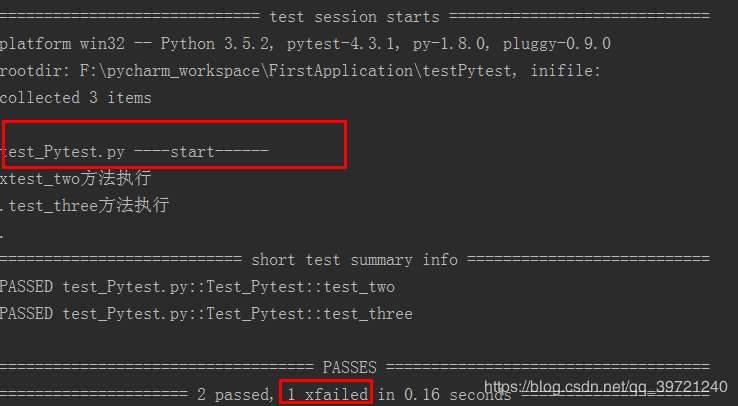
运行结果如下图:我们可以看到该用例中pytest.xfail()方法之前的代码运行了,之后的不再运行;结果中有一天用例被标记为xfail。
这个方法是我们直接将用例标记为失败,那什么情况我们会这么做呢?功能未完成、已知有问题。除此之外,就是用例的执行需要前置条件或操作,如果前置条件或操作失败,那么我们就可以直接将该用例设为失败,也就是xfail。
@pytest.mark.xfail
除了上面学习的pytest.xfail(),xfai还有一种使用方法。就是@pytest.mark.xfail标签,他的含义是期望测试用例是失败的,但是不会影响测试用例的的执行。如果测试用例执行失败的则结果是xfail(不会额外显示出错误信息);如果测试用例执行成功的则结果是xpass。
吃个荔枝:我们直接在测试用例上加上@pytest.mark.xfail标签。
#test_Pytest.py文件
#coding=utf-8

import pytest

class Test_Pytest():

        @pytest.mark.xfail
        def test_one(self):
                print("test_one方法执行" )
                assert 1==2

        def test_two(self):
                print("test_two方法执行" )
                assert "o" in "love"

        def test_three(self):
                print("test_three方法执行" )
                assert 3-2==1

if __name__=="__main__":
    pytest.main(['-s','test_Pytest.py'])
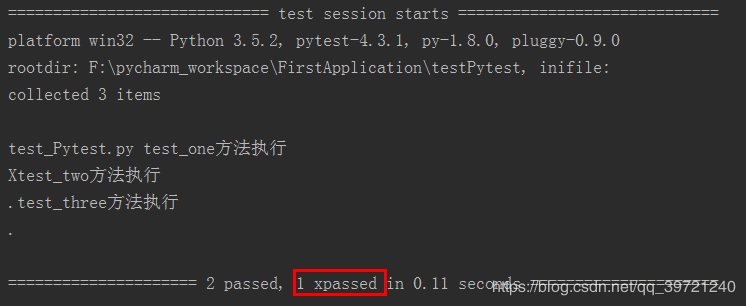
运行结果如下图:可以看到我们标记的用例确实运行了;因为断言失败所以结果是xfailed,也没有像正常一样显示出错误用例及具体信息。

我们把断言改成正确的,再运行一次,结果如下图:尽管我们的用例正常运行通过,但是仍被标记为xpassed,而不是passed。
4,使用自定义标记mark只执行部分用例
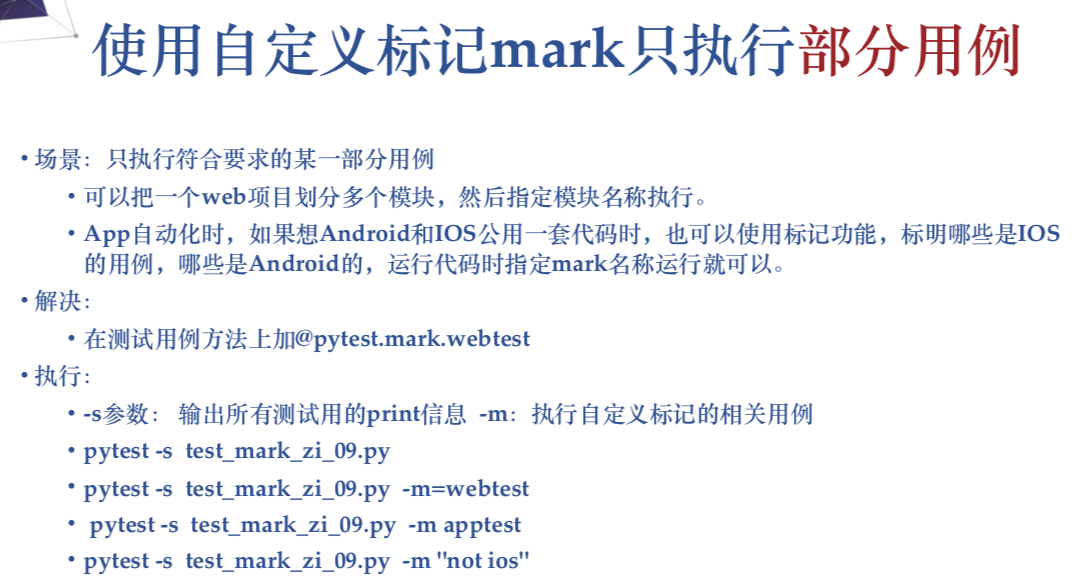
1.mark标记
以下用例,标记test_send_http()为webtest
# content of test_server.py

import pytest

@pytest.mark.webtest
def test_send_http():
    pass # perform some webtest test for your app

def test_something_quick():
    pass

def test_another():
    pass

class TestClass:
    def test_method(self):
        pass

if __name__ == "__main__":
    pytest.main(["-s", "test_server.py", "-m=webtest"])
只运行用webtest标记的测试,cmd运行的时候,加个-m 参数,指定参数值webtest

```py
pytest -v -m webtest
如果不想执行标记webtest的用例,那就用”not webtest”
pytest -v -m “not webtest”
import pytest

@pytest.mark.webtest
def test_send_http():
    pass # perform some webtest test for your app
def test_something_quick():
    pass
def test_another():
    pass
class TestClass:
    def test_method(self):
        pass

if __name__ == "__main__":
    pytest.main(["-s", "test_server.py", "-m='not webtest'"])
5,文件名类名方法执行部分用例
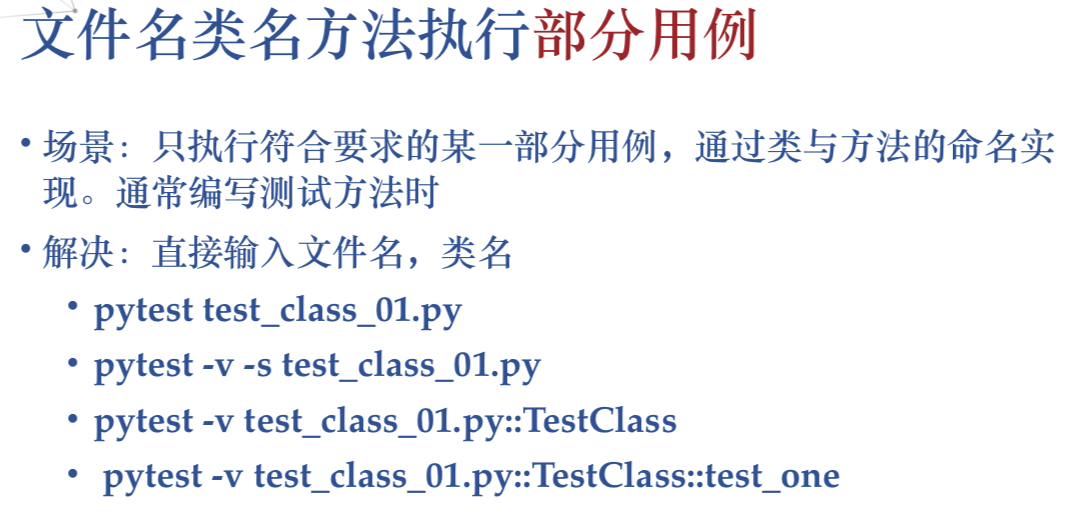
2.-v 指定的函数节点id
如果想指定运行某个.py模块下,类里面的一个用例,如:TestClass里面testmethod用例
每个test开头(或_test结尾)的用例,函数(或方法)的名称就是用例的节点id,指定节点id运行用-v 参数
pytest -v test_server.py::TestClass::test_method
当然也能选择运行整个class
pytest -v test_server.py::TestClass
也能选择多个节点运行,多个节点中间空格隔开
pytest -v test_server.py::TestClass test_server.py::test_send_http
6,-k 组合调用执行部分用例
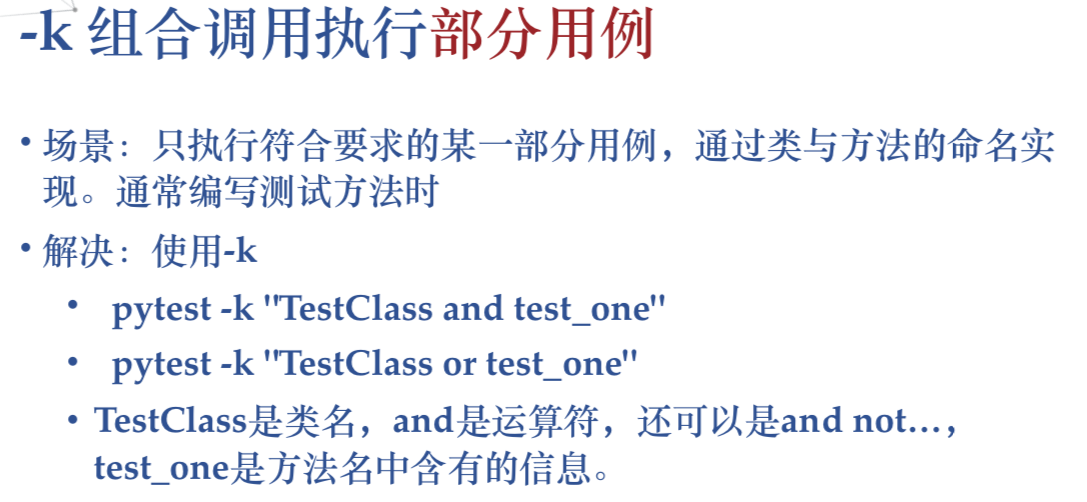
.-k 匹配用例名称
可以使用-k命令行选项指定在匹配用例名称的表达式
pytest -v -k http
您也可以运行所有的测试,根据用例名称排除掉某些用例:
pytest -k “not send_http” -v
也可以同时选择匹配 “http” 和“quick”
pytest -k “http or quick” -v
三, Pytest -fixture
下面都有实战很详细-fixture确实牛逼


pytest 相较于 unittest 最为跳跃的一点应该就是 fixture 机制
对于unittest来说,每个用例的类中都需要去写入setUp和tearDown。也就是我们所说的前置和后置,
而不可避免的,很多用例的前置和后置都是一样(例如很多用例都需要前置登录,后置退出),于是我们需要重复的复制粘贴,这样导致工作量增加,代码量也增加,界面也显得冗杂。
所以此时pytest中fixture机制便要闪亮登场了。
通俗的讲: fixture = 前置+后置
而方便的是:如果很多用例都有同样的前置和后置,那么我就只实现一个,然后需要的用例就去调用就好了。
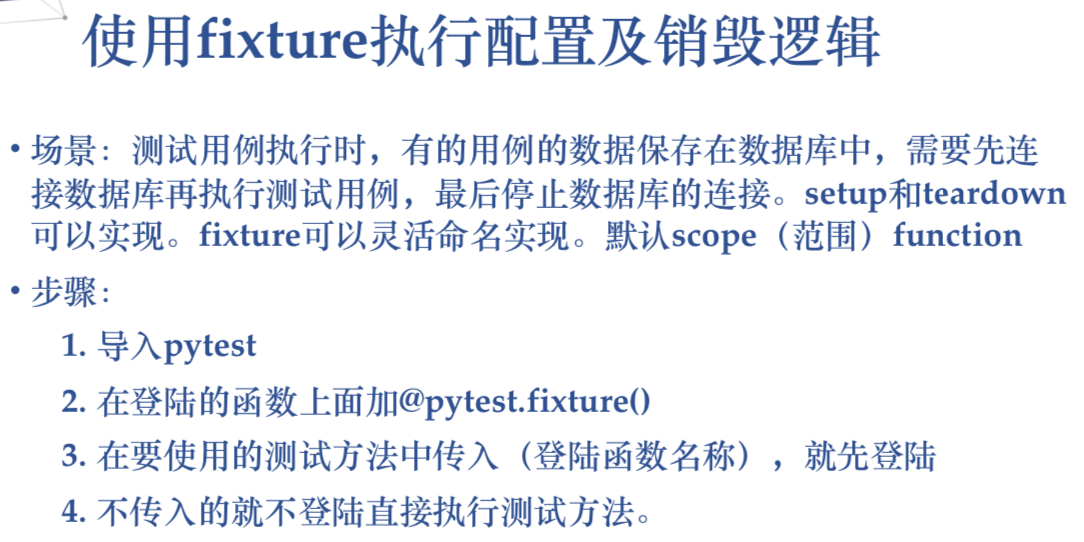
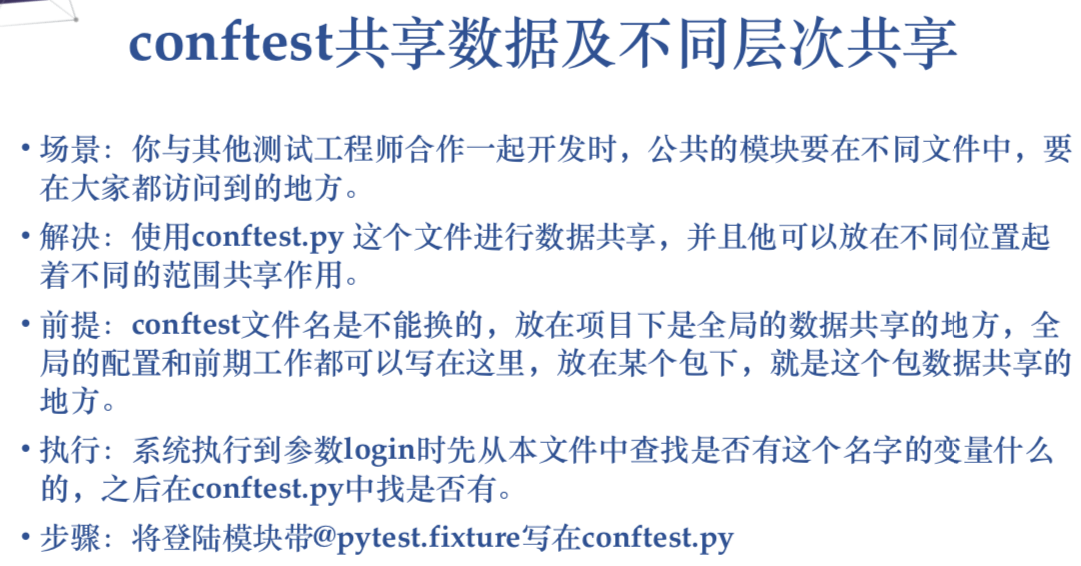
1.机制:与测试用例同级,或者是测试用例的父级,创建一个conftest.py文件。
2.conftest.py文件里:放所有的前置和后置。 不需要用例.py文件主动引入conftest文件。
3.定义一个函数:包含前置操作+后置操作。
4.把函数声明为fixture :在函数前面加上 @pytest.fixture(作用级别=默认为function)
5.fixture的定义。
如果有返回值,那么写在yield后面。(yield的作用就相当于return)
在测试用例当中,调用有返回值的fixture函数时,函数名称就是代表返回值。
在测试用例当中,函数名称作为用例的参数即可。
1. 如下: 定义一个函数名叫open_url的fixture前后置,前置为打开链接,后置为退出浏览器
@pytest.fixture(scope=“class”) #定义scope的范围
  def open_url():
    # 前置
    driver = webdriver.Chrome()
    driver.get(url) #url为链接地址
    yield driver    #yield之前代码是前置,之后的代码就是后置。
    # 后置
    driver.quit()
这样我们就定义了一个叫做 open_url 的 fixture
2.在我们要用这个前后置的类前面 我们用@pytest.mark.usefixtures(fixture函数名)
就可以直接调用上面定义好的这个前后置
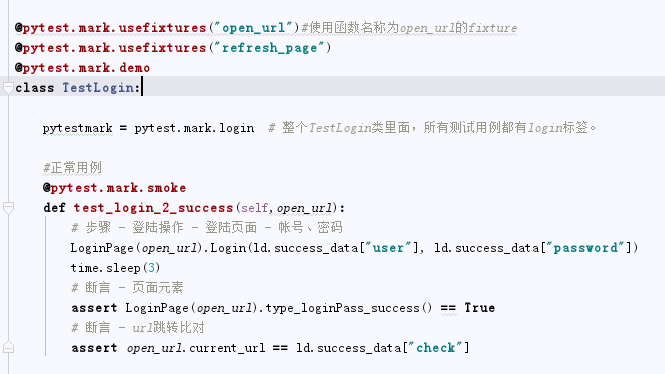
可以看到 在TestLogin 这个类中 我们不再去编写setup 和 teardown. 直接写我们的中间过程就可以了。是不是很方便了?
3.进阶方法:conftest中定义多个fixture,一个fixture可以是另一个fixture的前后置,期间还是用field隔开前后置
如上图中可以看到我class中另外还引用了一个名为refresh_page的fixture,直接上代码:
# 刷新页面 - 定义的第二个fixture
@pytest.fixture
def refresh_page(open_url):
    yield
    open_url.refresh()
直接将open_url作为了另一个fixture的前置引用进来,用yield隔开,当用例中执行完open_url前后置后,再执行了一次refresh的后置。
执行顺序: open_url yield 之前代码 – 用例代码 – open_url yield 之后代码 –》 refresh_page yield 之后代码
是不是很妙,可以解决许多用例流程环环相扣时的麻烦。
4.说到上面的多个fixture调用,很多人就会疑惑,会不会fixture之间相互冲突。
当然是不会了,fixture在conftest.py当中就已经决定了他的用例域,他会主动去区分你这个fixture是作用在哪个用例域。
首先我们看一下框架中对于fixture函数的定义: 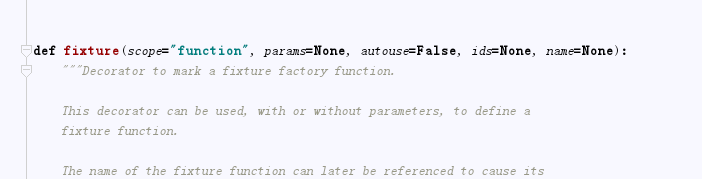
scope便是定义用例域的范围:
function:默认范围,每一个函数或方法都会调用,不填写时便是它
class:每一个类调用一次
module: 每一个.py文件调用一次,文件中可以有多个function和class
session:多个文件调用一次,可以跨文件,如在.py文件中,每一个.py文件就是module
范围:
session > module > class > function
所以在调用时各个fixture之间并不会相互冲突。
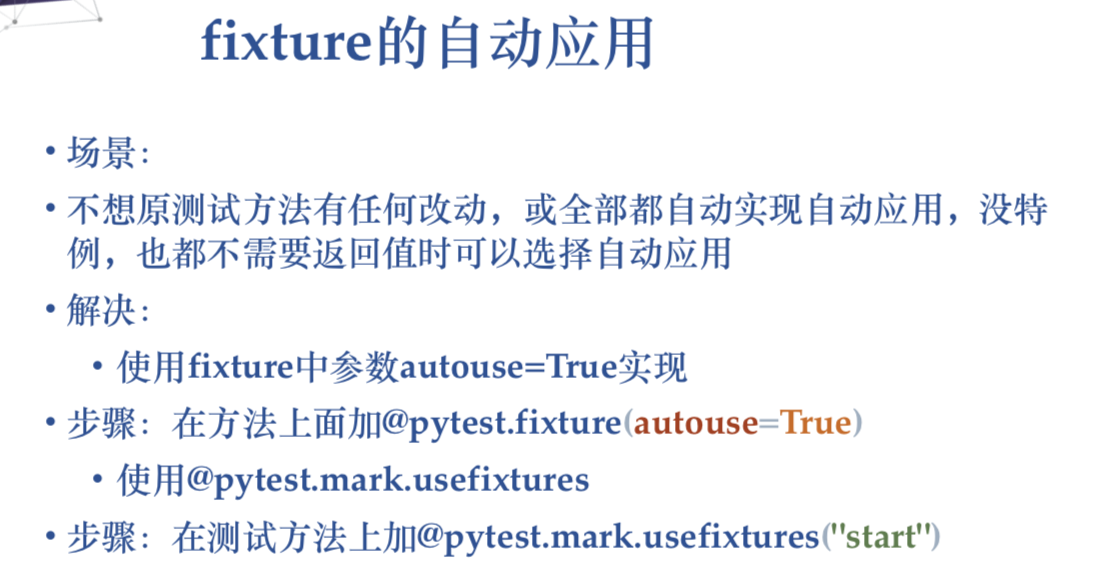
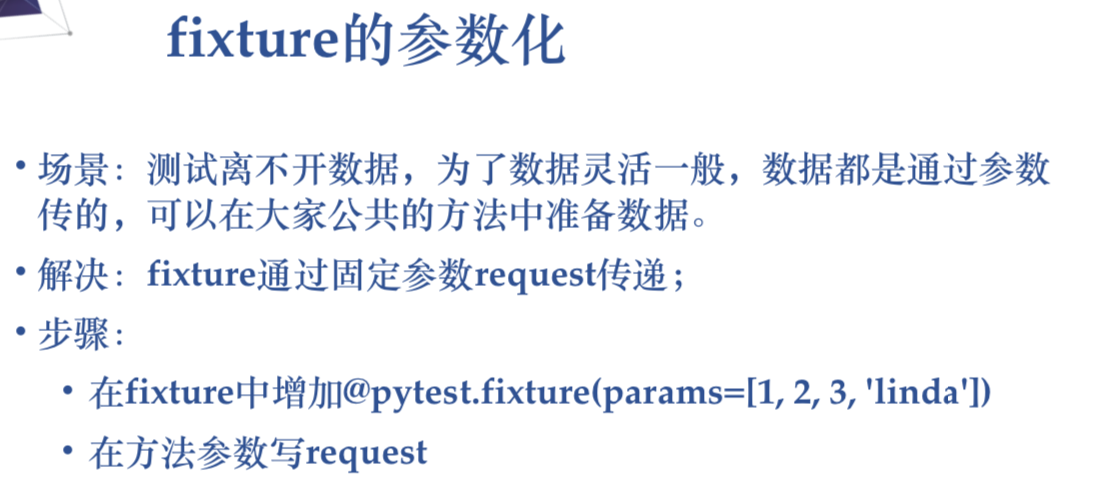
5,fixture的自动应用autouse
autouse调用例子:**
当管理用例比较多的时候,这种方法比较方便高效,但是用该功能时也要小心,一定要注意fixture的作用范围。需要注意的是,当使用这种方式时,就不能使用返回值的功了。autouse默认设置为False。当默认为False,就可以选择用上面两种方式来试用fixture。当设置为True时,所有的test都会自动调用这个fixture。autouse遵循scope=”关键字参数”规则:当scope=”session”时,无论怎样定义只运行一次;当scope=”module”时,每个py文件只运行一次;当scope=”class”时,每个class只运行一次(但是一个文件中包括function和class时,会在每个function(不在class中)运行一次);当scope=”function”时,每个function运行一次;
‘’’
平常写自动化用例会写一些前置的fixture操作,用例需要用到就直接传该函数的参数名称就行了。当用例很多的时候,每次都传这个参数,会比较麻烦。
fixture里面有个参数autouse,默认是Fasle没开启的,可以设置为True开启自动使用fixture功能,这样用例就不用每次都去传参了
设置autouse=True
autouse设置为True,自动调用fixture功能
start设置scope为module级别,在当前.py用例模块只执行一次,autouse=True自动使用[图片]open_home设置scope为function级别,
每个用例前都调用一次,自动使用
import pytest

@pytest.fixture(scope="module",autouse=True)
def start(request):
    print("\n----开始执行module------")
    print('module : %s'% request.module.__name__)
    print('------启动浏览器-------')
    yield
    print("------结束测试 end!----------")

@pytest.fixture(scope="function",autouse=True)
def open_home(request):
    print("function:%s \n--回到首页--"% request.function.__name__)

def test_01():
    print('----用例01-----')

def test_02():
    print('----用例02-----')

if __name__ == '__main__':
    pytest.main(["-s","autouse.py"])
执行结果
----开始执行module------
module : autouse
------启动浏览器-------
function:test_01
--回到首页--
.----用例01-----
function:test_02
--回到首页--
.----用例02-----
------结束测试 end!----------
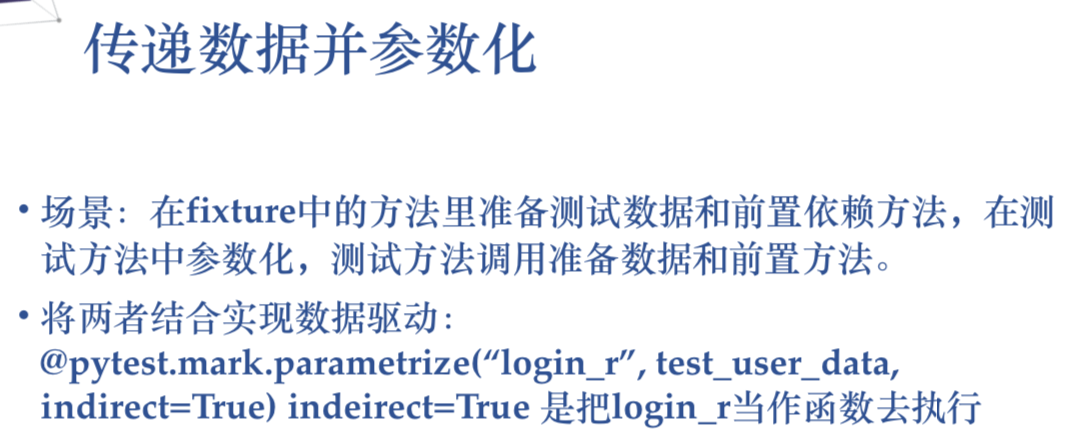
四,参数化与数据驱动框架实现
参数化1


import pytest


@pytest.mark.parametrize('test_input,expected',[('3+5',8),
                         ('2-1',1),('7*5',30)])
def test_eval(test_input,expected):
    assert eval(test_input)==expected    ----eval把字符串转换成表达式


est_param.py::test_eval[2-1-1]
test_param.py::test_eval[7*5-30] PASSED [ 33%]PASSED [ 66%]FAILED [100%]
test_param.py:3 (test_eval[7*5-30])
35 != 30

Expected :30
Actual :35
<Click to see difference>

test_input = '7*5', expected = 30

@pytest.mark.parametrize('test_input,expected',[('3+5',8),
('2-1',1),('7*5',30)])
def test_eval(test_input,expected):
> assert eval(test_input)==expected
E assert 35 == 30          ----提示把30改成35

test_param.py:7: AssertionError

Assertion failed
参数化2
import pytest
test_user_data=['linda','sai','tom']
@pytest.fixture(scope='module')
def login(request):
    user=request.param
    print('打开首页登陆%s'%user)
    return user


#indirect=True是把login当作函数去执行
@pytest.mark.parametrize('login',test_user_data,indirect=True)
def test_cart(login):
    usera=login
    print('不同用户添加购物车%s'%usera)
    assert usera!=''

Process finished with exit code 0
打开首页登陆linda
PASSED [ 33%]不同用户添加购物车linda
打开首页登陆sai
PASSED [ 66%]不同用户添加购物车sai
打开首页登陆tom
PASSED [100%]不同用户添加购物车tom
参数化3
import pytest
test_user_data=[
    {
   'user':'linda','password':'8888'},
    {
   'user':'servenruby','password':'123456'},
    {
   'user':'test01','password':''}
]

@pytest.fixture(scope='module')
def login_r(request):
    #可以通过dict形式,虽然传递一个参数,但通过key的方式可以达到累死传入多个参数的效果
    user=request.param['user']
    pwd=request.param['password']
    print('\n打开首页准备登陆,登陆用户%s,密码%s'%(user,pwd))
    if pwd:
        return True
    else:
        return False

#这是pytest参数化驱动,indeirect=True是把login_r当作函数去执行
@pytest.mark.parametrize('login_r',test_user_data,indirect=True)
def test_cart(login_r):
    #登陆用例
    a=login_r
    print('测试用例中login_r的返回值%s'%a)
    assert a,'失败原因,密码为空'

开首页准备登陆,登陆用户linda,密码8888
PASSED [ 33%]测试用例中login_r的返回值True

打开首页准备登陆,登陆用户servenruby,密码123456
PASSED [ 66%]测试用例中login_r的返回值True

打开首页准备登陆,登陆用户test01,密码
FAILED [100%]测试用例中login_r的返回值False


打开首页准备登陆,登陆用户linda,密码8888
PASSED [ 33%]测试用例中login_r的返回值True

打开首页准备登陆,登陆用户servenruby,密码123456
PASSED [ 66%]测试用例中login_r的返回值True

打开首页准备登陆,登陆用户test01,密码
FAILED [100%]测试用例中login_r的返回值False

test_mark_param_request2.py:19 (test_cart[login_r2])
login_r = False

@pytest.mark.parametrize('login_r',test_user_data,indirect=True)
def test_cart(login_r):
#登陆用例
a=login_r
print('测试用例中login_r的返回值%s'%a)
> assert a,'失败原因,密码为空'
E AssertionError: 失败原因,密码为空
E assert False
参数化3*3
import pytest
test_user_data1=[{
   'user':'linda','password':'888888'},
                 {
   'user':'servenruby','password':'123456'},
                 {
   'user':'test01','password':''}]
test_user_data2=[{
   'q':'中国平安','count':3,'page':1},
                 {
   'q':'阿里巴巴','count':2,'page':2},
                 {
   'q':'pdd','count':3,'page':1}]
@pytest.fixture(scope='module')
def login_r(request):
    #这是接受不了输入的参数,接收一个参数
    user=request.param['user']
    pwd=request.param['password']
    print('\n用户名:%s,密码:%s'%(user,pwd))

@pytest.fixture(scope='module')
def query_param(request):
    q=request.param['q']
    count=request.param['count']
    page=request.param['page']
    print('查询的搜索词%s'%q)
    return request.param

#这是pytest的数据驱动,indeirect=True是把login_r当作函数去执行
#从下往上执行
#两个数据进行组合测试,有3*3个测试用例执行(test_user_data1的个数*test_user_data2的个数
@pytest.mark.parametrize('query_param',test_user_data2,indirect=True)
@pytest.mark.parametrize('login_r',test_user_data1,indirect=True)
def test_login(login_r,query_param):
    #登陆用例
    print(login_r)
    print(query_param)


pytest_mark_request3.py::test_login[login_r1-query_param0] ✓ 44% ████▌ 查询的搜索词pdd
None
{
   'q': 'pdd', 'count': 3, 'page': 1}

pytest_mark_request3.py::test_login[login_r1-query_param2] ✓ 56% █████▋
用户名:linda,密码:888888
None
{
   'q': 'pdd', 'count': 3, 'page': 1}

pytest_mark_request3.py::test_login[login_r0-query_param2] ✓ 67% ██████▋
用户名:test01,密码:
None
{
   'q': 'pdd', 'count': 3, 'page': 1}

pytest_mark_request3.py::test_login[login_r2-query_param2] ✓ 78% ███████▊ 查询的搜索词阿里巴巴
None
{
   'q': '阿里巴巴', 'count': 2, 'page': 2}

pytest_mark_request3.py::test_login[login_r2-query_param1] ✓ 89% ████████▉ 查询的搜索词中国平安
None
{
   'q': '中国平安', 'count': 3, 'page': 1}

pytest_mark_request3.py::test_login[login_r2-query_param0] ✓ 100% ██████████
五,第三方插件
1,调整测试用例的执行顺序
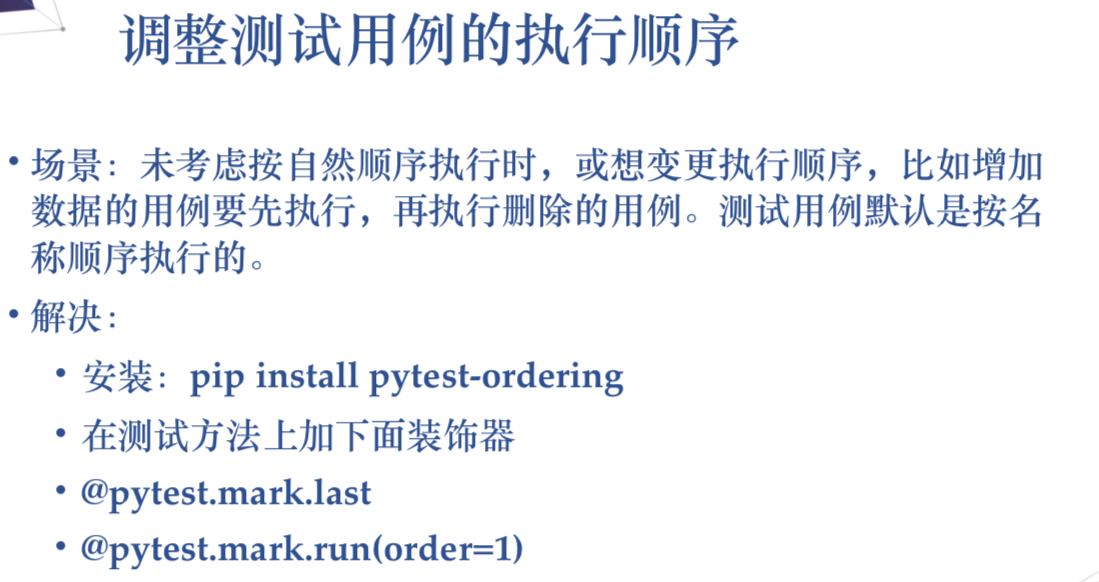
场景:未考虑按自然顺序执行时,或想变更执行顺序,比如增加 数据的用例要先执行,再执行删除的用例。测试用例默认是按名 称顺序执行的。
• 解决:
• 安装:pip install pytest-ordering
• 在测试方法上加下面装饰器
•@pytest.mark.last —最后一个执行
• @pytest.mark.run(order=1)—第几个执行
pytest默认按字母顺序去执行的
import pytest
@pytest.mark.run(order=1)
def test_01():
    print('test01')

@pytest.mark.run(order=2)
def test_02():
    print('test01')
@pytest.mark.last
def test_06():
    print('test01')

def test_04():
    print('test01')

def test_05():
    print('test01')
@pytest.mark.run(order=3)
def test_03():
    print('test01')

pytest_order.py::test_01 PASSED [ 16%]test01

pytest_order.py::test_02 PASSED [ 33%]test01

pytest_order.py::test_03 PASSED [ 50%]test01

pytest_order.py::test_04 PASSED [ 66%]test01

pytest_order.py::test_05 PASSED [ 83%]test01

pytest_order.py::test_06 PASSED [100%]test01
2, 执行用例遇到错误停止
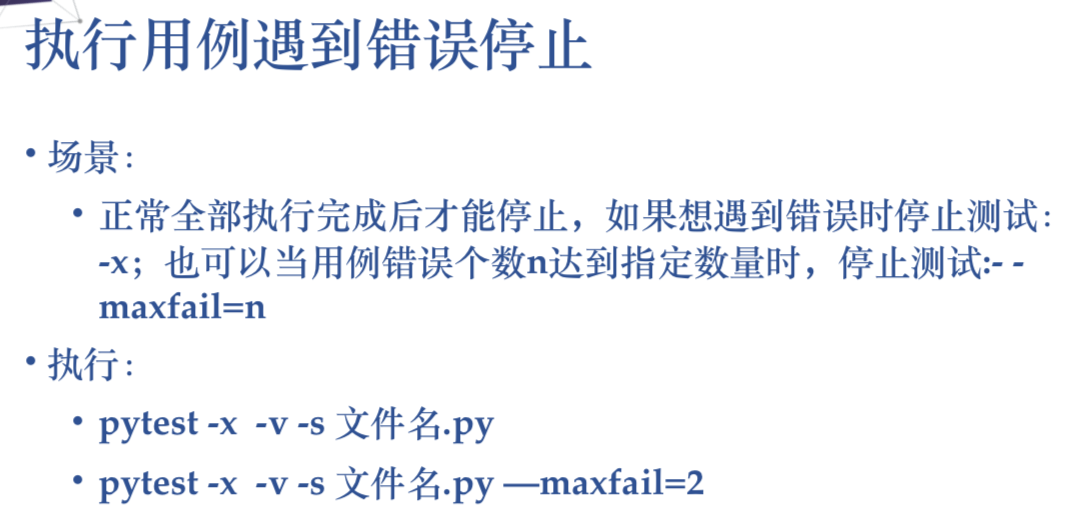
• 正常全部执行完成后才能停止,如果想遇到错误时停止测试: -x;也可以当用例错误个数n达到指定数量时,停止测试:- – maxfail=n
• 执行:
• pytest -x -v -s 文件名.py ——- -x是遇到错误就停止
• pytest -x -v -s 文件名.py —maxfail=2 ——- –maxfail=2 是遇到两个错误就停止
3,执行用例失败后重新运行
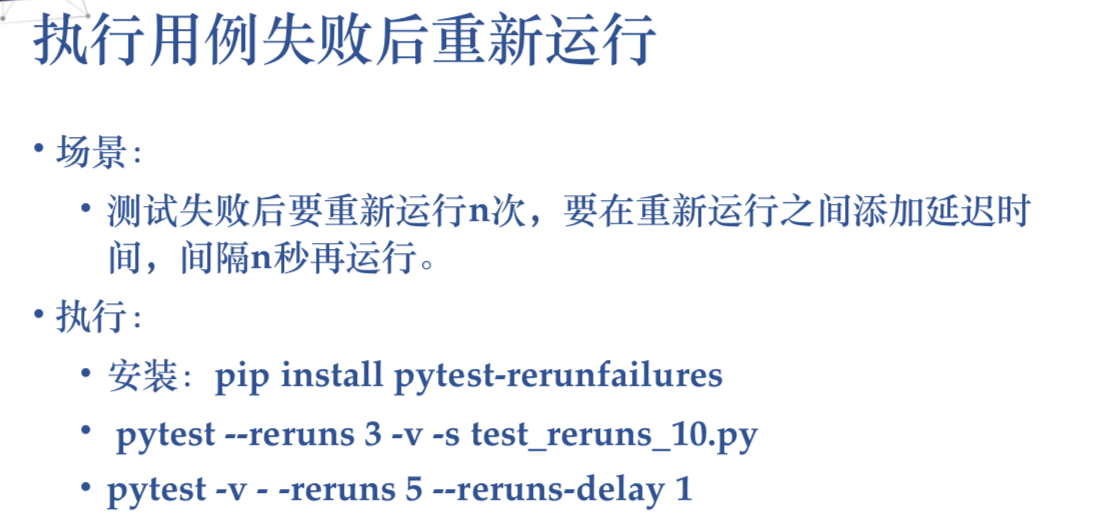
**场景:
• 测试失败后要重新运行n次,要在重新运行之间添加延迟时 间,间隔n秒再运行。
• 执行:
• 安装:pip install pytest-rerunfailures
• pytest -v – -reruns 5 –reruns-delay 1 —每次等1秒 重试5次
4,多条断言前面报错后面依然执行

pip3 install pytest-assume 断言后继续执行,但要修改断言**
@pytest.mark.parametrize(('x', 'y'), [(1, 1), (1, 0), (0, 1)])
def test_assume(x, y):
    pytest.assume(x == y)
    pytest.assume(3 == 4)
    pytest.assume(5 == 9)
5,多线程并行与分布式执行

场景:测试用例1000条,一个用例执行1钟,一个测试人员执行需要1000分 钟。通常我们会用人力成本换取时间成本,加几个人一起执行,时间就会缩
短。如果10人一起执行只需要100分钟,这就是一种并行测试,分布式场景。
解决:pytest分布式执行插件:pytest-xdist,多个CPU或主机执行
前提:用例之间都是独立的,没有先后顺序,随机都能执行,可重复运行不 影响其他用例。
安装:Pip3 install pytest-xdist
• 多个CPU并行执行用例,直接加-n 3是并行数量:pytest -n 3 • 在多个终端下一起执行
import pytest
import time

@pytest.mark.parametrize('x',list(range(10)))
def test_somethins(x):
    time.sleep(1)

pytest -v -s -n 5 test_xsdist.py  ----一次执行5个
运行以下代码,项目结构如下
web_conf_py是项目工程名称
│  conftest.py
│  __init__.py
│
├─baidu
│  │  conftest.py
│  │  test_1_baidu.py
│  │  test_2.py
│  │  __init__.py
│
├─blog
│  │  conftest.py
│  │  test_2_blog.py
│  │  __init__.py
代码参考:
# web_conf_py/conftest.py
import pytest

@pytest.fixture(scope="session")
def start():
    print("\n打开首页")
    return "yoyo"

# web_conf_py/baidu/conftest.py
import pytest

@pytest.fixture(scope="session")
def open_baidu():
    print("打开百度页面_session")

# web_conf_py/baidu/test_1_baidu.py
import pytest
import time

def test_01(start, open_baidu):
    print("测试用例test_01")
    time.sleep(1)
    assert start == "yoyo"

def test_02(start, open_baidu):
    print("测试用例test_02")
    time.sleep(1)
    assert start == "yoyo"

if __name__ == "__main__":
    pytest.main(["-s", "test_1_baidu.py"])


# web_conf_py/baidu/test_2.py
import pytest
import time

def test_06(start, open_baidu):
    print("测试用例test_01")
    time.sleep(1)
    assert start == "yoyo"
def test_07(start, open_baidu):
    print("测试用例test_02")
    time.sleep(1)
    assert start == "yoyo"

if __name__ == "__main__":
    pytest.main(["-s", "test_2.py"])


# web_conf_py/blog/conftest.py
import pytest

@pytest.fixture(scope="function")
def open_blog():
    print("打开blog页面_function")

# web_conf_py/blog/test_2_blog.py

import pytest
import time
def test_03(start, open_blog):
    print("测试用例test_03")
    time.sleep(1)
    assert start == "yoyo"

def test_04(start, open_blog):
    print("测试用例test_04")
    time.sleep(1)
    assert start == "yoyo"

def test_05(start, open_blog):
    '''跨模块调用baidu模块下的conftest'''
    print("测试用例test_05,跨模块调用baidu")
    time.sleep(1)
    assert start == "yoyo"

if __name__ == "__main__":
    pytest.main(["-s", "test_2_blog.py"])
正常运行需要消耗时间:7.12 seconds
E:\YOYO\web_conf_py>pytest
============================= test session starts =============================
platform win32 -- Python 3.6.0, pytest-3.6.3, py-1.5.4, pluggy-0.6.0
rootdir: E:\YOYO\web_conf_py, inifile:
plugins: xdist-1.23.2, metadata-1.7.0, html-1.19.0, forked-0.2
collected 7 items

baidu\test_1_baidu.py ..                                                 [ 28%]
baidu\test_2.py ..                                                       [ 57%]
blog\test_2_blog.py ...                                                  [100%]

========================== 7 passed in 7.12 seconds ===========================
设置并行运行数量为3,消耗时间:3.64 seconds,大大的缩短了用例时间
E:\YOYO\web_conf_py>pytest -n 3
============================= test session starts =============================
platform win32 -- Python 3.6.0, pytest-3.6.3, py-1.5.4, pluggy-0.6.0
rootdir: E:\YOYO\web_conf_py, inifile:
plugins: xdist-1.23.2, metadata-1.7.0, html-1.19.0, forked-0.2
gw0 [7] / gw1 [7] / gw2 [7]
scheduling tests via LoadScheduling
.......                                                                  [100%]
========================== 7 passed in 3.64 seconds ===========================
6,其他有意思的插件
这里就不多说了,喜欢的可以自己研究下
7,使用pytest执行unittest的测试用例
执行unitest就和原来一样,尽量不要混合使用搞那些花里胡哨的,用哪个就哪个,就不多说了
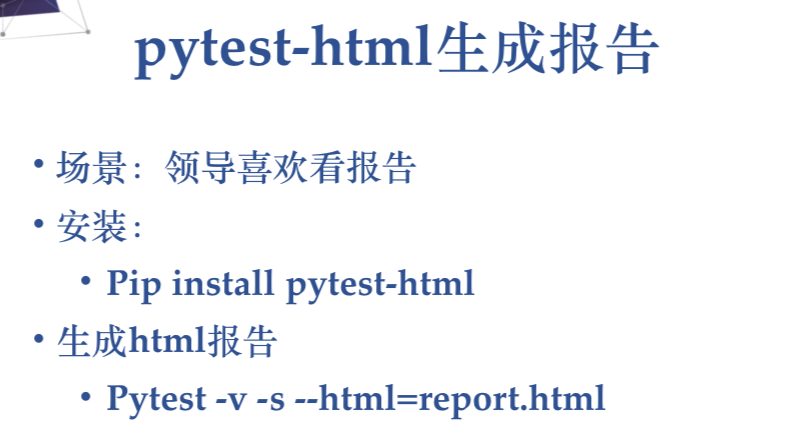
8,pytest-html生成报告
pytest-HTML是一个插件,pytest用于生成测试结果的HTML报告。兼容Python 2.7,3.6
pytest-html
1.github上源码地址【https://github.com/pytest-dev/pytest-html】
2.pip安装
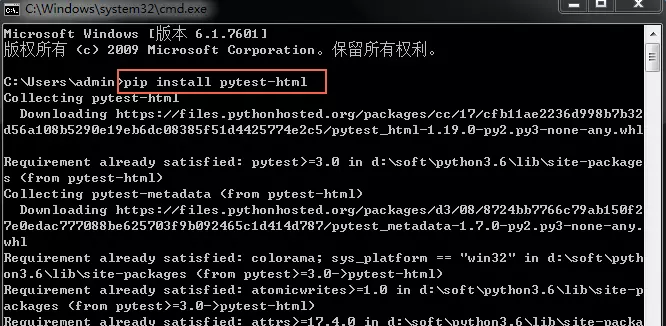
$ pip install pytest-html
3.执行方法
$ pytest --html=report.html
html报告
1.打开cmd,cd到需要执行pytest用例的目录,执行指令:pytest –html=report.html
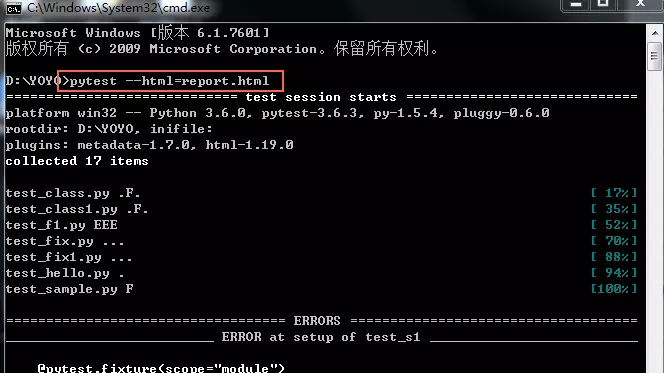
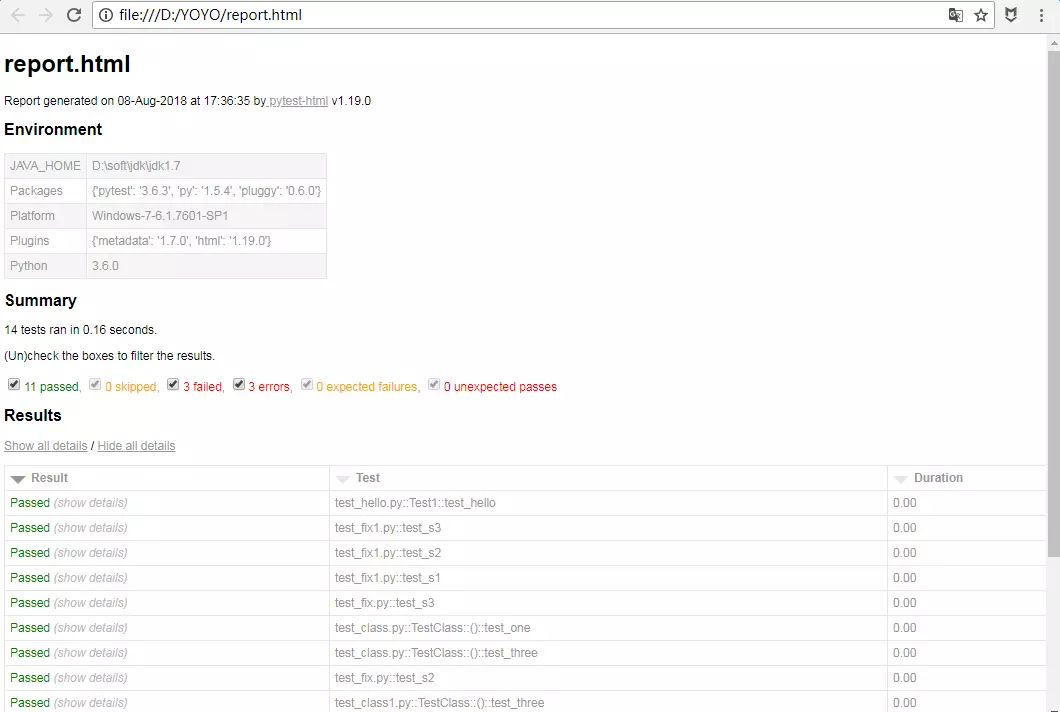
2.执行完之后,在当前目录会生成一个report.html的报告文件,显示效果如下
指定报告路径
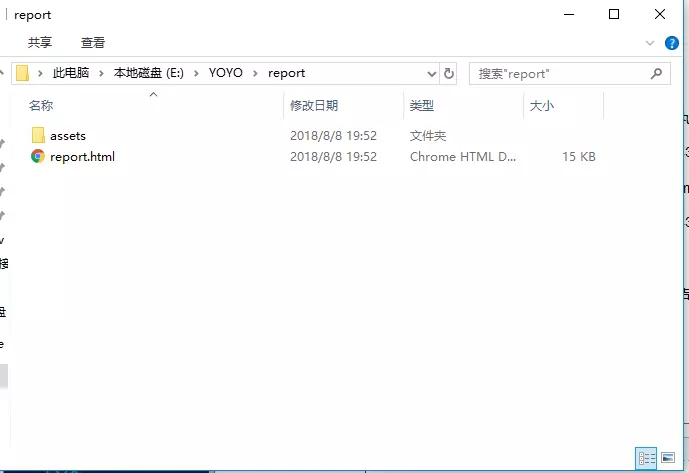
1.直接执行”pytest –html=report.html”生成的报告会在当前脚本的同一路径,如果想指定报告的存放位置,放到当前脚本的同一目录下的report文件夹里
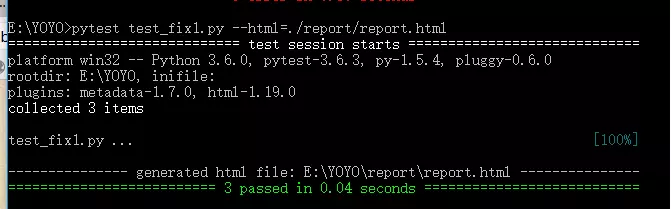
pytest --html=./report/report.html
2.如果想指定执行某个.py文件用例或者某个文件夹里面的所有用例,需加个参数。具体规则参考【pytest文档2-用例运行规则】
报告独立显示
1.上面方法生成的报告,css是独立的,分享报告的时候样式会丢失,为了更好的分享发邮件展示报告,可以把css样式合并到html里
$ pytest --html=report.html --self-contained-html
显示选项
默认情况下,“ 结果”表中的所有行都将被展开,但具测试通过的行除外Passed。
可以使用查询参数自定义此行为:?collapsed=Passed,XFailed,Skipped。
更多功能
1.更多功能查看官方文档【https://github.com/pytest-dev/pytest-html】
六,日志管理及代码覆盖率
1, pytest中logging的应用
2, 日志及级别的含义
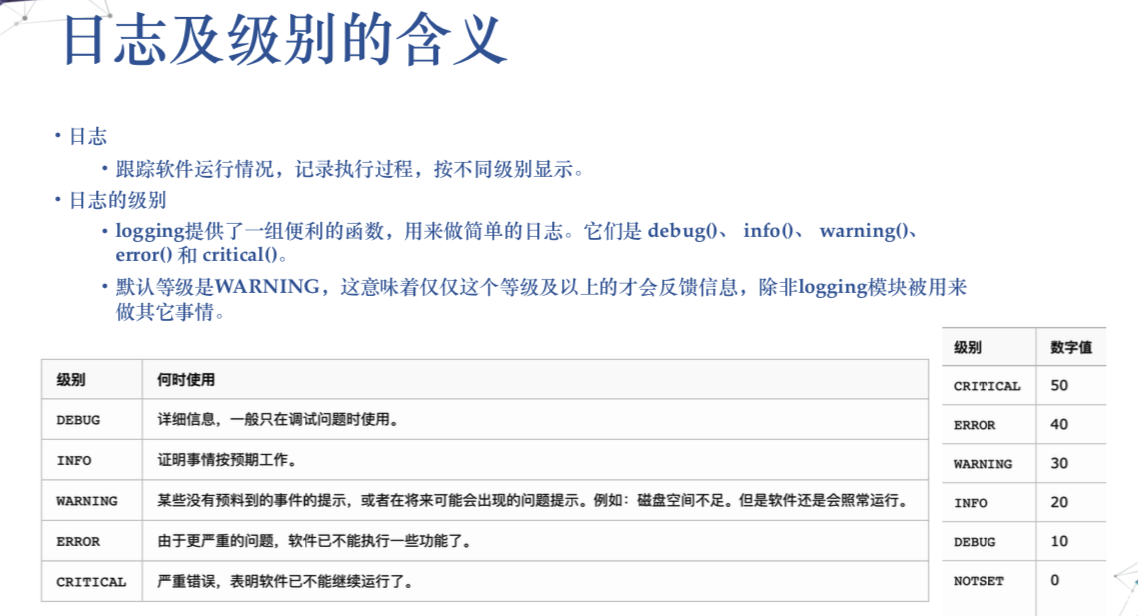
自动化测试用例的调试信息非常有用,可以让我们知道现在的运行情况到,执行到哪步以及相应的出错信息等,可以在pytest里面,有时并不会输出所有信息,比如默认情况下pass的测试用例是没有print输出的。本文将介绍如何在pytest里面实时显示所有的log信息。
1. 用print输出log信息
slowTest_print.py
import time

def test_1():
    print 'test_1'
    time.sleep(1)
    print 'after 1 sec'
    time.sleep(1)
    print 'after 2 sec'
    time.sleep(1)
    print 'after 3 sec'
    assert 1, 'should pass'

def test_2():
    print 'in test_2'
    time.sleep(1)
    print 'after 1 sec'
    time.sleep(1)
    print 'after 2 sec'
    time.sleep(1)
    print 'after 3 sec'
    assert 0, 'failing for demo purposes'
运行上述程序,pytest会capture所有的输出,保存直到所有的测试用例都执行结束,并且只输出那些失败的测试用例的信息,对于成功的测试用例,没有print的信息显示。
从下面的运行结果,如果需要查看test_1()的运行情况,没有log信息可看,print没有显示。
C:\Users\yatyang\PycharmProjects\pytest_example>pytest -v slowTest_print.py
============================= test session starts =============================
platform win32 -- Python 2.7.13, pytest-3.0.6, py-1.4.32, pluggy-0.4.0 -- C:\Python27\python.exe
cachedir: .cache
metadata: {
   'Python': '2.7.13', 'Platform': 'Windows-7-6.1.7601-SP1', 'Packages': {
   'py': '1.4.32', 'pytest': '3.0.6', 'pluggy': '0.4.0'}, 'JAVA_HOME': 'C:\\Program Files (x86)\\Java\\jd
k1.7.0_01', 'Plugins': {'html': '1.14.2', 'metadata': '1.3.0'}}
rootdir: C:\Users\yatyang\PycharmProjects\pytest_example, inifile:
plugins: metadata-1.3.0, html-1.14.2
collected 2 items

slowTest_print.py::test_1 PASSED
slowTest_print.py::test_2 FAILED

================================== FAILURES ===================================
___________________________________ test_2 ____________________________________

    def test_2():
        print 'in test_2'
        time.sleep(1)
        print 'after 1 sec'
        time.sleep(1)
        print 'after 2 sec'
        time.sleep(1)
        print 'after 3 sec'
>       assert 0, 'failing for demo purposes'
E       AssertionError: failing for demo purposes
E       assert 0

slowTest_print.py:22: AssertionError
---------------------------- Captured stdout call -----------------------------
in test_2
after 1 sec
after 2 sec
after 3 sec
===================== 1 failed, 1 passed in 6.45 seconds ======================

C:\Users\yatyang\PycharmProjects\pytest_example>
我们可以用‘-s’参数或者 ‘–capture=no’,这样就可以输出所有测试用的print信息。但是pytest还是会等着所有的测试用例都执行完毕才会显示运行结果。可以看到下面的test_1也显示出print的相关信息。
C:\Users\yatyang\PycharmProjects\pytest_example>py.test --capture=no slowTest_print.py
============================= test session starts =============================
platform win32 -- Python 2.7.13, pytest-3.0.6, py-1.4.32, pluggy-0.4.0
metadata: {
   'Python': '2.7.13', 'Platform': 'Windows-7-6.1.7601-SP1', 'Packages': {
   'py': '1.4.32', 'pytest': '3.0.6', 'pluggy': '0.4.0'}, 'JAVA_HOME': 'C:\\Program Files (x86)\\Java\\jd
k1.7.0_01', 'Plugins': {'html': '1.14.2', 'metadata': '1.3.0'}}
rootdir: C:\Users\yatyang\PycharmProjects\pytest_example, inifile:
plugins: metadata-1.3.0, html-1.14.2
collected 2 items

slowTest_print.py test_1
after 1 sec
after 2 sec
after 3 sec
.in test_2
after 1 sec
after 2 sec
after 3 sec
F

================================== FAILURES ===================================
___________________________________ test_2 ____________________________________

    def test_2():
        print 'in test_2'
        time.sleep(1)
        print 'after 1 sec'
        time.sleep(1)
        print 'after 2 sec'
        time.sleep(1)
        print 'after 3 sec'
>       assert 0, 'failing for demo purposes'
E       AssertionError: failing for demo purposes
E       assert 0

slowTest_print.py:22: AssertionError
===================== 1 failed, 1 passed in 6.17 seconds ======================
2. Python Logging用法
一般情况下,一些程序的调试过程中我们会让它输出一些信息,特别是一些大型的程序,我们通过这些信息可以了解程序的运行情况,python提供了一个日志模块logging,它可以把我们想要的信息全部保存到一个日志文件中,方便查看。
import logging

logging.debug('This is debug message')
logging.info('This is info message')
logging.warning('This is warning message')
屏幕上打印:
WARNING:root:This is warning message
默认情况下,logging将日志打印到屏幕,日志级别为WARNING;
日志级别大小关系为:CRITICAL > ERROR > WARNING > INFO > DEBUG > NOTSET,当然也可以自己定义日志级别。
3. 在pytest中用logging代替print
我们现在来看看在pytest的测试用例里面用logging的输出代替print,有什么不同。
slowTest_logging.py
import time
import logging

logging.basicConfig(level=logging.DEBUG)

def test_1():
    log = logging.getLogger('test_1')
    time.sleep(1)
    log.debug('after 1 sec')
    time.sleep(1)
    log.debug('after 2 sec')
    time.sleep(1)
    log.debug('after 3 sec')
    assert 1, 'should pass'


def test_2():
    log = logging.getLogger('test_2')
    time.sleep(1)
    log.debug('after 1 sec')
    time.sleep(1)
    log.debug('after 2 sec')
    time.sleep(1)
    log.debug('after 3 sec')
    assert 0, 'failing for demo purposes'
运行结果如下,log信息的显示是不是可读性更好了呢。可是pytest还是要等所有的结果都运行完毕才完全输出到屏幕上,没法看到实时的运行情况。比如现在要测试一个新的image,不知道quality如何,如果测试用例非常多,测试人员就得一直等,也许前面的一些测试用都失败就可以停止执行了。那怎么实现实时显示呢?请看方法4。
C:\Users\yatyang\PycharmProjects\pytest_example>pytest slowTest_logging.py
============================= test session starts =============================
platform win32 -- Python 2.7.13, pytest-3.0.6, py-1.4.32, pluggy-0.4.0
metadata: {
   'Python': '2.7.13', 'Platform': 'Windows-7-6.1.7601-SP1', 'Packages': {
   'py': '1.4.32', 'pytest': '3.0.6', 'pluggy': '0.4.0'}, 'JAVA_HOME': 'C:\\Program Files (x86)\\Java\\jd
k1.7.0_01', 'Plugins': {'html': '1.14.2', 'metadata': '1.3.0'}}
rootdir: C:\Users\yatyang\PycharmProjects\pytest_example, inifile:
plugins: metadata-1.3.0, html-1.14.2
collected 2 items

slowTest_logging.py .F

================================== FAILURES ===================================
___________________________________ test_2 ____________________________________

    def test_2():
        log = logging.getLogger('test_2')
        time.sleep(1)
        log.debug('after 1 sec')
        time.sleep(1)
        log.debug('after 2 sec')
        time.sleep(1)
        log.debug('after 3 sec')
>       assert 0, 'failing for demo purposes'
E       AssertionError: failing for demo purposes
E       assert 0

slowTest_logging.py:25: AssertionError
---------------------------- Captured stderr call -----------------------------
DEBUG:test_2:after 1 sec
DEBUG:test_2:after 2 sec
DEBUG:test_2:after 3 sec
===================== 1 failed, 1 passed in 6.37 seconds ======================
C:\Users\yatyang\PycharmProjects\pytest_example>pytest -s slowTest_logging.py
============================= test session starts =============================
platform win32 -- Python 2.7.13, pytest-3.0.6, py-1.4.32, pluggy-0.4.0
metadata: {
   'Python': '2.7.13', 'Platform': 'Windows-7-6.1.7601-SP1', 'Packages': {
   'py': '1.4.32', 'pytest': '3.0.6', 'pluggy': '0.4.0'}, 'JAVA_HOME': 'C:\\Program Files (x86)\\Java\\jd
k1.7.0_01', 'Plugins': {'html': '1.14.2', 'metadata': '1.3.0'}}
rootdir: C:\Users\yatyang\PycharmProjects\pytest_example, inifile:
plugins: metadata-1.3.0, html-1.14.2
collected 2 items

slowTest_logging.py DEBUG:test_1:after 1 sec
DEBUG:test_1:after 2 sec
DEBUG:test_1:after 3 sec
.DEBUG:test_2:after 1 sec
DEBUG:test_2:after 2 sec
DEBUG:test_2:after 3 sec
F

================================== FAILURES ===================================
___________________________________ test_2 ____________________________________

    def test_2():
        log = logging.getLogger('test_2')
        time.sleep(1)
        log.debug('after 1 sec')
        time.sleep(1)
        log.debug('after 2 sec')
        time.sleep(1)
        log.debug('after 3 sec')
>       assert 0, 'failing for demo purposes'
E       AssertionError: failing for demo purposes
E       assert 0

slowTest_logging.py:25: AssertionError
===================== 1 failed, 1 passed in 6.18 seconds ======================
4. pytest用logging和–capture=no实现实时输出log信息
请自己去运行下面的程序吧,可以看到该程序是实时输出当前测试用例执行的情况。
C:\Users\yatyang\PycharmProjects\pytest_example>pytest -s slowTest_logging.py
============================= test session starts =============================
platform win32 -- Python 2.7.13, pytest-3.0.6, py-1.4.32, pluggy-0.4.0
metadata: {
   'Python': '2.7.13', 'Platform': 'Windows-7-6.1.7601-SP1', 'Packages': {
   'py': '1.4.32', 'pytest': '3.0.6', 'pluggy': '0.4.0'}, 'JAVA_HOME': 'C:\\Program Files (x86)\\Java\\jd
k1.7.0_01', 'Plugins': {'html': '1.14.2', 'metadata': '1.3.0'}}
rootdir: C:\Users\yatyang\PycharmProjects\pytest_example, inifile:
plugins: metadata-1.3.0, html-1.14.2
collected 2 items

slowTest_logging.py DEBUG:test_1:after 1 sec
DEBUG:test_1:after 2 sec
DEBUG:test_1:after 3 sec
.DEBUG:test_2:after 1 sec
DEBUG:test_2:after 2 sec
DEBUG:test_2:after 3 sec
F

================================== FAILURES ===================================
___________________________________ test_2 ____________________________________

    def test_2():
        log = logging.getLogger('test_2')
        time.sleep(1)
        log.debug('after 1 sec')
        time.sleep(1)
        log.debug('after 2 sec')
        time.sleep(1)
        log.debug('after 3 sec')
>       assert 0, 'failing for demo purposes'
E       AssertionError: failing for demo purposes
E       assert 0

slowTest_logging.py:25: AssertionError
===================== 1 failed, 1 passed in 6.20 seconds ======================
5.总结
在写自动化测试用例时,添加有用的log信息是非常有必要的。比如在初期的调试过程,能够一旦运行有问题,就可以获取到精确的调试信息。后期在稳定的运行中,其他测试人员来运行也可以很容易上手,所以大家一定要重视测试用例的调试信息。
通过本文,应该知道如何用pytest,logging和–capture=no实现运行测试用例的实时输出所有的log信息。
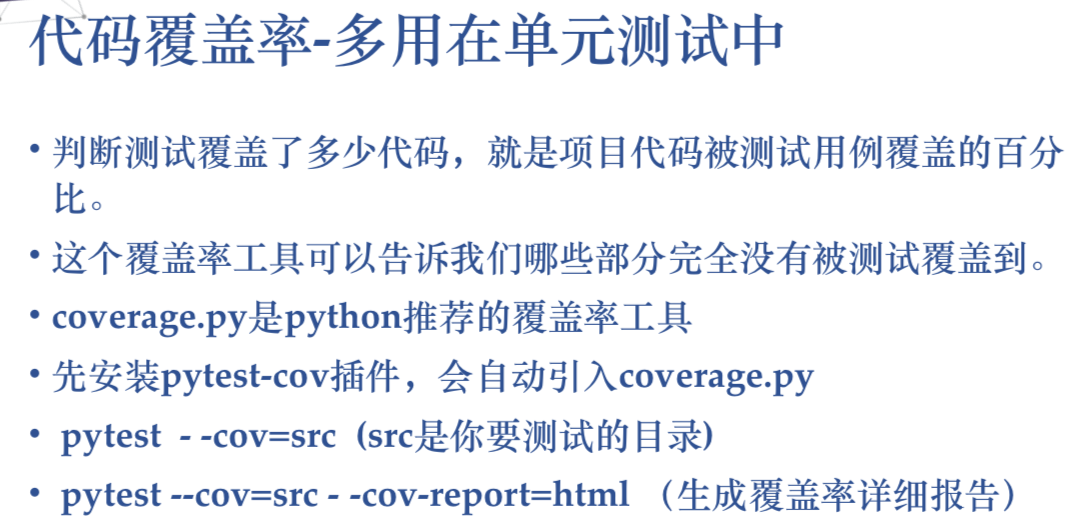
3, 代码覆盖率-多用在单元测试中
一,上篇(—- pytest-cov)
简介:
pytest-cov 是pytest的一个插件,其本质也是引用 python coverage 库 用来统计代码覆盖率。以下这篇文章只供理解,真实项目的话,我们都是用api调用接口的,所以真实项目使用会更复杂一些,这个待下次说明。
另外说明:coverage 是在覆盖率是语句覆盖的一种,不能对你的逻辑做判读,真实意义的话,需要多结合项目本身,这个覆盖率数据没有很强大说服力,不要盲目追求。
一般来说:
路径覆盖率 > 判定覆盖 > 语句覆盖
安装
pip install pytest-cover
安装完后有
py.test -h 可以看到多了以下的用法,说明安装成功:

coverage reporting with distributed testing support:
范例
新建三个文件,cau.py 与test_conver.py 在同一个目录code下。run.py文件在上一级目录pp下。
代码关系如下。
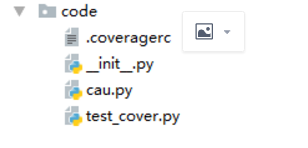
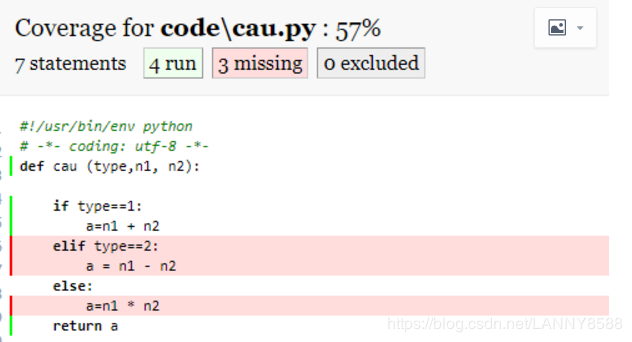
1.新建函数文件cau.py
#!/usr/bin/env python
# -*- coding: utf-8 -*-
def cau (type,n1, n2):

    if type==1:
        a=n1 + n2
    elif type==2:
        a = n1 - n2
    else:
        a=n1 * n2
    return a
2.新建test_conver.py测试文件:
#!/usr/bin/env python
# -*- coding: utf-8 -*-
from code.cau import cau
class Test_cover:
    def test_add(self):
        a=cau(1,2,3)
        assert a==3
3.新建执行脚本run.py
#!/usr/bin/env ```python
# -*- coding: utf-8 -*-
import pytest

if __name__=='__main__':
	pytest.main(["--cov=./code/" ,"--cov-report=html","--cov-config=./code/.coveragerc"] )  # 执行某个目录下case
说明:–cov参数 后面接的是测试的目录 (经给测试,不能指定某个特定的文件。),程序代码跟测试脚本必须在同一个文件下。 –cov-report=html 生成报告 ,只需要python run.py 就可以运行
coveragerc 意思是跳过某些脚本的覆盖率测试。此处跳过test_cover.py文件跟init文件。
内容如下:
[run]
omit =
	tests/*
	 */__init__.py
	*/test_cover.py
结果
生成完后可以直接点击indexhtml
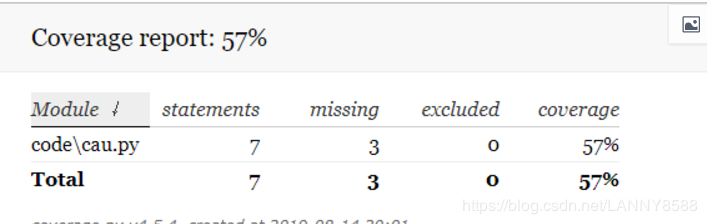
可以看到如下的执行情况,绿色代表运行,红色代表未被执行,自己检查下代码逻辑,可以得出该结果是正确的。
二:下篇(— coverage.py api)
使用pytest-cov 无法统计用 api调用服务的测试脚本所覆盖率,但大部分的项目基本也是使用api调用。所以我们额外需要使用coverage.py api 来统计。
当你安装pytest-cov时,已经默认安装了coverage 这个库。
服务启动
要想扫描到代码,必须在服务启动的时候要插入coverage相关配置。
我这边是flask 启动的,所以在flask启动的代码上添加,如下:
if __name__ == '__main__':
    cov = Coverage()
    cov.start()  # 开始检测代码
    print ("qidong")
    app.run(debug=True, host='0.0.0.0',port=9098)  #原本只有这一行
    cov.stop()  # 停止纪录
    print ("guanbi")
    cov.save()  # 保存在 .coverage 中
    print ("save")
    cov.html_report()  # 生成 HTML 报告
原本我们是python xx.py 这样启动,但现在不可以。
需要改成这样,source 表示目录,xx表示执行文件。
coverage run --source='/xxx/' xx.py
启动运行图如下:

然后调用你的自动化脚本(自动化脚本是直接调的该服务提供的api 。)
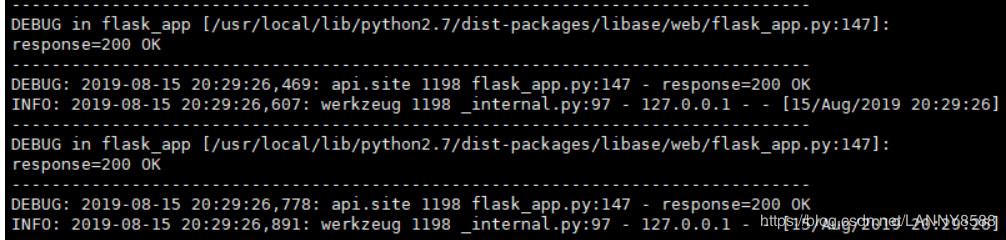
自动化如果正常运行,能看到运行的请求
以上说明你的脚本跟服务是没问题的
ctr-c停掉该脚本后,最后显示save,如果显示”Coverage.py warning: No data was collected. (no-data-collected)“ 说明的服务运行方式有问题,coverage 服务没有运行到你代码
报告生成
输入以下命令
coverage report
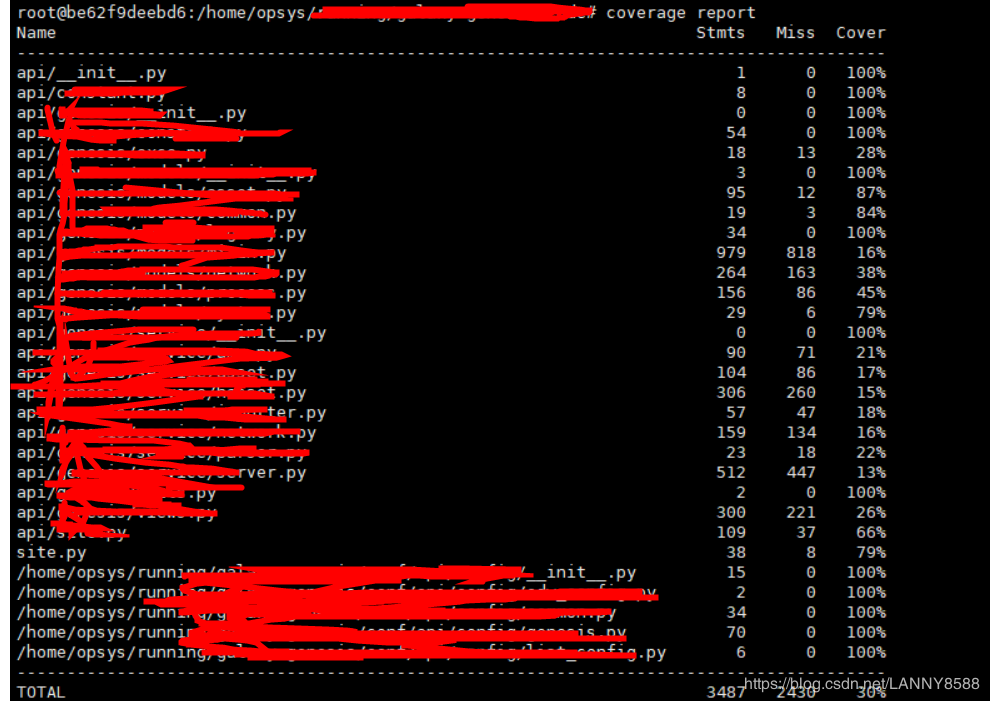
最后一步最后输入
coverage html
这样就可以省 html 文件了。
导出在window上看,具体点击某个文件,点击run,你可以看到绿色的就是运行的。但有问题是,你会发现有些代码应该是要被执行,但却没有被执行。所以coverage的数据准不准很难说。
4,allure测试报告框架
pytest+allure现在都是结合jenkins来搞的,很简单相信大家都会,不会的老哥可以去看我的另一个博客持续集成里的有写
5,定制报告


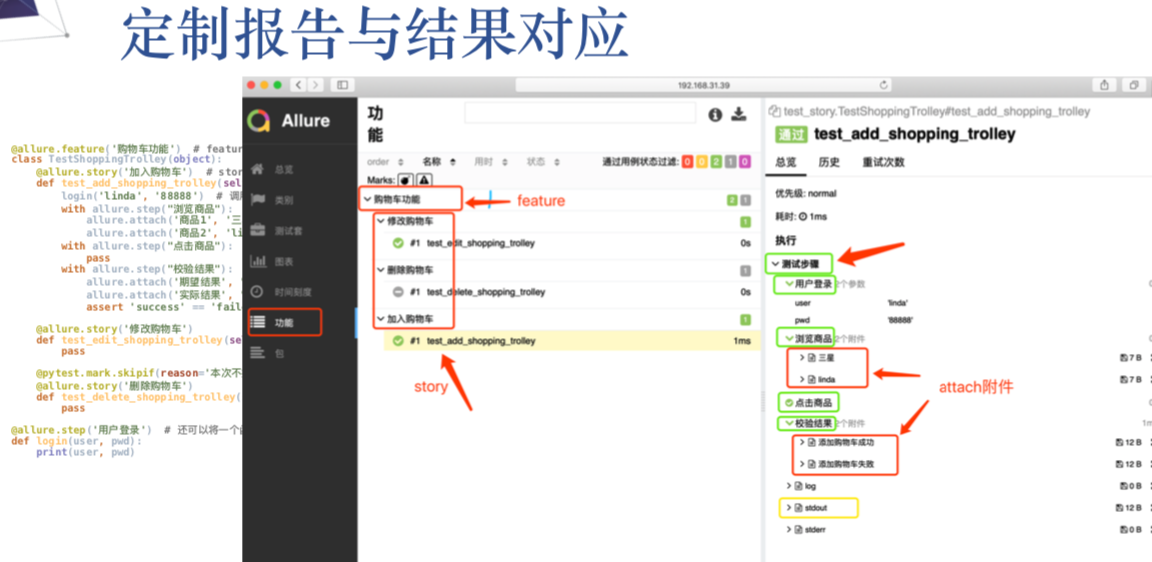
定制报告
Feature: 标注主要功能模块
Story: 标注Features功能模块下的分支功能
Severity: 标注测试用例的重要级别
Step: 标注测试用例的重要步骤
Issue和TestCase: 标注Issue、Case,可加入URL
1、Features定制详解
# -*- coding: utf-8 -*-
# @Time : 2018/8/17 上午10:10
# @Author : WangJuan
# @File : test_case.py
import allure
import pytest
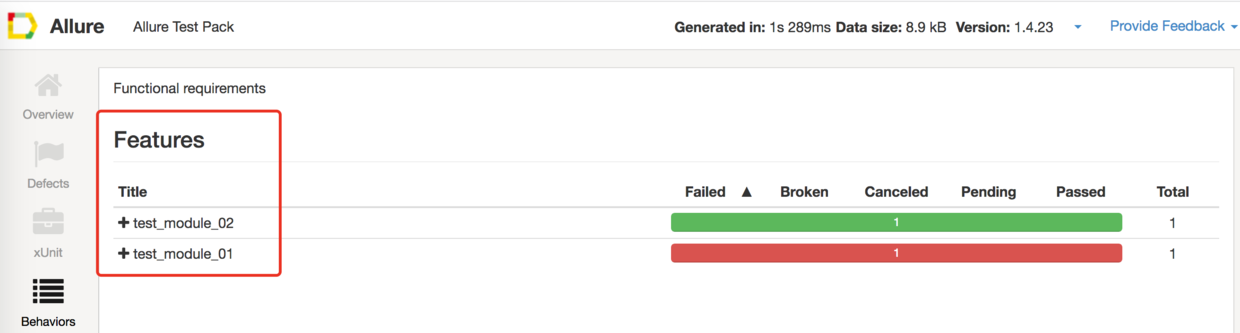
@allure.feature('test_module_01')
def test_case_01():
""" 用例描述:Test case 01 """
assert 0
@allure.feature('test_module_02')
def test_case_02():
""" 用例描述:Test case 02 """
assert 0 == 0
if __name__ == '__main__':
pytest.main(['-s', '-q', '--alluredir', './report/xml'])
添加feature,Report展示见下图。
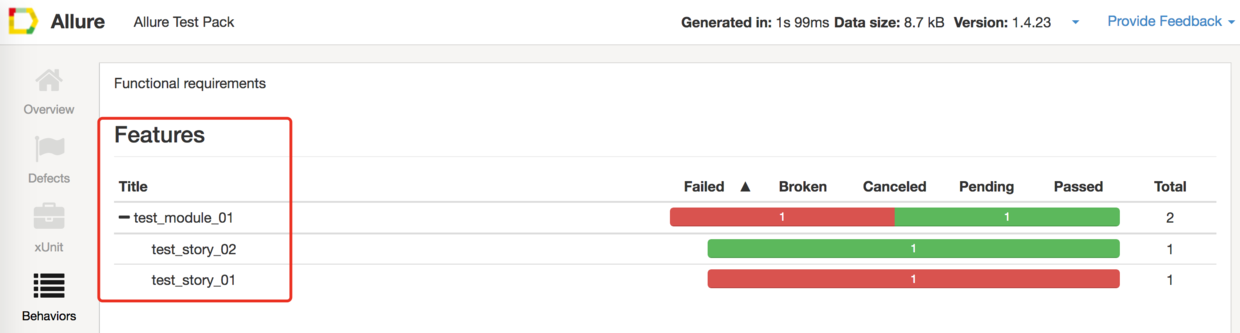
2、Story定制详解
# -*- coding: utf-8 -*-
# @Time : 2018/8/17 上午10:10
# @Author : WangJuan
# @File : test_case.py
import allure
import pytest


@allure.feature('test_module_01')
@allure.story('test_story_01')
def test_case_01():
    """ 用例描述:Test case 01 """
    assert 0

@allure.feature('test_module_01')
@allure.story('test_story_02')
def test_case_02():
    """ 用例描述:Test case 02 """
    assert 0 == 0


if __name__ == '__main__':
    pytest.main(['-s', '-q', '--alluredir', './report/xml'])
添加story,Report展示见下图。
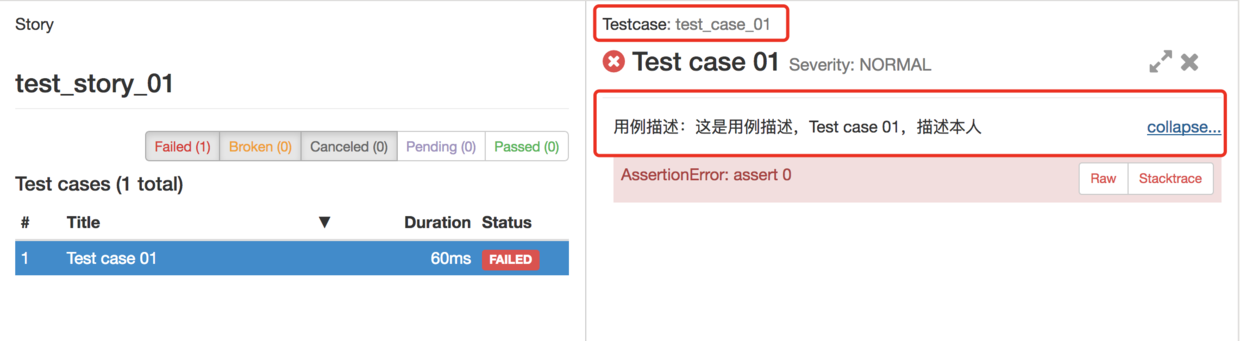
3、用例标题和用例描述定制详解
# -*- coding: utf-8 -*-
# @Time : 2018/8/17 上午10:10
# @Author : WangJuan
# @File : test_case.py
import allure
import pytest

@allure.feature('test_module_01')
@allure.story('test_story_01')
#test_case_01为用例title
def test_case_01():
    """ 用例描述:这是用例描述,Test case 01,描述本人 """
    #注释为用例描述
    assert 0

if __name__ == '__main__':
    pytest.main(['-s', '-q', '--alluredir', './report/xml'])
添加用例标题和用例描述,Report展示见下图。
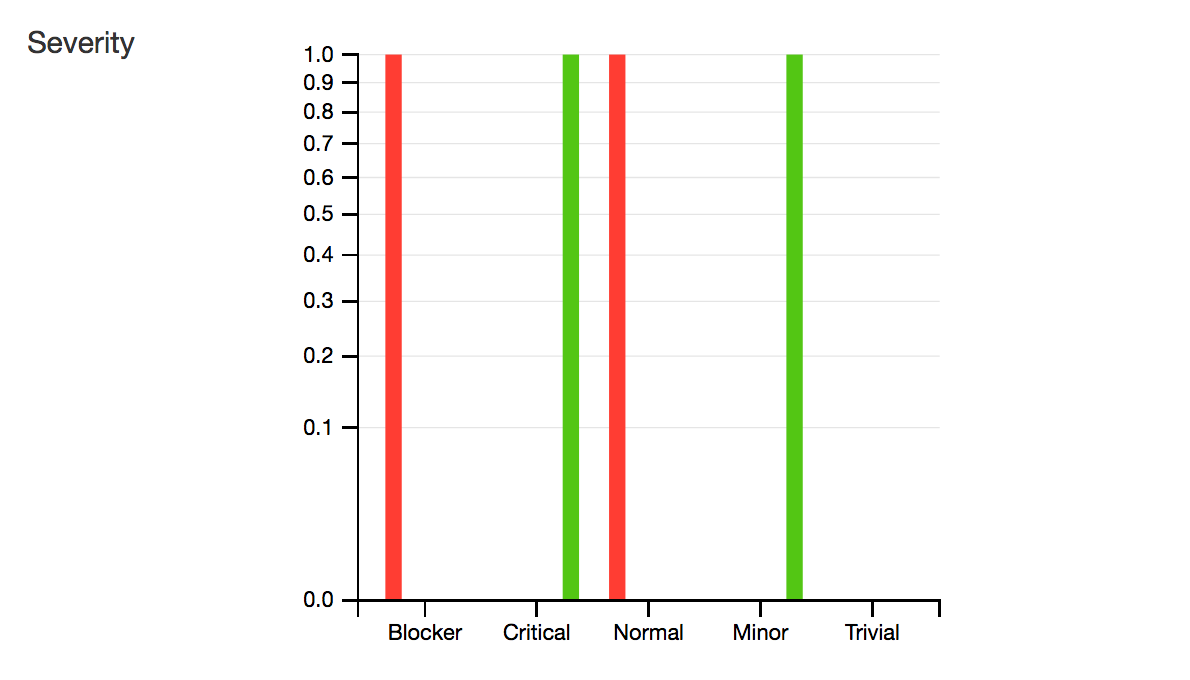
4 、Severity定制详解
Allure中对严重级别的定义:
1、 Blocker级别:中断缺陷(客户端程序无响应,无法执行下一步操作)
2、 Critical级别:临界缺陷( 功能点缺失)
3、 Normal级别:普通缺陷(数值计算错误)
4、 Minor级别:次要缺陷(界面错误与UI需求不符)
5、 Trivial级别:轻微缺陷(必输项无提示,或者提示不规范)
# -*- coding: utf-8 -*-
# @Time : 2018/8/17 上午10:10
# @Author : WangJuan
# @File : test_case.py
import allure
import pytest


@allure.feature('test_module_01')
@allure.story('test_story_01')
@allure.severity('blocker')
def test_case_01():
    """ 用例描述:Test case 01 """
    assert 0

@allure.feature('test_module_01')
@allure.story('test_story_01')
@allure.severity('critical')
def test_case_02():
    """ 用例描述:Test case 02 """
    assert 0 == 0

@allure.feature('test_module_01')
@allure.story('test_story_02')
@allure.severity('normal')
def test_case_03():
    """ 用例描述:Test case 03 """
    assert 0

@allure.feature('test_module_01')
@allure.story('test_story_02')
@allure.severity('minor')
def test_case_04():
    """ 用例描述:Test case 04 """
    assert 0 == 0


if __name__ == '__main__':
    pytest.main(['-s', '-q', '--alluredir', './report/xml'])
添加Severity,Report展示见下图。
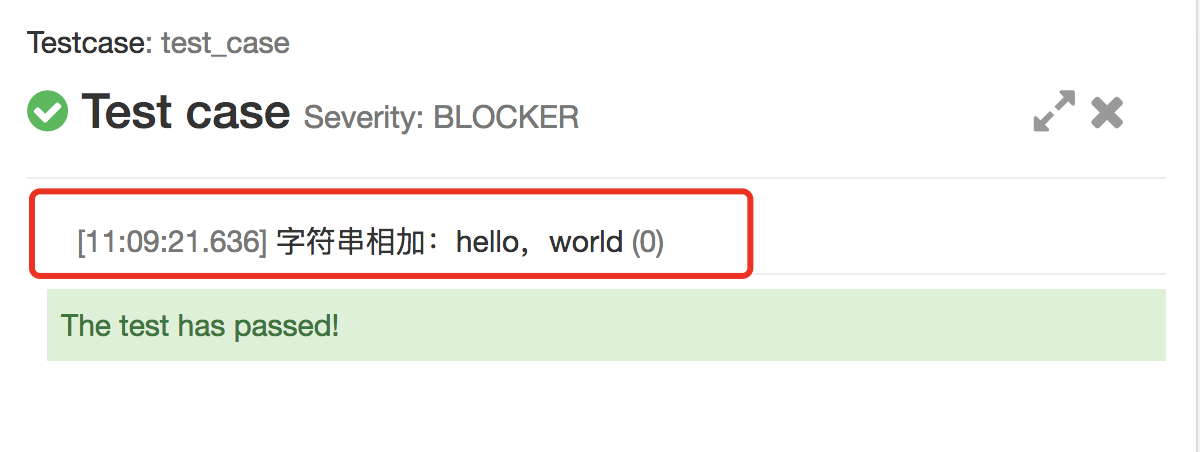
5、Step定制详解
# -*- coding: utf-8 -*-
# @Time : 2018/8/17 上午10:10
# @Author : WangJuan
# @File : test_case.py
import allure
import pytest

@allure.step("字符串相加:{0},{1}")
# 测试步骤,可通过format机制自动获取函数参数
def str_add(str1, str2):
    if not isinstance(str1, str):
        return "%s is not a string" % str1
    if not isinstance(str2, str):
        return "%s is not a string" % str2
    return str1 + str2

@allure.feature('test_module_01')
@allure.story('test_story_01')
@allure.severity('blocker')
def test_case():
    str1 = 'hello'
    str2 = 'world'
    assert str_add(str1, str2) == 'helloworld'


if __name__ == '__main__':
    pytest.main(['-s', '-q', '--alluredir', './report/xml'])
添加Step,Report展示见下图。
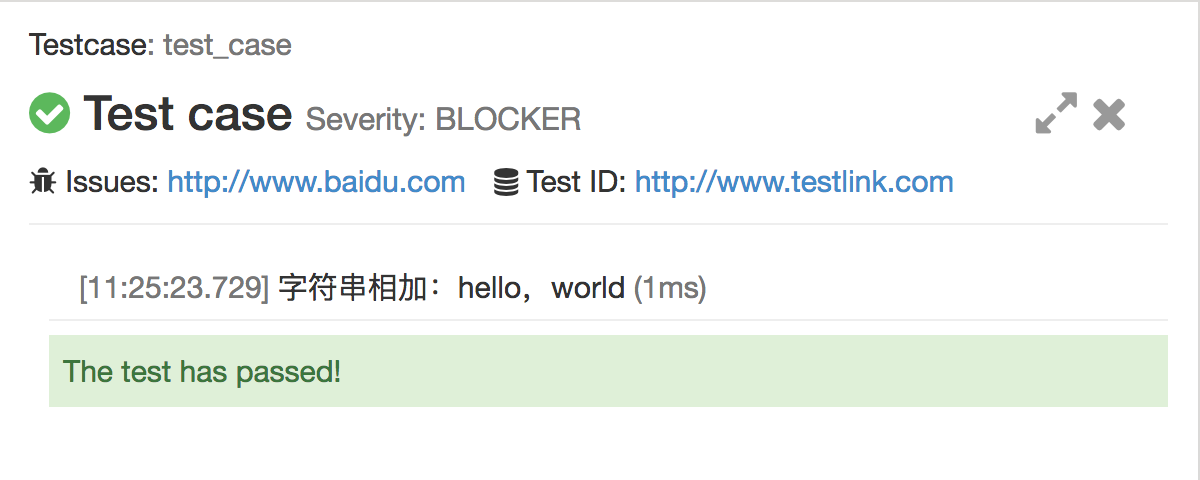
6、Issue和TestCase定制详解
# -*- coding: utf-8 -*-
# @Time : 2018/8/17 上午10:10
# @Author : WangJuan
# @File : test_case.py
import allure
import pytest


@allure.step("字符串相加:{0},{1}")     # 测试步骤,可通过format机制自动获取函数参数
def str_add(str1, str2):
    print('hello')
    if not isinstance(str1, str):
        return "%s is not a string" % str1
    if not isinstance(str2, str):
        return "%s is not a string" % str2
    return str1 + str2

@allure.feature('test_module_01')
@allure.story('test_story_01')
@allure.severity('blocker')
@allure.issue("http://www.baidu.com")
@allure.testcase("http://www.testlink.com")
def test_case():
    str1 = 'hello'
    str2 = 'world'
    assert str_add(str1, str2) == 'helloworld'


if __name__ == '__main__':
    pytest.main(['-s', '-q', '--alluredir', './report/xml'])
添加Issue和TestCase,Report展示见下图。
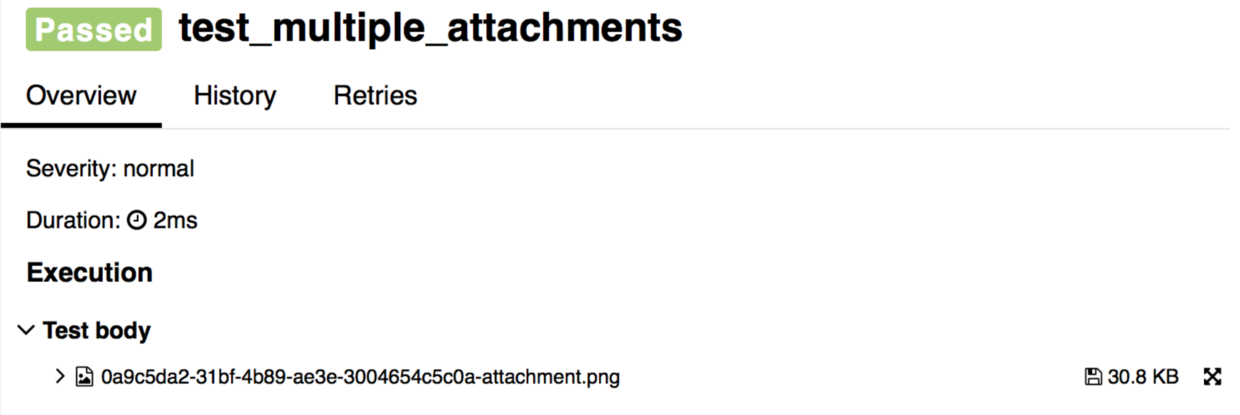
8、attach定制详解
 file = open('../test.png', 'rb').read()
 allure.attach('test_img', file, allure.attach_type.PNG)
在报告中增加附件:allure.attach(’arg1’,’arg2’,’arg3’):
arg1:是在报告中显示的附件名称
arg2:表示添加附件的内容
arg3:表示添加的类型(支持:HTML,JPG,PNG,JSON,OTHER,TEXTXML)
添加attach参数,Report展示见下图。
6,pytest运行指定用例
随着软件功能的增加,模块越来越多,也意味用例越来越多,为了节约执行时间,快速得到测试报告与结果,在工作中可以通过运行指定用例,达到快速执行用例
例子目录
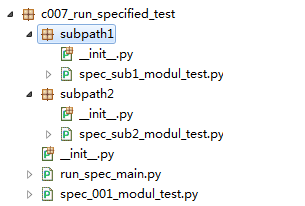
spec_sub1_modul_test.py
#coding: UTF-8
import pytest

def test_004_spec():
    assert 1==1
def test_005_spec():
    assert True==False

class Test_Class():
    def test_006_spec(self):
        assert 'G' in "Goods"
spec_sub2_modul_test.py
#coding: UTF-8
import pytest

def test_007_spec():
    assert 1==1
def test_008_spec():
    assert True==False

class Test_Class():
    def test_009_spec(self):
        assert 'G' in "Goods"
spec_001_modul_test
#coding: UTF-8
import pytest

def test_001_spec():
    assert 1==1
def test_002_spec():
    assert True==False

class Test_Class():
    def test_003_spec(self):
        assert 'H' in "Hell,Jerry"
运行指定模块
if __name__ == '__main__':
    pytest.main("-v -s spec_001_modul_test.py")
运行批量文件夹(运行当前文件夹包括子文件夹所有用例)
#coding: UTF-8
import pytest
if __name__ == '__main__':
    pytest.main("-v -s ./")
运行指定文件夹(subpath1目录下面所有用例)
#coding: UTF-8
import pytest
if __name__ == '__main__':
    pytest.main("-v -s subpath1/")
运行模块中指定用例 (运行模块中test_001_spec用例)
if __name__ == '__main__':
    pytest.main("-v -s spec_001_modul_test.py::test_001_spec")
运行class中指定的用例(运行模块中Test_Class类test_003_spec方法)
if __name__ == '__main__':
   pytest.main("-v -s spec_001_modul_test.py::Test_Class::test_003_spec")
模糊匹配运行用例(匹配当前目录下面包含)
if __name__ == '__main__':
    #运行spec_001_modul_test模块中用例名称包含spec的用例
    pytest.main("-v -s -k spec spec_001_modul_test.py")
    #运行当前文件夹匹配Test_Class的用例,类文件下面的用例
    pytest.main('-s -v -k Test_Class')
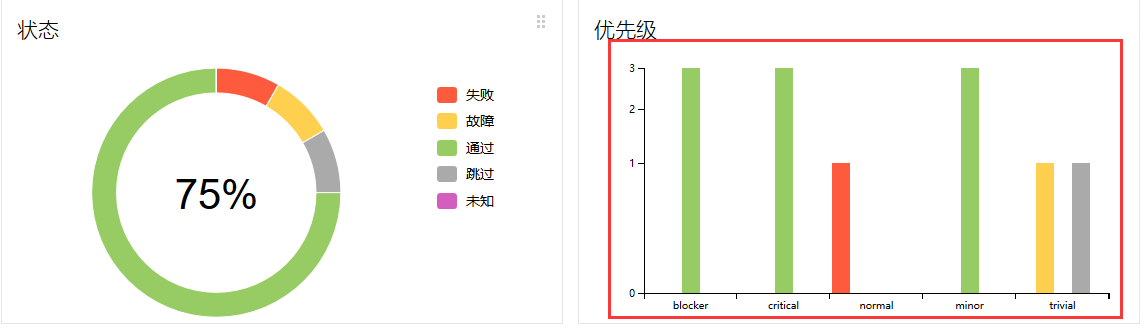
7,按重要性级别进行一定范围测试

此标记用来标识测试用例或者测试类的级别,分为blocker,critical,normal,minor,trivial5个级别,下面们把测试用例按级别标记,并查看一下测试报告
8, 为测试添加详说明@allure.description;@allure.title;
1.title case标题
可以自定义用例标题,标题默认为函数名.
@allure.title
# -*- coding: utf-8 -*-
# @Time : 2019/3/12 11:46
# @Author : zzt

import allure
import pytest


@allure.title("用例标题0")
def test_0():
    pass

@allure.title("用例标题1")
def test_1():
    pass


def test_2():
    pass
执行效果:

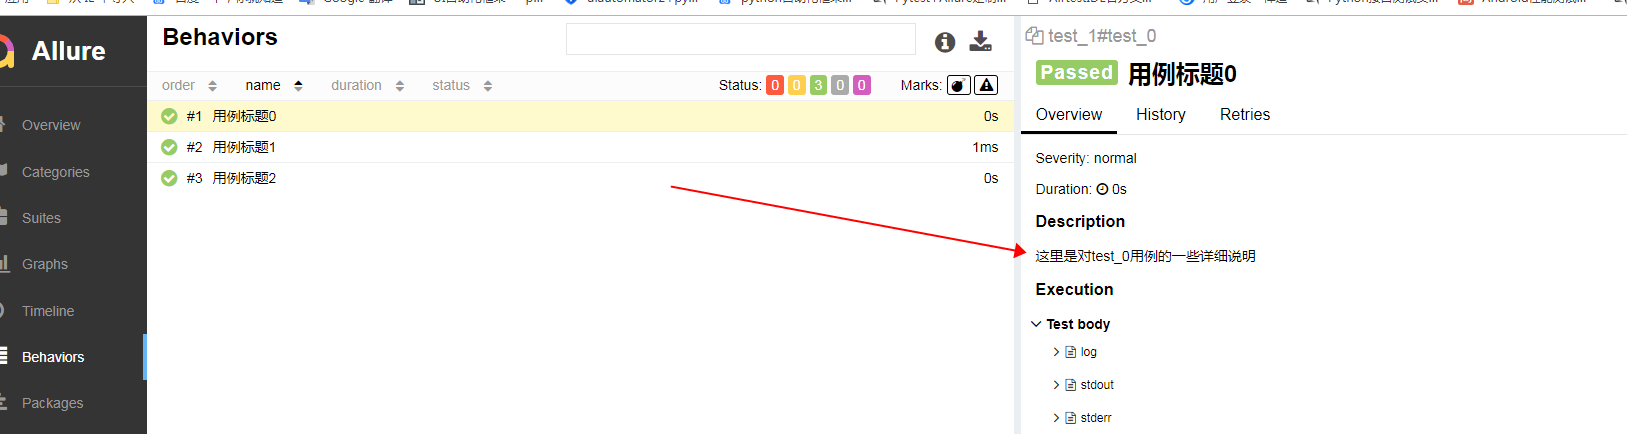
- 说明
可以添加测试的详细说明,以便根据需要为报告阅读器提供尽可能多的上下文。
两种方式:@allure.description 提供描述字符串的装饰器
@allure.description_html 提供一些HTML在测试用例的描述部分 (待研究)
# -*- coding: utf-8 -*-
# @Time : 2019/3/12 11:46
# @Author : zzt

import allure
import pytest

@allure.title("用例标题0")
@allure.description("这里是对test_0用例的一些详细说明")
def test_0():
    pass

@allure.title("用例标题1")
def test_1():
    pass

@allure.title("用例标题2")
def test_2():
    pass
9, 链接@allure.link @allure.issue @allure.testcase

@allure.link @allure.issue @allure.testcase
# -*- coding: utf-8 -*-
# @Time : 2019/3/12 11:46
# @Author : zzt
import allure
import pytest
@allure.feature('这里是一级标签')
class TestAllure():
@allure.title("用例标题0")
@allure.story("这里是第一个二级标签")
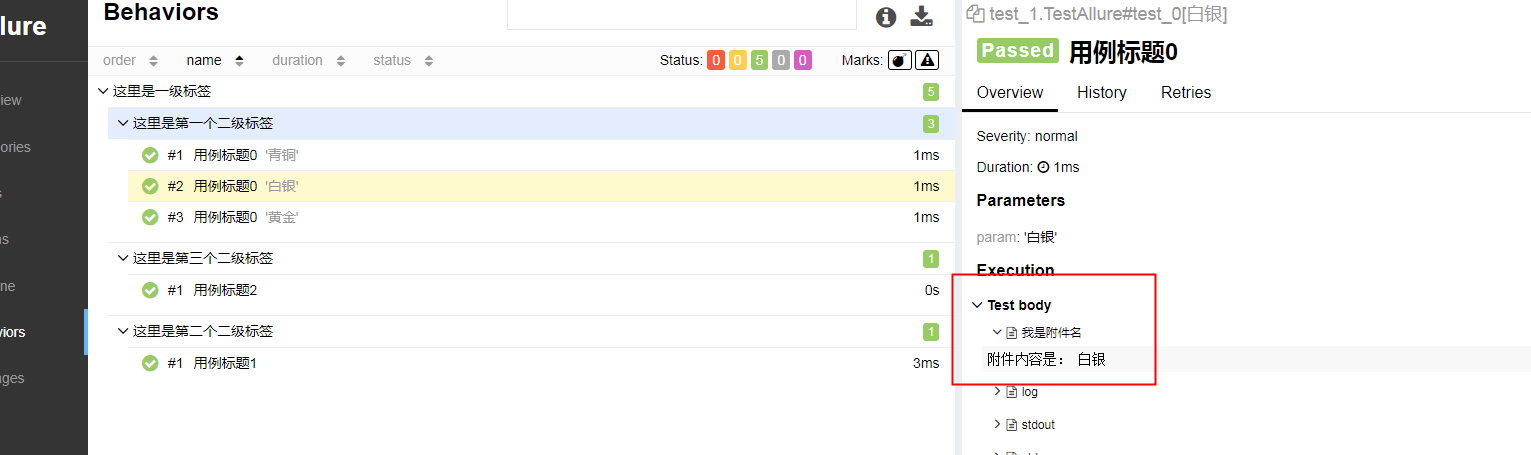
@pytest.mark.parametrize('param', ['青铜', '白银', '黄金'])
def test_0(self, param):
allure.attach('附件内容是: '+param, '我是附件名', allure.attachment_type.TEXT)
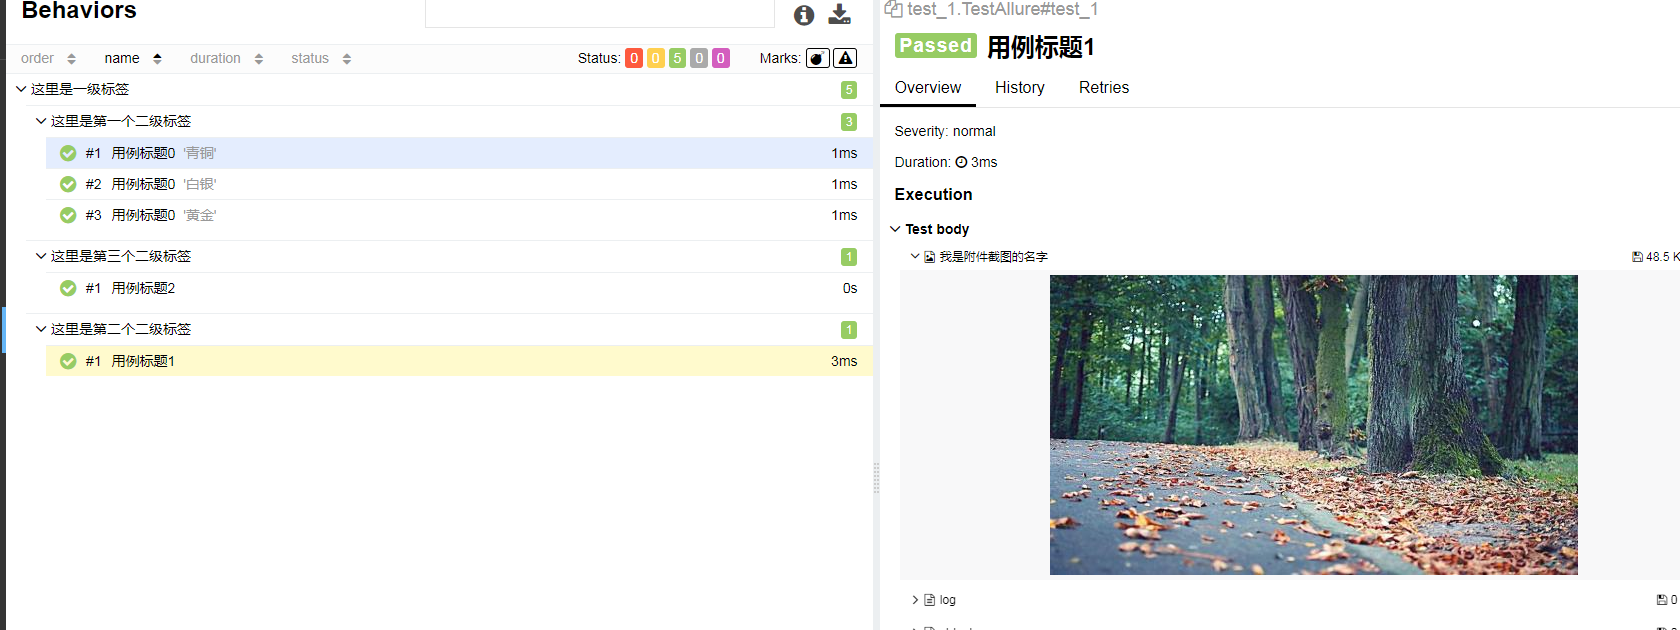
@allure.title("用例标题1")
@allure.story("这里是第二个二级标签")
def test_1(self):
allure.attach.file(r'E:\Myproject\pytest-allure\test\test_1.jpg', '我是附件截图的名字', attachment_type=allure.attachment_type.JPG)
@allure.title("用例标题2")
@allure.story("这里是第三个二级标签")
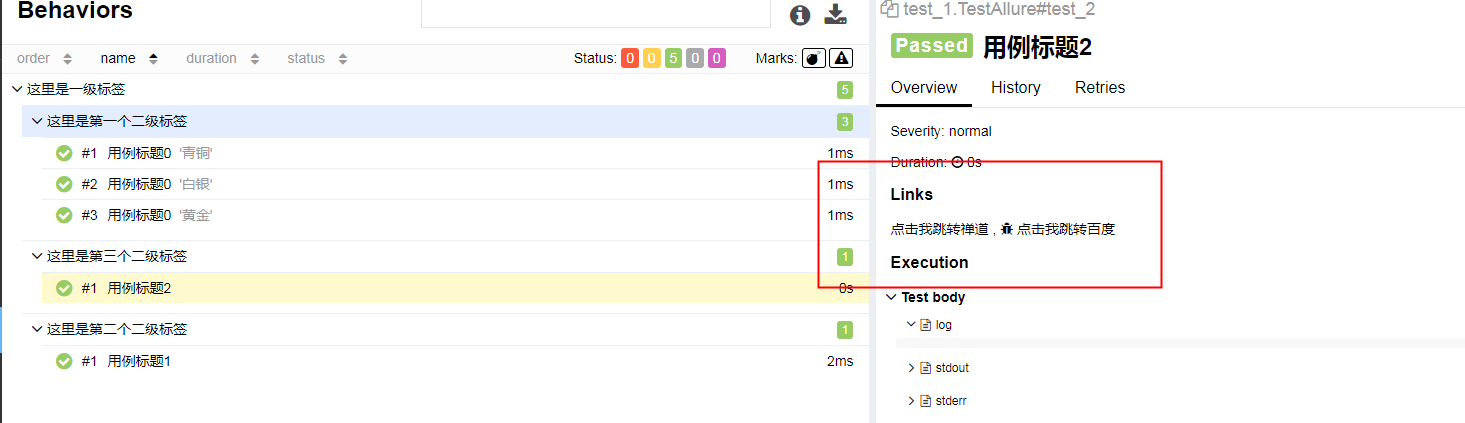
@allure.issue('http://baidu.com', name='点击我跳转百度')
@allure.testcase('http://bug.com/user-login-Lw==.html', name='点击我跳转禅道')
def test_2(self):
pass
执行结果如下:
七, 单元自动化测试pytest和allure在测试中应用 自动执行
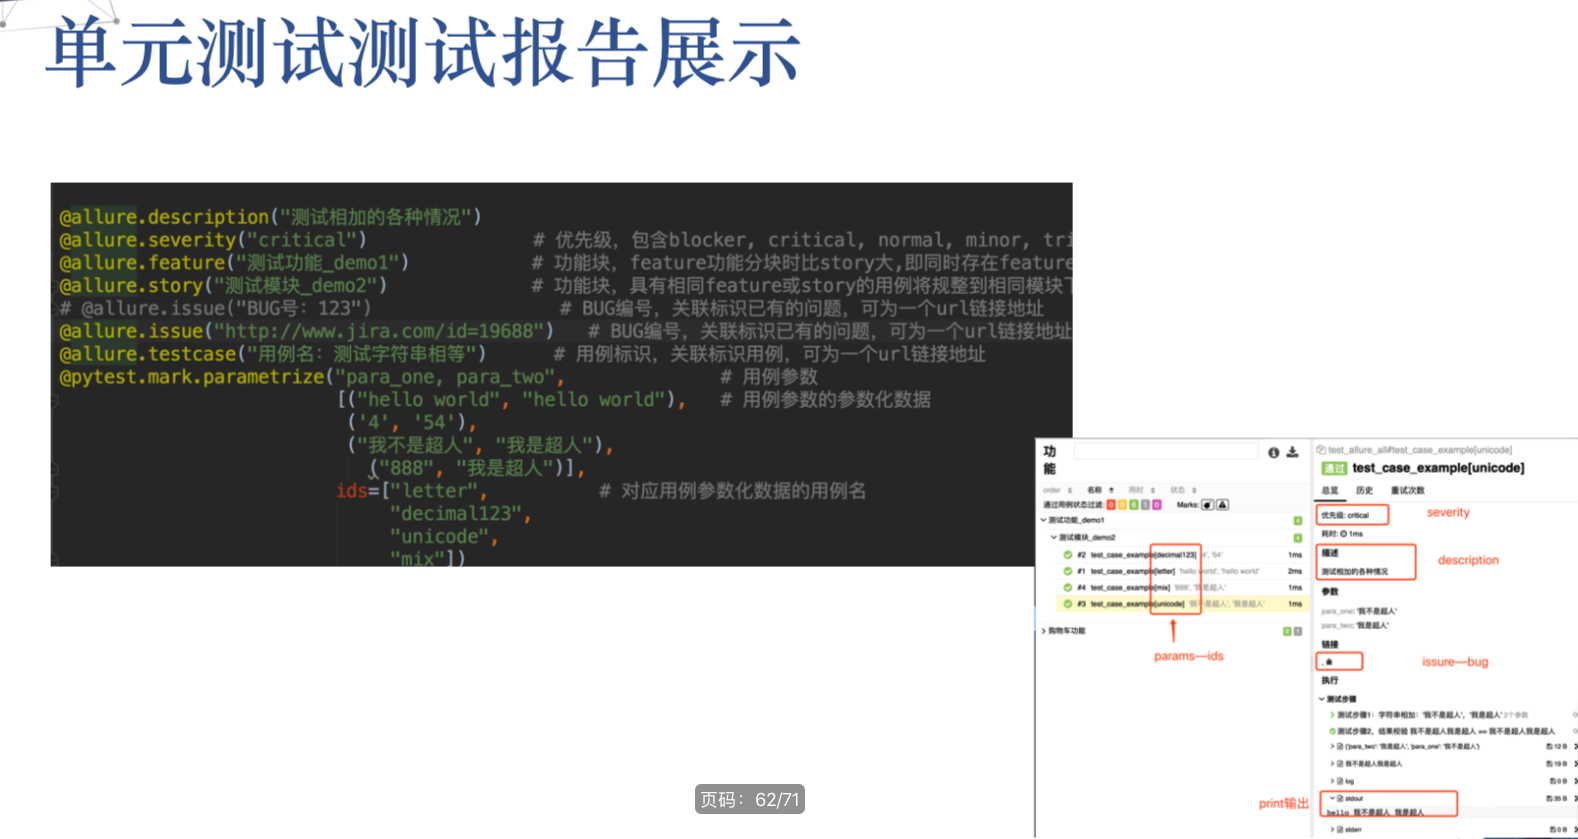
1, 单元测试测试报告展示
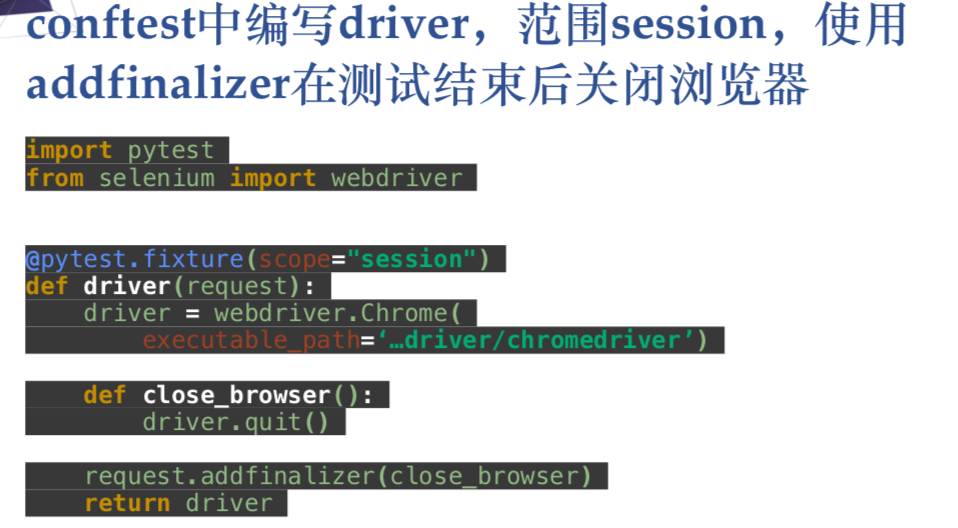
2, conftest中编写driver,范围session,使用 addfinalizer在测试结束后关闭浏览器
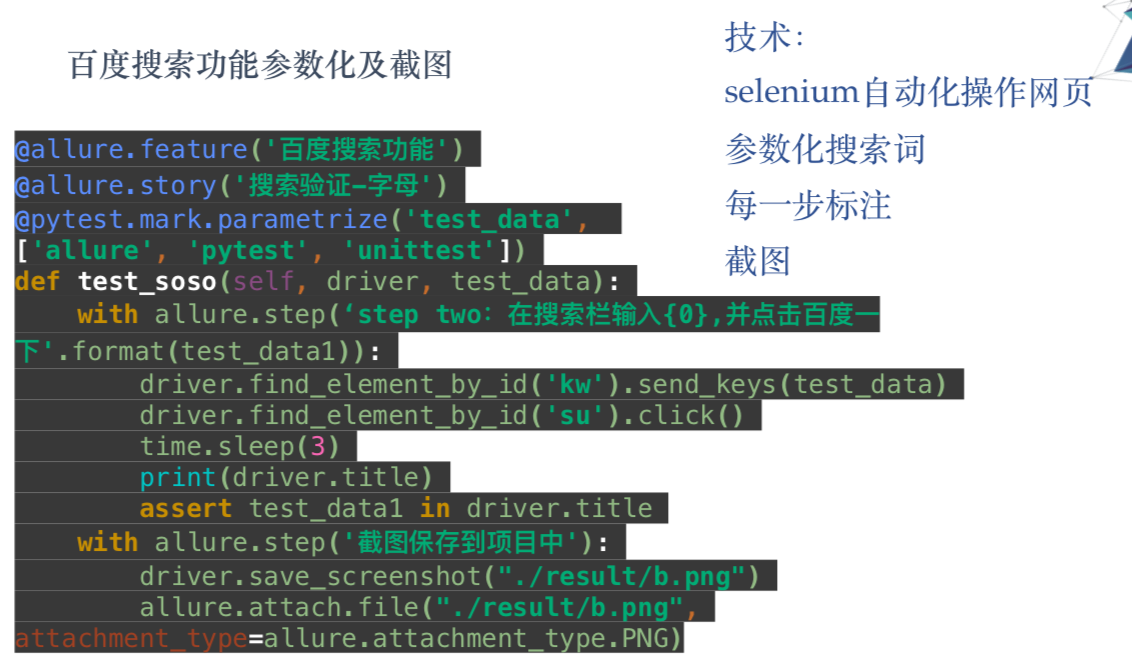
3, 前端自动化测试-百度搜索功能实战演示
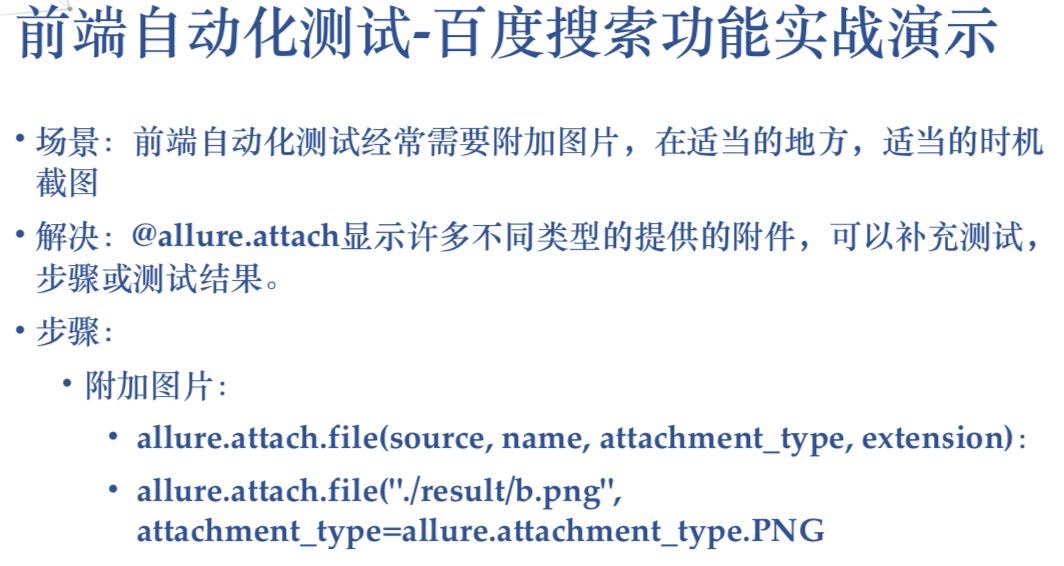
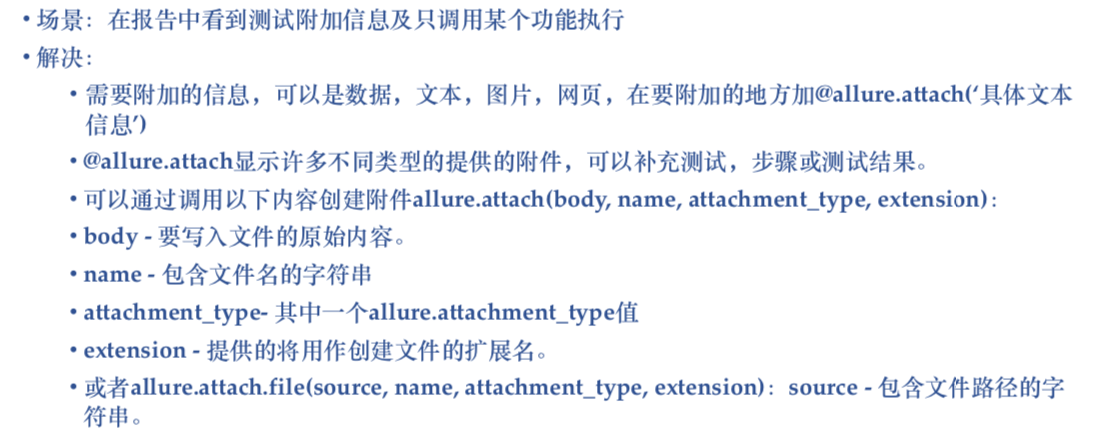
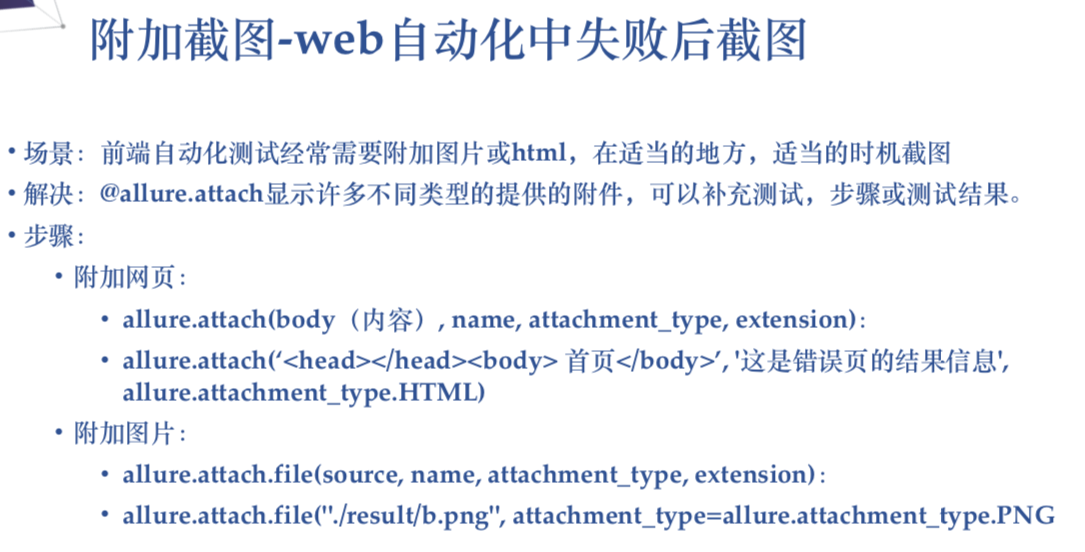
报告可以展示许多不同类型的附件,用来补充测试,步骤等信息
allure.attach(body, name, attachment_type, extension)
body – 要写入文件的原始内容。
name – 包含文件名的字符串
attachment_type- 其中一个allure.attachment_type值
extension – 提供的将用作创建文件的扩展名
或者 allure.attach.file(source, name, attachment_type, extension)
source – 包含文件路径的字符串。
# -*- coding: utf-8 -*-
# @Time : 2019/3/12 11:46
# @Author : zzt

import allure
import pytest

@allure.feature('这里是一级标签')
class TestAllure():

    @allure.title("用例标题0")
    @allure.story("这里是第一个二级标签")
    @pytest.mark.parametrize('param', ['青铜', '白银', '黄金'])
    def test_0(self, param):
        allure.attach('附件内容是: '+param, '我是附件名', allure.attachment_type.TEXT)

    @allure.title("用例标题1")
    @allure.story("这里是第二个二级标签")
    def test_1(self):
        allure.attach.file(r'E:\Myproject\pytest-allure\test\test_1.jpg', '我是附件截图的名字', attachment_type=allure.attachment_type.JPG)

    @allure.title("用例标题2")
    @allure.story("这里是第三个二级标签")
    @allure.severity(allure.severity_level.NORMAL)
    def test_2(self):
        pass
执行结果如下:
4,源码:Github:https://github.com/linda883/py_techDemo
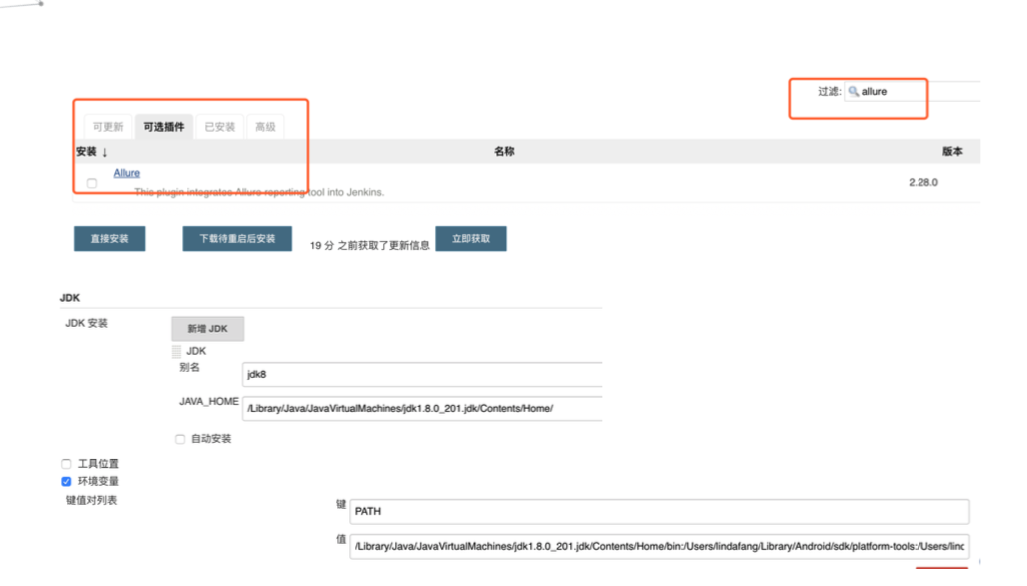
5, CI/CD使用jenkins进行持续集成
在Jenkins集成相信大家都会就不讲了,或者看我的持续集成博客


八,天蝎座的测试之旅

发布者:全栈程序员-用户IM,转载请注明出处:https://javaforall.cn/164415.html原文链接:https://javaforall.cn
【正版授权,激活自己账号】: Jetbrains全家桶Ide使用,1年售后保障,每天仅需1毛
【官方授权 正版激活】: 官方授权 正版激活 支持Jetbrains家族下所有IDE 使用个人JB账号...
