大家好,又见面了,我是你们的朋友全栈君。
目录
在一次项目中, 需要进行嵌入式操作系统选型, 需求就是选择一款OS,既能满足当下项目的需要,又要考虑公司未来对物联网应用的扩展能力,对比了目前市面上流行的开源操作系统,诸如FreeRTOS,RTX,UCOS,RT-Thread,contiki等, 最终确定了一款IoT OS:RT-Thread(遵循 Apache License 2.0 开源许可协议)。事实证明,这款操作系统也为公司物联网产品设计提供了很大便利,这里介绍其中一个我认为非常有用的组件FinSH,也正是深刻体会到了FinSH在程序应用开发中的便利, 使我下定决心将其移植到Linux平台,为我在linux平台的项目添上一个炫酷的操作接口,在此对整个过程进行总结。
FinSH介绍
整体来说,FinSH就是一个shell,通过嵌入到程序中, 将程序内部的符号(函数,变量)暴露出来,使得用户可以在程序运行后, 很轻易的通过命令行调用程序内部函数,变量,相比于使用gdb调试工具调试程序,FinSH为程序员提供了一个伸入程序内部的触手,可以在程序运行时随意查看程序内部状态, 调用接口,可谓是程序开发的一个利器。
以下内容摘自RT-Thread FinSH
FinSH 是 RT-Thread 的命令行组件,提供一套供用户在命令行与程序交互的操作接口,主要用于调试或查看系统信息。FinSH执行流程,如下图所示:

FinSH 支持权限验证功能,系统在启动后会进行权限验证,只有权限验证通过,才会开启 FinSH 功能,提升系统输入的安全性。
FinSH 支持自动补全、查看历史命令等功能,通过键盘上的按键可以很方便的使用这些功能,FinSH 支持的按键如下表所示:
| 按键 | 功能描述 |
|---|---|
| Tab 键 | 当没有输入任何字符时按下 Tab 键将会打印当前系统支持的所有命令。若已经输入部分字符时按下 Tab 键,将会查找匹配的命令,也会按照文件系统的当前目录下的文件名进行补全,并可以继续输入,多次补全 |
| ↑↓键 | 上下翻阅最近输入的历史命令 |
| 退格键 | 删除符 |
| ←→键 | 向左或向右移动标 |
FinSH支持两种输入模式,分别是传统命令行模式和 C 语言解释器模式。
传统命令行模式
此模式又称为 msh(module shell),msh 模式下,FinSH 与传统 shell(dos/bash)执行方式一致,例如,可以通过 cd / 命令将目录切换至根目录。
msh 通过解析,将输入字符分解成以空格区分开的命令和参数。其命令执行格式如下所示:
command [arg1] [arg2] [...]
其中 command 既可以是 RT-Thread 内置的命令,也可以是可执行的文件。
C 语言解释器模式
此模式又称为 C-Style 模式。C 语言解释器模式下,FinSH 能够解析执行大部分 C 语言的表达式,并使用类似 C 语言的函数调用方式访问系统中的函数及全局变量,此外它也能够通过命令行方式创建变量。在该模式下,输入的命令必须类似 C 语言中的函数调用方式,即必须携带 () 符号,例如,要输出系统当前所有线程及其状态,在 FinSH 中输入 list_thread() 即可打印出需要的信息。FinSH 命令的输出为此函数的返回值。对于一些不存在返回值的函数(void 返回值),这个打印输出没有意义。
最初 FinSH 仅支持 C-Style 模式,后来随着 RT-Thread 的不断发展,C-Style 模式在运行脚本或者程序时不太方便,而使用传统的 shell 方式则比较方便。另外,C-Style 模式下,FinSH 占用体积比较大。出于这些考虑,在 RT-Thread 中增加了 msh 模式,msh 模式体积小,使用方便,推荐大家使用 msh 模式。
如果在 RT-Thread 中同时使能了这两种模式,那它们可以动态切换,在 msh 模式下输入 exit 后回车,即可切换到 C-Style 模式。在 C-Style 模式输入 msh() 后回车,即可进入 msh 模式。两种模式的命令不通用,msh 命令无法在 C-Style 模式下使用,反之同理。
FinSH的实现原理并非单纯的字符串匹配,而是用到了链接,ELF文件结构, 词法分析,语法分析等编译器相关知识, 使得FinSH的调用方式非常灵活,满足C-Style形式的语法基本都可以被解析。
FinSH移植
FinSH作为RT-Thread的组件, 是以一个独立的线程形式存在, 要将其移植到linux平台,需要对底层相关调用,诸如线程,信号, 标准输入输出等方面进行移植,移植相关的基本介绍可阅读官方提供的FinSH移植。
源码下载: RT-Thread源码下载
移植要点
1. os相关
- 线程创建
RT-Thread中线程创建使用rt_thread_init函数, 在linux平台要使用pthread_create创建线程。线程创建代码位于shell.c中finsh_system_init()
rt_sem_init(&(shell->rx_sem), “shrx”, 0, 0);
result = rt_thread_init(&finsh_thread,
“tshell”,
finsh_thread_entry, RT_NULL,
&finsh_thread_stack[0], sizeof(finsh_thread_stack),
FINSH_THREAD_PRIORITY, 10);
if (result == RT_EOK)
rt_thread_startup(&finsh_thread);
- 信号
RT-Thread中信号接口rt_sem_init等修改为linux平台接口sem_init。
- 输入输出
输入输出相关的主要是针对命令行输入, 在RT-Thread中是通过串口等方式进行输入输出,而在linux平台,需要修改为终端输入输出,可以使用宏RT_USING_POSIX开启POSIX接口, 则会自动使用满足linux平台的接口。
2. 链接、链接脚本
要实现C-Style模式, 还必须借助链接脚本对程序进行特殊的控制(文件是计算机操作的基本单位,而段则是链接器操作的基本单位。一个文件中可以包含一个或多个段。对于链接器来说,它不关心有多少个输入文件,而只关心有多少个输入段)。
C-Style模式对外提供的函数接口需要使用宏FINSH_FUNCTION_EXPORT来定义,
#define FINSH_FUNCTION_EXPORT_CMD(name, cmd, desc)                      \
                const char __fsym_##cmd##_name[] SECTION(".rodata.name") = #cmd;    \
                const char __fsym_##cmd##_desc[] SECTION(".rodata.name") = #desc;   \
                RT_USED const struct finsh_syscall __fsym_##cmd SECTION("FSymTab")= \
                {                           \
                    __fsym_##cmd##_name,    \
                    __fsym_##cmd##_desc,    \
                    (syscall_func)&name     \
                };

            #define FINSH_VAR_EXPORT(name, type, desc)                              \
                const char __vsym_##name##_name[] SECTION(".rodata.name") = #name;  \
                const char __vsym_##name##_desc[] SECTION(".rodata.name") = #desc;  \
                RT_USED const struct finsh_sysvar __vsym_##name SECTION("VSymTab")= \
                {                           \
                    __vsym_##name##_name,   \
                    __vsym_##name##_desc,   \
                    type,                   \
                    (void*)&name            \
                };

#define FINSH_FUNCTION_EXPORT(name, desc)   \
    FINSH_FUNCTION_EXPORT_CMD(name, name, desc)
可以看出, 程序暴露出的函数和变量,都是定义在特殊的段中, 函数定义在SECTION(“FSymTab”),变量定义在SECTION(“VSymTab”),不了解SECTION的同学可以参考 理解ELF文件。这种实现方式和linux驱动编程中使用的宏module_init、module_exit是一样的道理:
#define module_init(x)     __initcall(x);              //include/linux/init.h

#define __initcall(fn) device_initcall(fn)

#define device_initcall(fn)                 __define_initcall("6",fn,6)

#define __define_initcall(level,fn,id) /

         static initcall_t __initcall_##fn##id __used /

         __attribute__((__section__(".initcall" level ".init"))) = fn
无论是实现形式,还是最终的调用执行都是一样的,还在纠结于module_init()定义的入口函数是怎么被调用起来的同学,也可以继续往下看。
我们已经在代码中指定了FSymTab和VSymTab, 还需要在链接脚本中定义这两个段(为什么需要在链接脚本中定义这两个段呢,是因为这两个段是我们自定义的, 缺省的链接脚本中缺少对自定义数据段的声明),以下是我所在平台的链接脚本内容:
OUTPUT_FORMAT("elf32-i386", "elf32-i386",
	      "elf32-i386")
OUTPUT_ARCH(i386)
ENTRY(_start)
SEARCH_DIR("=/usr/local/lib/i386-linux-gnu"); SEARCH_DIR("=/lib/i386-linux-gnu"); SEARCH_DIR("=/usr/lib/i386-linux-gnu"); SEARCH_DIR("=/usr/local/lib32"); SEARCH_DIR("=/lib32"); SEARCH_DIR("=/usr/lib32"); SEARCH_DIR("=/usr/local/lib"); SEARCH_DIR("=/lib"); SEARCH_DIR("=/usr/lib"); SEARCH_DIR("=/usr/i686-linux-gnu/lib32"); SEARCH_DIR("=/usr/i686-linux-gnu/lib");
SECTIONS
{
  /* Read-only sections, merged into text segment: */
  PROVIDE (__executable_start = SEGMENT_START("text-segment", 0x08048000)); . = SEGMENT_START("text-segment", 0x08048000) + SIZEOF_HEADERS;
  .interp         : { *(.interp) }
  .note.gnu.build-id : { *(.note.gnu.build-id) }
  .hash           : { *(.hash) }
  .gnu.hash       : { *(.gnu.hash) }
  .dynsym         : { *(.dynsym) }
  .dynstr         : { *(.dynstr) }
  .gnu.version    : { *(.gnu.version) }
  .gnu.version_d  : { *(.gnu.version_d) }
  .gnu.version_r  : { *(.gnu.version_r) }
  .rel.dyn        :
    {
      *(.rel.init)
      *(.rel.text .rel.text.* .rel.gnu.linkonce.t.*)
      *(.rel.fini)
      *(.rel.rodata .rel.rodata.* .rel.gnu.linkonce.r.*)
      *(.rel.data.rel.ro .rel.data.rel.ro.* .rel.gnu.linkonce.d.rel.ro.*)
      *(.rel.data .rel.data.* .rel.gnu.linkonce.d.*)
      *(.rel.tdata .rel.tdata.* .rel.gnu.linkonce.td.*)
      *(.rel.tbss .rel.tbss.* .rel.gnu.linkonce.tb.*)
      *(.rel.ctors)
      *(.rel.dtors)
      *(.rel.got)
      *(.rel.bss .rel.bss.* .rel.gnu.linkonce.b.*)
      *(.rel.ifunc)
    }
  .rel.plt        :
    {
      *(.rel.plt)
      PROVIDE_HIDDEN (__rel_iplt_start = .);
      *(.rel.iplt)
      PROVIDE_HIDDEN (__rel_iplt_end = .);
    }
  .init           :
  {
    KEEP (*(SORT_NONE(.init)))
  }
  .plt            : { *(.plt) *(.iplt) }
.plt.got        : { *(.plt.got) }
  .text           :
  {
    *(.text.unlikely .text.*_unlikely .text.unlikely.*)
    *(.text.exit .text.exit.*)
    *(.text.startup .text.startup.*)
    *(.text.hot .text.hot.*)
    *(.text .stub .text.* .gnu.linkonce.t.*)
    /* .gnu.warning sections are handled specially by elf32.em.  */
    *(.gnu.warning)
  }
  .fini           :
  {
    KEEP (*(SORT_NONE(.fini)))
  }
  PROVIDE (__etext = .);
  PROVIDE (_etext = .);
  PROVIDE (etext = .);
  .rodata         : { *(.rodata .rodata.* .gnu.linkonce.r.*) }
  .rodata1        : { *(.rodata1) }
  .eh_frame_hdr : { *(.eh_frame_hdr) *(.eh_frame_entry .eh_frame_entry.*) }
  .eh_frame       : ONLY_IF_RO { KEEP (*(.eh_frame)) *(.eh_frame.*) }
  .gcc_except_table   : ONLY_IF_RO { *(.gcc_except_table
  .gcc_except_table.*) }
  .gnu_extab   : ONLY_IF_RO { *(.gnu_extab*) }
  /* These sections are generated by the Sun/Oracle C++ compiler.  */
  .exception_ranges   : ONLY_IF_RO { *(.exception_ranges
  .exception_ranges*) }
  /* Adjust the address for the data segment.  We want to adjust up to
     the same address within the page on the next page up.  */
  . = DATA_SEGMENT_ALIGN (CONSTANT (MAXPAGESIZE), CONSTANT (COMMONPAGESIZE));
  /* Exception handling  */
  .eh_frame       : ONLY_IF_RW { KEEP (*(.eh_frame)) *(.eh_frame.*) }
  .gnu_extab      : ONLY_IF_RW { *(.gnu_extab) }
  .gcc_except_table   : ONLY_IF_RW { *(.gcc_except_table .gcc_except_table.*) }
  .exception_ranges   : ONLY_IF_RW { *(.exception_ranges .exception_ranges*) }
  /* Thread Local Storage sections  */
  .tdata	  : { *(.tdata .tdata.* .gnu.linkonce.td.*) }
  .tbss		  : { *(.tbss .tbss.* .gnu.linkonce.tb.*) *(.tcommon) }
  .preinit_array     :
  {
    PROVIDE_HIDDEN (__preinit_array_start = .);
    KEEP (*(.preinit_array))
    PROVIDE_HIDDEN (__preinit_array_end = .);
  }
  .init_array     :
  {
    PROVIDE_HIDDEN (__init_array_start = .);
    KEEP (*(SORT_BY_INIT_PRIORITY(.init_array.*) SORT_BY_INIT_PRIORITY(.ctors.*)))
    KEEP (*(.init_array EXCLUDE_FILE (*crtbegin.o *crtbegin?.o *crtend.o *crtend?.o ) .ctors))
    PROVIDE_HIDDEN (__init_array_end = .);
  }
  .fini_array     :
  {
    PROVIDE_HIDDEN (__fini_array_start = .);
    KEEP (*(SORT_BY_INIT_PRIORITY(.fini_array.*) SORT_BY_INIT_PRIORITY(.dtors.*)))
    KEEP (*(.fini_array EXCLUDE_FILE (*crtbegin.o *crtbegin?.o *crtend.o *crtend?.o ) .dtors))
    PROVIDE_HIDDEN (__fini_array_end = .);
  }
  .ctors          :
  {
    /* gcc uses crtbegin.o to find the start of
       the constructors, so we make sure it is
       first.  Because this is a wildcard, it
       doesn't matter if the user does not
       actually link against crtbegin.o; the
       linker won't look for a file to match a
       wildcard.  The wildcard also means that it
       doesn't matter which directory crtbegin.o
       is in.  */
    KEEP (*crtbegin.o(.ctors))
    KEEP (*crtbegin?.o(.ctors))
    /* We don't want to include the .ctor section from
       the crtend.o file until after the sorted ctors.
       The .ctor section from the crtend file contains the
       end of ctors marker and it must be last */
    KEEP (*(EXCLUDE_FILE (*crtend.o *crtend?.o ) .ctors))
    KEEP (*(SORT(.ctors.*)))
    KEEP (*(.ctors))
  }
  .dtors          :
  {
    KEEP (*crtbegin.o(.dtors))
    KEEP (*crtbegin?.o(.dtors))
    KEEP (*(EXCLUDE_FILE (*crtend.o *crtend?.o ) .dtors))
    KEEP (*(SORT(.dtors.*)))
    KEEP (*(.dtors))
  }
  .jcr            : { KEEP (*(.jcr)) }
  .data.rel.ro : { *(.data.rel.ro.local* .gnu.linkonce.d.rel.ro.local.*) *(.data.rel.ro .data.rel.ro.* .gnu.linkonce.d.rel.ro.*) }
  .dynamic        : { *(.dynamic) }
  .got            : { *(.got) *(.igot) }
  . = DATA_SEGMENT_RELRO_END (SIZEOF (.got.plt) >= 12 ? 12 : 0, .);
  .got.plt        : { *(.got.plt)  *(.igot.plt) }
  .data           :
  {
    *(.data .data.* .gnu.linkonce.d.*)
    SORT(CONSTRUCTORS)
  }
  .data1          : { *(.data1) }
  _edata = .; PROVIDE (edata = .);
  FSymTab :
  {
    PROVIDE_HIDDEN (__fsymtab_start = .);
    KEEP (*(FSymTab))
    PROVIDE_HIDDEN (__fsymtab_end = .);
  }
  VSymTab :
  {
    PROVIDE_HIDDEN (__vsymtab_start = .);
    KEEP (*(VSymtab))
    PROVIDE_HIDDEN (__vsymtab_end = .);
  }
  . = .;
  __bss_start = .;
  .bss            :
  {
   *(.dynbss)
   *(.bss .bss.* .gnu.linkonce.b.*)
   *(COMMON)
   /* Align here to ensure that the .bss section occupies space up to
      _end.  Align after .bss to ensure correct alignment even if the
      .bss section disappears because there are no input sections.
      FIXME: Why do we need it? When there is no .bss section, we don't
      pad the .data section.  */
   . = ALIGN(. != 0 ? 32 / 8 : 1);
  }
  . = ALIGN(32 / 8);
  . = SEGMENT_START("ldata-segment", .);
  . = ALIGN(32 / 8);
  _end = .; PROVIDE (end = .);
  . = DATA_SEGMENT_END (.);
  /* Stabs debugging sections.  */
  .stab          0 : { *(.stab) }
  .stabstr       0 : { *(.stabstr) }
  .stab.excl     0 : { *(.stab.excl) }
  .stab.exclstr  0 : { *(.stab.exclstr) }
  .stab.index    0 : { *(.stab.index) }
  .stab.indexstr 0 : { *(.stab.indexstr) }
  .comment       0 : { *(.comment) }
  /* DWARF debug sections.
     Symbols in the DWARF debugging sections are relative to the beginning
     of the section so we begin them at 0.  */
  /* DWARF 1 */
  .debug          0 : { *(.debug) }
  .line           0 : { *(.line) }
  /* GNU DWARF 1 extensions */
  .debug_srcinfo  0 : { *(.debug_srcinfo) }
  .debug_sfnames  0 : { *(.debug_sfnames) }
  /* DWARF 1.1 and DWARF 2 */
  .debug_aranges  0 : { *(.debug_aranges) }
  .debug_pubnames 0 : { *(.debug_pubnames) }
  /* DWARF 2 */
  .debug_info     0 : { *(.debug_info .gnu.linkonce.wi.*) }
  .debug_abbrev   0 : { *(.debug_abbrev) }
  .debug_line     0 : { *(.debug_line .debug_line.* .debug_line_end ) }
  .debug_frame    0 : { *(.debug_frame) }
  .debug_str      0 : { *(.debug_str) }
  .debug_loc      0 : { *(.debug_loc) }
  .debug_macinfo  0 : { *(.debug_macinfo) }
  /* SGI/MIPS DWARF 2 extensions */
  .debug_weaknames 0 : { *(.debug_weaknames) }
  .debug_funcnames 0 : { *(.debug_funcnames) }
  .debug_typenames 0 : { *(.debug_typenames) }
  .debug_varnames  0 : { *(.debug_varnames) }
  /* DWARF 3 */
  .debug_pubtypes 0 : { *(.debug_pubtypes) }
  .debug_ranges   0 : { *(.debug_ranges) }
  /* DWARF Extension.  */
  .debug_macro    0 : { *(.debug_macro) }
  .gnu.attributes 0 : { KEEP (*(.gnu.attributes)) }
  /DISCARD/ : { *(.note.GNU-stack) *(.gnu_debuglink) *(.gnu.lto_*) }
}
我们在链接脚本中定义了两个SECTION: FSymTab和VSymTab,这两个段在最终的ELF文件中,位于.data段之后, .bss段之前,同时,我们定义了4个变量,我们可以在c代码中使用这4个变量实现对SECTION的控制,我们可以在代码中通过这4个变量确定finsh指令段的起始和结束为止。
__fsymtab_start, __fsymtab_end:代表FSymTab段的起始和结束
__vsymtab_start,__vsymtab_end:代表VSymTab段的起始和结束
对应c代码如下:
    void finsh_system_function_init(const void *begin, const void *end)
    {
        _syscall_table_begin = (struct finsh_syscall *) begin;
        _syscall_table_end = (struct finsh_syscall *) end;
    }

    void finsh_system_var_init(const void *begin, const void *end)
    {
        _sysvar_table_begin = (struct finsh_sysvar *) begin;
        _sysvar_table_end = (struct finsh_sysvar *) end;
    }
    extern const int __fsymtab_start;
    extern const int __fsymtab_end;
    extern const int __vsymtab_start;
    extern const int __vsymtab_end;
    unsigned int start = &__fsymtab_start;
    unsigned int end = &__fsymtab_end;
    finsh_system_function_init(&__fsymtab_start, &__fsymtab_end);
    finsh_system_var_init(&__vsymtab_start, &__vsymtab_end);


/*
 * @ingroup finsh
 *
 * This function will initialize finsh shell
 */
int finsh_system_init(void)
{
    ......

    /* GNU GCC Compiler and TI CCS */
    extern const int __fsymtab_start;
    extern const int __fsymtab_end;
    extern const int __vsymtab_start;
    extern const int __vsymtab_end;
    finsh_system_function_init(&__fsymtab_start, &__fsymtab_end);
    finsh_system_var_init(&__vsymtab_start, &__vsymtab_end);

    ......
    return 0;
}
INIT_APP_EXPORT(finsh_system_init);
效果验证
最终的效果如下:
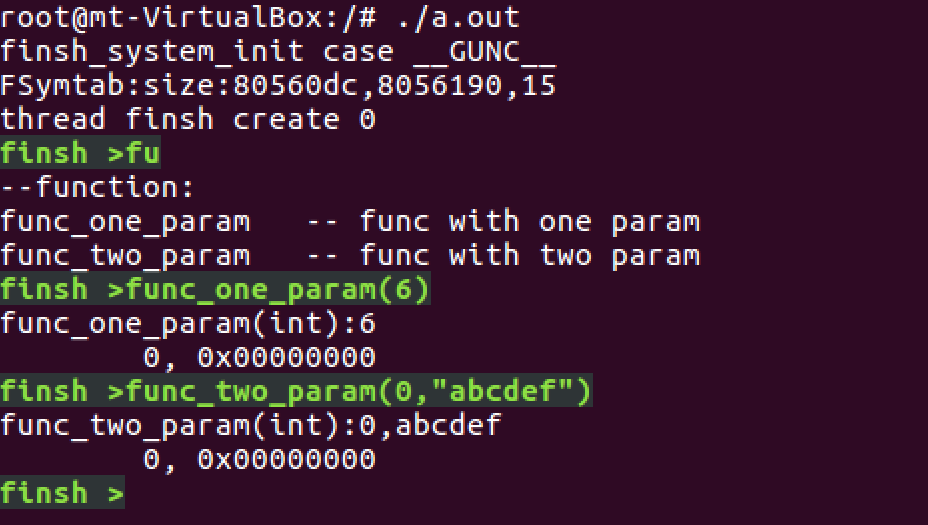
func_one_param(int),func_two_param(int,char*)是我自定义的两个函数,可以通过命令行进行调用。
碍于时间关系, 仅调通了C-Style模式,在原有功能⤴️⤵️键翻阅历史记录,Tab键自动补齐,退格键删除,⬅️➡️键移动光标基础上,增加了Ctrl+l清屏和高亮显示,后续会增加新的功能进来。
思考扩展
思考
在finsh移植到linux的过程中, 主要用到了2个编译链接技巧
1.利用编译器的编译特性, 实现在编译时将某个函数/变量放到指定的段Fsymtab中
2.利用链接脚本, 定义段Fsymtab的起始和结束地址(__fsymtab_start, __fsymtab_end), 并在c代码中通过__fsymtab_start, __fsymtab_end获取Fsymtab段中定义的函数
上述两个技巧可以在主流的编译器链接器上适用, 利用编译器的特性我们很容易实现将函数放在指定的段中,然而每次都要修改链接脚本就显得不那么方便(想要了解linux默认链接脚本的同学可以参考:https://blog.csdn.net/u011734326/article/details/101292754), 那么有没有更方便的实现方式呢?
答案是有的, 就是继续利用编译器的特性, 这将特别依赖于编译器的种类,不同编译器提供的实现方式往往不同,下面我们列举几种不修改链接脚本的实现方式:
#ifdef FINSH_USING_SYMTAB
#if defined(__CC_ARM) || defined(__CLANG_ARM)          /* ARM C Compiler */
    extern const int FSymTab$$Base; // FSymTab$$Base是利用了ARMC编译器的扩展特性, 代表段FSymTab的起始地址;
    extern const int FSymTab$$Limit;// FSymTab$$Base是利用了ARMC编译器的扩展特性, 代表段FSymTab的结束地址;
    extern const int VSymTab$$Base;
    extern const int VSymTab$$Limit;
    finsh_system_function_init(&FSymTab$$Base, &FSymTab$$Limit);
#ifndef FINSH_USING_MSH_ONLY
    finsh_system_var_init(&VSymTab$$Base, &VSymTab$$Limit);
#endif
#elif defined (__ICCARM__) || defined(__ICCRX__)      /* for IAR Compiler */
    finsh_system_function_init(__section_begin("FSymTab"),
                               __section_end("FSymTab")); // 适用于IAR编译器
    finsh_system_var_init(__section_begin("VSymTab"),
                          __section_end("VSymTab"));
#elif defined (__GNUC__) || defined(__TI_COMPILER_VERSION__)
    /* GNU GCC Compiler and TI CCS */
    extern const int __fsymtab_start; //在linux gcc平台,需要修改链接脚本,在链接脚本中定义__fsymtab_start来代表段的起始地址
    extern const int __fsymtab_end;
    extern const int __vsymtab_start;
    extern const int __vsymtab_end;
    finsh_system_function_init(&__fsymtab_start, &__fsymtab_end);
    finsh_system_var_init(&__vsymtab_start, &__vsymtab_end);
#elif defined(__ADSPBLACKFIN__) /* for VisualDSP++ Compiler */
    finsh_system_function_init(&__fsymtab_start, &__fsymtab_end);
    finsh_system_var_init(&__vsymtab_start, &__vsymtab_end);
#elif defined(_MSC_VER)
    unsigned int *ptr_begin, *ptr_end;

    if(shell)
    {
        rt_kprintf("finsh shell already init.\n");
        return RT_EOK;
    }

    ptr_begin = (unsigned int *)&__fsym_begin;
    ptr_begin += (sizeof(struct finsh_syscall) / sizeof(unsigned int));
    while (*ptr_begin == 0) ptr_begin ++;

    ptr_end = (unsigned int *) &__fsym_end;
    ptr_end --;
    while (*ptr_end == 0) ptr_end --;

    finsh_system_function_init(ptr_begin, ptr_end);
#endif
#endif
初始化函数表
通过上述技巧,我们可以很容易实现初始化函数表, 初始化函数表的表现就是新加新模块再也不需要在main代码中显式调用模块初始化接口,就可以完成初始化。Linux内核中module_init就构建了内核驱动初始化函数表的基础。
代码下载
参考
发布者:全栈程序员-用户IM,转载请注明出处:https://javaforall.cn/143308.html原文链接:https://javaforall.cn
【正版授权,激活自己账号】: Jetbrains全家桶Ide使用,1年售后保障,每天仅需1毛
【官方授权 正版激活】: 官方授权 正版激活 支持Jetbrains家族下所有IDE 使用个人JB账号...
