大家好,又见面了,我是你们的朋友全栈君。
Spring Data Mongodb多表关联查询
Spring Data Mongodb多表关联查询
前言
额瑞巴蒂,好。
最近公司的项目采用Mongodb作为数据库,我也是一头雾水,因为MongoDB是最近几年才火起来,没有什么太多的学习资料。只有看Mongodb官网,Spring Data Mongodb官网文档,看起也比较吃力。所以对Mongodb也是摸着石头过河,有什么不对的地方还请各位老铁多多指教。
开始吧!
一、实例
为了演示对象间一对一、一对多关系,现在创建三张表:公司(Company)、部门(Department)、员工(Employee)
1、数据准备
// 公司
public class Company {

    @Id
    private String id;

    private String companyName;

    private String mobile;
}
// 部门
public class Department {

    @Id
    private String id;

    private String departmentName;

    @DBRef
    private Company company;

    @DBRef
    private List<Employee> employeeList;
}
// 员工
public class Employee {

    @Id
    private String id;

    private String employeeName;

    private String phone;

    @DBRef
    private Department department;
}
创建测试所需的数据:
	@Autowired
    private MongoTemplate mongoTemplate;

    @Test
    public void initData() {

        // 公司
        Company company = new Company();
        company.setCompanyName("XXX公司");
        company.setMobile("023-66668888");
        mongoTemplate.save(company);

        // 部门
        Department department = new Department();
        department.setDepartmentName("XXX信息开发系统");
        department.setCompany(company);
        department.setEmployeeList(Collections.emptyList());
        mongoTemplate.save(department);

        // 员工
        List<Employee> employeeList = new ArrayList<>();
        Employee employee1 = new Employee();
        employee1.setEmployeeName("张一");
        employee1.setPhone("159228359xx");
        employee1.setDepartment(department);
        employeeList.add(employee1);

        Employee employee2 = new Employee();
        employee2.setEmployeeName("张二");
        employee2.setPhone("159228358xx");
        employee2.setDepartment(department);
        employeeList.add(employee2);
        mongoTemplate.insert(employeeList, Employee.class);

        department.setEmployeeList(employeeList);
        mongoTemplate.save(department);
    }
2、 一对一:两表关联查询
RemoveDollarOperation :自定义的Mongodb aggregation管道操作,在稍后的内容中会介绍
   /** * 员工表关联部门表 */
    @Test
    public void twoTableQuery() {

                // 1、消除@DBRef引用对象中的"$id"的"$"符号
        RemoveDollarOperation removeDollarOperation = new RemoveDollarOperation("newDepartmentFieldName", "department");

        // 2、使用mongodb $lookup实现左连接部门表
        LookupOperation lookupOperation = LookupOperation.newLookup().from("department")
                .localField("newDepartmentFieldName.id").foreignField("_id").as("newDepartment");

        // $match条件筛选
		// MatchOperation matchOperation = new MatchOperation(Criteria.where("newDepartment.departmentName").is("信息开发系统"));

        // 3、Aggregation管道操作(还可以加入$match、$project等其他管道操作,但是得注意先后顺序)
        TypedAggregation aggregation = Aggregation.newAggregation(Employee.class, removeDollarOperation, lookupOperation);
		// TypedAggregation aggregation = Aggregation.newAggregation(Employee.class, removeDollarOperation, lookupOperation, matchOperation);
        AggregationResults<Document> results = mongoTemplate.aggregate(aggregation, Document.class);

        System.out.println(JSONArray.toJSONString(results.getMappedResults()));
    }
3、一对一:多表关联查询
/** * 员工表关联部门表,部门表关联公司表 */
@Test
public void threeTableQuery() {

        // 1、消除@DBRef引用对象中的"$id"的"$"符号
        RemoveDollarOperation removeDollarOperation1 = new RemoveDollarOperation("newDepartmentFieldName", "department");

        // 2、使用mongodb $lookup实现左连接部门表
        LookupOperation lookupOperation1 = LookupOperation.newLookup().from("department")
                .localField("newDepartmentFieldName.id").foreignField("_id").as("newDepartment");

        // 3、使用$unwind展平步骤二中的左连接的department表的"newDepartment"
        UnwindOperation unwindOperation = new UnwindOperation(Fields.field("$newDepartment"));

        // 4、消除@DBRef引用对象中的"$id"的"$"符号
        RemoveDollarOperation removeDollarOperation2 = new RemoveDollarOperation("newCompanyFieldName", "newDepartment.company");

        // 5、使用mongodb $lookup实现左连接公司表
        LookupOperation lookupOperation2 = LookupOperation.newLookup().from("company")
                .localField("newCompanyFieldName.id").foreignField("_id").as("newCompany");

        MatchOperation matchOperation = new MatchOperation(Criteria.where("newCompany.companyName").is("XXX公司"));

        // 4、Aggregation管道操作(还可以加入$match、$project等其他管道操作,但是得注意先后顺序)
        TypedAggregation aggregation = Aggregation.newAggregation(Employee.class,
                removeDollarOperation1, lookupOperation1,
                unwindOperation,
                removeDollarOperation2, lookupOperation2,
                matchOperation);

        AggregationResults<Document> results = mongoTemplate.aggregate(aggregation, Document.class);

        System.out.println(JSONArray.toJSONString(results.getMappedResults()));
}
4、一对多:关联查询
	/** * 查询部门中的所有员工,部门关联多个员工 */
    @Test
	public void oneToManyTableQuery() {

        // 1、展平“多”的一方
        UnwindOperation unwindOperation = new UnwindOperation(Fields.field("employeeList"));

        // 2、消除@DBRef引用对象中的"$id"的"$"符号
        RemoveDollarOperation removeDollarOperation1 = new RemoveDollarOperation("newEmployeeFieldName", "employeeList");

        // 3、使用mongodb $lookup实现左连接员工表
        LookupOperation lookupOperation1 = LookupOperation.newLookup().from("employee")
                .localField("newEmployeeFieldName.id").foreignField("_id").as("newEmployee");

        // 筛选条件(非必须,看自己是否需要筛选)
        MatchOperation matchOperation = new MatchOperation(Criteria.where("newEmployee.employeeName").is("张一"));

        // 4、Aggregation管道操作(还可以加入$match、$project等其他管道操作,但是得注意先后顺序)
        TypedAggregation aggregation = Aggregation.newAggregation(Employee.class,
                unwindOperation,
                removeDollarOperation1, lookupOperation1,
                matchOperation);

        AggregationResults<Document> results = mongoTemplate.aggregate(aggregation, Document.class);

        System.out.println(JSONArray.toJSONString(results.getMappedResults()));
    }
二、讲道理
1、自定义RemoveDollarOperation管道操作的作用
先谈谈mongodb原生$lookup
我们先来看下mongodb的$lookup操作,这是mongodb $lookup的原生语法
{

   $lookup:
     {

       from: "collection to join(集合名)",
       localField: "field from the input documents(外键)",
       foreignField: "field from the documents of the "from" collection(被左连接的表的关联主键)",
       as: "output array field(存放连接获得的结果的列名)"
     }
}
然后使用原生语法进行lookup关联操作,我们来看下员工表与部门表在Mongodb中的数据
// employee
{

    "_id": ObjectId("5c244aafc8fbfb40c02d830c"),
    "employeeName": "张一",
    "phone": "159228359xx",
    "department": DBRef("department", ObjectId("5c244aafc8fbfb40c02d830b")),
    "_class": "com.example.mongo.domain.company.Employee"
}

// department
{

    "_id": ObjectId("5c244aafc8fbfb40c02d830b"),
    "departmentName": "信息开发系统",
    "company": DBRef("company", ObjectId("5c244aafc8fbfb40c02d830a")),
    "employeeList": [
        DBRef("employee", ObjectId("5c244aafc8fbfb40c02d830c")),
        DBRef("employee", ObjectId("5c244aafc8fbfb40c02d830d"))
    ],
    "_class": "com.example.mongo.domain.company.Department"
}
你以为可以直接通过下面方式进行表连接操作吗,那就错了
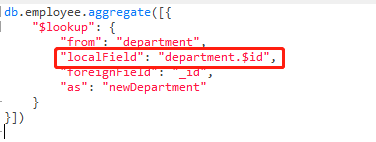

执行上面的mongo语句,会报以下错误

错误原因:field的名称不支持以”$”开头
那问题就来了,既然mongo原生lookup都不支持这一的操作,更何况Spring data mongodb了呢,那”localField”到底该填什么才能实现表关联呢?
去掉DBRef中”$id”的”$”
既然不能以”$“开头,那我就把”$”去掉呗:
MongoDB官方提供的一个方法:https://jira.mongodb.org/browse/SERVER-14466
db.collection.aggregate({
   $addFields:{
   "newFieldName":
     {
   $arrayToObject:{
   $map:{

          input:{
   $objectToArray:"$localFieldName"},
          in:{

             k:{
   $cond:[
                     {
   $eq:[{
   "$substrCP":["$$this.k",0,1]},{
   $literal:"$"}]},
                     {
   $substrCP:["$$this.k",1,{
   $strLenCP:"$$this.k"}]},
                     "$$this.k"
             ]},
             v:"$$this.v"
           }
         }}}
}})
使用前:
"department": DBRef("department", ObjectId("5c244aafc8fbfb40c02d830b"))
使用后:
"department": {
   "ref":"department", "id": "5c244aafc8fbfb40c02d830b"}
去除”$“的方式是通过在结果中新追加一列”newFieldName”,这列的值是来至”$localFieldName”。
所以我们在使用过程中只需替换上面两处的值即可。
来,我们按这方式操作一波:(修改为”newDepartmentFieldName”,”$department”)
db.employee.aggregate([{

    "$addFields": {

        "newDepartmentFieldName": {

            "$arrayToObject": {

                "$map": {

                    "input": {

                        "$objectToArray": "$department"
                    },
                    "in": {

                        "k": {

                            "$cond": [{

                                "$eq": [{

                                    "$substrCP": ["$$this.k", 0, 1]
                                }, {

                                    "$literal": "$"
                                }]
                            }, {

                                "$substrCP": ["$$this.k", 1, {

                                    "$strLenCP": "$$this.k"
                                }]
                            }, "$$this.k"]
                        },
                        "v": "$$this.v"
                    }
                }
            }
        }
    }
}, {

    "$lookup": {

        "from": "department",
        "localField": "newDepartmentFieldName.id",
        "foreignField": "_id",
        "as": "newDepartment"
    }
}])
结果出来咯,老铁们
{

    "_id": ObjectId("5c244aafc8fbfb40c02d830c"),
    "employeeName": "张一",
    "phone": "159228359xx",
    "department": DBRef("department", ObjectId("5c244aafc8fbfb40c02d830b")),
    "_class": "com.example.mongo.domain.company.Employee",
    "newDepartmentFieldName": {

        "ref": "department",
        "id": ObjectId("5c244aafc8fbfb40c02d830b")
    },
    "newDepartment": [
        {

            "_id": ObjectId("5c244aafc8fbfb40c02d830b"),
            "departmentName": "信息开发系统",
            "company": DBRef("company", ObjectId("5c244aafc8fbfb40c02d830a")),
            "employeeList": [
                DBRef("employee", ObjectId("5c244aafc8fbfb40c02d830c")),
                DBRef("employee", ObjectId("5c244aafc8fbfb40c02d830d"))
            ],
            "_class": "com.example.mongo.domain.company.Department"
        }
    ]
}
自定义RemoveDollarOperation管道操作
前面说了这么多,就是想告诉你们,我为什么要自定义一个RemoveDollarOperation管道操作。就是为了解决Mongodb $lookup的”localField”的值不支持以”$”开头
以下是RemoveDollarOperation的实现:
只需implements AggregationOperation,实现toDocument()方法即可
/** * @author : zhangmeng * Date : 2018/12/27 11:13 * Description : 自定义的Spring data mongodb的Aggregation Operation */
public class RemoveDollarOperation implements AggregationOperation {

    /** * 查询结果新追加的列名 */
    private String newField;

    /** * 需要关联的表中的外键 */
    private String localField;

    public RemoveDollarOperation(String newField, String localField) {

        this.newField = newField;
        this.localField = localField;
    }

    @Override
    public Document toDocument(AggregationOperationContext context) {

        List<Object> eqObjects = new ArrayList<>();
        eqObjects.add(new Document("$substrCP", Arrays.asList("$$this.k", 0, 1)));
        eqObjects.add(new Document("$literal", "$"));

        List<Object> substrCPObjects = new ArrayList<>();
        substrCPObjects.add("$$this.k");
        substrCPObjects.add(1);
        substrCPObjects.add(new Document("$strLenCP", "$$this.k"));

        List<Object> objects = new ArrayList<>();
        objects.add(new Document("$eq", eqObjects));
        objects.add(new Document("$substrCP", substrCPObjects));
        objects.add("$$this.k");

        Document operation = new Document(
                "$addFields",
                new Document(newField,
                        new Document("$arrayToObject",
                                new Document("$map",
                                        new Document("input",new Document("$objectToArray", "$"+localField))
                                                .append("in", new Document("k",new Document("$cond", objects))
                                                        .append("v", "$$this.v")))
                        )
                )
        );

        return context.getMappedObject(operation);
    }
}
你看到那么多的Document 拼接,其实就是为了实现
db.collection.aggregate({
   $addFields:{
   "newFieldName":
     {
   $arrayToObject:{
   $map:{

          input:{
   $objectToArray:"$localFieldName"},  ...
注意事项:
在实现过程中,可能因为Spring-data-mongodb版本不同,
	// Spring-data-mongodb 2.0以上使用Org.bson的Document (具体版本不确定)

	@Override
    public Document toDocument(AggregationOperationContext context) {

    	...
    	...
		Document operation = new Document(
                "$addFields",
                new Document(newField,"")
                ...
                ...
        );

        return context.getMappedObject(operation);
	}

	// Spring-data-mongodb 2.0以下使用com.mongodb.BasicDBObject

	@Override
    public DBObject toDBObject(AggregationOperationContext context) {

		...
    	...
		DBObject operation = new DBObject (
                "$addFields",
                new DBObject (newField,"")
                ...
                ...
        );

        return context.getMappedObject(operation);
}
2、实例中的一对一多表关联查询中的第4步使用UnwindOperation的原因
可能当我们实现了实例1中的一对一两表关联查询后,顺理成章就觉得如果要再关联第三张表的话,直接再使用
一次RemoveDollarOperation,LookupOperation进行关联
db.employee.aggregate([{

    "$addFields": {

        "newDepartmentFieldName": {

            "$arrayToObject": {

                "$map": {

                    "input": {

                        "$objectToArray": "$department"
                    },
                    "in": {

                        "k": {

                            "$cond": [{

                                "$eq": [{

                                    "$substrCP": ["$$this.k", 0, 1]
                                }, {

                                    "$literal": "$"
                                }]
                            }, {

                                "$substrCP": ["$$this.k", 1, {

                                    "$strLenCP": "$$this.k"
                                }]
                            }, "$$this.k"]
                        },
                        "v": "$$this.v"
                    }
                }
            }
        }
    }
}, {

    "$lookup": {

        "from": "department",
        "localField": "newDepartmentFieldName.id",
        "foreignField": "_id",
        "as": "newDepartment"
    }
}, {

    "$addFields": {

        "newCompanyFieldName": {

            "$arrayToObject": {

                "$map": {

                    "input": {

                        "$objectToArray": "$newDepartment.company"
                    },
                    "in": {

                        "k": {

                            "$cond": [{

                                "$eq": [{

                                    "$substrCP": ["$$this.k", 0, 1]
                                }, {

                                    "$literal": "$"
                                }]
                            }, {

                                "$substrCP": ["$$this.k", 1, {

                                    "$strLenCP": "$$this.k"
                                }]
                            }, "$$this.k"]
                        },
                        "v": "$$this.v"
                    }
                }
            }
        }
    }
}, {

    "$lookup": {

        "from": "company",
        "localField": "newCompanyFieldName.id",
        "foreignField": "_id",
        "as": "newCompany"
    }
}])
但是,执行后就错了:
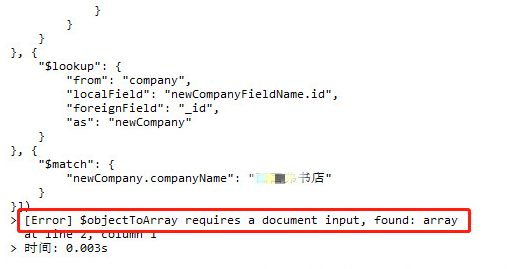
来来来,我们一步一步分析下
这是Employee关联Department后,得到的结果,“newDepartment”是关联后得到的结果:
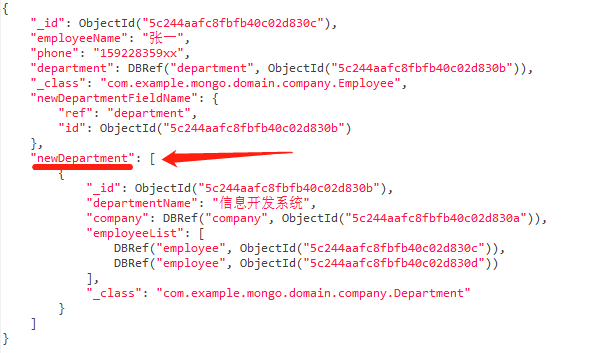
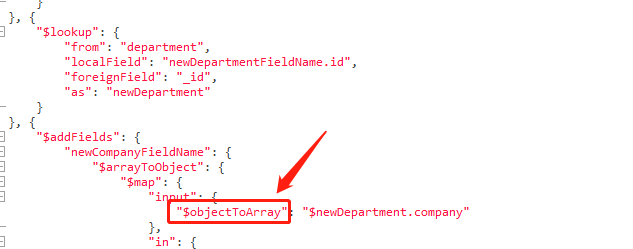
我们如果要进一步Department关联Company的话,直接再使用RemoveDollarOperation,LookupOperation是不行的,因为在消除”$”操作时入参需要一个非数组对象,而前一步的结果的”newDepartment”是一个数组,所以报错了
为了得到一个非数组对象,我们就要使用$unwind将”newDepartment”展平

然后就可以使用”newDepartment”继续RemoveDollarOperation,LookupOperation操作了。最终得到Employee关
联Department关联Company的结果了。如果还想继续关联,就以此类推。
最终得出的模型:

一对一两表关联的步骤:
1、RemoveDollarOperation
2、LookupOperation

一对一多表关联的步骤:
1、RemoveDollarOperation  2、LookupOperation
3、UnwindOperation
4、RemoveDollarOperation  5、LookupOperation
...

一对多表关联的步骤:
1、UnwindOperation
2、RemoveDollarOperation
3、LookupOperation
发布者:全栈程序员-用户IM,转载请注明出处:https://javaforall.cn/141950.html原文链接:https://javaforall.cn
【正版授权,激活自己账号】: Jetbrains全家桶Ide使用,1年售后保障,每天仅需1毛
【官方授权 正版激活】: 官方授权 正版激活 支持Jetbrains家族下所有IDE 使用个人JB账号...
