大家好,又见面了,我是你们的朋友全栈君。
目标检测之OHEM介绍
论文地址:https://arxiv.org/pdf/1604.03540.pdf
在two-stage检测算法中,RPN阶段会生成大量的检测框,由于很多时候一张图片可能只会有少量几个目标,也就是说绝大部分框是没有目标的,为了减少计算就需要进行sample,一般来说fasterrcnn的sample机制是算框和label的IOU,大于0.7认为是正样本,小于0.3是负样本。但是单纯的random_sample选出来的框不一定是最容易错的框。那么ohem就是这样的一种正负样本策略,通过根据框的loss得到最容易错的框。可以理解为错题集,我们只会把最容易错的题放到错题集。
首先是 negative,即负样本,其次是 hard,说明是困难样本,也可以说是容易将负样本看成正样本的那些样本,例如 RPN框里没有物体,全是背景,这时候分类器很容易正确分类成背景,这个就叫 easy negative;如果 框里有二分之一个物体,标签仍是负样本,这时候分类器就容易把他看成正样本,这时候就是 had negative。hard negative mining 就是多找一些 hard negative 加入负样本集,进行训练。
接下来我们来看看mmdection的ohem实现:
class OHEMSampler(BaseSampler):
    r"""Online Hard Example Mining Sampler described in `Training Region-based
    Object Detectors with Online Hard Example Mining
    <https://arxiv.org/abs/1604.03540>`_.
    """

    def __init__(self,
                 num,
                 pos_fraction,
                 context,
                 neg_pos_ub=-1,
                 add_gt_as_proposals=True,
                 **kwargs):
        super(OHEMSampler, self).__init__(num, pos_fraction, neg_pos_ub,
                                          add_gt_as_proposals)
        self.context = context
        if not hasattr(self.context, 'num_stages'):
            self.bbox_head = self.context.bbox_head
        else:
            self.bbox_head = self.context.bbox_head[self.context.current_stage]

    def hard_mining(self, inds, num_expected, bboxes, labels, feats):
        with torch.no_grad():
            rois = bbox2roi([bboxes])
            if not hasattr(self.context, 'num_stages'):
                bbox_results = self.context._bbox_forward(feats, rois)
            else:
                bbox_results = self.context._bbox_forward(
                    self.context.current_stage, feats, rois)
            cls_score = bbox_results['cls_score']
            loss = self.bbox_head.loss(
                cls_score=cls_score,
                bbox_pred=None,
                rois=rois,
                labels=labels,
                label_weights=cls_score.new_ones(cls_score.size(0)),
                bbox_targets=None,
                bbox_weights=None,
                reduction_override='none')['loss_cls']
            _, topk_loss_inds = loss.topk(num_expected)
        return inds[topk_loss_inds]

    def _sample_pos(self,
                    assign_result,
                    num_expected,
                    bboxes=None,
                    feats=None,
                    **kwargs):
        """Sample positive boxes.

        Args:
            assign_result (:obj:`AssignResult`): Assigned results
            num_expected (int): Number of expected positive samples
            bboxes (torch.Tensor, optional): Boxes. Defaults to None.
            feats (list[torch.Tensor], optional): Multi-level features.
                Defaults to None.

        Returns:
            torch.Tensor: Indices  of positive samples
        """
        # Sample some hard positive samples
        pos_inds = torch.nonzero(assign_result.gt_inds > 0, as_tuple=False)
        if pos_inds.numel() != 0:
            pos_inds = pos_inds.squeeze(1)
        if pos_inds.numel() <= num_expected:
            return pos_inds
        else:
            return self.hard_mining(pos_inds, num_expected, bboxes[pos_inds],
                                    assign_result.labels[pos_inds], feats)

    def _sample_neg(self,
                    assign_result,
                    num_expected,
                    bboxes=None,
                    feats=None,
                    **kwargs):
        """Sample negative boxes.

        Args:
            assign_result (:obj:`AssignResult`): Assigned results
            num_expected (int): Number of expected negative samples
            bboxes (torch.Tensor, optional): Boxes. Defaults to None.
            feats (list[torch.Tensor], optional): Multi-level features.
                Defaults to None.

        Returns:
            torch.Tensor: Indices  of negative samples
        """
        # Sample some hard negative samples
        neg_inds = torch.nonzero(assign_result.gt_inds == 0, as_tuple=False)
        if neg_inds.numel() != 0:
            neg_inds = neg_inds.squeeze(1)
        if len(neg_inds) <= num_expected:
            return neg_inds
        else:
            neg_labels = assign_result.labels.new_empty(
                neg_inds.size(0)).fill_(self.bbox_head.num_classes)
            return self.hard_mining(neg_inds, num_expected, bboxes[neg_inds],
                                    neg_labels, feats)
上面代码就是整个ohem的sample过程,整个ohem分为三个函数分别是hard_mining,_sample_pos,_sample_neg,_sample_pos和_sample_neg是获得对应的困难正样本/困难负样本,由hard_mining完成整个sample过程:根据输入的box_list得到对应的bbox_loss的list取最大的256/512个,由于这一批box的loss最大,就可以认为是最难区分的box,这一批bbox就是所谓的
困难正样本/困难负样本。
至此ohem阶段完成,后面就是对候选框的分类和回归,因为ohem阶段得到了容易分错的样本框,所以在后续训练阶段模型会对这些容易分错的框重点关注,有利于困难样本的检测,提升了模型的效果。
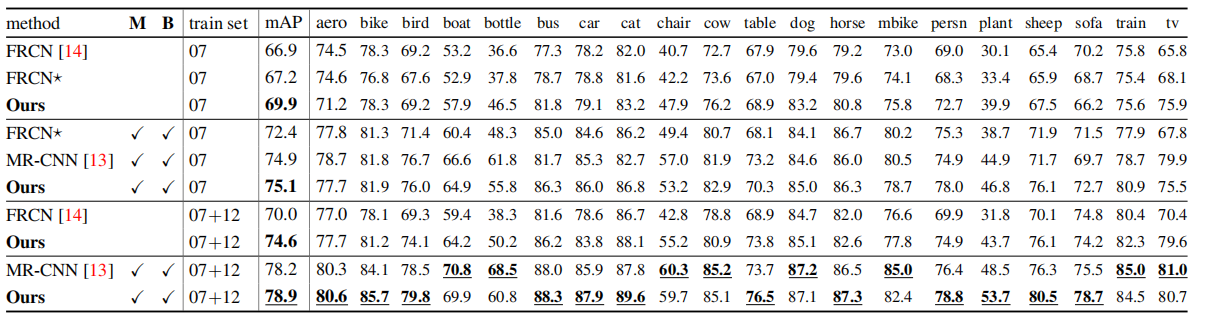
实际上提升还是很明显的:

发布者:全栈程序员-用户IM,转载请注明出处:https://javaforall.cn/139162.html原文链接:https://javaforall.cn
【正版授权,激活自己账号】: Jetbrains全家桶Ide使用,1年售后保障,每天仅需1毛
【官方授权 正版激活】: 官方授权 正版激活 支持Jetbrains家族下所有IDE 使用个人JB账号...
