大家好,又见面了,我是你们的朋友全栈君。
在很多的项目中,都会用到图像识别技术。我在智能电子秤的项目中,就使用了简单的图像识别算法来完成对果蔬的分类(三分类)。
图像识别中,最常用的框架就是TensorFlow,我们今天就使用这个框架,手把手教学完成图像识别分类。
完成一个图像识别模块主要包括四步:
- 采集数据集
- 搭建合适的模型
- 调参、训练并测试
- 完成接口到项目中
关于环境的配置我在此处不多赘余描述,可以自行百度搜索,进行环境配置:python3.6+tensorflow+opencv。关于编译器,我在此处推荐spyder。使用起来非常方便,非常适合数据处理和图像识别。

采集数据集
首先,我们需要对分类的物体采集数据集。
数据集会直接影响图像识别最后的精确度,所以我们在采集数据集的时候,需要严格按照要求,完成一个高质量的数据集。
互联网上并没有总结数据集的要求,这里我用我自己的经验来总结几点:
- 需要数据集数量大(需要充分对数据进行训练)
如果初学者不知道需要训练多少张,这里给出一个大概的推荐值供参考,如果是三分类,建议每种选取1000张以上代表性能力强的图像,如果代表性不强,建议两千张以上。我在实际的项目中,在超市中购买了三种果蔬,每种购买了十个左右,来采集数据集,这就是代表性很差的情况,所以我为了最终的识别效果,每一种拍摄了两千多张。建议初学者可以在互联网上查询现有的数据集,加入进自己的数据集中,也可以使用python爬虫,在百度图片进行爬取并手动筛选。此处给出一个百度图片的爬虫源码,可以很方便的爬取图片。
# -*- coding: utf-8 -*-
# @Author : Ein
import re
import requests
from urllib import error
from bs4 import BeautifulSoup
import os

num = 0
numPicture = 0
file = ''
List = []


def Find(url):
    global List
    print('正在检测图片总数,请稍等.....')
    t = 0
    i = 1
    s = 0
    while t < 1000:
        Url = url + str(t)
        try:
            Result = requests.get(Url, timeout=7)
            Result.add_header('User-Agent','Mozilla/5.0 (Windows NT 6.3; WOW64) AppleWebKit/537.36 (KHTML, like Gecko) Chrome/63.0.3239.132 Safari/537.36')
        except BaseException:
            t = t + 60
            continue
        else:
            result = Result.text
            pic_url = re.findall('"objURL":"(.*?)",', result, re.S)  # 先利用正则表达式找到图片url
            s += len(pic_url)
            if len(pic_url) == 0:
                break
            else:
                List.append(pic_url)
                t = t + 60
    return s


def recommend(url):
    Re = []
    try:
        html = requests.get(url)
    except error.HTTPError as e:
        return
    else:
        html.encoding = 'utf-8'
        bsObj = BeautifulSoup(html.text, 'html.parser')
        div = bsObj.find('div', id='topRS')
        if div is not None:
            listA = div.findAll('a')
            for i in listA:
                if i is not None:
                    Re.append(i.get_text())
        return Re


def dowmloadPicture(html, keyword):
    global num
    # t =0
    pic_url = re.findall('"objURL":"(.*?)",', html, re.S)  # 先利用正则表达式找到图片url
    print('找到关键词:' + keyword + '的图片,即将开始下载图片...')
    for each in pic_url:
        print('正在下载第' + str(num + 1) + '张图片,图片地址:' + str(each))
        try:
            if each is not None:
                pic = requests.get(each, timeout=7)
            else:
                continue
        except BaseException:
            print('错误,当前图片无法下载')
            continue
        else:
            string = file + r'\\' + keyword + '_' + str(num) + '.jpg'
            fp = open(string, 'wb')
            fp.write(pic.content)
            fp.close()
            num += 1
        if num >= numPicture:
            return


if __name__ == '__main__':  # 主函数入口
    word = input("请输入搜索关键词(可以是人名,地名等): ")
    # add = 'http://image.baidu.com/search/flip?tn=baiduimage&ie=utf-8&word=%E5%BC%A0%E5%A4%A9%E7%88%B1&pn=120'
    url = 'http://image.baidu.com/search/flip?tn=baiduimage&ie=utf-8&word=' + word + '&pn='
    tot = Find(url)
    Recommend = recommend(url)  # 记录相关推荐
    print('经过检测%s类图片共有%d张' % (word, tot))
    numPicture = int(input('请输入想要下载的图片数量 '))
    file = input('请建立一个存储图片的文件夹,输入文件夹名称即可')
    y = os.path.exists(file)
    if y == 1:
        print('该文件已存在,请重新输入')
        file = input('请建立一个存储图片的文件夹,)输入文件夹名称即可')
        os.mkdir(file)
    else:
        os.mkdir(file)
    t = 0
    tmp = url
    while t < numPicture:
        try:
            url = tmp + str(t)
            result = requests.get(url, timeout=10)
            print(url)
        except error.HTTPError as e:
            print('网络错误,请调整网络后重试')
            t = t + 60
        else:
            dowmloadPicture(result.text, word)
            t = t + 60

    print('当前搜索结束,感谢使用')
    print('猜你喜欢')
    for re in Recommend:
        print(re, end=' ')
用户使用时可以很方便的爬取图片,此处就不写教程了。
- 尽量选择代表性图片
代表性的图片可以大幅度增加泛华能力,可以在不同的光照下、不同的环境下多次进行采集图像,也可以从网上爬取代表性图片,这样可以大幅度提高识别效果。 - 训练的背景需要多次更换
我做的数据集存在着一个问题,就是数据集的背景过于单一:都是白底。所以,在采集数据时,可以多打印几张不同的纸,在不同的纸上训练,这样就可以避免背景被误认为是训练的因素了。 - 每种种类的数量要接近,不能偏差太大
如果有三种训练对象,第一种有50张训练集,第二种有500张,第三种有5000张。
这种情况下,欢迎大家进行测试,会发现训练效果极差无比。
所以应当保证每种训练集的数量接近,比如,都是2000张左右。
搭建合适的模型
模型的复杂度会直接影响识别效果。
因为在我的项目中仅仅用到了三分类,所以我选择了比较简单的模型,如果大家有更高的要求,可以参考googlenet等优秀的模型。
我的模型设计是这样的:
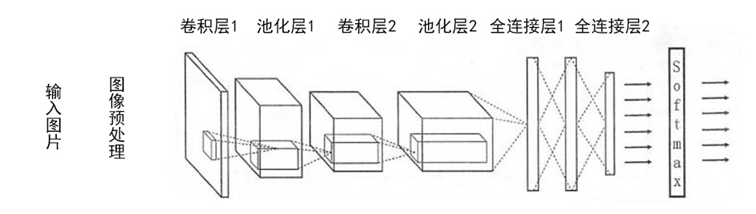
即输入图片并进行预处理后,经过两个卷积层,两个池化层,两个全连接层,最后通过一个softmax层输出结果。
卷积层以及池化层的原理这里不多解释,大家可以自行百度进行查看,我个人的理解是这样的,一张图片会通过全卷积的方式,逐步降维,最终得到分类。
TensorFlow对于模型的代码比较简单,模型相关函数可直接使用,只需对照着自己设计的模型,来编写模型的代码即可。
此处我将代码段贴出,代码段的备注直接在代码中。
首先是加载数据的代码load_data.py:
# -*- coding: utf-8 -*-


#D:\\360安全浏览器下载\\果蔬识别\\data\\train
import tensorflow as tf
import numpy as np
import os


def get_all_files(file_path, is_random=True):
    """ 获取图片路径及其标签 :param file_path: a sting, 图片所在目录 :param is_random: True or False, 是否乱序 :return: """
    image_list = []
    label_list = []

    corn_count = 0
    cucumber_count = 0
    orange_count=0
    for item in os.listdir(file_path):
        item_path = file_path + '\\' + item
        item_label = item.split('.')[0]  # 文件名形如 cat.0.jpg,只需要取第一个

        if os.path.isfile(item_path):
            image_list.append(item_path)
        else:
            raise ValueError('文件夹中有非文件项.')

        if item_label == 'corn':  # 玉米标记为'0'
            label_list.append(0)
            corn_count += 1
        elif item_label == 'cucumber': # 黄瓜标记为'1'
            label_list.append(1)
            cucumber_count += 1
        elif item_label == 'orange':#橙子标记为'2'
            label_list.append(2)
            orange_count += 1
    print('数据集中有%d个玉米,%d个黄瓜,%d个橙子.' % (corn_count, cucumber_count,orange_count))

    image_list = np.asarray(image_list)
    label_list = np.asarray(label_list)
    # 乱序文件
    if is_random:
        rnd_index = np.arange(len(image_list))
        np.random.shuffle(rnd_index)
        image_list = image_list[rnd_index]
        label_list = label_list[rnd_index]

    return image_list, label_list


def get_batch(train_list, image_size, batch_size, capacity, is_random=True):
    """ 获取训练批次 :param train_list: 2-D list, [image_list, label_list] :param image_size: a int, 训练图像大小 :param batch_size: a int, 每个批次包含的样本数量 :param capacity: a int, 队列容量 :param is_random: True or False, 是否乱序 :return: """

    intput_queue = tf.train.slice_input_producer(train_list, shuffle=False)

    # 从路径中读取图片
    image_train = tf.read_file(intput_queue[0])
    image_train = tf.image.decode_jpeg(image_train, channels=3)  # 这里是jpg格式
    image_train = tf.image.resize_images(image_train, [image_size, image_size])
    image_train = tf.cast(image_train, tf.float32) / 255.  # 转换数据类型并归一化

    # 图片标签
    label_train = intput_queue[1]

    # 获取批次
    if is_random:
        image_train_batch, label_train_batch = tf.train.shuffle_batch([image_train, label_train],
                                                                      batch_size=batch_size,
                                                                      capacity=capacity,
                                                                      min_after_dequeue=100,
                                                                      num_threads=2)
    else:
        image_train_batch, label_train_batch = tf.train.batch([image_train, label_train],
                                                              batch_size=1,
                                                              capacity=capacity,
                                                              num_threads=1)
    return image_train_batch, label_train_batch


if __name__ == '__main__':
    import matplotlib.pyplot as plt

    # 测试图片读取
    image_dir = 'data\\train'
    train_list = get_all_files(image_dir, True)
    image_train_batch, label_train_batch = get_batch(train_list, 256, 1, 200, False)


    sess = tf.Session()

    coord = tf.train.Coordinator()
    threads = tf.train.start_queue_runners(sess=sess, coord=coord)

    try:
        for step in range(10):
            if coord.should_stop():
                break

            image_batch, label_batch = sess.run([image_train_batch, label_train_batch])
            if label_batch[0]==0:
                label = 'corn'
            elif label_batch[0]==1:
                label = 'cucumber'
            elif label_batch[0]==2:
                label='orange'
            plt.imshow(image_batch[0]), plt.title(label)
            plt.show()

    except tf.errors.OutOfRangeError:
        print('Done.')
    finally:
        coord.request_stop()

    coord.join(threads=threads)
    sess.close()
其作用就是加载训练集的所有图片,并将训练集乱序,此处,我们使用python对于文件名的分割来获取图像的类别。例如:apple.1.jpg代表的就是label是苹果。代码段对训练集进行标号。在会话中完成读取训练集。
其次是模型的代码,model.py:
# -*- coding: utf-8 -*-

import tensorflow as tf
import tensorflow.contrib.layers as layers


def inference(images, n_classes):
    # conv1, shape = [kernel_size, kernel_size, channels, kernel_numbers]
    with tf.variable_scope("conv1") as scope:
        weights = tf.get_variable("weights",
                                  shape=[3, 3, 3, 16],
                                  dtype=tf.float32,
                                  initializer=tf.truncated_normal_initializer(stddev=0.1, dtype=tf.float32))
        biases = tf.get_variable("biases",
                                 shape=[16],
                                 dtype=tf.float32,
                                 initializer=tf.constant_initializer(0.1))
        conv = tf.nn.conv2d(images, weights, strides=[1, 1, 1, 1], padding="SAME")
        pre_activation = tf.nn.bias_add(conv, biases)
        conv1 = tf.nn.relu(pre_activation, name="conv1")

    # pool1 && norm1
    with tf.variable_scope("pooling1_lrn") as scope:
        pool1 = tf.nn.max_pool(conv1, ksize=[1, 3, 3, 1], strides=[1, 2, 2, 1],
                               padding="SAME", name="pooling1")
        norm1 = tf.nn.lrn(pool1, depth_radius=4, bias=1.0, alpha=0.001/9.0,
                          beta=0.75, name='norm1')

    # conv2
    with tf.variable_scope("conv2") as scope:
        weights = tf.get_variable("weights",
                                  shape=[3, 3, 16, 16],
                                  dtype=tf.float32,
                                  initializer=tf.truncated_normal_initializer(stddev=0.1, dtype=tf.float32))
        biases = tf.get_variable("biases",
                                 shape=[16],
                                 dtype=tf.float32,
                                 initializer=tf.constant_initializer(0.1))
        conv = tf.nn.conv2d(norm1, weights, strides=[1, 1, 1, 1], padding="SAME")
        pre_activation = tf.nn.bias_add(conv, biases)
        conv2 = tf.nn.relu(pre_activation, name="conv2")

    # pool2 && norm2
    with tf.variable_scope("pooling2_lrn") as scope:
        pool2 = tf.nn.max_pool(conv2, ksize=[1, 3, 3, 1], strides=[1, 2, 2, 1],
                               padding="SAME", name="pooling2")
        norm2 = tf.nn.lrn(pool2, depth_radius=4, bias=1.0, alpha=0.001/9.0,
                          beta=0.75, name='norm2')

    # full-connect1
    with tf.variable_scope("fc1") as scope:
        reshape = layers.flatten(norm2)
        dim = reshape.get_shape()[1].value
        weights = tf.get_variable("weights",
                                  shape=[dim, 128],
                                  dtype=tf.float32,
                                  initializer=tf.truncated_normal_initializer(stddev=0.005, dtype=tf.float32))
        biases = tf.get_variable("biases",
                                 shape=[128],
                                 dtype=tf.float32,
                                 initializer=tf.constant_initializer(0.1))
        fc1 = tf.nn.relu(tf.matmul(reshape, weights) + biases, name="fc1")

    # full_connect2
    with tf.variable_scope("fc2") as scope:
        weights = tf.get_variable("weights",
                                  shape=[128, 128],
                                  dtype=tf.float32,
                                  initializer=tf.truncated_normal_initializer(stddev=0.005, dtype=tf.float32))
        biases = tf.get_variable("biases",
                                 shape=[128],
                                 dtype=tf.float32,
                                 initializer=tf.constant_initializer(0.1))
        fc2 = tf.nn.relu(tf.matmul(fc1, weights) + biases, name="fc2")

    # softmax
    with tf.variable_scope("softmax_linear") as scope:
        weights = tf.get_variable("weights",
                                  shape=[128, n_classes],
                                  dtype=tf.float32,
                                  initializer=tf.truncated_normal_initializer(stddev=0.005, dtype=tf.float32))
        biases = tf.get_variable("biases",
                                 shape=[n_classes],
                                 dtype=tf.float32,
                                 initializer=tf.constant_initializer(0.1))
        softmax_linear = tf.add(tf.matmul(fc2, weights), biases, name="softmax_linear")
        # softmax_linear = tf.nn.softmax(softmax_linear)

    return softmax_linear


def losses(logits, labels):
    with tf.variable_scope('loss'):
        cross_entropy = tf.nn.sparse_softmax_cross_entropy_with_logits(logits=logits,
                                                                       labels=labels)
        loss = tf.reduce_mean(cross_entropy)
    return loss


def evaluation(logits, labels):
    with tf.variable_scope("accuracy"):
        correct = tf.nn.in_top_k(logits, labels, 1)
        correct = tf.cast(correct, tf.float16)
        accuracy = tf.reduce_mean(correct)
    return accuracy
其中,softmax用来得到分类,losses函数和evaluation函数分别用来得到loss的值和准确率,以方便在训练的过程中进行观察,避免过拟合。
调参、训练并测试
接下来,加载完了训练集,设计好了模型,就要进行训练了。
此处我先把训练段代码贴出,再进行解释。
train.py:
# -*- coding: utf-8 -*-
import os
import shutil
import tensorflow as tf
import numpy as np
import time
#import load_data
#import model
from load_data import *
from model import *
import matplotlib.pyplot as plt
import sys
from watchdog.observers import Observer
from watchdog.events import FileSystemEventHandler
#global_iii=0


# 训练模型
def training():
    N_CLASSES = 3
    IMG_SIZE = 208
    BATCH_SIZE = 16
    CAPACITY = 2000
    MAX_STEP = 20000
    LEARNING_RATE = 1e-4

    # 测试图片读取
    image_dir = 'data\\train'
    logs_dir = 'logs_1'     # 检查点保存路径A

    sess = tf.Session()

    train_list = get_all_files(image_dir, True)
    image_train_batch, label_train_batch = get_batch(train_list, IMG_SIZE, BATCH_SIZE, CAPACITY, True)
    train_logits = inference(image_train_batch, N_CLASSES)
    train_loss = losses(train_logits, label_train_batch)
    train_acc = evaluation(train_logits, label_train_batch)

    train_op = tf.train.AdamOptimizer(LEARNING_RATE).minimize(train_loss)

    var_list = tf.trainable_variables()
    paras_count = tf.reduce_sum([tf.reduce_prod(v.shape) for v in var_list])
    print('参数数目:%d' % sess.run(paras_count), end='\n\n')

    saver = tf.train.Saver()

    sess.run(tf.global_variables_initializer())

    coord = tf.train.Coordinator()
    threads = tf.train.start_queue_runners(sess=sess, coord=coord)

    s_t = time.time()
    try:
        for step in range(MAX_STEP):
            if coord.should_stop():
                break

            _, loss, acc = sess.run([train_op, train_loss, train_acc])

            if step % 100 == 0:  # 实时记录训练过程并显示
                runtime = time.time() - s_t
                print('Step: %6d, loss: %.8f, accuracy: %.2f%%, time:%.2fs, time left: %.2fhours'
                      % (step, loss, acc * 100, runtime, (MAX_STEP - step) * runtime / 360000))
                s_t = time.time()

            if step % 1000 == 0 or step == MAX_STEP - 1:  # 保存检查点
                checkpoint_path = os.path.join(logs_dir, 'model.ckpt')
                saver.save(sess, checkpoint_path, global_step=step)

    except tf.errors.OutOfRangeError:
        print('Done.')
    finally:
        coord.request_stop()

    coord.join(threads=threads)
    sess.close()


#%%

class MyDirEventHandler(FileSystemEventHandler):
    global global_iii

    def on_moved(self, event):
        print(event)
        eval()


    def on_created(self, event):
        print(event)

    def on_deleted(self, event):
        print(event)


    def on_modified(self, event):
        print("modified:", event)
        eval()


if __name__ == '__main__':
    training()
这段代码中,除了简单的参数配置,要具体说明的几个点如下:
- N_CLASSES代表训练的分类个数
- MAX_STEP代表训练次数
有的人可能会想当然的认为,训练的越多越好,其实并不是这样的,训练的过少或过多,都会影响结果。初学者可能会把握不好训练的次数,这里我也对训练的次数进行一个推荐,我个人认为,每张图片训练三次左右最为合适。
此处引入一个概念:过拟合。大家可以自行百度。
如果训练的次数过多,则会发生过拟合,影响识别结果,大家可能在使用matlab进行拟合的过程中也会有相同的感受,
我的训练集个数总共约为6000张,所以我将训练步数设置为20000,这样就可以避免过拟合。 - LEARNING_RATE代表训练率,这个参数的调节需要用户自行测试
训练的过程还是新建一个会话,程序会时常保留训练步数对应的模型,比如你训练两万次,程序会在10000次保存一次模型,12000次保存一次模型等等。训练的过程中,会实时输出当前步数的loss和准确率,用户可以自行通过这两个参数来测试。
完成接口到项目中
最后一步就是完成接口到项目中了。
我们知道图像识别使用的是会话,如果要让它不停执行图像识别就需要将执行识别进行循环。所以图像识别就直接占用了一个线程。
而在实际的项目中,线程又必须提供给主程序。所以,我们在这里提出多线程的方案。当主线程需要图像识别时,设置事件,将主线程暂停,开启图像识别线程,识别完成后,关闭图像识别线程,开启主线程。
我们还是先把代码段贴出,test.py:
# -*- coding: utf-8 -*-
import os
import shutil
import tensorflow as tf
import numpy as np
import time
import pyttsx3
import threading

import socket
import sys
import struct

from load_data import *
from model import *
import matplotlib.pyplot as plt
import sys
from watchdog.observers import Observer
from watchdog.events import FileSystemEventHandler
import chardet
import codecs
lock=threading.Lock()
start=time.time()

class MyDirEventHandler(FileSystemEventHandler):
    global global_iii
    def on_moved(self, event):
        print(event)
        eval()
    def on_created(self, event):
        print(event)
    def on_deleted(self, event):
        print(event)
    def on_modified(self, event):
        print("modified:", event)
        eval()

def socket_service_image():
    global event1,event2,answer
    try:
        s = socket.socket(socket.AF_INET, socket.SOCK_STREAM)
        s.setsockopt(socket.SOL_SOCKET, socket.SO_REUSEADDR, 1)
        #设置成非阻塞
        #s.setblocking(False)
        #s.bind(('192.168.43.180', 1902))
# s.bind(('192.168.226.1', 1900))
        s.bind(('192.168.43.180', 1904))
        s.listen(10)
    except socket.error as msg:
        print(msg)
        sys.exit(1)

    print("Wait for Connection.....................")

    while True:
        sock, addr = s.accept()  # addr是一个元组(ip,port)
        print("已建立连接")
        deal_image(sock, addr)

''' def deal_image(sock, addr): global event1,event2,answer print("Accept connection from {0}".format(addr)) # 查看发送端的ip和端口 filename = "D:\\360Download\\guoshushibie\\data\\receive\\corn.1.jpg" #接收到的图片写入的路径 # filename= "D:\\360Download\\guoshushibie\\data\\receive\\" # filename0="cuke.1" # filename += filename0 + '.jpg' while True: data = sock.recv(1024) if data: try: myfile = open(filename,'wb') print("%s 文件打开成功" % filename) except IOError: print("%s 文件打开失败,该文件不存在" % filename) myfile.write(data) while True: data=sock.recv(1024) if not data: myfile.close() break myfile.write(data) #myfile.close() ###识别结果 #event1.set() event2.set()#唤醒图像识别 print("5",event1.isSet()) print("6",event2.isSet()) event1.wait()#睡眠自己 #time.sleep(1) print("7",event1.isSet()) print("8",event2.isSet()) #print("test########################") print("输出结果为:",answer) send_data = answer sock.send(send_data.encode("gbk")) ##############这边是接收到图片,后发出数据到电子秤 # sock.shutdown() event1.clear()#变成False print("9",event1.isSet()) print("10",event2.isSet()) '''

def deal_image(sock, addr):
    global event1,event2,answer
    print("Accept connection from {0}".format(addr))  # 查看发送端的ip和端口
    filename = "D:\\360Download\\guoshushibie\\data\\receive\\corn.1.jpg" #接收到的图片写入的路径

# filename= "D:\\360Download\\guoshushibie\\data\\receive\\"
# filename0="cuke.1"
# filename += filename0 + '.jpg'

    while True:
        #try:
            #data = sock.recv(4096)
        datahead = sock.recv(5)

        #codeType = chardet.detect(datahead)["encoding"] #检测编码方式
        #print(u"编码是 ", codeType)
        #size=datahead.decode('utf-8','replace')
        print(datahead)
        size = datahead.decode()
        if size=='':
            break
        size_int=int(size)
        print(size_int)
        #size = size[:5]

        #size_int=int(size)

        #size=datahead.decode()
       # size_int=int(size)
        #datahead = int(datahead.decode())
        #print(datahead)
        #datahead.decode()
        #print(datahead.type())
        #datahead1=str(datahead)
        #datahead2=int(datahead1)
        #print(datahead2)

        #txt = str(data)
        #print(txt)
        inital=0
        myfile = open(filename,'wb')
        print("%s 文件打开成功" % filename)
        while(inital!=size_int):
            data=sock.recv(1024)
            myfile.write(data)
            inital=inital+len(data)
            #print(inital)
        myfile.close()

        event2.set()#唤醒图像识别
        print("5",event1.isSet())
        print("6",event2.isSet())
        event1.wait()#睡眠自己
        #time.sleep(1)
        print("7",event1.isSet())
        print("8",event2.isSet())
        #print("test########################")
        print("输出结果为:",answer)
        send_data = answer

        sock.send(send_data.encode("gbk"))              ##############这边是接收到图片,后发出数据到电子秤
       # sock.shutdown()
        event1.clear()#变成False
        print("9",event1.isSet())
        print("10",event2.isSet())
        #except:
            #sock.close()
            #continue


# 测试检查点
def eval():
    global event1,event2,answer
    print("waiting for socket")
# print(socket.gethostbyname(socket.gethostname()))
    while True:
        #print("waiting for socket222")
        event2.wait()#睡眠自己
        #time.sleep(1)
        print("开始调用")

        tf.reset_default_graph()
        N_CLASSES = 3
        IMG_SIZE = 208
        BATCH_SIZE = 1
        CAPACITY = 200
        MAX_STEP = 1


        test_dir = 'D:\\360Download\\guoshushibie\\data\\receive'
        logs_dir = 'logs_1'     # 检查点目录
        path=test_dir
        sess = tf.Session()


        i=1
    #对目录下的文件进行遍历
        for file in os.listdir(path):
            if os.path.isfile(os.path.join(path,file))==True:
    #设置新文件名
                new_name=file.replace(file,"corn.%d.jpg"%i)
    #重命名
            os.rename(os.path.join(path,file),os.path.join(path,new_name))
            i+=1
    #结束

        train_list = get_all_files(test_dir, is_random=True)
        image_train_batch, label_train_batch = get_batch(train_list,IMG_SIZE, BATCH_SIZE, CAPACITY, True)
        train_logits = inference(image_train_batch, N_CLASSES)
        train_logits = tf.nn.softmax(train_logits)  # 用softmax转化为百分比数值

        # 载入检查点
        saver = tf.train.Saver()
        print('\n载入检查点...')
        ckpt = tf.train.get_checkpoint_state(logs_dir)
        if ckpt and ckpt.model_checkpoint_path:
            global_step = ckpt.model_checkpoint_path.split('/')[-1].split('-')[-1]
            saver.restore(sess, ckpt.model_checkpoint_path)
            print('载入成功,global_step = %s\n' % global_step)
        else:
            print('没有找到检查点')
        coord = tf.train.Coordinator()
        threads = tf.train.start_queue_runners(sess=sess, coord=coord)

        try:
            for step in range(MAX_STEP):
                if coord.should_stop():
                    break

                image, prediction = sess.run([image_train_batch, train_logits])
                max_index = np.argmax(prediction)

    # data=open("D:\\360Download\\guoshushibie\\data\\data.txt",'a')


                if max_index == 0:
    # print ('%.2f%% is a cuke.' % (prediction[0][0] * 100))
    # data=open("D:\\360Download\\guoshushibie\\data\\data.txt",'w+')
    # print('cuke',file=data)
                    answer="corn"
                    print(answer)
                    plt.imshow(image[0])
                    plt.show()
    # time.sleep(3)
    # break
    # engine=pyttsx3.init()
    # voice=engine.getProperty('voice')
    # voices=engine.getProperty('voices')
    # for item in voices:
    # print(item.id,item.languages)
    # engine.setProperty('voice','zh')
    # engine.say('黄瓜 单价是 三块五一斤。The unit price of cucumber is three pieces per catty.')
    # engine.runAndWait()

                elif max_index == 1:
    # print ( '%.2f%% is a bittergourd.' % (prediction[0][1] * 100))
     # print('grape')
                    #data=open("D:\\360安全浏览器下载\\果蔬识别\\data\\data.txt",'w+')
    # print('bittergourd',file=data)
                    answer="cucumber"
                    print(answer)

    # engine=pyttsx3.init()
    # voice=engine.getProperty('voice')
    # voices=engine.getProperty('voices')
    # for item in voices:
    # print(item.id,item.languages)
    # engine.setProperty('voice','zh')
    # engine.say('我的天哪!苦 瓜 今日 特价 打八折 单价是 十三块五一斤。 Oh my god! Bitter melon today special price, hit twenty per cent off, the unit price is thirteen yuan per catty')
    # engine.runAndWait()
                    plt.imshow(image[0])
                    plt.show()

                elif max_index == 2:
    # print ('%.2f%% is a tomato.' % (prediction[0][2] * 100))
     # print('tomato')
                    #data=open("D:\\360安全浏览器下载\\果蔬识别\\data\\data.txt",'w+')
    # print('tomato',file=data)
                    answer="orange"
                    print(answer)
                    #data.close()
    # engine=pyttsx3.init()
    # voice=engine.getProperty('voice')
    # voices=engine.getProperty('voices')
    # for item in voices:
    # print(item.id,item.languages)
    # engine.setProperty('voice','zh')
    # engine.say('我的天哪!番 茄 今日 特价 打九折 单价是 六块五一斤 Oh my god!Tomato today special price, ten per cent off, the unit price is Six five per catty')
    # engine.runAndWait()
                    plt.imshow(image[0])
                    plt.show()

        except tf.errors.OutOfRangeError:
            print('Done.')
        finally:
            coord.request_stop()

        coord.join(threads=threads)
        #删除文件
        filelist=[]                      #选取删除文件夹的路径,最终结果删除img文件夹
        filelist=os.listdir(test_dir)                #列出该目录下的所有文件名
        for f in filelist:
            filepath = os.path.join( test_dir, f )   #将文件名映射成绝对路劲
            if os.path.isfile(filepath):            #判断该文件是否为文件或者文件夹
                os.remove(filepath)                 #若为文件,则直接删除
                print(str(filepath)+" removed!")
            elif os.path.isdir(filepath):
                shutil.rmtree(filepath,True)        #若为文件夹,则删除该文件夹及文件夹内所有文件
                print("dir "+str(filepath)+" removed!")
        tf.reset_default_graph()

        sess.close()
        print("结束eval函数")
        print("answer:",answer)
        print("11",event1.isSet())
        print("12",event2.isSet())
        event2.clear()
        print("1",event1.isSet())
        print("2",event2.isSet())
        print("**********************************")
        while True:
            time.sleep(0.1)
            if event1.isSet()==False:
                event1.set()
                break
        #event1.set()
        print("3",event1.isSet())
        print("4",event2.isSet())


# print("clear event")


if __name__ == '__main__':
    #for i1 in range(0,200):
   # while(1):
       # eval()
        #time.sleep(1)
    event1 = threading.Event()
    event2 = threading.Event()

    answer="none"

    test_dir = 'D:\\360Download\\guoshushibie\\data\\receive'
    logs_dir = 'logs_1'     # 检查点目录
    path=test_dir
# eval()
# print(answer)


    t1=threading.Thread(target=socket_service_image,args=())
    t2=threading.Thread(target=eval,args=())
    t2.start()
    t1.start()
''' for mmm in range(1000): break_flag=0 for i in range(1000): #监听from文件 work_path = 'D:\\360Download\\guoshushibie\\data\\from' if os.listdir(work_path): print( '目录为有') time.sleep(1) f=open('D:\\360Download\\guoshushibie\\data\\data.txt', "r+") f.truncate() os.remove(r'D:\\360Download\\guoshushibie\\data\\from\\from.txt') for file in os.listdir(path): if os.path.isfile(os.path.join(path,file))==False: time.sleep(1) if os.path.isfile(os.path.join(path,file))==True: break_flag=1 break if(break_flag==1): break time.sleep(1) '''
人生最痛苦的事情之一就是读以前自己写的代码,此处我写的代码和备注有些乱,由于线程的机制实在是复杂,所以删删改改了很多,建议大家养成优良的代码习惯,不要像我一样。
这个代码段我已经集成到了项目中,开启了socket通信和图像识别两个线程,实现的结果就是,当socket传来一张图片,我的图像识别就可以对这张图像进行识别,并将识别的结果通过socket通信返回发送回去。
这个里面的socket通信也是很有讲究,我和小组成员为了这个通信问题真的是绞尽脑汁,我以后有空再出一个socket通信传输图片的教程。这里直接把server端的socket成品放在这里了,大家有兴趣的可以自行研究研究。
这里的代码实在是简单,我就不多作解释了,大概的流程就是,会话首先读取模型,然后读取图像,进行识别,然后根据标签,输出结果。
总结
以上就是我在完成图像识别模块开发的全过程了。当初图像识别并没有选择调用api,就是想要自己进行一个尝试,好在tensorflow框架已经非常成熟,开发起来非常方便,不需要重复造轮子。
小白在入门的时候,知道自己想做分类,但是不知道怎么做,可能就会耗费大量的时间,我在刚开始,就在乱打乱撞,学了一段时间opencv,发现并没有卵用,自己尝试使用基于颜色的方法来识别,的确可以区分出差别大的,比如青菜和番茄,但是还是不能实用。后来我才了解了深度学习的概念,先后接触了百度api、英伟达api等,我就坚信肯定可以通过深度学习的方式来解决。后来咨询了无数大佬,才知道有卷积神经网络,就是CNN这个好东西。有了方向才能进行下一步。所以知识面广非常重要,并不是要什么都会,而是碰到不会的情况下,你就可以知道自己应该学习什么。
我现在正在开发目标检测+图像分割的技术,由于这个技术正在进行多项比赛和申请专利,所以暂时不进行开源,比完赛后申请完专利后也会进行开源,用自己的理解进行教学。
发布者:全栈程序员-用户IM,转载请注明出处:https://javaforall.cn/131514.html原文链接:https://javaforall.cn
【正版授权,激活自己账号】: Jetbrains全家桶Ide使用,1年售后保障,每天仅需1毛
【官方授权 正版激活】: 官方授权 正版激活 支持Jetbrains家族下所有IDE 使用个人JB账号...
