大家好,又见面了,我是你们的朋友全栈君。
论文:
The OCRopus Open Source OCR System
Transfer Learning for OCRopus Model Training on Early Printed Books
GitHub:
https://github.com/tmbdev/ocropy
https://github.com/tmbdev/ocropy2
https://github.com/NVlabs/ocropus3
https://github.com/tmbdev/clstm
https://github.com/chreul/OCR_Testdata_EarlyPrintedBooks
依赖:
Python2
Pytorch
系统结构:
整个系统由ocropus-nlbin(二值化预处理),ocropus-gpageseg(行检测分割),ocropus-rpred(基于过分割+OpenFST的识别+语言模型矫正),ocropus-hocr(HTML显示结果)这几部分组成。
其中,ocropy和ocropy2区别不大,ocropus3中大部分模块都替换为神经网络,并且改为nvidialab维护了。

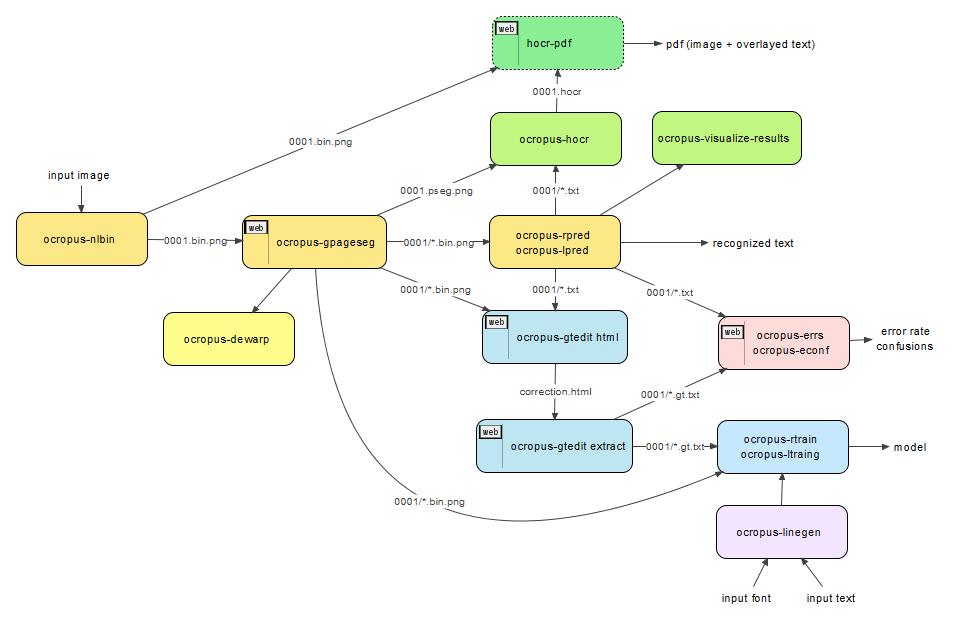
识别流程:

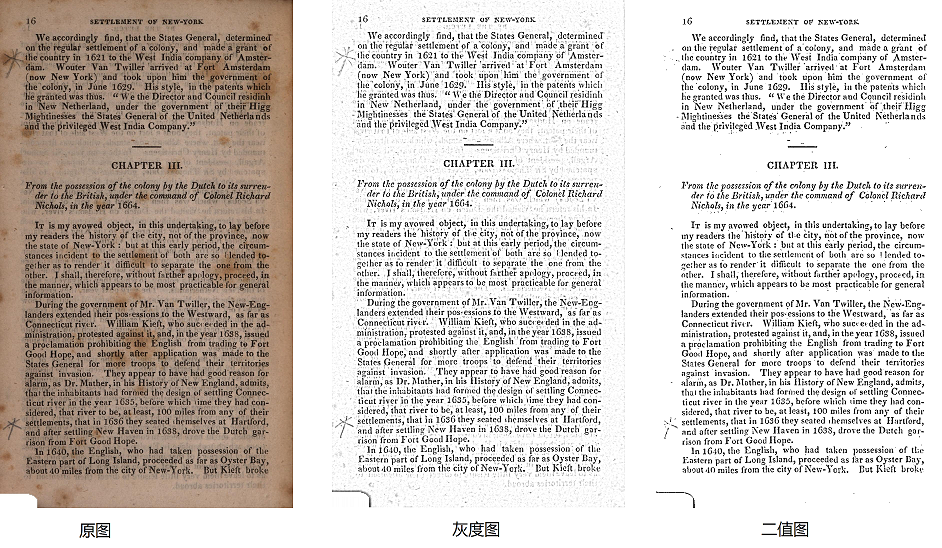
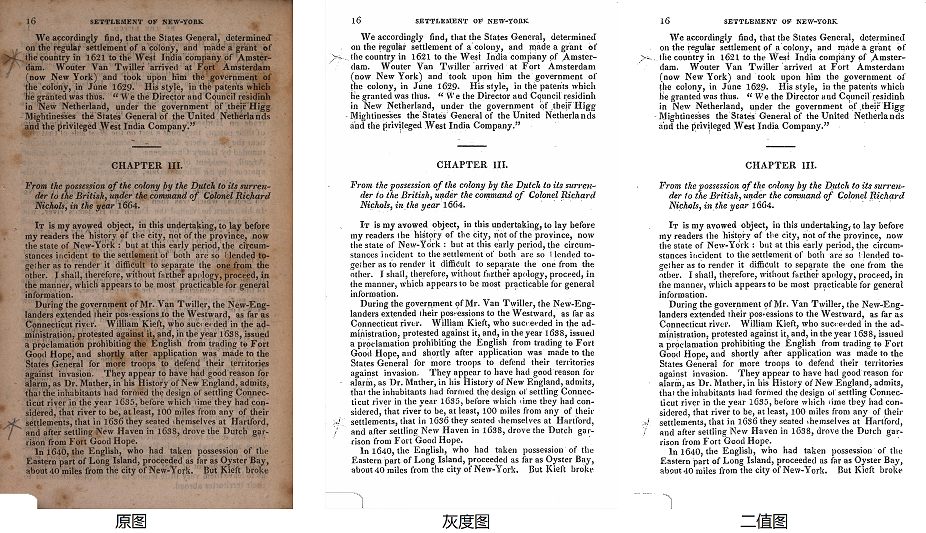
ocropus-nlbin,ocrobin:
该模块主要负责图像预处理,主要包含图像归一化处理,去噪点,去背景处理,角度旋转处理,直方图均衡化处理等。
归一化处理为常规的减均值,除方差操作。
去噪点背景为,通过一个概率分布的滤波器,对于20*2的窗口中的像素进行从小到大的排列,取像素值排列在80%的像素作为背景像素。然后原图减去背景就会得到前景的字。
角度旋转,基于设定的角度值,对原始图片进行旋转,然后求其每行的均值,然后所有行的均值组成一个向量,求该向量的方差。假设一个图正负5度每隔1度求一个方差,一共可以得到10个方差值,方差最大的所对应的角度就是需要旋转的角度。因为,正常的图总是一行黑字,一行空白,所以方差最大。
直方图均衡化,首先将所有像素从小到大排序,像素在5%位置的值定位最小值,像素在90%位置的定位最大值,然后进行直方图均衡化操作。
原程序中使用了scipy模块,速度较慢,经过opencv改进后,取得了速度和效果的兼得。
from __future__ import print_function
import numpy as np
import cv2
import time

class Pre_Process(object):
    def __init__(self):
        self.zoom=0.5
        self.perc=50
        self.range=20
        self.bignore=0.2
        self.maxskew=5
        self.skewsteps=1
        self.escale=1.0
        self.lo=0.05
        self.hi=0.9


    def normalize_raw_image(self,raw):
        ''' perform image normalization '''
        image = raw - np.amin(raw)
        if np.amax(image) == np.amin(image):
            return image
        image /= np.amax(image)
        return image


    def estimate_local_whitelevel(self,image,  bignore=0.2,zoom=0.5, perc=80, range=20):
        '''flatten it by estimating the local whitelevel
        zoom for page background estimation, smaller=faster, default: %(default)s
        percentage for filters, default: %(default)s
        range for filters, default: %(default)s
        '''
        d0, d1 = image.shape
        o0, o1 = int(bignore * d0), int(bignore * d1)
        est = image[o0:d0 - o0, o1:d1 - o1]

        image_black=np.sum(est < 0.05)
        image_white=np.sum(est > 0.95)
        extreme = (image_black+image_white) * 1.0 / np.prod(est.shape)

        if np.mean(est)<0.4:
            print( np.mean(est),np.median(est))
            image = 1 - image

        if extreme > 0.95:
            flat = image
        else:
            m=cv2.blur(image,(range,range))
            w, h = np.minimum(np.array(image.shape), np.array(m.shape))
            flat = np.clip(image[:w, :h] - m[:w, :h] + 1, 0, 1)


        return flat


    def estimate_skew_angle(self,image, angles):
        estimates = []
        for a in angles:
            matrix = cv2.getRotationMatrix2D((int(image.shape[1] / 2), int(image.shape[0] / 2)), a, 1)
            rotate_image = cv2.warpAffine(image, matrix, (image.shape[1], image.shape[0]))

            v = np.mean(rotate_image, axis=1)
            v = np.var(v)
            estimates.append((v, a))
        _, a = max(estimates)
        return a

    def estimate_skew(self,flat,maxskew=2, skewsteps=1):
        ''' estimate skew angle and rotate'''
        flat = np.amax(flat) - flat
        flat -= np.amin(flat)
        ma = maxskew
        ms = int(2 * maxskew * skewsteps)

        angle = self.estimate_skew_angle(flat, np.linspace(-ma, ma, ms + 1))

        matrix = cv2.getRotationMatrix2D((int(flat.shape[1] / 2), int(flat.shape[0] / 2)), angle, 1)
        flat= cv2.warpAffine(flat, matrix, (flat.shape[1], flat.shape[0]))


        flat = np.amax(flat) - flat
        return flat, angle

    def estimate_thresholds(self,flat, bignore=0.2, escale=1, lo=0.05, hi=0.9):
        '''# estimate low and high thresholds
        ignore this much of the border for threshold estimation, default: %(default)s
        scale for estimating a mask over the text region, default: %(default)s
        lo percentile for black estimation, default: %(default)s
        hi percentile for white estimation, default: %(default)s
        '''
        d0, d1 = flat.shape
        o0, o1 = int(bignore * d0), int(bignore * d1)
        est = flat[o0:d0 - o0, o1:d1 - o1]

        if escale > 0:
            # by default, we use only regions that contain
            # significant variance; this makes the percentile
            # based low and high estimates more reliable

            v = est -cv2.GaussianBlur(est, (3,3), escale * 20)
            v=cv2.GaussianBlur(v ** 2, (3,3), escale * 20)** 0.5


            v = (v > 0.3 * np.amax(v))
            v=np.asarray(v,np.uint8)
            v=cv2.cvtColor(v, cv2.COLOR_GRAY2RGB)

            kernel =  cv2.getStructuringElement(cv2.MORPH_RECT,(int(escale * 50),int(escale * 50)))
            v = cv2.dilate(v, kernel, 1)
            v=cv2.cvtColor(v, cv2.COLOR_RGB2GRAY)
            v = (v > 0.3 * np.amax(v))
            est = est[v]

        if len(est)!=0:
            est=np.sort(est)
            lo = est[int(lo*len(est))]
            hi = est[int(hi*len(est))]

        # rescale the image to get the gray scale image
        flat -= lo
        flat /= (hi - lo)
        flat = np.clip(flat, 0, 1)
        return flat

    def process(self,img):
        # perform image normalization(30ms)
        image = self.normalize_raw_image(img)

        # check whether the image is already effectively binarized(70ms)
        flat = self.estimate_local_whitelevel(image,self.bignore, self.zoom, self.perc, self.range)

        # estimate skew angle and rotate(100ms)
        flat, angle = self.estimate_skew(flat, self.maxskew, self.skewsteps)

        # estimate low and high thresholds(200ms)
        flat = self.estimate_thresholds(flat, self.bignore, self.escale, self.lo, self.hi)
        flat=np.asarray(flat*255,np.uint8)

        return flat


if __name__=="__main__":
    pp=Pre_Process()
    image=cv2.imread("0020_0022.png",0)
    image=image/255

    for i in range(1):
        start = time.time()
        flat=pp.process(image)
        print("time:",time.time()-start)
cv2.imwrite("gray.jpg", flat)
cv2.imwrite("binary.jpg", 255*(flat>128))
在ocropus3中,基于pytorch构建网络结构进行上述的预处理。尤其对噪声的处理,可以获得更好的效果。并且速度比原来的传统方法更快。模型也很小,只有26K。网络主要使用了2DLSTM。
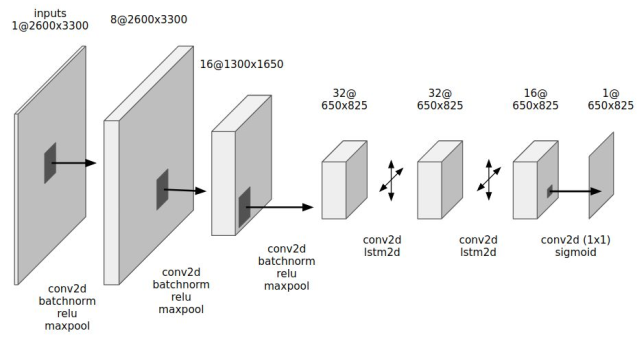
MDLSTM结构:
简单的说就是对一个平面先做横向的一维lstm,再做纵向的一维lstm。
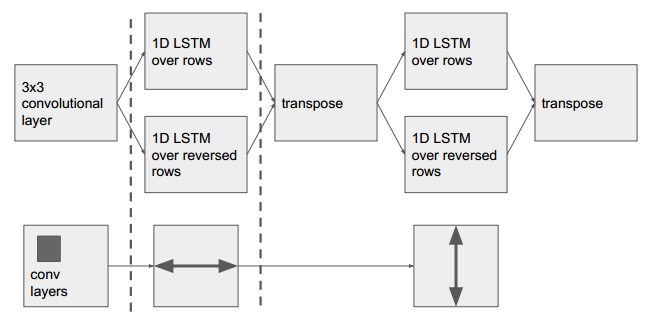
网络结构如下,
Sequential(
  (0): Conv2d(1, 8, kernel_size=(3, 3), stride=(1, 1), padding=(1, 1))
  (1): BatchNorm2d(8, eps=1e-05, momentum=0.1, affine=True)
  (2): ReLU()
  (3): LSTM2(
    (hlstm): RowwiseLSTM(
      (lstm): LSTM(8, 4, bidirectional=1)
    )
    (vlstm): RowwiseLSTM(
      (lstm): LSTM(8, 4, bidirectional=1)
    )
  )
  (4): Conv2d(8, 1, kernel_size=(1, 1), stride=(1, 1))
  (5): Sigmoid()
)
处理程序:
import ocrobin
import cv2
import numpy as np
import time
bm = ocrobin.Binarizer("bin-000000046-005393.pt")
bm.model
image = np.mean(cv2.imread("0020_0022.png")[:, :, :3], 2)
start=time.time()
binary = bm.binarize(image)
print("time:",time.time()-start)
print(np.max(binary),np.min(binary))
gray=(1-binary)*255
binary=(binary<0.5)*255
cv2.imwrite("gray.png",gray)
cv2.imwrite("bin.png",binary)
ocrorot:
该模块为ocropus3中的旋转(rotation)和对称(skew)矫正的模块。这里首先说明下,旋转指的是0度,90度,180度,360度,这4个角度的矫正。对称矫正指的是小于90度角度的矫正,就是对称矫正。相比于ocropy中只能进行小角度的矫正,ocrorot可以说更实用。旋转(rotation)和对称(skew)矫正都是通过神经网络实现。
其中旋转矫正的模块:
Sequential(
  (0): CheckSizes [(1, 128), (1, 512), (256, 256), (256, 256)]
  (1): Conv2d(1, 8, kernel_size=(3, 3), stride=(1, 1), padding=(1, 1))
  (2): BatchNorm2d(8, eps=1e-05, momentum=0.1, affine=True)
  (3): ReLU()
  (4): MaxPool2d(kernel_size=(2, 2), stride=(2, 2), dilation=(1, 1), ceil_mode=False)
  (5): Conv2d(8, 16, kernel_size=(3, 3), stride=(1, 1), padding=(1, 1))
  (6): BatchNorm2d(16, eps=1e-05, momentum=0.1, affine=True)
  (7): ReLU()
  (8): MaxPool2d(kernel_size=(2, 2), stride=(2, 2), dilation=(1, 1), ceil_mode=False)
  (9): Conv2d(16, 32, kernel_size=(3, 3), stride=(1, 1), padding=(1, 1))
  (10): BatchNorm2d(32, eps=1e-05, momentum=0.1, affine=True)
  (11): ReLU()
  (12): MaxPool2d(kernel_size=(2, 2), stride=(2, 2), dilation=(1, 1), ceil_mode=False)
  (13): Conv2d(32, 64, kernel_size=(3, 3), stride=(1, 1), padding=(1, 1))
  (14): BatchNorm2d(64, eps=1e-05, momentum=0.1, affine=True)
  (15): ReLU()
  (16): Img2FlatSum
  (17): Linear(in_features=64, out_features=64, bias=True)
  (18): BatchNorm1d(64, eps=1e-05, momentum=0.1, affine=True)
  (19): ReLU()
  (20): Linear(in_features=64, out_features=4, bias=True)
  (21): Sigmoid()
  (22): CheckSizes [(1, 128), (4, 4)]
)
对称矫正的模块:
Sequential(
  (0): CheckSizes [(1, 128), (1, 512), (256, 256), (256, 256)]
  (1): Conv2d(1, 8, kernel_size=(5, 5), stride=(1, 1), padding=(2, 2))
  (2): BatchNorm2d(8, eps=1e-05, momentum=0.1, affine=True)
  (3): ReLU()
  (4): Spectrum
  (5): Conv2d(8, 4, kernel_size=(5, 5), stride=(1, 1), padding=(2, 2))
  (6): BatchNorm2d(4, eps=1e-05, momentum=0.1, affine=True)
  (7): ReLU()
  (8): Reshape((0, [1, 2, 3]))
  (9): Linear(in_features=262144, out_features=128, bias=True)
  (10): BatchNorm1d(128, eps=1e-05, momentum=0.1, affine=True)
  (11): ReLU()
  (12): Linear(in_features=128, out_features=30, bias=True)
  (13): Sigmoid()
  (14): CheckSizes [(1, 128), (30, 30)]
)
ocrodeg:
该模块也是ocropus3中的模块,主要负责训练数据的增强处理。包含了页面旋转(page rotation),随机几何变换(random geometric transformations),随机分布变换(random distortions),规则表面失真(ruled surface distortions),模糊(blur),阈值化(thresholding),噪声(noise),多尺度噪声(multiscale noise),随机斑点(random blobs),纤维噪声(fibrous noise),前景背景选择(foreground/background selection)等。
ocropus-gpageseg,ocroseg:
该模块主要负责行图片的分割。具体包含了图片颜色尺度的检测,行的分割,计算阅读顺序等。其中行的分割,首先先去掉图片中的黑色下划线等有干扰的行线,然后找到列的分割线,再基于连通域的方法找到行线,从而将行分割出来。
在ocropus3中,该模块主要通过cnn实现。亮点同样是2维LSTM。主要通过网络来实现对于文本中划线的检测。然后在中划线上下取固定的高度生成文本框,实现对文本的检测。
网络结构如下:
Sequential(
  (0): Conv2d(1, 16, kernel_size=(3, 3), stride=(1, 1), padding=(1, 1))
  (1): BatchNorm2d(16, eps=1e-05, momentum=0.1, affine=True)
  (2): ReLU()
  (3): MaxPool2d(kernel_size=(2, 2), stride=(2, 2), dilation=(1, 1), ceil_mode=False)
  (4): Conv2d(16, 32, kernel_size=(3, 3), stride=(1, 1), padding=(1, 1))
  (5): BatchNorm2d(32, eps=1e-05, momentum=0.1, affine=True)
  (6): ReLU()
  (7): MaxPool2d(kernel_size=(2, 2), stride=(2, 2), dilation=(1, 1), ceil_mode=False)
  (8): Conv2d(32, 64, kernel_size=(3, 3), stride=(1, 1), padding=(1, 1))
  (9): BatchNorm2d(64, eps=1e-05, momentum=0.1, affine=True)
  (10): ReLU()
  (11): LSTM2(
    (hlstm): RowwiseLSTM(
      (lstm): LSTM(64, 32, bidirectional=1)
    )
    (vlstm): RowwiseLSTM(
      (lstm): LSTM(64, 32, bidirectional=1)
    )
  )
  (12): Conv2d(64, 32, kernel_size=(1, 1), stride=(1, 1))
  (13): BatchNorm2d(32, eps=1e-05, momentum=0.1, affine=True)
  (14): ReLU()
  (15): LSTM2(
    (hlstm): RowwiseLSTM(
      (lstm): LSTM(32, 32, bidirectional=1)
    )
    (vlstm): RowwiseLSTM(
      (lstm): LSTM(64, 32, bidirectional=1)
    )
  )
  (16): Conv2d(64, 1, kernel_size=(1, 1), stride=(1, 1))
  (17): Sigmoid()
)自己的tensorflow复现,https://github.com/watersink/ocrsegment,
ocropus-dewarp:
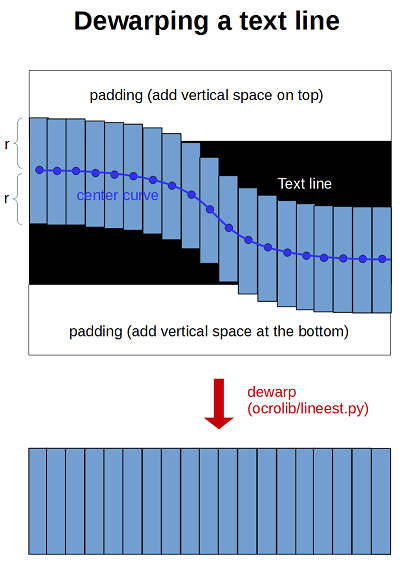
主要进行行图片的dewarp操作。首先对一张行图片进行高斯滤波和均匀滤波操作,然后取每一列的最大值作为这一列的字的中点位置。然后取0–h的数据和中点作差的均值,再乘以变化区间range,作为每一列的列高的一半。然后对原始行图片,上下各补列高一半的背景像素。然后在该图中以中心位置为中心,列高一半为长度取出有字的部分图片,最后将该图片做仿射变换,变换为规定高度的图片。

from __future__ import print_function
import os
import numpy as np
import matplotlib.pyplot as plt
from scipy.ndimage import interpolation,filters

def scale_to_h(img,target_height,order=1,dtype=np.dtype('f'),cval=0):
    h,w = img.shape
    scale = target_height*1.0/h
    target_width = int(scale*w)
    output = interpolation.affine_transform(1.0*img,np.eye(2)/scale,order=order,
                                            output_shape=(target_height,target_width),
                                            mode='constant',cval=cval)
    output = np.array(output,dtype=dtype)
    return output

class CenterNormalizer:
    def __init__(self,target_height=48,params=(4,1.0,0.3)):
        self.debug = int(os.getenv("debug_center") or "0")
        self.target_height = target_height
        self.range,self.smoothness,self.extra = params
    def setHeight(self,target_height):
        self.target_height = target_height
    def measure(self,line):
        h,w = line.shape
        h=float(h)
        w=float(w)
        smoothed = filters.gaussian_filter(line,(h*0.5,h*self.smoothness),mode='constant')
        smoothed += 0.001*filters.uniform_filter(smoothed,(h*0.5,w),mode='constant')
        self.shape = (h,w)
        a = np.argmax(smoothed,axis=0)
        a = filters.gaussian_filter(a,h*self.extra)
        self.center = np.array(a,'i')
        deltas = np.abs(np.arange(h)[:,np.newaxis]-self.center[np.newaxis,:])
        self.mad = np.mean(deltas[line!=0])
        self.r = int(1+self.range*self.mad)
        if self.debug:
            plt.figure("center")
            plt.imshow(line,cmap=plt.cm.gray)
            plt.plot(self.center)
            plt.ginput(1,1000)
    def dewarp(self,img,cval=0,dtype=np.dtype('f')):
        print(img.shape==self.shape)
        assert img.shape==self.shape
        h,w = img.shape
        # The actual image img is embedded into a larger image by
        # adding vertical space on top and at the bottom (padding)
        hpadding = self.r # this is large enough
        padded = np.vstack([cval*np.ones((hpadding,w)),img,cval*np.ones((hpadding,w))])
        center = self.center + hpadding
        dewarped = [padded[center[i]-self.r:center[i]+self.r,i] for i in range(w)]
        dewarped = np.array(dewarped,dtype=dtype).T
        return dewarped
    def normalize(self,img,order=1,dtype=np.dtype('f'),cval=0):
        dewarped = self.dewarp(img,cval=cval,dtype=dtype)
        h,w = dewarped.shape
        scaled = scale_to_h(dewarped,self.target_height,order=order,dtype=dtype,cval=cval)
        return scaled

if __name__=="__main__":
    cn=CenterNormalizer()
    import cv2
    image=cv2.imread("20180727122251.png",0)
    image=(image>128)*255
    image=255-image

    image=np.float32(image)
    cn.measure(image)
    scaled=cn.normalize(image)
    print(np.max(scaled),np.min(scaled))
    cv2.imwrite("scaled.png",255-scaled)
这一步dewarp操作,在训练数据多样性不是很大的情况下,还是比较有优势的。当然如果数据多样性比较大的话,做这个操作提升未必会很大。当然还有stn等操作,效果也许会比这个操作更好。
ocropus-linegen:
该模块主要基于语料(汤姆索亚历险记)和字体文件(DejaVuSans.ttf)生成训练的文本和label。写的很不错的一个文件。一定有用的上的地。
from __future__ import print_function

import random as pyrandom
import glob
import sys
import os
import re
import codecs
import traceback
import argparse

import numpy as np
import matplotlib.pyplot as plt
from PIL import Image
from PIL import ImageFont,ImageDraw
from scipy.ndimage import filters,measurements,interpolation
from scipy.misc import imsave

replacements = [
    (u'[_~#]',u"~"), # OCR control characters
    (u'"',u"''"), # typewriter double quote
    (u"`",u"'"), # grave accent
    (u'[“”]',u"''"), # fancy quotes
    (u"´",u"'"), # acute accent
    (u"[‘’]",u"'"), # left single quotation mark
    (u"[“”]",u"''"), # right double quotation mark
    (u"“",u"''"), # German quotes
    (u"„",u",,"), # German quotes
    (u"…",u"..."), # ellipsis
    (u"′",u"'"), # prime
    (u"″",u"''"), # double prime
    (u"‴",u"'''"), # triple prime
    (u"〃",u"''"), # ditto mark
    (u"µ",u"μ"), # replace micro unit with greek character
    (u"[–—]",u"-"), # variant length hyphens
    (u"fl",u"fl"), # expand Unicode ligatures
    (u"fi",u"fi"),
    (u"ff",u"ff"),
    (u"ffi",u"ffi"),
    (u"ffl",u"ffl"),
]

import unicodedata
def normalize_text(s):
    """Apply standard Unicode normalizations for OCR.
    This eliminates common ambiguities and weird unicode
    characters."""
    #s = unicode(s)
    s = unicodedata.normalize('NFC',s)
    s = re.sub(r'\s+(?u)',' ',s)
    s = re.sub(r'\n(?u)','',s)
    s = re.sub(r'^\s+(?u)','',s)
    s = re.sub(r'\s+$(?u)','',s)
    for m,r in replacements:
        s = re.sub((m),(r),s)
        #s = re.sub(unicode(m),unicode(r),s)
    return s

parser = argparse.ArgumentParser(description = "Generate text line training data")
parser.add_argument('-o','--base',default='linegen',help='output directory, default: %(default)s')
parser.add_argument('-r','--distort',type=float,default=1.0)
parser.add_argument('-R','--dsigma',type=float,default=20.0)
parser.add_argument('-f','--fonts',default="tests/DejaVuSans.ttf")
parser.add_argument('-F','--fontlist',default=None)
parser.add_argument('-t','--texts',default="tests/tomsawyer.txt")
parser.add_argument('-T','--textlist',default=None)
parser.add_argument('-m','--maxlines',default=200,type=int,
    help='max # lines for each directory, default: %(default)s')
parser.add_argument('-e','--degradations',default="lo",
    help="lo, med, or hi; or give a file, default: %(default)s")
parser.add_argument('-j','--jitter',default=0.5)
parser.add_argument('-s','--sizes',default="40-70")
parser.add_argument('-d','--display',action="store_true")
parser.add_argument('--numdir',action="store_true")
parser.add_argument('-C','--cleanup',default='[_~#]')
parser.add_argument('-D','--debug_show',default=None,
    help="select a class for stepping through")
args = parser.parse_args()

if "-" in args.sizes:
    lo,hi = args.sizes.split("-")
    sizes = range(int(lo),int(hi)+1)
else:
    sizes = [int(x) for x in args.sizes.split(",")]


if args.degradations=="lo":
    # sigma +/-   threshold +/-
    deglist = """
    0.5 0.0   0.5 0.0
    """
elif args.degradations=="med":
    deglist = """
    0.5 0.0   0.5 0.05
    1.0 0.3   0.4 0.05
    1.0 0.3   0.5 0.05
    1.0 0.3   0.6 0.05
    """
elif args.degradations=="hi":
    deglist = """
    0.5 0.0   0.5 0.0
    1.0 0.3   0.4 0.1
    1.0 0.3   0.5 0.1
    1.0 0.3   0.6 0.1
    1.3 0.3   0.4 0.1
    1.3 0.3   0.5 0.1
    1.3 0.3   0.6 0.1
    """
elif args.degradations is not None:
    with open(args.degradations) as stream:
        deglist = stream.read()

degradations = []
for deg in deglist.split("\n"):
    deg = deg.strip()
    if deg=="": continue
    deg = [float(x) for x in deg.split()]
    degradations.append(deg)

if args.fonts is not None:
    fonts = []
    for pat in args.fonts.split(':'):
        if pat=="": continue
        fonts += sorted(glob.glob(pat))
elif args.fontlist is not None:
    with open(args.fontlist) as fh:
        lines = (line.strip() for line in fh)
        fonts = [line for line in lines if line]
else:
    print("use -f or -F arguments to specify fonts")
    sys.exit(1)
assert len(fonts)>0,"no fonts?"
print("fonts", fonts)

if args.texts is not None:
    texts = []
    for pat in args.texts.split(':'):
        print(pat)
        if pat=="": continue
        texts += sorted(glob.glob(pat))
elif args.textlist is not None:
    texts = re.split(r'\s*\n\s*',open(args.textlist).read())
else:
    print("use -t or -T arguments to specify texts")
    sys.exit(1)
assert len(texts)>0,"no texts?"

lines = []
for text in texts:
    print("# reading", text)
    with codecs.open(text,'r','utf-8') as stream:
        for line in stream.readlines():
            line = line.strip()
            line = re.sub(args.cleanup,'',line)
            if len(line)<1: continue
            lines.append(line)
print("got", len(lines), "lines")
assert len(lines)>0
lines = list(set(lines))
print("got", len(lines), "unique lines")


def rgeometry(image,eps=0.03,delta=0.3):
    m = np.array([[1+eps*np.random.randn(),0.0],[eps*np.random.randn(),1.0+eps*np.random.randn()]])
    w,h = image.shape
    c = np.array([w/2.0,h/2])
    d = c-np.dot(m,c)+np.array([np.random.randn()*delta,np.random.randn()*delta])
    return interpolation.affine_transform(image,m,offset=d,order=1,mode='constant',cval=image[0,0])


def rdistort(image,distort=3.0,dsigma=10.0,cval=0):
    h,w = image.shape
    hs = np.random.randn(h,w)
    ws = np.random.randn(h,w)
    hs = filters.gaussian_filter(hs,dsigma)
    ws = filters.gaussian_filter(ws,dsigma)
    hs *= distort/np.amax(hs)
    ws *= distort/np.amax(ws)
    def f(p):
        return (p[0]+hs[p[0],p[1]],p[1]+ws[p[0],p[1]])
    return interpolation.geometric_transform(image,f,output_shape=(h,w),
        order=1,mode='constant',cval=cval)

if args.debug_show:
    plt.ion()
    plt.gray()


base = args.base
print("base", base)
if os.path.exists(base)==False:
    os.mkdir(base)


def crop(image,pad=1):
    [[r,c]] = measurements.find_objects(np.array(image==0,'i'))
    r0 = r.start
    r1 = r.stop
    c0 = c.start
    c1 = c.stop
    image = image[r0-pad:r1+pad,c0-pad:c1+pad]
    return image

last_font = None
last_size = None
last_fontfile = None


def genline(text,fontfile=None,size=36,sigma=0.5,threshold=0.5):
    global image,draw,last_font,last_fontfile
    if last_fontfile!=fontfile or last_size!=size:
        last_font = ImageFont.truetype(fontfile,size)
        last_fontfile = fontfile
    font = last_font
    image = Image.new("L",(6000,200))
    draw = ImageDraw.Draw(image)
    draw.rectangle((0,0,6000,6000),fill="white")
    # print("\t", size, font)
    draw.text((250,20),text,fill="black",font=font)
    a = np.asarray(image,'f')
    a = a*1.0/np.amax(a)
    if sigma>0.0:
        a = filters.gaussian_filter(a,sigma)
    a += np.clip(np.random.randn(*a.shape)*0.2,-0.25,0.25)
    a = rgeometry(a)
    a = np.array(a>threshold,'f')
    a = crop(a,pad=3)
    # FIXME add grid warping here
    # clf(); ion(); gray(); imshow(a); ginput(1,0.1)
    del draw
    del image
    return a

lines_per_size = args.maxlines//len(sizes)
for pageno,font in enumerate(fonts):
    if args.numdir:
        pagedir = "%s/%04d"%(base,pageno+1)
    else:
        fbase = re.sub(r'^[./]*','',font)
        fbase = re.sub(r'[.][^/]*$','',fbase)
        fbase = re.sub(r'[/]','_',fbase)
        pagedir = "%s/%s"%(base,fbase)
    if os.path.exists(pagedir)==False:
        os.mkdir(pagedir)
    print("===", pagedir, font)
    lineno = 0
    while lineno<args.maxlines:
        (sigma,ssigma,threshold,sthreshold) = pyrandom.choice(degradations)
        sigma += (2*np.random.rand()-1)*ssigma
        threshold += (2*np.random.rand()-1)*sthreshold
        line = pyrandom.choice(lines)
        size = pyrandom.choice(sizes)
        with open(pagedir+".info","w") as stream:
            stream.write("%s\n"%font)
        try:
            image = genline(text=line,fontfile=font,
                size=size,sigma=sigma,threshold=threshold)
        except:
            traceback.print_exc()
            continue
        if np.amin(image.shape)<10: continue
        if np.amax(image)<0.5: continue
        if args.distort>0:
            image = rdistort(image,args.distort,args.dsigma,cval=np.amax(image))
        if args.display:
            plt.gray()
            plt.clf()
            plt.imshow(image)
            plt.ginput(1,0.1)
        fname = pagedir+"/01%04d"%lineno
        imsave(fname+".bin.png",image)
        gt = normalize_text(line)
        with codecs.open(fname+".gt.txt","w",'utf-8') as stream:
            stream.write(gt+"\n")
        print("%5.2f %5.2f %3d\t%s" % (sigma, threshold, size, line))
        lineno += 1

dlinputs:
数据IO读取模块,主要优点:
- 纯python
- 支持任何深度学习框架
- 支持非常大的数据集
- 支持数据流
- 支持map-reduce和分布式数据增强
- 支持tar,tfrecords等多种格式
ocropus-rtrain,ocropus-ltrain,dltrainer:
该模块为训练模块,训练过程使用cpu训练。模型为多层感知机MLP,使用的是CTC loss。训练速度很快。
dltrainer为ocropus3的训练模块。

ocropus-rpred,ocropus-lpred,ocroline:
该模块为对训练后的模型进行测试的模块。
在ocropus3中,识别模块为卷积网络模块。损失还是CTC LOSS。
网络结构:
Sequential(
  (0): Reorder BHWD->BDHW
  (1): CheckSizes [(0, 900), (1, 1), (48, 48), (0, 9000)]
  (2): Conv2d(1, 100, kernel_size=(3, 3), stride=(1, 1), padding=(1, 1))
  (3): BatchNorm2d(100, eps=1e-05, momentum=0.1, affine=True)
  (4): ReLU()
  (5): MaxPool2d(kernel_size=(2, 1), stride=(2, 1), dilation=(1, 1), ceil_mode=False)
  (6): Conv2d(100, 200, kernel_size=(3, 3), stride=(1, 1), padding=(1, 1))
  (7): BatchNorm2d(200, eps=1e-05, momentum=0.1, affine=True)
  (8): ReLU()
  (9): Reshape((0, [1, 2], 3))
  (10): CheckSizes [(0, 900), (0, 5000), (0, 9000)]
  (11): LSTM1:LSTM(4800, 200, bidirectional=1)
  (12): Conv1d(400, 97, kernel_size=(1,), stride=(1,))
  (13): Reorder BDW->BWD
  (14): CheckSizes [(0, 900), (0, 9000), (97, 97)]
)
ocropus-hocr,ocropus-gtedit,ocropus-visualize-results:
将识别结果进行HTML显示的模块。

ocropus-econf,ocropus-errs:
计算错误率,漏检率,准确性的模块。
总结:
- ocropy网络的前向后向全部python实现,没有第三方神经网络框架的依赖,支持自己训练,需要python2版本。
- ocropy2,ocropus3有pytorch依赖
- ocropus3将各个模块都独立出来,耦合性更小
发布者:全栈程序员-用户IM,转载请注明出处:https://javaforall.cn/126699.html原文链接:https://javaforall.cn
【正版授权,激活自己账号】: Jetbrains全家桶Ide使用,1年售后保障,每天仅需1毛
【官方授权 正版激活】: 官方授权 正版激活 支持Jetbrains家族下所有IDE 使用个人JB账号...
