windows 系统控制台里给我提供很方便的运行的程序的方式。类似老式的dos环境。但是这种控制台的交互风格还是非常方便的。即便在现在的情况下,因为有些操作不使用图形化的界面反而会比较快捷。在控制台环境下,我们可以执行很多指令,比如“dir”,”ipconfig /all”,”ping”等。我们今天尝试做个图形化的界面,同样可以执行执行,并将执行的结果在winform窗体里显示。如下图:
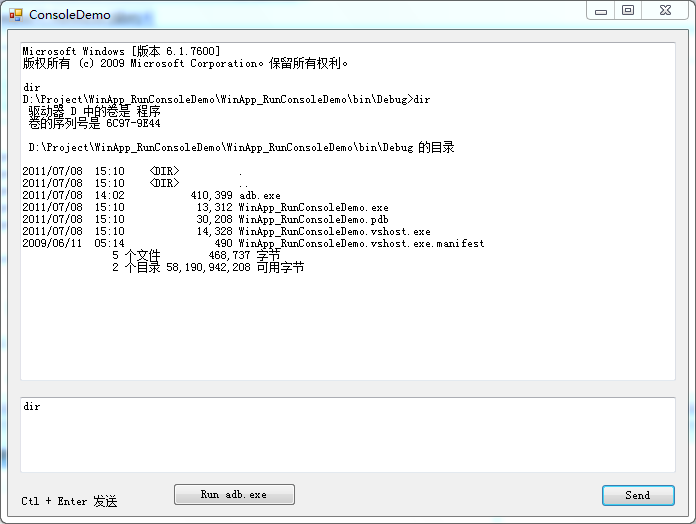

如上图所示,该窗体类似打开了一个控制台,在下方的文本框输入 “dir”指令时,会在上面提示区显示执行后的结果的内容。
这个过程是怎么实现的呢?实际上开启了一个控制台的进程,在这个进程里执行了cmd(相当于你启动一个控制台)。在我们的程序执行时,我们将 指令(比如上面输入的dir指令)发送给 这个进程,并且将这个进程的输出结果读取出来,显示在我们的winform窗体界面上。也就是说,我们开启了一个控制台,并为这个控制台做了输入,输出的重新定向,将这个控制台的输入输出的通道指向了我们的应用程序。使得我们可以将指令通过这个通道发送给控制台,并读取到控制台的输出结果。
我们是如何启动一个控制台的进程呢?代码如下:
=
new
ProcessStartInfo();
startInfo.FileName
=
“
cmd
“
;
startInfo.CreateNoWindow
=
true
;
startInfo.UseShellExecute
=
false
;
//
startInfo.WindowStyle = ProcessWindowStyle.Normal;
startInfo.RedirectStandardInput
=
true
;
startInfo.RedirectStandardOutput
=
true
;
startInfo.RedirectStandardError
=
true
;
startInfo.WorkingDirectory
=
Application.StartupPath;
_consoleProcess
=
Process.Start(startInfo);
在这里 构建了一个ProcessStartInfo 对象,这个对象描述了一个 启动项信息,它包括了 文件名,参数等。再调用Process.Start(startInfo)方法,来启动它。
注意上面的代码中,我们开启了它的重定向,也就是这三行代码:
startInfo.RedirectStandardInput
=
true
;
startInfo.RedirectStandardOutput
=
true
;
startInfo.RedirectStandardError
=
true
;
它指示了我们会对这个进程的输入,输出,错误进行重定向。
那么在,启动了一个重定向后的进程后,我们如何读取输出的内容,错误信息,和输入数据呢?
new
WaitCallback(
delegate
{
while
(
true
)
{
if
(_consoleProcess
!=
null
&&
!
_consoleProcess.HasExited)
{
StreamReader sr
=
_consoleProcess.StandardError;
string
str
=
sr.ReadLine();
Println(str);
}
Thread.Sleep(
10
);
}
}));
ThreadPool.QueueUserWorkItem(
new
WaitCallback(
delegate
{
while
(
true
)
{
if
(_consoleProcess
!=
null
&&
!
_consoleProcess.HasExited)
{
StreamReader sr
=
_consoleProcess.StandardOutput;
string
str
=
sr.ReadLine();
Println(str);
}
Thread.Sleep(
10
);
}
}));
如上面的代码所示,我么启动了两个线程,在这两个线程里,我们不停的读取这个进程 的 输出流,和错误流 里的数据,如果有,我们就把它显示出来。
那么如何写入数据到这个进程的输入流呢?
string
command
=
txtCommand.Text.Trim();
if
(
!
string
.IsNullOrEmpty(command))
{
if
(_consoleProcess
!=
null
&&
!
_consoleProcess.HasExited)
{
StreamWriter sw
=
_consoleProcess.StandardInput;
sw.WriteLine(command);
}
Println(command);
txtCommand.Text
=
“”
;
}
如上代码所示,我们从一个TextBox里(名字是txtCommand)读取 用户在窗体的输入框里输入的内容,然后获得 这个流的StandardInput,并将数据写过这个流内。
同时显示获得的数据内容的方法Println的实现:
///
<summary>
///
输出
///
</summary>
///
<param name=”str”></param>
public
void
Println(
string
str)
{
this
.Invoke(
new
MethodInvoker(
delegate
{
if
(str.EndsWith(
“
\n
“
))
{
txtMessage.AppendText(str);
}
else
{
txtMessage.AppendText(str
+
“
\n
“
);
}
txtMessage.ScrollToCaret();
}));
}
至此,我们就完成了一个控制台的重定向演示。
—-
下面是一些扩展内容
有时候我们会拿到一些exe文件,这些文件运行在控制台模式,必须sqlite,android里的adb等。这个时候我们需要调用这些exe来执行一些操作,而且想获得这些操作的执行结果,于是,我尝试自己封装了一个类,该类用于执行 这样的exe,并获得执行结果。代码如下:
———————————————————-
* @名称 :
* @描述 :
* @创建人 : 张云飞
* @创建日期: 2011/7/8 15:10:14
* @修改记录:
* ———————————————————-
*/
using
System;
using
System.Collections.Generic;
using
System.Linq;
using
System.Text;
using
System.Diagnostics;
namespace
WinApp_RunConsoleDemo
{
///
<summary>
///
指令
///
</summary>
public
class
Command
{
string
_workDirectory;//工作文件夹,应该指向 你要执行的exe文件的所在路径
public
Command()
{
}
public
Command(
string
workDirectory)
{
_workDirectory
=
workDirectory;
}
//comamndString是要执行的文件名,argment是执行参数,output是执行的输出结果,errout是当错误时返回的结果。
public
bool
RunCommand(
string
comamndString,
string
argment,
out
string
output,
out
string
errout)
{
StringBuilder _result
=
null
;
StringBuilder _error
=
null
;
_result
=
new
StringBuilder();
_error
=
new
StringBuilder();
ProcessStartInfo startInfo
=
new
ProcessStartInfo();
startInfo.FileName
=
comamndString;
//
“adb devices”;
startInfo.Arguments
=
argment;
startInfo.CreateNoWindow
=
true
;
startInfo.UseShellExecute
=
false
;
//
startInfo.WindowStyle = ProcessWindowStyle.Normal;
startInfo.RedirectStandardInput
=
true
;
startInfo.RedirectStandardOutput
=
true
;
startInfo.RedirectStandardError
=
true
;
startInfo.WorkingDirectory
=
_workDirectory;
Process process1
=
null
;
try
{
process1
=
Process.Start(startInfo);
//
接收错误的事件
process1.ErrorDataReceived
+=
(
object
sender, DataReceivedEventArgs e)
=>
{
if
(
!
string
.IsNullOrEmpty(e.Data))
{
_result.AppendLine(e.Data);
}
};
//
接收数据的事件
process1.OutputDataReceived
+=
(
object
sender, DataReceivedEventArgs e)
=>
{
if
(
!
string
.IsNullOrEmpty(e.Data))
{
_error.AppendLine(e.Data);
}
};
process1.BeginErrorReadLine();
process1.BeginOutputReadLine();
//
result = sr2.ReadToEnd();
//
err = sr1.ReadToEnd();
process1.WaitForExit();
}
catch
(Exception)
{
throw
;
}
finally
{
if
(process1
!=
null
&&
!
process1.HasExited)
{
process1.Kill();
}
}
output
=
_result.ToString();
errout
=
_error.ToString();
_error
=
null
;
_result
=
null
;
if
(
!
string
.IsNullOrEmpty(errout))
{
return
false
;
}
else
{
return
true
;
}
}
}
}
下面是执行的测试代码:
=
new
Command(Application.StartupPath);
string
output;
string
error;
if
(cmd.RunCommand(
“
adb.exe
“
,
“
devices
“
,
out
output,
out
error))
{
MessageBox.Show(
“
Ok:
“
+
output);
}
else
{
MessageBox.Show(
“
Error:
“
+
error);
}
如上代码所示,我指向了一个路径“Application.StartupPath”,这个是应用程序的启动目录,我在这里将android的adb.exe拷贝到了应用程序的根目录。上面代码相当于执行了”adb devices”这个查看设备列表的指令。
发布者:全栈程序员-用户IM,转载请注明出处:https://javaforall.cn/110596.html原文链接:https://javaforall.cn
【正版授权,激活自己账号】: Jetbrains全家桶Ide使用,1年售后保障,每天仅需1毛
【官方授权 正版激活】: 官方授权 正版激活 支持Jetbrains家族下所有IDE 使用个人JB账号...
