|
#!/bin/bash
#
# Script Name: initSystem.sh
# Description: setup linux system init.
# Author: 300second – 51cto.com
# Date: 2012-10-30
#
#set env
export PATH=$PATH:/bin:/sbin:/usr/sbin
export LANG=”zh_CN.GB18030″
#require root to run this script.
if [[ “$(whoami)” != “root” ]]; then
echo “Please run this script as root.” >&2
exit 1
fi
#define cmd var
SERVICE=`which service`
CHKCONFIG=`which chkconfig`
#Source function library.
. /etc/init.d/functions
#Modify the system yum source //修改系统Yum源
initYum() {
cat << EOF
+————————————————————–+
+—— Welcome to Modify the system yum source. ——+
+————————————————————–+
EOF
cd /etc/yum.repos.d/
\cp CentOS-Base.repo CentOS-Base.repo.ori.$(date +%F)
ping -c 1 baidu.com >/dev/null
[ ! $? -eq 0 ] && echo $”Networking not configured – exiting” && exit 1
wget –quiet -o /dev/null http://mirrors.sohu.com/help/CentOS-Base-sohu.repo
\cp CentOS-Base-sohu.repo CentOS-Base.repo
echo “Modify the system yum source.——->OK”
sleep 3
}
#Set the character encoding //设置字符编码
initI18n() {
cat << EOF
+————————————————————–+
+—— Welcome to Set the character encoding. ——+
+————————————————————–+
EOF
echo “#set LANG=”zh_cn.gb18030″”
\cp /etc/sysconfig/i18n /etc/sysconfig/i18n.$(date +%F)
sed -i ‘s#LANG=”en_US.UTF-8″#LANG=”zh_CN.GB18030″#’ /etc/sysconfig/i18n
source /etc/sysconfig/i18n
grep LANG /etc/sysconfig/i18n
echo “Set the character encoding.——->OK”
sleep 3
}
#Close the firewall and Selinux //关闭防火墙和Selinux
initFirewall() {
cat << EOF
+————————————————————–+
+—— Welcome to Close the firewall and Selinux. ——+
+————————————————————–+
EOF
\cp /etc/selinux/config /etc/selinux/config.`date +”%Y-%m-%d_%H-%M-%S”`
/etc/init.d/iptables stop
chkconfig iptables off
sed -i ‘s/SELINUX=enable/SELINUX=disabled/’ /etc/selinux/config
setenforce 0
/etc/init.d/iptables status
grep SELINUX=disabled /etc/selinux/config
echo “Close the firewall and Selinux.——->OK”
sleep 3
}
#Close unnecessary system service //关闭不必要系统服务
initService() {
cat << EOF
+————————————————————–+
+—— Welcome to Close unnecessary system service . ——+
+————————————————————–+
EOF
export LANG=”en_US.UTF-8″
for i in `chkconfig –list |grep 3:on|awk ‘{print $1}’`;do chkconfig –level 3 $i off;done
for i in crond network sshd syslog;do chkconfig –level 3 $i on;done
export LANG=”zh_CN.GB18030″
echo “Close unnecessary system service.——>OK”
sleep 3
}
#Set the sshConfig banned root login //设置sshConfig,禁止root登录
initSsh() {
cat << EOF
+————————————————————–+
+—— Welcome to Set the sshConfig banned root login. ——+
+————————————————————–+
EOF
\cp /etc/ssh/sshd_config /etc/ssh/sshd_config.`date +”%Y-%m-%d_%H-%M-%S”`
sed -i ‘s%#Port 22%Port 52113%’ /etc/ssh/sshd_config
sed -i ‘s%#PermitRootLogin yes%PermitRootLogin no%’ /etc/ssh/sshd_config
sed -i ‘s%#PermitEmptyPasswords no%PermitEmptyPasswords no%’ /etc/ssh/sshd_config
sed -i ‘s%#UseDNS yes%UseDNS no’ /etc/ssh/sshd_config
egrep “UseDNS|52113|RootLogin|EmptyPass” /etc/ssh/sshd_config
/etc/init.d/sshd reload
echo “Set the sshConfig banned root login.——>OK”
sleep 3
}
#Disable ctrlaltdel three key to reboot system //禁止ctrl+alt+del三个键重启系统
initSafe() {
cat << EOF
+————————————————————–+
+– Welcome to Disable ctrlaltdel three key to reboot system.–+
+————————————————————–+
EOF
\cp /etc/inittab /etc/inittab.`date +”%Y-%m-%d_%H-%M-%S”`
sed -i “s/ca::ctrlaltdel:\/sbin/shutdown -t3 -r now/#ca::ctrlaltdel:\/sbin/shutdown -t3 -r now/” /etc/inittab
/sbin/init q
echo “Disable ctrlaltdel three key to reboot system.——>OK”
sleep 3
}
#Add users and set permissions in sudo //添加SA用户并设置sudo权限
initAddUser() {
cat << EOF
+————————————————————–+
+——Welcome to Add users and set permissions in sudo.——+
+————————————————————–+
EOF
datetmp=`date +”%Y-%m-%d_%H-%M-%S”`
\cp /etc/sudoers /etc/sudoers.${datetmp}
saUserArr=(test test1 test2)
groupadd -g 901 sa
for((i=0;i<${#saUserArr[@]};i++))
do
#add user //添加用户
useradd -g sa -u 90${i} ${saUserArr[$i]}
#set password //设置密码
echo “${saUserArr[$i]}123″|passwd ${saUserArr[$i]} –stdin
#set permissions //设置sudo权限
[ $(grep “${saUserArr[$i]} ALL=(ALL) NOPASSWD: ALL” /etc/sudoers|wc -l) -le 0 ] &&echo “${saUserArr[$i]} ALL=(ALL) NOPASSWD: ALL” >>/etc/sudoers
[ `grep “\%sa” /etc/sudoers|grep -v grep |wc -l` -ne 1 ] && \
echo “%sa ALL=(ALL) NOPASSWD: ALL” >>/etc/sudoers
done
/usr/sbin/visudo -c
[ $? -ne 0 ] && /bin/cp /etc/sudoers.${datetmp} /etc/sudoers && echo $”Sudoers not configured – exiting” && exit 1
echo “Add users and set permissions in sudo.——>OK”
sleep 3
}
#Adjust the number of open files //调整系统打开文件数
initOpenFiles() {
cat << EOF
+————————————————————–+
+—— Welcome to Adjust the number of open files. ——+
+————————————————————–+
EOF
\cp /etc/security/limits.conf /etc/security/limits.conf.`date +”%Y-%m-%d_%H-%M-%S”`
sed -i ‘ /# End of file/i\*\t\t-\tnofile\t\t65535’ /etc/security/limits.conf
ulimit -HSn 65535
echo “ulimit -HSn 65535” >> /etc/rc.local
echo “Adjust the number of open files.——>OK”
sleep 3
}
#Set system time synchronization //设置系统同步时间
initSysTime() {
cat << EOF
+————————————————————–+
+—— Welcome to Set system time synchronization. ——+
+————————————————————–+
EOF
yum -y install ntp >>/dev/null 2>&1
ntpdate time.windows.com
echo “*/5 * * * * /usr/sbin/ntpdate time.windows.com >/dev/null 2>&1” >>/var/spool/cron/root
echo “Set system time synchronization.——>OK”
sleep 3
}
#Optimization of system kernel //优化系统内核
initKernel() {
cat << EOF
+————————————————————–+
+—— Welcome to Optimization of system kernel. ——+
+————————————————————–+
EOF
\cp /etc/sysctl.conf /etc/sysctl.conf.`date +”%Y-%m-%d_%H-%M-%S”`
cat>>/etc/sysctl.conf<<EOF
net.ipv4.tcp_timestamps = 0
net.ipv4.tcp_synack_retries = 2
net.ipv4.tcp_syn_retries = 2
net.ipv4.tcp_mem = 94500000 915000000 927000000
net.ipv4.tcp_max_orphans = 3276800
net.core.wmem_default = 8388608
net.core.rmem_default = 8388608
net.core.rmem_max = 16777216
net.core.wmem_max = 16777216
net.ipv4.tcp_rmem = 4096 87380 16777216
net.ipv4.tcp_wmem = 4096 87380 16777216
net.core.netdev_max_backlog = 32768
net.core.somaxconn = 32768
net.ipv4.tcp_syncookies = 1
net.ipv4.tcp_tw_reuse = 1
net.ipv4.tcp_tw_recycle = 1
net.ipv4.tcp_fin_timeout = 1
net.ipv4.tcp_keepalive_time = 600
net.ipv4.tcp_max_syn_backlog = 65535
net.ipv4.ip_local_port_range = 1024 65535
EOF
/sbin/sysctl -p
echo “Optimization of system kernel.——>OK”
sleep 3
}
#Installation system tools //安装系统工具
initTool() {
cat << EOF
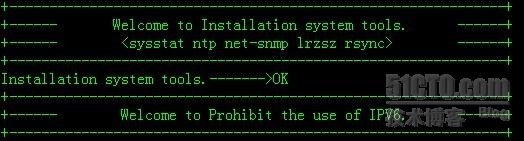
+————————————————————–+
+—— Welcome to Installation system tools. ——+
+—— <sysstat ntp net-snmp lrzsz rsync> ——+
+————————————————————–+
EOF
yum -y install sysstat ntp net-snmp lrzsz rsync >/dev/null 2>&1
echo “Installation system tools.——->OK”
sleep 3
}
#Prohibit the use of IPV6 //禁止使用IPV6
initIPV6() {
cat << EOF
+————————————————————–+
+—— Welcome to Prohibit the use of IPV6. ——+
+————————————————————–+
EOF
\cp /etc/modprobe.conf /etc/modprobe.conf.`date +”%Y-%m-%d_%H-%M-%S”`
echo “alias net-pf-10 off” >> /etc/modprobe.conf
echo “alias ipv6 off” >> /etc/modprobe.conf
echo “Prohibit the use of IPV6.——>OK”
sleep 3
}
AStr=”修改系统Yum源,设置字符编码,关闭防火墙和Selinux,关闭不必要系统服务”
BStr=”配置sshConfig,修改默认端口22->52113和禁止root登录”
CStr=”禁止Ctrl+Alt+Del三个键重启系统”
DStr=”添加SA用户并设置sudo权限”
EStr=”调整系统打开文件数”
FStr=”设置系统同步时间”
GStr=”优化系统内核”
HStr=”安装系统工具”
IStr=”禁止使用IPV6″
JStr=”一键初始化”
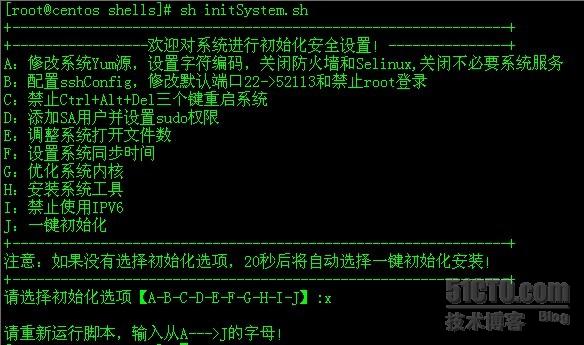
echo “+————————————————————–+”
echo “+—————–欢迎对系统进行初始化安全设置!—————+”
echo “A:${AStr}”
echo “B:${BStr}”
echo “C:${CStr}”
echo “D:${DStr}”
echo “E:${EStr}”
echo “F:${FStr}”
echo “G:${GStr}”
echo “H:${HStr}”
echo “I:${IStr}”
echo “J:${JStr}”
echo “+————————————————————–+”
echo “注意:如果没有选择初始化选项,20秒后将自动选择一键初始化安装!”
echo “+————————————————————–+”
option=”-1″
read -n1 -t20 -p “请选择初始化选项【A-B-C-D-E-F-G-H-I-J】:” option
flag1=$(echo $option|egrep “\-1″|wc -l)
flag2=$(echo $option|egrep “[A-Ja-j]”|wc -l)
if [ $flag1 -eq 1 ];then
option=”K”
elif [ $flag2 -ne 1 ];then
echo -e “\n\n请重新运行脚本,输入从A—>J的字母!”
exit 1
fi
echo -e “\n你选择的选项是:$option\n”
echo “5秒之后开始安装 ……”
sleep 5
case $option in
A|a)
initYum
initI18n
initFirewall
initService
;;
B|b)
initSsh
;;
C|c)
initSafe
;;
D|d)
initAddUser
;;
E|e)
initOpenFiles
;;
F|f)
initSysTime
;;
G|g)
initKernel
;;
H|h)
initTool
;;
I|i)
initIPV6
;;
J|j)
initYum
initI18n
initFirewall
initService
initSsh
initSafe
initAddUser
initOpenFiles
initSysTime
initKernel
initTool
initIPV6
;;
*)
echo “请输入从A—>J的字母,谢谢!”
exit
;;
esac
|