大家好,又见面了,我是全栈君。
阅读目录
Zato入门part1
前提:从part已经建立了集群、服务框架并成功的调用了服务。现在我们通过HTTP、ZeroMQ和JSON使用外部服务。
除非坚持手工调用,否则服务从来不知道什么确切的URLs来调用。它们总是被外部链接的信息屏蔽。
刚才指出的面向服务的连接叫做CRM,它是一种可以向服务推送请求的服务。当CRM改变了它的地址,服务不需要重新配置,我们仅仅需要做的是在web前端输入心得地址,那么它将会自动被传播到整个集群,这样下一次服务利用这个服务时会自动连接到新的地址。
我们现在没有CRM和方便的支付系统,但在本入门教程中我们可以通过请求之前准备好的服务(客户信息、消费信息)来模拟。
客户信息
{
 "firstName": "Sean",
 "lastName": "O'Brien"
}
消费信息
{
 "DATE": "2013-05-14T10:42:14.401555",
 "AMOUNT": "357"
}
利用ZeroMQ连接欺诈检测系统。
现在利用web前端,建立两个外部连接。
操作:Connections -> Outgoing -> Plain HTTP
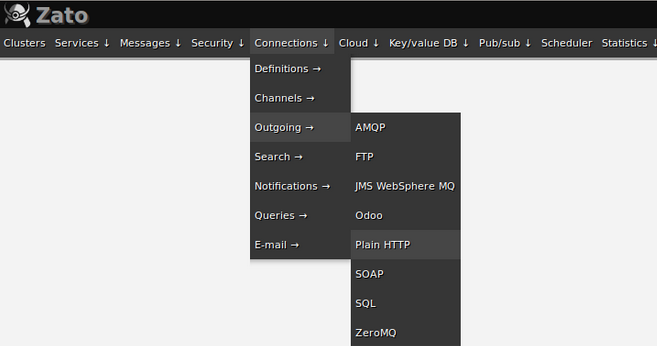

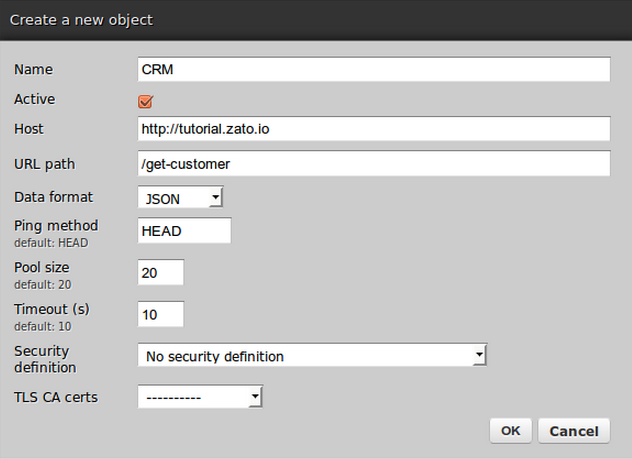
CRM 连接
消费连接

同步调用
代码
my_service.py

# Zato
from zato.server.service import Service

class GetClientDetails(Service):
    def handle(self):

        self.logger.info('Request: {}'.format(self.request.payload))
        self.logger.info('Request type: {}'.format(type(self.request.payload)))

        # Fetch connection to CRM
        crm = self.outgoing.plain_http.get('CRM')

        # Fetch connection to Payments
        payments = self.outgoing.plain_http.get('Payments')

        # Grab the customer info ..
        response = crm.conn.send(self.cid, self.request.payload)
        cust = response.data

        # .. and last payment's details
        response = payments.conn.send(self.cid, self.request.payload)
        last_payment = response.data

        self.logger.info('Customer details: {}'.format(cust))
        self.logger.info('Last payment: {}'.format(last_payment))

        response = {}
        response['first_name'] = cust['firstName']
        response['last_name'] = cust['lastName']
        response['last_payment_date'] = last_payment['DATE']
        response['last_payment_amount'] = last_payment['AMOUNT']

        self.logger.info('Response: {}'.format(response))

        # And return response to the caller
        self.response.payload = response
热部署
cp my_service.py $path/server1/pickup-dir
通过curl请求服务
$ curl localhost:11223/tutorial/first-service -d '{"cust_id":123, "cust_type":"A"}'
  {

    "first_name": "Sean", "last_name": "O'Brien",
   "last_payment_date": "2013-05-14T10:42:14.401555",
   "last_payment_amount": "357"}
$
同时一个server的日志中,会记录以下内容
INFO - Request: {u'cust_id': 123L, u'cust_type': u'A'}
INFO - Request type: <type 'dict'>

INFO - Customer details: {u'lastName': u"O'Brien", u'firstName': u'Sean'}
INFO - Last payment: {u'DATE': u'2013-05-14T10:42:14.401555', u'AMOUNT': u'357'}

INFO - Response: {

   'last_payment_amount': u'357', 'first_name': u'Sean',
  'last_name': u"O'Brien", 'last_payment_date': u'2013-05-14T10:42:14.401555'}
提示
- self.request.input.payload是在命令行中-d后面的内容
- payload是python中的字典对象
异步发送信息
到目前为止,我们有一个服务通过HTTP接受json,两个服务通过json调用服务,输出json到一个文档。
part1提到,商务人员对消费者的类型(A,B,C)做出判断需要近处观察——消费者的任何操作需要过侦查系统的检查,即使是最后毫无害处的付款行为。
我们没有机会接触到这样的系统,但是我们可以通过几行代码模拟该行为。这只需要执行一个ZeroMQ的PULL socket在一个无限循环中,并把任何输入的信息记录下来。我们将要把我们的服务做成一个异步推送数据给server,而server是如何处理处理并不是服务所关心的。
# stdlib
import logging

# ZeroMQ
import zmq

logging.basicConfig(level=logging.INFO, format='%(levelname)s - %(message)s')

address = 'tcp://127.0.0.1:35101'

context = zmq.Context()
socket = context.socket(zmq.PULL)
socket.bind(address)

logging.info('Fraud detection app running on {}'.format(address))

while True:
    msg = socket.recv_json()
    logging.info(msg)
该系统可以完美地执行,毕竟这是发送信息的整个点,我们只是发送信息,然后就不用管了。在这种特殊的情况下,接受者只是记录下所有的请求——这并不是我们关心的。
假设zato已经安装在$install_dir,我们可以执行该命令如下,注意命令中确实是’py’,而不是’python’。
$install_dir/bin/py zmq-server1.py
INFO - Fraud detection app running on tcp://127.0.0.1:35101
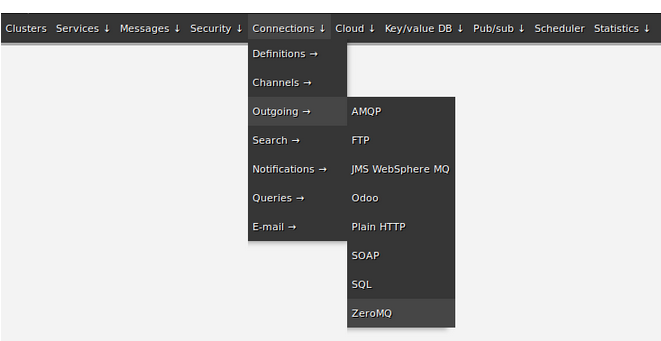
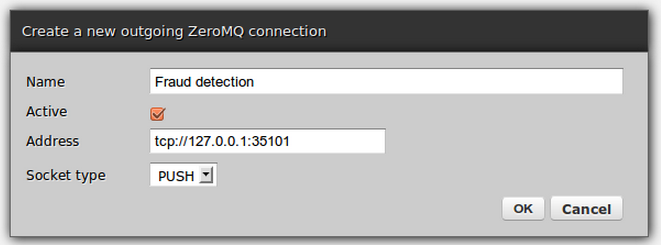
我们需要建立一个ZeroMQ:Connections -> Outgoing -> ZeroMQ
新建一个
热部署以下服务,观察侦查系统报出的日志:
# stdlib
from datetime import datetime
from json import dumps

# Zato
from zato.server.service import Service

class GetClientDetails(Service):

    def should_notify_frauds(self, cust_type):
        config_key = 'myapp:fraud-detection:cust-type'
        return cust_type in ('A', 'B', 'C')

    def handle(self):

        self.logger.info('Request: {}'.format(self.request.payload))
        self.logger.info('Request type: {}'.format(type(self.request.payload)))

        # Fetch connection to CRM
        crm = self.outgoing.plain_http.get('CRM')

        # Fetch connection to Payments
        payments = self.outgoing.plain_http.get('Payments')

        # Grab the customer info ..
        response = crm.conn.send(self.cid, self.request.payload)
        cust = response.data

        # .. and last payment's details
        response = payments.conn.send(self.cid, self.request.payload)
        last_payment = response.data

        self.logger.info('Customer details: {}'.format(cust))
        self.logger.info('Last payment: {}'.format(last_payment))

        response = {}
        response['first_name'] = cust['firstName']
        response['last_name'] = cust['lastName']
        response['last_payment_date'] = last_payment['DATE']
        response['last_payment_amount'] = last_payment['AMOUNT']

        if self.should_notify_frauds(self.request.payload['cust_type']):

            fraud_request = {}
            fraud_request['timestamp'] = datetime.utcnow().isoformat()
            fraud_request['request'] = dumps(self.request.payload)
            fraud_request['response'] = response
            fraud_request = dumps(fraud_request)

            self.outgoing.zmq.send(fraud_request, 'Fraud detection')

        else:
            self.logger.info('Skipped fraud detection for CID {}'.format(self.cid))

        self.logger.info('Response: {}'.format(response))

        # And return response to the caller
        self.response.payload = response
调用服务
$ curl localhost:11223/tutorial/first-service -d '{"cust_id":123, "cust_type":"A"}'
{

    "last_payment_amount": "357", "first_name": "Sean",
 "last_name": "O'Brien", "last_payment_date": "2013-05-14T10:42:14.401555"}
$
zmq显示
INFO - Fraud detection app running on tcp://127.0.0.1:35101
INFO - {u'timestamp': u'2013-05-14T18:16:56.048224',
        u'request': u'{"cust_id": 123, "cust_type": "A"}',
        u'response': u'{"last_payment_amount": "357", "first_name": "Sean",
i                        "last_name": "O\'Brien",
                        "last_payment_date": "2013-05-14T10:42:14.401555"}'}
可以看到,当类型为A,B,C时,有日志输出,当输入其他类型时,直接忽略了——因为根本就没有请求。
Redis
到目前为止,我们已经做得够炫酷的了,但是还有一件非常不和谐的事情在前面的步骤——消费者的类型需要额外的异步信息输送到检测系统,这在服务中是很难编码的。例如当工作人员决定使用更新的类型时,我们还得去改代码,然后重新部署,至少这样不是最好的。
我们可以把这行类型信息存在Redis中,这样Zato就可以从中读取。
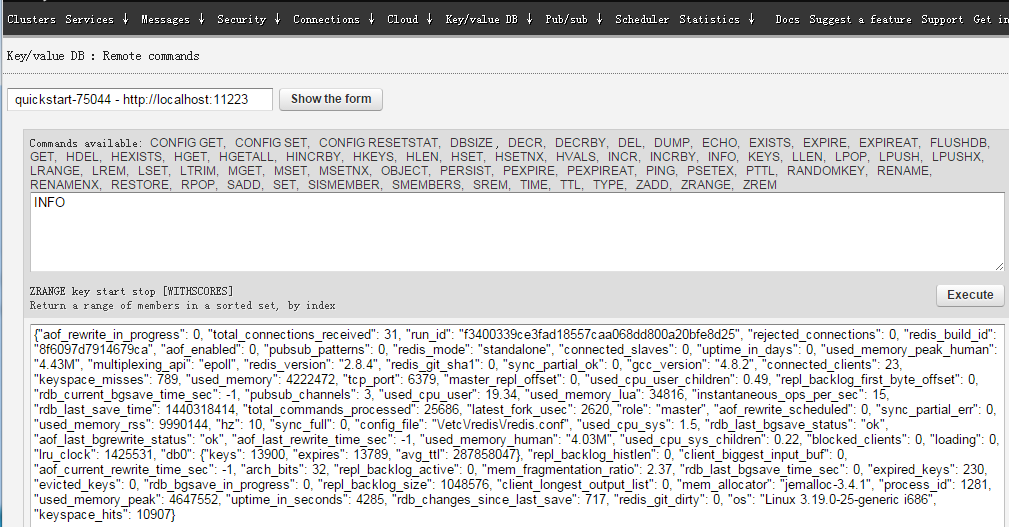
操作:Key/value DB -> Remote commands
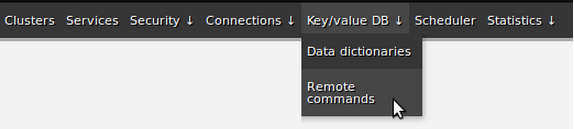
点击后,出现窗口,可以直接执行Redis命令,下面是执行INFO后的输出:
下面执行3个Redis命令
LPUSH myapp:fraud-detection:cust-type A
LPUSH myapp:fraud-detection:cust-type B
LPUSH myapp:fraud-detection:cust-type C
现在重新更改服务代码,用LRANGE来读取所有的配置值:
# stdlib
from datetime import datetime
from json import dumps, loads

# Zato
from zato.server.service import Service

class GetClientDetails(Service):

    def should_notify_frauds(self, cust_type):
        config_key = 'myapp:fraud-detection:cust-type'
        return cust_type in self.kvdb.conn.lrange(config_key, 0, -1)

    def handle(self):

        request = dumps(self.request.payload)

        self.logger.info('Request: {}'.format(self.request.payload))
        self.logger.info('Request type: {}'.format(type(self.request.payload)))

        # Fetch connection to CRM
        crm = self.outgoing.plain_http.get('CRM')

        # Fetch connection to Payments
        payments = self.outgoing.plain_http.get('Payments')

        # Grab the customer info ..
        cust = crm.conn.send(request)
        cust = loads(cust.text)

        # .. and last payment's details
        last_payment = payments.conn.send(request)
        last_payment = loads(last_payment.text)

        self.logger.info('Customer details: {}'.format(cust))
        self.logger.info('Last payment: {}'.format(last_payment))

        # Create response

        response = {}
        response['first_name'] = cust['firstName']
        response['last_name'] = cust['lastName']
        response['last_payment_date'] = last_payment['DATE']
        response['last_payment_amount'] = last_payment['AMOUNT']
        response = dumps(response)

        # Create a request to fraud detection and send it asynchronously
        # but only if a customer is of a certain type.

        if self.should_notify_frauds(self.request.payload['cust_type']):

            fraud_request = {}
            fraud_request['timestamp'] = datetime.utcnow().isoformat()
            fraud_request['request'] = request
            fraud_request['response'] = response
            fraud_request = dumps(fraud_request)

            self.outgoing.zmq.send(fraud_request, 'Fraud detection')

        else:
            self.logger.info('Skipped fraud detection for CID {}'.format(self.cid))

        self.logger.info('Response: {}'.format(response))

        # And return response to the caller
        self.response.payload = response
这样当新的事物来的时候,我们只需要操作Redis数据库,不需要修改服务代码,不需要重新热部署。
统计
web前端有丰富的展示统计信息页面。
可以两种类型的统计信息
- 由Zato产生的统计信息
- 由load-balancer产生的统计信息
前一个统计信息可以发现一个服务的好坏;后一个可以用来诊断集群中不良的端点。
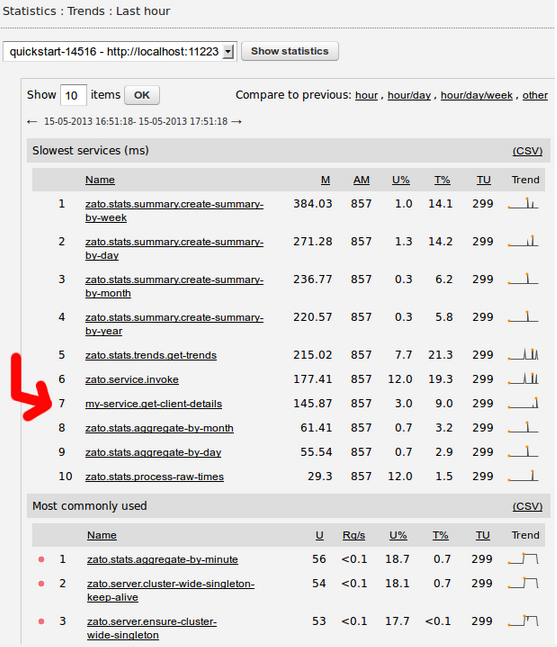
例如:

可以看到在我们的服务在最慢的10个服务之列,平均相应时间(M)为147.87ms,这并不意味着很差,因为所有服务的平均相应时间(AM)为857ms。同时可以分析到该服务占总服务数量的3%,占用时间占总时间的9%,倒数第二列告知在最后一小时(TU)总共有299次服务请求。最后一列显示其趋势。
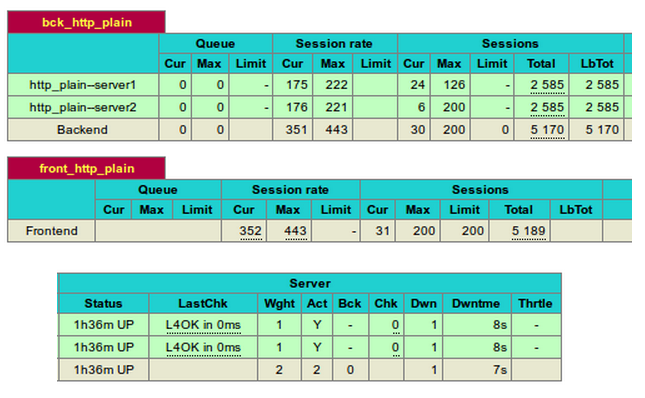
对于load-balancer,可以通过web前端页面分析LB的统计信息。注意这一部分需要一个新的认证信息,它是由潜在的HAProxy直接管理,账户和密码在$path/load-balancer/config/repo/zato.config,admin1为账户名,后面对应的为密码。当然里面密码可以改变,需要重启下服务方可生效。
本文转自jihite博客园博客,原文链接:http://www.cnblogs.com/kaituorensheng/p/4752260.html,如需转载请自行联系原作者
发布者:全栈程序员-用户IM,转载请注明出处:https://javaforall.cn/107853.html原文链接:https://javaforall.cn
【正版授权,激活自己账号】: Jetbrains全家桶Ide使用,1年售后保障,每天仅需1毛
【官方授权 正版激活】: 官方授权 正版激活 支持Jetbrains家族下所有IDE 使用个人JB账号...
