
前言
GitHub上面的博客就无法用了,所以使用Hexo和码云pages搭建个人博客这个方案进入了我的视线…
准备工作:
(1)首先得安装一个Git,各大软件管家都有的.
(2)第二步需要安装一个Node.js下载地址 一顿傻瓜式的安装就可以了
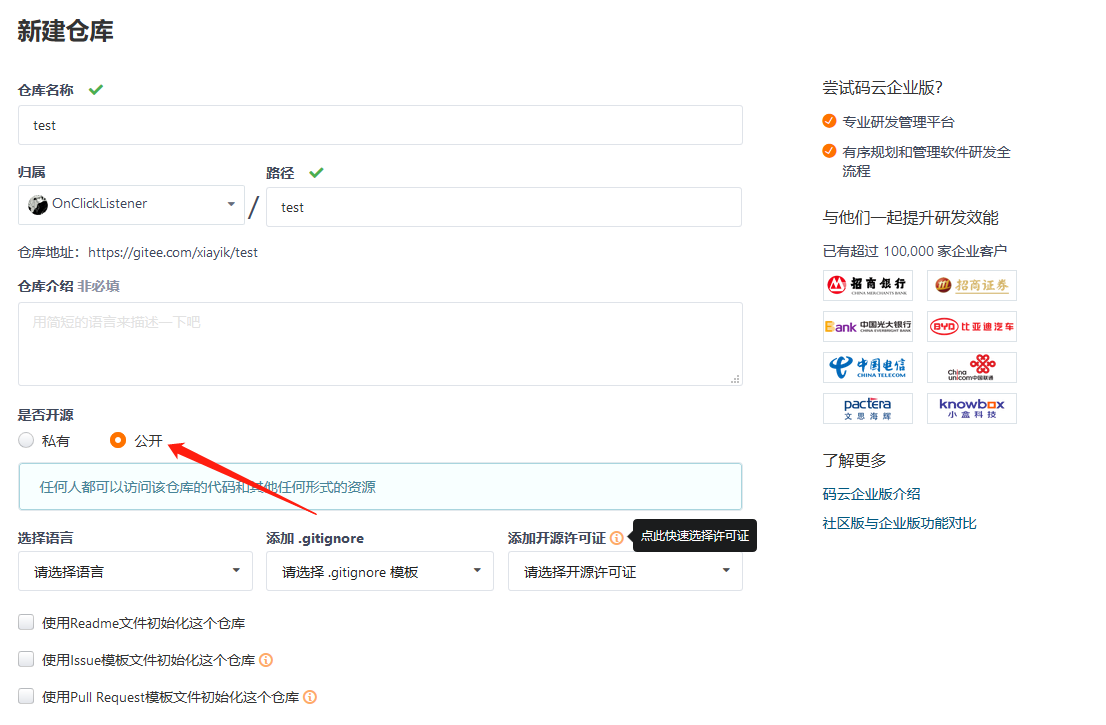
(3)注册一个码云账号 顺便建立一个仓库,选择公开仓库不要选择私有仓库哈

安装Hexo:
请新建立一个文件夹 hexo,打开文件夹右键 执行gitbash 因为咱们是同过Git命令安装
npm install hexo-cli -g
个人博客搭建:
在想要存放博客的目录里也就是hexo文件夹中,右键打开gitbash,然后输入:
hexo init
接着生成静态页面:
hexo g
然后启动本地服务,查看界面是否生成:
hexo s
然后将 http://localhost:4000 复制到浏览器查看,页面就生成了.怎么样是不是很简单呢?
更换主题:
自己的博客如果用了系统默认的主题那么毫无可玩性, 大家可以去 这里 下载自己喜欢的主题
或者跟我一样从GitHub上下载一个主题,执行gitbash
git clone https://github.com/theme-next/hexo-theme-next.git
然后将下载完的主题,放到themes内 下载完的主题名字hexo-theme-next 一会需要在_config.yml 文件中进行配置
设置_config.yml:
打开根目录下的_config.yml配置文件,修改主题:hexo-theme-next
    # Extensions
    ## Plugins: https://hexo.io/plugins/
    ## Themes: https://hexo.io/themes/
    theme: hexo-theme-next
如果不满意当前的界面,可以更换以下,next主题提供了四种模式,在hexo-theme-next的_config.yml文件中修改.注意了这个_config.yml 是主题目录下的
# Schemes
#scheme: Muse
#scheme: Mist
#scheme: Pisces
scheme: Gemini
 ```

这里我选的就是最后一种样式

### 个性化设置:

hexo文件下的_config.yml

 ```
 title: Xia燚 blog
 subtitle: ''
 description: ''
 keywords:
 author: Xia Yi
 language: zh-CN
 timezone: ''

 ```

更换用户的头像 当然需要去主题里面了,在hexo-theme-next的_config.yml文件中修改, 把timg.jpg改为自己喜欢的头像就好了

 ```
avatar:
# Replace the default image and set the url here.
url: /images/timg.jpg
# If true, the avatar will be dispalyed in circle.
rounded: true
# If true, the avatar will be rotated with the cursor.
rotated: false

# Posts / Categories / Tags in sidebar.
 site_state: true

 ```

### 发布文章 以及 分类标签:

#### 发布文章
hexo new "paper's name"
执行命令后便可生成文章.
---
title: 使用hexo和码云pages搭建个人博客
date: 2020-09-14 13:07:33
categories: 博客
tags: [业余]
---
categories 类别   tags标签 后面去讲


#### 添加分类
hexo new page categories
source文件夹下就会生成categories文件夹,修改里面的.md文件:
---
title: categories
date: 2020-09-14 12:03:11
type: categories
layout: "categories"
---
使用代码编辑工具打开生成的index.md前面两个属性 title date 不必去说,这里主要说一下 type: categories  layout: "categories"  如果不设置这两个属性,点击分类的时候 会提示你找不到分类页面.


#### 添加标签
hexo new page tags
source文件夹下就会生成tags文件夹,修改里面的index.md文件 type: categories layout: “categories” 如果不设置这两个属性,点击标签的时候 会提示你找不到标签页面.
---
title: categories
date: 2020-09-14 12:03:11
type: tags
layout: "tags"
---
如果想要添加about关于页面, 道理同上.
主题开启分类标签
去主题里面了,在hexo-theme-next的_config.yml文件中修改,把tags categories 的注解打开就完了.
    menu:
   home: / || fa fa-home
   about: /about/ || fa fa-user
   tags: /tags/ || fa fa-tags
   categories: /categories/ || fa fa-th
   archives: /archives/ || fa fa-archive
   #schedule: /schedule/ || fa fa-calendar
   #sitemap: /sitemap.xml || fa fa-sitemap
   #commonweal: /404/ || fa fa-heartbeat
在本地运行一下效果 http://localhost:4000 看看自己新创建的文章. 以及博客的样子.如果没什么问题下一步就需要将咱们的项目部署到码云上面了
将项目部署到码云上
npm install https://github.com/CodeFalling/hexo-asset-image --save
执行代码之后打开咱们的 hexo目录下的_config.yml
# Deployment
## Docs: https://hexo.io/docs/one-command-deployment
deploy:
type: git
repo: 自己码云的项目地址
branch: master
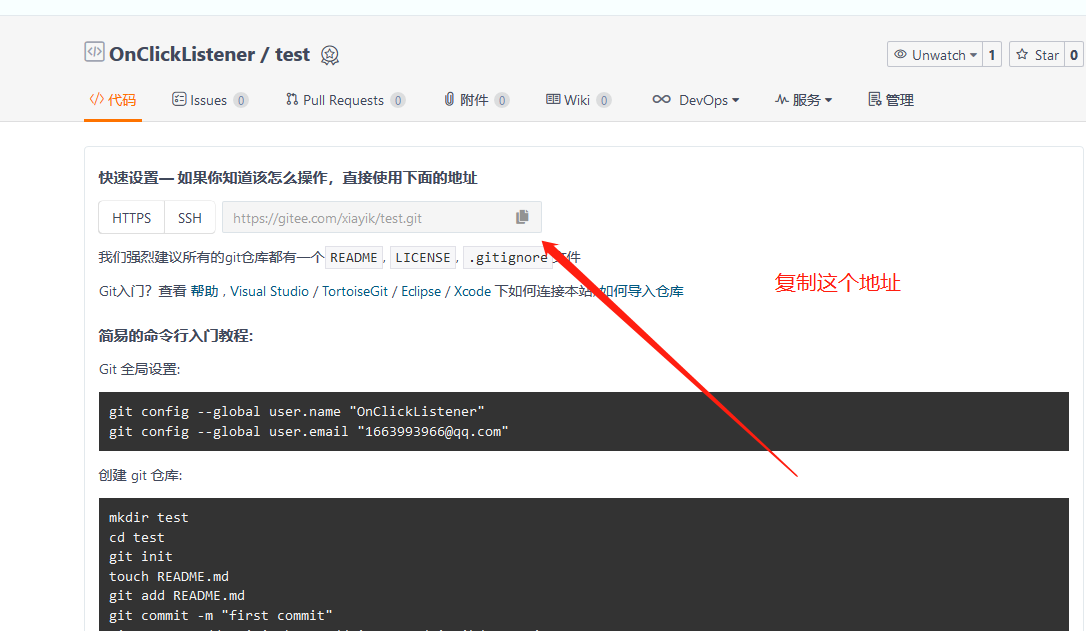
![]()
填写这个地址 填写之后
在hexo文件夹内执行 执行gitbash 然后修改git用户名和邮箱为码云的用户名和邮箱:
    git config --global user.name 码云的名字
	git config --global user.email 码云的邮箱
修改完成 接着安装hexo-deployer-git:
npm install hexo-deployer-git --save
然后部署到仓库: 分别执行
hexo g
hexo d
接着配置gitee pages:
![]()
改接着在项目根目录的_config.yml中修改url和root:
	# URL
	## If your site is put in a subdirectory, set url as 'http://example.com/child' and root as '/child/'
	url:   https://xia_yan.gitee.io/xblog/    这个地址就是刚才配置完gitee pages的地址. 需要替换成自己的地址
	root: /Xblog   这个是你项目名称,注意大小写. 比如我的项目就叫Xblog
最后将咱们修改完的内容重新部署一遍博客即可:
hexo clean
hexo g
hexo d
看一下效果吧 ,最后就可以通过gitee pages的域名访问自己的博客了
最后
可以给自己的博客添加一些别的元素,比如看板娘=_=! 比如我的就是小黑猫 hijiki
git执行
npm install –save hexo-helper-live2d
npm install live2d-widget-model- 模型的名称
在_config.yml中修改代码
	# Live2D
	## https://github.com/EYHN/hexo-helper-live2d
	live2d:
	enable: true
  # enable: false
  scriptFrom: local # 默认
  pluginRootPath: live2dw/ # 插件在站点上的根目录(相对路径)
  pluginJsPath: lib/ # 脚本文件相对与插件根目录路径
  pluginModelPath: assets/ # 模型文件相对与插件根目录路径
  # scriptFrom: jsdelivr # jsdelivr CDN
  # scriptFrom: unpkg # unpkg CDN
  # scriptFrom: https://cdn.jsdelivr.net/npm/live2d-widget@3.x/lib/L2Dwidget.min.js # 你的自定义 url
  tagMode: false # 标签模式, 是否仅替换 live2d tag标签而非插入到所有页面中
  debug: false # 调试, 是否在控制台输出日志
  model:
    use: live2d-widget-model-hijiki # npm-module package name
    # use: wanko # 博客根目录/live2d_models/ 下的目录名
    # use: ./wives/wanko # 相对于博客根目录的路径
    # use: https://cdn.jsdelivr.net/npm/live2d-widget-model-wanko@1.0.5/assets/wanko.model.json # 你的自定义 url
  display:
    position: right
    width: 150
    height: 300
  mobile:
    show: true # 手机中是否展示
至于模型地址百度上很多…
发布者:全栈程序员-用户IM,转载请注明出处:https://javaforall.cn/2815.html原文链接:https://javaforall.cn
【正版授权,激活自己账号】: Jetbrains全家桶Ide使用,1年售后保障,每天仅需1毛
【官方授权 正版激活】: 官方授权 正版激活 支持Jetbrains家族下所有IDE 使用个人JB账号...