大家好,又见面了,我是你们的朋友全栈君。如果您正在找激活码,请点击查看最新教程,关注关注公众号 “全栈程序员社区” 获取激活教程,可能之前旧版本教程已经失效.最新Idea2022.1教程亲测有效,一键激活。
Jetbrains全家桶1年46,售后保障稳定
ConcurrentSkipListMap数据结构
抓住了数据结构,对于理解整个ConcurrentSkipListMap有很重要的作用,其实,通过源码可知其数据结构如下。
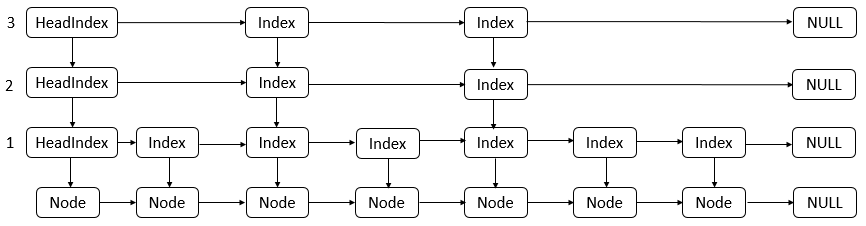

可以看到ConcurrentSkipListMap的数据结构使用的是跳表,每一个HeadIndex、Index结点都会包含一个对Node的引用,同一垂直方向上的Index、HeadIndex结点都包含了最底层的Node结点的引用。并且层级越高,该层级的结点(HeadIndex和Index)数越少。Node结点之间使用单链表结构。
ConcurrentSkipListMap的继承关系
public class ConcurrentSkipListMap<K,V> extends AbstractMap<K,V>
    implements ConcurrentNavigableMap<K,V>, Cloneable, Serializable {
   }
ConcurrentSkipListMap继承了AbstractMap抽象类,实现了ConcurrentNavigableMap接口,该接口定义了获取某一部分集合的操作。实现了Cloneable接口,表示允许克隆。实现了Serializable接口,表示可被序列化。
ConcurrentSkipListMap的内部类
ConcurrentSkipListMap包含了很多内部类,内部类的框架图如下:

其中,最为重要的类包括Index、HeadIndex、Node三个类。下面对这三个类进行逐一讲解
Index类
	static class Index<K,V> {

        final Node<K,V> node;
        final Index<K,V> down;
        volatile Index<K,V> right;

        // Unsafe mechanics
        private static final sun.misc.Unsafe UNSAFE;
        private static final long rightOffset;
        static {

            try {

                UNSAFE = sun.misc.Unsafe.getUnsafe();
                Class<?> k = Index.class;
                rightOffset = UNSAFE.objectFieldOffset
                    (k.getDeclaredField("right"));
            } catch (Exception e) {

                throw new Error(e);
            }
        }
    }
Index结点包括一个Node结点的引用,都是包含down域和right域,即对应数据结构中的Index结点。并且借助了反射来原子性的修改right域。
构造函数
        Index(Node<K,V> node, Index<K,V> down, Index<K,V> right) {

            this.node = node;
            this.down = down;
            this.right = right;
        }
构造Index结点,确定Node引用,down域和right域
link函数
		final boolean link(Index<K,V> succ, Index<K,V> newSucc) {

            // 获取Index结点的Node结点
            Node<K,V> n = node;
            // 将newSucc结点的right域设置为succ
            newSucc.right = succ;
            // 结点的值不为空并且比较并交换当前Index结点的right域(将当前Index(this)结点的right域设置为newSucc)
            return n.value != null && casRight(succ, newSucc);
        }
link方法用于在当前Index结点的后面插入一个Index结点,形成其right结点。并且插入的Index结点的right域为当前结点的right域。
unlink函数
		final boolean unlink(Index<K,V> succ) {

            // 当前Index结点的Node结点的值不为空并且将当前Index结点的right设置为succ的right结点
            return node.value != null && casRight(succ, succ.right);
        }
unlink方法与link方法作用相反,其删除当前Index结点的right结点,即将当前Index结点的right指向当前Index结点的right.right域。
HeadIndex类
	// 头结点索引类
    static final class HeadIndex<K,V> extends Index<K,V> {

        // 层级
        final int level;
        // 构造函数
        HeadIndex(Node<K,V> node, Index<K,V> down, Index<K,V> right, int level) {

            // 构造Index类
            super(node, down, right);
            this.level = level;
        }
    }
根据HeadIndex类可知其继承自Index类,并且在Index类的基础上添加了level域,表示当前的层级。
Node类
	static final class Node<K,V> {

        // 键
        final K key;
        // 值
        volatile Object value;
        // 下一个结点
        volatile Node<K,V> next;

        // UNSAFE mechanics

        private static final sun.misc.Unsafe UNSAFE;
        // value域的偏移地址
        private static final long valueOffset;
        // next域的偏移地址
        private static final long nextOffset;

        static {

            try {

                UNSAFE = sun.misc.Unsafe.getUnsafe();
                Class<?> k = Node.class;
                valueOffset = UNSAFE.objectFieldOffset
                    (k.getDeclaredField("value"));
                nextOffset = UNSAFE.objectFieldOffset
                    (k.getDeclaredField("next"));
            } catch (Exception e) {

                throw new Error(e);
            }
        }
    }
Node类包含了key、value、next域,其是用来实际存放元素的结点,并且是使用单链表结构。同时,也使用了反射来原子性的修改value与和next域。
构造函数
		Node(K key, Object value, Node<K,V> next) {

            this.key = key;
            this.value = value;
            this.next = next;
        }

		// 用于建立标记结点,值为本身
        Node(Node<K,V> next) {

            this.key = null;
            this.value = this;
            this.next = next;
        }
Node类包含了两种构造函数,分别表示正常的结点和marker标记结点,marker标记结点在删除结点时被使用。
helpDelete函数
		void helpDelete(Node<K,V> b, Node<K,V> f) {

            /* * Rechecking links and then doing only one of the * help-out stages per call tends to minimize CAS * interference among helping threads. */
            if (f == next && this == b.next) {
    // f为当前结点的后继并且b为当前结点的前驱
                if (f == null || f.value != f) // f为空或者f的value不为本身,即没有被标记 not already marked
                    // 当前结点后添加一个marker结点,并且当前结点的后继为marker,marker结点的后继为f
                    casNext(f, new Node<K,V>(f));
                else // f不为空并且f的值为本身
                    // 设置b的next域为f的next域
                    b.casNext(this, f.next);
            }
        }
删除结点,在结点后面添加一个marker结点或者将结点和其后的marker结点从其前驱中断开。
ConcurrentSkipListMap的属性
public class ConcurrentSkipListMap<K,V> extends AbstractMap<K,V>
    implements ConcurrentNavigableMap<K,V>, Cloneable, Serializable {

    // 版本序列号
    private static final long serialVersionUID = -8627078645895051609L;
    // 基础层的头结点
    private static final Object BASE_HEADER = new Object();
    // 最顶层头结点的索引
    private transient volatile HeadIndex<K,V> head;
    // 比较器
    final Comparator<? super K> comparator;
    // 键集合
    private transient KeySet<K> keySet;
    // entry集合
    private transient EntrySet<K,V> entrySet;
    // 值集合
    private transient Values<V> values;
    // 降序键集合
    private transient ConcurrentNavigableMap<K,V> descendingMap;

    // Unsafe mechanics
    private static final sun.misc.Unsafe UNSAFE;
    // head域的偏移量
    private static final long headOffset;
    // Thread类的threadLocalRandomSecondarySeed的偏移量
    private static final long SECONDARY;
    static {

        try {

            UNSAFE = sun.misc.Unsafe.getUnsafe();
            Class<?> k = ConcurrentSkipListMap.class;
            headOffset = UNSAFE.objectFieldOffset
                (k.getDeclaredField("head"));
            Class<?> tk = Thread.class;
            SECONDARY = UNSAFE.objectFieldOffset
                (tk.getDeclaredField("threadLocalRandomSecondarySeed"));

        } catch (Exception e) {

            throw new Error(e);
        }
    }
}
ConcurrentSkipListMap包含了head属性,表示跳表的头结点,并且包含了一个比较器,值得注意的是,对于ConcurrentSkipListMap的使用,键必须能够进行比较,如传递了比较器或者键本身就能够进行比较。同时,也使用了反射来保证原子性的更新head域。
ConcurrentSkipListMap的构造函数
	// 构造一个新的空映射,该映射按照键的自然顺序进行排序
    public ConcurrentSkipListMap() {

        // 比较器为空,那么键必须能够比较(实现了Comparable接口)
        this.comparator = null;
        // 初始化相关的域
        initialize();
    }
构造一个新的空映射,该映射按照键的自然顺序进行排序,即键K必须实现了Comparable接口,否则,会报错。
ConcurrentSkipListMap的核心函数
doPut函数
	// 插入一个结点
    private V doPut(K key, V value, boolean onlyIfAbsent) {

        Node<K,V> z;             // added node
        if (key == null) // 键为空,抛出空异常
            throw new NullPointerException();
        // 比较器
        Comparator<? super K> cmp = comparator;
        outer: for (;;) {
    // 无限循环
            for (Node<K,V> b = findPredecessor(key, cmp), n = b.next;;) {
    // 找到先驱结点,n为当前结点
                if (n != null) {
    // next域不为空
                    Object v; int c;
                    // f为当前结点的后继节点
                    Node<K,V> f = n.next;
                    if (n != b.next)  // 不一致,重试 // inconsistent read
                        break;
                    if ((v = n.value) == null) {
    // n结点已经被删除 // n is deleted
                        // 进行删除
                        n.helpDelete(b, f);
                        break;
                    }
                    if (b.value == null || v == n) // b结点已经被删除 b is deleted
                        break;
                    if ((c = cpr(cmp, key, n.key)) > 0) {
    // key大于结点的key
                        // b往后移动
                        b = n;
                        // n往后移动
                        n = f;
                        continue;
                    }
                    if (c == 0) {
    // 键相等
                        if (onlyIfAbsent || n.casValue(v, value)) {
    // 比较并交换值
                            @SuppressWarnings("unchecked") V vv = (V)v;
                            return vv;
                        }
                        // 重试
                        break; // restart if lost race to replace value
                    }
                    // else c < 0; fall through
                }
                // 新生一个结点
                z = new Node<K,V>(key, value, n);
                if (!b.casNext(n, z)) // 比较并交换next域
                    break;         // restart if lost race to append to b
                // 成功,则跳出循环
                break outer;
            }
        }
        // 随机生成种子
        int rnd = ThreadLocalRandom.nextSecondarySeed();
        if ((rnd & 0x80000001) == 0) {
    // test highest and lowest bits
            int level = 1, max;
            while (((rnd >>>= 1) & 1) != 0) // 判断从右到左有多少个连续的1
                ++level;
            Index<K,V> idx = null;
            // 保存头结点
            HeadIndex<K,V> h = head;
            if (level <= (max = h.level)) {
    // 小于跳表的层级
                for (int i = 1; i <= level; ++i) // 为结点生成对应的Index结点
                    // 从下至上依次赋值,并且赋值了Index结点的down域
                    idx = new Index<K,V>(z, idx, null);
            }
            else {
    // try to grow by one level
                level = max + 1; // hold in array and later pick the one to use
                // 生成Index结点的数组,其中,idxs[0]不作使用
                @SuppressWarnings("unchecked")Index<K,V>[] idxs =
                    (Index<K,V>[])new Index<?,?>[level+1];
                for (int i = 1; i <= level; ++i) // 从下到上生成Index结点,并赋值down域
                    idxs[i] = idx = new Index<K,V>(z, idx, null);
                for (;;) {
    // 无限循环
                    // 保存头结点
                    h = head;
                    // 保存跳表之前的层级
                    int oldLevel = h.level;
                    if (level <= oldLevel) // lost race to add level
                        break;
                    // 保存头结点
                    HeadIndex<K,V> newh = h;
                    // 保存头结点对应的Node结点
                    Node<K,V> oldbase = h.node;
                    for (int j = oldLevel+1; j <= level; ++j) // 为每一层生成一个头结点
                        newh = new HeadIndex<K,V>(oldbase, newh, idxs[j], j);
                    if (casHead(h, newh)) {
    // 比较并替换头结点
                        // h赋值为最高层的头结点
                        h = newh;
                        // idx赋值为之前层级的头结点,并将level赋值为之前的层级
                        idx = idxs[level = oldLevel];
                        break;
                    }
                }
            }
            // find insertion points and splice in
            // 插入Index结点
            splice: for (int insertionLevel = level;;) {

                // 保存新跳表的层级
                int j = h.level;
                for (Index<K,V> q = h, r = q.right, t = idx;;) {

                    if (q == null || t == null) // 头结点或者idx结点为空
                        // 跳出外层循环
                        break splice;
                    if (r != null) {
    // right结点不为空
                        // 保存r对应的Node结点
                        Node<K,V> n = r.node;
                        // compare before deletion check avoids needing recheck
                        // 比较key与结点的key值
                        int c = cpr(cmp, key, n.key);
                        if (n.value == null) {
    // 结点的值为空,表示需要删除
                            if (!q.unlink(r)) // 删除q的Index结点
                                break;
                            // r为q的right结点
                            r = q.right;
                            continue;
                        }
                        if (c > 0) {
    // key大于结点的key
                            // 向右寻找
                            q = r;
                            r = r.right;
                            continue;
                        }
                    }

                    if (j == insertionLevel) {

                        if (!q.link(r, t)) // r结点插入q与t之间
                            break; // restart
                        if (t.node.value == null) {
    // t结点的值为空,需要删除
                            // 利用findNode函数的副作用
                            findNode(key);
                            break splice;
                        }
                        if (--insertionLevel == 0) // 到达最底层,跳出循环
                            break splice;
                    }

                    if (--j >= insertionLevel && j < level)
                        t = t.down;
                    q = q.down;
                    r = q.right;
                }
            }
        }
        return null;
    }
说明:doPut提供对put函数的支持,doPut的大体流程如下:
① 根据给定的key从跳表的左上方往右或者往下查找到Node链表的前驱Node结点,这个查找过程会删除一些已经标记为删除的结点。
② 找到前驱结点后,开始往后插入查找插入的位置(因为找到前驱结点后,可能有另外一个线程在此前驱结点后插入了一个结点,所以步骤①得到的前驱现在可能不是要插入的结点的前驱,所以需要往后查找)。
③ 随机生成一个种子,判断是否需要增加层级,并且在各层级中插入对应的Index结点。
其中,会调用到findPredecessor函数,findPredecessor函数源码如下
	private Node<K,V> findPredecessor(Object key, Comparator<? super K> cmp) {

        if (key == null) // 键为空,抛出空异常
            throw new NullPointerException(); // don't postpone errors
        for (;;) {
    // 无限循环
            for (Index<K,V> q = head, r = q.right, d;;) {
    //
                if (r != null) {
    // 右Index结点不为空
                    // n为当前Node结点
                    Node<K,V> n = r.node;
                    // 为当前key
                    K k = n.key;
                    if (n.value == null) {
    // 当前Node结点的value为空,表示需要删除
                        if (!q.unlink(r)) // unlink r Index结点
                            break;           // restart
                        // r为rightIndex结点
                        r = q.right;         // reread r
                        continue;
                    }
                    if (cpr(cmp, key, k) > 0) {
    // 比较key与当前Node结点的k,若大于0
                        // 向右移动
                        q = r;
                        r = r.right;
                        continue;
                    }
                }
                if ((d = q.down) == null) // q的down域为空,直接返回q对应的Node结点
                    return q.node;
                // 向下移动
                q = d;
                // d的right结点
                r = d.right;
            }
        }
    }
说明:findPredecessor函数的主要流程如下。
从头结点(head)开始,先比较key与当前结点的key的大小,若key大于当前Index结点的key并且当前Index结点的right不为空,则向右移动,继续查找;若当前Index结点的right为空,则向下移动,继续查找;若key小于等于当前Index结点的key,则向下移动,继续查找。直至找到前驱结点。
doRemove函数
	// 移除一个结点
    final V doRemove(Object key, Object value) {

        if (key == null)
            throw new NullPointerException();
        // 保存比较器
        Comparator<? super K> cmp = comparator;
        outer: for (;;) {
    // 无限循环
            for (Node<K,V> b = findPredecessor(key, cmp), n = b.next;;) {
    // 根据key找到前驱结点,n为当前Index结点
                Object v; int c;
                if (n == null) // n不为空
                    break outer;
                // f为当前结点的next结点
                Node<K,V> f = n.next;
                if (n != b.next)  // 不一致,重试 // inconsistent read
                    break;
                if ((v = n.value) == null) {
     // 当前结点的value为空,需要删除 // n is deleted
                    // 删除n结点
                    n.helpDelete(b, f);
                    break;
                }
                if (b.value == null || v == n)      // b is deleted
                    break;
                if ((c = cpr(cmp, key, n.key)) < 0) // key小于当前结点的key
                    // 跳出外层循环
                    break outer;
                if (c > 0) {
    // key大于当前结点的key
                    // 向后移动
                    b = n;
                    n = f;
                    continue;
                }
                if (value != null && !value.equals(v))
                    break outer;
                if (!n.casValue(v, null)) // 当前结点的value设置为null
                    break;
                if (!n.appendMarker(f) || !b.casNext(n, f)) // 在n结点后添加一个marker结点,并且将b的next域更新为f
                    findNode(key);                  // retry via findNode
                else {
    // 添加节点并且更新均成功
                    // 利用findNode函数的副作用,删除n结点对应的Index结点
                    findPredecessor(key, cmp);      // clean index
                    if (head.right == null) // 头结点的right为null
                        // 需要减少层级
                        tryReduceLevel();
                }
                @SuppressWarnings("unchecked") V vv = (V)v;
                return vv;
            }
        }
        return null;
    }
doRemove函数的处理流程如下。
① 根据key值找到前驱结点,查找的过程会删除一个标记为删除的结点。
② 从前驱结点往后查找该结点。
③ 在该结点后面添加一个marker结点,若添加成功,则将该结点的前驱的后继设置为该结点之前的后继。
④ 头结点的next域是否为空,若为空,则减少层级。
下面的示意图给出了remove操作一种可能的情况(仅仅涉及Node结点的链表层的操作)
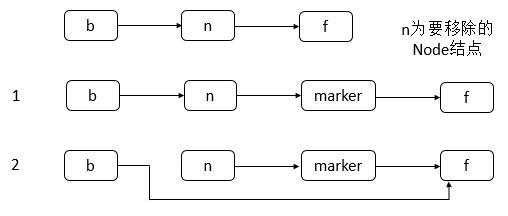
可以看到remove操作是分为两步进行的,首先是在要删除结点的后面添加一个marker结点,然后修改删除结点的前驱结点的next域。注意,这里仅仅只给出了Node结点的链表层的操作,并没有涉及到Index结点,关于Index结点的情况,之后会给出一个示例。其中会调用到tryReduceLevel函数,tryReduceLevel源码如下
	// 减少跳表层级
    private void tryReduceLevel() {

        // 保存头结点
        HeadIndex<K,V> h = head;
        HeadIndex<K,V> d;
        HeadIndex<K,V> e;
        if (h.level > 3 &&
            (d = (HeadIndex<K,V>)h.down) != null &&
            (e = (HeadIndex<K,V>)d.down) != null &&
            e.right == null &&
            d.right == null &&
            h.right == null &&
            casHead(h, d) && // try to set
            h.right != null) // recheck
            casHead(d, h);   // try to backout
    }
如果最高的前三个HeadIndex不为空,并且其right域都为null,那么就将level减少1层,并将head设置为之前head的下一层,设置完成后,还有检测之前的head的right域是否为null,如果为null,则减少层级成功,否则再次将head设置为h。
doGet函数
	private V doGet(Object key) {

        if (key == null)
            throw new NullPointerException();
        Comparator<? super K> cmp = comparator;
        outer: for (;;) {

            for (Node<K,V> b = findPredecessor(key, cmp), n = b.next;;) {
    // 根据key找到前驱结点,n为当前结点
                Object v; int c;
                if (n == null) // 当前Index结点为null,跳出外层循环
                    break outer;
                // f为当前结点的next结点
                Node<K,V> f = n.next;
                if (n != b.next)    // 不一致,重试 // inconsistent read
                    break;
                if ((v = n.value) == null) {
       // n is deleted
                    n.helpDelete(b, f);
                    break;
                }
                if (b.value == null || v == n)  // b is deleted
                    break;
                if ((c = cpr(cmp, key, n.key)) == 0) {
    // 找到key值相等的结点
                    @SuppressWarnings("unchecked") V vv = (V)v;
                    // 返回value
                    return vv;
                }
                if (c < 0) // 小于当前结点
                    // 则表示没有找到,跳出外层循环
                    break outer;
                // 继续向后移动
                b = n;
                n = f;
            }
        }
        return null;
    }
doGet函数流程比较简单,首先根据key找到前驱结点,然后从前驱结点开始往后查找,找到与key相等的结点,则返回该结点,否则,返回null。在这个过程中会删除一些已经标记为删除状态的结点。
size函数
	public int size() {

        long count = 0;
        for (Node<K,V> n = findFirst(); n != null; n = n.next) {
    // 找到第一个结点
            if (n.getValidValue() != null) // n结点没有被标记删除
                // 计数器加1
                ++count;
        }
        return (count >= Integer.MAX_VALUE) ? Integer.MAX_VALUE : (int) count;
    }
size函数的流程如下,首先利用findFirst函数找到第一个value不为null的结点。然后开始往后遍历,调用Node结点的getValidValue函数判断结点的value是否有效,有效则计数器加1。其中findFirst源码如下
	final Node<K,V> findFirst() {

        for (Node<K,V> b, n;;) {

            if ((n = (b = head.node).next) == null) // 头结点的下一个结点为当前结点,为null
                // 返回null
                return null;
            if (n.value != null) // 当前结点不为null
                // 则返回该结点
                return n;
            // 表示当前结点的value为null,则进行删除
            n.helpDelete(b, n.next);
        }
    }
findFirst函数的功能是找到第一个value不为null的结点。getValidValue源码如下
	V getValidValue() {

            Object v = value;
            if (v == this || v == BASE_HEADER) // value为自身或者为BASE_HEADER
                return null;
            @SuppressWarnings("unchecked") V vv = (V)v;
            return vv;
        }
若结点的value为自身或者是BASE_HEADER,则返回null,否则返回结点的value。
示例
下面通过一个简单的示例,来深入了解ConcurrentSkipListMap的内部结构。
package com.hust.grid.leesf.collections;

import java.util.concurrent.ConcurrentSkipListMap;

public class ConcurrentSkipListMapDemo {

    public static void main(String[] args) {

        ConcurrentSkipListMap<String, Integer> cslm = new ConcurrentSkipListMap<String, Integer>();
        cslm.put("leesf", 24);
        cslm.put("dyd", 24);

        for (String key :cslm.keySet()) {

            System.out.print("[" + key + "," + cslm.get(key) + "] ");
        }
        System.out.println();
        cslm.remove("leesf");
        for (String key :cslm.keySet()) {

            System.out.print("[" + key + "," + cslm.get(key) + "] ");
        }
    }
}
运行结果:
[dyd,24] [leesf,24]
[dyd,24]
上面的一个示例非常简单,下面借这个示例,来分析ConcurrentSkipListMap的内部结构。
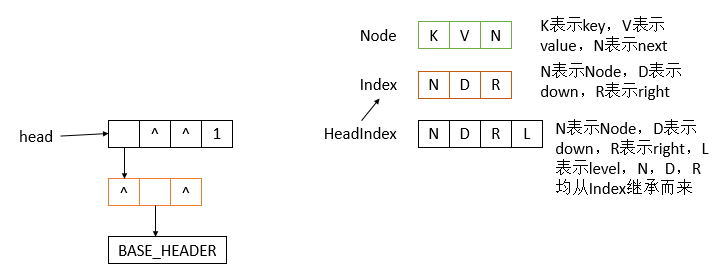
① 当新生一个ConcurrentSkipListMap时,有如下结构。
② 当put(“leesf”, 24)后,可能有如下结构
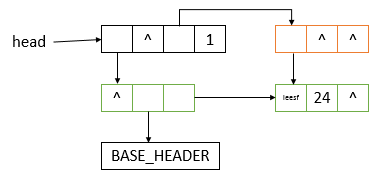
在插入一个Node结点的同时,也插入一个Index结点,并且head结点的right域指向该Index结点,该Index的Node域指向插入的Node结点。
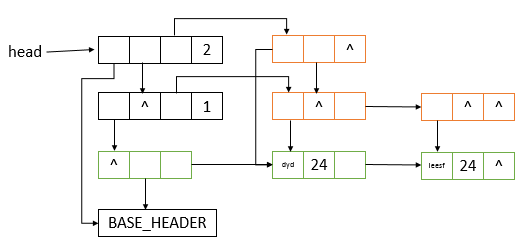
③ 当put(“dyd”, 24)后,可能有如下结构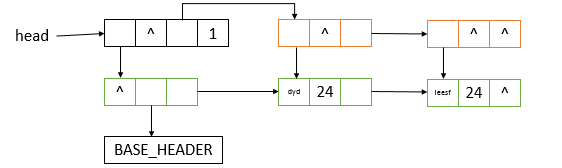
插入的(“dyd”, 24),新生成的结点在leesf结点之前,并且也生成了一个Index结点指向它,此时跳表的层级还是为1。
④ 同样,当put(“dyd”, 24)后,也可能有如下结构
在插入(“dyd”, 24)后,层级加1,此时会生成两个Index结点,并且两个Index结点均指向新生成的Node结点。
⑤ 在remove(“dyd”)之后,存在如下结构
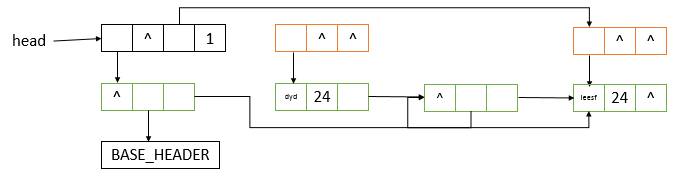
在key为dyd的结点后面添加了一个marker结点(key为null,value为自身),并且Node结点对应的Index也将从Index链表中断开,最后会被GC。
发布者:全栈程序员-用户IM,转载请注明出处:https://javaforall.cn/234994.html原文链接:https://javaforall.cn
【正版授权,激活自己账号】: Jetbrains全家桶Ide使用,1年售后保障,每天仅需1毛
【官方授权 正版激活】: 官方授权 正版激活 支持Jetbrains家族下所有IDE 使用个人JB账号...
