大家好,又见面了,我是你们的朋友全栈君。如果您正在找激活码,请点击查看最新教程,关注关注公众号 “全栈程序员社区” 获取激活教程,可能之前旧版本教程已经失效.最新Idea2022.1教程亲测有效,一键激活。
Jetbrains全家桶1年46,售后保障稳定
版本:1.0


 @Override
public void onBuildHeaders(List<Header> target) {
   loadHeadersFromResource(R.xml.preference_headers, target);
}
Jetbrains全家桶1年46,售后保障稳定
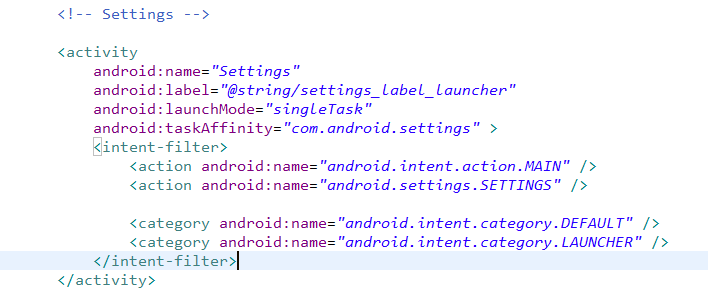
去生成选项表,点击选项表的一个条目,右边显示对应的Fragment,这就是很典型的header+fragment组合,所以如果想在Settings基础之上添加条目的话,在这个方法里面的xml文件中添加即可,然后对应上fragment。下面分析一下执行流程:
@Override
    protected void onCreate(Bundle savedInstanceState) {
        if (getIntent().getBooleanExtra(EXTRA_CLEAR_UI_OPTIONS, false)) {
            getWindow().setUiOptions(0);
        }
        mAuthenticatorHelper = new AuthenticatorHelper();
        mAuthenticatorHelper.updateAuthDescriptions(this);
        mAuthenticatorHelper.onAccountsUpdated(this, null);
        mDevelopmentPreferences = getSharedPreferences(DevelopmentSettings.PREF_FILE,
                Context.MODE_PRIVATE);
        getMetaData();
        mInLocalHeaderSwitch = true;
        super.onCreate(savedInstanceState);
        mInLocalHeaderSwitch = false;
        if (!onIsHidingHeaders() && onIsMultiPane()) {
            highlightHeader(mTopLevelHeaderId);
            // Force the title so that it doesn't get overridden by a direct launch of
            // a specific settings screen.
            setTitle(R.string.settings_label);
        }
        // Retrieve any saved state
        if (savedInstanceState != null) {
            mCurrentHeader = savedInstanceState.getParcelable(SAVE_KEY_CURRENT_HEADER);
            mParentHeader = savedInstanceState.getParcelable(SAVE_KEY_PARENT_HEADER);
        }
        // If the current header was saved, switch to it
        if (savedInstanceState != null && mCurrentHeader != null) {
            //switchToHeaderLocal(mCurrentHeader);
            showBreadCrumbs(mCurrentHeader.title, null);
        }
        if (mParentHeader != null) {
            setParentTitle(mParentHeader.title, null, new OnClickListener() {
                public void onClick(View v) {
                    switchToParent(mParentHeader.fragment);
                }
            });
        }
        // Override up navigation for multi-pane, since we handle it in the fragment breadcrumbs
        if (onIsMultiPane()) {
            getActionBar().setDisplayHomeAsUpEnabled(false);
            getActionBar().setHomeButtonEnabled(false);
        }
    }
第一个if用于设置window ui的对修改来说不用考虑了,意义不大,
mAuthenticatorHelper = new AuthenticatorHelper();
mAuthenticatorHelper.updateAuthDescriptions(this);
mAuthenticatorHelper.onAccountsUpdated(this, null);
这个段代码用于认证以及更新账户信息,接着往下看:
mDevelopmentPreferences = getSharedPreferences(DevelopmentSettings.PREF_FILE,Context.MODE_PRIVATE);
用于之后保存数据,
然后是getMetaData();这个方法,代码如下:
private void getMetaData() {
        try {
            ActivityInfo ai = getPackageManager().getActivityInfo(getComponentName(),
                    PackageManager.GET_META_DATA);
            if (ai == null || ai.metaData == null) return;
            mTopLevelHeaderId = ai.metaData.getInt(META_DATA_KEY_HEADER_ID);
            mFragmentClass = ai.metaData.getString(META_DATA_KEY_FRAGMENT_CLASS);
            // Check if it has a parent specified and create a Header object
            final int parentHeaderTitleRes = ai.metaData.getInt(META_DATA_KEY_PARENT_TITLE);
            String parentFragmentClass = ai.metaData.getString(META_DATA_KEY_PARENT_FRAGMENT_CLASS);
            if (parentFragmentClass != null) {
                mParentHeader = new Header();
                mParentHeader.fragment = parentFragmentClass;
                if (parentHeaderTitleRes != 0) {
                    mParentHeader.title = getResources().getString(parentHeaderTitleRes);
                }
            }
        } catch (NameNotFoundException nnfe) {
            // No recovery
        }
    }
这个方法用于设置mParentHeader的Fragment以及title。下面具体举两个例子,关于如何修改Settings。
<?xml version="1.0" encoding="utf-8"?>
<!--
     Copyright (C) 2010 The Android Open Source Project

     Licensed under the Apache License, Version 2.0 (the "License");
     you may not use this file except in compliance with the License.
     You may obtain a copy of the License at

          http://www.apache.org/licenses/LICENSE-2.0

     Unless required by applicable law or agreed to in writing, software
     distributed under the License is distributed on an "AS IS" BASIS,
     WITHOUT WARRANTIES OR CONDITIONS OF ANY KIND, either express or implied.
     See the License for the specific language governing permissions and
     limitations under the License.
-->

<preference-headers xmlns:android="http://schemas.android.com/apk/res/android" >

    <!-- WIRELESS and NETWORKS -->
    <header
        android:id="@+id/wireless_section"
        android:title="@string/header_category_wireless_networks" />

    <!-- Wifi -->
    <header
        android:id="@+id/wifi_settings"
        android:fragment="com.android.settings.wifi.WifiSettings"
        android:icon="@drawable/ic_settings_wireless"
        android:title="@string/wifi_settings_title" />

    <!-- Bluetooth -->
    <header
        android:id="@+id/bluetooth_settings"
        android:fragment="com.android.settings.bluetooth.BluetoothSettings"
        android:icon="@drawable/ic_settings_bluetooth2"
        android:title="@string/bluetooth_settings_title" />

    <!-- Data Usage -->
    <header
        android:id="@+id/data_usage_settings"
        android:fragment="com.android.settings.DataUsageSummary"
        android:icon="@drawable/ic_settings_data_usage"
        android:title="@string/data_usage_summary_title" />

    <!-- Operator hook -->
    <header
        android:id="@+id/operator_settings"
        android:fragment="com.android.settings.WirelessSettings" >
        <intent android:action="com.android.settings.OPERATOR_APPLICATION_SETTING" />
    </header>

    <!-- Other wireless and network controls -->
    <header
        android:id="@+id/wireless_settings"
        android:breadCrumbTitle="@string/wireless_networks_settings_title"
        android:fragment="com.android.settings.WirelessSettings"
        android:icon="@drawable/empty_icon"
        android:title="@string/radio_controls_title" />

    <!-- DEVICE -->
    <header
        android:id="@+id/device_section"
        android:title="@string/header_category_device" />

    <!-- Sound -->
    <header
        android:id="@+id/sound_settings"
        android:fragment="com.android.settings.SoundSettings"
        android:icon="@drawable/ic_settings_sound"
        android:title="@string/sound_settings" />

    <!-- Display -->
    <header
        android:id="@+id/display_settings"
        android:fragment="com.android.settings.DisplaySettings"
        android:icon="@drawable/ic_settings_display"
        android:title="@string/display_settings" />

    <!-- Storage -->
    <header
        android:id="@+id/storage_settings"
        android:fragment="com.android.settings.deviceinfo.Memory"
        android:icon="@drawable/ic_settings_storage"
        android:title="@string/storage_settings" />

    <!-- Battery -->
    <header
        android:id="@+id/battery_settings"
        android:fragment="com.android.settings.fuelgauge.PowerUsageSummary"
        android:icon="@drawable/ic_settings_battery"
        android:title="@string/power_usage_summary_title" />

    <!-- Application Settings -->
    <header
        android:id="@+id/application_settings"
        android:fragment="com.android.settings.applications.ManageApplications"
        android:icon="@drawable/ic_settings_applications"
        android:title="@string/applications_settings" />

    <!-- Manage users -->
    <header
        android:id="@+id/user_settings"
        android:fragment="com.android.settings.users.UserSettings"
        android:icon="@drawable/ic_settings_multiuser"
        android:title="@string/user_settings_title" />

    <!-- Manufacturer hook -->
    <header
        android:id="@+id/manufacturer_settings"
        android:fragment="com.android.settings.WirelessSettings" >
        <intent android:action="com.android.settings.MANUFACTURER_APPLICATION_SETTING" />
    </header>

    <!-- PERSONAL -->
    <header
        android:id="@+id/personal_section"
        android:title="@string/header_category_personal" />

    <!-- Location -->
    <header
        android:id="@+id/location_settings"
        android:fragment="com.android.settings.LocationSettings"
        android:icon="@drawable/ic_settings_location"
        android:title="@string/location_settings_title" />

    <!-- Security -->
    <header
        android:id="@+id/security_settings"
        android:fragment="com.android.settings.SecuritySettings"
        android:icon="@drawable/ic_settings_security"
        android:title="@string/security_settings_title" />

    <!-- Language -->
    <header
        android:id="@+id/language_settings"
        android:fragment="com.android.settings.inputmethod.InputMethodAndLanguageSettings"
        android:icon="@drawable/ic_settings_language"
        android:title="@string/language_settings" />

    <!-- Backup and reset -->
    <header
        android:id="@+id/privacy_settings"
        android:fragment="com.android.settings.PrivacySettings"
        android:icon="@drawable/ic_settings_backup"
        android:title="@string/privacy_settings" />
    <header
        android:id="@+id/kytusers_settings"
        android:fragment="com.android.settings.KytUsersSettings"
        android:icon="@drawable/ic_settings_backup"
        android:title="考易通账户" />

    <!-- ACCOUNTS section -->
    <header
        android:id="@+id/account_settings"
        android:title="@string/account_settings" />
    <header
        android:id="@+id/account_add"
        android:icon="@drawable/ic_menu_add"
        android:title="@string/add_account_label" >
        <intent android:action="android.settings.ADD_ACCOUNT_SETTINGS" />
    </header>

    <!-- SYSTEM -->
    <header
        android:id="@+id/system_section"
        android:title="@string/header_category_system" />

    <!-- Date & Time -->
    <header
        android:id="@+id/date_time_settings"
        android:fragment="com.android.settings.DateTimeSettings"
        android:icon="@drawable/ic_settings_date_time"
        android:title="@string/date_and_time_settings_title" />

    <!-- Accessibility feedback -->
    <header
        android:id="@+id/accessibility_settings"
        android:fragment="com.android.settings.AccessibilitySettings"
        android:icon="@drawable/ic_settings_accessibility"
        android:title="@string/accessibility_settings" />

    <!-- Development -->
    <header
        android:id="@+id/development_settings"
        android:fragment="com.android.settings.DevelopmentSettings"
        android:icon="@drawable/ic_settings_development"
        android:title="@string/development_settings_title" />

    <!-- About Device -->
    <header
        android:id="@+id/about_settings"
        android:fragment="com.android.settings.DeviceInfoSettings"
        android:icon="@drawable/ic_settings_about"
        android:title="@string/about_settings" />

</preference-headers>
这些header分别对应着各自的菜单,如果想要添加还是删除就在这里修改即可。比如我们不想要蓝牙模块了,那就直接把下面这个header删除即可,添加的话类似。
  <!-- Bluetooth -->
    <header
        android:id="@+id/bluetooth_settings"
        android:fragment="com.android.settings.bluetooth.BluetoothSettings"
        android:icon="@drawable/ic_settings_bluetooth2"
        android:title="@string/bluetooth_settings_title" />
如果是做添加操作的话,不要忘了创建你的PreferenceFragment,然后在header里面添加id、fragment、icon、title等,如上面那样。

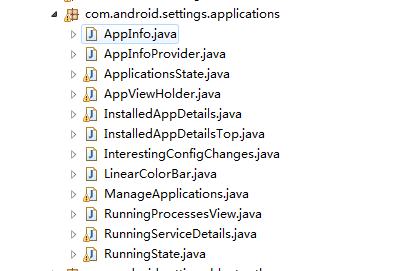
看一下在源码中对应的包:
   <!-- Application Settings -->
    <header
        android:id="@+id/application_settings"
        android:fragment="com.android.settings.applications.ManageApplications"
        android:icon="@drawable/ic_settings_applications"
        android:title="@string/applications_settings" />
然后打开对应的fragment,ManageApplications。发现这个它是继承于Fragment

既然继承于Fragment,那就直接定位到onCreate()方法,
 @Override
    public void onCreate(Bundle savedInstanceState) {
        super.onCreate(savedInstanceState);

        setHasOptionsMenu(true);

        mApplicationsState = ApplicationsState.getInstance(getActivity().getApplication());
        Intent intent = getActivity().getIntent();
        String action = intent.getAction();
        int defaultListType = LIST_TYPE_DOWNLOADED;
        String className = getArguments() != null
                ? getArguments().getString("classname") : null;
        if (className == null) {
            className = intent.getComponent().getClassName();
        }
        if (className.equals(RunningServicesActivity.class.getName())
                || className.endsWith(".RunningServices")) {
            defaultListType = LIST_TYPE_RUNNING;
        } else if (className.equals(StorageUseActivity.class.getName())
                || Intent.ACTION_MANAGE_PACKAGE_STORAGE.equals(action)
                || className.endsWith(".StorageUse")) {
            mSortOrder = SORT_ORDER_SIZE;
            defaultListType = LIST_TYPE_ALL;
        } else if (Settings.ACTION_MANAGE_ALL_APPLICATIONS_SETTINGS.equals(action)) {
            // Select the all-apps list, with the default sorting
            defaultListType = LIST_TYPE_ALL;
        }

        if (savedInstanceState != null) {
            mSortOrder = savedInstanceState.getInt(EXTRA_SORT_ORDER, mSortOrder);
            int tmp = savedInstanceState.getInt(EXTRA_DEFAULT_LIST_TYPE, -1);
            if (tmp != -1) defaultListType = tmp;
            mShowBackground = savedInstanceState.getBoolean(EXTRA_SHOW_BACKGROUND, false);
        }

        mDefaultListType = defaultListType;

        final Intent containerIntent = new Intent().setComponent(
                StorageMeasurement.DEFAULT_CONTAINER_COMPONENT);
        getActivity().bindService(containerIntent, mContainerConnection, Context.BIND_AUTO_CREATE);

        mInvalidSizeStr = getActivity().getText(R.string.invalid_size_value);
        mComputingSizeStr = getActivity().getText(R.string.computing_size);

        TabInfo tab = new TabInfo(this, mApplicationsState,
                getActivity().getString(R.string.filter_apps_third_party),
                LIST_TYPE_DOWNLOADED, this, savedInstanceState);
        mTabs.add(tab);

        if (!Environment.isExternalStorageEmulated()) {
            tab = new TabInfo(this, mApplicationsState,
                    getActivity().getString(R.string.filter_apps_onsdcard),
                    LIST_TYPE_SDCARD, this, savedInstanceState);
            mTabs.add(tab);
        }

        tab = new TabInfo(this, mApplicationsState,
                getActivity().getString(R.string.filter_apps_running),
                LIST_TYPE_RUNNING, this, savedInstanceState);
        mTabs.add(tab);

        tab = new TabInfo(this, mApplicationsState,
                getActivity().getString(R.string.filter_apps_all),
                LIST_TYPE_ALL, this, savedInstanceState);
        mTabs.add(tab);
    }
这里主要是初始化TabInfo的数据,之后显示程序的时候会用到。接下来定位到onCreateView()方法,这个方法主要是初始化界面,
@Override
    public View onCreateView(LayoutInflater inflater, ViewGroup container, Bundle savedInstanceState) {
        // initialize the inflater
        mInflater = inflater;

        View rootView = mInflater.inflate(R.layout.manage_applications_content,
                container, false);
        mContentContainer = container;
        mRootView = rootView;

        mViewPager = (ViewPager) rootView.findViewById(R.id.pager);
        MyPagerAdapter adapter = new MyPagerAdapter();
        mViewPager.setAdapter(adapter);
        mViewPager.setOnPageChangeListener(adapter);
        PagerTabStrip tabs = (PagerTabStrip) rootView.findViewById(R.id.tabs);
        tabs.setTabIndicatorColorResource(android.R.color.holo_blue_light);

        // We have to do this now because PreferenceFrameLayout looks at it
        // only when the view is added.
        if (container instanceof PreferenceFrameLayout) {
            ((PreferenceFrameLayout.LayoutParams) rootView.getLayoutParams()).removeBorders = true;
        }

        if (savedInstanceState != null && savedInstanceState.getBoolean(EXTRA_RESET_DIALOG)) {
            buildResetDialog();
        }

        if (savedInstanceState == null) {
            // First time init: make sure view pager is showing the correct tab.
            for (int i = 0; i < mTabs.size(); i++) {
                TabInfo tab = mTabs.get(i);
                if (tab.mListType == mDefaultListType) {
                    mViewPager.setCurrentItem(i);
                    break;
                }
            }
        }

        return rootView;
    }
可以看到,正是使用了ViewPager,另外还有PagerTabStrip。先看一下最下面的:
  if (savedInstanceState == null) {
            // First time init: make sure view pager is showing the correct tab.
            for (int i = 0; i < mTabs.size(); i++) {
                TabInfo tab = mTabs.get(i);
                if (tab.mListType == mDefaultListType) {
                    mViewPager.setCurrentItem(i);
                    break;
                }
            }
        }
这段代码的作用就是用于设置默认显示哪个选项卡的程序,所以就是“已下载”这个界面。然后回过头看一下上面的代码,
MyPagerAdapter adapter = new MyPagerAdapter();
        mViewPager.setAdapter(adapter);
这个就是熟悉的适配器了,所以显示程序的数据在这里面。开打这个类,
class MyPagerAdapter extends PagerAdapter
            implements ViewPager.OnPageChangeListener {
        int mCurPos = 0;

        @Override
        public int getCount() {
            return mTabs.size();
        }

        @Override
        public Object instantiateItem(ViewGroup container, int position) {
            TabInfo tab = mTabs.get(position);
            View root = tab.build(mInflater, mContentContainer, mRootView);
            container.addView(root);
            return root;
        }

        @Override
        public void destroyItem(ViewGroup container, int position, Object object) {
            container.removeView((View)object);
        }

        @Override
        public boolean isViewFromObject(View view, Object object) {
            return view == object;
        }

        @Override
        public CharSequence getPageTitle(int position) {
            return mTabs.get(position).mLabel;
        }

        @Override
        public void onPageScrolled(int position, float positionOffset, int positionOffsetPixels) {
        }

        @Override
        public void onPageSelected(int position) {
            mCurPos = position;
        }

        @Override
        public void onPageScrollStateChanged(int state) {
            if (state == ViewPager.SCROLL_STATE_IDLE) {
                updateCurrentTab(mCurPos);
            }
        }
    }
可以看到,有几个滑动的页卡,是通过mTabs这个类来控制的,而它就是
TabInfo类型。接着看一下绘制视图的方法:
MyPagerAdapter  @Override
        public Object instantiateItem(ViewGroup container, int position) {
            TabInfo tab = mTabs.get(position);
            View root = tab.build(mInflater, mContentContainer, mRootView);
            container.addView(root);
            return root;
        }
首先是获取到一个tab,然后这个tab用它的build()方法去生成一个视图,最后放到ViewPager显示。所以问题的重点分析就是TabInfo这个类了。先说buid()方法,
 public View build(LayoutInflater inflater, ViewGroup contentParent,
                View contentChild) {
            if (mRootView != null) {
                return mRootView;
            }

            mInflater = inflater;
            mRootView = inflater
                    .inflate(
                            mListType == LIST_TYPE_RUNNING ? R.layout.manage_applications_running
                                    : R.layout.manage_applications_apps, null);
            mLoadingContainer = mRootView.findViewById(R.id.loading_container);
            mLoadingContainer.setVisibility(View.VISIBLE);
            mListContainer = mRootView.findViewById(R.id.list_container);
            if (mListContainer != null) {
                // Create adapter and list view here
                View emptyView = mListContainer
                        .findViewById(com.android.internal.R.id.empty);
                ListView lv = (ListView) mListContainer
                        .findViewById(android.R.id.list);
                if (emptyView != null) {
                    lv.setEmptyView(emptyView);
                }
                lv.setOnItemClickListener(this);
                lv.setSaveEnabled(true);
                lv.setItemsCanFocus(true);
                lv.setTextFilterEnabled(true);
                mListView = lv;
                mApplications = new ApplicationsAdapter(mApplicationsState,
                        this, mFilter);
                mListView.setAdapter(mApplications);
                mListView.setRecyclerListener(mApplications);
                mColorBar = (LinearColorBar) mListContainer
                        .findViewById(R.id.storage_color_bar);
                mStorageChartLabel = (TextView) mListContainer
                        .findViewById(R.id.storageChartLabel);
                mUsedStorageText = (TextView) mListContainer
                        .findViewById(R.id.usedStorageText);
                mFreeStorageText = (TextView) mListContainer
                        .findViewById(R.id.freeStorageText);
                Utils.prepareCustomPreferencesList(contentParent, contentChild,
                        mListView, false);
                if (mFilter == FILTER_APPS_SDCARD) {
                    mStorageChartLabel.setText(mOwner.getActivity().getText(
                            R.string.sd_card_storage));
                } else {
                    mStorageChartLabel.setText(mOwner.getActivity().getText(
                            R.string.internal_storage));
                }
                applyCurrentStorage();
            }
            mRunningProcessesView = (RunningProcessesView) mRootView
                    .findViewById(R.id.running_processes);
            if (mRunningProcessesView != null) {
                mRunningProcessesView.doCreate(mSavedInstanceState);
            }

            return mRootView;
        }
第四行是生成了一view对象,
mRootView = inflater.inflate(mListType == LIST_TYPE_RUNNING ? R.layout.manage_applications_running: R.layout.manage_applications_apps, null);
这行代码用来判断加载哪个布局文件,确实viewpager虽然动态显示四个页面,但是其中三个的布局是一样的,唯一不一样的就是显示正在运行的界面。
ListView lv = (ListView) mListContainer
                        .findViewById(android.R.id.list);
                if (emptyView != null) {
                    lv.setEmptyView(emptyView);
                }
                lv.setOnItemClickListener(this);
                lv.setSaveEnabled(true);
                lv.setItemsCanFocus(true);
                lv.setTextFilterEnabled(true);
                mListView = lv;
                mApplications = new ApplicationsAdapter(mApplicationsState,
                        this, mFilter);
                mListView.setAdapter(mApplications);
这段代码就是用于显示app程序了,然后定位到
ApplicationsAdapter这个类,在它的构造方法里面,传入三个参数。一个是
mApplicationsState对象,以后用于对
ApplicationsState类进行操作;
一个是TabInfo,用来显示不同的界面;一个是过滤器,是标识显示哪个界面。进入这个构造方法,
   public ApplicationsAdapter(ApplicationsState state, TabInfo tab,
                int filterMode) {
            mState = state;
            mSession = state.newSession(this);
            mTab = tab;
            mContext = tab.mOwner.getActivity();
            mFilterMode = filterMode;
        }
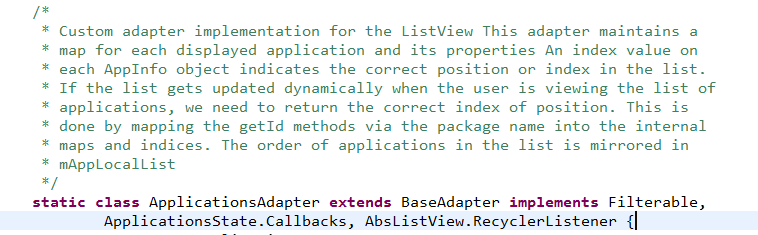
发现没有在这里传入什么数据,然后看一下ApplicationsAdapter这个类,发现它继承了三个接口,第一个是过滤用的,第三个是系统SDK接口用于ListView循环处理。而第二个接口正是负责处理数据的,
它有六个回调方法:
public static interface Callbacks { public void onRunningStateChanged(boolean running); public void onPackageListChanged(); public void onRebuildComplete(ArrayList<AppEntry> apps); public void onPackageIconChanged(); public void onPackageSizeChanged(String packageName); public void onAllSizesComputed(); }
第三个回调方法onRebuildComplete(ArrayList<AppEntry> apps)正是用于返回app Entities的,但是到这里如果我们还是按这条线是分析不下去了,找不到这个数据是从哪里来的。所以不能按照这个思路往下走了,也就是说app程序数据不是在这里获取的,那会是什么地方呢?一般情况下,我们是在onStart或者onCreat方法里面,但是Setting里面都没有这样做,那往下看一下onResume吧。果然Settings是在这个方法里面加载数据的,
@Override public void onResume() { super.onResume(); mActivityResumed = true; updateCurrentTab(mViewPager.getCurrentItem()); updateOptionsMenu(); }
首先是调用了updateCurrentTab(mViewPager.getCurrentItem())方法,然后updateCurrentTab方法里面又调用了TabInfo的resume方法,在
TabInfo的resume方法里面接着调用了
ApplicationsAdapter 的
resume方法,又在
ApplicationsAdapter 的
resume方法里面调用
Session的resume方法,最后又在
Session的resume方法里面调用
doResumeIfNeededLocked()方法,这个方法就是从系统读取程序信息的,代码如下:
void doResumeIfNeededLocked() { if (mResumed) { return; } mResumed = true; if (mPackageIntentReceiver == null) { mPackageIntentReceiver = new PackageIntentReceiver(); mPackageIntentReceiver.registerReceiver(); } //这个mApplications就是所有程序数据,如果你想过滤哪些程序的信息,对这个集合进行修改即可。比如你在做定制机的时候,不想自己的程序显示在Settings里面,那就在这里修改。 mApplications = mPm.getInstalledApplications(mRetrieveFlags); if (mApplications == null) { mApplications = new ArrayList<ApplicationInfo>(); } if (mInterestingConfigChanges.applyNewConfig(mContext.getResources())) { // If an interesting part of the configuration has changed, we // should completely reload the app entries. mEntriesMap.clear(); mAppEntries.clear(); } else { for (int i = 0; i < mAppEntries.size(); i++) { mAppEntries.get(i).sizeStale = true; } } for (int i = 0; i < mApplications.size(); i++) { final ApplicationInfo info = mApplications.get(i); // Need to trim out any applications that are disabled by // something different than the user. if (!info.enabled && info.enabledSetting != PackageManager.COMPONENT_ENABLED_STATE_DISABLED_USER) { mApplications.remove(i); i--; continue; } final AppEntry entry = mEntriesMap.get(info.packageName); if (entry != null) { entry.info = info; } } mCurComputingSizePkg = null; if (!mBackgroundHandler.hasMessages(BackgroundHandler.MSG_LOAD_ENTRIES)) { mBackgroundHandler .sendEmptyMessage(BackgroundHandler.MSG_LOAD_ENTRIES); } };
至此,完成了显示程序的剖析,其他模块类似,只要按照流程走就行了。
发布者:全栈程序员-用户IM,转载请注明出处:https://javaforall.cn/234857.html原文链接:https://javaforall.cn
【正版授权,激活自己账号】: Jetbrains全家桶Ide使用,1年售后保障,每天仅需1毛
【官方授权 正版激活】: 官方授权 正版激活 支持Jetbrains家族下所有IDE 使用个人JB账号...
