大家好,又见面了,我是你们的朋友全栈君。如果您正在找激活码,请点击查看最新教程,关注关注公众号 “全栈程序员社区” 获取激活教程,可能之前旧版本教程已经失效.最新Idea2022.1教程亲测有效,一键激活。
Jetbrains全家桶1年46,售后保障稳定
最近需求需要实现收款语音的播报,如果不考虑费用问题,使用推送与百度AL开发平台的语音合成功能就可也实现收款语音的播报功能,但是考虑到费用问题,同时还考虑到ios与Android可以同步使用的问题(ps:ios如果使用推送需要把应用上架到苹果商店,需要有证书,而且还需要通过审核才能进行推送。但是目前ios的签名一般都不上架,而是进行企业签,使用第三方的分发进行软件的更新,所以一般都不考虑上架)。由此,第二种方案就出来了,使用消息队列MQTT进行收款金额的推送,在移动端进行收款语音的播报,下面总结一下我在对接阿里云MQTT的踩坑的总结(因为阿里云给出的Android开发文档太少了,只能一步步摸索)。
首先,需要对接阿里云的MQTT功能,就需要有一个阿里云的消息队列的账号,这些就略过了,直接进行到主题。
使用MQTT就需要有MQTT实例,资源申请的方法按官方给的文档一步步走就可以,资源申请地址https://help.aliyun.com/document_detail/44867.html?spm=a2c4g.11186623.6.680.60df4fe8rI5vhS
一、使用MQTT使用到的几点
1、topic管理(也就是消息主题)
2、生产者管理(消息的发送者,也就是服务端发送的数据)
3、消费者管理(消息的接收者,也就是移动端接收的数据)
4、实例管理
5、Group Id管理
附上图片:
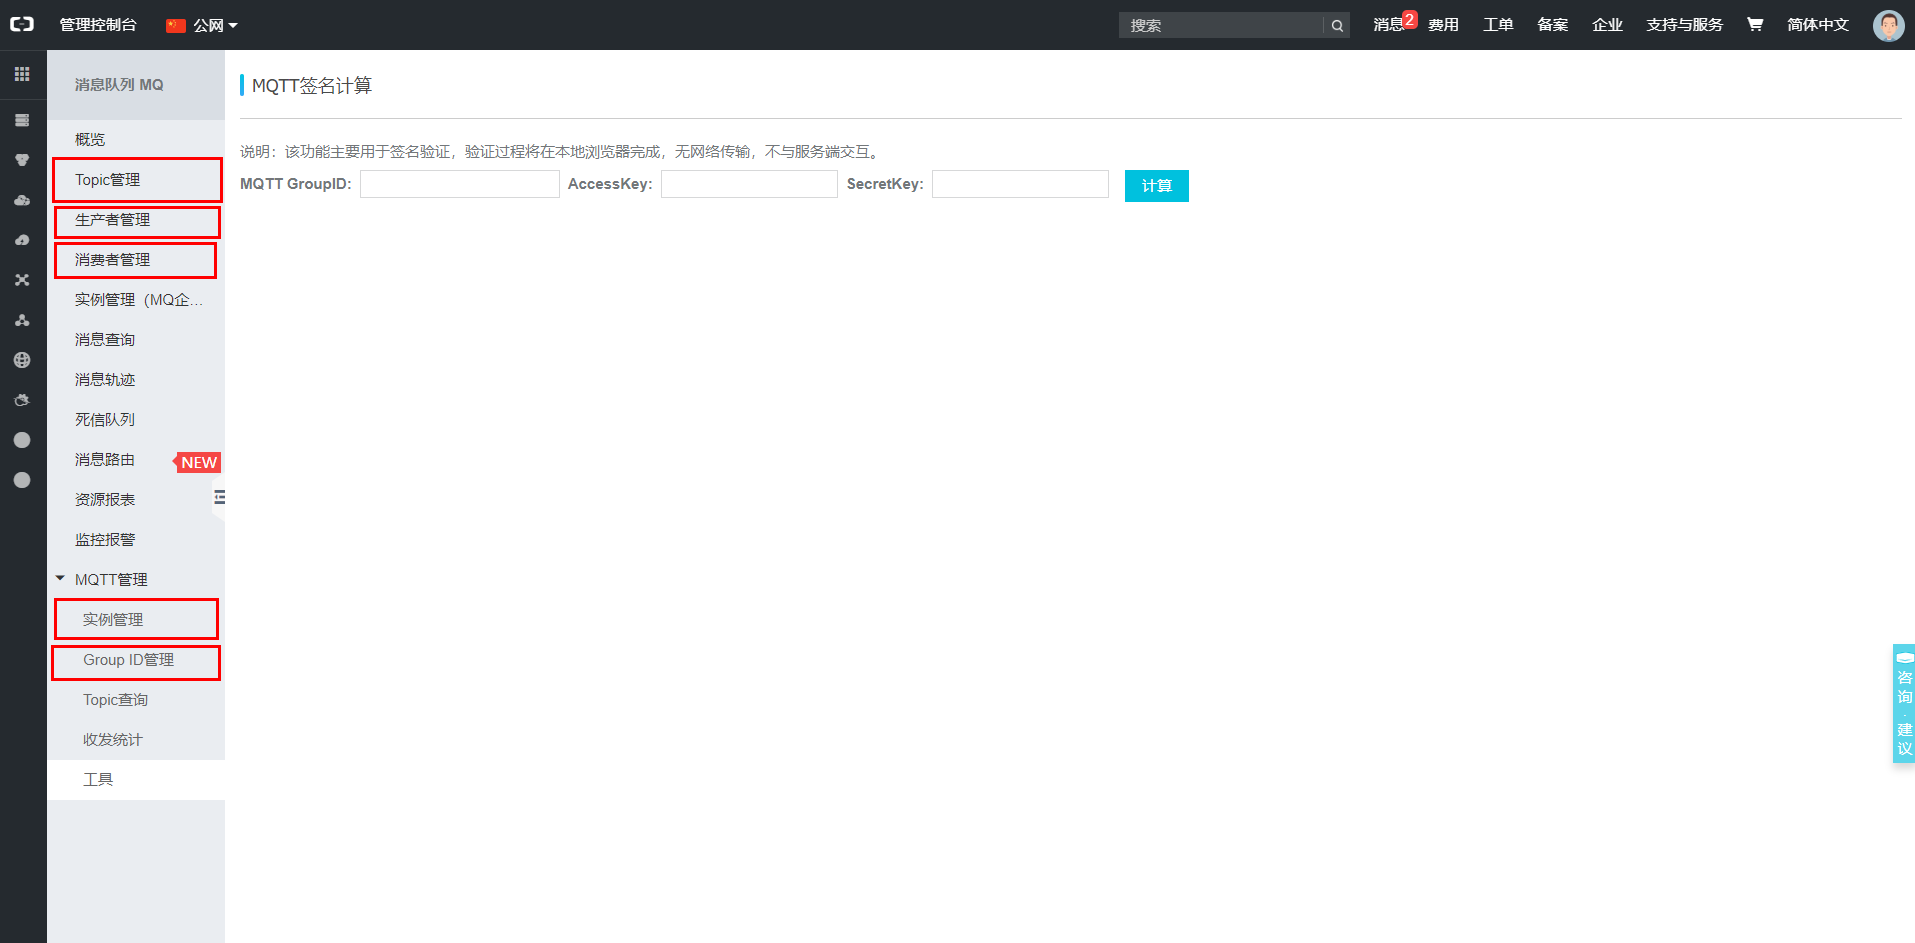

以上这些一般都是后台人员进行创建,但是在测试阶段,移动端开发人员也会自己去创建一个测试的实例进行测试使用,所以此部分也是需要了解的,具体创建参考官方文档即可。
二、Android接入示例
创建好以上需要的数据之后,就可以进行消息的接收操作了,也就是Android客户端。
1、Android 依赖添加
在 Android 工程中找到 app 下的配置文件 build.gradle。添加依赖如下。
dependencies{
compile 'org.eclipse.paho:org.eclipse.paho.client.mqttv3:1.1.0'
compile group: 'commons-codec', name: 'commons-codec', version: '1.5'
}
2、添加权限
<uses-permission android:name="android.permission.WAKE_LOCK" />
<uses-permission android:name="android.permission.WRITE_EXTERNAL_STORAGE" />
<uses-permission android:name="android.permission.ACCESS_NETWORK_STATE" />

<uses-permission android:name="android.permission.READ_EXTERNAL_STORAGE" />
<uses-permission android:name="android.permission.INTERNET" />
3、注册service
<service android:name=".mqtt.service.MqttService" />https://help.aliyun.com/document_detail/44885.html?spm=a2c4g.11186623.6.700.5c005acf5G6LIu
同时,这里还有Android demo,但是demo是java的代码,并不能在Android机子上跑起来。
注意,对于第一次对接MQTT的开发人员来说,总是会去看一下接入示例,下载示例的demo运行跑一遍,但是这里有一个坑,阿里云的MQTT Android接入示例并不是Android客户端。附上图片:
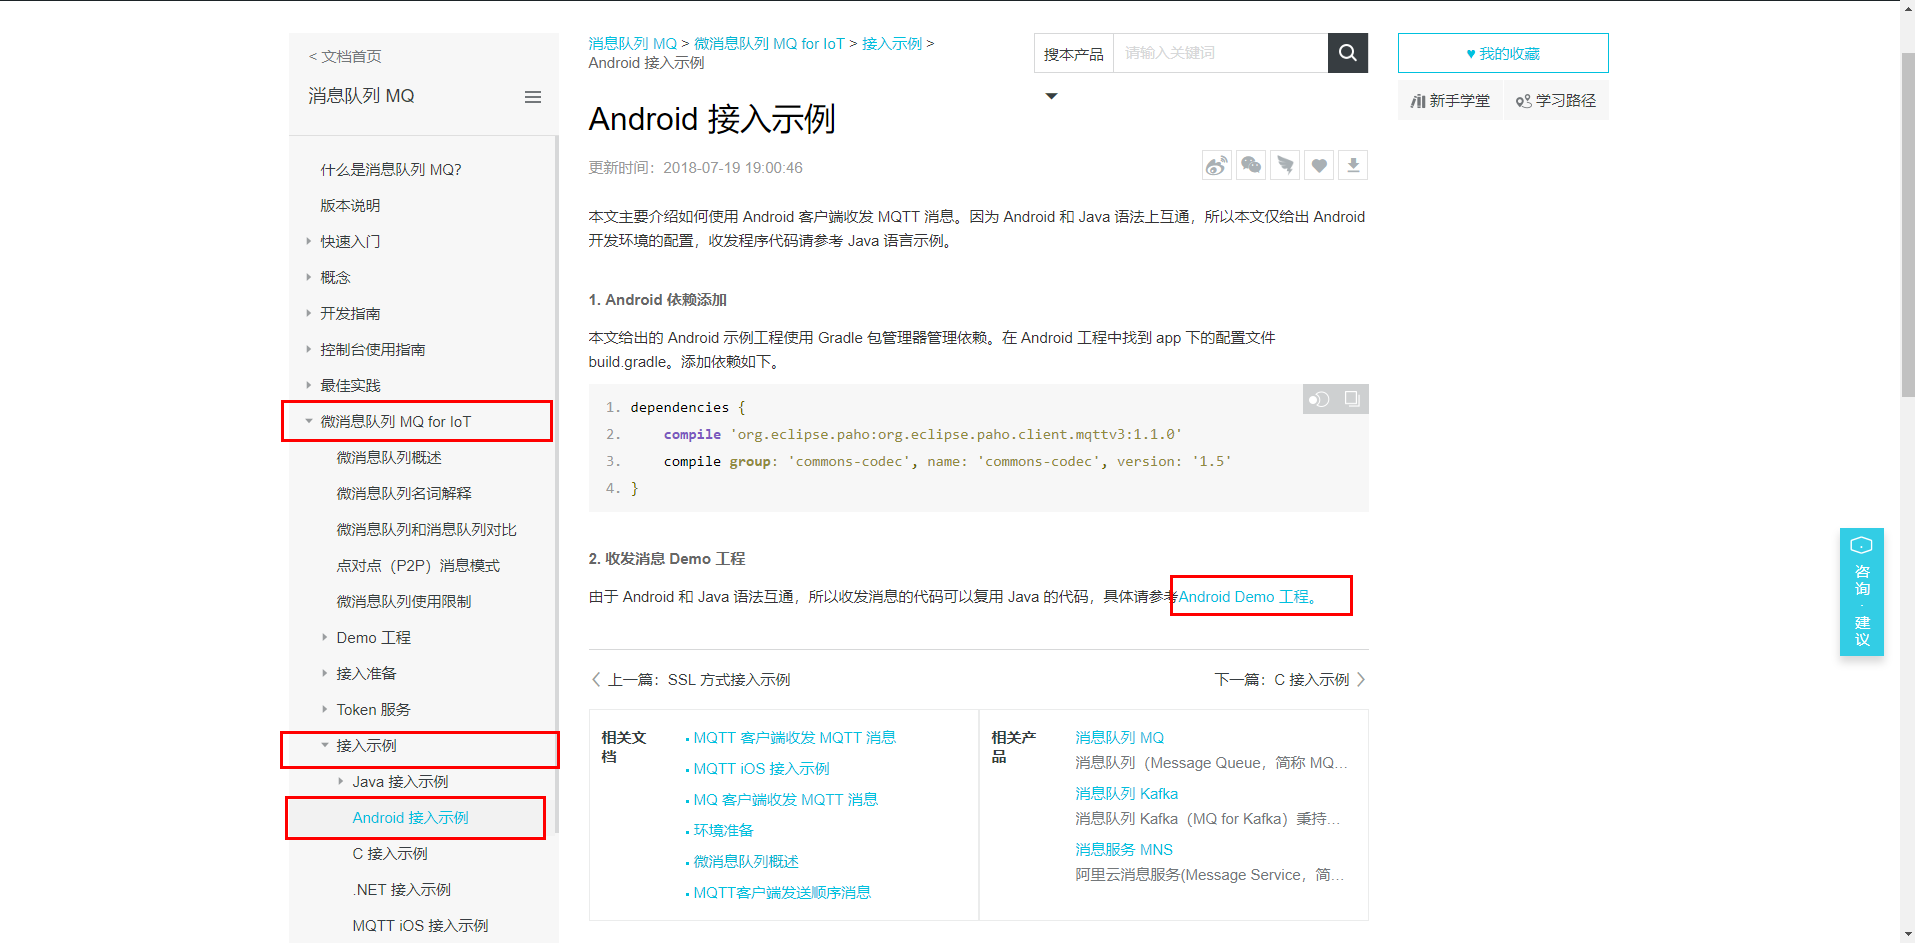

Android客户端github地址:
以上的官方Android接入示例对于首次接入MQTT的人来说,一般都会去下载这个demo进行运行,但是这不是Android的客户端,客户端就是以上的github地址。附上图片标明官方文档的Android客户端位置:
三、使用Android客户端
在github上下载下来的项目包含三个文件,如图所示:
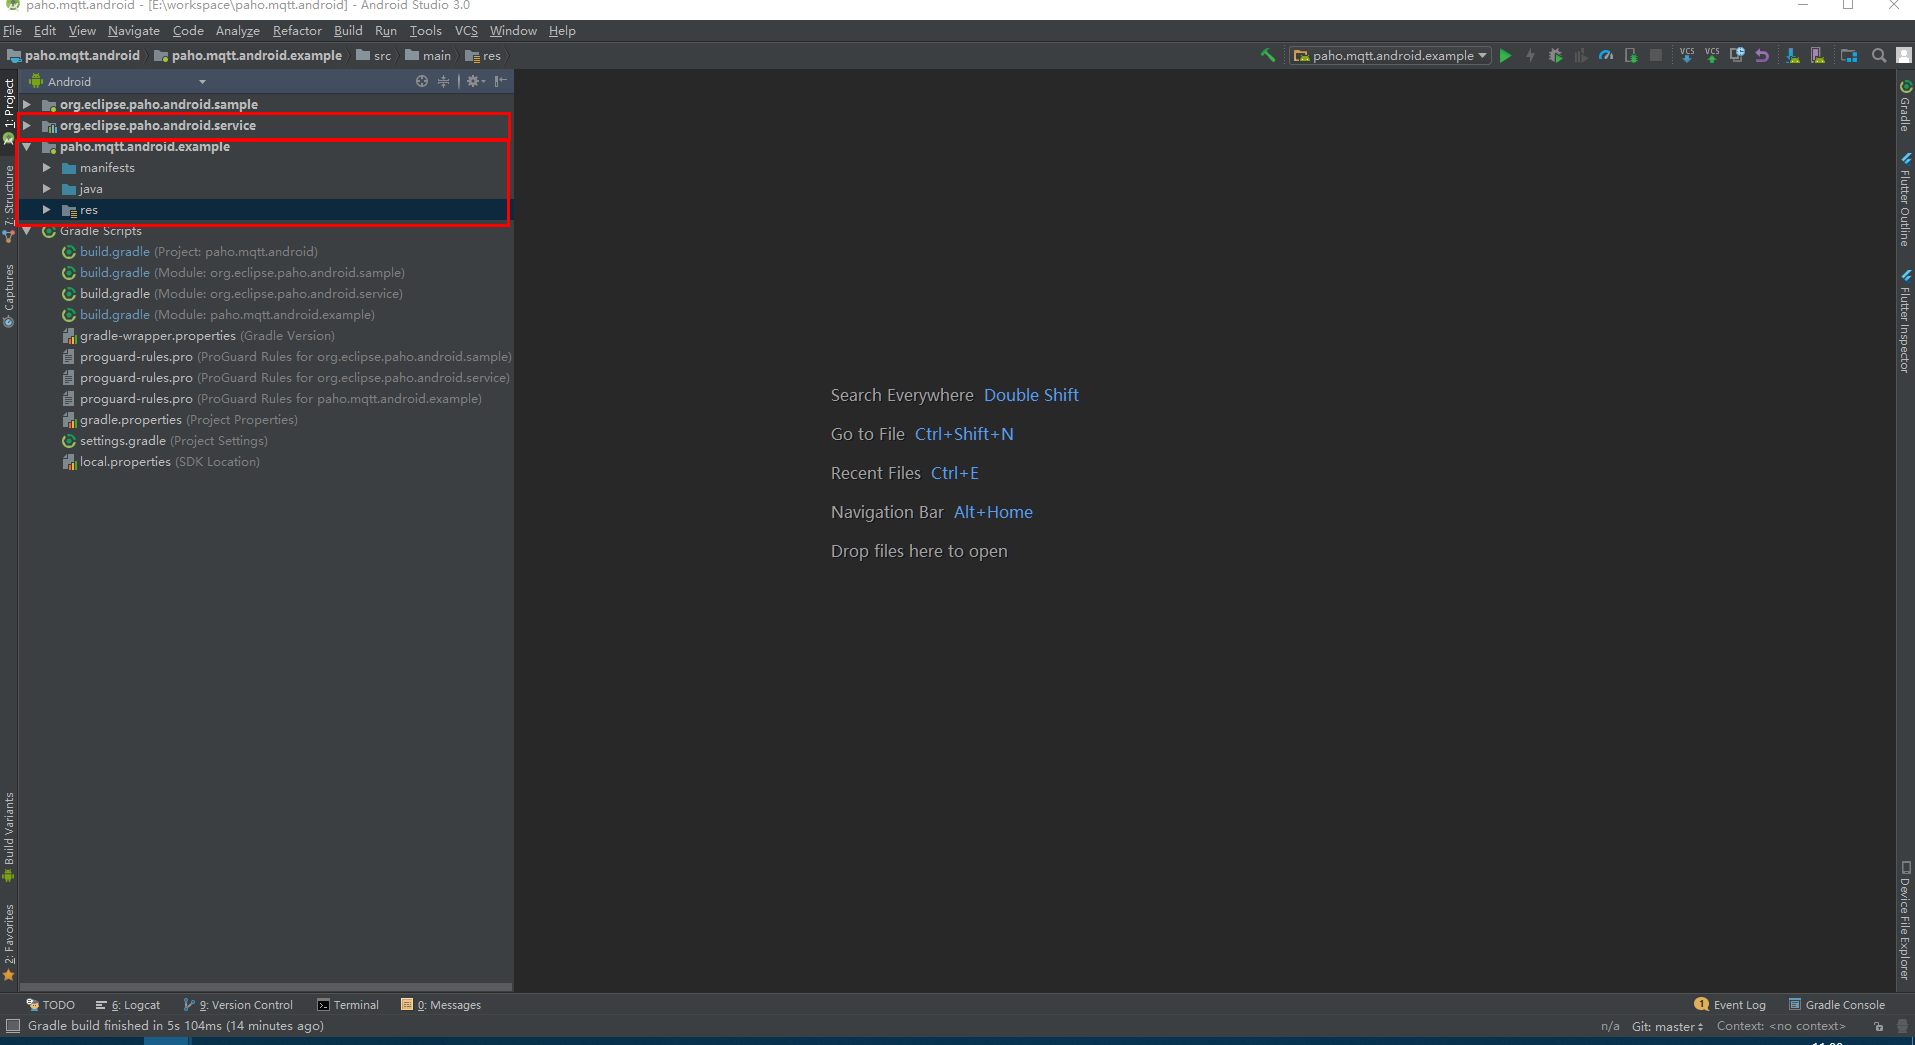
1、paho.mqtt.android.example 这个是我们需要使用到的接收消息的demo
2、org.eclipse.paho.android.service 这个是我们接收使用到的service的 library
3、org.eclipse.paho.android.sample 这个是模拟发送的demo(这里我没有使用,而是使用后台的发送代码或者官网上生产者那里的发送进行发送消息,就不做说明了)
四、官方Android客户端demo的使用
在官方的demo中,我在Android studio上运行了一遍,是可以安装,但是在你使用了自己的服务器地址之后,总是会连接不上,不断处于重连的情况。
下面贴出官方的对接代码:
public class PahoExampleActivity1 extends AppCompatActivity{
    private HistoryAdapter mAdapter;

    MqttAndroidClient mqttAndroidClient;

    final String serverUri = "tcp://iot.eclipse.org:1883";

    String clientId = "AndroidExampleClient";
    final String subscriptionTopic = "exampleAndroidTopic";
    final String publishTopic = "exampleAndroidPublishTopic";
    final String publishMessage = "Hello World!";


    @Override
    protected void onCreate(Bundle savedInstanceState) {
        super.onCreate(savedInstanceState);
        setContentView(R.layout.activity_scrolling);
        Toolbar toolbar = (Toolbar) findViewById(R.id.toolbar);
        setSupportActionBar(toolbar);

        FloatingActionButton fab = (FloatingActionButton) findViewById(R.id.fab);
        fab.setOnClickListener(new View.OnClickListener() {
            @Override
            public void onClick(View view) {
                publishMessage();
            }
        });


        RecyclerView mRecyclerView = (RecyclerView) findViewById(R.id.history_recycler_view);
        RecyclerView.LayoutManager mLayoutManager = new LinearLayoutManager(this);
        mRecyclerView.setLayoutManager(mLayoutManager);

        mAdapter = new HistoryAdapter(new ArrayList<String>());
        mRecyclerView.setAdapter(mAdapter);

        clientId = clientId + System.currentTimeMillis();

        mqttAndroidClient = new MqttAndroidClient(getApplicationContext(), serverUri, clientId);
        mqttAndroidClient.setCallback(new MqttCallbackExtended() {
            @Override
            public void connectComplete(boolean reconnect, String serverURI) {

                if (reconnect) {
                    addToHistory("Reconnected to : " + serverURI);
                    // Because Clean Session is true, we need to re-subscribe
                    subscribeToTopic();
                } else {
                    addToHistory("Connected to: " + serverURI);
                }
            }

            @Override
            public void connectionLost(Throwable cause) {
                addToHistory("The Connection was lost.");
                Log.e("TAG","失败信息"+cause.toString());
            }

            @Override
            public void messageArrived(String topic, MqttMessage message) throws Exception {
                addToHistory("Incoming message: " + new String(message.getPayload()));
            }

            @Override
            public void deliveryComplete(IMqttDeliveryToken token) {

            }
        });

        MqttConnectOptions mqttConnectOptions = new MqttConnectOptions();
        mqttConnectOptions.setAutomaticReconnect(true);
        mqttConnectOptions.setCleanSession(false);


        try {
            //addToHistory("Connecting to " + serverUri);
            mqttAndroidClient.connect(mqttConnectOptions, null, new IMqttActionListener() {
                @Override
                public void onSuccess(IMqttToken asyncActionToken) {
                    DisconnectedBufferOptions disconnectedBufferOptions = new DisconnectedBufferOptions();
                    disconnectedBufferOptions.setBufferEnabled(true);
                    disconnectedBufferOptions.setBufferSize(100);
                    disconnectedBufferOptions.setPersistBuffer(false);
                    disconnectedBufferOptions.setDeleteOldestMessages(false);
                    mqttAndroidClient.setBufferOpts(disconnectedBufferOptions);
                    subscribeToTopic();
                }

                @Override
                public void onFailure(IMqttToken asyncActionToken, Throwable exception) {
                    addToHistory("Failed to connect to: " + serverUri);
                    Log.e("TAG",exception.toString());
                }
            });


        } catch (MqttException ex){
            ex.printStackTrace();
        }

    }

    private void addToHistory(String mainText){
        System.out.println("LOG: " + mainText);
        mAdapter.add(mainText);
        Snackbar.make(findViewById(android.R.id.content), mainText, Snackbar.LENGTH_LONG)
                .setAction("Action", null).show();

    }

    @Override
    public boolean onCreateOptionsMenu(Menu menu) {
        // Inflate the menu; this adds items to the action bar if it is present.

        return true;
    }

    @Override
    public boolean onOptionsItemSelected(MenuItem item) {
        // Handle action bar item clicks here. The action bar will
        // automatically handle clicks on the Home/Up button, so long
        // as you specify a parent activity in AndroidManifest.xml.
        int id = item.getItemId();

        //noinspection SimplifiableIfStatement

        return super.onOptionsItemSelected(item);
    }

    public void subscribeToTopic(){
        try {
            mqttAndroidClient.subscribe(subscriptionTopic, 0, null, new IMqttActionListener() {
                @Override
                public void onSuccess(IMqttToken asyncActionToken) {
                    addToHistory("Subscribed!");
                }

                @Override
                public void onFailure(IMqttToken asyncActionToken, Throwable exception) {
                    addToHistory("Failed to subscribe");
                    Log.e("TAG",exception.toString());
                }
            });

            // THIS DOES NOT WORK!
            mqttAndroidClient.subscribe(subscriptionTopic, 0, new IMqttMessageListener() {
                @Override
                public void messageArrived(String topic, MqttMessage message) throws Exception {
                    // message Arrived!
                    System.out.println("Message: " + topic + " : " + new String(message.getPayload()));
                }
            });

        } catch (MqttException ex){
            System.err.println("Exception whilst subscribing");
            ex.printStackTrace();
        }
    }

    public void publishMessage(){

        try {
            MqttMessage message = new MqttMessage();
            message.setPayload(publishMessage.getBytes());
            mqttAndroidClient.publish(publishTopic, message);
            addToHistory("Message Published");
            if(!mqttAndroidClient.isConnected()){
                addToHistory(mqttAndroidClient.getBufferedMessageCount() + " messages in buffer.");
            }
        } catch (MqttException e) {
            System.err.println("Error Publishing: " + e.getMessage());
            e.printStackTrace();
        }
    }

}
使用官方demo给出的serverUri运行demo是可以连接的,但是我们需要的并不仅仅是连接啊,还需要接收消息,所以我们需把serverUri习惯成我们的serverUri,之后就发现一直连接不上,参数等配置也都没有问题,也找不出问题出现在哪里。无奈之下只能让后台去先去对接,然而奇妙的解决方案就在此处找到了。
在服务端的demo中,可以进行发送与接收,想到Android也是使用java语言进行开发的,所以就尝试使用后台的接收代码去代入Android的接入demo中去尝试一次看看能不能跑通,但是神奇的,竟然跑通了,但是Android与java还是有区别的,所以不能完全招搬,要取我们需要的部分进行代入。
修改后的代码如下:
public class PahoExampleActivity extends AppCompatActivity{
    private HistoryAdapter mAdapter;

    MqttAndroidClient mqttAndroidClient;

//    final String serverUri = "tcp://iot.eclipse.org:1883";
//
//    String clientId = "AndroidExampleClient";
//    final String subscriptionTopic = "exampleAndroidTopic";
//    final String publishTopic = "exampleAndroidPublishTopic";
//    final String publishMessage = "Hello World!";

    final String serverUri = "tcp://xxx:1883";
    final String groupId = "xxx";
    final String topic = "xxx";
    final int qosLevel = 0;
    final Boolean cleanSession =true;
    String clientId = groupId + "@@@RECV0001";
    String accessKey = "xxx";
    String secretKey = "xxx";
    @Override
    protected void onCreate(Bundle savedInstanceState) {
        super.onCreate(savedInstanceState);
        setContentView(R.layout.activity_scrolling);
        Toolbar toolbar = (Toolbar) findViewById(R.id.toolbar);
        setSupportActionBar(toolbar);

        FloatingActionButton fab = (FloatingActionButton) findViewById(R.id.fab);
        fab.setOnClickListener(new View.OnClickListener() {
            @Override
            public void onClick(View view) {
                publishMessage();
            }
        });


        RecyclerView mRecyclerView = (RecyclerView) findViewById(R.id.history_recycler_view);
        RecyclerView.LayoutManager mLayoutManager = new LinearLayoutManager(this);
        mRecyclerView.setLayoutManager(mLayoutManager);

        mAdapter = new HistoryAdapter(new ArrayList<String>());
        mRecyclerView.setAdapter(mAdapter);

        clientId = clientId + System.currentTimeMillis();
        mqttAndroidClient = new MqttAndroidClient(getApplicationContext(), serverUri, clientId);
        mqttAndroidClient.setCallback(new MqttCallbackExtended() {
            @Override
            public void connectComplete(boolean reconnect, String serverURI) {

                if (reconnect) {
                    addToHistory("Reconnected to : " + serverURI);
                    // Because Clean Session is true, we need to re-subscribe
                    subscribeToTopic();
                } else {
                    addToHistory("Connected to: " + serverURI);
                }
                System.out.println("connect success");
            }

            @Override
            public void connectionLost(Throwable cause) {
//                addToHistory("The Connection was lost.");
                Log.e("TAG","失败信息"+cause.toString());
            }

            @Override
            public void messageArrived(String topic, MqttMessage message) throws Exception {
                Log.e("TAG","接收的消息Incoming message: " + new String(message.getPayload()));
                addToHistory("接收的消息Incoming message: " + new String(message.getPayload()));
            }

            @Override
            public void deliveryComplete(IMqttDeliveryToken token) {

            }
        });

        MqttConnectOptions mqttConnectOptions = new MqttConnectOptions();
        mqttConnectOptions.setAutomaticReconnect(true);
        mqttConnectOptions.setCleanSession(false);
        String sign = null;
        try {
            sign = MacSignature.macSignature(clientId.split("@@@")[0], secretKey);
        } catch (InvalidKeyException e) {
            e.printStackTrace();
        } catch (NoSuchAlgorithmException e) {
            e.printStackTrace();
        }
        mqttConnectOptions.setUserName(accessKey);
        mqttConnectOptions.setPassword(sign.toCharArray());
        mqttConnectOptions.setCleanSession(cleanSession);
        mqttConnectOptions.setKeepAliveInterval(90);
        mqttConnectOptions.setAutomaticReconnect(true);
        mqttConnectOptions.setMqttVersion(MQTT_VERSION_3_1_1);


        try {
            //addToHistory("Connecting to " + serverUri);
            mqttAndroidClient.connect(mqttConnectOptions, null, new IMqttActionListener() {
                @Override
                public void onSuccess(IMqttToken asyncActionToken) {
                    DisconnectedBufferOptions disconnectedBufferOptions = new DisconnectedBufferOptions();
                    disconnectedBufferOptions.setBufferEnabled(true);
                    disconnectedBufferOptions.setBufferSize(100);
                    disconnectedBufferOptions.setPersistBuffer(false);
                    disconnectedBufferOptions.setDeleteOldestMessages(false);
                    mqttAndroidClient.setBufferOpts(disconnectedBufferOptions);
                    subscribeToTopic();
                }

                @Override
                public void onFailure(IMqttToken asyncActionToken, Throwable exception) {
                    addToHistory("Failed to connect to: " + serverUri);
                    Log.e("TAG",exception.toString());
                }
            });


        } catch (MqttException ex){
            ex.printStackTrace();
        }

    }

    private void addToHistory(String mainText){
        System.out.println("LOG: " + mainText);
        mAdapter.add(mainText);
        Snackbar.make(findViewById(android.R.id.content), mainText, Snackbar.LENGTH_LONG)
                .setAction("Action", null).show();

    }

    @Override
    public boolean onCreateOptionsMenu(Menu menu) {
        // Inflate the menu; this adds items to the action bar if it is present.

        return true;
    }

    @Override
    public boolean onOptionsItemSelected(MenuItem item) {
        // Handle action bar item clicks here. The action bar will
        // automatically handle clicks on the Home/Up button, so long
        // as you specify a parent activity in AndroidManifest.xml.
        int id = item.getItemId();

        //noinspection SimplifiableIfStatement

        return super.onOptionsItemSelected(item);
    }

    public void subscribeToTopic(){
        try {
            mqttAndroidClient.subscribe(topic, 0, null, new IMqttActionListener() {
                @Override
                public void onSuccess(IMqttToken asyncActionToken) {
                    addToHistory("Subscribed!");
                }

                @Override
                public void onFailure(IMqttToken asyncActionToken, Throwable exception) {
                    addToHistory("Failed to subscribe");
                    Log.e("TAG",exception.toString());
                }
            });

            // THIS DOES NOT WORK!
            mqttAndroidClient.subscribe(topic, 0, new IMqttMessageListener() {
                @Override
                public void messageArrived(String topic, MqttMessage message) throws Exception {
                    // message Arrived!
                    System.out.println("Message: " + topic + " : " + new String(message.getPayload()));
                    addToHistory("Message: " + topic + " : " + new String(message.getPayload()));
                }
            });

        } catch (MqttException ex){
            System.err.println("Exception whilst subscribing");
            ex.printStackTrace();
        }
    }

    public void publishMessage(){

        try {
            MqttMessage message = new MqttMessage();
            message.setPayload(topic.getBytes());
            mqttAndroidClient.publish(topic, message);
            addToHistory("Message Published");
            if(!mqttAndroidClient.isConnected()){
                Log.e("TAG","接收");
                addToHistory(mqttAndroidClient.getBufferedMessageCount() + " messages in buffer.");
            }
        } catch (MqttException e) {
            System.err.println("Error Publishing: " + e.getMessage());
            e.printStackTrace();
        }
    }

}
下面对修改后的参数进行说明一下:
1、serverUri 服务器的域名加端口 例如:tcp://xxx:1883 因为不能泄露一些数据,所以使用xxx代替了,具体的地址则是在MQTT管理—-》实例管理下的接入点域名,复制的接入点域名即是xxx了,注意,tcp还是需要的哦,接入点域名只是xxx的那一部分。
2、groupId groupId可在 MQTT管理—-》Group Id管理中获取到,这个id是需要自己创建的。
3、topic 主题(注意:主题是需要一致的)
4、clientId 客户端id,clientId 是由groupId +@@@+设备名。设备名可以随便取,但是客户端id有长度限制,具体长度限制可查看官方文档。
5、accessKey 与secretKey 这两也是需要自己创建,在创建完成后需要保存好。
以上代码能进行接收的主要区别是以下这段代码:
String sign = null;
try {
    sign = MacSignature.macSignature(clientId.split("@@@")[0], secretKey);
} catch (InvalidKeyException e) {
    e.printStackTrace();
} catch (NoSuchAlgorithmException e) {
    e.printStackTrace();
}
mqttConnectOptions.setUserName(accessKey);
mqttConnectOptions.setPassword(sign.toCharArray());
mqttConnectOptions.setCleanSession(cleanSession);
mqttConnectOptions.setKeepAliveInterval(90);
mqttConnectOptions.setAutomaticReconnect(true);
mqttConnectOptions.setMqttVersion(MQTT_VERSION_3_1_1);
如果把这段代码去掉,也是会连接不上,会不断进行重连。
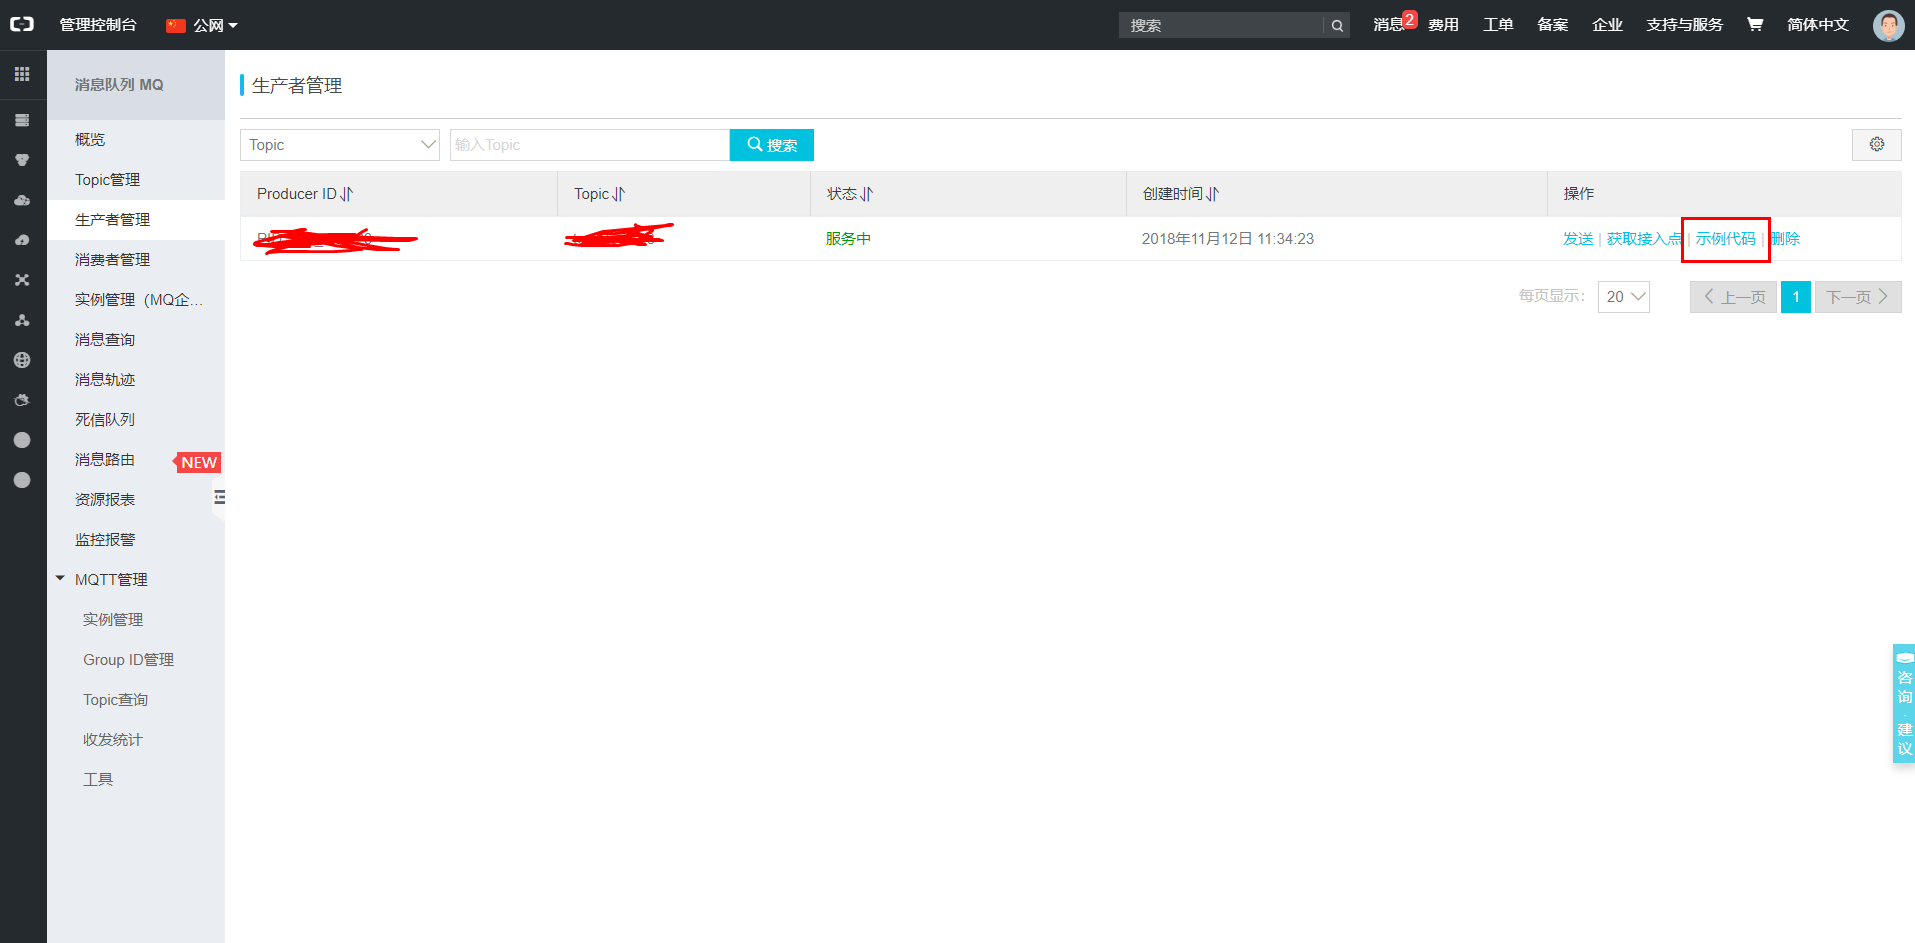
修改后的接收代码是可以进行接收了,但是有出现了另外一个问题。之前不是说使用服务端的的接收代码是可以在java的main函数中直接进行接收与发送的。但是使用以上代码进行接收之后,服务端的发送代码在Android上是接收不到的,但是ios就可以接收的了消息。不过虽然后台的发送代码发送的消息是接收不到,但是很奇怪的是直接在阿里云上的生产者那里进行消息的发送是可以进行消息的接收的,暂时也没找到问题的所在,所以就直接让后台使用生产者的发送示例代码进行消息的发送,这样就解决了,同时ios与Android都能同时接收到消息了。生产者的发送示例代码我就不贴出来了,可以在MQTT控制台上找到,如图所示:
这样就实现了MQTT的对接了,需要运用到我们的项目中,所以我对代码进行了一下整理:
final String serverUri = "xxx";
final String groupId = "xxx";
final String topic = "xxx";
final int qosLevel = 0;
final Boolean cleanSession =true;
private String clientId = groupId + "@@@RECV0001";
private String accessKey = "xxx";
private String secretKey = "xxx";
private MqttAndroidClient mqttAndroidClient;
public void startMQTTService(){
clientId = clientId + System.currentTimeMillis();
mqttAndroidClient = new MqttAndroidClient(getApplicationContext(), serverUri, clientId);
mqttAndroidClient.setCallback(new MqttCallbackExtended() {
@Override
public void connectComplete(boolean reconnect, String serverURI) {
if (reconnect) {
LogUtils.e("Reconnected to : " + serverURI);
// Because Clean Session is true, we need to re-subscribe
subscribeToTopic();
} else {
LogUtils.e("Connected to: " + serverURI);
}
}
@Override
public void connectionLost(Throwable cause) {
LogUtils.e("The Connection was lost.");
LogUtils.e("MQTT失败信息-->"+cause.toString());
}
@Override
public void messageArrived(String topic, MqttMessage message) throws Exception {
LogUtils.e("接收的消息Incoming message: " + new String(message.getPayload()));
}
@Override
public void deliveryComplete(IMqttDeliveryToken token) {
}
});
MqttConnectOptions mqttConnectOptions = new MqttConnectOptions();
mqttConnectOptions.setAutomaticReconnect(true);
mqttConnectOptions.setCleanSession(false);
String sign = null;
try {
sign = MacSignature.macSignature(clientId.split("@@@")[0], secretKey);
} catch (InvalidKeyException e) {
e.printStackTrace();
} catch (NoSuchAlgorithmException e) {
e.printStackTrace();
}
mqttConnectOptions.setUserName(accessKey);
mqttConnectOptions.setPassword(sign.toCharArray());
mqttConnectOptions.setCleanSession(cleanSession);
mqttConnectOptions.setKeepAliveInterval(90);
mqttConnectOptions.setAutomaticReconnect(true);
mqttConnectOptions.setMqttVersion(MQTT_VERSION_3_1_1);
try {
//addToHistory("Connecting to " + serverUri);
mqttAndroidClient.connect(mqttConnectOptions, null, new IMqttActionListener() {
@Override
public void onSuccess(IMqttToken asyncActionToken) {
DisconnectedBufferOptions disconnectedBufferOptions = new DisconnectedBufferOptions();
disconnectedBufferOptions.setBufferEnabled(true);
disconnectedBufferOptions.setBufferSize(100);
disconnectedBufferOptions.setPersistBuffer(false);
disconnectedBufferOptions.setDeleteOldestMessages(false);
mqttAndroidClient.setBufferOpts(disconnectedBufferOptions);
subscribeToTopic();
}
@Override
public void onFailure(IMqttToken asyncActionToken, Throwable exception) {
LogUtils.e("Failed to connect to: " + serverUri);
LogUtils.e(exception.toString());
}
});
} catch (MqttException ex){
ex.printStackTrace();
}
}
public void subscribeToTopic(){
try {
mqttAndroidClient.subscribe(topic, 0, null, new IMqttActionListener() {
@Override
public void onSuccess(IMqttToken asyncActionToken) {
Log.e("TAG","Subscribed!");
}
@Override
public void onFailure(IMqttToken asyncActionToken, Throwable exception) {
LogUtils.e("Failed to subscribe");
LogUtils.e(exception.toString());
}
});
// THIS DOES NOT WORK!
mqttAndroidClient.subscribe(topic, 0, new IMqttMessageListener() {
@Override
public void messageArrived(String topic, MqttMessage message) throws Exception {
// message Arrived!
LogUtils.e("Message: " + topic + " : " + new String(message.getPayload()));
String money= new String(message.getPayload());
if (!TextUtils.isEmpty(money)) {
if (OENType.currentType() == OENType.fengniao) {
VoiceSpeaker.getInstance().speak(VoiceTemplate.getDefaultTemplate(money));
}
}
}
});
} catch (MqttException ex){
LogUtils.e("Exception whilst subscribing");
ex.printStackTrace();
}
}启动服务则只有在onCreate()方法中调用startMQTTService()方法即可。
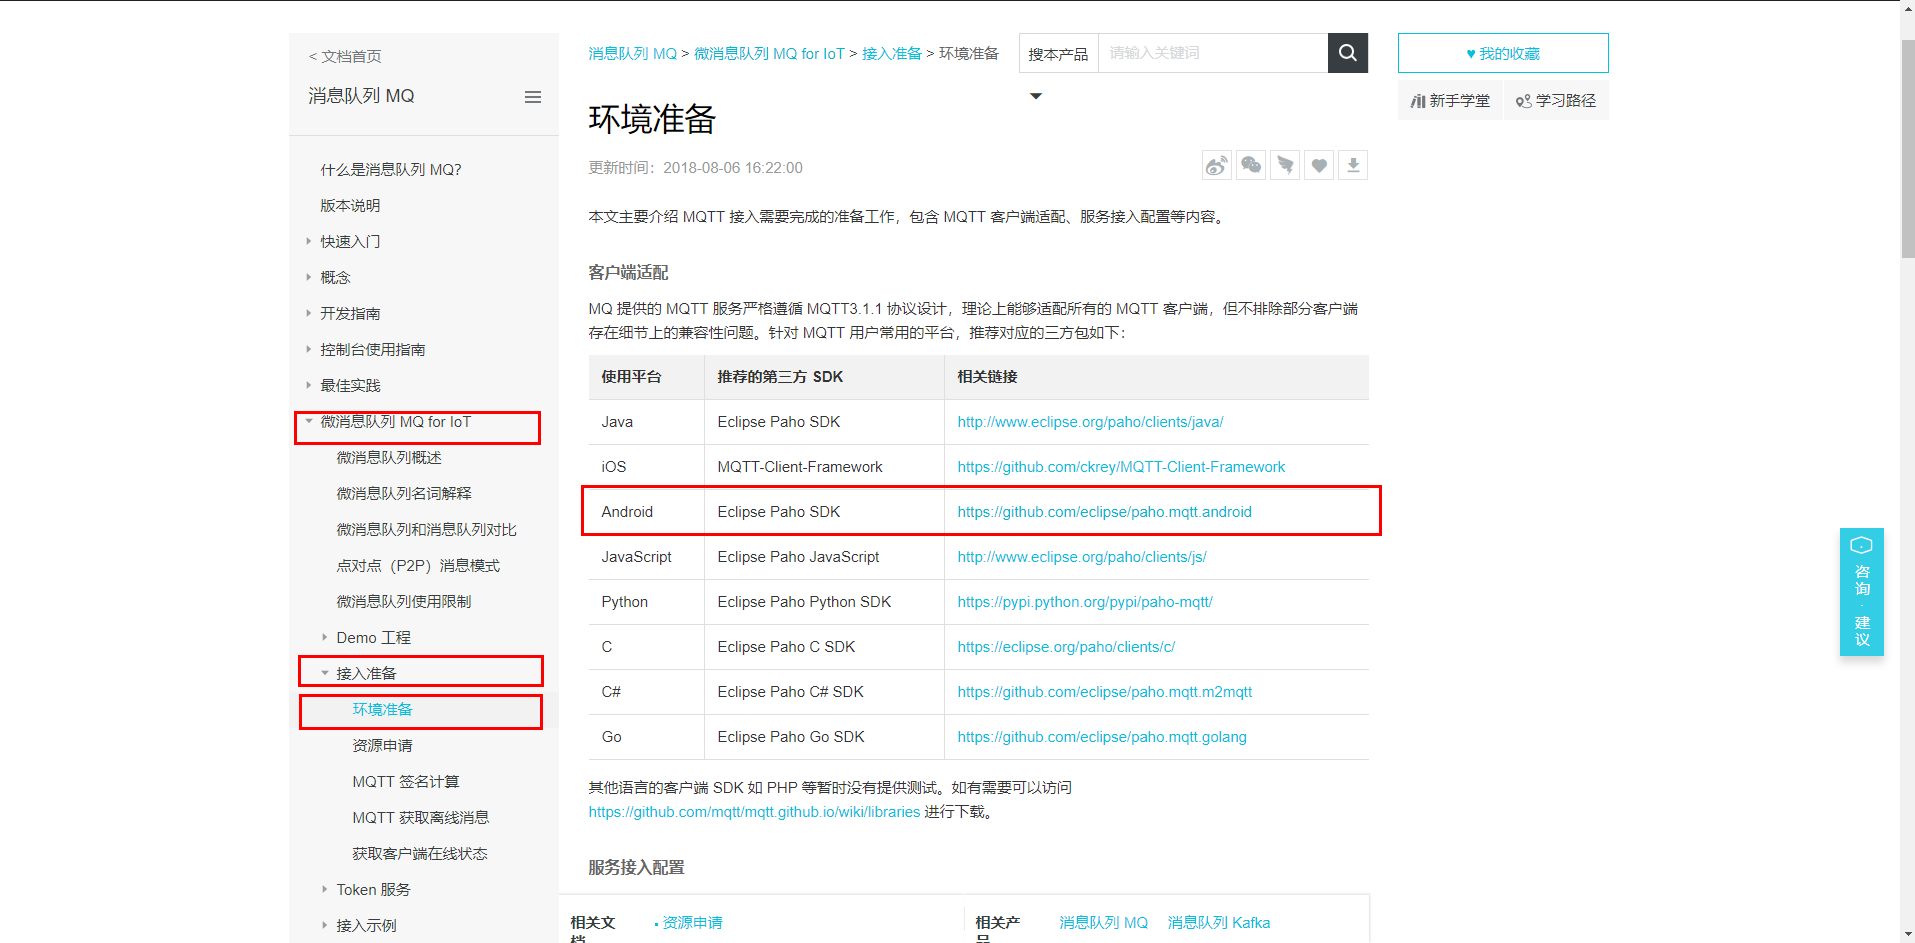
五、org.eclipse.paho.android.service的使用方式注意事项
1、使用导入library的方式
2、直接复制代码的方式
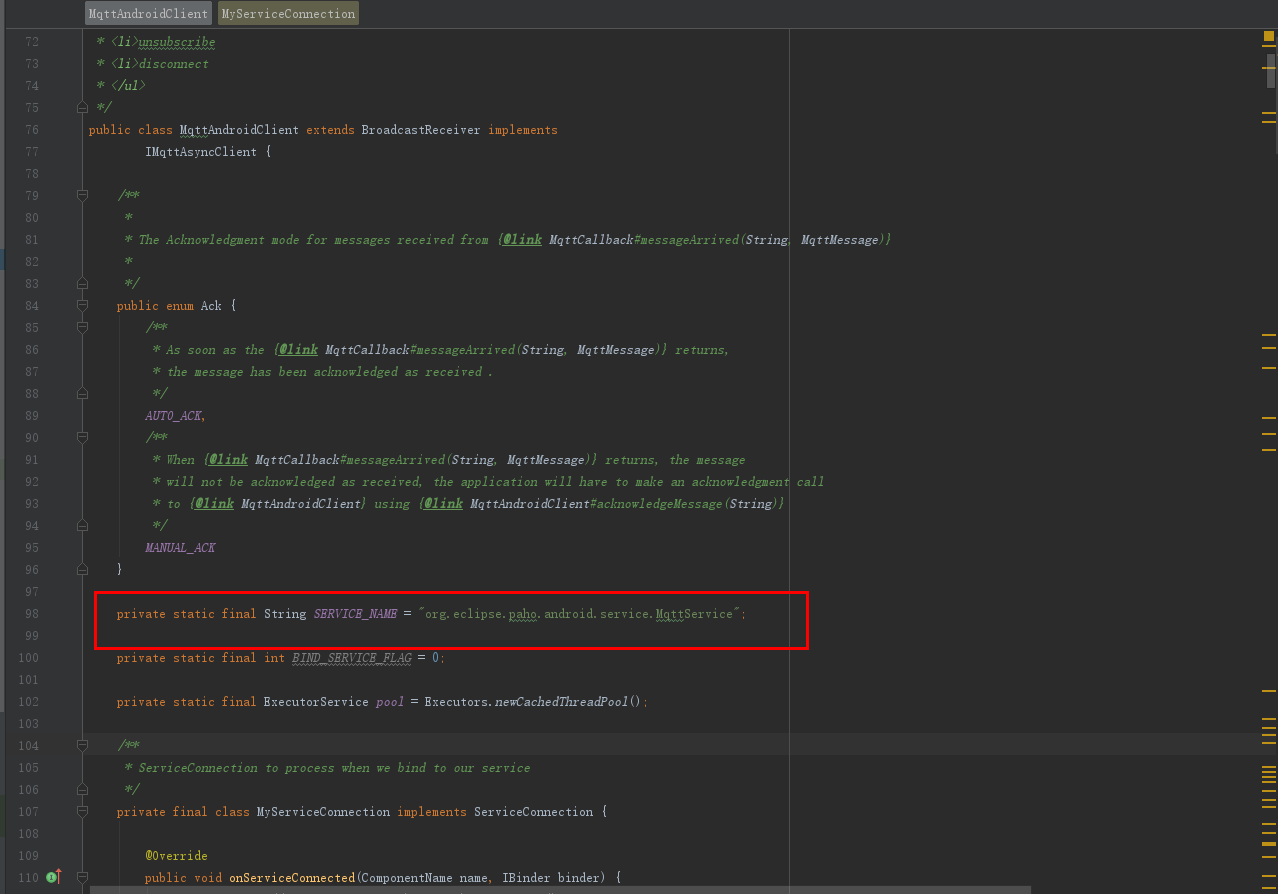
如果使用了方式2,则需要注意在MqttAndroidClient这个类中把自己的服务的名字改成自己的MqttService这个java类的位置,如图所示:
这样,MQTT的Android就完成了,接下来就是实现自己的播报部分了。
因为阿里云的MQTT在网上没有多少文档,所以特地写了下总结,希望对初次接入MQTT的同行有帮助。
发布者:全栈程序员-用户IM,转载请注明出处:https://javaforall.cn/234583.html原文链接:https://javaforall.cn
【正版授权,激活自己账号】: Jetbrains全家桶Ide使用,1年售后保障,每天仅需1毛
【官方授权 正版激活】: 官方授权 正版激活 支持Jetbrains家族下所有IDE 使用个人JB账号...