大家好,又见面了,我是你们的朋友全栈君。如果您正在找激活码,请点击查看最新教程,关注关注公众号 “全栈程序员社区” 获取激活教程,可能之前旧版本教程已经失效.最新Idea2022.1教程亲测有效,一键激活。
Jetbrains全家桶1年46,售后保障稳定
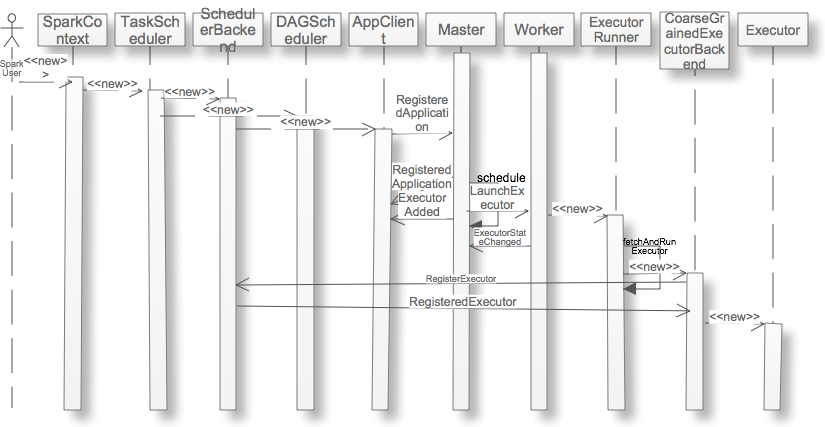
当用户应用new SparkContext后,集群就会为在Worker上分配executor,那么这个过程是什么呢?本文以Standalone的Cluster为例,详细的阐述这个过程。序列图如下:

1. SparkContext创建TaskScheduler和DAG Scheduler
SparkContext是用户应用和Spark集群的交换的主要接口,用户应用一般首先要创建它。如果你使用SparkShell,你不必自己显式去创建它,系统会自动创建一个名字为sc的SparkContext的实例。创建SparkContext的实例,主要的工作除了设置一些conf,比如executor使用到的memory的大小。如果系统的配置文件有,那么就读取该配置。否则则读取环境变量。如果都没有设置,那么取默认值为512M。当然了这个数值还是很保守的,特别是在内存已经那么昂贵的今天。
private[spark] val executorMemory = conf.getOption("spark.executor.memory")
    .orElse(Option(System.getenv("SPARK_EXECUTOR_MEMORY")))
    .orElse(Option(System.getenv("SPARK_MEM")).map(warnSparkMem))
    .map(Utils.memoryStringToMb)
    .getOrElse(512)
Jetbrains全家桶1年46,售后保障稳定
除了加载这些集群的参数,它
完成了TaskScheduler和DAGScheduler的创建:
  // Create and start the scheduler
  private[spark] var taskScheduler = SparkContext.createTaskScheduler(this, master)
  private val heartbeatReceiver = env.actorSystem.actorOf(
    Props(new HeartbeatReceiver(taskScheduler)), "HeartbeatReceiver")
  @volatile private[spark] var dagScheduler: DAGScheduler = _
  try {
    dagScheduler = new DAGScheduler(this)
  } catch {
    case e: Exception => throw
      new SparkException("DAGScheduler cannot be initialized due to %s".format(e.getMessage))
  }

  // start TaskScheduler after taskScheduler sets DAGScheduler reference in DAGScheduler's
  // constructor
  taskScheduler.start()
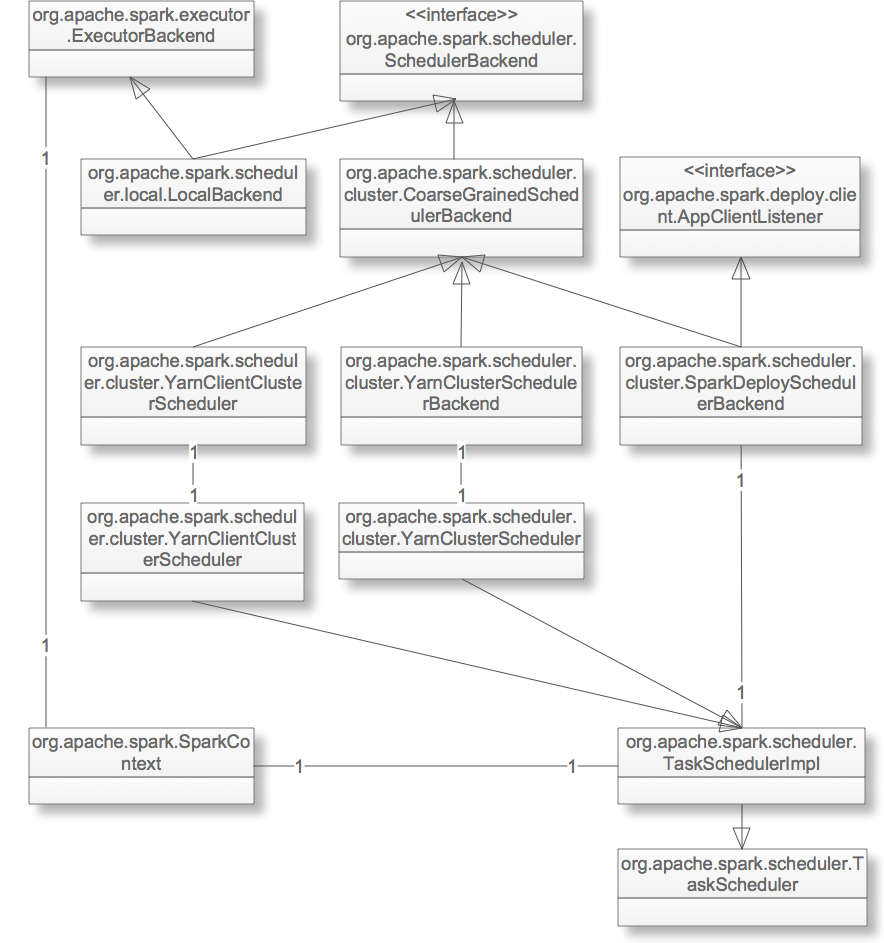
TaskScheduler是通过不同的SchedulerBackend来调度和管理任务。它包含资源分配和任务调度。它实现了FIFO调度和FAIR调度,基于此来决定不同jobs之间的调度顺序。并且管理任务,包括任务的提交和终止,为饥饿任务启动备份任务。
不同的Cluster,包括local模式,都是通过不同的SchedulerBackend的实现其不同的功能。这个模块的类图如下:
2. TaskScheduler通过SchedulerBackend创建AppClient
private[spark] class SparkDeploySchedulerBackend(
    scheduler: TaskSchedulerImpl,
    sc: SparkContext,
    masters: Array[String])
  extends CoarseGrainedSchedulerBackend(scheduler, sc.env.actorSystem)
  with AppClientListener
  with Logging {

  var client: AppClient = null  //注:Application与Master的接口

  val maxCores = conf.getOption("spark.cores.max").map(_.toInt) //注:获得每个executor最多的CPU core数目
  override def start() {
    super.start()

    // The endpoint for executors to talk to us
    val driverUrl = "akka.tcp://%s@%s:%s/user/%s".format(
      SparkEnv.driverActorSystemName,
      conf.get("spark.driver.host"),
      conf.get("spark.driver.port"),
      CoarseGrainedSchedulerBackend.ACTOR_NAME)
    //注:现在executor还没有申请,因此关于executor的所有信息都是未知的。
    //这些参数将会在org.apache.spark.deploy.worker.ExecutorRunner启动ExecutorBackend的时候替换这些参数
    val args = Seq(driverUrl, "{

   {EXECUTOR_ID}}", "{

   {HOSTNAME}}", "{

   {CORES}}", "{

   {WORKER_URL}}")
    //注:设置executor运行时需要的环境变量
    val extraJavaOpts = sc.conf.getOption("spark.executor.extraJavaOptions")
      .map(Utils.splitCommandString).getOrElse(Seq.empty)
    val classPathEntries = sc.conf.getOption("spark.executor.extraClassPath").toSeq.flatMap { cp =>
      cp.split(java.io.File.pathSeparator)
    }
    val libraryPathEntries =
      sc.conf.getOption("spark.executor.extraLibraryPath").toSeq.flatMap { cp =>
        cp.split(java.io.File.pathSeparator)
      }

    // Start executors with a few necessary configs for registering with the scheduler
    val sparkJavaOpts = Utils.sparkJavaOpts(conf, SparkConf.isExecutorStartupConf)
    val javaOpts = sparkJavaOpts ++ extraJavaOpts
    //注:在Worker上通过org.apache.spark.deploy.worker.ExecutorRunner启动
    // org.apache.spark.executor.CoarseGrainedExecutorBackend,这里准备启动它需要的参数
    val command = Command("org.apache.spark.executor.CoarseGrainedExecutorBackend",
      args, sc.executorEnvs, classPathEntries, libraryPathEntries, javaOpts)
    //注:org.apache.spark.deploy.ApplicationDescription包含了所有注册这个Application的所有信息。
    val appDesc = new ApplicationDescription(sc.appName, maxCores, sc.executorMemory, command,
      sc.ui.appUIAddress, sc.eventLogger.map(_.logDir))

    client = new AppClient(sc.env.actorSystem, masters, appDesc, this, conf)
    client.start()
    //注:在Master返回注册Application成功的消息后,AppClient会回调本class的connected,完成了Application的注册。
    waitForRegistration()
}- 向Master成功注册Application,即成功链接到集群;
- 断开连接,如果当前SparkDeploySchedulerBackend::stop == false,那么可能原来的Master实效了,待新的Master ready后,会重新恢复原来的连接;
- Application由于不可恢复的错误停止了,这个时候需要重新提交出错的TaskSet;
- 添加一个Executor,在这里的实现仅仅是打印了log,并没有额外的逻辑;
- 删除一个Executor,可能有两个原因,一个是Executor退出了,这里可以得到Executor的退出码,或者由于Worker的退出导致了运行其上的Executor退出,这两种情况需要不同的逻辑来处理。
private[spark] trait AppClientListener {
  def connected(appId: String): Unit

  /** Disconnection may be a temporary state, as we fail over to a new Master. */
  def disconnected(): Unit

  /** An application death is an unrecoverable failure condition. */
  def dead(reason: String): Unit

  def executorAdded(fullId: String, workerId: String, hostPort: String, cores: Int, memory: Int)

  def executorRemoved(fullId: String, message: String, exitStatus: Option[Int]): Unit
}3. AppClient向Master提交Application
AppClient是Application和Master交互的接口。它的包含一个类型为org.apache.spark.deploy.client.AppClient.ClientActor的成员变量actor。它负责了所有的与Master的交互。actor首先向Master注册Application。如果超过20s没有接收到注册成功的消息,那么会重新注册;如果重试超过3次仍未成功,那么本次提交就以失败结束了。
    def tryRegisterAllMasters() {
      for (masterUrl <- masterUrls) {
        logInfo("Connecting to master " + masterUrl + "...")
        val actor = context.actorSelection(Master.toAkkaUrl(masterUrl))
        actor ! RegisterApplication(appDescription) // 向Master注册
      }
    }

    def registerWithMaster() {
      tryRegisterAllMasters()
      import context.dispatcher
      var retries = 0
      registrationRetryTimer = Some { // 如果注册20s内未收到成功的消息,那么再次重复注册
        context.system.scheduler.schedule(REGISTRATION_TIMEOUT, REGISTRATION_TIMEOUT) {
          Utils.tryOrExit {
            retries += 1
            if (registered) { // 注册成功,那么取消所有的重试
              registrationRetryTimer.foreach(_.cancel())
            } else if (retries >= REGISTRATION_RETRIES) { // 重试超过指定次数(3次),则认为当前Cluster不可用,退出
              markDead("All masters are unresponsive! Giving up.")
            } else { // 进行新一轮的重试
              tryRegisterAllMasters()
            }
          }
        }
      }
    }
主要的消息如下:
- RegisteredApplication(appId_, masterUrl) => //注:来自Master的注册Application成功的消息
- ApplicationRemoved(message) => //注:来自Master的删除Application的消息。Application执行成功或者失败最终都会被删除。
- ExecutorAdded(id: Int, workerId: String, hostPort: String, cores: Int, memory: Int) => //注:来自Master
- ExecutorUpdated(id, state, message, exitStatus) => //注:来自Master的Executor状态更新的消息,如果是Executor是完成的状态,那么回调SchedulerBackend的executorRemoved的函数。
- MasterChanged(masterUrl, masterWebUiUrl) => //注:来自新竞选成功的Master。Master可以选择ZK实现HA,并且使用ZK来持久化集群的元数据信息。因此在Master变成leader后,会恢复持久化的Application,Driver和Worker的信息。
- StopAppClient => //注:来自AppClient::stop()
4. Master根据AppClient的提交选择Worker
Master接收到AppClient的registerApplication的请求后,处理逻辑如下:
    case RegisterApplication(description) => {
      if (state == RecoveryState.STANDBY) {
        // ignore, don't send response //注:AppClient有超时机制(20s),超时会重试
      } else {
        logInfo("Registering app " + description.name)
        val app = createApplication(description, sender)
        // app is ApplicationInfo(now, newApplicationId(date), desc, date, driver, defaultCores), driver就是AppClient的actor
        //保存到master维护的成员变量中,比如
        /* apps += app;
           idToApp(app.id) = app
           actorToApp(app.driver) = app
           addressToApp(appAddress) = app
           waitingApps += app */
        registerApplication(app)

        logInfo("Registered app " + description.name + " with ID " + app.id)
        persistenceEngine.addApplication(app) //持久化app的元数据信息,可以选择持久化到ZooKeeper,本地文件系统,或者不持久化
        sender ! RegisteredApplication(app.id, masterUrl)
        schedule() //为处于待分配资源的Application分配资源。在每次有新的Application加入或者新的资源加入时都会调用schedule进行调度
      }
    }
schedule() 为处于待分配资源的Application分配资源。在每次有新的Application加入或者新的资源加入时都会调用schedule进行调度。为Application分配资源选择worker(executor),现在有两种策略:
- 尽量的打散,即一个Application尽可能多的分配到不同的节点。这个可以通过设置spark.deploy.spreadOut来实现。默认值为true,即尽量的打散。
- 尽量的集中,即一个Application尽量分配到尽可能少的节点。
对于同一个Application,它在一个worker上只能拥有一个executor;当然了,这个executor可能拥有多于1个core。对于策略1,任务的部署会慢于策略2,但是GC的时间会更快。
其主要逻辑如下:
if (spreadOutApps) { //尽量的打散负载,如有可能,每个executor分配一个core // Try to spread out each app among all the nodes, until it has all its cores for (app <- waitingApps if app.coresLeft > 0) { //使用FIFO的方式为等待的app分配资源 // 可用的worker的标准:State是Alive,其上并没有该Application的executor,可用内存满足要求。 // 在可用的worker中,优先选择可用core数多的。 val usableWorkers = workers.toArray.filter(_.state == WorkerState.ALIVE) .filter(canUse(app, _)).sortBy(_.coresFree).reverse val numUsable = usableWorkers.length val assigned = new Array[Int](numUsable) // Number of cores to give on each node 保存在该节点上预分配的core数 var toAssign = math.min(app.coresLeft, usableWorkers.map(_.coresFree).sum) var pos = 0 while (toAssign > 0) { if (usableWorkers(pos).coresFree - assigned(pos) > 0) { toAssign -= 1 assigned(pos) += 1 } pos = (pos + 1) % numUsable } // Now that we've decided how many cores to give on each node, let's actually give them for (pos <- 0 until numUsable) { if (assigned(pos) > 0) { val exec = app.addExecutor(usableWorkers(pos), assigned(pos)) launchExecutor(usableWorkers(pos), exec) app.state = ApplicationState.RUNNING } } } } else {//尽可能多的利用worker的core // Pack each app into as few nodes as possible until we've assigned all its cores for (worker <- workers if worker.coresFree > 0 && worker.state == WorkerState.ALIVE) { for (app <- waitingApps if app.coresLeft > 0) { if (canUse(app, worker)) { val coresToUse = math.min(worker.coresFree, app.coresLeft) if (coresToUse > 0) { val exec = app.addExecutor(worker, coresToUse) launchExecutor(worker, exec) app.state = ApplicationState.RUNNING } } } } }在选择了worker和确定了worker上得executor需要的CPU core数后,Master会调用 launchExecutor(worker: WorkerInfo, exec: ExecutorInfo)向Worker发送请求,向AppClient发送executor已经添加的消息。同时会更新master保存的worker的信息,包括增加executor,减少可用的CPU core数和memory数。Master不会等到真正在worker上成功启动executor后再更新worker的信息。如果worker启动executor失败,那么它会发送FAILED的消息给Master,Master收到该消息时再次更新worker的信息即可。这样是简化了逻辑。
  def launchExecutor(worker: WorkerInfo, exec: ExecutorInfo) {
    logInfo("Launching executor " + exec.fullId + " on worker " + worker.id)
    worker.addExecutor(exec)//更新worker的信息,可用core数和memory数减去本次分配的executor占用的
    // 向Worker发送启动executor的请求
    worker.actor ! LaunchExecutor(masterUrl,
      exec.application.id, exec.id, exec.application.desc, exec.cores, exec.memory)
    // 向AppClient发送executor已经添加的消息ß
    exec.application.driver ! ExecutorAdded(
      exec.id, worker.id, worker.hostPort, exec.cores, exec.memory)
  }
小结:现在的分配方式还是比较粗糙的。比如并没有考虑节点的当前总体负载。可能会导致节点上executor的分配是比较均匀的,单纯静态的从executor分配到得CPU core数和内存数来看,负载是比较均衡的。但是从实际情况来看,可能有的executor的资源消耗比较大,因此会导致集群负载不均衡。这个需要从生产环境的数据得到反馈来进一步的修正和细化分配策略,以达到更好的资源利用率。
5. Worker根据Master的资源分配结果来创建Executor
Worker接收到来自Master的LaunchExecutor的消息后,会创建org.apache.spark.deploy.worker.ExecutorRunner。Worker本身会记录本身资源的使用情况,包括已经使用的CPU core数,memory数等;但是这个统计只是为了web UI的展现。Master本身会记录Worker的资源使用情况,无需Worker自身汇报。Worker与Master之间的心跳的目的仅仅是为了报活,不会携带其他的信息。
ExecutorRunner会将在org.apache.spark.scheduler.cluster.SparkDeploySchedulerBackend中准备好的org.apache.spark.deploy.ApplicationDescription以进程的形式启动起来。当时以下几个参数还是未知的:
val args = Seq(driverUrl, “{
{EXECUTOR_ID}}”, “{
{HOSTNAME}}”, “{
{CORES}}”, “{
{WORKER_URL}}”)。ExecutorRunner需要将他们替换成已经分配好的实际值:
 /** Replace variables such as {

   {EXECUTOR_ID}} and {

   {CORES}} in a command argument passed to us */
  def substituteVariables(argument: String): String = argument match {
    case "{

   {WORKER_URL}}" => workerUrl
    case "{

   {EXECUTOR_ID}}" => execId.toString
    case "{

   {HOSTNAME}}" => host
    case "{

   {CORES}}" => cores.toString
    case other => other
  }
接下来就启动org.apache.spark.deploy.ApplicationDescription中携带的org.apache.spark.executor.CoarseGrainedExecutorBackend:
def fetchAndRunExecutor() {
    try {
      // Create the executor's working directory
      val executorDir = new File(workDir, appId + "/" + execId)
      if (!executorDir.mkdirs()) {
        throw new IOException("Failed to create directory " + executorDir)
      }

      // Launch the process
      val command = getCommandSeq
      logInfo("Launch command: " + command.mkString("\"", "\" \"", "\""))
      val builder = new ProcessBuilder(command: _*).directory(executorDir)
      val env = builder.environment()
      for ((key, value) <- appDesc.command.environment) {
        env.put(key, value)
      }
      // In case we are running this from within the Spark Shell, avoid creating a "scala"
      // parent process for the executor command
      env.put("SPARK_LAUNCH_WITH_SCALA", "0")
      process = builder.start()
CoarseGrainedExecutorBackend启动后,会首先通过传入的driverUrl这个参数向在org.apache.spark.scheduler.cluster.CoarseGrainedSchedulerBackend::DriverActor发送RegisterExecutor(executorId, hostPort, cores),DriverActor会回复RegisteredExecutor,此时CoarseGrainedExecutorBackend会创建一个org.apache.spark.executor.Executor。至此,Executor创建完毕。Executor在Mesos, YARN, and the standalone scheduler中,都是相同的。不同的只是资源的分配管理方式。
发布者:全栈程序员-用户IM,转载请注明出处:https://javaforall.cn/223788.html原文链接:https://javaforall.cn
【正版授权,激活自己账号】: Jetbrains全家桶Ide使用,1年售后保障,每天仅需1毛
【官方授权 正版激活】: 官方授权 正版激活 支持Jetbrains家族下所有IDE 使用个人JB账号...
