大家好,又见面了,我是你们的朋友全栈君。如果您正在找激活码,请点击查看最新教程,关注关注公众号 “全栈程序员社区” 获取激活教程,可能之前旧版本教程已经失效.最新Idea2022.1教程亲测有效,一键激活。
Jetbrains全系列IDE使用 1年只要46元 售后保障 童叟无欺
PreferenceFragment
在Android3.0之前,设置界面使用PreferenceActivity,在Android3.0之后,官方推荐使用PreferenceFragment,对应于碎片化技术。
使用
新建Fragment
新建GeneralPreferenceFragment 继承PreferenceFragment,加载选项配置xml文件。
public static class GeneralPreferenceFragment extends PreferenceFragment {

        @Override
        public void onCreate(Bundle savedInstanceState) {

            super.onCreate(savedInstanceState);
            addPreferencesFromResource(R.xml.pref_general);
            setHasOptionsMenu(true);

            // Bind the summaries of EditText/List/Dialog/Ringtone preferences
            // to their values. When their values change, their summaries are
            // updated to reflect the new value, per the Android Design
            // guidelines.
            bindPreferenceSummaryToValue(findPreference("example_text"));
            bindPreferenceSummaryToValue(findPreference("example_list"));
        }

        @Override
        public boolean onOptionsItemSelected(MenuItem item) {

            int id = item.getItemId();
            if (id == android.R.id.home) {

                startActivity(new Intent(getActivity(), SettingsActivity.class));
                return true;
            }
            return super.onOptionsItemSelected(item);
        }
    }
新建xml文件
在res文件夹目录下新建xml文件夹,在xml文件夹新建pref_general.xml
<PreferenceScreen xmlns:android="http://schemas.android.com/apk/res/android">

    <SwitchPreference android:defaultValue="true" android:key="example_switch" android:summary="@string/pref_description_social_recommendations" android:title="@string/pref_title_social_recommendations" />

    <!-- NOTE: EditTextPreference accepts EditText attributes. -->
    <!-- NOTE: EditTextPreference's summary should be set to its value by the activity code. -->
    <EditTextPreference android:capitalize="words" android:defaultValue="@string/pref_default_display_name" android:inputType="textCapWords" android:key="example_text" android:maxLines="1" android:selectAllOnFocus="true" android:singleLine="true" android:title="@string/pref_title_display_name" />

    <!-- NOTE: Hide buttons to simplify the UI. Users can touch outside the dialog to dismiss it. -->
    <!-- NOTE: ListPreference's summary should be set to its value by the activity code. -->
    <ListPreference android:defaultValue="-1" android:entries="@array/pref_example_list_titles" android:entryValues="@array/pref_example_list_values" android:key="example_list" android:negativeButtonText="@null" android:positiveButtonText="@null" android:title="@string/pref_title_add_friends_to_messages" />

</PreferenceScreen>
- PreferenceScreen:根标签。
- SwitchPreference:开关标签
- EditTextPreference:编辑标签
- ListPreference:集合标签,多选一。
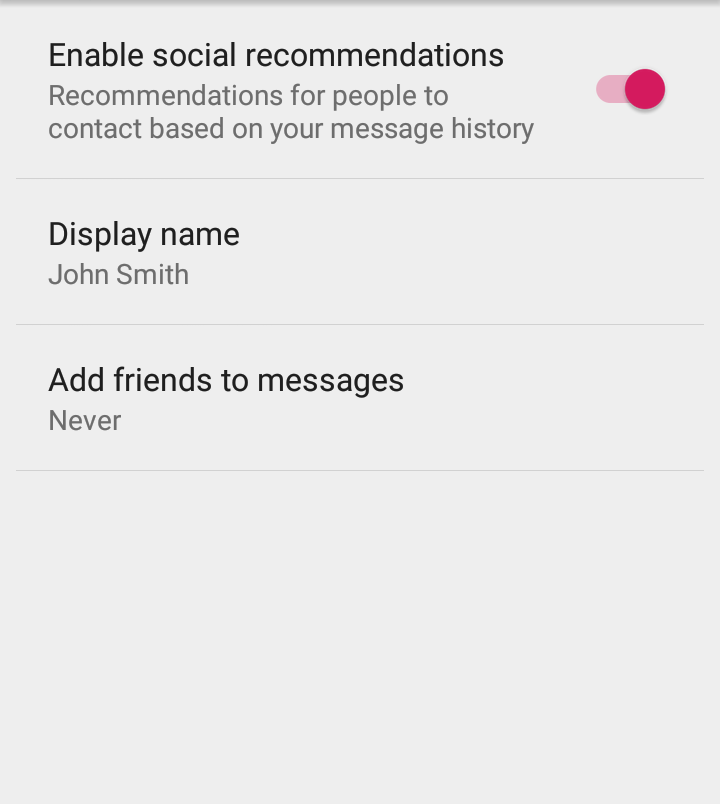
效果图

分类
使用PreferenceCategory标签进行分类。
<PreferenceScreen xmlns:android="http://schemas.android.com/apk/res/android">
<!-- NOTE: EditTextPreference accepts EditText attributes. -->
<!-- NOTE: EditTextPreference's summary should be set to its value by the activity code. -->
<PreferenceCategory android:key="@string/pref_header_mqtt" android:summary="@string/pref_header_mqtt" android:title="@string/pref_header_mqtt">
<EditTextPreference android:capitalize="characters" android:defaultValue="@string/pref_defult_mqtt_ip" android:inputType="textCapWords" android:key="@string/pref_key_mqtt_ip" android:maxLines="1" android:selectAllOnFocus="true" android:singleLine="true" android:title="@string/pref_title_mqtt_ip" android:summary="@string/pref_defult_mqtt_ip" />
<EditTextPreference android:capitalize="characters" android:defaultValue="@string/pref_defult_mqtt_port" android:inputType="textCapWords" android:key="@string/pref_key_mqtt_port" android:maxLines="1" android:selectAllOnFocus="true" android:singleLine="true" android:title="@string/pref_title_mqtt_port" android:summary="@string/pref_defult_mqtt_port" />
<EditTextPreference android:capitalize="characters" android:defaultValue="@string/pref_defult_mqtt_topic" android:inputType="textCapWords" android:key="@string/pref_key_mqtt_topic" android:maxLines="1" android:selectAllOnFocus="true" android:singleLine="true" android:title="@string/pref_title_mqtt_topic" android:summary="@string/pref_defult_mqtt_topic" />
<EditTextPreference android:capitalize="characters" android:defaultValue="@string/pref_defult_mqtt_user" android:inputType="textCapWords" android:key="@string/pref_key_mqtt_user" android:maxLines="1" android:selectAllOnFocus="true" android:singleLine="true" android:title="@string/pref_title_mqtt_user" android:summary="@string/pref_defult_mqtt_user" />
<EditTextPreference android:capitalize="characters" android:defaultValue="@string/pref_defult_mqtt_pswd" android:inputType="textCapWords" android:key="@string/pref_key_mqtt_pswd" android:maxLines="1" android:selectAllOnFocus="true" android:singleLine="true" android:title="@string/pref_title_mqtt_pswd" android:summary="@string/pref_defult_mqtt_pswd" />
</PreferenceCategory>
</PreferenceScreen>
使用Header跳转页面
使用preference-headers进行实现,在res/xml文件夹新建pref_headers.xml
<preference-headers xmlns:android="http://schemas.android.com/apk/res/android">
<!-- These settings headers are only used on tablets. -->
<header android:fragment="com.pax.preference.SettingsActivity$GeneralPreferenceFragment" android:icon="@drawable/ic_info_black_24dp" android:title="@string/pref_header_general" />
<header android:fragment="com.pax.preference.SettingsActivity$NotificationPreferenceFragment" android:icon="@drawable/ic_notifications_black_24dp" android:title="@string/pref_header_notifications" />
<header android:fragment="com.pax.preference.SettingsActivity$DataSyncPreferenceFragment" android:icon="@drawable/ic_sync_black_24dp" android:title="@string/pref_header_data_sync" />
</preference-headers>
在Activity中设置xml
@Override
@TargetApi(Build.VERSION_CODES.HONEYCOMB)
public void onBuildHeaders(List<Header> target) {

loadHeadersFromResource(R.xml.pref_headers, target);
}
进行平板适配,这种方式可以适配平板显示。
private static boolean isXLargeTablet(Context context) {

return (context.getResources().getConfiguration().screenLayout
& Configuration.SCREENLAYOUT_SIZE_MASK) >= Configuration.SCREENLAYOUT_SIZE_XLARGE;
}
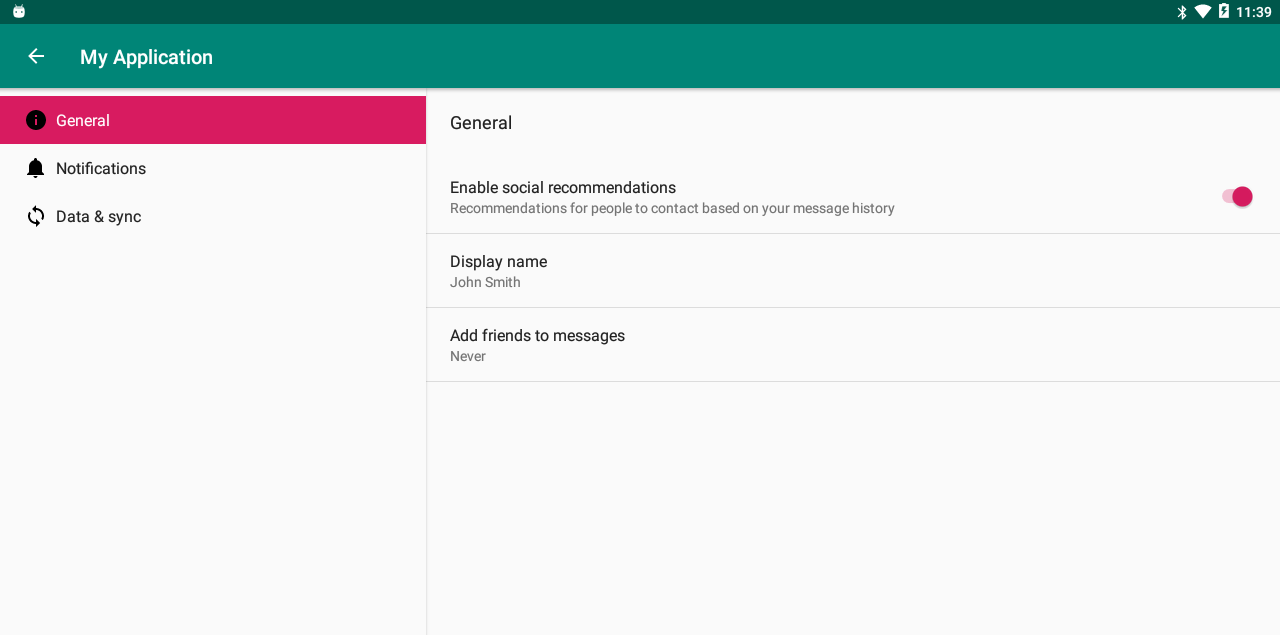
平板显示效果

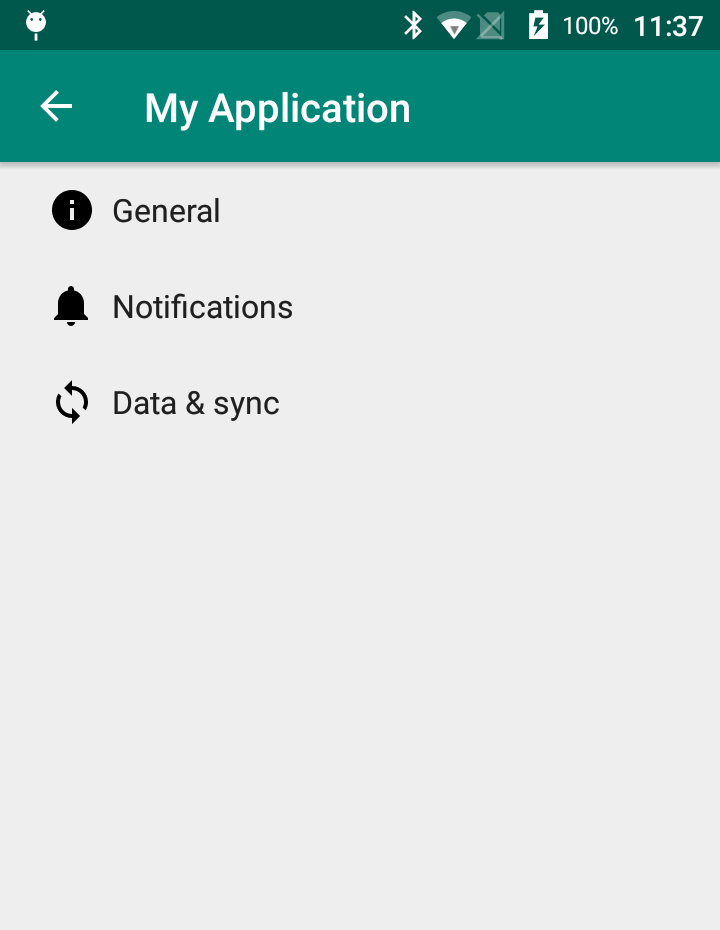
手机显示效果
致谢
感谢观看,欢迎评论和点赞!
版权声明:本文内容由互联网用户自发贡献,该文观点仅代表作者本人。本站仅提供信息存储空间服务,不拥有所有权,不承担相关法律责任。如发现本站有涉嫌侵权/违法违规的内容, 请发送邮件至 举报,一经查实,本站将立刻删除。
发布者:全栈程序员-用户IM,转载请注明出处:https://javaforall.cn/196320.html原文链接:https://javaforall.cn
【正版授权,激活自己账号】: Jetbrains全家桶Ide使用,1年售后保障,每天仅需1毛
【官方授权 正版激活】: 官方授权 正版激活 支持Jetbrains家族下所有IDE 使用个人JB账号...