大家好,又见面了,我是你们的朋友全栈君。如果您正在找激活码,请点击查看最新教程,关注关注公众号 “全栈程序员社区” 获取激活教程,可能之前旧版本教程已经失效.最新Idea2022.1教程亲测有效,一键激活。
Jetbrains全系列IDE使用 1年只要46元 售后保障 童叟无欺
移植linux之petalinux
之前一篇博文中,提到了一种通用的传统移植方式,将linux移植到ZYNQ中的ARM芯片中。本文将针对xilinx的专用开发环境petalinux,进行入门和开发,本文petalinux的运行环境依然在虚拟机的linux系统里,即将体验petalinux相对于传统方式的便捷和强大之处
一、安装petalinux
-
-1.安装虚拟机,在虚拟机里安装linux系统(ubuntu16)
- 虚拟机里磁盘尽量留大点,建议60G,我的是80G
sudo passwd命令,设置超级用户su时的密码- 建议安装VMware Tools
- 开发工具:vivado2017.1(Windows下) + petalinux 2017.1(Linux下)
-
0.更新apt-get(可选,加速用,同传统方式移植那篇文章的第二节)
-
1.安装petalinux的依赖环境
安装petalinux的必要依赖环境,直接复制粘贴下面的命令行到shell中,系统自动下载安装下面的工具:sudo apt-get install build-essential vim tofrodos \
iproute2 gawk gcc git make net-tools zlib1g-dev \
libssl-dev flex bison libselinux1 libncurses5-dev \
tftpd lib32z1 lib32ncurses5 libbz2-1.0:i386 \
lib32stdc++6 xvfb chrpath socat autoconf libtool -
2.修改/bin/sh
shell中输入:dpkg-reconfigure dash,在出现的界面中选择‘否’ -
3.下载petalinux
去官网下载petalinux-v2017.1-final-installer.run(文件8个G,上传不了) -
4.安装petalinux
- 在一个用户目录下(我的是:
home/hlf/mnt),用鼠标右键,新建一个文件夹petalinux - 在普通用户下(非root模式下,即命令行是:
hlf@hlf-virtual-machine:~/mnt$这样的),shell中输入命令:./petalinux-v2017.1-final-installer.run ./petalinux - 经过漫长的等待,安装到一半的时候,提醒查看许可,按回车查看,按q退出,退出后输入y,回车,如此重复三次,才开始正式安装(这个步骤要很小心,如果没有输入y,就回车,就要重新了)
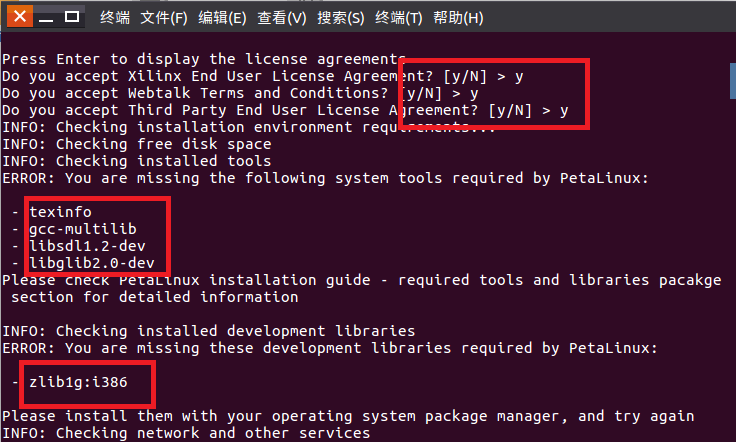
- 安装的时候提示,提示有几个库没装,不过没关系,等petalinux安装完之后,再补也不迟,静候一直到安装完毕

- 在一个用户目录下(我的是:
-
5.补一些库的安装
- 懒人直接只看这一点即可(可以跳过下面两点),把下面命令粘贴到shell中回车即可:
apt-get install texinfo gcc-multilib libsdl1.2-dev libglib2.0-dev zlib1g:i386 libncurses5 libncurses5-dev libc6:i386 libstdc++6:i386 zlib1g:i386 libssl-dev tftpd tftp openbsd-inetd
-
先安装刚刚安装时,提示缺少的库:
apt-get install texinfo gcc-multilib libsdl1.2-dev libglib2.0-dev zlib1g:i386
-
安装一些之后需要的库,全都安装了避免麻烦:
- 在运行petalinux-config -c kernel会出现错误,需安装:
apt-get install libncurses5 libncurses5-dev - 编译时可能会出现错误arm-xilinx-linux-gnueabi-gcc: Command not found,需安装:
apt-get install libc6:i386 libstdc++6:i386 zlib1g:i386 - 提示缺少zlib和openssl,需安装:
apt-get install libssl-dev - 出现警告(警告而已,强迫症可以处理一下),提示No tftp server found – please refer to “PetaLinux SDK Installation Guide” for its impact and solution,需安装:
apt-get install tftpd tftp openbsd-inetd,安装完成后,编辑一下/etc/inetd.conf里的东西:
直接shell中输入gedit /etc/inetd.conf,打开了文件,并在文件最后一行增加:
tftp dgram udp wait nobody /usr/sbin/tcpd /usr/sbin/in.tftpd /tftproot然后保存并退出 ,之后再进行一些简单操作:
mkdir /tftproot
chmod 777 /tftproot
/etc/init.d/openbsd-inetd restart
输入netstat -an | more | grep udp命令,以确定成功(打印出udp 0 0 0.0.0.0:69 0.0.0.0:*)
- 在运行petalinux-config -c kernel会出现错误,需安装:
- 懒人直接只看这一点即可(可以跳过下面两点),把下面命令粘贴到shell中回车即可:
-
6.验证是否安装成功
source /home/hlf/mnt/petalinux/settings.sh
成功定位不报错的话,基本是成功了的
echo $PETALINUX
命令行会打印出安装路径/home/hlf/mnt/petalinux
二、搭建硬件环境
-
1.新建工程,选择对应的芯片型号,并新建一个 BD 原理图文件(命名为system),然后添加一个ZYNQ Processing system的IP核,并设置好与硬件相符合的PS和PL时钟以及DDR型号
这个步骤同传统方式移植那篇文章 -
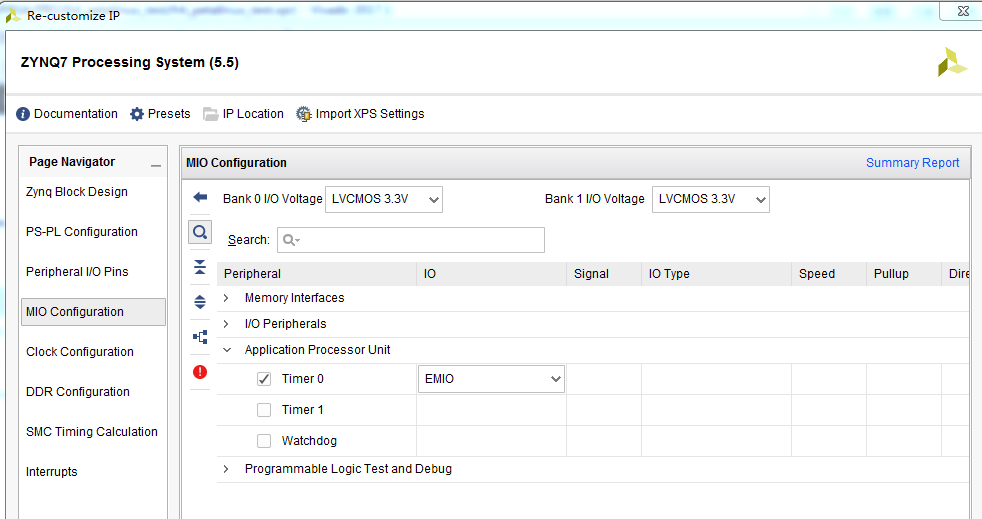
2.为了使PetaLinux正常的运行,需要分配一些硬件外设资源
1.TTC模块(必须) ,如果有多个,Linux内核将会使用第一个。
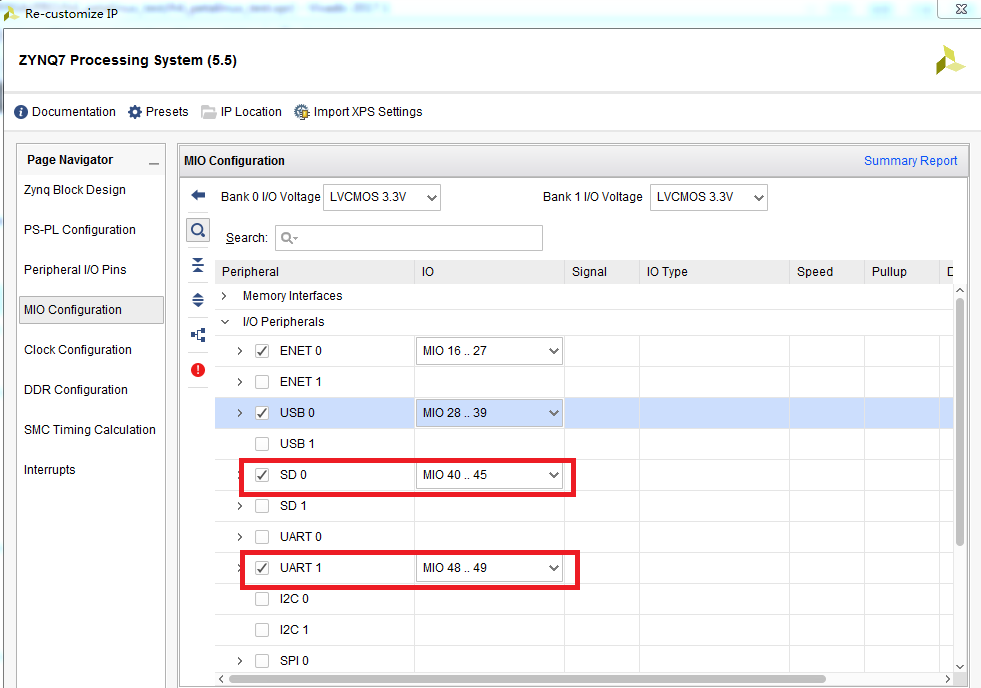
2.外部32MB存储空间(必须)
3.UART模块(必须),控制台打印信息用,若用IP核的话,需中断信号连到PS
4.非易失存储器(可选),如:QSPI Flash,SD/MMC
5.以太网接口(可选),若用IP核或外部PHY的话,需中断信号连到PS本文硬件上,将在ZYNQ Processing system里启用TTC、UART、SD以及之后可能用到的USB、Ethernet(网口0在bank1,bank1电压要选1.8V,否则报错)
预留好上述模块就可以了,
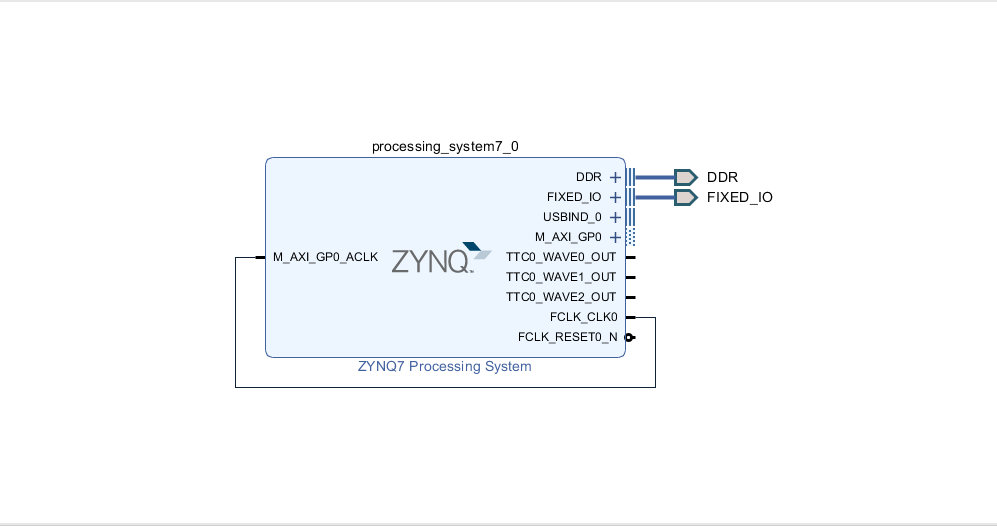
然后右键单击 Block 文件,文件选择 Generate the Output Products,然后右键单击 Block 文件,选择 Create a HDL wrapper,根据 Block 文件内容产生一个 HDL 的顶层文件,并选择让 vivado 自动完成经Vivado综合,实现后,在Vivado中导出硬件,输出PetaLinux所需要的硬件描述文件
输出的文件就在“/(工程文件夹)/(工程名).sdk”这个文件夹下,这个文件夹下的system_wrapper.hdf待用
三、搭建petalinux工程
-
0.定位目录
先在shell中找一个准备存放工程的地方,(我的是home/hlf/PRO),命令行cd home/hlf/PRO -
1.定位编译链
根据安装petalinux的路径:
source /home/hlf/mnt/petalinux/settings.sh -
2.创建petalinux工程
将在PRO目录下面,创建一个工程:
petalinux-create --type project --template zynq --name h1_petalinux_test
h1_petalinux_test是工程名,该命令会自动在PRO文件夹里创建h1_petalinux_test文件夹 -
3.引用刚才输出的硬件描述文件
把之前导出的硬件描述文件system_wrapper.hdf拷贝到虚拟机中的h1_petalinux_test工程文件夹下,然后:
petalinux-config --get-hw-description=/home/hlf/PRO/h1_petalinux_test
会进入一个配置界面,在里面我们可以配置一些系统参数,主要的配置包括:启动方式,启动存储器分区表,启动文件名称等等,本文暂不对其修改(默认是从SD卡中启动),然后等待其配置(时间较长) -
4.获取文件夹权限
在上一步完成后,输入命令sudo chmod -R 777 /home/hlf获取文件夹权限(工程文件夹和petalinux的安装文件夹),否则编译的时候,会发生错误 -
目前为止,在shell中的命令既可以以超级用户su的身份运行也可以以普通用户的方式运行(建议全部都用普通用户的方式,免得切换),但是等下编译u-boot和kernel以及rootfs的时候,必须以普通用户的身份运行命令行,否则会报错的
-
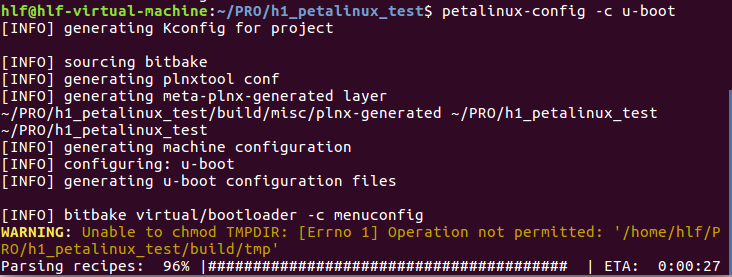
5.编译u-boot
注意:到此处的时候,不能再用超级用户了,要切换到普通用户下,之后的所有操作都在普通用户下
普通用户的shell中输入petalinux-config -c u-boot(依然要事先输入source /home/hlf/mnt/petalinux/settings.sh命令),然后等待GUI出来,这里暂时不改动啥,直接save(save为u-boot.config,名字随便取但不要留空),然后继续等(新建工程要等的时间还是比较长的,后来就会好的)
-
6.编译kernel
命令petalinux-config -c kernel,操作同上(save为kernel.config) -
7.编译rootfs
命令petalinux-config -c rootfs,操作同上(save为默认即可) -
8.设备树配置
若要修改,直接在工程文件夹下,Ctr+F搜索.dts就可以找到相关文件,做出相应修改”
暂时默认吧,不修改,按照它自动生成的设备树 -
9.编译工程
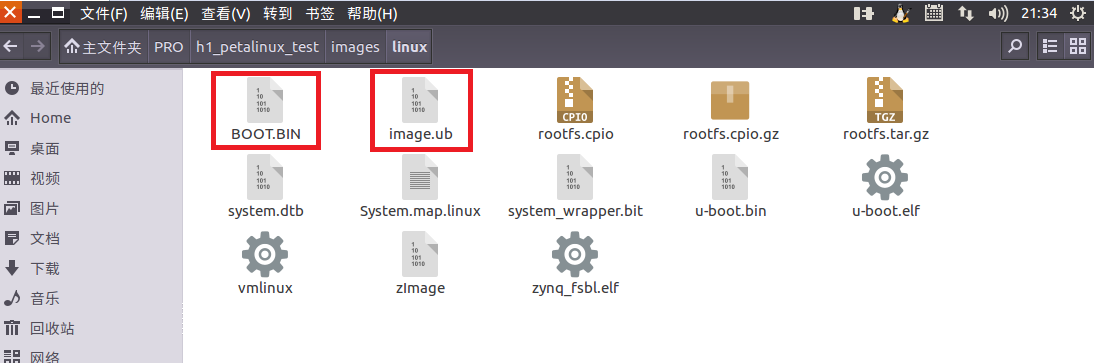
输入命令petalinux-build,等待即可,最后生成的文件在 image/linux下 -
10.生成BOOT.BIN
把shell定位到image/linux目录下,执行命令
petalinux-package --boot --format BIN --fsbl zynq_fsbl.elf --fpga system_wrapper.bit --u-boot,在文件夹下就可以发现,多了一个BOOT.BIN -
11.将如下文件拷入SD卡
-
12.开机
将SD卡,插回,开机,串口打印信息为:
U-Boot 2017.01 (Dec 06 2017 - 20:05:03 +0800)

Board: Xilinx Zynq
DRAM:  ECC disabled 1 GiB
MMC:   sdhci@e0100000: 0 (SD)
Using default environment

## Error: flags type check failure for "serverip" <= "AUTO" (type: i)
himport_r: can't insert "serverip=AUTO" into hash table
In:    serial
Out:   serial
Err:   serial
Net:   ZYNQ GEM: e000b000, phyaddr ffffffff, interface rgmii-id
PHY is not detected
GEM PHY init failed
No ethernet found.
U-BOOT for h1_petalinux_test

ZYNQ GEM: e000b000, phyaddr ffffffff, interface rgmii-id
mdio_register: non unique device name 'eth0'
ZYNQ GEM: e000b000, phyaddr ffffffff, interface rgmii-id
mdio_register: non unique device name 'eth0'
ZYNQ GEM: e000b000, phyaddr ffffffff, interface rgmii-id
mdio_register: non unique device name 'eth0'
ZYNQ GEM: e000b000, phyaddr ffffffff, interface rgmii-id
mdio_register: non unique device name 'eth0'
No ethernet found.
ZYNQ GEM: e000b000, phyaddr ffffffff, interface rgmii-id
mdio_register: non unique device name 'eth0'
Hit any key to stop autoboot:  0
Device: sdhci@e0100000
Manufacturer ID: 41
OEM: 3432
Name: SD16G
Tran Speed: 50000000
Rd Block Len: 512
SD version 3.0
High Capacity: Yes
Capacity: 7.5 GiB
Bus Width: 4-bit
Erase Group Size: 512 Bytes
reading image.ub
9470752 bytes read in 539 ms (16.8 MiB/s)
## Loading kernel from FIT Image at 10000000 ...
   Using 'conf@1' configuration
   Verifying Hash Integrity ... OK
   Trying 'kernel@0' kernel subimage
     Description:  Linux Kernel
     Type:         Kernel Image
     Compression:  uncompressed
     Data Start:   0x100000d4
     Data Size:    3740448 Bytes = 3.6 MiB
     Architecture: ARM
     OS:           Linux
     Load Address: 0x00008000
     Entry Point:  0x00008000
     Hash algo:    sha1
     Hash value:   0ea332944f4f3a57b6148e243370717e68305f55
   Verifying Hash Integrity ... sha1+ OK
## Loading ramdisk from FIT Image at 10000000 ...
   Using 'conf@1' configuration
   Trying 'ramdisk@0' ramdisk subimage
     Description:  ramdisk
     Type:         RAMDisk Image
     Compression:  uncompressed
     Data Start:   0x10394960
     Data Size:    5715407 Bytes = 5.5 MiB
     Architecture: ARM
     OS:           Linux
     Load Address: unavailable
     Entry Point:  unavailable
     Hash algo:    sha1
     Hash value:   ea6447a1589e48aa270804e584288cce35a013d5
   Verifying Hash Integrity ... sha1+ OK
## Loading fdt from FIT Image at 10000000 ...
   Using 'conf@1' configuration
   Trying 'fdt@0' fdt subimage
     Description:  Flattened Device Tree blob
     Type:         Flat Device Tree
     Compression:  uncompressed
     Data Start:   0x103914e8
     Data Size:    13254 Bytes = 12.9 KiB
     Architecture: ARM
     Hash algo:    sha1
     Hash value:   891d21220292064a5c6f8b11f8932ff240df21c0
   Verifying Hash Integrity ... sha1+ OK
   Booting using the fdt blob at 0x103914e8
ZYNQ GEM: e000b000, phyaddr ffffffff, interface rgmii-id
mdio_register: non unique device name 'eth0'
   Loading Kernel Image ... OK
   Loading Ramdisk to 07a8c000, end 07fff5cf ... OK
   Loading Device Tree to 07a85000, end 07a8b3c5 ... OK

Starting kernel ...

Uncompressing Linux... done, booting the kernel.
Booting Linux on physical CPU 0x0
Linux version 4.9.0-xilinx-v2017.1 (hlf@hlf-virtual-machine) (gcc version 6.2.1 20161016 (Linaro GCC 6.2-2016.11) ) #1 SMP PREEMPT Wed Dec 6 18:14:40 CST 2017
CPU: ARMv7 Processor [413fc090] revision 0 (ARMv7), cr=18c5387d
CPU: PIPT / VIPT nonaliasing data cache, VIPT aliasing instruction cache
OF: fdt:Machine model: xlnx,zynq-7000
bootconsole [earlycon0] enabled
cma: Reserved 16 MiB at 0x3f000000
Memory policy: Data cache writealloc
percpu: Embedded 14 pages/cpu @ef7d3000 s25932 r8192 d23220 u57344
Built 1 zonelists in Zone order, mobility grouping on.  Total pages: 260608
Kernel command line: console=ttyPS0,115200 earlyprintk
PID hash table entries: 4096 (order: 2, 16384 bytes)
Dentry cache hash table entries: 131072 (order: 7, 524288 bytes)
Inode-cache hash table entries: 65536 (order: 6, 262144 bytes)
Memory: 1007764K/1048576K available (6144K kernel code, 202K rwdata, 1456K rodata, 1024K init, 229K bss, 24428K reserved, 16384K cma-reserved, 245760K highmem)
Virtual kernel memory layout:
    vector  : 0xffff0000 - 0xffff1000   (   4 kB)
    fixmap  : 0xffc00000 - 0xfff00000   (3072 kB)
    vmalloc : 0xf0800000 - 0xff800000   ( 240 MB)
    lowmem  : 0xc0000000 - 0xf0000000   ( 768 MB)
    pkmap   : 0xbfe00000 - 0xc0000000   (   2 MB)
    modules : 0xbf000000 - 0xbfe00000   (  14 MB)
      .text : 0xc0008000 - 0xc0700000   (7136 kB)
      .init : 0xc0900000 - 0xc0a00000   (1024 kB)
      .data : 0xc0a00000 - 0xc0a32800   ( 202 kB)
       .bss : 0xc0a32800 - 0xc0a6be98   ( 230 kB)
Preemptible hierarchical RCU implementation.
        Build-time adjustment of leaf fanout to 32.
        RCU restricting CPUs from NR_CPUS=4 to nr_cpu_ids=2.
RCU: Adjusting geometry for rcu_fanout_leaf=32, nr_cpu_ids=2
NR_IRQS:16 nr_irqs:16 16
efuse mapped to f0802000
slcr mapped to f0804000
L2C: platform modifies aux control register: 0x72360000 -> 0x72760000
L2C: DT/platform modifies aux control register: 0x72360000 -> 0x72760000
L2C-310 erratum 769419 enabled
L2C-310 enabling early BRESP for Cortex-A9
L2C-310 full line of zeros enabled for Cortex-A9
L2C-310 ID prefetch enabled, offset 1 lines
L2C-310 dynamic clock gating enabled, standby mode enabled
L2C-310 cache controller enabled, 8 ways, 512 kB
L2C-310: CACHE_ID 0x410000c8, AUX_CTRL 0x76760001
zynq_clock_init: clkc starts at f0804100
Zynq clock init
sched_clock: 64 bits at 325MHz, resolution 3ns, wraps every 4398046511103ns
clocksource: arm_global_timer: mask: 0xffffffffffffffff max_cycles: 0x4af477f6aa, max_idle_ns: 440795207830 ns
Switching to timer-based delay loop, resolution 3ns
clocksource: ttc_clocksource: mask: 0xffff max_cycles: 0xffff, max_idle_ns: 551318127 ns
timer #0 at f080c000, irq=17
Console: colour dummy device 80x30
Calibrating delay loop (skipped), value calculated using timer frequency.. 650.00 BogoMIPS (lpj=3250000)
pid_max: default: 32768 minimum: 301
Mount-cache hash table entries: 2048 (order: 1, 8192 bytes)
Mountpoint-cache hash table entries: 2048 (order: 1, 8192 bytes)
CPU: Testing write buffer coherency: ok
CPU0: thread -1, cpu 0, socket 0, mpidr 80000000
Setting up static identity map for 0x100000 - 0x100058
CPU1: thread -1, cpu 1, socket 0, mpidr 80000001
Brought up 2 CPUs
SMP: Total of 2 processors activated (1300.00 BogoMIPS).
CPU: All CPU(s) started in SVC mode.
devtmpfs: initialized
VFP support v0.3: implementor 41 architecture 3 part 30 variant 9 rev 4
clocksource: jiffies: mask: 0xffffffff max_cycles: 0xffffffff, max_idle_ns: 19112604462750000 ns
pinctrl core: initialized pinctrl subsystem
NET: Registered protocol family 16
DMA: preallocated 256 KiB pool for atomic coherent allocations
cpuidle: using governor menu
hw-breakpoint: found 5 (+1 reserved) breakpoint and 1 watchpoint registers.
hw-breakpoint: maximum watchpoint size is 4 bytes.
zynq-ocm f800c000.ocmc: ZYNQ OCM pool: 256 KiB @ 0xf0880000
zynq-pinctrl 700.pinctrl: zynq pinctrl initialized
vgaarb: loaded
SCSI subsystem initialized
usbcore: registered new interface driver usbfs
usbcore: registered new interface driver hub
usbcore: registered new device driver usb
media: Linux media interface: v0.10
Linux video capture interface: v2.00
pps_core: LinuxPPS API ver. 1 registered
pps_core: Software ver. 5.3.6 - Copyright 2005-2007 Rodolfo Giometti <giometti@linux.it>
PTP clock support registered
EDAC MC: Ver: 3.0.0
FPGA manager framework
fpga-region fpga-full: FPGA Region probed
Advanced Linux Sound Architecture Driver Initialized.
clocksource: Switched to clocksource arm_global_timer
NET: Registered protocol family 2
TCP established hash table entries: 8192 (order: 3, 32768 bytes)
TCP bind hash table entries: 8192 (order: 4, 65536 bytes)
TCP: Hash tables configured (established 8192 bind 8192)
UDP hash table entries: 512 (order: 2, 16384 bytes)
UDP-Lite hash table entries: 512 (order: 2, 16384 bytes)
NET: Registered protocol family 1
RPC: Registered named UNIX socket transport module.
RPC: Registered udp transport module.
RPC: Registered tcp transport module.
RPC: Registered tcp NFSv4.1 backchannel transport module.
Trying to unpack rootfs image as initramfs...
Freeing initrd memory: 5584K (c7a8c000 - c8000000)
hw perfevents: enabled with armv7_cortex_a9 PMU driver, 7 counters available
futex hash table entries: 512 (order: 3, 32768 bytes)
workingset: timestamp_bits=30 max_order=18 bucket_order=0
jffs2: version 2.2. (NAND) (SUMMARY)  © 2001-2006 Red Hat, Inc.
bounce: pool size: 64 pages
io scheduler noop registered
io scheduler deadline registered
io scheduler cfq registered (default)
dma-pl330 f8003000.dmac: Loaded driver for PL330 DMAC-241330
dma-pl330 f8003000.dmac:        DBUFF-128x8bytes Num_Chans-8 Num_Peri-4 Num_Events-16
e0001000.serial: ttyPS0 at MMIO 0xe0001000 (irq = 143, base_baud = 6250000) is a xuartps
▒console [ttyPS0] enabled
console [ttyPS0] enabled
bootconsole [earlycon0] disabled
bootconsole [earlycon0] disabled
xdevcfg f8007000.devcfg: ioremap 0xf8007000 to f086d000
[drm] Initialized
brd: module loaded
loop: module loaded
libphy: Fixed MDIO Bus: probed
CAN device driver interface
libphy: MACB_mii_bus: probed
macb e000b000.ethernet eth0: Cadence GEM rev 0x00020118 at 0xe000b000 irq 144 (00:0a:35:00:1e:53)
Generic PHY e000b000.etherne:00: attached PHY driver [Generic PHY] (mii_bus:phy_addr=e000b000.etherne:00, irq=-1)
e1000e: Intel(R) PRO/1000 Network Driver - 3.2.6-k
e1000e: Copyright(c) 1999 - 2015 Intel Corporation.
ehci_hcd: USB 2.0 'Enhanced' Host Controller (EHCI) Driver
ehci-pci: EHCI PCI platform driver
usbcore: registered new interface driver usb-storage
mousedev: PS/2 mouse device common for all mice
i2c /dev entries driver
EDAC MC: ECC not enabled
Xilinx Zynq CpuIdle Driver started
sdhci: Secure Digital Host Controller Interface driver
sdhci: Copyright(c) Pierre Ossman
sdhci-pltfm: SDHCI platform and OF driver helper
mmc0: SDHCI controller on e0100000.sdhci [e0100000.sdhci] using DMA
ledtrig-cpu: registered to indicate activity on CPUs
usbcore: registered new interface driver usbhid
usbhid: USB HID core driver
NET: Registered protocol family 10
sit: IPv6, IPv4 and MPLS over IPv4 tunneling driver
NET: Registered protocol family 17
can: controller area network core (rev 20120528 abi 9)
NET: Registered protocol family 29
can: raw protocol (rev 20120528)
mmc0: Problem switching card into high-speed mode!
mmc0: new SDHC card at address 0001
can: broadcast manager protocol (rev 20161123 t)
mmcblk0: mmc0:0001 SD16G 7.50 GiB
 mmcblk0: p1 p2
can: netlink gateway (rev 20130117) max_hops=1
Registering SWP/SWPB emulation handler
hctosys: unable to open rtc device (rtc0)
of_cfs_init
of_cfs_init: OK
ALSA device list:
  No soundcards found.
Freeing unused kernel memory: 1024K (c0900000 - c0a00000)
INIT: version 2.88 booting
Starting udev
udevd[755]: starting version 3.2
random: udevd: uninitialized urandom read (16 bytes read)
random: udevd: uninitialized urandom read (16 bytes read)
random: udevd: uninitialized urandom read (16 bytes read)
udevd[756]: starting eudev-3.2
random: udevd: uninitialized urandom read (16 bytes read)
Populating dev cache
random: dd: uninitialized urandom read (512 bytes read)
hwclock: can't open '/dev/misc/rtc': No such file or directory
Wed Dec  6 10:24:47 UTC 2017
hwclock: can't open '/dev/misc/rtc': No such file or directory
Starting internet superserver: inetd.
INIT: Entering runlevel: 5
Configuring network interfaces... IPv6: ADDRCONF(NETDEV_UP): eth0: link is not ready
udhcpc (v1.24.1) started
Sending discover...
Sending discover...
Sending discover...
No lease, forking to background
done.
Starting Dropbear SSH server: random: dropbearkey: uninitialized urandom read (32 bytes read)
Generating key, this may take a while...
random: dropbearkey: uninitialized urandom read (32 bytes read)
random: dropbearkey: uninitialized urandom read (32 bytes read)
Public key portion is:
ssh-rsa AAAAB3NzaC1yc2EAAAADAQABAAABAQCZcPRl7kGwAEL4U/yLvEVXBnbmVx8kgBHJpleEmJnE5bxZNrt5uUgRcuwEVhb/RZYNcq+random: dropbear: uninitialized urandom read (32 bytes read)
OyiJ6e0M+e3FZDixMSUSsCjBxj2zi142fu0ssLdhmzd6TWi79AtkJCRxIFOE5VTPyaVq5tPvEdrzy6je+ukN4rvXTH+22+Kj4LwRC7xu41XpbXWpzK7oo2IHgP0KRcyPAXyI9x2QWPNsLbYj/wDta3n7GWjbnVxqrDbN8E/VejGxjL96zeKhclyvj6T2arkvfvsB3XYKfZlOMI7ozCtOyUfNhbjaFMVvqDq8hR63b2bCfjYmCwffkPJvh3hMElNGqQtl1V0gouF+oTy7D root@plnx_arm
Fingerprint: md5 0c:53:86:51:85:23:31:f3:26:ed:92:fa:6e:b3:c0:7b
dropbear.
hwclock: can't open '/dev/misc/rtc': No such file or directory
Starting syslogd/klogd: done
Starting tcf-agent: random: tcf-agent: uninitialized urandom read (16 bytes read)
OK

PetaLinux 2017.1 plnx_arm /dev/ttyPS0

plnx_arm login: root
Password:
root@plnx_arm:~# cd ..
root@plnx_arm:/home# ls
root
root@plnx_arm:/home# cd ..
root@plnx_arm:/# ls
bin    dev    home   lib    mnt    root   sbin   tmp    var
boot   etc    init   media  proc   run    sys    usr
root@plnx_arm:/# echo "hello"
hello
root@plnx_arm:/#开机时登录的用户名和密码都是root
可以看到正常开机了,连SD卡的文件系统都不需要自己做了,但是不自带python了
这种基于petalinux方式移植linux的方法,到此流程也就走完了,至于更深的操作,还要在实践中,不断学习,至少现在看来,比传统方式移植方便了一些,而且移植的流程petalinux也都集成了的,好处还是挺多的,慢慢发掘他的强大之处
发布者:全栈程序员-用户IM,转载请注明出处:https://javaforall.cn/194693.html原文链接:https://javaforall.cn
【正版授权,激活自己账号】: Jetbrains全家桶Ide使用,1年售后保障,每天仅需1毛
【官方授权 正版激活】: 官方授权 正版激活 支持Jetbrains家族下所有IDE 使用个人JB账号...
