大家好,又见面了,我是你们的朋友全栈君。如果您正在找激活码,请点击查看最新教程,关注关注公众号 “全栈程序员社区” 获取激活教程,可能之前旧版本教程已经失效.最新Idea2022.1教程亲测有效,一键激活。
Jetbrains全系列IDE使用 1年只要46元 售后保障 童叟无欺
在上一篇文章里,我总结了一下自定义控件需要了解的基础知识:View的绘制流程——《自定义控件知识储备-View的绘制流程》。其中,在View的测量流程里,View的测量宽高是由父控件的MeasureSpec和View自身的LayoutParams共同决定的。MeasureSpec是什么,上一篇文章里已经说得很清楚了(啥,没看过?快去路克路克,(๑•̀ㅂ•́)و✧)。而LayoutParams呢?是时候在这里做个了断了。
LayoutParams是什么?
LayoutParams,顾名思义,就是Layout Parameters :布局参数。
很久很久以前,我就知道LayoutParams了,并且几乎天天见面。那时候在布局文件XML里,写的最多的肯定是android:layout_width = "match_parent"之类的了。比如:


<TextView
    style="@style/text_flag_01"
    android:layout_width="match_parent"
    android:layout_height="100dp"
    android:layout_marginLeft="10dp"
    android:layout_gravity="center"
    android:gravity="center"
    android:text="英明神武蘑菇君"
    android:textColor="@color/white"
android:background="@color/colorAccent"/>我们都知道layout_width和layout_height这两个属性是为View指定宽度的。不过,当时年轻的我心里一直有个疑问:为什么要加上”layout_”前缀修饰呢?其它的描述属性,如textColor和background,都很正常啊!讲道理,应该用width和height描述宽高才对啊?
后来呀,我遇到了LayoutParams,它说layout_width是它的属性而非View的,并且不只是针对这一个,而是所有以”layout_”开头的属性都与它有关!所以,它的东西当然要打上自己的标识”layout_”。(呵呵,嚣张个啥,到头来你自己还不是属于View的一部分( ̄┰ ̄*))
既然layout_width这样的属性是LayoutParams定义的,那为何会出现在描述View的xml属性里呢?View和LayoutParams之间有什么恩怨纠缠呢?
不吹不黑,咱们来看看官方文档是怎么说的:
LayoutParams are used by views to tell their parents how they want to be laid out.
– LayoutParams是View用来告诉它的父控件如何放置自己的。The base LayoutParams class just describes how big the view wants to be for both width and height.
– 基类LayoutParams(也就是ViewGroup.LayoutParams)仅仅描述了这个View想要的宽度和高度。There are subclasses of LayoutParams for different subclasses of ViewGroup.
– 不同ViewGroup的继承类对应着不同的ViewGroup.LayoutParams的子类。
看着我妙到巅峰的翻译,想必大家都看懂了<( ̄▽ ̄)/。看不懂?那我再来画蛇添足稍微解释一下:
-
上面我们提到过,描述View直接用它们自己的属性就好了,如
textColor和background等等,为什么还需要引入LayoutParams呢?在我看来,textColor和background这样的属性都是只与TextView自身有关的,无论这个TextView处于什么环境,这些属性都是不变的。而layout_width与layout_marginLeft这样的属性是与它的父控件息息相关的,是父控件通过LayoutParams提供这些”layout_”属性给孩子们用的;是父控件根据孩子们的要求(LayoutParams)来决定怎么测量,怎么安放孩子们的;是父控件……(写不下去了,我都快被父控件感动了,不得不再感慨一句,当父母的都不容易啊(′⌒`)) )。所以,View的LayoutParams离开了父控件,就没有意义了。 -
基类LayoutParams是ViewGroup类里的一个静态内部类(看吧,这就证明了LayoutParams是与父控件直接相关的),它的功能很简单,只提供了
width和height两个属性,对应于xml里的layout_width和layout_height。所以,对任意系统提供的容器控件或者是自定义的ViewGroup,其chid view总是能写layout_width和layout_height属性的。 -
自从有了
ViewGroup.LayoutParams后,我们就可以在自定义ViewGroup时,根据自己的逻辑实现自己的LayoutParams,为孩子们提供更多的布局属性。不用说,系统里提供给我们的容器控件辣么多,肯定也有很多LayoutParams的子类啦。let us see see:
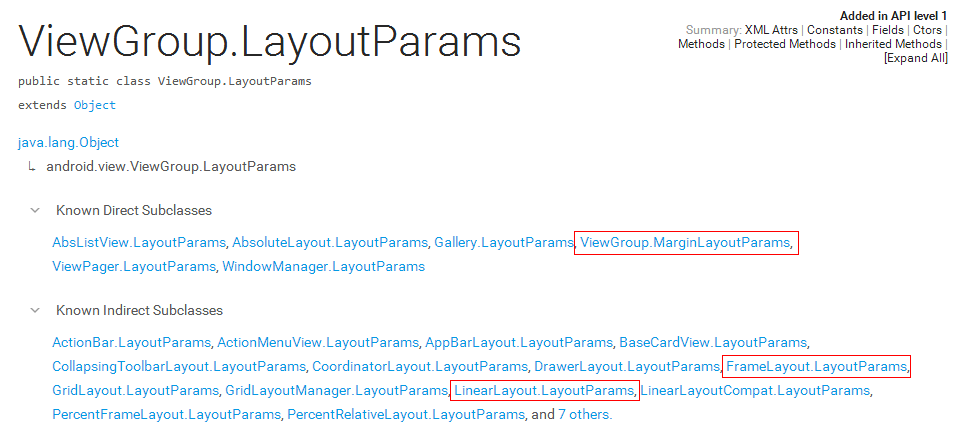
果然,我们看到了很多ViewGroup.LayoutParams的子类,里面大部分我们应该都比较熟悉。如果你觉得和它们不熟,那就是你一厢情愿啦,你早就“偷偷摸摸”的用过它们好多次了→_→
ViewGroup.MarginLayoutParams
我们首先来看看ViewGroup.MarginLayoutParams,看名字我们也能猜到,它是用来提供margin属性滴。margin属性也是我们在布局时经常用到的。看看这个类里面的属性:
public static class MarginLayoutParams extends ViewGroup.LayoutParams {


        public int leftMargin;

        public int topMargin;

        public int rightMargin;

        public int bottomMargin;

        private int startMargin = DEFAULT_MARGIN_RELATIVE;

        private int endMargin = DEFAULT_MARGIN_RELATIVE;

        ...
} 前面4个属性是我们以前在布局文件里常用的,而后面的startMargin和endMargin是为了支持RTL设计出来代替leftMargin和rightMargin的。
一般情况下,View开始部分就是左边,但是有的语言目前为止还是按照从右往左的顺序来书写的,例如阿拉伯语。在Android 4.2系统之后,Google在Android中引入了RTL布局,更好的支持了从右往左文字布局的显示。为了更好的兼容RTL布局,google推荐使用MarginStart和MarginEnd来替代MarginLeft和MarginRight,这样应用可以在正常的屏幕和从右往左显示文字的屏幕上都保持一致的用户体验。
我们除了在布局文件里用layout_marginLeft和layout_marginTop这样的属性来指定单个方向的间距以外,还会用layout_margin来表示四个方向的统一间距。我们来通过源码看看这一过程:
 public MarginLayoutParams(Context c, AttributeSet attrs) {
            super();

            TypedArray a = c.obtainStyledAttributes(attrs, R.styleable.ViewGroup_MarginLayout);
            setBaseAttributes(a,
                    R.styleable.ViewGroup_MarginLayout_layout_width,
                    R.styleable.ViewGroup_MarginLayout_layout_height);

            int margin = a.getDimensionPixelSize(
                    com.android.internal.R.styleable.ViewGroup_MarginLayout_layout_margin, -1);
            if (margin >= 0) {
                leftMargin = margin;
                topMargin = margin;
                rightMargin= margin;
                bottomMargin = margin;
            } else {
                leftMargin = a.getDimensionPixelSize(
                        R.styleable.ViewGroup_MarginLayout_layout_marginLeft,
                        UNDEFINED_MARGIN);
                if (leftMargin == UNDEFINED_MARGIN) {
                    mMarginFlags |= LEFT_MARGIN_UNDEFINED_MASK;
                    leftMargin = DEFAULT_MARGIN_RESOLVED;
                }
                ...
            }
            ...
    }
在这个MarginLayoutParams的构造函数里,将获取到的xml布局文件里的属性转化成了leftMagrin与rightMagrin等值。先获取xml里的layout_margin值,如果未设置,则再去获取layout_marginLeft与layout_marginRight等值。所以从这里可以得出一个小结论:
在xml布局里,
layout_margin属性的值会覆盖layout_marginLeft与layout_marginRight等属性的值。
以前我还很傻很天真的猜测,属性写在后面,就会覆盖前面的属性。虽然经过实践,也能发现上述的结论,但是自己了解了背后的原理,再去看看源码实现,自然就有更深刻的印象了。<( ̄ˇ ̄)/
揭开隐藏的LayoutParams
在上文中提到,我们初学Android的时候经常在“偷偷摸摸”的使用着LayoutParams,而自己却还
。
因为我们常用它的方式是在XML布局文件里,使用容器控件的LayoutParams里的各种属性来给孩子们布局。这种方式直观方便,直接就能在预览界面看到效果,但是同时布局也被我们写死了,无法动态改变。想要动态变化,那还是得不怕麻烦,使用代码来写。(实际上,我们写的XML布局最终也是通过代码来解析滴)

好的,那还是让我们通过源码来揭开隐藏在ViewGroup里的LayoutParams吧!<( ̄︶ ̄)↗[GO!]……等会,我们该从哪里开始看源码呢?我认为有句名言说的在理:
脱离场景谈源码,都是在耍流氓 ——英明神武蘑菇君
上文提到,LayoutParams其实是父控件提供给child view的,好让child view选择如何测量和放置自己。所以肯定在child view添加到父控件的那一刻,child view就应该有LayoutParams了。我们来看看几个常见的添加View的方式:
LinearLayout parent = (LinearLayout) findViewById(R.id.parent);
// 1.直接添加一个“裸”的TextView,不主动指定LayoutParams
TextView textView = new TextView(this);
textView.setText("红色蘑菇君");
textView.setTextColor(Color.RED);
parent.addView(textView);

// 2.先手动给TextView设定好LayoutParams,再添加
textView = new TextView(this);
textView.setText("绿色蘑菇君");
textView.setTextColor(Color.GREEN);
LinearLayout.LayoutParams lp = new LinearLayout.LayoutParams(300,300);
textView.setLayoutParams(lp);
parent.addView(textView);

// 3.在添加的时候传递一个创建好的LayoutParams
textView = new TextView(this);
textView.setText("蓝色蘑菇君");
textView.setTextColor(Color.BLUE);
LinearLayout.LayoutParams lp2 = new LinearLayout.LayoutParams(ViewGroup.LayoutParams.WRAP_CONTENT,300);
parent.addView(textView, lp2);
上面代码展示的是3种往LinearLayout里动态添加TextView的方式,其中都涉及到了addView这个方法。我们来看看addView的几个重载方法:
//这3个方法都来自于基类ViewGroup

 public void addView(View child) {
        addView(child, -1);
    }

 /*
  * @param child the child view to add
  * @param index the position at which to add the child
  /
public void addView(View child, int index) {
        if (child == null) {
            throw new IllegalArgumentException("Cannot add a null child view to a ViewGroup");
        }
        LayoutParams params = child.getLayoutParams();
        if (params == null) {
            params = generateDefaultLayoutParams();
            if (params == null) {
                throw new IllegalArgumentException("generateDefaultLayoutParams() cannot return null");
            }
        }
        addView(child, index, params);
    }

public void addView(View child, LayoutParams params) {
        addView(child, -1, params);
    }
可以看出addView(View child)是调用了addView(View child, int index)方法的,在这个里面对child的LayoutParams做了判断,如果为null的话,则调用了generateDefaultLayoutParams方法为child生成一个默认的LayoutParams。这也合情合理,毕竟现在这个社会呀,像蘑菇君我这么懒的人太多,你要是不给个默认的选项,那别说友谊的小船了,就算泰坦尼克,那也说翻就翻!<( ̄︶ ̄)>……好的,那让我们看看LinearLayout为我们这群懒人生成了怎样的默认LayoutParams:
@Override
protected LayoutParams generateDefaultLayoutParams() {
        if (mOrientation == HORIZONTAL) {
            return new LayoutParams(LayoutParams.WRAP_CONTENT, LayoutParams.WRAP_CONTENT);
        } else if (mOrientation == VERTICAL) {
            return new LayoutParams(LayoutParams.MATCH_PARENT, LayoutParams.WRAP_CONTENT);
        }
        return null;
}显然,LinearLayout是重写了基类ViewGroup里的generateDefaultLayoutParams方法的:如果布局是水平方向,则孩子们的宽高都是WRAP_CONTENT,而如果是垂直方向,高仍然是WRAP_CONTENT,但宽却变成了MATCH_PARENT。所以,这一点大家得注意,因为很有可能因为我们的懒,导致布局效果和我们理想中的不一样。因此呢,第1种添加View的方式是不推荐滴,像第2或第3种方式,添加的时候指定了LayoutParams,不仅明确,而且易修改。(果然还是勤劳致富呀…)
上面三个重载的addView方法最终都调用了addView(View child, int index, LayoutParams params)这个参数最多的方法:
public void addView(View child, int index, LayoutParams params) {
        ...
        requestLayout();
        invalidate(true);
        addViewInner(child, index, params, false);
    }

private void addViewInner(View child, int index, LayoutParams params,
            boolean preventRequestLayout) {
        ...

        if (!checkLayoutParams(params)) {
            params = generateLayoutParams(params);
        }

        if (preventRequestLayout) {
            child.mLayoutParams = params;
        } else {
            child.setLayoutParams(params);
        }

        ...
    }
addView方法又调用了方法addViewInner,在这个私有方法里,又干了哪些偷偷摸摸的事呢?接着来看看:
//这两个方法都重写了基类ViewGroup里的方法
// Override to allow type-checking of LayoutParams.
@Override
protected boolean checkLayoutParams(ViewGroup.LayoutParams p) {
    return p instanceof LinearLayout.LayoutParams;
}

@Override
  protected LayoutParams generateLayoutParams(ViewGroup.LayoutParams p) {
    return new LayoutParams(p);
}checkLayoutParams方法的作用是检查传递进来的LayoutParams是不是LinearLayout的LayoutParam。如果不是呢?再通过generateLayoutParams方法根据你传递的LayoutParams的属性构造一个LinearLayout的LayoutParams。不得不再次感慨父容器控件的不容易:我们懒得设置child view的LayoutParams,甚至是设置了错误的LayoutParams,父控件都在竭尽所能的纠正我们的错误,只为了给孩子提供一个舒适的环境。(╥╯^╰╥)
不过呀,虽然父控件可以在添加View时帮我们纠正部分错误,但我们在其他情况下错误的修改child View的LayoutParams,那父控件也爱莫能助了。比如下面这种情况:
LinearLayout parent = (LinearLayout) findViewById(R.id.parent);
textView = new TextView(this);
textView.setText("此处有BUG");
LinearLayout.LayoutParams lp = new LinearLayout.LayoutParams(200,200);
parent.addView(textView, lp);

textView.setLayoutParams(new ViewGroup.LayoutParams(100,100));会直接报ClassCastException:
java.lang.ClassCastException: android.view.ViewGroup$LayoutParams cannot be cast to android.widget.LinearLayout$LayoutParams上面这种异常熟悉么?反正我是相当熟悉的〒▽〒……原因就是上面代码里的textView是LinearLayout的孩子,而我们调用textView的setLayoutParams方法强行给它设置了一个ViewGroup的LayoutParams,所有在LinearLayout重新进行绘制流程的时候,在onMeasure方法里,会进行强制类型转换操作:
LinearLayout.LayoutParams lp = (LinearLayout.LayoutParams) child.getLayoutParams();所以App斯巴达了。也许你会说,我才不会这么傻,我知道textView的父控件是LinearLayout了,我肯定会给它设置相应的LayoutParams的!这是当然的啦,在这种明确的情况下,我们当然不会这么傻。但是,很不幸的是,有很多时候我们并不能一眼就看出来一个View的LayoutParams是什么类型的LayoutParams,这就需要动用你的智慧去分析分析啦,希望这篇文章能给你一些帮助。♪(^∀^●)ノ
自定义LayoutParams
在本文的开头就提到过:每个容器控件几乎都会有自己的LayoutParams实现,像LinearLayout、FrameLayout和RelativeLayout等等。所以,我们在自定义ViewGroup时,几乎都要自定义相应的LayoutParams。这一节呢,就是对如何自定义LayoutParams进行一个总结。
我以一个简单的流布局FlowLayout为例,流布局的简单定义如下:
FlowLayout:添加到此容器的控件自左往右依次排列,如果当前行的宽度不足以容纳下一个控件,就会将此控件放置到下一行。
假设这个FlowLayout可以给它的孩子们提供一个gravity属性,效果就是让孩子能在某一行的垂直方向上选择三个位置:top(处于顶部)、center(居中)、bottom(处于底部)。咦?这个效果是不是和LinearLayout提供给孩子的layout_gravity属性很像?那好,我们来参考一下LinearLayout里的LayoutParams源码:
public static class LayoutParams extends ViewGroup.MarginLayoutParams {


        public float weight;

        public int gravity = -1;

        public LayoutParams(Context c, AttributeSet attrs) {

            super(c, attrs);
            TypedArray a =
            c.obtainStyledAttributes(attrs, com.android.internal.R.styleable.LinearLayout_Layout);
            weight = a.getFloat(com.android.internal.R.styleable.LinearLayout_Layout_layout_weight, 0);
            gravity = a.getInt(com.android.internal.R.styleable.LinearLayout_Layout_layout_gravity, -1);

            a.recycle();
        }


        public LayoutParams(ViewGroup.LayoutParams p) {
            super(p);
        }


        public LayoutParams(ViewGroup.MarginLayoutParams source) {
            super(source);
        }

         public LayoutParams(LayoutParams source) {
            super(source);

            this.weight = source.weight;
            this.gravity = source.gravity;
        }
    }
首先,LinearLayout里的静态内部类LayoutParams是继承ViewGroup.MarginLayoutParams的,所以它的孩子们都可以用margin属性。事实上,绝大部分容器控件都是直接继承ViewGroup.MarginLayoutParams而非ViewGroup.LayoutParams。所以我们的FlowLayout也直接继承ViewGroup.MarginLayoutParams。
其次,LinearLayout支持两个属性weight和gravity,这两个属性在xml对应的就是layout_weight和layout_gravity。在它的构造函数LayoutParams(Context c, AttributeSet attrs)里,将获取到的xml布局文件里的属性转化成了weight与gravity的值。不过com.android.internal.R.styleable.LinearLayout_Layout这个东西是什么鬼?其实这是系统在xml属性文件里配置的declare-styleable,好让系统知道LinearLayout能为它的孩子们提供哪些属性支持。我们在布局的时候IDE也会给出这些快捷提示。而对于自定义的FlowLayout来说,模仿LinearLayout的写法,可以在attrs.xml文件里这么写:
<declare-styleable name="FlowLayout_Layout">
        <attr name="android:layout_gravity"/>
    </declare-styleable>
而剩下的几个构造方法起的作用就是从传递的LayoutParams参数里克隆属性了。
依葫芦画瓢,FlowLayout的LayoutParams如下:
public static class LayoutParams extends ViewGroup.MarginLayoutParams {


        public int gravity = -1;

        public LayoutParams(Context c, AttributeSet attrs) {

            super(c, attrs);
            TypedArray a =
            c.obtainStyledAttributes(attrs, com.android.internal.R.styleable.LinearLayout_Layout);
            weight = a.getFloat(R.styleable.FlowLayout_Layout, 0);
            gravity = a.getInt(R.styleable.FlowLayout_Layout_android_layout_gravity, -1);

            a.recycle();
        }

         public LayoutParams(ViewGroup.LayoutParams p) {
            super(p);
        }


        public LayoutParams(ViewGroup.MarginLayoutParams source) {
            super(source);
        }


         public LayoutParams(LayoutParams source) {
            super(source);
            this.gravity = source.gravity;
        }

    }
看起来还是挺简单的吧?好,那我们这篇文章到此结束……等一等!好像忘记了点什么……

如果对上面分析ViewGroup的addView方法的流程还有印象,可能你会注意ViewGroup里的这几个方法:
 public LayoutParams generateLayoutParams(AttributeSet attrs) {
        return new LayoutParams(getContext(), attrs);
    }

protected LayoutParams generateLayoutParams(ViewGroup.LayoutParams p) {
        return p;
    }

protected LayoutParams generateDefaultLayoutParams() {
        return new LayoutParams(LayoutParams.WRAP_CONTENT, LayoutParams.WRAP_CONTENT);
    }

protected boolean checkLayoutParams(ViewGroup.LayoutParams p) {
        return  p != null;
    }
为了能在添加child view时给它设置正确的LayoutParams,我们还需要重写上面几个方法(还问为啥要重写?快翻到前面再see see)。同样的,我们还是先来看看LinearLayout是怎么处理的吧:
 @Override
    public LayoutParams generateLayoutParams(AttributeSet attrs) {
        return new LinearLayout.LayoutParams(getContext(), attrs);
    }


    @Override
    protected LayoutParams generateDefaultLayoutParams() {
        if (mOrientation == HORIZONTAL) {
            return new LayoutParams(LayoutParams.WRAP_CONTENT, LayoutParams.WRAP_CONTENT);
        } else if (mOrientation == VERTICAL) {
            return new LayoutParams(LayoutParams.MATCH_PARENT, LayoutParams.WRAP_CONTENT);
        }
        return null;
    }

    @Override
    protected LayoutParams generateLayoutParams(ViewGroup.LayoutParams p) {
        return new LayoutParams(p);
    }


    // Override to allow type-checking of LayoutParams.
    @Override
    protected boolean checkLayoutParams(ViewGroup.LayoutParams p) {
        return p instanceof LinearLayout.LayoutParams;
    }
那FlowLayout该如何重写上面的几个方法呢?相信聪明的你已经知道了。(๑•̀ㅂ•́)و✧
总结
这一篇文章从自定义控件的角度,并结合源码和表情包生动形象的谈了谈我所理解的LayoutParams。(生动,形象?真不要脸…(¯﹃¯))。不得不说,结合源码来学习某个知识点,的确是能起到事半功倍的作用。蘑菇君初来乍到,文章里如有错误和疏漏之处,欢迎指正和补充。
预告
下一篇文章打算记录一个简单的自定义ViewGroup:流布局FlowLayout的实现过程,将自定义控件知识储备-View的绘制流程里的知识点和本篇文章的LayoutParams结合起来。
PS:写博客的初始阶段果然是有些艰辛,脑海里想写的很多,而真到了要以文字表达出来时,却有一种“爱你在心口难开”的尴尬。不过,感觉到艰难也就意味着自己在走上坡路,坚持下去,希望能给自己和大家带来更多的帮助。
我是蘑菇君,我为自己带盐

发布者:全栈程序员-用户IM,转载请注明出处:https://javaforall.cn/190977.html原文链接:https://javaforall.cn
【正版授权,激活自己账号】: Jetbrains全家桶Ide使用,1年售后保障,每天仅需1毛
【官方授权 正版激活】: 官方授权 正版激活 支持Jetbrains家族下所有IDE 使用个人JB账号...
