大家好,又见面了,我是你们的朋友全栈君。如果您正在找激活码,请点击查看最新教程,关注关注公众号 “全栈程序员社区” 获取激活教程,可能之前旧版本教程已经失效.最新Idea2022.1教程亲测有效,一键激活。
Jetbrains全系列IDE稳定放心使用
欢迎大家关注笔者,你的关注是我持续更博的最大动力
原创文章,转载告知,盗版必究
YOLOv5的详细使用教程,以及使用yolov5训练自己的数据集
文章目录:
本人环境声明:
系统环境:Ubuntu18.04.1cuda版本:10.2.89cudnn版本:7.6.5torch版本:1.5.0torchvision版本:0.6.0- 项目代码
yolov5,官网,项目开源的时间:20200601
自定义数据集:
1 安装环境依赖
1.1 克隆项目
git clone https://github.com/ultralytics/yolov5 # clone repo
如果下载比较慢,建议使用下面的镜像下载:
git clone https://github.com.cnpmjs.org/ultralytics/yolov5 # clone repo
1.2 安装必要的环境依赖
官方给出的要求是:python>=3.7、PyTorch>=1.5,安装依赖:
cd yolov5
pip install -U -r requirements.txt
requirements.txt
# pip install -U -r requirements.txt
Cython
numpy==1.17
opencv-python
torch>=1.5
matplotlib
pillow
tensorboard
PyYAML>=5.3
torchvision
scipy
tqdm
git+https://github.com/cocodataset/cocoapi.git#subdirectory=PythonAPI

# Nvidia Apex (optional) for mixed precision training --------------------------
# git clone https://github.com/NVIDIA/apex && cd apex && pip install -v --no-cache-dir --global-option="--cpp_ext" --global-option="--cuda_ext" . --user && cd .. && rm -rf apex

# Conda commands (in place of pip) ---------------------------------------------
# conda update -yn base -c defaults conda
# conda install -yc anaconda numpy opencv matplotlib tqdm pillow ipython
# conda install -yc conda-forge scikit-image pycocotools tensorboard
# conda install -yc spyder-ide spyder-line-profiler
# conda install -yc pytorch pytorch torchvision
# conda install -yc conda-forge protobuf numpy && pip install onnx # https://github.com/onnx/onnx#linux-and-macos
2 下载预训练模型和标注的数据集
2.1 下载预训练模型
2.1.1 执行脚本下载预训练模型
/yolov5/weights/download_weights.sh脚本定义下载预训练模型,脚本代码内容如下:
#!/bin/bash
# Download common models

python3 -c "from utils.google_utils import *;
attempt_download('weights/yolov5s.pt');
attempt_download('weights/yolov5m.pt');
attempt_download('weights/yolov5l.pt');
attempt_download('weights/yolov5x.pt')"
attempt_download函数在/yolov5/utils/google_utils.py脚本中定义
2.1.2 直接下载预训练模型,然后保存到/yolov5/weights目录下即可,我已经把预训练模型的url提取出来
大家直接在google driver中下载即可,地址(可能需要科学上网):
点我——》带你去:
https://drive.google.com/drive/folders/1Drs_Aiu7xx6S-ix95f9kNsA6ueKRpN2J
2.2 下载标注的数据集
2.2.1 执行脚本下载
python3 -c "from yolov5.utils.google_utils import gdrive_download; gdrive_download('1n_oKgR81BJtqk75b00eAjdv03qVCQn2f','coco128.zip')" # download dataset
执行上面的代码,会下载:coco128.zip数据集,该数据是COCO train2017数据的一部分,只取了coco数据集中的128张标注的图片,coco128.zip下载完后解压到/yolov5目录下即可,解压后的coco128文件结构如下:
coco128
|-- LICENSE
|-- README.txt  # 相关说明
|-- annotations  # 空目录
|-- images   # 128张jpg图片
`-- labels  # 128张标注的txt文件
/yolov5/utils/google_utils.py脚本是下载预训练模型和标注的训练数据集,该脚本代码内容如下:
# This file contains google utils: https://cloud.google.com/storage/docs/reference/libraries
# pip install --upgrade google-cloud-storage
# from google.cloud import storage

import os
import time
from pathlib import Path


def attempt_download(weights):
    # Attempt to download pretrained weights if not found locally
    weights = weights.strip()
    msg = weights + ' missing, try downloading from https://drive.google.com/drive/folders/1Drs_Aiu7xx6S-ix95f9kNsA6ueKRpN2J'

    r = 1
    if len(weights) > 0 and not os.path.isfile(weights):
        d = {
   'yolov3-spp.pt': '1mM67oNw4fZoIOL1c8M3hHmj66d8e-ni_',  # yolov3-spp.yaml
             'yolov5s.pt': '1R5T6rIyy3lLwgFXNms8whc-387H0tMQO',  # yolov5s.yaml
             'yolov5m.pt': '1vobuEExpWQVpXExsJ2w-Mbf3HJjWkQJr',  # yolov5m.yaml
             'yolov5l.pt': '1hrlqD1Wdei7UT4OgT785BEk1JwnSvNEV',  # yolov5l.yaml
             'yolov5x.pt': '1mM8aZJlWTxOg7BZJvNUMrTnA2AbeCVzS',  # yolov5x.yaml
             }

        file = Path(weights).name
        if file in d:
            r = gdrive_download(id=d[file], name=weights)

        if not (r == 0 and os.path.exists(weights) and os.path.getsize(weights) > 1E6):  # weights exist and > 1MB
            os.remove(weights) if os.path.exists(weights) else None  # remove partial downloads
            s = "curl -L -o %s 'https://storage.proxy.ustclug.org/ultralytics/yolov5/ckpt/%s'" % (weights, file)
            r = os.system(s)  # execute, capture return values

            # Error check
            if not (r == 0 and os.path.exists(weights) and os.path.getsize(weights) > 1E6):  # weights exist and > 1MB
                os.remove(weights) if os.path.exists(weights) else None  # remove partial downloads
                raise Exception(msg)


def gdrive_download(id='1HaXkef9z6y5l4vUnCYgdmEAj61c6bfWO', name='coco.zip'):
    # https://gist.github.com/tanaikech/f0f2d122e05bf5f971611258c22c110f
    # Downloads a file from Google Drive, accepting presented query
    # from utils.google_utils import *; gdrive_download()
    t = time.time()

    print('Downloading https://drive.google.com/uc?export=download&id=%s as %s... ' % (id, name), end='')
    os.remove(name) if os.path.exists(name) else None  # remove existing
    os.remove('cookie') if os.path.exists('cookie') else None

    # Attempt file download
    os.system("curl -c ./cookie -s -L \"https://drive.google.com/uc?export=download&id=%s\" > /dev/null" % id)
    if os.path.exists('cookie'):  # large file
        s = "curl -Lb ./cookie \"https://drive.google.com/uc?export=download&confirm=`awk '/download/ {print $NF}' ./cookie`&id=%s\" -o %s" % (
            id, name)
    else:  # small file
        s = "curl -s -L -o %s 'https://drive.google.com/uc?export=download&id=%s'" % (name, id)
    r = os.system(s)  # execute, capture return values
    os.remove('cookie') if os.path.exists('cookie') else None

    # Error check
    if r != 0:
        os.remove(name) if os.path.exists(name) else None  # remove partial
        print('Download error ')  # raise Exception('Download error')
        return r

    # Unzip if archive
    if name.endswith('.zip'):
        print('unzipping... ', end='')
        os.system('unzip -q %s' % name)  # unzip
        os.remove(name)  # remove zip to free space

    print('Done (%.1fs)' % (time.time() - t))
    return r

# def upload_blob(bucket_name, source_file_name, destination_blob_name):
# # Uploads a file to a bucket
# # https://cloud.google.com/storage/docs/uploading-objects#storage-upload-object-python
#
# storage_client = storage.Client()
# bucket = storage_client.get_bucket(bucket_name)
# blob = bucket.blob(destination_blob_name)
#
# blob.upload_from_filename(source_file_name)
#
# print('File {} uploaded to {}.'.format(
# source_file_name,
# destination_blob_name))
#
#
# def download_blob(bucket_name, source_blob_name, destination_file_name):
# # Uploads a blob from a bucket
# storage_client = storage.Client()
# bucket = storage_client.get_bucket(bucket_name)
# blob = bucket.blob(source_blob_name)
#
# blob.download_to_filename(destination_file_name)
#
# print('Blob {} downloaded to {}.'.format(
# source_blob_name,
# destination_file_name))
2.2.2 如果下载比较慢,也可以通过url链接直接下载coco128.zip
点我——》带你去:https://drive.google.com/uc?export=download&id=1n_oKgR81BJtqk75b00eAjdv03qVCQn2f
上面下载好预训练
准备好上面的环境和下载好文件之后,就可以开始自定义自己的数据集,进行训练啦!
3 训练下载的coco128数据集
3.1 创建训练数据集的配置文件Dataset.yaml
上面下载好coco128.zip小型数据集之后,这些数据集可以用于训练和验证
/content/yolov5/models/yolov5l.yaml。coco128.yaml中定义了:
- 训练图片的路径(或训练图片列表的
.txt文件) - 与验证集相同的图片
- 目标的类别数
- 类名列表
下面是/data/coco128.yaml文件中定义的内容:
# COCO 2017 dataset http://cocodataset.org - first 128 training images
# Download command: python -c "from yolov5.utils.google_utils import gdrive_download; gdrive_download('1n_oKgR81BJtqk75b00eAjdv03qVCQn2f','coco128.zip')"
# Train command: python train.py --data ./data/coco128.yaml
# Dataset should be placed next to yolov5 folder:
# /parent_folder
# /coco128
# /yolov5


# 训练集和验证集 (图片的目录路径或 *.txt图片路径)
train: ../coco128/images/train2017/
val: ../coco128/images/train2017/

# 类别数 number of classes
nc: 80

# 类别列表 class names
names: ['person', 'bicycle', 'car', 'motorcycle', 'airplane', 'bus', 'train', 'truck', 'boat', 'traffic light',
        'fire hydrant', 'stop sign', 'parking meter', 'bench', 'bird', 'cat', 'dog', 'horse', 'sheep', 'cow',
        'elephant', 'bear', 'zebra', 'giraffe', 'backpack', 'umbrella', 'handbag', 'tie', 'suitcase', 'frisbee',
        'skis', 'snowboard', 'sports ball', 'kite', 'baseball bat', 'baseball glove', 'skateboard', 'surfboard',
        'tennis racket', 'bottle', 'wine glass', 'cup', 'fork', 'knife', 'spoon', 'bowl', 'banana', 'apple',
        'sandwich', 'orange', 'broccoli', 'carrot', 'hot dog', 'pizza', 'donut', 'cake', 'chair', 'couch',
        'potted plant', 'bed', 'dining table', 'toilet', 'tv', 'laptop', 'mouse', 'remote', 'keyboard', 'cell phone',
        'microwave', 'oven', 'toaster', 'sink', 'refrigerator', 'book', 'clock', 'vase', 'scissors', 'teddy bear',
        'hair drier', 'toothbrush']
3.2 创建标签(Labels)
对数据集进行打标签,可以选择如下两种打标工具:
将标签导出为darknet格式,每个标注图像有一个*.txt文件(如果图像中没有对象,则不需要*.txt文件),*.txt文件格式如下:
- 每行一个对象
- 每行都是:
class x_center y_center width height格式 - 框的坐标格式必须采用
归一化格式的xywh(从0到1),如果你框以像素为单位,则将x_center和width除以图像宽度,将y_center和height除以图像的高度 - 类别是从
索引0开始的
通过在器路径名中将/images/*.jpg替换为/label/*.txt,可以定位每个图像的标签文件,示例图像和标签对为:
dataset/images/train2017/000000109622.jpg  # image
dataset/labels/train2017/000000109622.txt  # label
例如:000000000009.txt标签文件,表示000000000009.jpg图片中标注了8个目标:
45 0.479492 0.688771 0.955609 0.5955
45 0.736516 0.247188 0.498875 0.476417
50 0.637063 0.732938 0.494125 0.510583
45 0.339438 0.418896 0.678875 0.7815
49 0.646836 0.132552 0.118047 0.096937
49 0.773148 0.129802 0.090734 0.097229
49 0.668297 0.226906 0.131281 0.146896
49 0.642859 0.079219 0.148063 0.148062
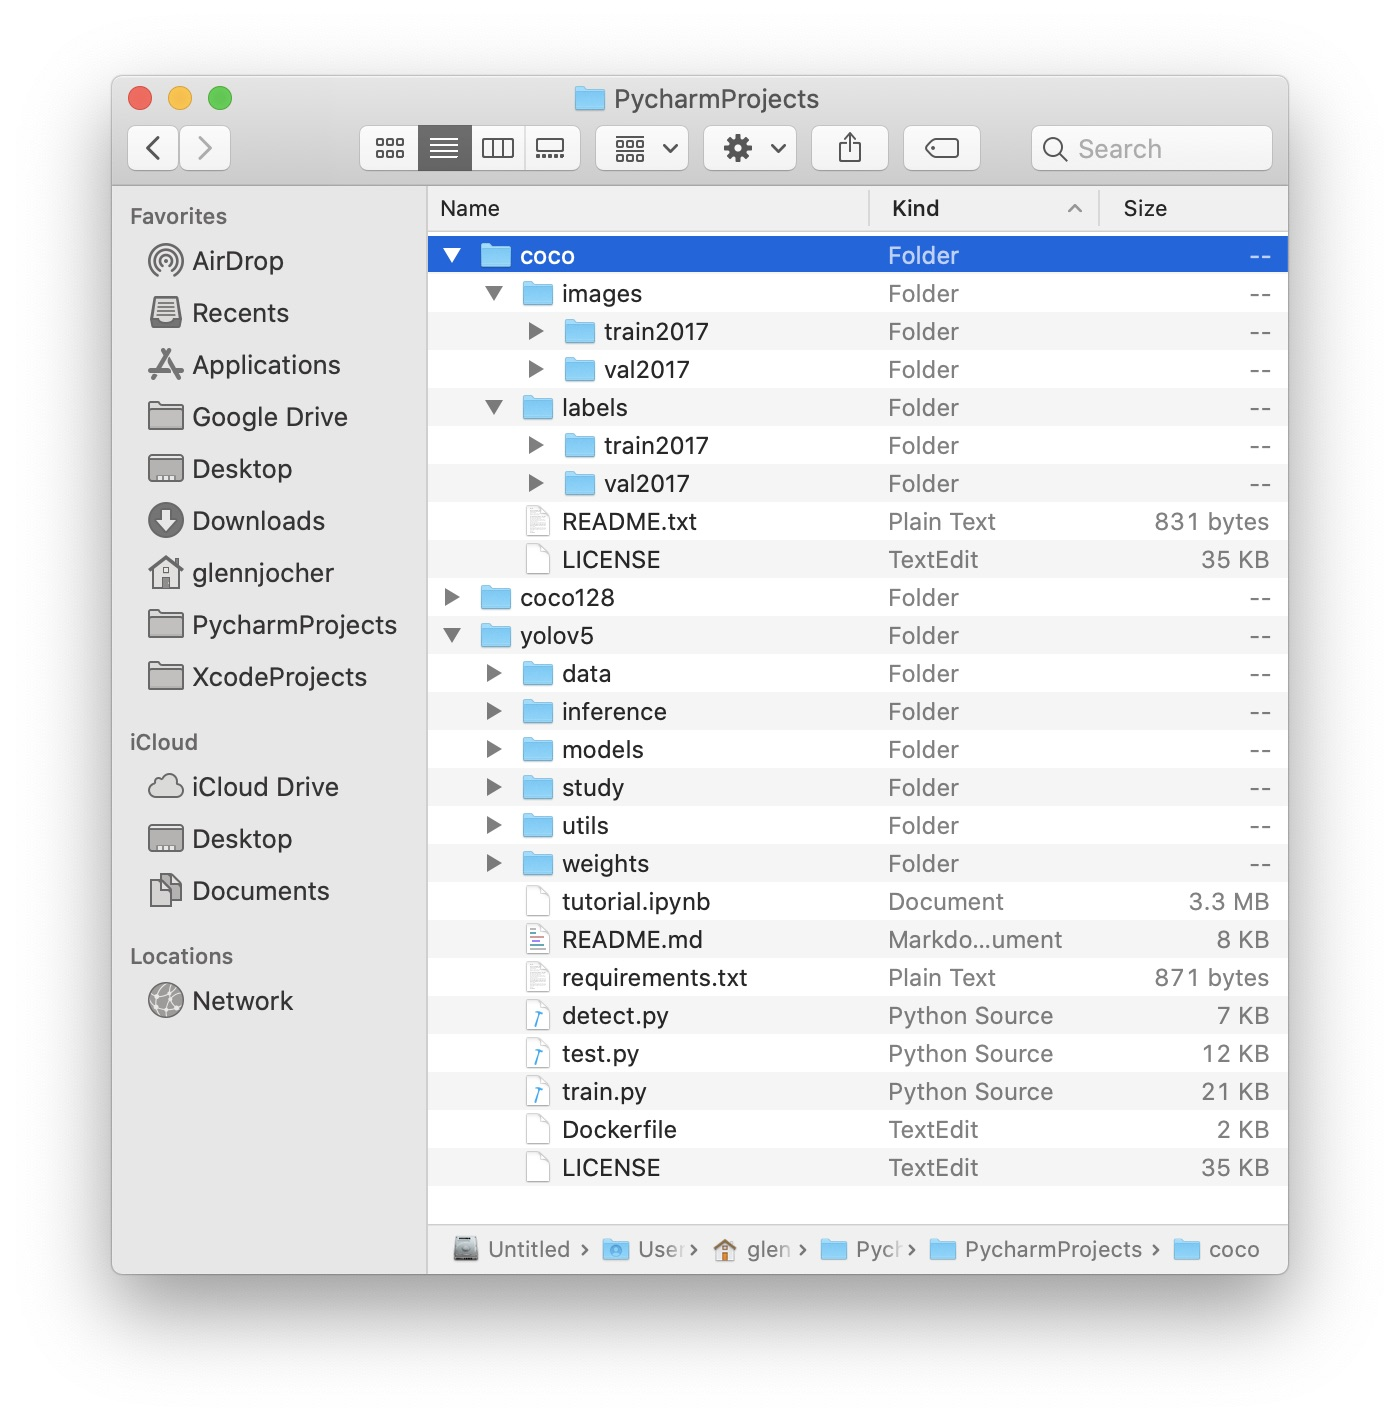
3.3 组织文件结构
根据下图整理自己的训练集和验证集图片及标签。注意:/coco128目录应该和yolov5目录同级,同时确保coco128/labels和coco128/images两个目录同级!

3.4 选择一个模型训练
上面已经修改了自定义数据集的配置文件,同时组织好了数据。下面就可以选择一个模型进行训练了。
从./models目录下选择一个模型的配置文件,这里我们选择yolov5s.ymal,这是一个最小最快的模型。关于其他模型之间的比较下面介绍。选择好模型之后,如果你使用的不是coco数据集进行训练,而是自定义的数据集,此时只需要修改*.yaml配置文件中的nc: 80参数和数据的类别列表
下面是yolo5s.ymal配置文件的内容:
# parameters
nc: 80  # number of classes
depth_multiple: 0.33  # model depth multiple
width_multiple: 0.50  # layer channel multiple

# anchors
anchors:
  - [116,90, 156,198, 373,326]  # P5/32
  - [30,61, 62,45, 59,119]  # P4/16
  - [10,13, 16,30, 33,23]  # P3/8

# YOLOv5 backbone
backbone:
  # [from, number, module, args]
  [[-1, 1, Focus, [64, 3]],  # 0-P1/2
   [-1, 1, Conv, [128, 3, 2]],  # 1-P2/4
   [-1, 3, BottleneckCSP, [128]],
   [-1, 1, Conv, [256, 3, 2]],  # 3-P3/8
   [-1, 9, BottleneckCSP, [256]],
   [-1, 1, Conv, [512, 3, 2]],  # 5-P4/16
   [-1, 9, BottleneckCSP, [512]],
   [-1, 1, Conv, [1024, 3, 2]], # 7-P5/32
   [-1, 1, SPP, [1024, [5, 9, 13]]],
  ]

# YOLOv5 head
head:
  [[-1, 3, BottleneckCSP, [1024, False]],  # 9

   [-1, 1, Conv, [512, 1, 1]],
   [-1, 1, nn.Upsample, [None, 2, 'nearest']],
   [[-1, 6], 1, Concat, [1]],  # cat backbone P4
   [-1, 3, BottleneckCSP, [512, False]],  # 13

   [-1, 1, Conv, [256, 1, 1]],
   [-1, 1, nn.Upsample, [None, 2, 'nearest']],
   [[-1, 4], 1, Concat, [1]],  # cat backbone P3
   [-1, 3, BottleneckCSP, [256, False]],
   [-1, 1, nn.Conv2d, [na * (nc + 5), 1, 1]],  # 18 (P3/8-small)

   [-2, 1, Conv, [256, 3, 2]],
   [[-1, 14], 1, Concat, [1]],  # cat head P4
   [-1, 3, BottleneckCSP, [512, False]],
   [-1, 1, nn.Conv2d, [na * (nc + 5), 1, 1]],  # 22 (P4/16-medium)

   [-2, 1, Conv, [512, 3, 2]],
   [[-1, 10], 1, Concat, [1]],  # cat head P5
   [-1, 3, BottleneckCSP, [1024, False]],
   [-1, 1, nn.Conv2d, [na * (nc + 5), 1, 1]],  # 26 (P5/32-large)

   [[], 1, Detect, [nc, anchors]],  # Detect(P5, P4, P3)
  ]
yolov5s.yaml配置文件中主要定义了:
- 参数(parameters):类别等
- anchor
- YOLOv5 backbone
- YOLOv5 head
3.5 开始训练
3.5.1 训练命令
上面一切准备就绪,可以开始训练啦
运行下面的命令训练coco128.ymal,训练5epochs。可以有两种训练方式,如下参数:
--cfg yolov5s.yaml --weights '':从头开始训练--cfg yolov5s.yaml --weights yolov5s.pt:从预训练的模型加载开始训练
YOLOv5在coco128上训练5epochs的命令:
python train.py --img 640 --batch 16 --epochs 5 --data ./data/coco128.yaml --cfg ./models/yolov5s.yaml --weights ''
训练的更多可选参数:
--epochs:训练的epoch,默认值300--batch-size:默认值16--cfg:模型的配置文件,默认为yolov5s.yaml--data:数据集的配置文件,默认为data/coco128.yaml--img-size:训练和测试输入大小,默认为[640, 640]--rect:rectangular training,布尔值--resume:是否从最新的last.pt中恢复训练,布尔值--nosave:仅仅保存最后的checkpoint,布尔值--notest:仅仅在最后的epoch上测试,布尔值--evolve:进化超参数(evolve hyperparameters),布尔值--bucket:gsutil bucket,默认值''--cache-images:缓存图片可以更快的开始训练,布尔值--weights:初始化参数路径,默认值''--name:如果提供,将results.txt重命名为results_name.txt--device:cuda设备,例如:0或0,1,2,3或cpu,默认''--adam:使用adam优化器,布尔值--multi-scale:改变图片尺寸img-size+/0- 50%,布尔值--single-cls:训练单个类别的数据集,布尔值
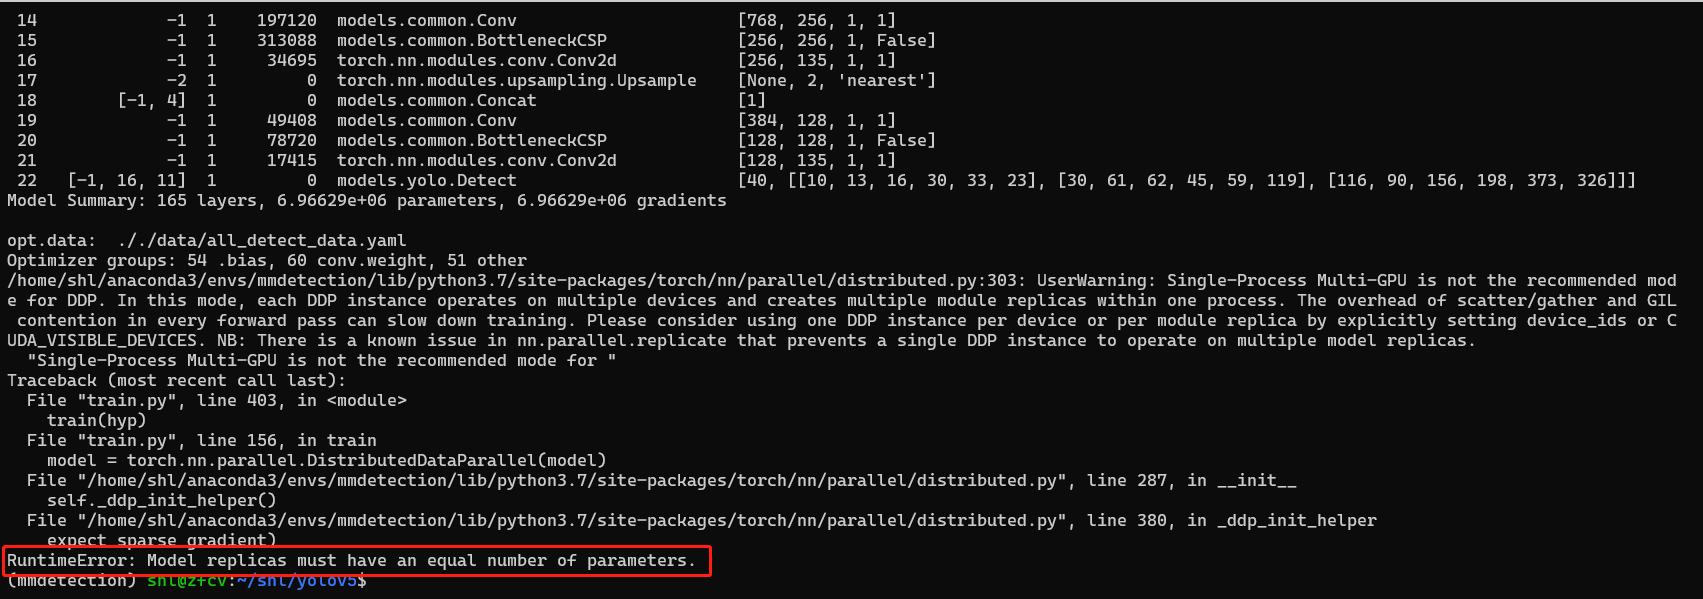
3.5.2 训练常见错误1
1、执行训练命令报错:RuntimeError: Model replicas must have an equal number of parameters.,错误显示,模型的副本必须有相同的参数
2、解决方式:
这个可能是由于Pytorch的版本问题导致的错误,我的torch版本为15.0,把版本降为1.4.0即可(参考):
pip install torch==1.4.0+cu100 torchvision==0.5.0+cu100 -f https://download.pytorch.org/whl/torch_stable.html
3.5.3 训练常见错误2
1、执行训练命令报错:ModuleNotFoundError: No module named 'yaml'
2、解决方式:
这是由于没有安装yaml库包错误,虽然导入是:import yaml,但是安装的名字却不是yaml,下面是正确安装yaml:
pip install PyYAML
3.5.4 训练常见错误3
1、执行训练命令报错:AttributeError: 'DistributedDataParallel' object has no attribute 'model'
2、错误解决方式:
这个是由于--device的默认值为'',此时默认会使用多GPU进行训练,但是多GPU训练时就会出现上面这个问题,这可能时一个bug(参考),解决方式就是使用单GPU,把训练命令改成如下:
python train.py --img 640 --batch 16 --epochs 5 --data ./data/coco128.yaml --cfg ./models/yolov5s.yaml --weights '' --device 0
3.6 使用tensorboard可视化结果
在yolov5目录下,使用:
tensorboard --logdir=runs
然后把返回的url地址粘贴到浏览器中即可!我测试显示结果如下:
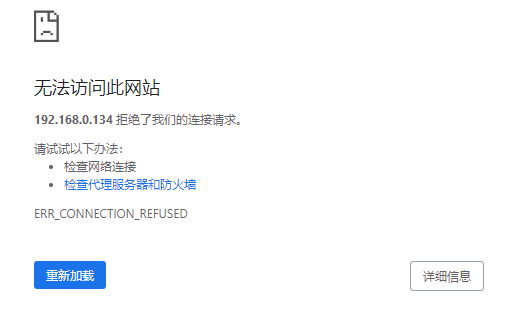
注意:
如果返回拒绝了我们的请求,可以在tensorboard的后面加上参数--port ip:
tensorboard --logdir=runs --host=192.168.0.134
3.7 测试
测试的更多可选参数:
--weights:预训练模型路径,默认值weights/yolov5s.pt--data:数据集的配置文件,默认为data/coco.yaml--batch-size:默认值32--img-size:推理大小(pixels),默认640--conf-thres:目标置信度阈值,默认0.001--iou-thres:NMS的IOU阈值,默认0.65--save-json:把结果保存为cocoapi-compatible的json文件--task:默认val,可选其他值:val, test, study--device:cuda设备,例如:0或0,1,2,3或cpu,默认''--half:半精度的FP16推理--single-cls:将其视为单类别,布尔值--augment:增强推理,布尔值--verbose:显示类别的mAP,布尔值
测试命令示例:
python test.py --weights yolov5s.pt --data ./data/coco.yaml --img 640
4 训练自己的数据集
数据准备有两种方式:
- 一种是直接指定训练集和测试集图片的路径(
本文使用的这种方法) - 另外一种是给出训练和测试集图片的txt文件
4.1 准备数据集
yolov5中的数据集的标签都是保存为YOLO格式的txt文件的,关于:
- 怎么标注数据集
- VOC数据和YOLO数据格式时是什么样的
- 怎么把VOC格式数据转化为YOLO格式数据
- 以及VOC格式和YOLO格式相互转化计算过程
请参考:这篇博客,这里不在赘述!!!
数据集标注好之后,存放如下目录格式:
(yolov5) shl@zfcv:~/shl/yolov5$ tree hat_hair_beard
hat_hair_beard
├── images
│   ├── train2017        # 训练集图片,这里我只列举几张示例
│   │   ├── 000050.jpg
│   │   ├── 000051.jpg
│   │   └── 000052.jpg
│   └── val2017          # 验证集图片
│       ├── 001800.jpg
│       ├── 001801.jpg
│       └── 001802.jpg
└── labels
    ├── train2017       # 训练集的标签文件
    │   ├── 000050.txt
    │   ├── 000051.txt
    │   └── 000052.txt
    └── val2017         # 验证集的标签文件
        ├── 001800.txt
        ├── 001801.txt
        └── 001802.txt

6 directories, 13 files
(yolov5) shl@zfcv:~/shl/yolov5$
- had_hair_beard:存放数据的目录,该目录位于
yolov5目录下 - images:目录下存放的是图片,包含训练集和验证集图片
- labels:目录下存放的是标签文件,包含训练集和验证集图片对应的标签文件
按照上面的结构组织好数据的目录结构,然后就可以修改一些训练相关的文件了!
4.2 修改数据和模型配置文件
4.2.1 修改数据配置文件
原先的配置文件为:./yolov5/data/coco128.yaml,该文件中内容为:
(yolov5) shl@zfcv:~/shl/yolov5/data$ ls
Annotations   coco.yaml        hat_hair_beard.yaml  JPEGImages
coco128.yaml  get_coco2017.sh  ImageSets            VOC2007
(yolov5) shl@zfcv:~/shl/yolov5/data$ cat coco128.yaml
# COCO 2017 dataset http://cocodataset.org - first 128 training images
# Download command: python -c "from yolov5.utils.google_utils import gdrive_download; gdrive_download('1n_oKgR81BJtqk75b00eAjdv03qVCQn2f','coco128.zip')"
# Train command: python train.py --data ./data/coco128.yaml
# Dataset should be placed next to yolov5 folder:
# /parent_folder
# /coco128
# /yolov5


# train and val datasets (image directory or *.txt file with image paths)
train: ../coco128/images/train2017/
val: ../coco128/images/train2017/

# number of classes
nc: 80

# class names
names: ['person', 'bicycle', 'car', 'motorcycle', 'airplane', 'bus', 'train', 'truck', 'boat', 'traffic light',
        'fire hydrant', 'stop sign', 'parking meter', 'bench', 'bird', 'cat', 'dog', 'horse', 'sheep', 'cow',
        'elephant', 'bear', 'zebra', 'giraffe', 'backpack', 'umbrella', 'handbag', 'tie', 'suitcase', 'frisbee',
        'skis', 'snowboard', 'sports ball', 'kite', 'baseball bat', 'baseball glove', 'skateboard', 'surfboard',
        'tennis racket', 'bottle', 'wine glass', 'cup', 'fork', 'knife', 'spoon', 'bowl', 'banana', 'apple',
        'sandwich', 'orange', 'broccoli', 'carrot', 'hot dog', 'pizza', 'donut', 'cake', 'chair', 'couch',
        'potted plant', 'bed', 'dining table', 'toilet', 'tv', 'laptop', 'mouse', 'remote', 'keyboard', 'cell phone',
        'microwave', 'oven', 'toaster', 'sink', 'refrigerator', 'book', 'clock', 'vase', 'scissors', 'teddy bear',
        'hair drier', 'toothbrush'](yolov5) shl@zfcv:~/shl/yolov5/data$
我们把该文件拷贝一份(这是我个人的习惯,你也可以不改,直接在coco128.yaml文件中进修改)
cp coco128.yaml hat_hair_beard.yaml
然后在hat_hair_beard.yaml中需要修改3处内容:
1、训练集和验证集图片的路径
train: /home/shl/shl/yolov5/hat_hair_beard/images/train2017
val: /home/shl/shl/yolov5/hat_hair_beard/images/val2017
注意:
最好用绝对路径,我在使用相对路径的时候报错,说路径存在
2、修改类别数nc
nc=7#我数据集一共分7个类别
3、修改类别列表,把类别修改为自己的类别
names: ['hard_hat', 'other', 'regular', 'long_hair', 'braid', 'bald', 'beard']
修改后的hat_hair_beard.yaml完整配置内容如下:
# COCO 2017 dataset http://cocodataset.org - first 128 training images
# Download command: python -c "from yolov5.utils.google_utils import gdrive_download; gdrive_download('1n_oKgR81BJtqk75b00eAjdv03qVCQn2f','coco128.zip')"
# Train command: python train.py --data ./data/coco128.yaml
# Dataset should be placed next to yolov5 folder:
# /parent_folder
# /coco128
# /yolov5


# train and val datasets (image directory or *.txt file with image paths)
#train: ../my_dataset/hat_hair_beard/images/train2017/
#val: ../my_dataset/hat_hair_beard/images/train2017/

#train: ../hat_hair_beard/images/train2017
train: /home/shl/shl/yolov5/hat_hair_beard/images/train2017
#val: ../hat_hair_beard/images/val2017
val: /home/shl/shl/yolov5/hat_hair_beard/images/val2017


# number of classes
nc: 7

# class names
names: ['hard_hat', 'other', 'regular', 'long_hair', 'braid', 'bald', 'beard']
4.2.2 修改模型配置文件
修改模型配置文件,这里我使用的是yolov5/models/yolov5s.yaml模型的配置文件,个人习惯我还是把改配置文件拷贝一份,为:hat_hair_beard_yolov5s.yaml(你也可以不改,直接在yolov5.yaml中修改)

yolov5s.yaml配置文件中原内容为:
(yolov5) shl@zfcv:~/shl/yolov5/models$ cat yolov5s.yaml
# parameters
nc: 80  # number of classes
depth_multiple: 0.33  # model depth multiple
width_multiple: 0.50  # layer channel multiple

# anchors
anchors:
  - [10,13, 16,30, 33,23]  # P3/8
  - [30,61, 62,45, 59,119]  # P4/16
  - [116,90, 156,198, 373,326]  # P5/32

# yolov5 backbone
backbone:
  # [from, number, module, args]
  [[-1, 1, Focus, [64, 3]],  # 1-P1/2
   [-1, 1, Conv, [128, 3, 2]],  # 2-P2/4
   [-1, 3, Bottleneck, [128]],
   [-1, 1, Conv, [256, 3, 2]],  # 4-P3/8
   [-1, 9, BottleneckCSP, [256]],
   [-1, 1, Conv, [512, 3, 2]],  # 6-P4/16
   [-1, 9, BottleneckCSP, [512]],
   [-1, 1, Conv, [1024, 3, 2]], # 8-P5/32
   [-1, 1, SPP, [1024, [5, 9, 13]]],
   [-1, 6, BottleneckCSP, [1024]],  # 10
  ]

# yolov5 head
head:
  [[-1, 3, BottleneckCSP, [1024, False]],  # 11
   [-1, 1, nn.Conv2d, [na * (nc + 5), 1, 1]],  # 12 (P5/32-large)

   [-2, 1, nn.Upsample, [None, 2, 'nearest']],
   [[-1, 6], 1, Concat, [1]],  # cat backbone P4
   [-1, 1, Conv, [512, 1, 1]],
   [-1, 3, BottleneckCSP, [512, False]],
   [-1, 1, nn.Conv2d, [na * (nc + 5), 1, 1]],  # 17 (P4/16-medium)

   [-2, 1, nn.Upsample, [None, 2, 'nearest']],
   [[-1, 4], 1, Concat, [1]],  # cat backbone P3
   [-1, 1, Conv, [256, 1, 1]],
   [-1, 3, BottleneckCSP, [256, False]],
   [-1, 1, nn.Conv2d, [na * (nc + 5), 1, 1]],  # 22 (P3/8-small)

   [[], 1, Detect, [nc, anchors]],  # Detect(P3, P4, P5)
  ]
(yolov5) shl@zfcv:~/shl/yolov5/models$
因此,在hat_hair_beard.yaml中只需要修改一处,把nc修改为自己的类别数即可
nc : 7
上面数据的准备和配置文件的修改全部准备好之后,就可以开始训练了!!!
4.3 训练自己的数据集
4.3.1 使用yolovs.pt预训练模型进行训练
训练命令:
python train.py --img 640 --batch 16 --epochs 300 --data ./data/hat_hair_beard.yaml --cfg ./models/hat_hair_beard_yolov5s.yaml --weights ./weights/yolov5s.pt --device 1
关于参数的介绍,上面已经介绍了,这里不再赘述
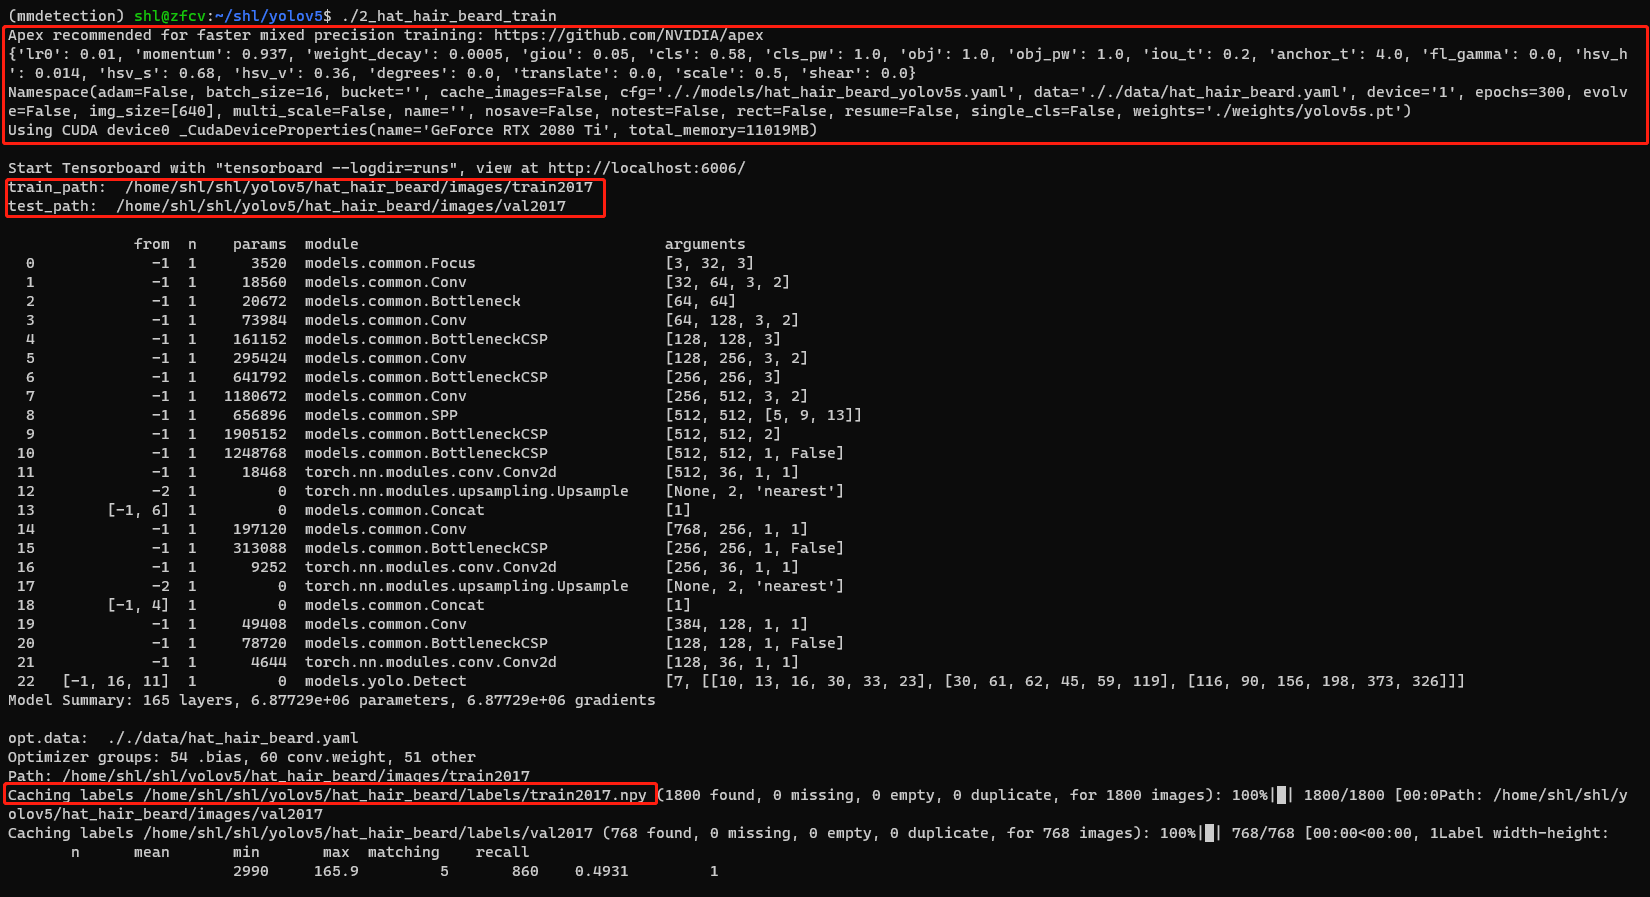
正常训练,如下图:
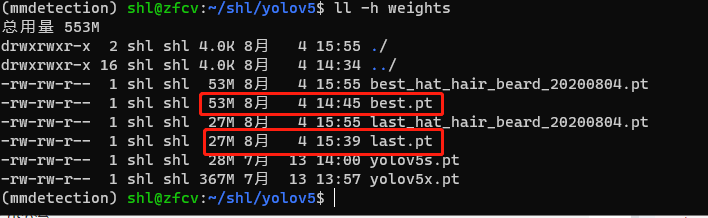
训练结束后,会生成两个预训练的模型:
best.pt:保存的是中间一共比较好模型last.pt:训练结束后保存的最后模型
我把最终训练的模型保存拷贝一份,防止下载再训练给覆盖,白白训练!
注意:
当使用--device参数设置多GPU进行训练时,可能会报错:RuntimeError: Model replicas must have an equal number of parameters. 具体错误如下图,会报错的命令:
--device 1:指定单个GPU不会报错--device 1,2,3:当使用两个以上的GPU会报错- 官方的iusses解决方式:把torch的把那本更新为
torch1.4,而我的torch为1.5版本
4.3.2 使用yolov5l.pt预训练模型进行训练
这是用yolov5l.pt预训练模型训练的效果
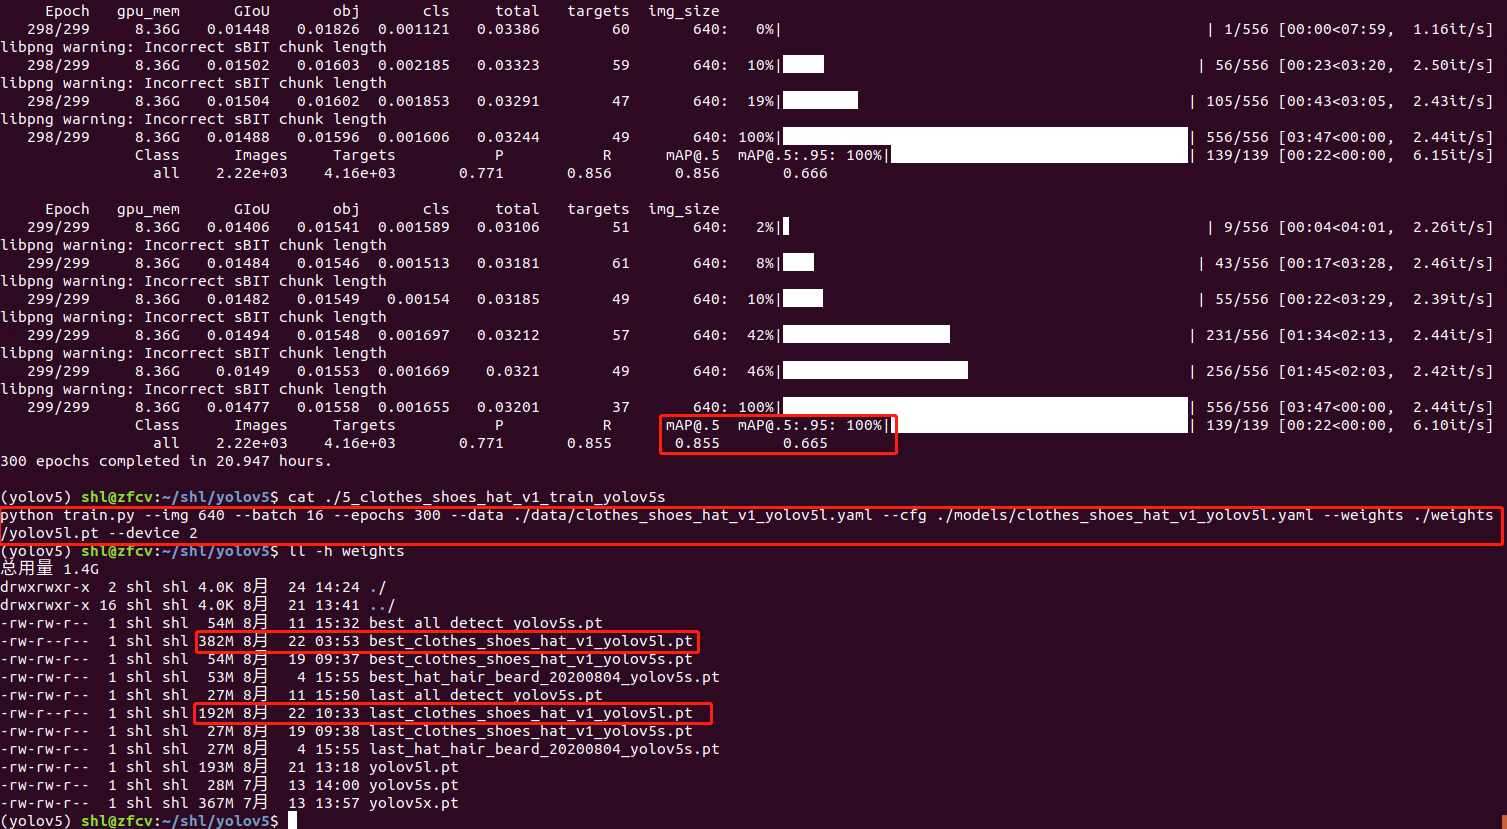
可以看到,使用yolov5l.pt预训练模型,保存的最终模型和最优模型都比较大:
best.pt:382Mlast.pt:192M
4.4 使用训练好的预训练模型进行测试
1、单张图片测试命令:
python detect.py --source inference/1_input/1_img/hat3.jpg --we ights ./weights/last_hat_hair_beard_20200804.pt --output inference/2_output/1_img/ --device 1

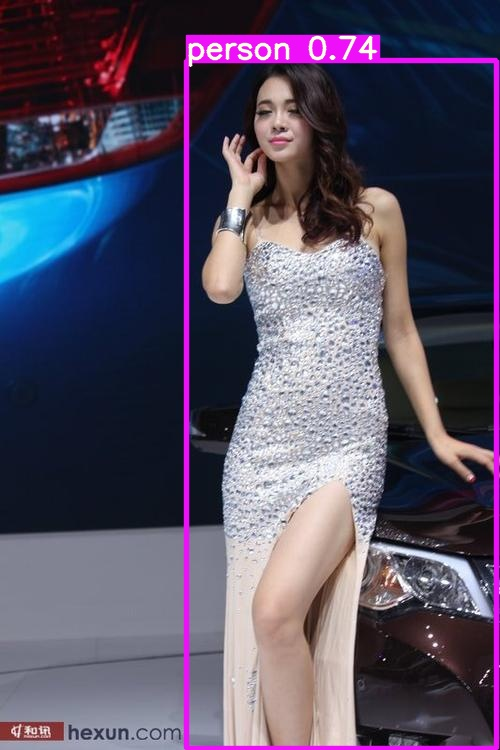
原图:
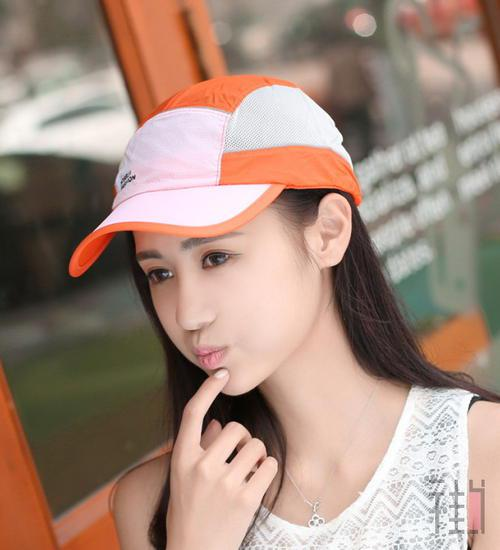
测试结果图:
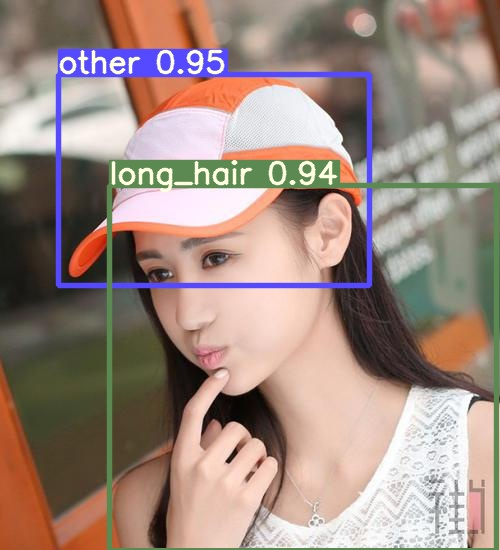
从结果可以看到,置信度还是很高的,而且目标都检测到了!(保存的结果图片,会把上一此保存的测试结果图删了,最终只保存最后一侧测试的结果图)
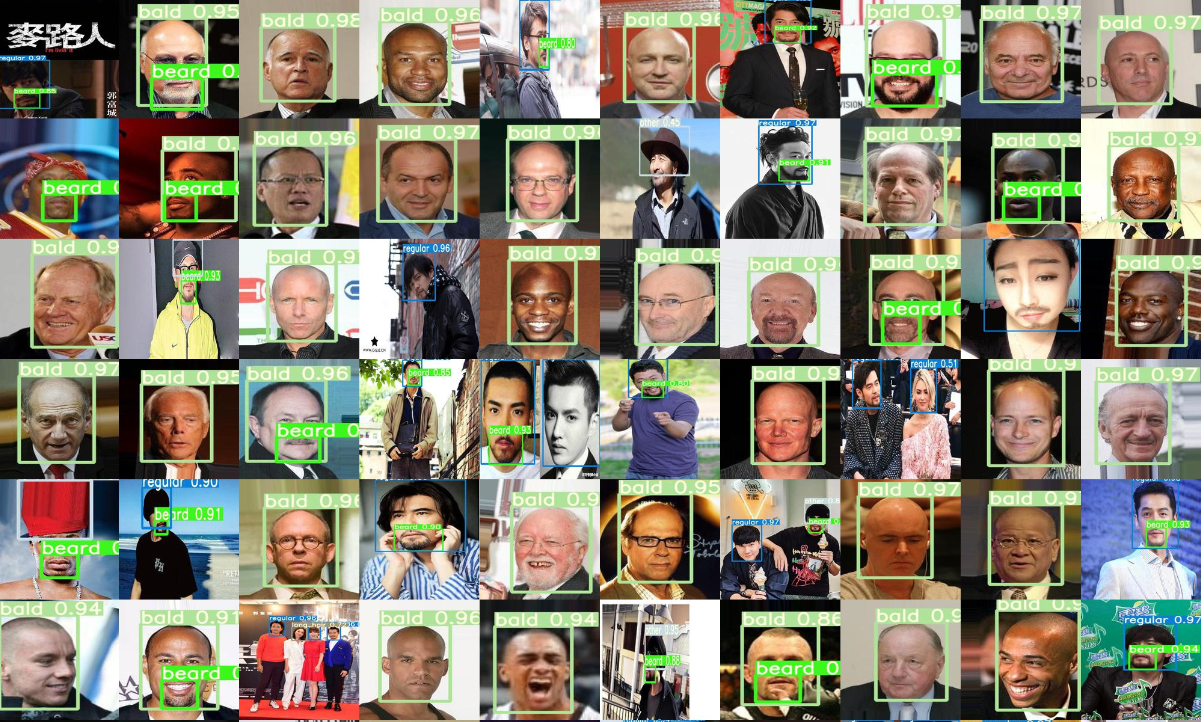
2、图片目录测试
python detect.py --source inference/1_input/2_imgs_hat --weights ./weights/last_hat_hair_beard_20200804.pt --output inference/2_output/2_imgs_hat --device 1
下面是测试图片集的效果:
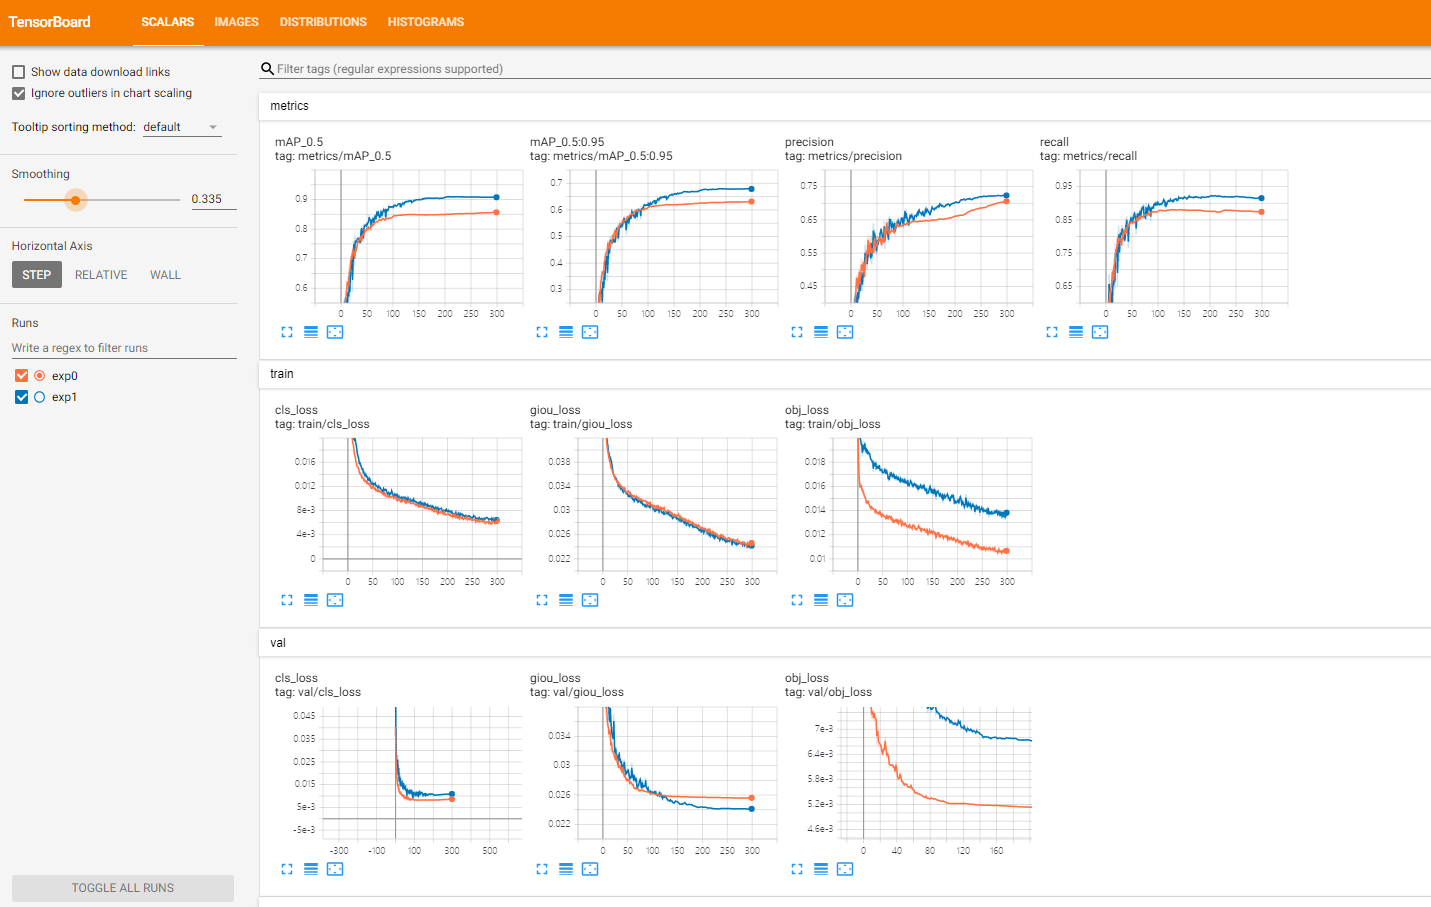
4.5 在Tensorbaord上查看数据的训练过程中的一些指标
使用如下命令,然后在浏览器中查看一些数据指标的可视化图
tensorbaord --logdir=runs
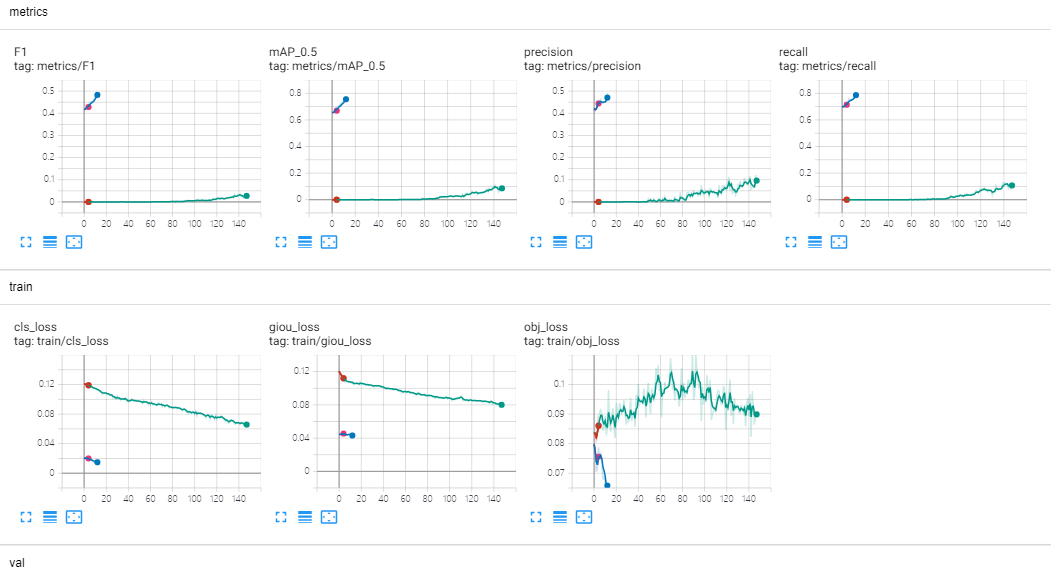
1、scalars
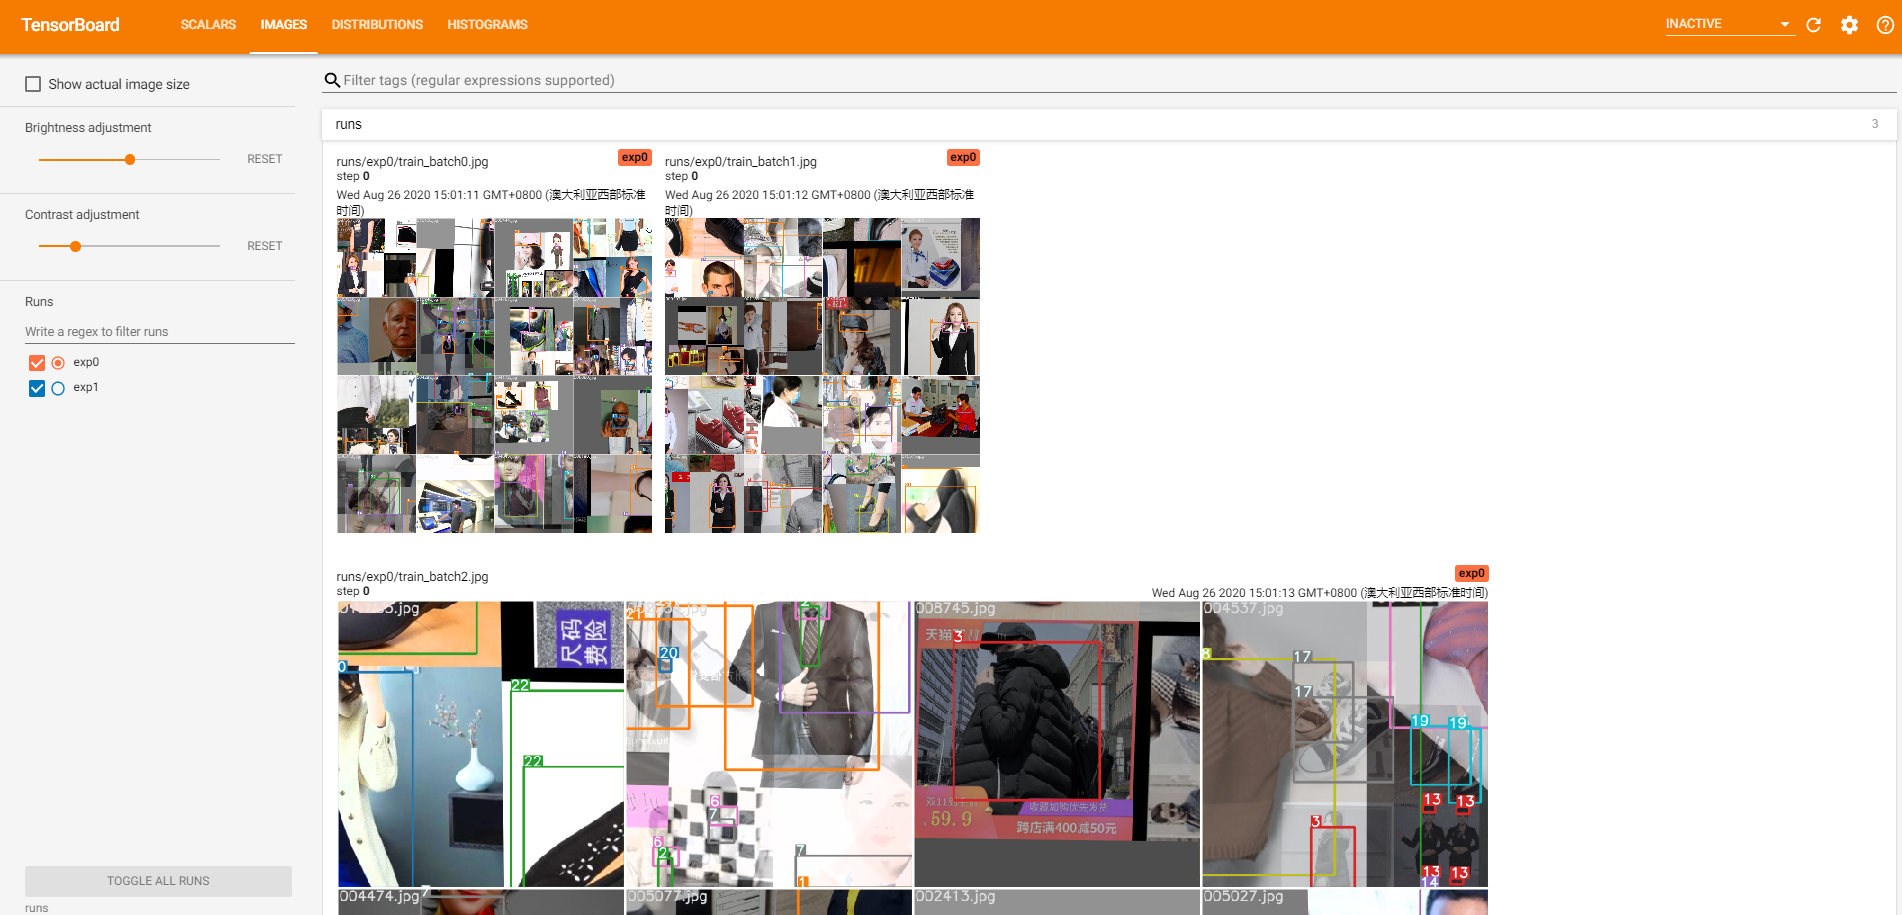
2、images
5 推理测试
使用预训练的模型进行推理测试,YOLOv5支持多种数据源推理测试,如下:
- 图像
- 目录
- 视频
- 网络摄像头
- http流
- rtsp流
使用python detect.py进行推理,关于推理的更多参数使用如下命令查看:
python detect.py -h
--weights:预训练模型.pt的路径,默认值为:weights/yolov5s.pt--source:输入的数据源,可以是:图片、目录、视频、网络摄像头、http和rtsp流,默认值为:interence/images--output: 输出检测结果的路径,默认值为:inference/output--img-size:用于推理图片的大小(pixels),默认值为:640--conf-thres:对象的置信度阈值(object confidence threshold),默认值为:0.4--iou-thres:NMS的IOU阈值( IOU threshold for NMS),默认值为:0.5--fourcc:输出视频的编码格式(必须是ffmepeg支持的),例如:H264格式,默认格式为:mp4v--half: 使用版精度F16推理(half precision FP16 inference),布尔值,默认为true--device:cuda设备,例如:0或0,1,2,3或cpu,默认''--view-img:显示结果,‘布尔值,默认为true’--save-txt:把结果保存到*.txt文件中--classes:过滤类别 CLASSES [CLASSES …],filter by class--agnostic-nms:类不可知 NMS--augment:增强推理(augmented inference)
我把自己的推理的输出和输入组织成如下文件结构:
(yolov5) shl@zfcv:~/shl/yolov5/inference$ tree -L 2
.
├── 1_input   # 输入
│   ├── 1_img
│   ├── 2_imgs
│   ├── 3_video
│   ├── 4_Webcam
│   ├── 5_http
│   └── 6_rtsp
└── 2_output  # 输出
    ├── 1_img
    ├── 2_imgs
    ├── 3_video
    ├── 4_Webcam
    ├── 5_http
    └── 6_rtsp
5.1 图像推理测试
1、推理图片命令
python detect.py --source inference/1_input/1_img/bus.jpg --weights ./weights/yolov5s.pt --output inference/2_output/1_img/
直接指定输出结果保存的目录即可,保存名字和输入图片命令相同!
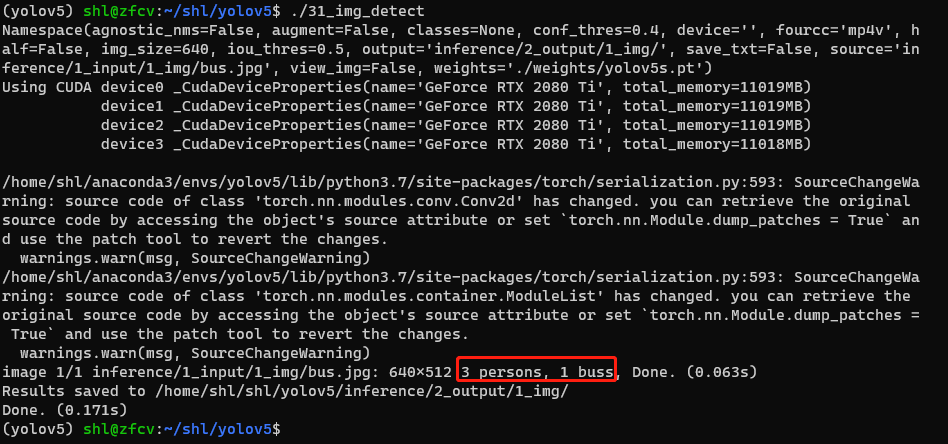
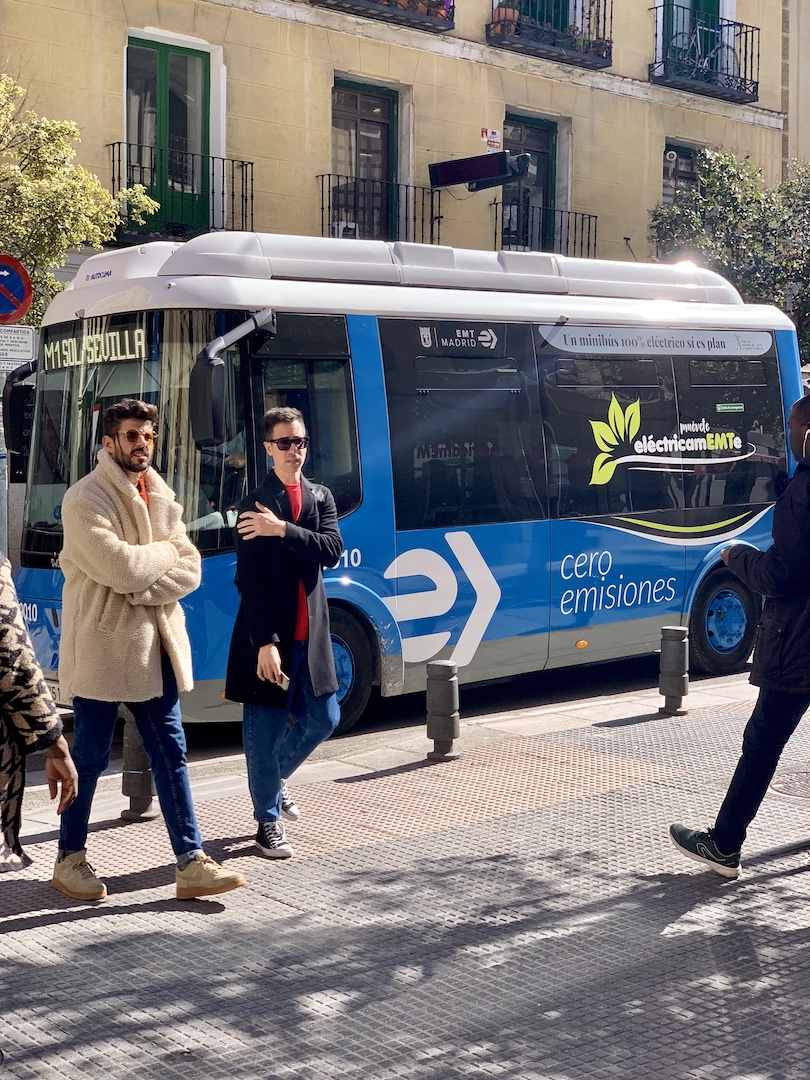
2、测试结果如下
测试图片:
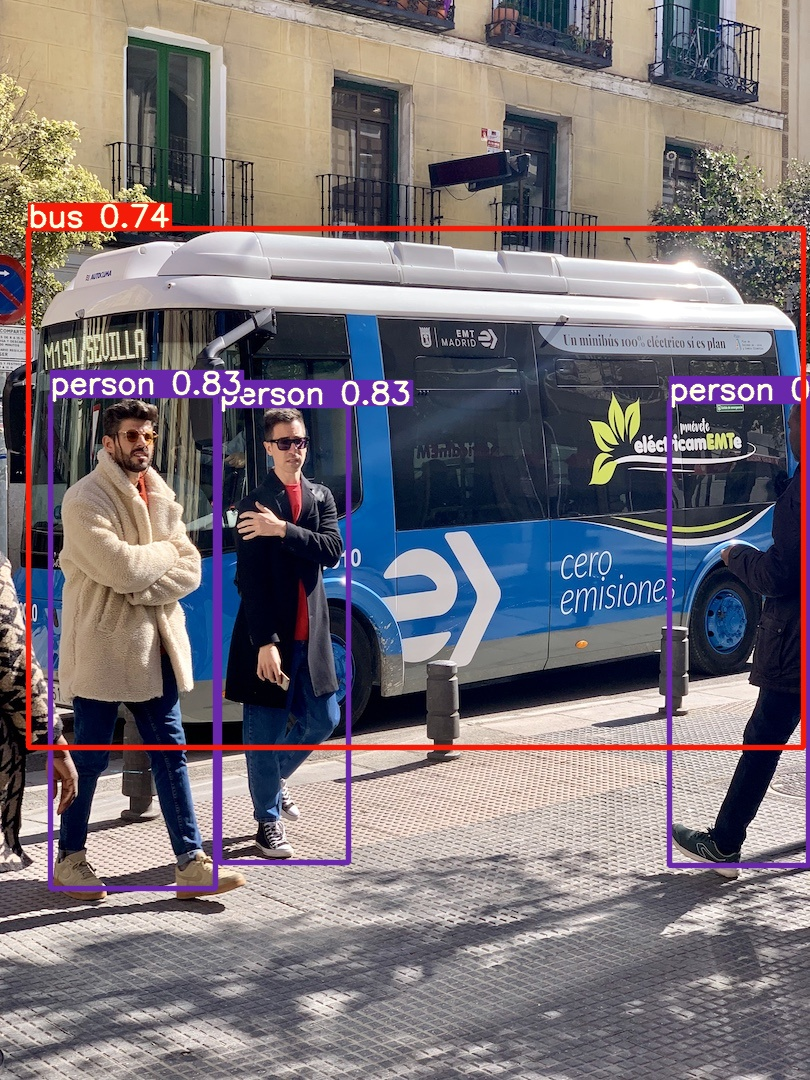
测试结果:
5.2 目录推理测试
1、推理目录下图片集命令
python detect.py --source inference/1_input/2_imgs --weights ./weights/yolov5s.pt --output inference/2_output/2_imgs
2、测试结果如下
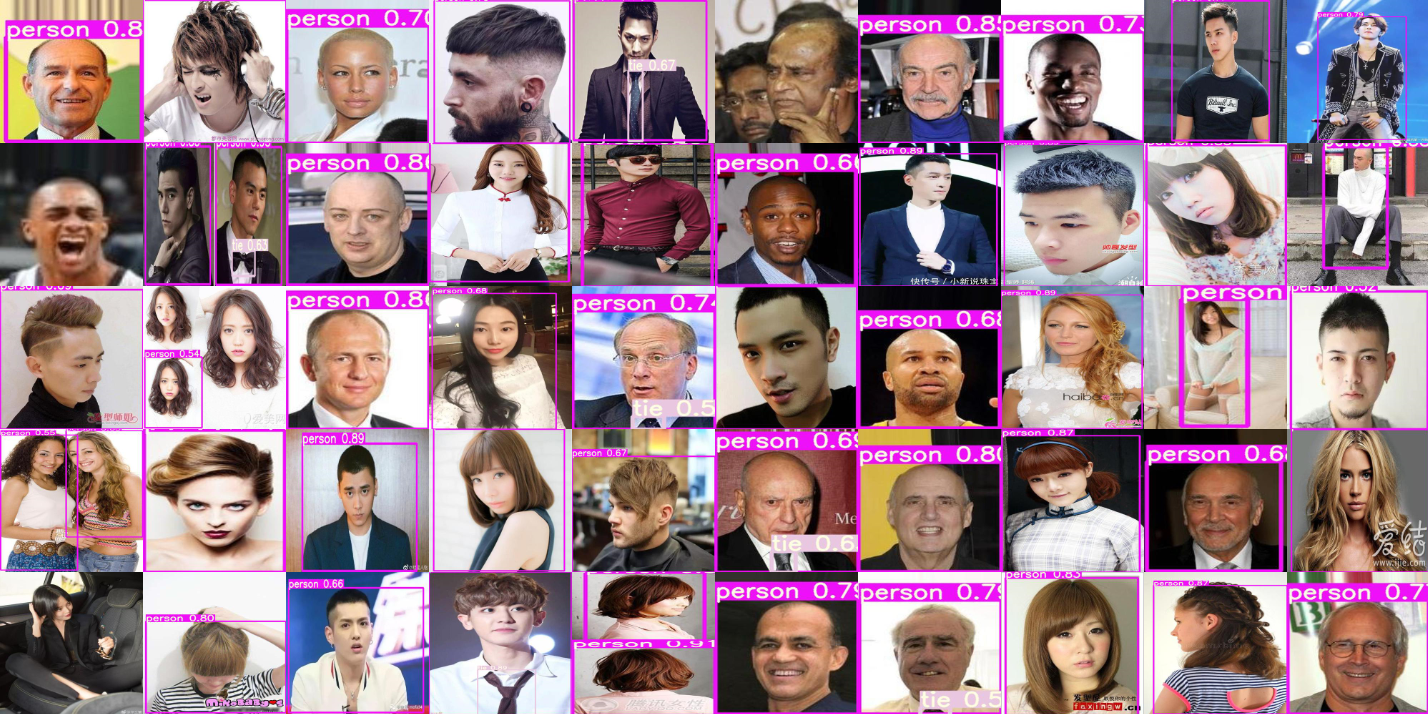
如果检测中有些图片置信度比较低的可以通过--conf-thres参数过滤掉,例如:
python detect.py --source inference/1_input/2_imgs --weights ./weights/yolov5s.pt --output inference/2_output/2_imgs --conf-thres 0.8
默认--conf-thres的值为0.4,如果我们把置信度的阈值设置为0.8,此时在下面的这图中就看不到检测目标的框!
5.3 视频推理测试
1、推理视频命令
python detect.py --source test.mp4 --weights ./weights/yolov5s.pt --output test_result/3_video
如果想指定输出视频的fourcc格式,用如下命令:
python detect.py --source test.mp4 --weights ./weights/yolov5s.pt --output test_result/3_video --fourcc H264
关于ffmeg支持的fourcc格式(参考),注意:视频的格式必须时四个字符长度
2、推理视频结果
本来我是想上传视频的,但是CSDN目前只支持腾讯、优酷、哔哩哔哩,没有自己的视频服务器,如果上传还需要等待审核,比较慢,我我就直接放个gif动图,大家简单看下效果吧,又由于CSDN限制上传图片小于5M,因此只能截取不到1秒(泪奔,我不想再去压缩一下,费劲):
5.4 网络摄像头推理测试
5.5 http流推理测试
5.6 rtsp流推理测试
推理测试命令:
# 示例语法(不要运行此单元格)
python detect.py --source ./file.jpg  # 图片
                          ./file.mp4  # 视频
                          ./dir  # 目录
                          0  # 网络摄像头
      'rtsp://170.93.143.139/rtplive/470011e600ef003a004ee33696235daa' # rtsp流
      'http://112.50.243.8/PLTV/88888888/224/3221225900/1.m3u8'  # http流
6 可视化
6.1 训练的模型的测试表现可视化
1、训练开始后,浏览train*.jpg图像查看训练的图片(training images)、标签(labels)和数据增强的结果。注意:mosaic数据增强的数据用于训练(增强图片如下图所示),这是由UItralytics在YOLOv4中创建的一种图像数据增强方法。如果你发现你标注的标签有不正确的,你应该回去重新标注!
Image(filename='./train_batch1.jpg', width=900)# view augmented training mosaics
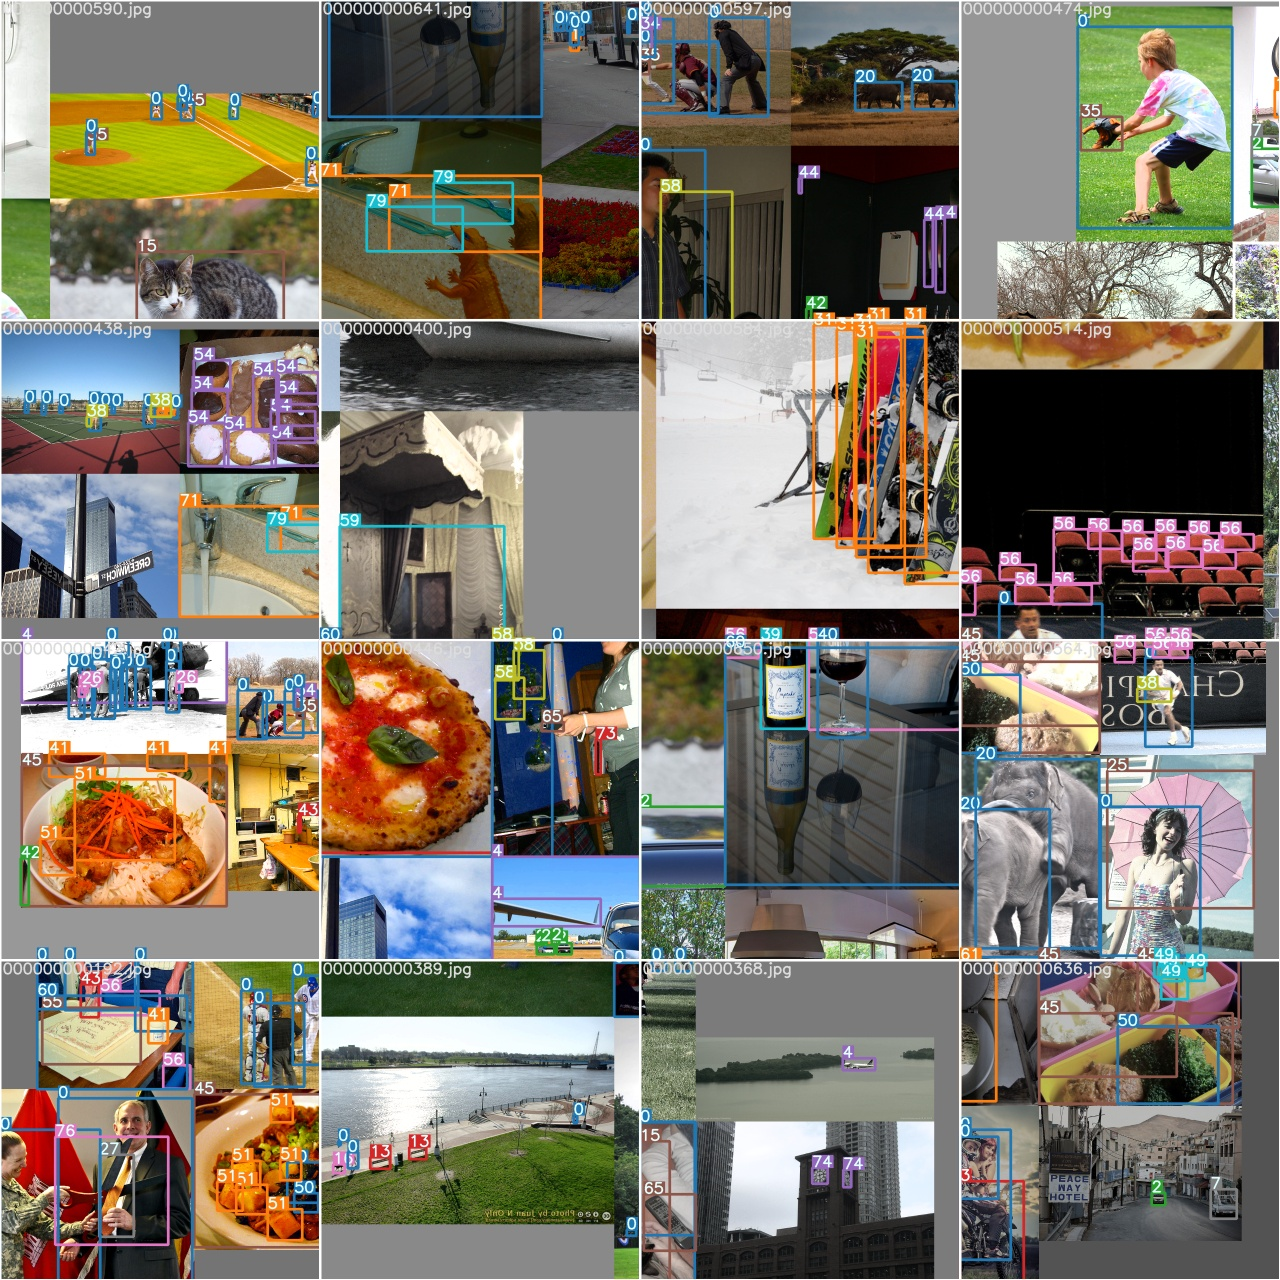
2、第一个epoch完成之后,查看test_batch0_gt.jpg,可以看到测试batch 0 ground truth的标签,如下图所示:
Image(filename='./test_batch0_gt.jpg', width=900)# view test image labels
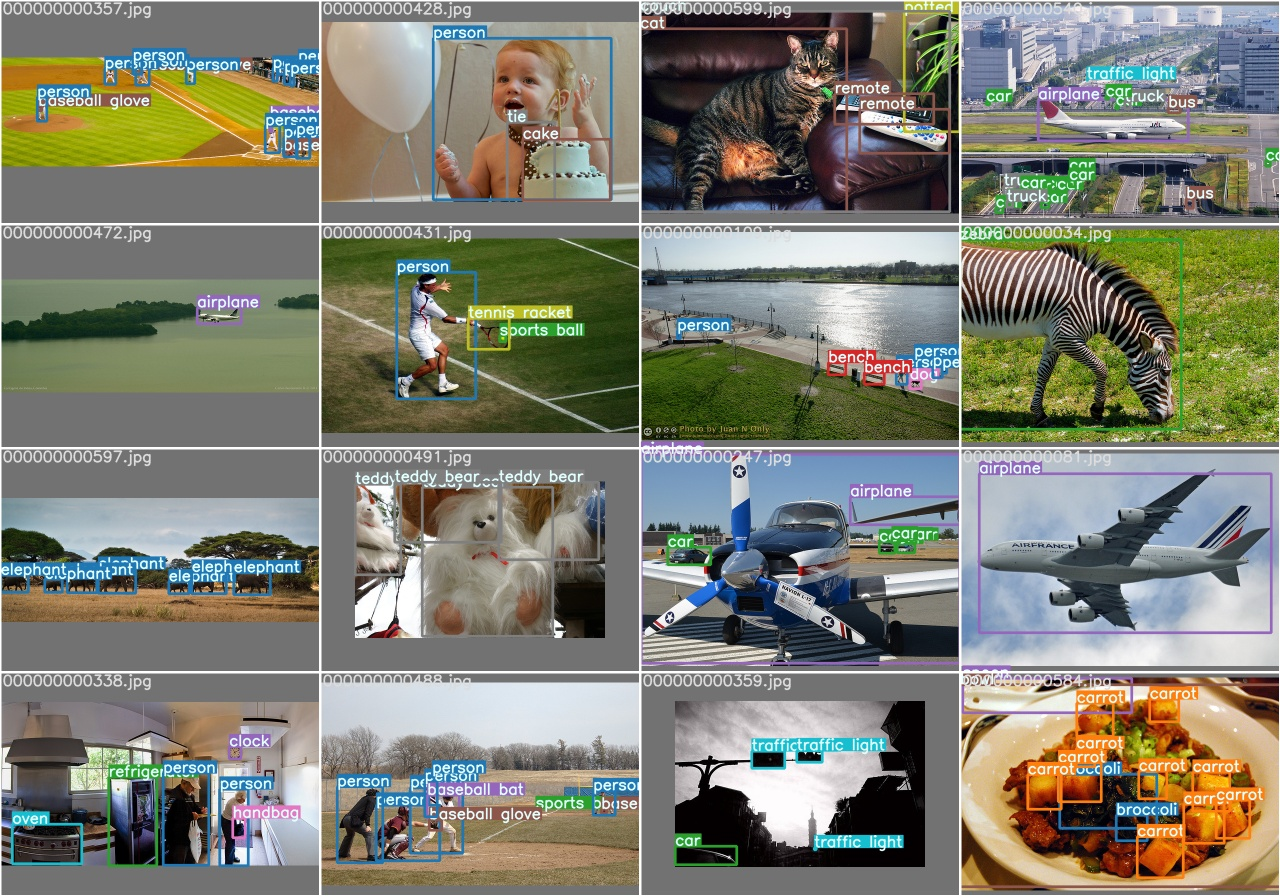
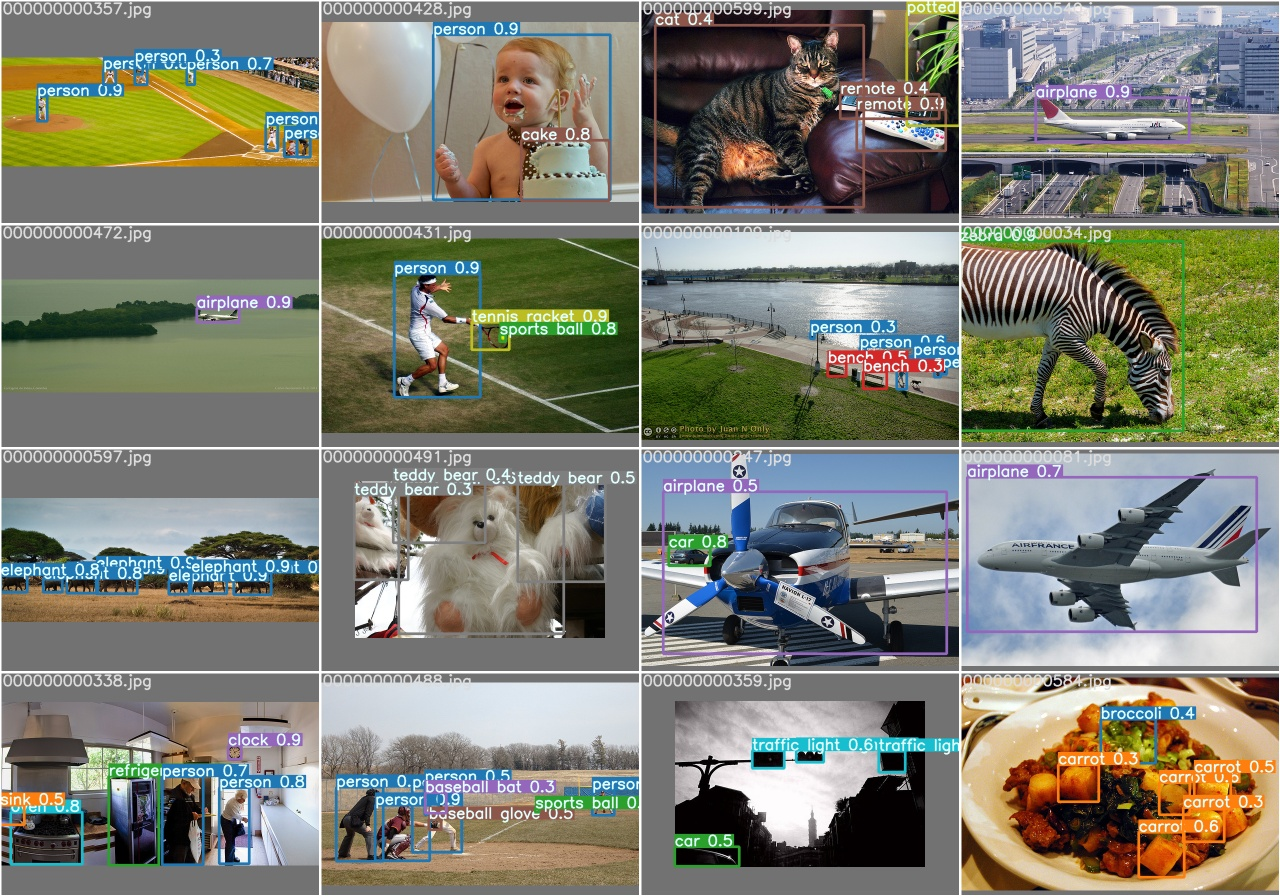
3、通过查看test_batch0_pred.jpg来查看test batch 0 predictions,结果下图所示:
Image(filename='./test_batch0_pred.jpg', width=900)# view test image predictions
6.2 训练损失和性能指标视化
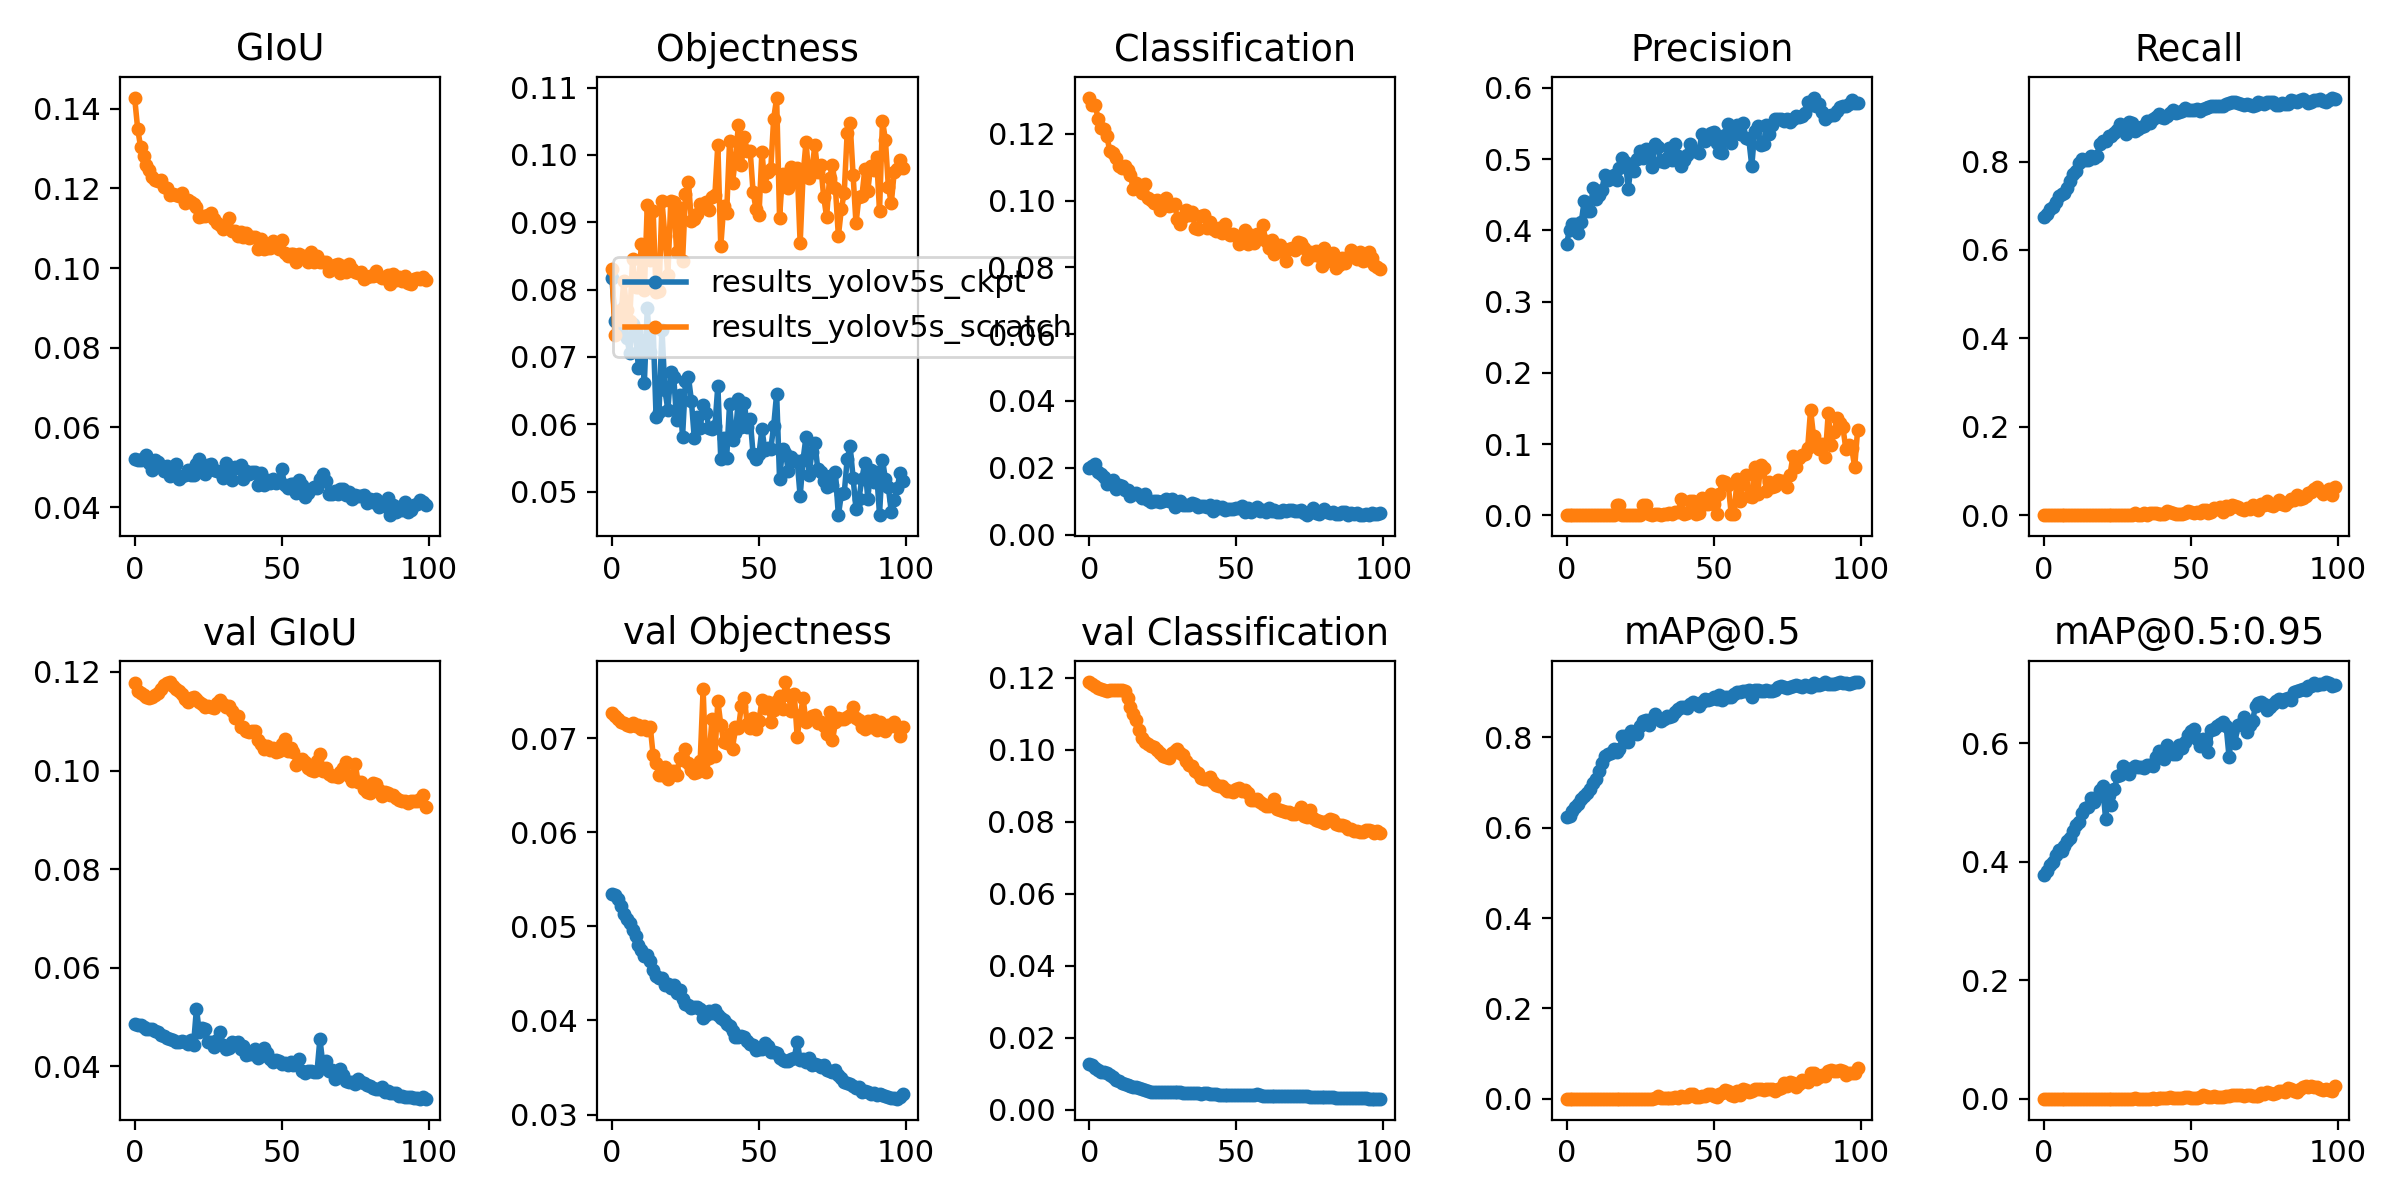
训练损失(training losses)和性能指标(performance metrrics)被保存到Tensorboard和results.txt日志文件中。result.txt绘制训练完成之后的结果,保存为result.png。可以使用如下代码,绘制部分完成的results.txt
from utils.utils import plot_results; plot_results()  # plot results.txt as results.png
Image(filename='./results.png', width=1000)  # view results.png
这里我们显示YOLOv5s在coco128上训练100 epochs:
橘黄色曲线:是从头开始训练蓝色曲线:从预训练的yolov5s.pt权重开始训练,


♠ ⊕ ♠ ⊕ ♠ ⊕ ♠ ⊕ ♠ ⊕ ♠ ⊕ ♠ ⊕ ♠ ⊕ ♠ ⊕ ♠ ⊕ ♠ ⊕ ♠ ⊕ ♠ ⊕ ♠ ⊕ ♠ ⊕ ♠ ⊕ ♠ ⊕ ♠ ⊕ ♠ ⊕ ♠ ⊕ ♠ ⊕ ♠ ⊕ ♠ ⊕ ♠ ⊕ ♠ ⊕ ♠ ⊕ ♠ ⊕ ♠ ⊕ ♠ ⊕ ♠ ⊕ ♠
发布者:全栈程序员-用户IM,转载请注明出处:https://javaforall.cn/189907.html原文链接:https://javaforall.cn
【正版授权,激活自己账号】: Jetbrains全家桶Ide使用,1年售后保障,每天仅需1毛
【官方授权 正版激活】: 官方授权 正版激活 支持Jetbrains家族下所有IDE 使用个人JB账号...
