大家好,又见面了,我是你们的朋友全栈君。如果您正在找激活码,请点击查看最新教程,关注关注公众号 “全栈程序员社区” 获取激活教程,可能之前旧版本教程已经失效.最新Idea2022.1教程亲测有效,一键激活。
Jetbrains全系列IDE稳定放心使用
TextClock
TextClock 可以将当前日期和/或时间显示为格式化字符串。TextClock 遵循 24 小时格式系统设置。因此,提供「两种不同的格式化模式」:
-
以 24 小时制显示日期/时间,
-
以 12 小时制显示日期/时间。
可以调用「is24HourModeEnabled()」 来确定「系统当前是否处于 24 小时模式」。
如何格式化日期和时间的规则如下:
- 在 24 小时模式下:
-
如果没获取时间,首先通过 getFormat24Hour()返回值
-
获取失败,则通过 getFormat12Hour()获取返回值
-
以上都获取失败则使用默认值,例如 ah:mm
-
- 在 12 小时模式下:
-
如果没获取时间,首先通过 getFormat12Hour()返回值
-
获取失败,则通过 getFormat24Hour()获取返回值
-
以上都获取失败则使用默认值,例如 HH:mm
-
主要XML属性如下:
「android:format12Hour」 设置12小时制的格式。
「android:format24Hour」 设置24小时制的格式。
「android:timeZone」 指定要使用的时区,设置后忽略系统时间变化。
常用方法
「setFormat12Hour(CharSequence format)」:设置12小时制的格式。
「setFormat24Hour(CharSequence format)」:设置24小时制的格式。
「setTimeZone(String timeZone)」:设置要在此时钟中使用的指定时区。
「getFormat12Hour()」:返回12小时制的格式。
「getFormat24Hour()」:返回24小时制的格式。
「getTimeZone()」:指示此视图当前使用的时区。
「is24HourModeEnabled()」:指「系统」当前是否使用 24 小时模式。
「onVisibilityAggregated(Boolean isVisible:)」:当此视图的用户可见性可能受到此视图本身、祖先视图或此视图附加到的窗口的更改的影响时调用。
「refreshTime()」:如有必要,更新显示的时间并使视图无效(在API 30中添加)。
示例
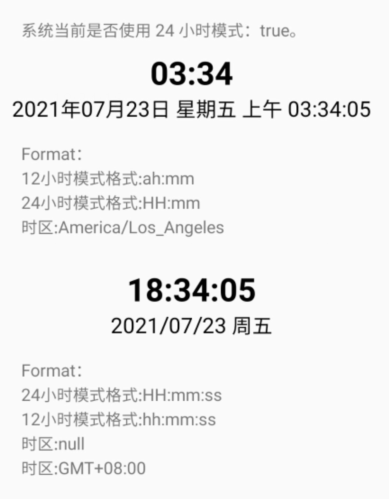
看上面介绍十分简单,咱们还是搞个实例了解一下吧,先看效果图。

主界面布局文件
<?xml version="1.0" encoding="utf-8"?>
<LinearLayout xmlns:android="http://schemas.android.com/apk/res/android"
    android:orientation="vertical" android:layout_width="match_parent"
    android:layout_margin="@dimen/dimen_20"
    android:layout_height="match_parent">
    <TextView
        android:id="@+id/tv_is24HourModeEnabled"
        android:layout_width="match_parent"
        android:layout_height="wrap_content"
        android:layout_marginTop="@dimen/dimen_10"
        android:textSize="@dimen/text_size_16"
        android:padding="@dimen/dimen_10"/>
    <TextClock
        android:id="@+id/tc_timeText_12"
        android:layout_width="match_parent"
        android:layout_height="wrap_content"
        android:gravity="center"
        android:textColor="@color/black"
        android:textSize="30sp"
        android:textStyle="bold"/>
    <TextClock
        android:id="@+id/tc_dateText_12"
        android:layout_width="match_parent"
        android:layout_height="wrap_content"
        android:gravity="center"
        android:textColor="@color/black"
        android:textSize="20sp"/>
    <TextView
        android:id="@+id/tv_12hour"
        android:layout_width="match_parent"
        android:layout_height="wrap_content"
        android:layout_marginTop="@dimen/dimen_10"
        android:textSize="@dimen/text_size_16"
        android:padding="@dimen/dimen_10"/>

    <TextClock
        android:id="@+id/tc_timeText_24"
        android:layout_width="match_parent"
        android:layout_height="wrap_content"
        android:layout_marginTop="@dimen/dimen_20"
        android:format12Hour="hh:mm:ss"
        android:format24Hour="HH:mm:ss"
        android:gravity="center"
        android:textColor="@color/black"
        android:textSize="30sp"
        android:textStyle="bold"/>
    <TextClock
        android:id="@+id/tc_dateText_24"
        android:layout_width="match_parent"
        android:layout_height="wrap_content"
        android:format12Hour="yyyy/MM/dd E"
        android:format24Hour="yyyy/MM/dd E"
        android:gravity="center"
        android:textColor="@color/black"
        android:textSize="20sp"/>
    <TextView
        android:id="@+id/tv_24hour"
        android:layout_width="match_parent"
        android:layout_height="wrap_content"
        android:layout_marginTop="@dimen/dimen_10"
        android:textSize="@dimen/text_size_16"
        android:padding="@dimen/dimen_10"/>
</LinearLayout>
主界面代码
public class TextClockActivity extends AppCompatActivity {
    private TextClock tc_timeText_12,tc_dateText_12,tc_timeText_24,tc_dateText_24;
    private TextView tv_12hour,tv_24hour,tv_is24HourModeEnabled;
    @Override
    protected void onCreate(Bundle savedInstanceState) {
        super.onCreate(savedInstanceState);
        setContentView(R.layout.activity_textview_textclock);//加载布局文件
        initView();
    }
    private void initView() {
        tv_is24HourModeEnabled = findViewById(R.id.tv_is24HourModeEnabled);

        tc_timeText_12 = findViewById(R.id.tc_timeText_12);
        tc_dateText_12 = findViewById(R.id.tc_dateText_12);
        tv_12hour = findViewById(R.id.tv_12hour);
        //setTimeZone使用(UTC-7)无效,
        //原因:源码未对UTC+(-)进行处理,下面有具体的源码分析
        tc_timeText_12.setTimeZone("America/Los_Angeles");//有效
        tc_dateText_12.setTimeZone("America/Los_Angeles");//有效
        //tc_timeText_12.setTimeZone("GMT+7:00");//有效
        //tc_dateText_12.setTimeZone("GMT+7:00");//有效
        tc_dateText_12.setFormat24Hour("HH:mm");
        tc_dateText_12.setFormat12Hour("yyyy/MM/dd E");
        // EEEE:星期五 ;E/EE/EEE:周五;a:上午/下午
        tc_dateText_12.setFormat24Hour("yyyy年MM月dd日 EEEE aa HH:mm:ss");
        String format12 = "\n12小时模式格式:"+tc_timeText_12.getFormat12Hour();
        format12 = format12+"\n24小时模式格式:"+tc_timeText_12.getFormat24Hour();
        format12 = format12+"\n时区:"+tc_timeText_12.getTimeZone();
        tv_12hour.setText("Format:"+format12);

        tc_timeText_24 = findViewById(R.id.tc_timeText_24);
        tc_dateText_24 = findViewById(R.id.tc_dateText_24);
        tv_24hour = findViewById(R.id.tv_24hour);
        String format = "\n24小时模式格式:"+tc_timeText_24.getFormat24Hour();
        format = format+"\n12小时模式格式:"+tc_timeText_24.getFormat12Hour();
        format = format+"\n时区:"+tc_timeText_24.getTimeZone();
        String timeZome =TimeZone.getDefault().getDisplayName(true, TimeZone.SHORT);
        format = format+"\n时区:"+timeZome;
        tv_24hour.setText("Format:"+format);
        String is24HourMode = String.format("系统当前是否使用 24 小时模式:%s。", tc_dateText_24.is24HourModeEnabled());
        tv_is24HourModeEnabled.setText(is24HourMode);
    }
}
示例分析
手机系统默认是24小时格式
例一的时间/日期显示格式在代码中设置;
例一的12小时制格式返回:「ah:mm」 这个是默认值。
例二的时间/日期显示格式在xml文件中设置;
例二未设置时区所以时区返回null,可通过下面代码获取系统时区来显示
TimeZone.getDefault().getDisplayName(true, TimeZone.SHORT);
源码分析
setFormat12Hour()
public void setFormat12Hour(CharSequence format) {
        mFormat12 = format;

        chooseFormat();
        onTimeChanged();
    }
setFormat24Hour()
public void setFormat24Hour(CharSequence format) {
        mFormat24 = format;

        chooseFormat();
        onTimeChanged();
    }
看完「setFormat12Hour」和「setFormat24Hour」,你会发现他们除了各自格式赋值,后面都调用了「chooseFormat()」 和「onTimeChanged()」,下面咱看看这俩方法是干什么的。
chooseFormat()
先进行了判断是不是24小时制,后面用到了「abc()」;mDescFormat12,mDescFormat24用于内容描述,下面讲到。咱们接着往下看abc()
 /**
     * Selects either one of {@link #getFormat12Hour()} or {@link #getFormat24Hour()}
     * depending on whether the user has selected 24-hour format.
     */
    private void chooseFormat() {
        final boolean format24Requested = is24HourModeEnabled();

        LocaleData ld = LocaleData.get(getContext().getResources().getConfiguration().locale);

        if (format24Requested) {
            mFormat = abc(mFormat24, mFormat12, ld.timeFormat_Hm);
            mDescFormat = abc(mDescFormat24, mDescFormat12, mFormat);
        } else {
            mFormat = abc(mFormat12, mFormat24, ld.timeFormat_hm);
            mDescFormat = abc(mDescFormat12, mDescFormat24, mFormat);
        }

        boolean hadSeconds = mHasSeconds;
        mHasSeconds = DateFormat.hasSeconds(mFormat);

        if (mShouldRunTicker && hadSeconds != mHasSeconds) {
            if (hadSeconds) getHandler().removeCallbacks(mTicker);
            else mTicker.run();
        }
    }
abc()
-
a不为null,返回a;否则继续往下看;
-
b不为null,返回b;否则返回c;
-
例如:24小时制:a=24小时格式;b=12小时格式,c默认格式
说白了就是上面的:「如何格式化日期和时间的规则。」
    /**
     * Returns a if not null, else return b if not null, else return c.
     */
    private static CharSequence abc(CharSequence a, CharSequence b, CharSequence c) {
        return a == null ? (b == null ? c : b) : a;
    }
onTimeChanged()
获取系统当前时间并展示。这里多了一个「setContentDescription()」;咱后面看看是干嘛的
 /**
     * Update the displayed time if this view and its ancestors and window is visible
     */
    @UnsupportedAppUsage
    private void onTimeChanged() {
        mTime.setTimeInMillis(System.currentTimeMillis());
        setText(DateFormat.format(mFormat, mTime));
        setContentDescription(DateFormat.format(mDescFormat, mTime));
    }
setContentDescription()
设置 控件 的内容描述。
  @RemotableViewMethod
    public void setContentDescription(CharSequence contentDescription) {
        //mContentDescription:简要描述视图,主要用于辅助功能支持。
        if (mContentDescription == null) {
            if (contentDescription == null) {
                return;
            }
        } else if (mContentDescription.equals(contentDescription)) {
            return;
        }
        mContentDescription = contentDescription;
        final boolean nonEmptyDesc = contentDescription != null && contentDescription.length() > 0;
        if (nonEmptyDesc && getImportantForAccessibility() == IMPORTANT_FOR_ACCESSIBILITY_AUTO) {
            setImportantForAccessibility(IMPORTANT_FOR_ACCESSIBILITY_YES);
            notifySubtreeAccessibilityStateChangedIfNeeded();
        } else {
            notifyViewAccessibilityStateChangedIfNeeded(
                    AccessibilityEvent.CONTENT_CHANGE_TYPE_CONTENT_DESCRIPTION);
        }
    }
setTimeZone()
设置时区
public void setTimeZone(String timeZone)
{
    mTimeZone = timeZone;
    createTime(timeZone);
    onTimeChanged();
}
设置时区调用了两个方法「createTime()」 和「onTimeChanged()」,onTimeChanged()获取系统当前时间并展示,咱们在上面讲过了,这里咱重点看createTime()
createTime()
判断是使用设置的时区还是用系统时区
private void createTime(String timeZone) {
        if (timeZone != null) {
            mTime = Calendar.getInstance(TimeZone.getTimeZone(timeZone));
        } else {
            mTime = Calendar.getInstance();
        }
    }
从上面看出不管timeZong是否为null都会调用「Calendar.getInstance()」,区别在是否传参,还有「TimeZone.getTimeZone(timeZone)」 在下面咱们看看这两个方法。
TimeZone.getTimeZone(timeZone)
这个是重点,这里面包含了:
-
zone = ZoneInfoDb.getInstance().makeTimeZone(id);设置时区成功(如:America/Los_Angeles)
-
zone = getCustomTimeZone(id);设置时区成功(如:GMT+7:00)
-
UTC失败,从这里看到设置UTC+(-)时区未做设置所以都无效。
public static synchronized TimeZone getTimeZone(String id) {
        if (id == null) {
            throw new NullPointerException("id == null");
        }

        // Special cases? These can clone an existing instance.
        if (id.length() == 3) {
            if (id.equals("GMT")) {
                return (TimeZone) GMT.clone();
            }
            if (id.equals("UTC")) {
                return (TimeZone) UTC.clone();
            }
        }

        // In the database?
        TimeZone zone = null;
        try {
            zone = ZoneInfoDb.getInstance().makeTimeZone(id);
        } catch (IOException ignored) {
        }

        // Custom time zone?
        if (zone == null && id.length() > 3 && id.startsWith("GMT")) {
            zone = getCustomTimeZone(id);
        }

        // We never return null; on failure we return the equivalent of "GMT".
        return (zone != null) ? zone : (TimeZone) GMT.clone();
    }
下面咱们看看getCustomTimeZone(id)。
getCustomTimeZone(id)
从下面代码可以看到 返回一个新的 SimpleTimeZone:格式为“GMT[+|-]hh[[:]mm]”的 ID,或者返回null。
private static TimeZone getCustomTimeZone(String id) {
        Matcher m = NoImagePreloadHolder.CUSTOM_ZONE_ID_PATTERN.matcher(id);
        if (!m.matches()) {
            return null;
        }

        int hour;
        int minute = 0;
        try {
            hour = Integer.parseInt(m.group(1));
            if (m.group(3) != null) {
                minute = Integer.parseInt(m.group(3));
            }
        } catch (NumberFormatException impossible) {
            throw new AssertionError(impossible);
        }

        if (hour < 0 || hour > 23 || minute < 0 || minute > 59) {
            return null;
        }

        char sign = id.charAt(3);
        int raw = (hour * 3600000) + (minute * 60000);
        if (sign == '-') {
            raw = -raw;
        }

        String cleanId = String.format(Locale.ROOT, "GMT%c%02d:%02d", sign, hour, minute);

        return new SimpleTimeZone(raw, cleanId);
    }
上面的就是对传参进行处理下面咱们看看刚刚说到的Calendar.getInstance()
Calendar.getInstance()
//设置的时区和系统时区对比看看是不是当前时区
public static Calendar getInstance(TimeZone zone)
{
        return createCalendar(zone, Locale.getDefault(Locale.Category.FORMAT));
}
接着看下面的:createCalendar()
// END Android-added: add getJapaneseImperialInstance()
private static Calendar createCalendar(TimeZone zone, Locale aLocale)
{
        // BEGIN Android-changed: only support GregorianCalendar here
        return new GregorianCalendar(zone, aLocale);
        // END Android-changed: only support GregorianCalendar here
    }
再往下看GregorianCalendar(zone, aLocale)
 /**
     * Constructs a <code>GregorianCalendar</code> based on the current time
     * in the given time zone with the given locale.
     *
     * @param zone the given time zone.
     * @param aLocale the given locale.
     */
    public GregorianCalendar(TimeZone zone, Locale aLocale) {
        super(zone, aLocale);
        gdate = (BaseCalendar.Date) gcal.newCalendarDate(zone);
        //根据给定的 long 值设置当前时间。
        setTimeInMillis(System.currentTimeMillis());
    }
以上就是本文的全部内容,希望对大家学习Android TextClock有所帮助和启发。
发布者:全栈程序员-用户IM,转载请注明出处:https://javaforall.cn/189086.html原文链接:https://javaforall.cn
【正版授权,激活自己账号】: Jetbrains全家桶Ide使用,1年售后保障,每天仅需1毛
【官方授权 正版激活】: 官方授权 正版激活 支持Jetbrains家族下所有IDE 使用个人JB账号...
