大家好,又见面了,我是你们的朋友全栈君。如果您正在找激活码,请点击查看最新教程,关注关注公众号 “全栈程序员社区” 获取激活教程,可能之前旧版本教程已经失效.最新Idea2022.1教程亲测有效,一键激活。
Jetbrains全系列IDE稳定放心使用
目录
一、WSGI是什么?
WSGI是一套接口规范。一个WSGI程序用以接受客户端请求,传递给应用,再返回服务器的响应给客户端。WSGI程序通常被定义成一个函数,当然你也可以使用类实例来实现。
下图显示了python中客户端、服务器、WSGI、应用之间的关系:

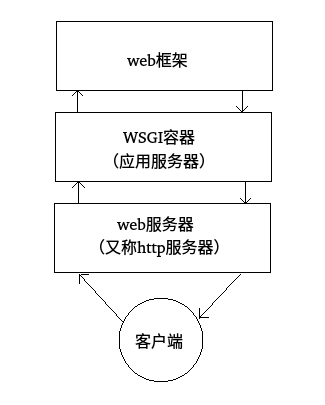
从下往上开始介绍:
客户端:浏览器或者app。
web服务器:Web服务器是指驻留于因特网上某种类型计算机的程序。当Web浏览器(客户端)连到服务器上并请求文件时,服务器将处理该请求并将文件发送到该浏览器上,附带的信息会告诉浏览器如何查看该文件(即文件类型)。服务器使用HTTP(超文本传输协议)进行信息交流,这就是人们常把它们称为HTTP服务器的原因。
严格意义上Web服务器只负责处理HTTP协议,用于处理静态页面的内容。而动态内容需要通过WSGI接口交给应用服务器去处理。
Web服务器包括Nginx,Apache,IIS等。而优秀的web服务器在接收http请求时,还可以做负载均衡和反向代理等工作。
WSGI容器:常见的WSGI容器有Gunicorn,uWSGI等。web框架和web服务器之间需要通信,这时候需要设计一套双方都遵守的接口。PEP3333指出,WSGI(Web Server Gateway Interface)是WEB服务器和web框架或web应用之间建立的一种简单通用的接口规范。有了wsgi这份接口规范,在web开发的过程中,能更加自由的选择服务器端和框架;在服务器端和框架的开发过程能够分离开来,不用过多的考虑双方具体的实现,使得服务器端和框架开发者能够专心自己领域的开发工作。而WSGI容器就是根据这套接口写出来的。WSGI容器的作用就是根据web服务器传递而来的参数构建一个让WSGI应用成功执行的环境,例如request,而且还得把WSGI应用上处理好的结果返回给web服务器。此外WSGI容器也叫应用服务器。
注: 一般应用服务器都集成了web服务器,主要是为了调试方便,出于性能和稳定性考虑,并不能在生产环境中使用。
web框架:作用主要是方便我们开发 web应用程序,HTTP请求的动态数据就是由 web框架层来提供的。常见的 web框架有Flask,Django,Tornado等,而Tornado不光是一个web框架,还实现了WSGI容器的功能。
二、Werkzeug是什么
都知道Flask是一个web框架,而且Flask是基于werkzeug开发的,那werkzeug是什么呢?
Werkzeug是一个WSGI工具包,他可以作为一个Web框架的底层库。这里稍微说一下, werkzeug 不是一个web服务器,也不是一个web框架,而是一个工具包,官方的介绍说是一个 WSGI 工具包,它可以作为一个 Web 框架的底层库,因为它封装好了很多 Web 框架的东西,例如 Request,Response 等等。使用它可以减轻web框架开发工作量。我看过werkzeug的源码后发现,werkzeug也实现了WSGI容器的功能,而且利用python/http/server.py库实现了一个简易的http服务器。因此在调试的时候可以直接使用app.run()把服务器给运行起来。
WSGI简化了编写Web app的复杂度,使程序员不必关注底层的数据传输而专注于Web本身。框架则基于WSGI进一步抽象,用一个函数处理一个URL。而URL与函数的绑定,称为路由(route),而这些就交给Web框架来做了。Python Flask的路由,是由装饰器实现的。
三、Flask的WSGI实现
有了上面的知识,从最简单的这个flask程序来看WSGI的实现。
- 使用app.run()方法来启动flask应用(app.run()代码隐藏着创建一个服务器),app应用本身会作为参数传递到WSGI服务器中。
- 在客户端(这里就是浏览器)输入网址(发送一个请求),服务器使用WSGI 中间件来处理这个请求。
- WSGI 处理请求对应着wsgi_app(self, environ, start_response)方法,self参数对应着app,即flask程序;environ和 start_response由服务器提供。
- wsgi_app()作用就是调用各种请求处理函数来处理请求,然后返回处理结果。即用户输入网址后,看到了网页响应。
from flask import Flask

app = Flask(__name__)
#生成app实例,传递 __name__参数,__name__ 就是当前模块名字。

@app.route("/")
def index():
    return "2017-08-21"

if __name__ == '__main__':
    app.run(debug=True)
1. 首先 app.run()方法开始。 看run()方法的定义,调用了werkzeug库中的一个run_simple()方法,最后启动了BaseWSGIServer 服务器。 运行run()方法是只传递了debug=True参数。 看run() 方法内部:
- 第一个 if 语句设置默认host参数值为 127.0.0.1
- 第二个 if 语句设置默认port参数值为5000
- 第三个 if 语句中传递了debug 参数值为 True
- the options to be forwarded to the underlying Werkzeug server. 这里把debug状态传递到底层的Werkzeug server。即use_reloader=True ; use_debugger=True
- 最后调用werkzeug库中的一个run_simple()方法。同时,传递了刚刚设置的几个参数
def run(self, host=None, port=None, debug=None, **options):
        """Runs the application on a local development server.
        ...
        """
        from werkzeug.serving import run_simple
        if host is None:
            host = '127.0.0.1'
        if port is None:
            server_name = self.config['SERVER_NAME']
            if server_name and ':' in server_name:
                port = int(server_name.rsplit(':', 1)[1])
            else:
                port = 5000
        if debug is not None:
            self.debug = bool(debug)
        options.setdefault('use_reloader', self.debug)
        options.setdefault('use_debugger', self.debug)
        try:
            run_simple(host, port, self, **options)
        finally:
            self._got_first_request = False
2. 看run_simple()方法
- hostname, port, application 对应着刚才run()方法中传递过来的host, port, self 参数。(这里self 就是Flask实例化了的app)
- 同时run()方法中还传递了user_debugger=True;user_loader=True 。剩余的参数使用初始值。
- 根据上面 user_loader=True,第一个if语句成立,调用了werkzeug.debug模块中的 DebuggedApplication类来对应用程序包装一次。传入了application参数和use_evalex参数,调用run_simple()方法时设置了use_evalex=True。DebuggedApplication类的简单说明:Enables debugging support for a given application
- 第二个if条件语句不成立,不执行之后的代码。
- 定义了log_startup函数和inner()函数,使用的时候再看具体实现了什么。
- if use_reloader: 成立,会执行之后的代码。最关键的一行代码:run_with_reloader(inner, extra_files, reloader_interval, reloader_type)调用了run_with_reloader方法,inner作为run_with_reloader方法中的main_func 参数;run_simple()方法设置了extra_files=None ,reloader_interval=1,reloader_type=’auto’ 同时作为参数传递到run_with_reloader方法中。
- 然后,inner()方法中关键语句:make_server()创建http服务器; server_forever()让服务器不要关闭,一直等待下一个请求。
def run_simple(hostname, port, application, use_reloader=False,
               use_debugger=False, use_evalex=True,
               extra_files=None, reloader_interval=1,
               reloader_type='auto', threaded=False,
               processes=1, request_handler=None, static_files=None,
               passthrough_errors=False, ssl_context=None):
    """Start a WSGI application. Optional features include a reloader,
    multithreading and fork support.
    :param hostname: The host for the .  eg: ``'localhost'``
    :param port: The port for the server.  eg: ``8080``
    :param application: the WSGI application to execute
    ...
    (省略了其余的参数介绍。)
    """
    if use_debugger:
        from werkzeug.debug import DebuggedApplication
        application = DebuggedApplication(application, use_evalex)
    if static_files:
        from werkzeug.wsgi import SharedDataMiddleware
        application = SharedDataMiddleware(application, static_files)

    def log_startup(sock):
        display_hostname = hostname not in ('', '*') and hostname or 'localhost'
        if ':' in display_hostname:
            display_hostname = '[%s]' % display_hostname
        quit_msg = '(Press CTRL+C to quit)'
        port = sock.getsockname()[1]
        _log('info', ' * Running on %s://%s:%d/ %s',
             ssl_context is None and 'http' or 'https',
             display_hostname, port, quit_msg)

    def inner():
        try:
            fd = int(os.environ['WERKZEUG_SERVER_FD'])
        except (LookupError, ValueError):
            fd = None
        srv = make_server(hostname, port, application, threaded,
                          processes, request_handler,
                          passthrough_errors, ssl_context,
                          fd=fd)
        if fd is None:
            log_startup(srv.socket)
        srv.serve_forever()

    if use_reloader:
        # If we're not running already in the subprocess that is the
        # reloader we want to open up a socket early to make sure the
        # port is actually available.
        if os.environ.get('WERKZEUG_RUN_MAIN') != 'true':
            if port == 0 and not can_open_by_fd:
                raise ValueError('Cannot bind to a random port with enabled '
                                 'reloader if the Python interpreter does '
                                 'not support socket opening by fd.')

            # Create and destroy a socket so that any exceptions are
            # raised before we spawn a separate Python interpreter and
            # lose this ability.
            address_family = select_ip_version(hostname, port)
            s = socket.socket(address_family, socket.SOCK_STREAM)
            s.setsockopt(socket.SOL_SOCKET, socket.SO_REUSEADDR, 1)
            s.bind((hostname, port))
            if hasattr(s, 'set_inheritable'):
                s.set_inheritable(True)

            # If we can open the socket by file descriptor, then we can just
            # reuse this one and our socket will survive the restarts.
            if can_open_by_fd:
                os.environ['WERKZEUG_SERVER_FD'] = str(s.fileno())
                s.listen(LISTEN_QUEUE)
                log_startup(s)
            else:
                s.close()

        # Do not use relative imports, otherwise "python -m werkzeug.serving"
        # breaks.
        from werkzeug._reloader import run_with_reloader
        run_with_reloader(inner, extra_files, reloader_interval,
                          reloader_type)
    else:
        inner()
3. 然后,makeserver()方法:
- inner()方法中调用makeserver()方法时传递了所有需要的参数;hostname = 127.0.0.1,port = 5000,app 在这里就是flask 程序,thread-线程。 processes = 1 单进程 …
- 根据判断条件,make_server()方法最后会返回BaseWSGIServer(host, port, app, request_handler, passthrough_errors, ssl_context, fd=fd) 来启动BaseWSGIServer,创造一个单线程,单进程的WSGI server。
def make_server(host=None, port=None, app=None, threaded=False, processes=1,
                request_handler=None, passthrough_errors=False,
                ssl_context=None, fd=None):
    """Create a new server instance that is either threaded, or forks
    or just processes one request after another.
    """
    if threaded and processes > 1:
        raise ValueError("cannot have a multithreaded and "
                         "multi process server.")
    elif threaded:
        return ThreadedWSGIServer(host, port, app, request_handler,
                                  passthrough_errors, ssl_context, fd=fd)
    elif processes > 1:
        return ForkingWSGIServer(host, port, app, processes, request_handler,
                                 passthrough_errors, ssl_context, fd=fd)
    else:
        return BaseWSGIServer(host, port, app, request_handler,
                              passthrough_errors, ssl_context, fd=fd)
4. class BaseWSGIServer(HTTPServer, object)
BaseWSGIServer类继承自HTTPServer类,最后详细讲。
class BaseWSGIServer(HTTPServer, object):

    """Simple single-threaded, single-process WSGI server."""
    multithread = False
    multiprocess = False
    request_queue_size = LISTEN_QUEUE

    def __init__(self, host, port, app, handler=None,
                 passthrough_errors=False, ssl_context=None, fd=None):
        if handler is None:
            handler = WSGIRequestHandler

        self.address_family = select_ip_version(host, port)

        if fd is not None:
            real_sock = socket.fromfd(fd, self.address_family,
                                      socket.SOCK_STREAM)
            port = 0
        HTTPServer.__init__(self, (host, int(port)), handler)
        self.app = app
        self.passthrough_errors = passthrough_errors
        self.shutdown_signal = False
        self.host = host
        self.port = self.socket.getsockname()[1]

        # Patch in the original socket.
        if fd is not None:
            self.socket.close()
            self.socket = real_sock
            self.server_address = self.socket.getsockname()

        if ssl_context is not None:
            if isinstance(ssl_context, tuple):
                ssl_context = load_ssl_context(*ssl_context)
            if ssl_context == 'adhoc':
                ssl_context = generate_adhoc_ssl_context()
            # If we are on Python 2 the return value from socket.fromfd
            # is an internal socket object but what we need for ssl wrap
            # is the wrapper around it :(
            sock = self.socket
            if PY2 and not isinstance(sock, socket.socket):
                sock = socket.socket(sock.family, sock.type, sock.proto, sock)
            self.socket = ssl_context.wrap_socket(sock, server_side=True)
            self.ssl_context = ssl_context
        else:
            self.ssl_context = None

    def log(self, type, message, *args):
        _log(type, message, *args)

    def serve_forever(self):
        self.shutdown_signal = False
        try:
            HTTPServer.serve_forever(self)
        except KeyboardInterrupt:
            pass
        finally:
            self.server_close()

    def handle_error(self, request, client_address):
        if self.passthrough_errors:
            raise
        return HTTPServer.handle_error(self, request, client_address)

    def get_request(self):
        con, info = self.socket.accept()
        return con, info
5. 找到HTTPServer类:
- HTTPServer类在python安装路径的Lib/http/server.py 模块中。
- HTTPServer类实现了一个server_bind()方法用来绑定服务器地址和端口。
- class HTTPServer(socketserver.TCPServer) HTTPServer类继承了socketserver模块中的TCPServer类。
class HTTPServer(socketserver.TCPServer):

    allow_reuse_address = 1    # Seems to make sense in testing environment

    def server_bind(self):
        """Override server_bind to store the server name."""
        socketserver.TCPServer.server_bind(self)
        host, port = self.server_address[:2]
        self.server_name = socket.getfqdn(host)
        self.server_port = port
6. 找到 TCPServer类:
- TCPServer在socketserver模块中。首先,socket 介绍: A network socket is an internal endpoint for sending or receiving data at a single node in a computer network. 。
- TCPServer类中的介绍:Base class for various socket-based server classes. Defaults to synchronous IP stream (i.e., TCP).
- TCPServer类继承了BaseServer基类。都是定义了服务器端的基本属性。后面的继承类可以重写这里的一部分属性。
7. 再回到BaseWSGIServer 类:
BaseWSGIServer类重写了一大堆东西,首先 __init__ 初始化类中的变量,供类中其他函数调用。
- __init__ 函数首先定义了handler = WSGIRequestHandler 来处理请求。
- WSGIRequestHandler简单介绍:A request handler that implements WSGI dispatching.
- class WSGIRequestHandler(BaseHTTPRequestHandler, object) WSGIRequestHandler 继承自 BaseHTTPRequestHandler。
- class BaseHTTPRequestHandler(socketserver.StreamRequestHandler)BaseHTTPRequestHandler继承自socketserver模块中的StreamRequestHandler
- class StreamRequestHandler(BaseRequestHandler) StreamRequestHandler继承自BaseRequestHandler,就是用来处理请求的类。
- 最初的BaseRequestHandler基类定义的属性很少,一层层的重写,到了WSGIRequestHandler类,越来越完善了。
- 最重要的要知道,这个WSGIRequestHandler类是用来处理请求的。
def __init__(self, host, port, app, handler=None,
                 passthrough_errors=False, ssl_context=None, fd=None):
        if handler is None:
            handler = WSGIRequestHandler
            ...
8. WSGIRequestHandler类中定义了很多方法。因为WSGI 是单线程、单进程的server,来看这个handle_one_request(self)方法,用来处理一个请求。
 def handle_one_request(self):
        """Handle a single HTTP request."""
        self.raw_requestline = self.rfile.readline()
        if not self.raw_requestline:
            self.close_connection = 1
        elif self.parse_request():
            return self.run_wsgi()
9. 调用了run_wsgi()方法,run_wsgi()方法方法好长,重点看这句execute(self.server.app) ,在这儿处理请求使用Flask中的__call__ 方法。。app(Flask实例对象)作为参数在make_server()时已经传递到服务器中了。
def run_wsgi(self):
       ...

        def write(data):
            ...

        def start_response(status, response_headers, exc_info=None):
            ...
            return write

        def execute(app):
            ...

        try:
            execute(self.server.app)
        except ...
        ...
10. 服务器收到http请求,去调用app的时候,实际上是用了Flask 的 __call__方法,会调用wsgi_app()方法。
def __call__(self, environ, start_response):
        """Shortcut for :attr:`wsgi_app`."""
        return self.wsgi_app(environ, start_response)
11. 到了wsgi_app(),就和上一篇笔记的WSGI介绍联系起来了。这里wsgi_app作为中间件的存在,连接着服务器和应用程序。对服务器来说wsgi_app是应用程序;对应用程序来说,wsgi_app是服务器。
wsgi_app(self, environ, start_response)需要三个参数,self即需要运行的flask 应用程序,在创建服务器时传递到了 WSGI server。environ, start_response由服务器提供,wsgi_app的功能就是根据请求查找各种请求处理函数,然后返回请求处理结果到服务器。
def wsgi_app(self, environ, start_response):
        """The actual WSGI application.  This is not implemented in
        `__call__` so that middlewares can be applied without losing a
        reference to the class.  So instead of doing this::
            app = MyMiddleware(app)
        :param environ: a WSGI environment
        :param start_response: a callable accepting a status code,
                               a list of headers and an optional
                               exception context to start the response
        """
        ctx = self.request_context(environ)
        ctx.push()
        error = None
        try:
            try:
                response = self.full_dispatch_request()
            except Exception as e:
                error = e
                response = self.handle_exception(e)
            except:
                error = sys.exc_info()[1]
                raise
            return response(environ, start_response)
        finally:
            if self.should_ignore_error(error):
                error = None
            ctx.auto_pop(error)
参考博客:
https://blog.csdn.net/sodawaterer/article/details/71497086
https://blog.csdn.net/sinat_36651044/article/details/77462831
https://www.jianshu.com/p/265aa5d0f22d
发布者:全栈程序员-用户IM,转载请注明出处:https://javaforall.cn/188324.html原文链接:https://javaforall.cn
【正版授权,激活自己账号】: Jetbrains全家桶Ide使用,1年售后保障,每天仅需1毛
【官方授权 正版激活】: 官方授权 正版激活 支持Jetbrains家族下所有IDE 使用个人JB账号...
