大家好,又见面了,我是你们的朋友全栈君。如果您正在找激活码,请点击查看最新教程,关注关注公众号 “全栈程序员社区” 获取激活教程,可能之前旧版本教程已经失效.最新Idea2022.1教程亲测有效,一键激活。
Jetbrains全系列IDE稳定放心使用
这里提供两种分页方法
一种是手写分页,不常用,但是明白一下分页的逻辑实现
第二种是用heyui提供的组件.很多功能都给封装好了,用起来也比较美观.
手写分页
后端接口
class GoodList(APIView):
    def get(self, request):
        # 当前页
        page = int(request.GET.get('page', 1))
        # 一页有多少条商品
        size = int(request.GET.get('size', 1))

        # 定义从哪里开始切片
        data_start = (page - 1) * size

        # 定义切到哪
        data_end = page * size

        #查询数据
        goodslist=Goods.objects.all()[data_start:data_end]

        #查询总数量
        count=Goods.objects.count()

        # 序列化操作
        goods_ser=GoodsSer(goodslist,many=True)
        # 返回响应
        return Response({

            'total':count,
            'data':goods_ser.data
        })
前端页面
<template>
......
          <!--自主分页-->
          <div>
              <!-- v-show 判断当前页数是否有需要显示上或下一页 -->
            <Button v-show="lastpage" @click="getdata(lastpage)">上一页</Button>
            <Button v-for="index in all" @click="getdata(index)">{

  {index}}</Button>
            <Button v-show="nextpage" @click="getdata(nextpage)">下一页</Button>
          </div>
</template>


<script>


  export default {
    data() {
      return {
        //自主分页
        total: 0,//商品总数
        curpage: 1,//当前页
        all: 0,//总页数
        lastpage: 0,//上一页
        nextpage: 0,//下一页
        size: 2,//每页显示多少

        //商品列表
        goodlist: '',


    mounted() {
      //调用自主分请求
      this.getdata(1);
    },

    methods: {
      //自主分页接口
      getdata: function (mypage) {
        this.axios.get('http://localhost:8000/goodlist/', {
          params: {
            page: mypage,
            size: this.size
          }
        })
          .then(res => {
            this.goodlist = res.data.data;
            console.log(res.data.data);

            //判断上一页
            if (mypage == 1) {
              this.lastpage = 0;
            } else {
              this.lastpage = mypage - 1
            }

            // 计算总页数   Math.ceil  向上取整
            this.all = Math.ceil(res.data.total / this.size);
            //判断下一页
            if (mypage == this.all) {
              this.nextpage = 0
            } else {
              this.nextpage = mypage + 1
            }
          });
      },
    }
  }


</script>

<style>


</style>
heyui 组件库
后端代码不用做修改.可以直接复用.heyui前端就相对来说简单了许多.
<template>
  ......
          <!--heyui分页-->
          <br>
        </div>
        <div>
            <!-- layout可以自定义控制显示那些组件和顺序.-->
          <Pagination v-model="pagination" @change="change" layout="sizes,pager,jumper" align="center">

          </Pagination>

</template>


<script>

  export default {
    data() {
      return {
        //分页器变量
        pagination: {
          page: 1,
          size: 3,
          total: 5
        },
        //商品列表
        goodlist: '',
    },

    mounted() {
      //请求商品接口返回数据
      this.axios.get('http://localhost:8000/goodlist/', {params: {page: 1, size: 3}})
        .then(res => {
          this.goodlist = res.data.data;
          console.log(res.data.data)
        });
    },
    methods: {
      //分页器事件
      change: function () {
        //二次请求
        this.axios.get('http://localhost:8000/goodlist/', {
          params: {
            page: this.pagination.page,
            size: this.pagination.size
          }
        })
          .then(res => {
            this.goodlist = res.data.data;
            console.log(res.data.data)
          });
      },
    }
  }


</script>

<style>


</style>
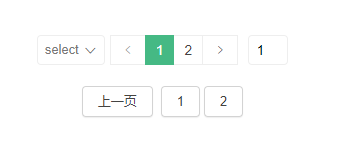
两种分页的效果.上边的是heyui组件,下边是手写分页器.

HEY UI 分页文档:https://www.heyui.top/component/data/view/page
Element 组件文档:https://element.eleme.cn/#/zh-CN/component/installation
功能多多 各自挖掘吧.
版权声明:本文内容由互联网用户自发贡献,该文观点仅代表作者本人。本站仅提供信息存储空间服务,不拥有所有权,不承担相关法律责任。如发现本站有涉嫌侵权/违法违规的内容, 请发送邮件至 举报,一经查实,本站将立刻删除。
发布者:全栈程序员-用户IM,转载请注明出处:https://javaforall.cn/187285.html原文链接:https://javaforall.cn
【正版授权,激活自己账号】: Jetbrains全家桶Ide使用,1年售后保障,每天仅需1毛
【官方授权 正版激活】: 官方授权 正版激活 支持Jetbrains家族下所有IDE 使用个人JB账号...
