大家好,又见面了,我是你们的朋友全栈君。如果您正在找激活码,请点击查看最新教程,关注关注公众号 “全栈程序员社区” 获取激活教程,可能之前旧版本教程已经失效.最新Idea2022.1教程亲测有效,一键激活。
Jetbrains全系列IDE稳定放心使用
前言
最近在思考实现定时任务的几种方式,比如
quartz,delay queue,scheduleThreadPool,时间轮。在对比的同时,也了解了下其简单原理,在这里描述下我对时间轮算法实现定时任务的理解。
时间轮定时使用方式
 @Test
    public void test3() throws InterruptedException {

        DateTimeFormatter formatter = DateTimeFormatter.ofPattern("yyyy-MM-dd HH:mm:ss");
        HashedWheelTimer timer = new HashedWheelTimer(new NamedThreadFactory("timer-task"), 1, TimeUnit.MILLISECONDS,8);
        TimerTask timerTask = new TimerTask() {

            @Override
            public void run(Timeout timeout) throws Exception {

                System.out.println("hello world " + LocalDateTime.now().format(formatter));
                //执行完成之后再次加入调度
                timer.newTimeout(this, 4, TimeUnit.SECONDS);
            }
        };
        //将定时任务放入时间轮
        timer.newTimeout(timerTask, 4, TimeUnit.SECONDS);
        Thread.currentThread().join();
    }
在这里我使用的是 netty 使用时间轮算法实现的HashedWheelTimer来做的每隔 4s 的定时调度。
    public HashedWheelTimer(
            ThreadFactory threadFactory,
            long tickDuration, TimeUnit unit, int ticksPerWheel)
使用方式比较简单,创建一个HashedWheelTimer时间轮定时器对象,threadFactory:创建线程的线程工厂
tickDuration:一个间隔时间(步长)
tickDuration:间隔时间的单位
ticksPerWheel:时间轮的大小
最后执行结果为:
hello world 2021-04-12 19:25:37
hello world 2021-04-12 19:25:41
hello world 2021-04-12 19:25:45
hello world 2021-04-12 19:25:49
hello world 2021-04-12 19:25:53
hello world 2021-04-12 19:25:57
hello world 2021-04-12 19:26:01
时间轮定时内部原理
时间轮定时器原理基本都是如下图:
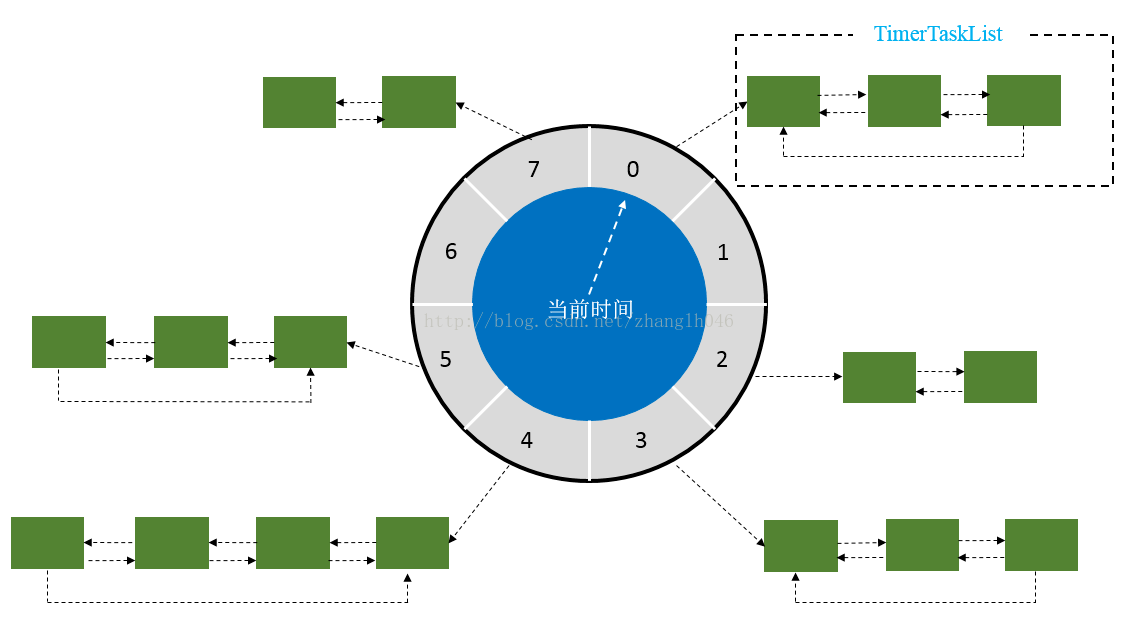

时间轮算法可以简单的看成一个循环数组+双向链表的数据结构实现的。
循环数组构成一个环形结构,指针每隔 tickDuration 时间走一步,每个数组上挂载一个双向链表结构的定时任务列表。
双向链表上的任务有个属性为 remainingRounds,即当前任务剩下的轮次是多少,每当指针走到该任务的位置时,remainingRounds 减 1,直到remainingRounds 为 0 时,定时任务触发。
通过时间轮算法的原理图我们可以知道,tickDuration 越小,定时任务越精确。
时间轮定时源码剖析
构造方法
首先从 HashedWheelTimer 的构造方法分析
    public HashedWheelTimer(
            ThreadFactory threadFactory,
            long tickDuration, TimeUnit unit, int ticksPerWheel, boolean leakDetection,
            long maxPendingTimeouts) {

		//线程工厂非null判断
        if (threadFactory == null) {

            throw new NullPointerException("threadFactory");
        }
        //时间单位非null判断
        if (unit == null) {

            throw new NullPointerException("unit");
        }
        //时间间隔(步长)大于0判断
        if (tickDuration <= 0) {

            throw new IllegalArgumentException("tickDuration must be greater than 0: " + tickDuration);
        }
        //循环数组长度大于0判断
        if (ticksPerWheel <= 0) {

            throw new IllegalArgumentException("ticksPerWheel must be greater than 0: " + ticksPerWheel);
        }

        // Normalize ticksPerWheel to power of two and initialize the wheel.
        // 将ticksPerWheel修改为2的整数次幂 并且新建数组
        wheel = createWheel(ticksPerWheel);
        // 数组长度-1,其二进制均为1. 通过指针tick&mask 获取当前的数组下标,类似于hashmap的 hashcode&(len -1)
        mask = wheel.length - 1;

        // Convert tickDuration to nanos.
        long duration = unit.toNanos(tickDuration);

        // Prevent overflow.
        if (duration >= Long.MAX_VALUE / wheel.length) {

            throw new IllegalArgumentException(String.format(
                    "tickDuration: %d (expected: 0 < tickDuration in nanos < %d",
                    tickDuration, Long.MAX_VALUE / wheel.length));
        }

        if (duration < MILLISECOND_NANOS) {

            if (logger.isWarnEnabled()) {

                logger.warn("Configured tickDuration %d smaller then %d, using 1ms.",
                            tickDuration, MILLISECOND_NANOS);
            }
            this.tickDuration = MILLISECOND_NANOS;
        } else {

            this.tickDuration = duration;
        }
		//创建工作线程,该线程会定期的移动指针,扫描链表任务,后面再分析
        workerThread = threadFactory.newThread(worker);

        leak = leakDetection || !workerThread.isDaemon() ? leakDetector.track(this) : null;

        this.maxPendingTimeouts = maxPendingTimeouts;

		//判断HashedWheelTimer实例是否创建太多,如果是就输出一个日志
        if (INSTANCE_COUNTER.incrementAndGet() > INSTANCE_COUNT_LIMIT &&
            WARNED_TOO_MANY_INSTANCES.compareAndSet(false, true)) {

            reportTooManyInstances();
        }
    }
构造方法比较简单明了,主要是做一些初始化工作,比如数组的长度控制为2的整数次幂,新建数组,新建工作线程等。
添加任务
继续往下看如何向时间轮定时器添加一个定时任务。
 @Override
    public Timeout newTimeout(TimerTask task, long delay, TimeUnit unit) {

        if (task == null) {

            throw new NullPointerException("task");
        }
        if (unit == null) {

            throw new NullPointerException("unit");
        }
		//一个计数器,表示当前在队列中等待的任务数量
        long pendingTimeoutsCount = pendingTimeouts.incrementAndGet();
		//默认maxPendingTimeouts为-1,如果该值>0.添加新任务时会进行判断,如果当前任务大于maxPendingTimeouts,则跑出拒绝异常
        if (maxPendingTimeouts > 0 && pendingTimeoutsCount > maxPendingTimeouts) {

            pendingTimeouts.decrementAndGet();
            throw new RejectedExecutionException("Number of pending timeouts ("
                + pendingTimeoutsCount + ") is greater than or equal to maximum allowed pending "
                + "timeouts (" + maxPendingTimeouts + ")");
        }
		//检测工作线程扫描是否启动,如果未启动,启动下
        start();

        // Add the timeout to the timeout queue which will be processed on the next tick.
        // During processing all the queued HashedWheelTimeouts will be added to the correct HashedWheelBucket.
        //startTime为工作线程启动的时间,deadline为:System.nanoTime()+任务延迟时间-工作线程的启动时间
        long deadline = System.nanoTime() + unit.toNanos(delay) - startTime;

        // Guard against overflow.
        //溢出判断,因为startTime是在start()方法中启动工作线程后赋值的,在delay大于0的情况下,deadline是不可能小于0,除非溢出了。如果溢出了为deadline赋值一个最大值
        if (delay > 0 && deadline < 0) {

            deadline = Long.MAX_VALUE;
        }
        //创建HashedWheelTimeout对象
        HashedWheelTimeout timeout = new HashedWheelTimeout(this, task, deadline);
        //将任务加入timeouts队列
        timeouts.add(timeout);
        return timeout;
    }
该方法主要执行以下几个工作
1.参数非空校验
2.任务数量最大值检测
3.工作线程启动
4.获取任务的 deadline,将任务封装为 HashedWheelTimeout 对象
5.将 HashedWheelTimeout 对象放入任务队列 timeouts
工作线程启动
下面简单看下 start 方法
  public void start() {

        switch (WORKER_STATE_UPDATER.get(this)) {

            case WORKER_STATE_INIT:
                if (WORKER_STATE_UPDATER.compareAndSet(this, WORKER_STATE_INIT, WORKER_STATE_STARTED)) {

                	//如果发现当前工作线程的状态为WORKER_STATE_INIT 初始化状态,则设置线程状态为 WORKER_STATE_STARTED并 启动工作线程,
                    workerThread.start();
                }
                break;
            case WORKER_STATE_STARTED:
                break;
            case WORKER_STATE_SHUTDOWN:
                throw new IllegalStateException("cannot be started once stopped");
            default:
                throw new Error("Invalid WorkerState");
        }

        // Wait until the startTime is initialized by the worker.
        //startTime 初始值为0,并且在工作线程启动后设置。startTimeInitialized是一个CountDownLatch锁,在工作线程启动后释放
        while (startTime == 0) {

            try {

                startTimeInitialized.await();
            } catch (InterruptedException ignore) {

                // Ignore - it will be ready very soon.
            }
        }
    }
该方法主要是启动工作线程并等待工作线程启动完成。
继续看工作线程的 run 方法做什么事情
工作线程run方法
public void run() {

            // Initialize the startTime.
            //线程启动后初始化startTime 时间为System.nanoTime()
            startTime = System.nanoTime();
            if (startTime == 0) {

                // We use 0 as an indicator for the uninitialized value here, so make sure it's not 0 when initialized.
                startTime = 1;
            }

            // Notify the other threads waiting for the initialization at start().
            //释放start方法中的CountDownLatch锁
            startTimeInitialized.countDown();
			//在当前工作线程状态一直为 WORKER_STATE_STARTED 时循环执行
            do {

            	//waitForNextTick 主要是指针跳动,内部使用Thread.sleep实现
                final long deadline = waitForNextTick();
                //小于0表示收到了关闭的信号
                if (deadline > 0) {

                	//tick和mask进行按位与操作获取到当前数组下标位置
                    int idx = (int) (tick & mask);
                    //从时间轮中移除所有已经取消的定时任务
                    processCancelledTasks();
                    //获取到下标对应的链表头
                    HashedWheelBucket bucket =
                            wheel[idx];
                   	//将队列中的定时任务放入到时间轮中
                    transferTimeoutsToBuckets();
                    //遍历链表任务,将达到执行时间的任务触发执行
                    bucket.expireTimeouts(deadline);
                    //指针+1
                    tick++;
                }
            } while (WORKER_STATE_UPDATER.get(HashedWheelTimer.this) == WORKER_STATE_STARTED);

            // Fill the unprocessedTimeouts so we can return them from stop() method.
            //工作线程停止后,将时间轮上的所有任务放入unprocessedTimeouts集合
            for (HashedWheelBucket bucket: wheel) {

                bucket.clearTimeouts(unprocessedTimeouts);
            }
            //将任务队列中的任务也放入unprocessedTimeouts集合
            for (;;) {

                HashedWheelTimeout timeout = timeouts.poll();
                if (timeout == null) {

                    break;
                }
                if (!timeout.isCancelled()) {

                    unprocessedTimeouts.add(timeout);
                }
            }
            //移除所有的未处理的定时任务
            processCancelledTasks();
        }
该部分代码主要分为以下几个部分
-
设置线程的启动时间
startTime -
在工作线程启动的状态下
- 根据用户配置的
tickDuration指针每次跳动一下 - 从时间轮中移除所有已经取消的定时任务
- 将队列中的定时任务放入到时间轮中
- 遍历链表任务,将达到执行时间的任务触发执行
- 根据用户配置的
-
工作线程停止后的清理工作
下面看一下指针跳动的代码
指针跳动
 private long waitForNextTick() {

 			//获取下一个指针的deadline时间
            long deadline = tickDuration * (tick + 1);

            for (;;) {

            	//当前工作线程的活动时间
                final long currentTime = System.nanoTime() - startTime;
                //计算还需要多久达到deadline 。这里加上999999的原因是因为/只会取整数部分,并且是使用Thread.sleep时间的,参数为毫秒。为了保证任务不被提前执行,加上999999后就能够向上取整1ms。
                long sleepTimeMs = (deadline - currentTime + 999999) / 1000000;
				//sleepTimeMs 小于0表示达到了任务的触发时间
                if (sleepTimeMs <= 0) {

                    if (currentTime == Long.MIN_VALUE) {

                        return -Long.MAX_VALUE;
                    } else {

                        return currentTime;
                    }
                }

                // Check if we run on windows, as if thats the case we will need
                // to round the sleepTime as workaround for a bug that only affect
                // the JVM if it runs on windows.
                //
                // See https://github.com/netty/netty/issues/356
                if (PlatformDependent.isWindows()) {

                    sleepTimeMs = sleepTimeMs / 10 * 10;
                }

                try {

                    Thread.sleep(sleepTimeMs);
                } catch (InterruptedException ignored) {

                    if (WORKER_STATE_UPDATER.get(HashedWheelTimer.this) == WORKER_STATE_SHUTDOWN) {

                        return Long.MIN_VALUE;
                    }
                }
            }
        }
通过源码分析我们可以看到时间轮算法实现的指针跳动是通过Thread.sleep 实现的,难以理解的就是 (deadline - currentTime + 999999) / 1000000; 仔细研究下就懂了
将队列任务放入时间轮中
在工作线程的 run 方法中会调用 transferTimeoutsToBuckets方法,该方法会将用户提交到队列中的定时任务移动到时间轮中,下面具体分析下
private void transferTimeoutsToBuckets() {

            // transfer only max. 100000 timeouts per tick to prevent a thread to stale the workerThread when it just
            // adds new timeouts in a loop.
            //每次最多只迁移 10W 个定时任务,主要是为了防止迁移时间过长,导致时间轮中的任务延迟执行
            for (int i = 0; i < 100000; i++) {

                HashedWheelTimeout timeout = timeouts.poll();
                if (timeout == null) {

                    // all processed
                    break;
                }
                //如果任务已经被取消,就跳过
                if (timeout.state() == HashedWheelTimeout.ST_CANCELLED) {

                    // Was cancelled in the meantime.
                    continue;
                }
				//计算任务需要放入的数组位置
                long calculated = timeout.deadline / tickDuration;
                //由于时间轮中的数组是循环数组,计算还需要几个轮次
                timeout.remainingRounds = (calculated - tick) / wheel.length;
				//calculated 和tick 取最大,主要是为了保证过时的任务能够被调度。正常情况下calculated是大于tick的,如果某些任务执行时间过长,导致tick大于calculated,此时直接把过时的任务放到当前链表队列
                final long ticks = Math.max(calculated, tick); // Ensure we don't schedule for past.
                //按位与获取任务的执行位置
                int stopIndex = (int) (ticks & mask);

                HashedWheelBucket bucket = wheel[stopIndex];
                //将任务放入当前数组上的链表
                bucket.addTimeout(timeout);
            }
        }
transferTimeoutsToBuckets 方法很简单,我们主要要记住两点
1.每次最多会迁移10W 个队列中的任务到时间轮中,为了保证不影响工作线程的指针跳动
2.并且我们发现取消的任务会直接跳过,过时的任务会直接放到当前位置。
链表任务遍历
   public void expireTimeouts(long deadline) {

            HashedWheelTimeout timeout = head;

            // process all timeouts
            //遍历链表的所有任务
            while (timeout != null) {

                HashedWheelTimeout next = timeout.next;
                //如果剩下的轮次<=0
                if (timeout.remainingRounds <= 0) {

                	//从双向链表中移除该任务
                    next = remove(timeout);
                    //如果当前任务的deadline小于目前时间轮的deadline,表示任务已经可以被触发
                    if (timeout.deadline <= deadline) {

                    	//任务执行
                        timeout.expire();
                    } else {

                        // The timeout was placed into a wrong slot. This should never happen.
                        throw new IllegalStateException(String.format(
                                "timeout.deadline (%d) > deadline (%d)", timeout.deadline, deadline));
                    }
                } else if (timeout.isCancelled()) {

                //任务取消也从链表中移除
                    next = remove(timeout);
                } else {

                	// 任务的剩余轮次-1
                    timeout.remainingRounds --;
                }
                //链表遍历
                timeout = next;
            }
        }
该方法主要是遍历链表上的定时任务
- 任务所剩轮次为
0并且任务的deadline小于目前时间轮的deadline,任务触发执行 - 任务被取消,从链表中移除
- 任务轮次大于
0并且还未取消,轮次-1 - 遍历下个定时任务
定时任务执行
    public void expire() {

            if (!compareAndSetState(ST_INIT, ST_EXPIRED)) {

                return;
            }

            try {

                task.run(this);
            } catch (Throwable t) {

                if (logger.isWarnEnabled()) {

                    logger.warn("An exception was thrown by " + TimerTask.class.getSimpleName() + '.', t);
                }
            }
        }
定时任务执行代码,看着很简单,首先将任务的状态设置为ST_EXPIRED,然后直接调用 run方法执行任务,这里说明任务是在工作线程中执行的,也就是说如果任务执行时间过长,会影响其它定时任务的触发。
发布者:全栈程序员-用户IM,转载请注明出处:https://javaforall.cn/187243.html原文链接:https://javaforall.cn
【正版授权,激活自己账号】: Jetbrains全家桶Ide使用,1年售后保障,每天仅需1毛
【官方授权 正版激活】: 官方授权 正版激活 支持Jetbrains家族下所有IDE 使用个人JB账号...
