大家好,又见面了,我是你们的朋友全栈君。如果您正在找激活码,请点击查看最新教程,关注关注公众号 “全栈程序员社区” 获取激活教程,可能之前旧版本教程已经失效.最新Idea2022.1教程亲测有效,一键激活。
Jetbrains全系列IDE稳定放心使用
版权声明:如有使用转载,请附加出处 https://blog.csdn.net/jia666666/article/details/81668590
QTreeWidget
QTreeWidget类中的常用方法
| 方法 | 描述 |
|---|---|
| setColumnWidth(int column,int width) | 将指定列的宽度设置为给定的值 |
| Column:指定的列 | |
| width:指定的宽度 | |
| insertTopLevelItems() | 在视图的顶层索引中引入项目的列表 |
| expandAll() | 展开所有节点的树形节点 |
| invisibleRootItem() | 返回树形控件中不可见的根选项(Root Item) |
| selectionItems() | 返回所有选定的非隐藏项目的列表内 |
QTreeWidgetItem类中常用的方法
| 方法 | 描述 |
|---|---|
| addChild() | 将子项追加到子列表中 |
| setText() | 设置显示的节点文本 |
| Text() | 返回显示的节点文本 |
| setCheckState(column.state) | 设置指定列的选中状态: |
| Qt.Checked:节点选中 | |
| Qt.Unchecked:节点没有选中 | |
| setIcon(column,icon) | 在指定的列中显示图标 |
实例:树形结构的实现
树形结构是通过QTreeWidget和QTreeWidgetItem类实现的,其中QTreeWidgetItem类实现了节点的添加,其完整代码如下
import sys
from PyQt5.QtWidgets import *
from PyQt5.QtGui import QIcon, QBrush, QColor
from PyQt5.QtCore import Qt


class TreeWidgetDemo(QMainWindow):
    def __init__(self, parent=None):
        super(TreeWidgetDemo, self).__init__(parent)
        self.setWindowTitle('TreeWidget 例子')

        self.tree=QTreeWidget()
        #设置列数
        self.tree.setColumnCount(2)
        #设置树形控件头部的标题
        self.tree.setHeaderLabels(['Key','Value'])

        #设置根节点
        root=QTreeWidgetItem(self.tree)
        root.setText(0,'Root')
        root.setIcon(0,QIcon('./images/root.png'))

        # todo 优化2 设置根节点的背景颜色
        brush_red=QBrush(Qt.red)
        root.setBackground(0,brush_red)
        brush_blue=QBrush(Qt.blue)
        root.setBackground(1,brush_blue)

        #设置树形控件的列的宽度
        self.tree.setColumnWidth(0,150)

        #设置子节点1
        child1=QTreeWidgetItem()
        child1.setText(0,'child1')
        child1.setText(1,'ios')
        child1.setIcon(0,QIcon('./images/IOS.png'))

        #todo 优化1 设置节点的状态
        child1.setCheckState(0,Qt.Checked)

        root.addChild(child1)


        #设置子节点2
        child2=QTreeWidgetItem(root)
        child2.setText(0,'child2')
        child2.setText(1,'')
        child2.setIcon(0,QIcon('./images/android.png'))

        #设置子节点3
        child3=QTreeWidgetItem(child2)
        child3.setText(0,'child3')
        child3.setText(1,'android')
        child3.setIcon(0,QIcon('./images/music.png'))


        #加载根节点的所有属性与子控件
        self.tree.addTopLevelItem(root)

        #TODO 优化3 给节点添加响应事件
        self.tree.clicked.connect(self.onClicked)


        #节点全部展开
        self.tree.expandAll()
        self.setCentralWidget(self.tree)

    def onClicked(self,qmodeLindex):
        item=self.tree.currentItem()
        print('Key=%s,value=%s'%(item.text(0),item.text(1)))

if __name__ == '__main__':
    app = QApplication(sys.argv)
    tree = TreeWidgetDemo()
    tree.show()
    sys.exit(app.exec_())
- 1
- 2
- 3
- 4
- 5
- 6
- 7
- 8
- 9
- 10
- 11
- 12
- 13
- 14
- 15
- 16
- 17
- 18
- 19
- 20
- 21
- 22
- 23
- 24
- 25
- 26
- 27
- 28
- 29
- 30
- 31
- 32
- 33
- 34
- 35
- 36
- 37
- 38
- 39
- 40
- 41
- 42
- 43
- 44
- 45
- 46
- 47
- 48
- 49
- 50
- 51
- 52
- 53
- 54
- 55
- 56
- 57
- 58
- 59
- 60
- 61
- 62
- 63
- 64
- 65
- 66
- 67
- 68
- 69
- 70
- 71
- 72
- 73
- 74
- 75
- 76
- 77
- 78
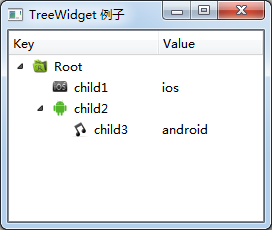
初始运行图如下

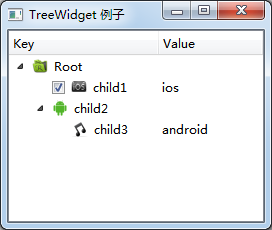
优化一:设置节点的状态
这里添加了child1的选中状态
child1.setCheckState(0,Qt.Checked)
- 1
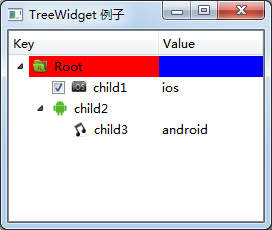
优化二:设置节点的背景颜色
这里设置了根节点的背景颜色
brush_red=QBrush(Qt.red)
        root.setBackground(0,brush_red)
        brush_blue=QBrush(Qt.blue)
        root.setBackground(1,brush_blue)
- 1
- 2
- 3
- 4
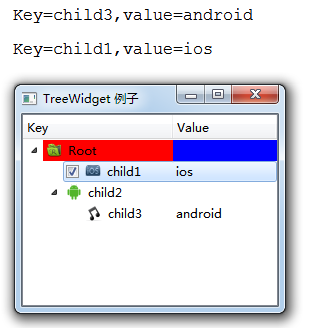
优化三:给节点添加响应事件
点击,会在控制台输出当前地key值与value值
self.tree.clicked.connect(self.onClicked)
def onClicked(self,qmodeLindex):
        item=self.tree.currentItem()
        print('Key=%s,value=%s'%(item.text(0),item.text(1)))
- 1
- 2
- 3
- 4
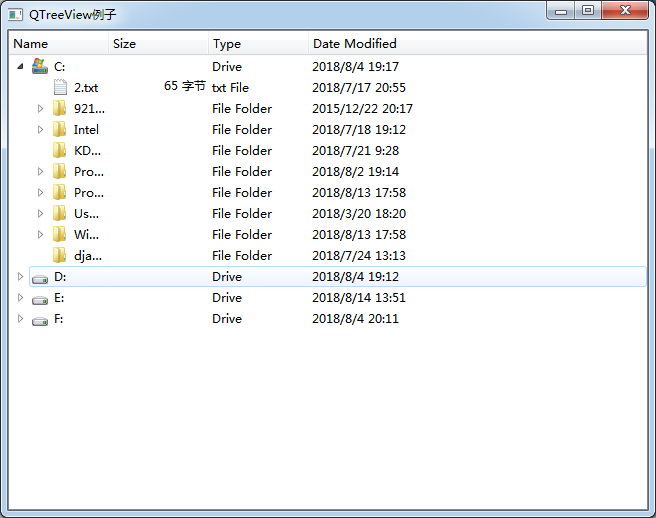
实例:系统定制模式
在上面的例子中,QTreeWidgetItem类的节点是一个个添加上去的,这样有时很不方便,特别是窗口产生比较复杂的树形结构时,一般都是通过QTreeView类来实现的,而不是QTreeWidget类,QTreeView和QTreeWidget类最大的区别就是,QTreeView类可以使用操作系统提供的定制模式,比如文件系统盘的树列表
import sys
from PyQt5.QtWidgets import *
from PyQt5.QtGui import *

if __name__ == '__main__':
    app=QApplication(sys.argv)

    #window系统提供的模式
    model=QDirModel()
    #创建一个QTreeView的控件
    tree=QTreeView()
    #为控件添加模式
    tree.setModel(model)

    tree.setWindowTitle('QTreeView例子')
    tree.resize(640,480)

    tree.show()
    sys.exit(app.exec_())
- 1
- 2
- 3
- 4
- 5
- 6
- 7
- 8
- 9
- 10
- 11
- 12
- 13
- 14
- 15
- 16
- 17
- 18
- 19
相关文件及下载地址
https://download.csdn.net/download/jia666666/10609488
发布者:全栈程序员-用户IM,转载请注明出处:https://javaforall.cn/187196.html原文链接:https://javaforall.cn
【正版授权,激活自己账号】: Jetbrains全家桶Ide使用,1年售后保障,每天仅需1毛
【官方授权 正版激活】: 官方授权 正版激活 支持Jetbrains家族下所有IDE 使用个人JB账号...
