大家好,又见面了,我是你们的朋友全栈君。如果您正在找激活码,请点击查看最新教程,关注关注公众号 “全栈程序员社区” 获取激活教程,可能之前旧版本教程已经失效.最新Idea2022.1教程亲测有效,一键激活。
Jetbrains全系列IDE稳定放心使用
一,首先去github上下载mask-rcnn源码,这里提供一个百度网盘地址
链接:https://pan.baidu.com/s/1htJYyNy 密码:0r2b
含可运行DEMO更新链接:百度网盘 请输入提取码 密码:bvm5
二,下载对应的mask_rcnn_coco.h5模型,这里给出百度网盘下载地址
链接:https://pan.baidu.com/s/1drKvfg 密码:yer9
三,运行如下代码,根据提示安装相应的库
import os
import sys
import random
import math
import numpy as np
import skimage.io
import matplotlib
import matplotlib.pyplot as plt

import coco
import utils
import model as modellib
import visualize
对于pycocotools库安装方法如下
git clone https://github.com/pdollar/coco

cd coco/PythonAPI
将makefile中的python 改为python3
然后先运行安装python3-dev
然后命令行输入
make -j8然后将pycocotools文件夹复制到mask-rcnn下
最 后再
sudo pip3 install h5py四,当编译器不再报错时运行如下程序
import os
import sys
import random
import math
import numpy as np
import skimage.io
import matplotlib
import matplotlib.pyplot as plt

import coco
import utils
import model as modellib
import visualize

#%matplotlib inline

# Root directory of the project
ROOT_DIR = os.getcwd()

# Directory to save logs and trained model
MODEL_DIR = os.path.join(ROOT_DIR, "logs")

# Local path to trained weights file
COCO_MODEL_PATH =  "mask_rcnn_coco.h5"


# Directory of images to run detection on
IMAGE_DIR = os.path.join(ROOT_DIR, "images")


class InferenceConfig(coco.CocoConfig):
    # Set batch size to 1 since we'll be running inference on
    # one image at a time. Batch size = GPU_COUNT * IMAGES_PER_GPU
    GPU_COUNT = 1
    IMAGES_PER_GPU = 1

config = InferenceConfig()
config.display()


# Create model object in inference mode.
model = modellib.MaskRCNN(mode="inference", model_dir=MODEL_DIR, config=config)

# Load weights trained on MS-COCO
model.load_weights(COCO_MODEL_PATH, by_name=True)


# COCO Class names
# Index of the class in the list is its ID. For example, to get ID of
# the teddy bear class, use: class_names.index('teddy bear')
class_names = ['BG', 'person', 'bicycle', 'car', 'motorcycle', 'airplane',
               'bus', 'train', 'truck', 'boat', 'traffic light',
               'fire hydrant', 'stop sign', 'parking meter', 'bench', 'bird',
               'cat', 'dog', 'horse', 'sheep', 'cow', 'elephant', 'bear',
               'zebra', 'giraffe', 'backpack', 'umbrella', 'handbag', 'tie',
               'suitcase', 'frisbee', 'skis', 'snowboard', 'sports ball',
               'kite', 'baseball bat', 'baseball glove', 'skateboard',
               'surfboard', 'tennis racket', 'bottle', 'wine glass', 'cup',
               'fork', 'knife', 'spoon', 'bowl', 'banana', 'apple',
               'sandwich', 'orange', 'broccoli', 'carrot', 'hot dog', 'pizza',
               'donut', 'cake', 'chair', 'couch', 'potted plant', 'bed',
               'dining table', 'toilet', 'tv', 'laptop', 'mouse', 'remote',
               'keyboard', 'cell phone', 'microwave', 'oven', 'toaster',
               'sink', 'refrigerator', 'book', 'clock', 'vase', 'scissors',
               'teddy bear', 'hair drier', 'toothbrush']


# Load a random image from the images folder
file_names = next(os.walk(IMAGE_DIR))[2]
image = skimage.io.imread(os.path.join(IMAGE_DIR, random.choice(file_names)))

# Run detection
results = model.detect([image], verbose=1)

# Visualize results
r = results[0]
visualize.display_instances(image, r['rois'], r['masks'], r['class_ids'],
                            class_names, r['scores'])
print('OK')
至此mask-rcnn完成
五,用mask-rcnn训练自己数据
这里提供一个最新源码(没积分的留言联系我,我发给你的邮箱)
这里我们主要用到源码提供的coco.py
首先我们去如下两个网址下载coco数据集
http://images.cocodataset.org/zips/train2014.zip
http://images.cocodataset.org/zips/val2014.zip
接着我们下载对应的json文件
https://dl.dropboxusercontent.com/s/o43o90bna78omob/instances_minival2014.json.zip?dl=0
https://dl.dropboxusercontent.com/s/s3tw5zcg7395368/instances_valminusminival2014.json.zip?dl=0
可能上面链接失效,这里提供instances_minival2014.json和instances_valminusminival2014.json一个csdn的下载地址json下载
instances_train2014.json和instances_val2014.json百度云下载链接为:
链接:https://pan.baidu.com/s/1qHoeAOULbsAFiPnBr4a8JA 密码:fk62
将上面下载的源码解压,将sample中coco/coco.py复制到Mask_RCNN-master 根目录下,新建一个文件夹coco用来存放我们上面下载的数据图片及json文件
进入coco文件夹中解压train2014.zip和val2014.zip 到当前目录下
解压上面的包含json文件的zip,这里我们只需要
instances_minival2014.json instances_train2014.json instances_val2014.json instances_valminusminival2014.json
这四个json ,在coco目录下新建一个文件夹annotations用来存放上面的四个json,
最终目录如下:


在home目录存放预训练模型mask_rcnn_coco.h5
此时我们可以回到Mask_RCNN-master目录下,运行命令
python3 coco.py train --dataset=coco/ --model=coco然后我们会看到如下界面
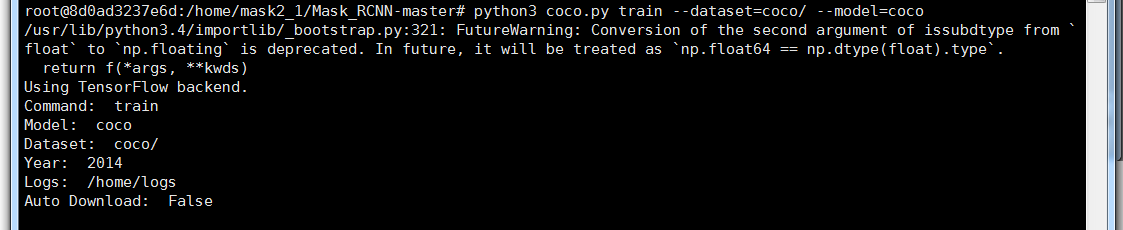
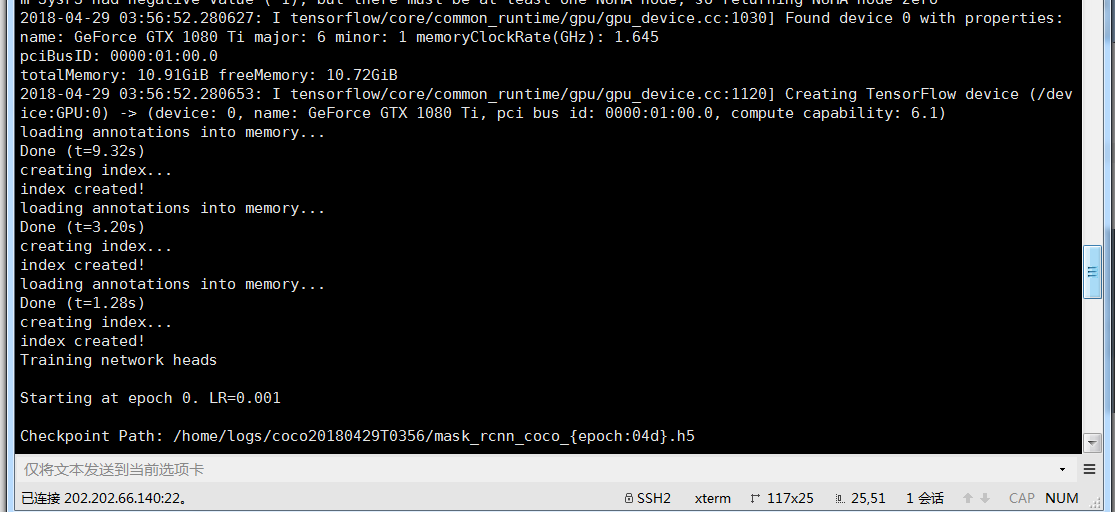
Logs处就是我们保存训练后的模型所在目录
到此,我们成功开始训练coco数据集
六,分析coco数据集
1,为了更好地分析coco数据集,这里我们准备一个工具labelme,这是一个打标的工具
安装方法如下:
pip3 install labelme安装完成之后打开
labelme
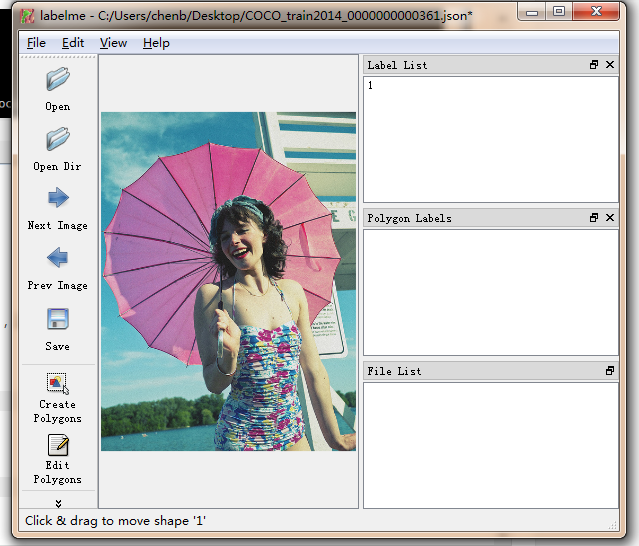
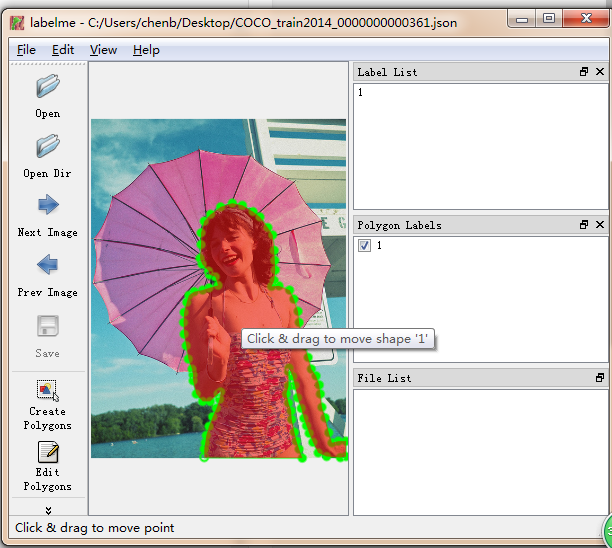
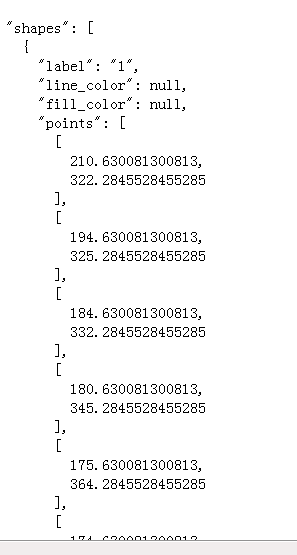
第二幅图就是我们自己给图片打标注后,我们进行保存会生成一个json文件,打开生成的json文件我们可以看到标注的所有点的x,y坐标
这个工具可以用来标注我们自己的数据集,然后进行训练。
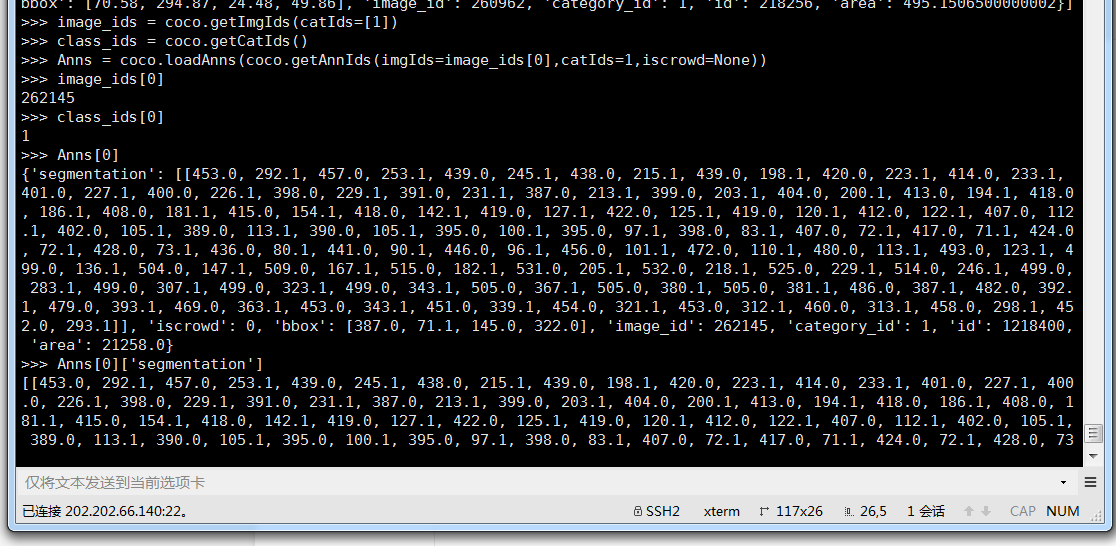
2,获取coco标注文件内容
coco标注文件比较大,一个json有500M多,我们用普通的记事本是打不开的,这里我们要用到coco官网提供的一个python API包,该api是抽象的,封装了各装函数用来获取json的数据,我们分析后发现该json相当于一个字典文件,键值对形式呈现。
# The following API functions are defined:
#  COCO       - COCO api class that loads COCO annotation file and prepare data structures.
#  decodeMask - Decode binary mask M encoded via run-length encoding.
#  encodeMask - Encode binary mask M using run-length encoding.
#  getAnnIds  - Get ann ids that satisfy given filter conditions.
#  getCatIds  - Get cat ids that satisfy given filter conditions.
#  getImgIds  - Get img ids that satisfy given filter conditions.
#  loadAnns   - Load anns with the specified ids.
#  loadCats   - Load cats with the specified ids.
#  loadImgs   - Load imgs with the specified ids.
#  annToMask  - Convert segmentation in an annotation to binary mask.
#  showAnns   - Display the specified annotations.
#  loadRes    - Load algorithm results and create API for accessing them.
#  download   - Download COCO images from mscoco.org server.
# Throughout the API "ann"=annotation, "cat"=category, and "img"=image.
# Help on each functions can be accessed by: "help COCO>function".

# See also COCO>decodeMask,
# COCO>encodeMask, COCO>getAnnIds, COCO>getCatIds,
# COCO>getImgIds, COCO>loadAnns, COCO>loadCats,
# COCO>loadImgs, COCO>annToMask, COCO>showAnns
from pycocotools.coco import COCO
from pycocotools.cocoeval import COCOeval
from pycocotools import mask as maskUtils
coco=COCO("pycocotools/instances_train2014.json")

3,分析coco中的segemention
我们提取其中一幅图片的segemention用如下代码将其按labelme要求的json格式写入test.txt文件中
l = [345.28, 220.68, 348.17, 269.8, 355.4, 307.36, 377.07, 318.92, 395.85, 370.93, 444.97, 565.96, 473.86, 616.52, 478.19, 628.08, 431.96, 628.08, 401.63, 581.85, 377.07, 477.83, 375.62, 529.84, 387.18, 600.63, 397.29, 628.08, 325.06, 623.75, 216.7, 622.3, 216.7, 606.41, 251.38, 529.84, 223.93, 529.84, 209.48, 528.4, 202.26, 505.28, 193.59, 485.06, 167.58, 375.26, 179.14, 334.81, 203.7, 324.7, 229.71, 313.14, 209.48, 278.47, 193.59, 248.13, 208.04, 188.89, 223.93, 175.89, 236.93, 168.67, 258.6, 162.89, 294.72, 168.67, 310.61, 174.45, 326.5, 197.56]
l0 = []
l1 = []
l3 = []
l4 = []
for i in range(len(l)):
if i%2==0:
l0.append(l[i])
else:
l1.append(l[i])
for i in range(len(l)):
if i%2==0:
l3.append(l[i])
else:
l3.append(l[i])
l4.append(l3)
l3 = []
print(l0)
print(l1)
print(l4)
f = open("test.txt","w")
for e in l4:
f.write('\n [\n ')
f.write(str(e[0]))
f.write(',\n ')
f.write(str(e[1]))
f.write('\n ],')
f.close()
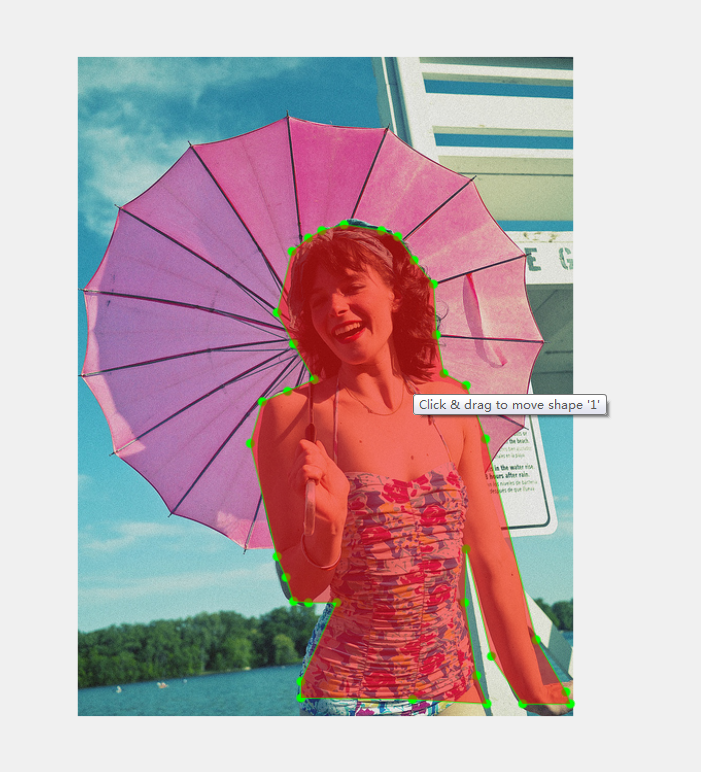
a = input()然后我们将之前labelme保存的json文件中的位置坐标进行替换,我们得到如下图片:
最新源码和相关json文件的下载地址见下:
发布者:全栈程序员-用户IM,转载请注明出处:https://javaforall.cn/185883.html原文链接:https://javaforall.cn
【正版授权,激活自己账号】: Jetbrains全家桶Ide使用,1年售后保障,每天仅需1毛
【官方授权 正版激活】: 官方授权 正版激活 支持Jetbrains家族下所有IDE 使用个人JB账号...
