大家好,又见面了,我是你们的朋友全栈君。如果您正在找激活码,请点击查看最新教程,关注关注公众号 “全栈程序员社区” 获取激活教程,可能之前旧版本教程已经失效.最新Idea2022.1教程亲测有效,一键激活。
Jetbrains全系列IDE使用 1年只要46元 售后保障 童叟无欺
一、kafka简述
1、简介
kafka是一个高吞吐的分布式消息队列系统。特点是生产者消费者模式,先进先出(FIFO)保证顺序,自己不丢数据,默认每隔7天清理数据。消息列队常见场景:系统之间解耦合、峰值压力缓冲、异步通信。
2、集群介绍

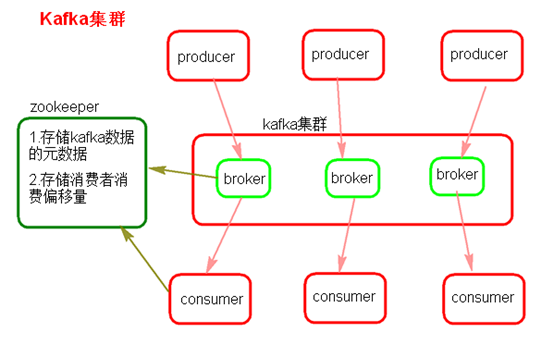
(1)Kafka架构是由producer(消息生产者)、consumer(消息消费者)、borker(kafka集群的server,负责处理消息读、写请求,存储消息,在kafka cluster这一层这里,其实里面是有很多个broker)、topic(消息队列/分类相当于队列,里面有生产者和消费者模型)、zookeeper(元数据信息存在zookeeper中,包括:存储消费偏移量,topic话题信息,partition信息) 这些部分组成。
(2)kafka里面的消息是有topic来组织的,简单的我们可以想象为一个队列,一个队列就是一个topic,然后它把每个topic又分为很多个partition,这个是为了做并行的,在每个partition内部消息强有序,相当于有序的队列,其中每个消息都有个序号offset,比如0到12,从前面读往后面写。一个partition对应一个broker,一个broker可以管多个partition,比如说,topic有6个partition,有两个broker,那每个broker就管3个partition。这个partition可以很简单想象为一个文件,当数据发过来的时候它就往这个partition上面append,追加就行,消息不经过内存缓冲,直接写入文件,kafka和很多消息系统不一样,很多消息系统是消费完了我就把它删掉,而kafka是根据时间策略删除,而不是消费完就删除,在kafka里面没有一个消费完这么个概念,只有过期这样一个概念。
(3)producer自己决定往哪个partition里面去写,这里有一些的策略,譬如如果hash,不用多个partition之间去join数据了。consumer自己维护消费到哪个offset,每个consumer都有对应的group,group内是queue消费模型(各个consumer消费不同的partition,因此一个消息在group内只消费一次),group间是publish-subscribe消费模型,各个group各自独立消费,互不影响,因此一个消息在被每个group消费一次。
3、leader负载均衡机制
当一个broker停止或者crashes时,所有本来将它作为leader的分区将会把leader转移到其他broker上去,极端情况下,会导致同一个leader管理多个分区,导致负载不均衡,同时当这个broker重启时,如果这个broker不再是任何分区的leader,kafka的client也不会从这个broker来读取消息,从而导致资源的浪费。
kafka中有一个被称为优先副本(preferred replicas)的概念。如果一个分区有3个副本,且这3个副本的优先级别分别为0,1,2,根据优先副本的概念,0会作为leader 。当0节点的broker挂掉时,会启动1这个节点broker当做leader。当0节点的broker再次启动后,会自动恢复为此partition的leader。不会导致负载不均衡和资源浪费,这就是leader的均衡机制。
在配置文件conf/ server.properties中配置开启(默认就是开启):
auto.leader.rebalance.enable true一般保持默认配置,通常研发人员在客户端代码层面依据需要设置是否自动提交位点
二、集群配置
1、zookeeper安装与配置
(1)下载并解压
在node01 /opt/bigdata/下 解压 tar -zxvf zookeeper-3.4.6.tar.gz
(2)编辑配置
配置hosts vim /etc/hosts
192.168.172.73 node03
192.168.172.72 node02
192.168.172.71 node01
配置zookeeper环境变量
export ZOOKEEPER_HOME=/opt/bigdata/zookeeper-3.4.6 #zookeeper安装路径
export PATH=$ZOOKEEPER_HOME/bin:$PATH
配置zoo.cfg
在/opt/bigdata下,复制cp zookeeper-3.4.5/conf/zoo_sample.cfg zookeeper-3.4.5/conf/zoo.cfg
编辑:vim zookeeper-3.4.5/conf/zoo.cfg
# The number of milliseconds of each tick
tickTime=2000
# The number of ticks that the initial
# synchronization phase can take
initLimit=10
# The number of ticks that can pass between
# sending a request and getting an acknowledgement
syncLimit=5
# the directory where the snapshot is stored.
# do not use /tmp for storage, /tmp here is just
# example sakes.
dataDir=/opt/bigdata/data/zookeeper/zkdata #zookeeper数据存放路径
dataLogDir=/opt/bigdata/data/zookeeper/zkdatalog #zookeeper日志存放路径
# the port at which the clients will connect
clientPort=2181        ##zookeeper对外通信端口

server.1=node01:2888:3888
server.2=node02:2888:3888
server.3=node03:2888:3888
#
# Be sure to read the maintenance section of the
# administrator guide before turning on autopurge.
#
# http://zookeeper.apache.org/doc/current/zookeeperAdmin.html#sc_maintenance
#
# The number of snapshots to retain in dataDir
#autopurge.snapRetainCount=3
# Purge task interval in hours
# Set to "0" to disable auto purge feature
#autopurge.purgeInterval=1
分别在node01、node02、node03下/opt/bigdata/data/zookeeper/zkdata
vim myid 新建myid文件,内容分别为1、2、3保存
(3)节点分发
在node01 /opt/bigdata下 scp远程复制,分别分发到node02、node03对应目录下
scp -r zookeeper-3.4.6 node02:`pwd`
scp -r zookeeper-3.4.6 node03:`pwd`
(4)启动zookeeper集群
分别在node01、node02、node03下执行 zkServer.sh start命令启动zookeeper
稍等片刻,分别在node01、node02、node03下执行zkServer.sh status命令,查看状态
[root@node01 ~]# zkServer.sh status
JMX enabled by default
Using config: /opt/bigdata/zookeeper-3.4.5/bin/../conf/zoo.cfg
Mode: leader
[root@node02 bigdata]# zkServer.sh status
JMX enabled by default
Using config: /opt/bigdata/zookeeper-3.4.5/bin/../conf/zoo.cfg
Mode: follower
[root@node03 ~]# zkServer.sh status
JMX enabled by default
Using config: /opt/bigdata/zookeeper-3.4.5/bin/../conf/zoo.cfg
Mode: follower
3、kafka安装与配置
(1)下载并解压
wget http://mirror.bit.edu.cn/apache/kafka/1.1.0/kafka_2.11-1.1.0.tgz 去下载
在node01上 /opt/bigdata/下 解压
tar zxvf kafka_2.11-1.1.0.tgz
(2)编辑配置
在/opt/bigdata/下 vim kafka_2.11-1.1.0/config/server.properties编辑配置
这里重点修改三个参数broker.id标识本机、log.dirs是kafka接收消息存放路径、
zookeeper.connect指定连接的zookeeper集群地址
其他参数保持默认即可,也可自己根据情况修改
############################# Server Basics #############################
# The id of the broker. This must be set to a unique integer for each broker.
broker.id=1
############################# Socket Server Settings #############################
listeners=PLAINTEXT://:9092

# The port the socket server listens on
#port=9092

# Hostname the broker will bind to. If not set, the server will bind to all interfaces
#host.name=localhost

# Hostname the broker will advertise to producers and consumers. If not set, it uses the
# value for "host.name" if configured.  Otherwise, it will use the value returned from
# java.net.InetAddress.getCanonicalHostName().
#advertised.host.name=<hostname routable by clients>

# The port to publish to ZooKeeper for clients to use. If this is not set,
# it will publish the same port that the broker binds to.
#advertised.port=<port accessible by clients>

# The number of threads handling network requests
num.network.threads=3

# The number of threads doing disk I/O
num.io.threads=8

# The send buffer (SO_SNDBUF) used by the socket server
socket.send.buffer.bytes=102400

# The receive buffer (SO_RCVBUF) used by the socket server
socket.receive.buffer.bytes=102400

# The maximum size of a request that the socket server will accept (protection against OOM)
socket.request.max.bytes=104857600

############################# Log Basics #############################
# A comma seperated list of directories under which to store log files
log.dirs=/opt/bigdata/kafka_2.11-1.1.0/kafka-logs

# The default number of log partitions per topic. More partitions allow greater
# parallelism for consumption, but this will also result in more files across
# the brokers.
num.partitions=1

# The number of threads per data directory to be used for log recovery at startup and flushing at shutdown.
# This value is recommended to be increased for installations with data dirs located in RAID array.
num.recovery.threads.per.data.dir=1

############################# Log Flush Policy #############################
# The number of messages to accept before forcing a flush of data to disk
#log.flush.interval.messages=10000

# The maximum amount of time a message can sit in a log before we force a flush
#log.flush.interval.ms=1000

############################# Log Retention Policy #############################
# The following configurations control the disposal of log segments. The policy can
# be set to delete segments after a period of time, or after a given size has accumulated.
# A segment will be deleted whenever *either* of these criteria are met. Deletion always happens
# from the end of the log.

# The minimum age of a log file to be eligible for deletion
log.retention.hours=168

# A size-based retention policy for logs. Segments are pruned from the log as long as the remaining
# segments don't drop below log.retention.bytes.
#log.retention.bytes=1073741824

# The maximum size of a log segment file. When this size is reached a new log segment will be created.
log.segment.bytes=1073741824

# The interval at which log segments are checked to see if they can be deleted according
# to the retention policies
log.retention.check.interval.ms=300000

# If log.cleaner.enable=true is set the cleaner will be enabled and individual logs can then be marked for log compaction.
log.cleaner.enable=false

############################# Zookeeper #############################
zookeeper.connect=node01:2181,node02:2181,node03:2181

# Timeout in ms for connecting to zookeeper
zookeeper.connection.timeout.ms=6000
(3)节点分发
在 /opt/bigdata下 远程复制到node01、node02对应路径下,当然复制时需要ssh免登录
scp -r  kafka_2.11-1.1.0 node02:`pwd`
scp -r  kafka_2.11-1.1.0 node03:`pwd`
分别修改server.properties对应的broker.id为2、3即可
(4)启动kafka集群
kafka集群启动前要启动zookeeper集群,若zookeeper集群没启动,首先启动
在/opt/bigdata下 ,三个节点分别执行如下命令,启动kafka集群
./kafka_2.11-1.1.0/bin/kafka-server-start.sh -daemon ./kafka_2.11-1.1.0/config/server.properties &(5)基本操作
1)、创建topic
./kafka_2.11/bin/kafka-topics.sh --create --zookeeper node02:2181,node03:2181,node04:2181 --replication-factor 3 --partitions 6 --topic kfk_test2)、列出创建的topic
./kafka_2.11/bin/kafka-topics.sh --list --zookeeper node02:2181,node03:2181,node04:21813)、生成数据
./kafka_2.11/bin/kafka-console-producer.sh -broker-list node02:9092,node03:9092,node04:9092 --topic kfk_test4)、消费生产数据
kafka 0.9版本之前用zookeeper
./kafka_2.11/bin/kafka-console-consumer.sh --zookeeper node02:2181,node03:2181,node04:2181 --from-beginning --topic kfk_test

kafka 0.9版本之后不推荐zookeeper方式,仍然支持,但逐渐会被取消,推荐bootstrap-server方式
./kafka_2.11/bin/kafka-console-consumer.sh --bootstrap-server node02:9092,node03:9092,node04:9092 --from-beginning --topic kfk_test
5)、查看指定topic信息
./kafka_2.11/bin/kafka-topics.sh --describe --zookeeper node02:2181,node03:2181,node04:2181 --topic kfk_test信息如下:
Topic:kfk_test  PartitionCount:6	ReplicationFactor:3	Configs:
Topic: kfk_test	 Partition: 0	Leader: 1	Replicas: 1,3,2	Isr: 2,3,1
Topic: kfk_test	 Partition: 1	Leader: 2	Replicas: 2,1,3	Isr: 2,3,1
Topic: kfk_test	 Partition: 2	Leader: 3	Replicas: 3,2,1	Isr: 2,3,1
Topic: kfk_test	 Partition: 3	Leader: 1	Replicas: 1,2,3	Isr: 2,3,1
Topic: kfk_test	 Partition: 4	Leader: 2	Replicas: 2,3,1	Isr: 2,3,1
Topic: kfk_test	 Partition: 5	Leader: 3	Replicas: 3,1,2	Isr: 2,3,1
可以看到6个分区,每个分区3个副本
partiton: partion id 分区id
leader:当前负责读写的lead broker id ,就是server.properties的broker.id
replicas:当前partition的所有replication broker list
isr:(in-sync replicas)relicas的子集,只包含出于活动状态的broker,离线或挂掉的broker不在此列表
6)、删除指定的topic
删除kafka中的topic
./kafka_2.11/bin/kafka-topics.sh --delete --zookeeper node02:2181,node03:2181,node04:2181 --topic kfk_test删除zookeeper中的topic信息
rmr /brokers/topics/kfk_test

rmr /config/topics/kfk_test

rmr /admin/delete_topics/kfk_test

rmr /consumers/kfk_test-group
删除topic数据相关的目录
rm -rf /var/local/kafka/data/kfk_test*发布者:全栈程序员-用户IM,转载请注明出处:https://javaforall.cn/183850.html原文链接:https://javaforall.cn
【正版授权,激活自己账号】: Jetbrains全家桶Ide使用,1年售后保障,每天仅需1毛
【官方授权 正版激活】: 官方授权 正版激活 支持Jetbrains家族下所有IDE 使用个人JB账号...
