大家好,又见面了,我是你们的朋友全栈君。如果您正在找激活码,请点击查看最新教程,关注关注公众号 “全栈程序员社区” 获取激活教程,可能之前旧版本教程已经失效.最新Idea2022.1教程亲测有效,一键激活。
Jetbrains全系列IDE稳定放心使用
学习前言
数据增强是非常重要的提高目标检测算法鲁棒性的手段,学习一下对身体有好处!


代码下载
https://github.com/bubbliiiing/object-detection-augmentation
数据增强做了什么
数据增强其实就是让图片变得更加多样。比如说原图是一个电脑
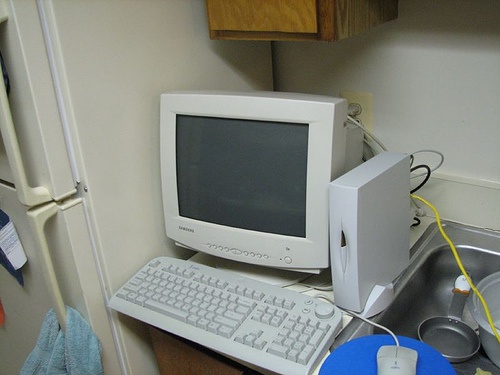
如果不使用数据增强的话这个电脑就只是一个电脑,每次训练的电脑都是这样的样子的,但是我们实际生活中电脑是多样的。
因此我们可以通过改变亮度,图像扭曲等方式使得图像变得更加多种多样,如下图所示,尽管亮度,形态发生了细微改变,但本质上,这些东西都依然是电脑。
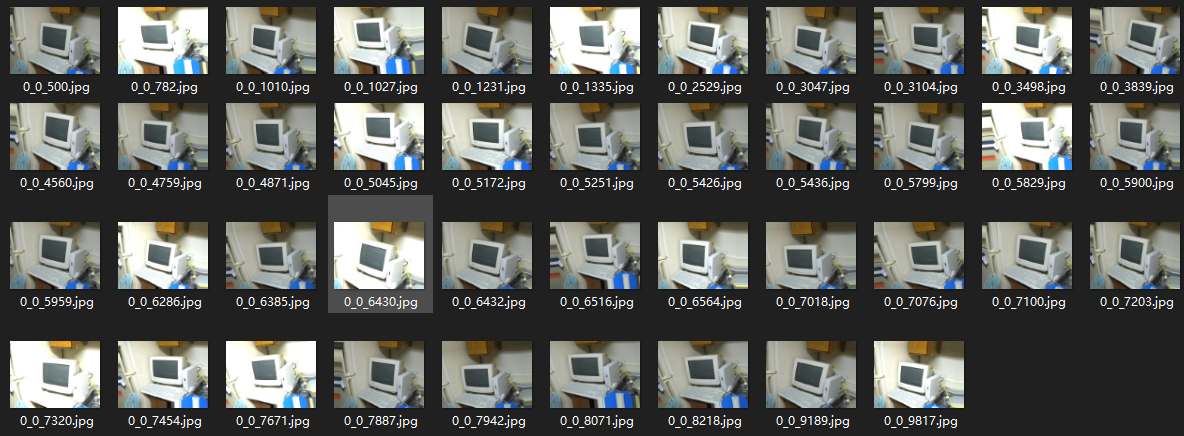
改变后的图片放入神经网络进行训练可以提高网络的鲁棒性,降低各方面额外因素对识别的影响。
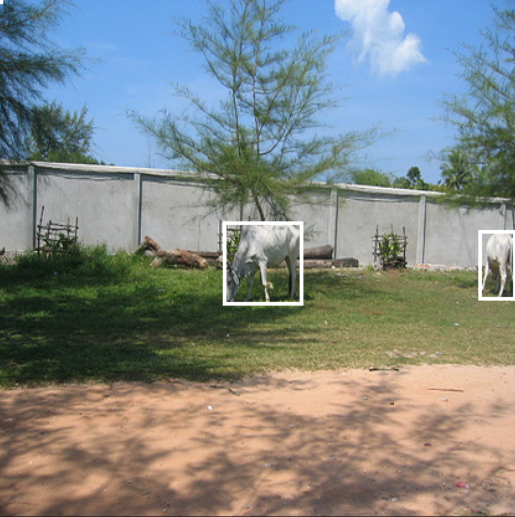
目标检测中的图像增强
在目标检测中如果要增强数据,并不是直接增强图片就好了,还要考虑到图片扭曲后框的位置。
也就是框的位置要跟着图片的位置进行改变。
如果大家对我的目标检测代码有少许研究的话,应该都可以看到。我特别喜欢用这个数据增强代码:
def get_random_data(annotation_line, input_shape, jitter=.3, hue=.1, sat=0.7, val=0.4, random=True):
    line    = annotation_line.split()
    #------------------------------#
    # 读取图像并转换成RGB图像
    #------------------------------#
    image   = Image.open(line[0])
    image   = image.convert('RGB')

    #------------------------------#
    # 获得图像的高宽与目标高宽
    #------------------------------#
    iw, ih  = image.size
    h, w    = input_shape
    #------------------------------#
    # 获得预测框
    #------------------------------#
    box     = np.array([np.array(list(map(int,box.split(',')))) for box in line[1:]])

    if not random:
        scale = min(w/iw, h/ih)
        nw = int(iw*scale)
        nh = int(ih*scale)
        dx = (w-nw)//2
        dy = (h-nh)//2

        #---------------------------------#
        # 将图像多余的部分加上灰条
        #---------------------------------#
        image       = image.resize((nw,nh), Image.BICUBIC)
        new_image   = Image.new('RGB', (w,h), (128,128,128))
        new_image.paste(image, (dx, dy))
        image_data  = np.array(new_image, np.float32)

        #---------------------------------#
        # 对真实框进行调整
        #---------------------------------#
        if len(box)>0:
            np.random.shuffle(box)
            box[:, [0,2]] = box[:, [0,2]]*nw/iw + dx
            box[:, [1,3]] = box[:, [1,3]]*nh/ih + dy
            box[:, 0:2][box[:, 0:2]<0] = 0
            box[:, 2][box[:, 2]>w] = w
            box[:, 3][box[:, 3]>h] = h
            box_w = box[:, 2] - box[:, 0]
            box_h = box[:, 3] - box[:, 1]
            box = box[np.logical_and(box_w>1, box_h>1)] # discard invalid box

        return image_data, box

    #------------------------------------------#
    # 对图像进行缩放并且进行长和宽的扭曲
    #------------------------------------------#
    new_ar = iw/ih * rand(1-jitter,1+jitter) / rand(1-jitter,1+jitter)
    scale = rand(.25, 2)
    if new_ar < 1:
        nh = int(scale*h)
        nw = int(nh*new_ar)
    else:
        nw = int(scale*w)
        nh = int(nw/new_ar)
    image = image.resize((nw,nh), Image.BICUBIC)

    #------------------------------------------#
    # 将图像多余的部分加上灰条
    #------------------------------------------#
    dx = int(rand(0, w-nw))
    dy = int(rand(0, h-nh))
    new_image = Image.new('RGB', (w,h), (128,128,128))
    new_image.paste(image, (dx, dy))
    image = new_image

    #------------------------------------------#
    # 翻转图像
    #------------------------------------------#
    flip = rand()<.5
    if flip: image = image.transpose(Image.FLIP_LEFT_RIGHT)

    image_data      = np.array(image, np.uint8)
    #---------------------------------#
    # 对图像进行色域变换
    # 计算色域变换的参数
    #---------------------------------#
    r               = np.random.uniform(-1, 1, 3) * [hue, sat, val] + 1
    #---------------------------------#
    # 将图像转到HSV上
    #---------------------------------#
    hue, sat, val   = cv2.split(cv2.cvtColor(image_data, cv2.COLOR_RGB2HSV))
    dtype           = image_data.dtype
    #---------------------------------#
    # 应用变换
    #---------------------------------#
    x       = np.arange(0, 256, dtype=r.dtype)
    lut_hue = ((x * r[0]) % 180).astype(dtype)
    lut_sat = np.clip(x * r[1], 0, 255).astype(dtype)
    lut_val = np.clip(x * r[2], 0, 255).astype(dtype)

    image_data = cv2.merge((cv2.LUT(hue, lut_hue), cv2.LUT(sat, lut_sat), cv2.LUT(val, lut_val)))
    image_data = cv2.cvtColor(image_data, cv2.COLOR_HSV2RGB)

    #---------------------------------#
    # 对真实框进行调整
    #---------------------------------#
    if len(box)>0:
        np.random.shuffle(box)
        box[:, [0,2]] = box[:, [0,2]]*nw/iw + dx
        box[:, [1,3]] = box[:, [1,3]]*nh/ih + dy
        if flip: box[:, [0,2]] = w - box[:, [2,0]]
        box[:, 0:2][box[:, 0:2]<0] = 0
        box[:, 2][box[:, 2]>w] = w
        box[:, 3][box[:, 3]>h] = h
        box_w = box[:, 2] - box[:, 0]
        box_h = box[:, 3] - box[:, 1]
        box = box[np.logical_and(box_w>1, box_h>1)]

    return image_data, box
里面有一些比较重要的参数如:
scale = rand(.25, 2);
jitter=.3;
hue=.1;
sat=0.7;
val=0.4。
其中:
1、scale代表原图片的缩放比率,rand(.25, 2)表示在0.25到2之间缩放。
2、jitter代表原图片的宽高的扭曲比率,jitter=.3表示在0.7/1.3(0.538)到1.3/0.7(1.857)之间扭曲。
3、hue=.1,sat=0.7,val=0.4;分别代表hsv色域中三个通道的扭曲,分别是:色调(H),饱和度(S),明度(V)。
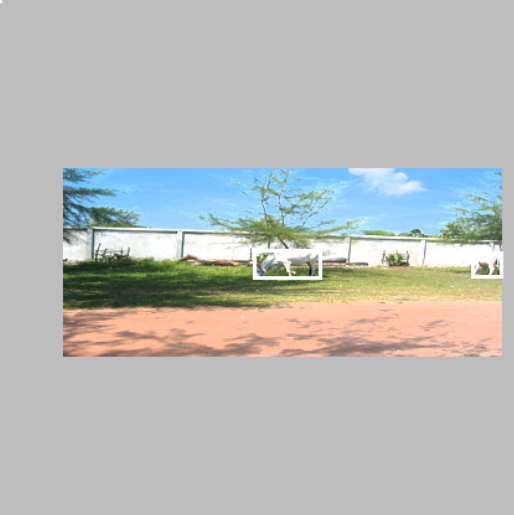
实际效果如下:
原图:
增强后:
全部代码
这里的代码直接复制无法使用,请到Github下载。
1、数据增强
该部分为数据增强。
import cv2
import numpy as np
from PIL import Image, ImageDraw


def rand(a=0, b=1):
    return np.random.rand()*(b-a) + a

def get_random_data(annotation_line, input_shape, jitter=.3, hue=.1, sat=0.7, val=0.4, random=True):
    line    = annotation_line.split()
    #------------------------------#
    # 读取图像并转换成RGB图像
    #------------------------------#
    image   = Image.open(line[0])
    image   = image.convert('RGB')

    #------------------------------#
    # 获得图像的高宽与目标高宽
    #------------------------------#
    iw, ih  = image.size
    h, w    = input_shape
    #------------------------------#
    # 获得预测框
    #------------------------------#
    box     = np.array([np.array(list(map(int,box.split(',')))) for box in line[1:]])

    if not random:
        scale = min(w/iw, h/ih)
        nw = int(iw*scale)
        nh = int(ih*scale)
        dx = (w-nw)//2
        dy = (h-nh)//2

        #---------------------------------#
        # 将图像多余的部分加上灰条
        #---------------------------------#
        image       = image.resize((nw,nh), Image.BICUBIC)
        new_image   = Image.new('RGB', (w,h), (128,128,128))
        new_image.paste(image, (dx, dy))
        image_data  = np.array(new_image, np.float32)

        #---------------------------------#
        # 对真实框进行调整
        #---------------------------------#
        if len(box)>0:
            np.random.shuffle(box)
            box[:, [0,2]] = box[:, [0,2]]*nw/iw + dx
            box[:, [1,3]] = box[:, [1,3]]*nh/ih + dy
            box[:, 0:2][box[:, 0:2]<0] = 0
            box[:, 2][box[:, 2]>w] = w
            box[:, 3][box[:, 3]>h] = h
            box_w = box[:, 2] - box[:, 0]
            box_h = box[:, 3] - box[:, 1]
            box = box[np.logical_and(box_w>1, box_h>1)] # discard invalid box

        return image_data, box

    #------------------------------------------#
    # 对图像进行缩放并且进行长和宽的扭曲
    #------------------------------------------#
    new_ar = iw/ih * rand(1-jitter,1+jitter) / rand(1-jitter,1+jitter)
    scale = rand(.25, 2)
    if new_ar < 1:
        nh = int(scale*h)
        nw = int(nh*new_ar)
    else:
        nw = int(scale*w)
        nh = int(nw/new_ar)
    image = image.resize((nw,nh), Image.BICUBIC)

    #------------------------------------------#
    # 将图像多余的部分加上灰条
    #------------------------------------------#
    dx = int(rand(0, w-nw))
    dy = int(rand(0, h-nh))
    new_image = Image.new('RGB', (w,h), (128,128,128))
    new_image.paste(image, (dx, dy))
    image = new_image

    #------------------------------------------#
    # 翻转图像
    #------------------------------------------#
    flip = rand()<.5
    if flip: image = image.transpose(Image.FLIP_LEFT_RIGHT)

    image_data      = np.array(image, np.uint8)
    #---------------------------------#
    # 对图像进行色域变换
    # 计算色域变换的参数
    #---------------------------------#
    r               = np.random.uniform(-1, 1, 3) * [hue, sat, val] + 1
    #---------------------------------#
    # 将图像转到HSV上
    #---------------------------------#
    hue, sat, val   = cv2.split(cv2.cvtColor(image_data, cv2.COLOR_RGB2HSV))
    dtype           = image_data.dtype
    #---------------------------------#
    # 应用变换
    #---------------------------------#
    x       = np.arange(0, 256, dtype=r.dtype)
    lut_hue = ((x * r[0]) % 180).astype(dtype)
    lut_sat = np.clip(x * r[1], 0, 255).astype(dtype)
    lut_val = np.clip(x * r[2], 0, 255).astype(dtype)

    image_data = cv2.merge((cv2.LUT(hue, lut_hue), cv2.LUT(sat, lut_sat), cv2.LUT(val, lut_val)))
    image_data = cv2.cvtColor(image_data, cv2.COLOR_HSV2RGB)

    #---------------------------------#
    # 对真实框进行调整
    #---------------------------------#
    if len(box)>0:
        np.random.shuffle(box)
        box[:, [0,2]] = box[:, [0,2]]*nw/iw + dx
        box[:, [1,3]] = box[:, [1,3]]*nh/ih + dy
        if flip: box[:, [0,2]] = w - box[:, [2,0]]
        box[:, 0:2][box[:, 0:2]<0] = 0
        box[:, 2][box[:, 2]>w] = w
        box[:, 3][box[:, 3]>h] = h
        box_w = box[:, 2] - box[:, 0]
        box_h = box[:, 3] - box[:, 1]
        box = box[np.logical_and(box_w>1, box_h>1)]

    return image_data, box
2、调用代码
该部分为调用代码
import os
from random import sample

import numpy as np
from PIL import Image, ImageDraw

from utils.random_data import get_random_data, get_random_data_with_MixUp
from utils.utils import convert_annotation, get_classes

#-----------------------------------------------------------------------------------#
# Origin_VOCdevkit_path 原始数据集所在的路径
#-----------------------------------------------------------------------------------#
Origin_VOCdevkit_path   = "VOCdevkit_Origin"
#-----------------------------------------------------------------------------------#
# input_shape 生成的图片大小。
#-----------------------------------------------------------------------------------#
input_shape             = [640, 640]

if __name__ == "__main__":
    Origin_JPEGImages_path  = os.path.join(Origin_VOCdevkit_path, "VOC2007/JPEGImages")
    Origin_Annotations_path = os.path.join(Origin_VOCdevkit_path, "VOC2007/Annotations")

    #---------------------------#
    # 遍历标签并赋值
    #---------------------------#
    xml_names = os.listdir(Origin_Annotations_path)

    #------------------------------#
    # 获取一个图像与标签
    #------------------------------#
    sample_xmls     = sample(xml_names, 1)
    unique_labels   = get_classes(sample_xmls, Origin_Annotations_path)

    jpg_name        = os.path.join(Origin_JPEGImages_path, os.path.splitext(sample_xmls[0])[0] + '.jpg')
    xml_name        = os.path.join(Origin_Annotations_path, sample_xmls[0])

    line = convert_annotation(jpg_name, xml_name, unique_labels)

    #------------------------------#
    # 各自数据增强
    #------------------------------#
    image_data, box_data  = get_random_data(line, input_shape)

    img = Image.fromarray(image_data.astype(np.uint8))
    for j in range(len(box_data)):
        thickness = 3
        left, top, right, bottom  = box_data[j][0:4]
        draw = ImageDraw.Draw(img)
        for i in range(thickness):
            draw.rectangle([left + i, top + i, right - i, bottom - i],outline=(255, 255, 255))
    img.show()
发布者:全栈程序员-用户IM,转载请注明出处:https://javaforall.cn/183565.html原文链接:https://javaforall.cn
【正版授权,激活自己账号】: Jetbrains全家桶Ide使用,1年售后保障,每天仅需1毛
【官方授权 正版激活】: 官方授权 正版激活 支持Jetbrains家族下所有IDE 使用个人JB账号...
