大家好,又见面了,我是你们的朋友全栈君。如果您正在找激活码,请点击查看最新教程,关注关注公众号 “全栈程序员社区” 获取激活教程,可能之前旧版本教程已经失效.最新Idea2022.1教程亲测有效,一键激活。
Jetbrains全系列IDE稳定放心使用
Batch Normalization
开发环境
- python–3.7
- torch–1.8+cu101
- torchsummary
- torchvision–0.6.1+cu101
- PIL
- numpy
- opencv-python
- pillow
项目代码结构
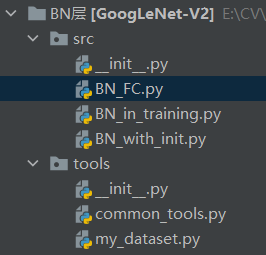

src文件夹存储了带有BN的FC训练文件、基于初始化的带BN的FC训练文件以及BN在训练阶段的操作。
tools存储了通用数据集:生成虚拟数据集和FC模型。
生成虚拟数据程序
import numpy as np
import torch

def generate_data(num_samples):
	# training data
	x = np.linspace(-7, 10, num_samples)[:, np.newaxis]  # 在-7到10区间内等距离划分num_samples个数据,并添加一维,生成二维数据。
	noise = np.random.normal(0, 2, x.shape)  # 添加噪声
	y = np.square(x) - 5 + noise    # y与x的关系

	# testing data
	test_x = np.linspace(-7, 10, 200)[:, np.newaxis]
    noise = np.random.normal(0, 2, test_x.shape)
    test_y = np.square(test_x) - 5 + noise

	# to tensor
    train_x = torch.from_numpy(x).float()
    train_y = torch.from_numpy(y).float()
    test_x = torch.from_numpy(test_x).float()
    test_y = torch.from_numpy(test_y).float()

    return train_x, train_y, test_x, test_y
神经网络构建
class Net(nn.Module):
    def __init__(self, n_hidden, act_func, batch_normalization=False):
        super(Net, self).__init__()
        self.do_bn = batch_normalization
        self.fcs = []
        self.bns = []
        self.bn_input = nn.BatchNorm1d(1, momentum=0.5)
        self.act_func = act_func
        self.n_hidden = n_hidden

        for i in range(n_hidden):
            input_size = 1 if i == 0 else 10
            fc = nn.Linear(input_size, 10)
            setattr(self, 'fc%i' % i, fc)

            self._set_init(fc)
            self.fcs.append(fc)

            if self.do_bn:
                bn = nn.BatchNorm1d(10, momentum=0.5)
                setattr(self, 'bn%i' % i, bn)
                self.bns.append(bn)
        self.predict = nn.Linear(10, 1)
        self._set_init(self.predict)

    def _set_init(self, layer):
        nn.init.normal_(layer.weight, mean=0., std=1.)
        nn.init.constant_(layer.bias, -0.2)

    def forward(self, x):
        pre_activation = [x]
        if self.do_bn:
            x = self.bn_input(x)

        layer_input = [x]

        for i in range(self.n_hidden):
            x = self.fcs[i](x)
            pre_activation.append(x)

            if self.do_bn:
                x = self.bns[i](x)

            x = self.act_func(x)

            layer_input.append(x)

        out = self.predict(x)
        return out, layer_input, pre_activation
带初始化模型的神经网络构建
class MLP(nn.Module):
    def __init__(self, neural_num, layers=100, do_bn=False):
        super(MLP, self).__init__()
        self.linears = nn.ModuleList([nn.Linear(neural_num, neural_num, bias=False) for i in range(layers)])
        self.bns = nn.ModuleList([nn.BatchNorm1d(neural_num) for i in range(layers)])
        self.neural_num = neural_num
        self.do_bn = do_bn

    def forward(self, x):
        for (i, linear), bn in zip(enumerate(self.linears), self.bns):
            x = linear(x)

            if self.do_bn:
                x = bn(x)
            x = torch.relu(x)

            if torch.isnan(x.std()):
                print("output is nan in {} layers".format(i))
                break
            print("layers:{}, std:{}".format(i, x.std().item()))

        return x

    def initialize(self, mode, std_init=1):
        for m in self.modules():
            if isinstance(m, nn.Linear):
                if mode == "normal":
                    nn.init.normal_(m.weight.data, std=std_init)
                elif mode == "kaiming":
                    nn.init.kaiming_normal_(m.weight.data)
                else:
                    print("不支持{}输入".format(mode))
带BN的FC网络和不带BN的FC网络对比
import torch
import torch.utils.data as Data
import matplotlib.pyplot as plt
import numpy as np
from tools.common_tools import generate_data, Net


torch.manual_seed(1)
np.random.seed(1)


def plot_histogram(l_in, l_in_bn, pre_ac, pre_ac_bn):
    for i, (ax_pa, ax_pa_bn, ax, ax_bn) in enumerate(zip(axs[0, :], axs[1, :], axs[2, :], axs[3, :])):
        [a.clear() for a in [ax_pa, ax_pa_bn, ax, ax_bn]]
        if i == 0:
            p_range = (-7, 10)
            the_range = (-7, 10)

        else:
            p_range = (-4, 4)
            the_range = (-1, 1)

        ax_pa.set_title('L' + str(i))
        ax_pa.hist(pre_ac[i].data.numpy().ravel(), bins=10, range=p_range, color='#FF9359', alpha=0.5)
        ax_pa_bn.hist(pre_ac_bn[i].data.numpy().ravel(), bins=10, range=p_range, color='#74BCFF', alpha=0.5)
        ax.hist(l_in[i].data.numpy().ravel(), bins=10, range=the_range, color='#FF9359')
        ax_bn.hist(l_in_bn[i].data.numpy().ravel(), bins=10, range=the_range, color='#74BCFF')

        for a in [ax_pa, ax, ax_pa_bn, ax_bn]:
            a.set_yticks(())
            a.set_xticks(())

        ax_pa_bn.set_xticks(p_range)
        ax_bn.set_xticks(the_range)

        axs[0, 0].set_ylabel('PreAct')
        axs[1, 0].set_ylabel('BN PreAct')
        axs[2, 0].set_ylabel('Act')
        axs[3, 0].set_ylabel('BN Act')

    plt.suptitle("Activation:{} epoch:{}/{}".format(act_name, epoch, EPOCH))
    plt.pause(0.05)


if __name__ == "__main__":
    act_name = "ReLU"
    # act_name = "Tanh"
    # act_name = "Sigmoid"

    activations = {
   "ReLU": torch.relu, "Tanh": torch.tanh, "Sigmoid": torch.sigmoid}
    ACTIVATION = activations[act_name]

    # config
    EPOCH = 12
    LR = 0.03
    N_HIDDEN = 8
    N_SAMPLES = 2000
    BATCH_SIZE = 64
    B_INIT = -0.2  # use a bad bias constant initializer

    # 1. 生成虚假数据
    train_x, train_y, test_x, test_y = generate_data(N_SAMPLES)
    train_dataset = Data.TensorDataset(train_x, train_y)
    train_loader = Data.DataLoader(dataset=train_dataset, batch_size=BATCH_SIZE, shuffle=True, num_workers=2)

    # show data
    plt.scatter(train_x.numpy(), train_y.numpy(), c='#FF9359', s=50, alpha=0.2, label='train')
    plt.legend(loc='upper left')

    # 2. 创建网络/loss/优化器
    nets = [Net(N_HIDDEN, ACTIVATION, batch_normalization=False), Net(N_HIDDEN, ACTIVATION, batch_normalization=True)]
    loss_func = torch.nn.MSELoss()
    opts = [torch.optim.Adam(net.parameters(), lr=LR) for net in nets]

    # 3. 训练,绘图
    f, axs = plt.subplots(4, N_HIDDEN + 1, figsize=(10, 5))
    plt.ion()  # something about plotting
    plt.show()

    losses = [[], []]  # recode loss for two networks
    for epoch in range(EPOCH):
        print('Epoch: {}/{}'.format(epoch, EPOCH))

        # 记录数据
        layer_inputs, pre_acts = [], []
        for net, l in zip(nets, losses):
            net.eval()  # set eval mode to fix moving_mean and moving_var
            pred, layer_input, pre_act = net(test_x)
            l.append(loss_func(pred, test_y).data.item())
            layer_inputs.append(layer_input)
            pre_acts.append(pre_act)
            net.train()  # free moving_mean and moving_var
        plot_histogram(*layer_inputs, *pre_acts)  # plot histogram

        # 训练更新模型
        for step, (b_x, b_y) in enumerate(train_loader):
            for net, opt in zip(nets, opts):  # train for each network
                pred, _, _ = net(b_x)
                loss = loss_func(pred, b_y)
                opt.zero_grad()
                loss.backward()
                opt.step()  # it will also learns the parameters in Batch Normalization

    plt.ioff()

    # plot training loss
    plt.figure(2)
    plt.plot(losses[0], c='#FF9359', lw=3, label='Original')
    plt.plot(losses[1], c='#74BCFF', lw=3, label='Batch Normalization')
    plt.xlabel('step')
    plt.ylabel('test loss')
    plt.ylim((0, 2000))
    plt.legend(loc='best')

    # evaluation
    # set net to eval mode to freeze the parameters in batch normalization layers
    [net.eval() for net in nets]  # set eval mode to fix moving_mean and moving_var
    preds = [net(test_x)[0] for net in nets]
    plt.figure(3)
    plt.plot(test_x.data.numpy(), preds[0].data.numpy(), c='#FF9359', lw=4, label='Original')
    plt.plot(test_x.data.numpy(), preds[1].data.numpy(), c='#74BCFF', lw=4, label='Batch Normalization')
    plt.scatter(test_x.data.numpy(), test_y.data.numpy(), c='r', s=50, alpha=0.2, label='train')
    plt.legend(loc='best')
    plt.show()
不同初始化方式带BN的网络模型对比
import torch
import numpy as np
import torch.nn as nn


torch.manual_seed(1)
np.random.seed(1)


class MLP(nn.Module):
    def __init__(self, neural_num, layers=100, do_bn=False):
        super(MLP, self).__init__()
        self.linears = nn.ModuleList([nn.Linear(neural_num, neural_num, bias=False) for i in range(layers)])
        self.bns = nn.ModuleList([nn.BatchNorm1d(neural_num) for i in range(layers)])
        self.neural_num = neural_num
        self.do_bn = do_bn

    def forward(self, x):
        for (i, linear), bn in zip(enumerate(self.linears), self.bns):
            x = linear(x)

            if self.do_bn:
                x = bn(x)
            x = torch.relu(x)

            if torch.isnan(x.std()):
                print("output is nan in {} layers".format(i))
                break
            print("layers:{}, std:{}".format(i, x.std().item()))

        return x

    def initialize(self, mode, std_init=1):
        for m in self.modules():
            if isinstance(m, nn.Linear):
                if mode == "normal":
                    nn.init.normal_(m.weight.data, std=std_init)
                elif mode == "kaiming":
                    nn.init.kaiming_normal_(m.weight.data)
                else:
                    print("不支持{}输入".format(mode))


if __name__ == "__main__":
    neural_nums = 256
    layer_nums = 100
    batch_size = 16

    net = MLP(neural_nums, layer_nums, do_bn=False)   # 1. 无初始化; # 2. normal_初始化; # 3。 kaiming初始化
    # net = MLP(neural_nums, layer_nums, do_bn=True) # 4. BN+无初始化; 5. BN + normal; 6. BN + kaiming, 7. BN+1000
    # net.initialize("normal", std_init=1)
    # net.initialize("normal", std_init=1000)
    net.initialize("kaiming")

    inputs = torch.randn((batch_size, neural_nums))  # normal: mean=0, std=1

    output = net(inputs)
    print(output)
BN层原理及代码
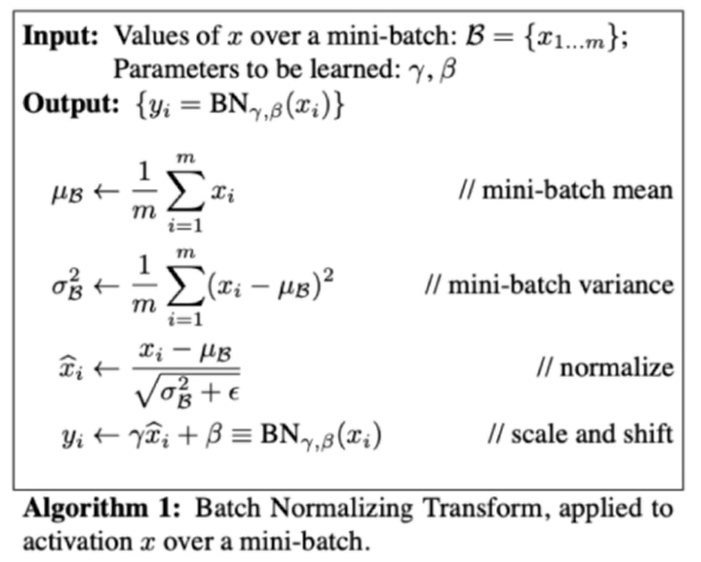
- 训练阶段:均值和标准差通过指数滑动平均统计得来的, γ \gamma γ和 β \beta β通过梯度反向传播不断更新
- 测试阶段:均值和标准差是固定的, γ \gamma γ和 β \beta β也是固定的.
- 指数滑动平均计算公式
m v t = d e c a y ∗ m v t − 1 + ( 1 − d e c a y ) ∗ a t mv_t=decay*mv_{t-1}+(1-decay)*a_t mvt=decay∗mvt−1+(1−decay)∗at - pytorch中的指数滑动平均计算公式
m v t = ( 1 − m o m e n t u m ) ∗ m v t − 1 + m o m e n t u m ∗ a t mv_t=(1-momentum)*mv_{t-1}+momentum*a_t mvt=(1−momentum)∗mvt−1+momentum∗at
pytorch中的BN层
import torch.nn as nn

# 1dBN
nn.BatchNorm1d
# 2d
nn.BatchNorm2d
# 3d
nn.BatchNorm3d

# 参数
_init_(self, num_features,
		eps = 1e-5,
		momentum = 0.1,
		affine = True,
		track_running_stats = True)

""" num_features: 一个样本特征数量 eps: 分母修正项 momentum: 指数加权平均估计当前mean/var affine:是否需要affine transform track_running_stats:是否需要统计mean/var """
版权声明:本文内容由互联网用户自发贡献,该文观点仅代表作者本人。本站仅提供信息存储空间服务,不拥有所有权,不承担相关法律责任。如发现本站有涉嫌侵权/违法违规的内容, 请发送邮件至 举报,一经查实,本站将立刻删除。
发布者:全栈程序员-用户IM,转载请注明出处:https://javaforall.cn/182025.html原文链接:https://javaforall.cn
【正版授权,激活自己账号】: Jetbrains全家桶Ide使用,1年售后保障,每天仅需1毛
【官方授权 正版激活】: 官方授权 正版激活 支持Jetbrains家族下所有IDE 使用个人JB账号...
