大家好,又见面了,我是你们的朋友全栈君。如果您正在找激活码,请点击查看最新教程,关注关注公众号 “全栈程序员社区” 获取激活教程,可能之前旧版本教程已经失效.最新Idea2022.1教程亲测有效,一键激活。
Jetbrains全系列IDE稳定放心使用
介绍:工作流引擎目前比较热门的有Activiti、Flowable等,Flowable是Activiti(Alfresco持有的注册商标)的fork版本。下面就两种工作流引擎做一个比较和入门分析。
模块一 对比:
- Activiti现存文档比Flowable多,有大量与业务集成的文档及博客。相比之下,学习Flowable主要为官方的用户手册。
- Flowable是Activiti的fork版本,所以API使用类似,包括核心类、各种服务类和业务对象。
- Flowable目前最新版本为6.4.X,其插件设计器只支持Eclipse;Activiti目前最新版本为7.X,这个版本是基于6.X版本的Bug修改和API封装。
- 查看Flowable的发展史,发现Flowable的开发人员是原来Activiti的主要负责人员,所以可能Flowable为后起之秀。但目前与业务集成文档较少。
模块二 Flowable引擎使用:
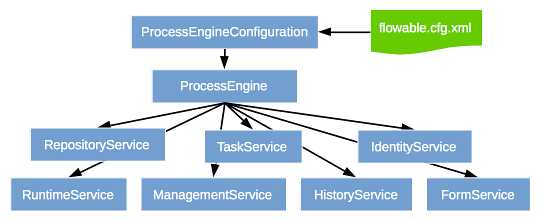
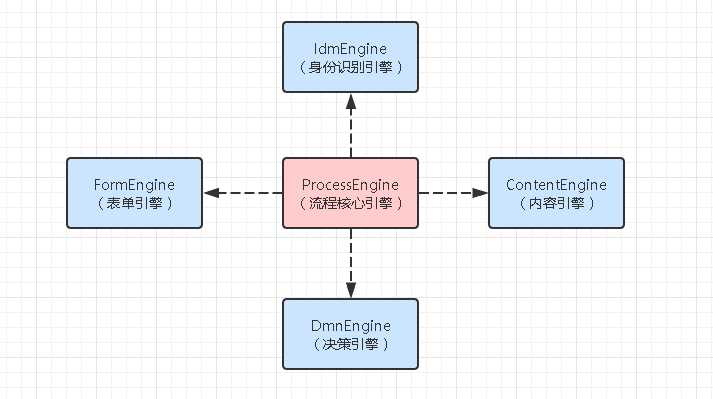
- Flowable有几大引擎,分别用来管理不同部分
- ProcessEngine(重要):核心引擎,其下管理着各种Service
- RuntimeService:负责创建实例
- TaskService:负责操作任务,如查询任务
- RepositoryService: 负责操作流程,如加载bpmn文件部署流程、创建查询对象
- CmmnEngine
- DmnEngine:决策引擎
- FormEngine:表单引擎
- ContentEngine:内容引擎
- IdmEngine:身份识别引擎
- ProcessEngine(重要):核心引擎,其下管理着各种Service

2. 独立运行的Flowable引擎
2.1 引入引擎的依赖,这里数据库使用的是内存数据库
<!-- Standalone -->
<dependencies>
    <dependency>
        <groupId>org.flowable</groupId>
        <artifactId>flowable-engine</artifactId>
        <version>6.3.0</version>
    </dependency>
    <dependency>
        <groupId>com.h2database</groupId>
        <artifactId>h2</artifactId>
        <version>1.3.176</version>
    </dependency>
    <dependency>
        <groupId>org.slf4j</groupId>
        <artifactId>slf4j-api</artifactId>
        <version>1.7.21</version>
    </dependency>
    <dependency>
        <groupId>org.slf4j</groupId>
        <artifactId>slf4j-log4j12</artifactId>
        <version>1.7.21</version>
    </dependency>
</dependencies>
2.2 创建引擎配置,并使用此配置生成引擎
ProcessEngineConfiguration cfg = new StandaloneProcessEngineConfiguration()
        .setJdbcUrl("jdbc:h2:mem:flowable;DB_CLOSE_DELAY=-1")
        .setJdbcUsername("sa")
        .setJdbcPassword("")
        .setJdbcDriver("org.h2.Driver")
        .setDatabaseSchemaUpdate(ProcessEngineConfiguration.DB_SCHEMA_UPDATE_TRUE);

ProcessEngine processEngine = cfg.buildProcessEngine();
2.3 使用RepositoryService部署一个流程,需提供BPMN或BPMN 2.0 XML文件
实例文件:
<?xml version="1.0" encoding="UTF-8"?>
<definitions xmlns="http://www.omg.org/spec/BPMN/20100524/MODEL"
             xmlns:xsi="http://www.w3.org/2001/XMLSchema-instance"
             xmlns:xsd="http://www.w3.org/2001/XMLSchema"
             xmlns:bpmndi="http://www.omg.org/spec/BPMN/20100524/DI"
             xmlns:omgdc="http://www.omg.org/spec/DD/20100524/DC"
             xmlns:omgdi="http://www.omg.org/spec/DD/20100524/DI"
             xmlns:flowable="http://flowable.org/bpmn"
             typeLanguage="http://www.w3.org/2001/XMLSchema"
             expressionLanguage="http://www.w3.org/1999/XPath"
             targetNamespace="http://www.flowable.org/processdef">
    <process id="holidayRequest" name="Holiday Request" isExecutable="true">
        <startEvent id="startEvent"/>
        <sequenceFlow sourceRef="startEvent" targetRef="approveTask"  />
        <userTask id="approveTask" name="Approve or reject request" flowable:candidateGroups="managers" />
        <sequenceFlow sourceRef="approveTask" targetRef="decision"/>
        <exclusiveGateway id="decision"/>
        <sequenceFlow sourceRef="decision" targetRef="externalSystemCall">
            <conditionExpression xsi:type="tFormalExpression">
                <![CDATA[
          ${approved}
        ]]>
            </conditionExpression>
        </sequenceFlow>
        <sequenceFlow  sourceRef="decision" targetRef="sendRejectionMail">
            <conditionExpression xsi:type="tFormalExpression">
                <![CDATA[
          ${!approved}
        ]]>
            </conditionExpression>
        </sequenceFlow>
        <serviceTask id="externalSystemCall" name="Enter holidays in external system"
                     flowable:class="org.flowable.CallExternalSystemDelegate"/>
        <sequenceFlow sourceRef="externalSystemCall" targetRef="holidayApprovedTask"/>
        <userTask id="holidayApprovedTask" name="Holiday approved" flowable:assignee="${employee}"/>
        <sequenceFlow sourceRef="holidayApprovedTask" targetRef="approveEnd"/>
        <serviceTask id="sendRejectionMail" name="Send out rejection email"
                     flowable:class="org.flowable.SendRejectionMail"/>
        <sequenceFlow sourceRef="sendRejectionMail" targetRef="rejectEnd"/>
        <endEvent id="approveEnd"/>
        <endEvent id="rejectEnd"/>
    </process>
</definitions>
部署流程:
RepositoryService repositoryService = processEngine.getRepositoryService();
Deployment deploy = repositoryService.createDeployment().addClasspathResource("processes/one-task-process.bpmn20.xml").deploy();
ProcessDefinition processDefinition = repositoryService.createProcessDefinitionQuery().deploymentId(deploy.getId()).singleResult();
System.out.println("流程定义: " + processDefinition.getName());
2.4 使用RuntimeService开启一个流程实例任务
String employee = "dedu";
Integer holidayNumber = 5;
String reason = "tensorflow";

//根据process id 创建实例
String processId = "holidayRequest";
RuntimeService runtimeService = processEngine.getRuntimeService();
// 开启实例并传入参数
Map<String, Object> conditions = new HashMap<>();
conditions.put("employee", employee);
conditions.put("holidayNumber", holidayNumber);
conditions.put("reason", reason);
runtimeService.startProcessInstanceByKey(processId, conditions);
2.5 使用TaskService查询并完成任务
// 查询任务
TaskService taskService = processEngine.getTaskService();
List<Task> taskList = taskService.createTaskQuery().taskCandidateGroup("managers").list();
System.out.println("你有"+ taskList.size() + "个任务!");
Map<String, Object> variables = taskService.getVariables(taskList.get(0).getId());
System.out.println(variables);

// 完成任务
variables = new HashMap<>();
variables.put("approved", true);
taskService.complete(taskList.get(0).getId(), variables);

//查询 任务数量
List<Task> endTaskList = taskService.createTaskQuery().taskCandidateGroup("managers").list();
System.out.println("你有"+ endTaskList.size() + "个任务!");
2.6 可以配置任务完成后的回调,注意package名字需改成org.flowable并实现JavaDelegate接口:
package org.flowable;

import org.flowable.engine.delegate.DelegateExecution;
import org.flowable.engine.delegate.JavaDelegate;

public class CallExternalSystemDelegate implements JavaDelegate {

    @Override
    public void execute(DelegateExecution delegateExecution) {
        System.out.println("任务完成后回调:");
        System.out.println(delegateExecution.getVariables());
    }
}
3 整合SpringBoot的Flowable引擎,即由Spring管理Flowable,然后在使用各种Service时直接依赖注入即可。
3.1 引入依赖,这里使用的Flowable引擎版本为6.4(引入的依赖为flowable-spring-boot-starter,即会加载所有引擎,如只需个别引擎,可单独引入)。这里使用MySQL数据库管理流程,所以引入了JPA。
<properties>
    <java.version>1.8</java.version>
    <flowable.version>6.4.0</flowable.version>
</properties>

<dependencies>
    <dependency>
        <groupId>org.flowable</groupId>
        <artifactId>flowable-spring-boot-starter</artifactId>
        <version>${flowable.version}</version>
    </dependency>
    <!--<dependency>-->
        <!--<groupId>com.h2database</groupId>-->
        <!--<artifactId>h2</artifactId>-->
        <!--<version>1.4.197</version>-->
    <!--</dependency>-->
    <dependency>
        <groupId>org.springframework.boot</groupId>
        <artifactId>spring-boot-starter-web</artifactId>
    </dependency>
    <dependency>
        <groupId>org.projectlombok</groupId>
        <artifactId>lombok</artifactId>
        <optional>true</optional>
    </dependency>
    <dependency>
        <groupId>org.springframework.boot</groupId>
        <artifactId>spring-boot-starter-test</artifactId>
        <scope>test</scope>
    </dependency>
    <dependency>
        <groupId>org.springframework.boot</groupId>
        <artifactId>spring-boot-starter-data-jpa</artifactId>
    </dependency>
    <dependency>
        <groupId>mysql</groupId>
        <artifactId>mysql-connector-java</artifactId>
    </dependency>
</dependencies>
3.2 配置数据源和Flowable配置。这里flowable.check-process-definitions设置为true,程序启动后会自动生成流程引擎所需表。
spring:
  application:
    name: flowable-module

  datasource:
      driver-class-name: com.mysql.cj.jdbc.Driver
      url: jdbc:mysql://111.231.193.138:3306/test?serverTimezone=UTC&characterEncoding=utf-8&useSSL=false
      username: root
      password: ZhongFei-ca-2018
      # Hikari数据源配置
      hikari.maximum-pool-size: 20
      hikari.minimum-idle: 5

logging:
  level:
    ROOT: debug

flowable:
  #是否需要自动部署resource/processes中的流程定义
  check-process-definitions: true
  #db-identity-used: true
  # 自动生成flowable相关表 第一次生成后建议关闭提高运行速度
  database-schema-update: false
  # 保存历史数据级别设置为full最高级别,便于历史数据的追溯
  history-level: full
3.3 Flowable交给Spring管理后,会自动扫描resources下cases、forms、processes包下的文件,所以需将设计好的BPMN或BPMN 2.0 XML文件放到processes流程包下。示例文件同上。
3.4 启动程序,有两种方式提供服务:
3.4.1 提供CommandLineRunner实现,启动后自动加载引擎
@SpringBootApplication
public class FlowableModuleApplication {

    public static void main(String[] args) {
        SpringApplication.run(FlowableModuleApplication.class, args);
    }

    @Bean
    public CommandLineRunner init(final RepositoryService repositoryService,
                                  final RuntimeService runtimeService,
                                  final TaskService taskService) {

        return new CommandLineRunner() {
            @Override
            public void run(String... strings) throws Exception {
                System.out.println("Number of process definitions : "
                        + repositoryService.createProcessDefinitionQuery().count());
                System.out.println("Number of tasks : " + taskService.createTaskQuery().count());
                runtimeService.startProcessInstanceByKey("oneTaskProcess");
                System.out.println("Number of tasks after process start: "
                        + taskService.createTaskQuery().count());
            }
        };
    }
}
3.4.2 提供相应的控制器,手动调用加载引擎
@RestController
public class DemoController {

    @Autowired
    private DemoService myService;

    @RequestMapping(value="/process", method= RequestMethod.POST)
    public void startProcessInstance() {
        myService.startProcess("oneTaskProcess");
    }

    @RequestMapping(value="/tasks", method= RequestMethod.GET, produces=MediaType.APPLICATION_JSON_VALUE)
    public List<TaskRepresentation> getTasks(@RequestParam String assignee) {
        List<Task> tasks = myService.getTasks(assignee);
        List<TaskRepresentation> dtos = new ArrayList<>();
        for (Task task : tasks) {
            dtos.add(new TaskRepresentation(task.getId(), task.getName()));
        }
        return dtos;
    }

    @Data
    @AllArgsConstructor
    static class TaskRepresentation {
        private String id;
        private String name;
    }
}

@Slf4j
@Service
public class DemoService {

    @Autowired
    private RuntimeService runtimeService;

    @Autowired
    private TaskService taskService;

    @Autowired
    private RepositoryService repositoryService;

    @Transactional
    public void startProcess(String process) {
        runtimeService.startProcessInstanceByKey(process);
    }

    @Transactional
    public List<Task> getTasks(String assignee) {
        return taskService.createTaskQuery().taskAssignee(assignee).list();
    }

    public Deployment deployFlow(String filePath) {
        try {
            DeploymentBuilder deploymentBuilder = repositoryService
                    .createDeployment()
                    .addClasspathResource(filePath);
            Deployment deployment = deploymentBuilder.deploy();
            log.info("成功:部署工作流成:" + filePath);
            return deployment;
        } catch (Exception e) {
            log.error("失败:部署工作流:" + e);
            return null;
        } // end catch
    }

}
模块三 Activiti引擎使用:
- Activiti目前分为两大类:Activiti Core和Activiti Cloud。如果想上手Activiti的核心是否遵循了新的运行时,API的入门指南可参考Activiti Core;如果你想基于Kuberantes构建Activiti,你可以参考Activiti Cloud HELM Charts:Activiti Cloud。同Flowable类似,Activiti 6.X提供了几大Service接口,分别用来和用户交互流程的不同生命周期部分;Activiti 7.X则对6.X版本及之前的版本中各大Service接口进行了封装,提供了两个核心API:
- RepositoryService
- RuntimeService
- TaskService
- IdentityService
- ManagementService
- HistoryService
- FormService
- askRuntime API(7.X版本)
- ProcessRuntime API(7.X版本)
- 流程设计器:目前的流程设计器有Eclipse Designer、IDEA的actiBPM插件和基于Web的Activiti Modeler流程设计器。
- 独立运行的Activiti 7引擎(由于Activiti7中新的API是对老的几大Service的封装,因此直接引入activiti-spring-boot-starter也是可以直接使用老的Service API)
3.1 引入Activiti和SpringDataJPA依赖,注意直接在Maven仓库中搜索最新版本
<dependencies>
<!-- https://mvnrepository.com/artifact/org.activiti/activiti-spring-boot-starter -->
<dependency>
<groupId>org.activiti</groupId>
<artifactId>activiti-spring-boot-starter</artifactId>
<version>7.1.0.M2</version>
</dependency>
<dependency>
<groupId>org.springframework.boot</groupId>
<artifactId>spring-boot-starter-web</artifactId>
</dependency>
<dependency>
<groupId>org.springframework.boot</groupId>
<artifactId>spring-boot-devtools</artifactId>
<scope>runtime</scope>
<optional>true</optional>
</dependency>
<dependency>
<groupId>org.projectlombok</groupId>
<artifactId>lombok</artifactId>
<optional>true</optional>
</dependency>
<dependency>
<groupId>org.springframework.boot</groupId>
<artifactId>spring-boot-starter-test</artifactId>
<scope>test</scope>
</dependency>
<dependency>
<groupId>org.springframework.boot</groupId>
<artifactId>spring-boot-starter-data-jpa</artifactId>
</dependency>
<dependency>
<groupId>mysql</groupId>
<artifactId>mysql-connector-java</artifactId>
</dependency>
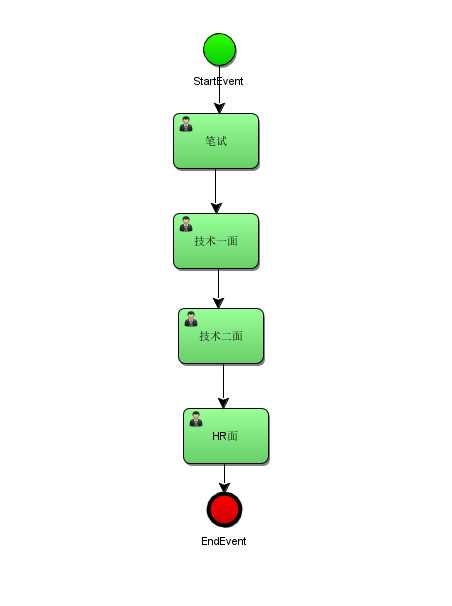
</dependencies>3.2 在resources下创建processes目录,并创建bpmn流程文件(IDEA流程设计器使用的是插件actiBPM)例如:
<?xml version="1.0" encoding="UTF-8" standalone="yes"?>
<definitions xmlns="http://www.omg.org/spec/BPMN/20100524/MODEL" xmlns:activiti="http://activiti.org/bpmn" xmlns:bpmndi="http://www.omg.org/spec/BPMN/20100524/DI" xmlns:dc="http://www.omg.org/spec/DD/20100524/DC" xmlns:di="http://www.omg.org/spec/DD/20100524/DI" xmlns:tns="http://www.activiti.org/testm1564641391279" xmlns:xsd="http://www.w3.org/2001/XMLSchema" xmlns:xsi="http://www.w3.org/2001/XMLSchema-instance" expressionLanguage="http://www.w3.org/1999/XPath" id="m1564641391279" name="" targetNamespace="http://www.activiti.org/testm1564641391279" typeLanguage="http://www.w3.org/2001/XMLSchema">
  <process id="HelloworldProcess" isClosed="false" isExecutable="true" name="HelloworldProcess" processType="None">
    <startEvent id="_2" name="StartEvent"/>
    <endEvent id="_3" name="EndEvent"/>
    <userTask activiti:assignee="system" activiti:exclusive="true" id="_4" name="笔试"/>
    <sequenceFlow id="_5" sourceRef="_2" targetRef="_4"/>
    <userTask activiti:assignee="zhangsan" activiti:exclusive="true" id="_6" name="技术一面"/>
    <sequenceFlow id="_7" sourceRef="_4" targetRef="_6"/>
    <userTask activiti:assignee="lisi" activiti:exclusive="true" id="_8" name="技术二面"/>
    <userTask activiti:assignee="wangwu" activiti:exclusive="true" id="_9" name="HR面"/>
    <sequenceFlow id="_10" sourceRef="_6" targetRef="_8"/>
    <sequenceFlow id="_11" sourceRef="_8" targetRef="_9"/>
    <sequenceFlow id="_12" sourceRef="_9" targetRef="_3"/>
  </process>
  <bpmndi:BPMNDiagram documentation="background=#3C3F41;count=1;horizontalcount=1;orientation=0;width=842.4;height=1195.2;imageableWidth=832.4;imageableHeight=1185.2;imageableX=5.0;imageableY=5.0" id="Diagram-_1" name="New Diagram">
    <bpmndi:BPMNPlane bpmnElement="HelloworldProcess">
      <bpmndi:BPMNShape bpmnElement="_2" id="Shape-_2">
        <dc:Bounds height="32.0" width="32.0" x="440.0" y="185.0"/>
        <bpmndi:BPMNLabel>
          <dc:Bounds height="32.0" width="32.0" x="0.0" y="0.0"/>
        </bpmndi:BPMNLabel>
      </bpmndi:BPMNShape>
      <bpmndi:BPMNShape bpmnElement="_3" id="Shape-_3">
        <dc:Bounds height="32.0" width="32.0" x="445.0" y="645.0"/>
        <bpmndi:BPMNLabel>
          <dc:Bounds height="32.0" width="32.0" x="0.0" y="0.0"/>
        </bpmndi:BPMNLabel>
      </bpmndi:BPMNShape>
      <bpmndi:BPMNShape bpmnElement="_4" id="Shape-_4">
        <dc:Bounds height="55.0" width="85.0" x="410.0" y="265.0"/>
        <bpmndi:BPMNLabel>
          <dc:Bounds height="55.0" width="85.0" x="0.0" y="0.0"/>
        </bpmndi:BPMNLabel>
      </bpmndi:BPMNShape>
      <bpmndi:BPMNShape bpmnElement="_6" id="Shape-_6">
        <dc:Bounds height="55.0" width="85.0" x="410.0" y="365.0"/>
        <bpmndi:BPMNLabel>
          <dc:Bounds height="55.0" width="85.0" x="0.0" y="0.0"/>
        </bpmndi:BPMNLabel>
      </bpmndi:BPMNShape>
      <bpmndi:BPMNShape bpmnElement="_8" id="Shape-_8">
        <dc:Bounds height="55.0" width="85.0" x="415.0" y="460.0"/>
        <bpmndi:BPMNLabel>
          <dc:Bounds height="55.0" width="85.0" x="0.0" y="0.0"/>
        </bpmndi:BPMNLabel>
      </bpmndi:BPMNShape>
      <bpmndi:BPMNShape bpmnElement="_9" id="Shape-_9">
        <dc:Bounds height="55.0" width="85.0" x="420.0" y="560.0"/>
        <bpmndi:BPMNLabel>
          <dc:Bounds height="55.0" width="85.0" x="0.0" y="0.0"/>
        </bpmndi:BPMNLabel>
      </bpmndi:BPMNShape>
      <bpmndi:BPMNEdge bpmnElement="_12" id="BPMNEdge__12" sourceElement="_9" targetElement="_3">
        <di:waypoint x="461.0" y="615.0"/>
        <di:waypoint x="461.0" y="645.0"/>
        <bpmndi:BPMNLabel>
          <dc:Bounds height="0.0" width="0.0" x="0.0" y="0.0"/>
        </bpmndi:BPMNLabel>
      </bpmndi:BPMNEdge>
      <bpmndi:BPMNEdge bpmnElement="_5" id="BPMNEdge__5" sourceElement="_2" targetElement="_4">
        <di:waypoint x="456.0" y="217.0"/>
        <di:waypoint x="456.0" y="265.0"/>
        <bpmndi:BPMNLabel>
          <dc:Bounds height="0.0" width="0.0" x="0.0" y="0.0"/>
        </bpmndi:BPMNLabel>
      </bpmndi:BPMNEdge>
      <bpmndi:BPMNEdge bpmnElement="_7" id="BPMNEdge__7" sourceElement="_4" targetElement="_6">
        <di:waypoint x="452.5" y="320.0"/>
        <di:waypoint x="452.5" y="365.0"/>
        <bpmndi:BPMNLabel>
          <dc:Bounds height="0.0" width="0.0" x="0.0" y="0.0"/>
        </bpmndi:BPMNLabel>
      </bpmndi:BPMNEdge>
      <bpmndi:BPMNEdge bpmnElement="_11" id="BPMNEdge__11" sourceElement="_8" targetElement="_9">
        <di:waypoint x="460.0" y="515.0"/>
        <di:waypoint x="460.0" y="560.0"/>
        <bpmndi:BPMNLabel>
          <dc:Bounds height="0.0" width="0.0" x="0.0" y="0.0"/>
        </bpmndi:BPMNLabel>
      </bpmndi:BPMNEdge>
      <bpmndi:BPMNEdge bpmnElement="_10" id="BPMNEdge__10" sourceElement="_6" targetElement="_8">
        <di:waypoint x="455.0" y="420.0"/>
        <di:waypoint x="455.0" y="460.0"/>
        <bpmndi:BPMNLabel>
          <dc:Bounds height="0.0" width="0.0" x="0.0" y="0.0"/>
        </bpmndi:BPMNLabel>
      </bpmndi:BPMNEdge>
    </bpmndi:BPMNPlane>
  </bpmndi:BPMNDiagram>
</definitions>
效果图:
3.3 核心API调用
public static void main(String[] args) {
        // 获得内存存储的工作流引擎
        ProcessEngine processEngine = ProcessEngineConfiguration.createStandaloneInMemProcessEngineConfiguration().buildProcessEngine();

        // 部署流程
        delopyProcess(processEngine);

        // 查询流程
        queryProcess(processEngine);

        // 流程删除
//        deleteProcess(processEngine);

        // 开启流程实例
        startProcessInstance(processEngine);

        // 查询已开启的实例
        queryProcessInstance(processEngine);

        // 查询任务
        querySelfTask(processEngine);

        // 完成任务
        completeSelfTask(processEngine);

        // 完成后再次查询任务
        querySelfTask(processEngine);
    }


    public static void delopyProcess(ProcessEngine processEngine) {
        // ②获得repositoryService并进行部署流程
        RepositoryService repositoryService = processEngine.getRepositoryService();
        String filePath = "processes/Helloworld.bpmn";
        Deployment deploy = repositoryService.createDeployment().addClasspathResource(filePath).name("Helloworld").deploy();
        printMessage("部署流程:{0} -> {1} -> {2}.",deploy.getId(),deploy.getKey(), deploy.getName());
    }

    public static void queryProcess(ProcessEngine processEngine) {
        RepositoryService repositoryService = processEngine.getRepositoryService();
        String processKey = "HelloworldProcess";
        printMessage("查询流程:{0}", processKey);
        List<ProcessDefinition> processDefinitionList = repositoryService.createProcessDefinitionQuery().processDefinitionKey(processKey).list();
        processDefinitionList.stream().forEach(t-> System.out.println(t));
    }

    public static void deleteProcess(ProcessEngine processEngine) {
        RepositoryService repositoryService = processEngine.getRepositoryService();
        String deploymentId = "1";
        printMessage("删除流程:{0}", deploymentId);
        repositoryService.deleteDeployment(deploymentId);
    }

    public static void startProcessInstance(ProcessEngine processEngine) {
        RuntimeService runtimeService = processEngine.getRuntimeService();
        String processKey = "HelloworldProcess";
        String businessKey = "关联的业务Id";
        ProcessInstance helloworldProcess = runtimeService.startProcessInstanceByKey(processKey, businessKey);
        printMessage("开启流程实例:{0} -> {1}", helloworldProcess.getId(), helloworldProcess.getProcessDefinitionId());
    }

    private static void queryProcessInstance(ProcessEngine processEngine) {

        RuntimeService runtimeService = processEngine.getRuntimeService();
        String processDefinitionKey = "HelloworldProcess";
        List<ProcessInstance> processInstanceList = runtimeService.createProcessInstanceQuery().processDefinitionKey(processDefinitionKey).list();
        processInstanceList.stream().forEach(t -> printMessage("查询到流程:{0} -> {1}", t.getId(), t.getBusinessKey()));
    }

    public static void querySelfTask(ProcessEngine processEngine) {
        String assignee = "zhangsan";
        String processDefinitionKey = "HelloworldProcess";
        TaskService taskService = processEngine.getTaskService();
        List<Task> taskList = taskService.createTaskQuery().processDefinitionKey(processDefinitionKey).taskAssignee(assignee).list();
        printMessage("查询到任务:");
        taskList.stream().forEach(t -> {
            printMessage(MessageFormat.format("任务Id:{0},任务名称:{1},任务负责人:{2}",t.getId(), t.getName(), t.getAssignee()));
        });

        List<Task> sysTaskList = taskService.createTaskQuery().processDefinitionKey("HelloworldProcess").taskAssignee("system").list();
        printMessage("查询到任务:");
        sysTaskList.stream().forEach(t -> {
            printMessage("任务Id:{0},任务名称:{1},任务负责人:{2}",t.getId(), t.getName(), t.getAssignee());
        });
    }

    public static void completeSelfTask(ProcessEngine processEngine) {
        String taskId = "8";
        printMessage("完成任务:{0}", taskId);
        TaskService taskService = processEngine.getTaskService();
        taskService.complete(taskId);
    }

    private static void printMessage(String message, Object... args) {
        System.out.println(MessageFormat.format(message, args));
    }
4 SpringBoot整合Activiti 7引擎(实际使用的是原生API)
4.1 同独立运行Activiti引擎一样,引入Activiti和SpringDataJPA依赖
4.2 配置数据源和activiti配置
spring:
  application:
    name: activiti-module

  activiti:
    async-executor-activate: true
    mail-server-use-ssl: true
    #自动更新数据库
    database-schema-update: true
    #校验流程文件,默认校验resources下的processes文件夹里的流程文件
    #check-process-definitions: false
    #restApiEnabled: false

  datasource:
    driverClassName: com.mysql.cj.jdbc.Driver
    type: com.zaxxer.hikari.HikariDataSource
    url: jdbc:mysql://*****:3306/test?serverTimezone=UTC&characterEncoding=utf-8&useSSL=false
    username: ****
    password: ****
    # Hikari数据源配置
    hikari:
      maximum-pool-size: 20
      minimum-idle: 5
4.3 在 resources目录下新建processes目录并编写bpmn流程文件
4.4 编写controller控制器和service服务
package com.dedu.activitimodule.controller;
import com.alibaba.fastjson.JSON;
import com.dedu.activitimodule.service.ActivitiCoreService;
import org.springframework.beans.factory.annotation.Autowired;
import org.springframework.http.MediaType;
import org.springframework.stereotype.Controller;
import org.springframework.web.bind.annotation.GetMapping;
import org.springframework.web.bind.annotation.PathVariable;
import org.springframework.web.bind.annotation.RequestParam;
import org.springframework.web.bind.annotation.ResponseBody;
import javax.imageio.ImageIO;
import javax.servlet.http.HttpServletResponse;
import java.io.IOException;
import java.io.OutputStream;
@Controller
public class HelloController {
@Autowired
private ActivitiCoreService activitiCoreService;
@GetMapping("/hello")
@ResponseBody
public String hello() {
return "hello";
}
@GetMapping("/delopyProcess")
@ResponseBody
public String delopyProcess() {
activitiCoreService.delopyProcess();
return "部署成功!";
}
@GetMapping("/process/{key}")
@ResponseBody
public String queryProcess(@PathVariable(value = "key") String processKey) {
return JSON.toJSONString(activitiCoreService.queryProcess(processKey));
}
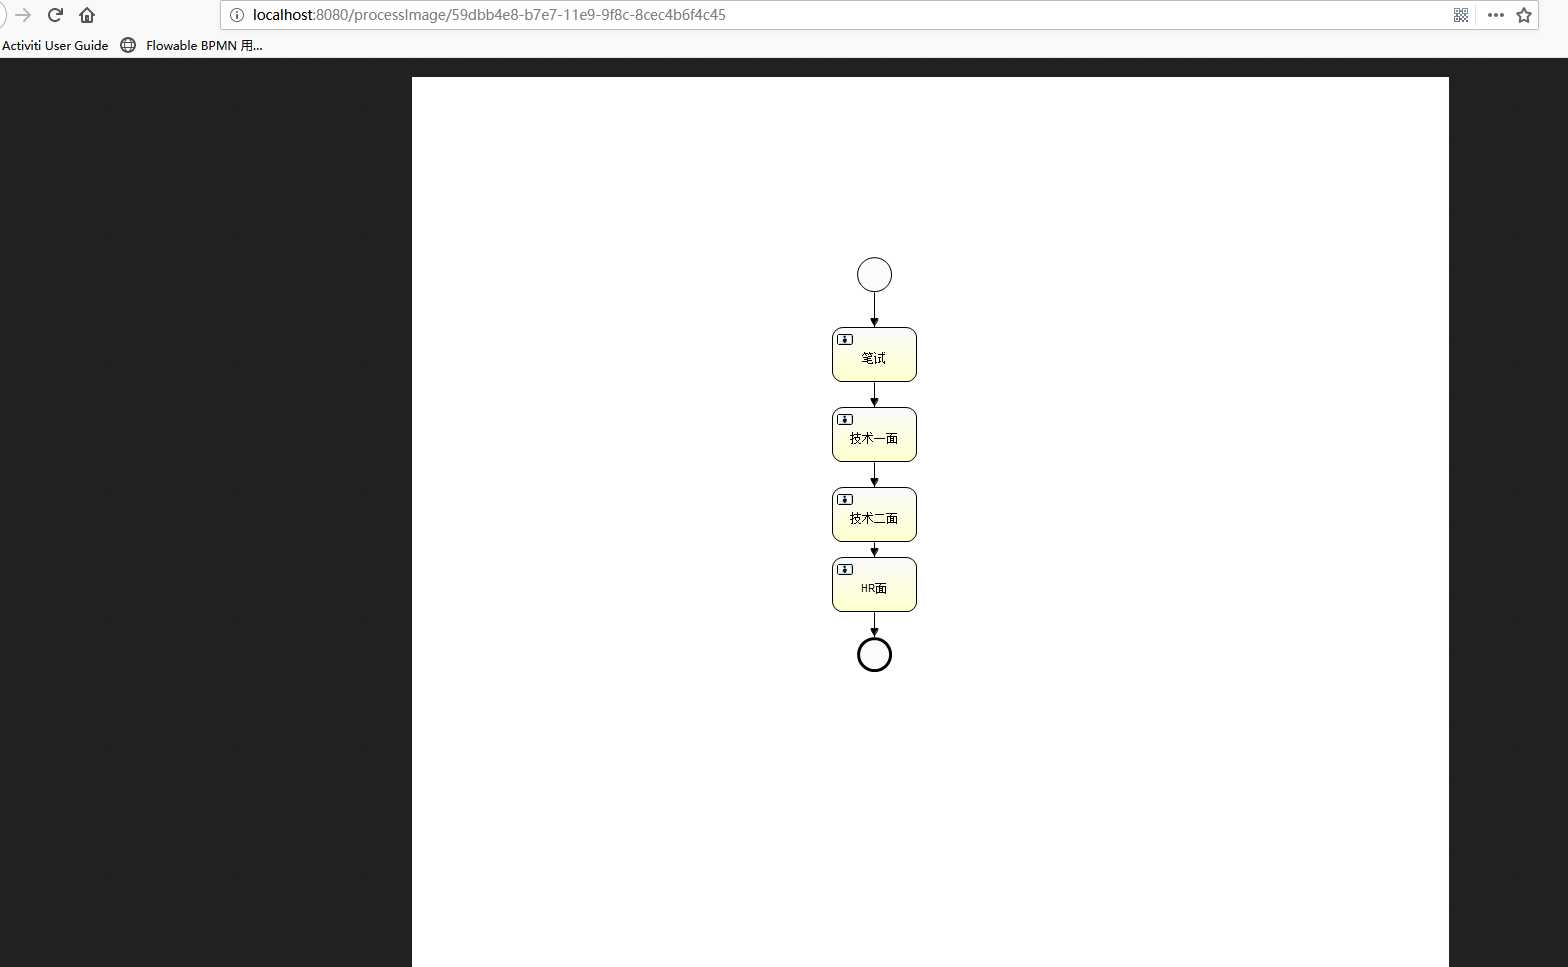
@GetMapping(value = "/processImage/{key}", produces = MediaType.IMAGE_JPEG_VALUE)
public void queryProcessImage(@PathVariable(value = "key") String processKey, HttpServletResponse response) throws IOException {
OutputStream os = response.getOutputStream();
ImageIO.write(ImageIO.read(activitiCoreService.queryProcessImage(processKey)), "png", os);
}
@GetMapping("/deleteProcess/{id}")
@ResponseBody
public String deleteProcess(@PathVariable(value = "id") String deploymentId) {
activitiCoreService.deleteProcess(deploymentId);
return "删除成功!";
}
@GetMapping("/startProcess")
@ResponseBody
public String startProcessInstance(@RequestParam String processKey, @RequestParam String businessKey) {
activitiCoreService.startProcessInstance(processKey, businessKey);
return "已开启流程实例!";
}
@GetMapping("/queryProcessInstance")
@ResponseBody
public String queryProcessInstance(@RequestParam String processInstanceKey) {
return JSON.toJSONString(activitiCoreService.queryProcessInstance(processInstanceKey));
}
@GetMapping("/queryTaskByProcessAndAssignee")
@ResponseBody
public String queryTaskByProcessAndAssignee(@RequestParam String processDefinitionKey,@RequestParam String assignee) {
return JSON.toJSONString(activitiCoreService.querySelfTask(processDefinitionKey, assignee));
}
@GetMapping("/completeTask")
@ResponseBody
public String completeTask(@RequestParam String taskId) {
activitiCoreService.completeTaskByTaskId(taskId);
return "完成任务!";
}
}
package com.dedu.activitimodule.service.impl;
import com.dedu.activitimodule.module.SysProcessDefinition;
import com.dedu.activitimodule.module.SysTask;
import com.dedu.activitimodule.service.ActivitiCoreService;
import org.activiti.api.process.runtime.ProcessRuntime;
import org.activiti.api.task.runtime.TaskRuntime;
import org.activiti.engine.ProcessEngine;
import org.activiti.engine.RepositoryService;
import org.activiti.engine.RuntimeService;
import org.activiti.engine.TaskService;
import org.activiti.engine.repository.Deployment;
import org.activiti.engine.repository.ProcessDefinition;
import org.activiti.engine.runtime.ProcessInstance;
import org.activiti.engine.task.Task;
import org.springframework.beans.BeanUtils;
import org.springframework.beans.factory.annotation.Autowired;
import org.springframework.stereotype.Service;
import java.io.InputStream;
import java.text.MessageFormat;
import java.util.ArrayList;
import java.util.List;
@Service
public class ActivitiCoreServiceImpl implements ActivitiCoreService {
@Autowired
private ProcessEngine processEngine;
@Autowired
private RepositoryService repositoryService;
@Autowired
private RuntimeService runtimeService;
@Autowired
private TaskService taskService;
@Autowired
private ProcessRuntime processRuntime;
@Autowired
private TaskRuntime taskRuntime;
/**
* 部署流程
* TODO 文件名和图片名写死的
*/
@Override
public void delopyProcess() {
// ②获得repositoryService并进行部署流程
RepositoryService repositoryService = processEngine.getRepositoryService();
String filePath = "processes/Helloworld.bpmn";
String imagePath = "processes/Helloworld.png";
Deployment deploy = repositoryService.createDeployment().addClasspathResource(filePath).addClasspathResource(imagePath).name("Helloworld").deploy();
printMessage("部署流程:{0} -> {1} -> {2}.",deploy.getId(),deploy.getKey(), deploy.getName());
}
/**
* 查询流程
* @return
*/
@Override
public List<SysProcessDefinition> queryProcess(String processKey) {
RepositoryService repositoryService = processEngine.getRepositoryService();
printMessage("查询流程:{0}", processKey);
List<ProcessDefinition> processDefinitionList = repositoryService.createProcessDefinitionQuery().processDefinitionKey(processKey).list();
List<SysProcessDefinition> sysProcessDefinitionList = new ArrayList<>();
processDefinitionList.stream().forEach(t-> {
SysProcessDefinition sysProcessDefinition = new SysProcessDefinition();
BeanUtils.copyProperties(t, sysProcessDefinition);
sysProcessDefinitionList.add(sysProcessDefinition);
});
return sysProcessDefinitionList;
}
/**
*
* @param processKey ACT_RE_DEPLOYMENT表主键Id.
* @return 图片输入流.
*/
@Override
public InputStream queryProcessImage(String processKey) {
RepositoryService repositoryService = processEngine.getRepositoryService();
List<String> deploymentResourceNames = repositoryService.getDeploymentResourceNames(processKey);
InputStream resourceAsStream = null;
if (!deploymentResourceNames.isEmpty()) {
String imageResourceName =deploymentResourceNames.stream().filter(t -> t.indexOf(".png") >= 0).findFirst().get();
resourceAsStream = repositoryService.getResourceAsStream(processKey, imageResourceName);
}
return resourceAsStream;
}
@Override
public void deleteProcess(String deploymentId) {
RepositoryService repositoryService = processEngine.getRepositoryService();
repositoryService.deleteDeployment(deploymentId);
printMessage("删除流程:{0}", deploymentId);
}
@Override
public void startProcessInstance(String processKey, String businessKey) {
RuntimeService runtimeService = processEngine.getRuntimeService();
ProcessInstance helloworldProcess = runtimeService.startProcessInstanceByKey(processKey, businessKey);
printMessage("开启流程实例:{0} -> {1}", helloworldProcess.getId(), helloworldProcess.getProcessDefinitionId());
}
@Override
public List<SysProcessDefinition> queryProcessInstance(String processDefinitionKey) {
RuntimeService runtimeService = processEngine.getRuntimeService();
List<ProcessInstance> processInstanceList = runtimeService.createProcessInstanceQuery().processDefinitionKey(processDefinitionKey).list();
List<SysProcessDefinition> sysProcessDefinitionList = new ArrayList<>();
processInstanceList.stream().forEach(t-> {
SysProcessDefinition sysProcessDefinition = new SysProcessDefinition();
BeanUtils.copyProperties(t, sysProcessDefinition);
sysProcessDefinitionList.add(sysProcessDefinition);
});
return sysProcessDefinitionList;
}
@Override
public List<SysTask> querySelfTask(String processDefinitionKey, String assignee) {
TaskService taskService = processEngine.getTaskService();
List<Task> taskList = taskService.createTaskQuery().processDefinitionKey(processDefinitionKey).taskAssignee(assignee).list();
printMessage("查询到任务:");
List<SysTask> sysTaskList = new ArrayList<>();
taskList.stream().forEach(t -> {
printMessage(MessageFormat.format("任务Id:{0},任务名称:{1},任务负责人:{2}",t.getId(), t.getName(), t.getAssignee()));
SysTask sysTask = new SysTask();
BeanUtils.copyProperties(t, sysTask);
sysTaskList.add(sysTask);
});
return sysTaskList;
}
@Override
public void completeTaskByTaskId(String taskId) {
printMessage("完成任务:{0}", taskId);
TaskService taskService = processEngine.getTaskService();
taskService.complete(taskId);
}
private void printMessage(String message, Object... args) {
System.out.println(MessageFormat.format(message, args));
}
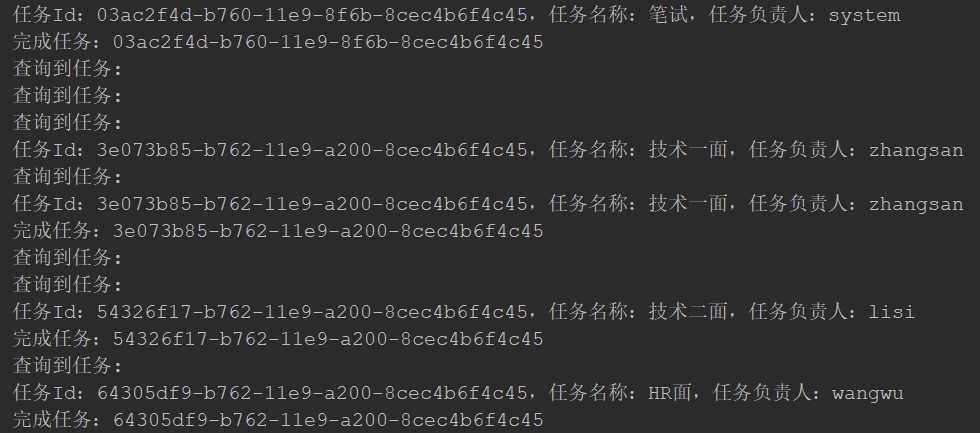
}4.5 启动程序,并依次调用相关接口,实现整个面试流程状态变化,控制台日志如下
4.6 查看流程图结果如下:
4.7 注意:由于Activiti集成了SpringSecurity,因此实例中使用的是官方提供的activiti-examples-master中activiti-api-spring-integration-example里的配置,除此以外可以自己集成配置SpringSecurity,相关集成见另一篇博客。官方配置如下:
@Configuration
public class DemoApplicationConfiguration {

    private Logger logger = LoggerFactory.getLogger(DemoApplicationConfiguration.class);

    @Bean
    public UserDetailsService myUserDetailsService() {

        InMemoryUserDetailsManager inMemoryUserDetailsManager = new InMemoryUserDetailsManager();

        String[][] usersGroupsAndRoles = {
                {"system", "system", "ROLE_ACTIVITI_USER"},
                {"zhangsan", "zhangsan", "ROLE_ACTIVITI_USER"},
                {"lisi", "lisi", "ROLE_ACTIVITI_USER"},
                {"wangwu", "wangwu", "ROLE_ACTIVITI_USER"},
                {"admin", "admin", "ROLE_ACTIVITI_ADMIN"},
        };

        for (String[] user : usersGroupsAndRoles) {
            List<String> authoritiesStrings = Arrays.asList(Arrays.copyOfRange(user, 2, user.length));
            logger.info("> Registering new user: " + user[0] + " with the following Authorities[" + authoritiesStrings + "]");
            inMemoryUserDetailsManager.createUser(new User(user[0], passwordEncoder().encode(user[1]),
                    authoritiesStrings.stream().map(s -> new SimpleGrantedAuthority(s)).collect(Collectors.toList())));
        }


        return inMemoryUserDetailsManager;

    }

    @Bean
    public PasswordEncoder passwordEncoder() {
        return new BCryptPasswordEncoder();
    }
}


@Component
public class SecurityUtil {

    @Autowired
    private UserDetailsService userDetailsService;

    public void logInAs(String username) {

        UserDetails user = userDetailsService.loadUserByUsername(username);
        if (user == null) {
            throw new IllegalStateException("User " + username + " doesn't exist, please provide a valid user");
        }

        SecurityContextHolder.setContext(new SecurityContextImpl(new Authentication() {
            @Override
            public Collection<? extends GrantedAuthority> getAuthorities() {
                return user.getAuthorities();
            }

            @Override
            public Object getCredentials() {
                return user.getPassword();
            }

            @Override
            public Object getDetails() {
                return user;
            }

            @Override
            public Object getPrincipal() {
                return user;
            }

            @Override
            public boolean isAuthenticated() {
                return true;
            }

            @Override
            public void setAuthenticated(boolean isAuthenticated) throws IllegalArgumentException {

            }

            @Override
            public String getName() {
                return user.getUsername();
            }
        }));
        org.activiti.engine.impl.identity.Authentication.setAuthenticatedUserId(username);
    }
}
5 Activiti Modeler集成:
目前网络博客大多是集成Activiti5.x版本,Activiti6官方提供的是全流程集成,目前还是集成中。当然可以在一些在线bpmn设计网站进行设计,然后手动部署到业务系统。
①在线设计:
https://online.visual-paradigm.com/cn/features/bpmn-tool/
发布者:全栈程序员-用户IM,转载请注明出处:https://javaforall.cn/179923.html原文链接:https://javaforall.cn
【正版授权,激活自己账号】: Jetbrains全家桶Ide使用,1年售后保障,每天仅需1毛
【官方授权 正版激活】: 官方授权 正版激活 支持Jetbrains家族下所有IDE 使用个人JB账号...
