大家好,又见面了,我是你们的朋友全栈君。如果您正在找激活码,请点击查看最新教程,关注关注公众号 “全栈程序员社区” 获取激活教程,可能之前旧版本教程已经失效.最新Idea2022.1教程亲测有效,一键激活。
Jetbrains全系列IDE使用 1年只要46元 售后保障 童叟无欺
第一次写小程序,老板就让我用websoket写个聊天对话,群聊这种。第一次写聊天功能,第一次用websoket,第一次用小程序,这是在考验我吗?
 不过我还是研究了一下,终于实现了。
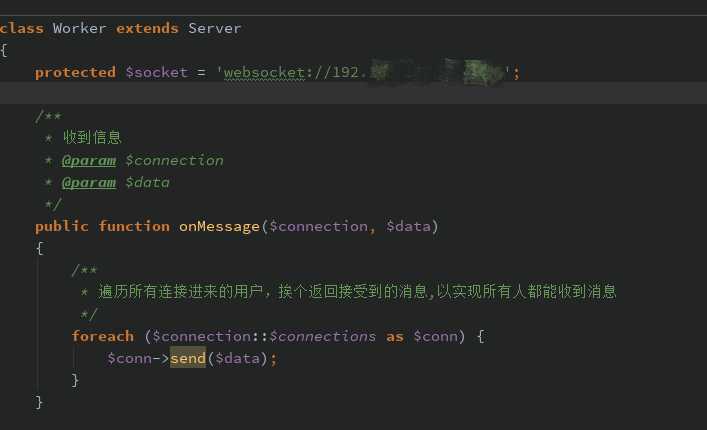
首先看一下界面,界面很简单,就是首页刚进来获取了用户信息头像,昵称等。点击进入聊天室就可以聊天了,下面我介绍的是前端代码实现,后台需要做的很简单,就是你给他发送什么数据,他就给你返回什么数据,就是在接收前台发送过来的图片的时候需要做个格式转换,因为有时候前端将接收到的json字符串转换json对象的时候,遇到有特殊的标点符号可能会报错,比如我就是‘\’报的错,找了半天。
因为有人咨询,所以附上所有小程序代码,地址:https://github.com/chongwenwen/weixin_chat/tree/master
有人说为什么没有utile.js的代码,这个功能只用到websoket.js跟utile.js没有关系哦!还有后台代码在页面最底下


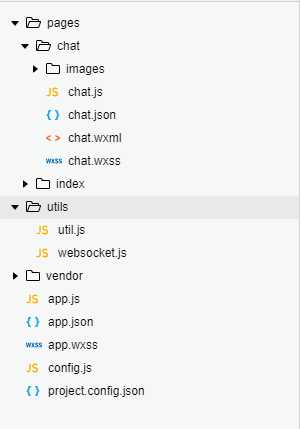
文档目录结构如下:(聊天页面为chat)
chat.wxml页面
首先写好页面结构,既然是群聊功能,肯定有自己和别人,所以页面的view盒子应给有两部分,一个内容左侧显示,一个内容右侧显示,下面是代码,因为没有正式注册企业项目,我用的服务器都是本地的服务器,所以界面区分别人和我的聊天信息是用昵称区分的,如果正式项目应该是由一个用户标记去区分的
<view class="news" bindtap='outbtn'>

<view class="chat-notice" wx:if="{

  {userInfo}}">系统消息: 欢迎 {

  { userInfo.nickName }} 加入群聊</view>

<view class="historycon">

<scroll-view scroll-y="true" class="history" scroll-top="{

  {scrollTop}}">

<block wx:for="{

  {newslist}}" wx:key>

    <!-- 历史消息 -->

<!-- <view class="chat-news">

<view style="text-align: left;padding-left: 20rpx;">

<image class='new_img' src="{

  {item.avatarUrl? item.avatarUrl:'images/avator.png'}}"></image>

<text class="name">{

  { item.nickName }}{

  {item.date}}</text>

</view>

<view class='you_left'>

<block wx:if="{

  {item.type=='text'}}">

<view class='new_txt'>{

  {item.content}}</view>

</block>

<block wx:if="{

  {item.type=='image'}}">

<image class="selectImg" src="{

  {item.images}}"></image>

</block>

</view>

</view> -->

<view>{

  {item.date}}</view>

<!--自己的消息 -->

<view class="chat-news" wx:if="{

  {item.nickName == userInfo.nickName}}">

<view style="text-align: right;padding-right: 20rpx;">

<text class="name">{

  { item.nickName }}</text>

<image class='new_img' src="{

  {userInfo.avatarUrl}}"></image>

</view>

<view class='my_right'>

<block wx:if="{

  {item.type=='text'}}">

<view class='new_txt'>{

  {item.content}}</view>

</block>

<block wx:if="{

  {item.type=='image'}}">

<image class="selectImg" src="{

  {item.images}}" data-src="{

  {item.images}}" lazy-load="true" bindtap="previewImg"></image>

</block>

</view>

</view>

<!-- 别人的消息 -->

<view class="chat-news" wx:else>

<view style="text-align: left;padding-left: 20rpx;">

<image class='new_img' src="{

  {item.avatarUrl? item.avatarUrl:'images/avator.png'}}"></image>

<text class="name">{

  { item.nickName }}</text>

</view>

<view class='you_left'>

<block wx:if="{

  {item.type=='text'}}">

<view class='new_txt'>{

  {item.content}}</view>

</block>

<block wx:if="{

  {item.type=='image'}}">

<image class="selectImg" src="{

  {item.images}}" data-src="{

  {item.images}}" lazy-load="true" bindtap="previewImg"></image>

</block>

</view>

</view>

</block>

</scroll-view>

</view>

</view>

<view id="flag"></view>

<!-- 聊天输入 -->

<view class="message">

<form bindreset="cleanInput" class="sendMessage">

<input type="text" placeholder="请输入聊天内容.." value="{

  {massage}}" bindinput='bindChange'></input>

<view class="add" bindtap='increase'>+</view>

<button type="primary" bindtap='send' formType="reset" size="small" button-hover="blue">发送</button>

</form>

<view class='increased {

  {aniStyle?"slideup":"slidedown"}}' wx:if="{

  {increase}}">

<view class="image" bindtap='chooseImage'>相册 </view>

</view>

</view>
websoket.js文件
在utils目录下,是封装了websoket的请求过程,以便在chat.js中调用。需要注意的是wx.connectSocket代表客户端首次和服务器建立联系,wx.onSocketOpen才是正式打开通道,wx.onSocketMessage必须在 wx.onSocketOpen 回调之后发送才生效。
wx.onSocketMessage里面带有参数是一个函数回调,这个回调就是后台服务器实时接收并返给前台的数据
var url = 'ws://........';//服务器地址


function connect(user,func) {

wx.connectSocket({

url: url,

header:{'content-type': 'application/json'},

success: function () {

console.log('信道连接成功~')

},

fail: function () {

console.log('信道连接失败~')

}

})

wx.onSocketOpen(function (res) {

wx.showToast({

title: '信道已开通~',

icon: "success",

duration: 2000

})

//接受服务器消息

wx.onSocketMessage(func);//func回调可以拿到服务器返回的数据

});

wx.onSocketError(function (res) {

wx.showToast({

title: '信道连接失败,请检查!',

icon: "none",

duration: 2000

})

})

}

//发送消息

function send(msg) {

wx.sendSocketMessage({

data: msg

});

}

module.exports = {

connect: connect,

send: send

}
chat.js文件
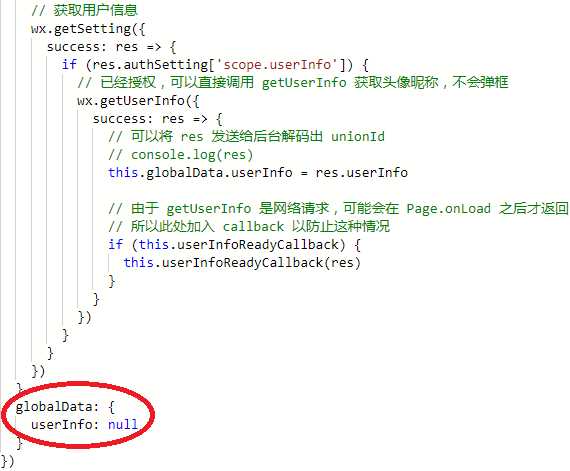
聊天室的逻辑操作页面,websocket.connect(){}调用的是websocket.js封装好的websoket的逻辑函数,回调就是后台的数据,之所以在本页面调用就是方便接收以后的逻辑操作。我建立文件的时候用的就是微信官方的快速模板生成的,所以app.js里面没有变动,用户在chat.js获取userInfo的时候可以引用全局的app.globalData.userInfo
还有要注意的一点就是在选择发送图片的时候,必须是先把本地的图片地址发送给后台,转换成服务器的图片地址再次通过wensoket.send发送给服务器,这个时候服务器推送给其他用户的才是正确的地址,否则你的本地地址其他用户是访问不到的。
// pages/chat/chat.js

const app = getApp()

var websocket = require('../../utils/websocket.js');

var utils = require('../../utils/util.js');

Page({


/**

* 页面的初始数据

*/

data: {

newslist:[],

userInfo: {},

scrollTop: 0,

increase:false,//图片添加区域隐藏

aniStyle: true,//动画效果

message:"",

previewImgList:[]

},

/**

* 生命周期函数--监听页面加载

*/

onLoad: function () {

var that = this

if (app.globalData.userInfo) {

this.setData({

userInfo: app.globalData.userInfo

})

}

//调通接口

websocket.connect(this.data.userInfo, function (res) {

// console.log(JSON.parse(res.data))

var list = []

list = that.data.newslist

list.push(JSON.parse(res.data))

that.setData({

newslist: list

})

})

},

// 页面卸载

onUnload(){

wx.closeSocket();

wx.showToast({

title: '连接已断开~',

icon: "none",

duration: 2000

})

},

//事件处理函数

send: function () {

var flag = this

if (this.data.message.trim() == ""){

wx.showToast({

title: '消息不能为空哦~',

icon: "none",

duration: 2000

})

}else {

setTimeout(function(){

flag.setData({

increase: false

})

},500)

websocket.send('{ "content": "' + this.data.message + '", "date": "' + utils.formatTime(new Date()) + '","type":"text", "nickName": "' + this.data.userInfo.nickName + '", "avatarUrl": "' + this.data.userInfo.avatarUrl+'" }')

this.bottom()

}

},

//监听input值的改变

bindChange(res) {

this.setData({

message : res.detail.value

})

},

cleanInput(){

//button会自动清空,所以不能再次清空而是应该给他设置目前的input值

this.setData({

message: this.data.message

})

},

increase() {

this.setData({

increase: true,

aniStyle: true

})

},

//点击空白隐藏message下选框

outbtn(){

this.setData({

increase: false,

aniStyle: true

})

},

//发送图片

chooseImage() {

var that = this

wx.chooseImage({

count: 1, // 默认9

sizeType: ['original', 'compressed'], // 可以指定是原图还是压缩图,默认二者都有

sourceType: ['album', 'camera'], // 可以指定来源是相册还是相机,默认二者都有

success: function (res) {

// 返回选定照片的本地文件路径列表,tempFilePath可以作为img标签的src属性显示图片

var tempFilePaths = res.tempFilePaths

// console.log(tempFilePaths)

wx.uploadFile({

url: 'http://.....', //服务器地址

filePath: tempFilePaths[0],

name: 'file',

headers: {

'Content-Type': 'form-data'

},

success: function (res) {

if (res.data){

that.setData({

increase: false

})

websocket.send('{"images":"'+ res.data +'","date":"'+utils.formatTime(new Date())+'","type":"image","nickName":"'+that.data.userInfo.nickName+'","avatarUrl":"'+that.data.userInfo.avatarUrl+'"}')

that.bottom()

}

}

})

}

})

},

//图片预览

previewImg(e){

var that = this

//必须给对应的wxml的image标签设置data-set=“图片路径”,否则接收不到

var res = e.target.dataset.src

var list = this.data.previewImgList //页面的图片集合数组

//判断res在数组中是否存在,不存在则push到数组中, -1表示res不存在

if (list.indexOf(res) == -1 ) {

this.data.previewImgList.push(res)

}

wx.previewImage({

current: res, // 当前显示图片的http链接

urls: that.data.previewImgList // 需要预览的图片http链接列表

})

},

//聊天消息始终显示最底端

bottom: function () {

var query = wx.createSelectorQuery()

query.select('#flag').boundingClientRect()

query.selectViewport().scrollOffset()

query.exec(function (res) {

wx.pageScrollTo({

scrollTop: res[0].bottom // #the-id节点的下边界坐标

})

res[1].scrollTop // 显示区域的竖直滚动位置

})

},

})
最后是页面的样式文件chat.wxss
/* pages/chat/chat.wxss */

page {

background-color: #f7f7f7;

height: 100%;

}

/* 聊天内容 */

.news {

padding-top: 30rpx;

text-align: center;

/* height:100%; */

box-sizing:border-box;

}

#flag{

margin-bottom: 100rpx;

height: 30rpx;

}

.chat-notice{

text-align: center;

font-size: 30rpx;

padding: 10rpx 0;

color: #666;

}

.historycon {

height: 100%;

width: 100%;

/* flex-direction: column; */

display: flex;

border-top: 0px;

}

/* 聊天 */

.chat-news{

width: 100%;

overflow: hidden;

}

.chat-news .my_right {

float: right;

/* right: 40rpx; */

padding: 10rpx 10rpx;

}

.chat-news .name{

margin-right: 10rpx;

}

.chat-news .you_left {

float: left;

/* left: 5rpx; */

padding: 10rpx 10rpx;

}

.selectImg{

display: inline-block;

width: 150rpx;

height: 150rpx;

margin-left: 50rpx;

}

.my_right .selectImg{

margin-right: 80rpx;

}

.new_img {

width: 60rpx;

height: 60rpx;

border-radius: 50%;

vertical-align: middle;

margin-right: 10rpx;

}

.new_txt {

max-width: 300rpx;

display: inline-block;

border-radius: 6rpx;

line-height: 60rpx;

background-color: #95d4ff;

padding: 5rpx 20rpx;

margin: 0 10rpx;

margin-left: 50rpx;

}

.my_right .new_txt{

margin-right:60rpx;

}

.you{

background-color: lightgreen;

}

.my {

border-color: transparent transparent transparent #95d4ff;

}

.you {

border-color: transparent #95d4ff transparent transparent;

}

.hei{

margin-top: 50px;

height: 20rpx;

}

.history {

height: 100%;

margin-top: 15px;

padding: 10rpx;

font-size: 14px;

line-height: 40px;

word-break: break-all;

}

::-webkit-scrollbar {

width: 0;

height: 0;

color: transparent;

z-index: -1;

}


/* 信息输入区域 */

.message{

position: fixed;

bottom:0;

width: 100%;

}

.sendMessage{

display: block;

height: 80rpx;

padding: 10rpx 10rpx;

background-color: #fff;

border-top: 2rpx solid #eee;

border-bottom: 2rpx solid #eee;

z-index:3;

}

.sendMessage input{

float:left;

width: 66%;

height: 100%;

line-height: 80rpx;

border-bottom: 1rpx solid #ccc;

padding:0 10rpx;

font-size: 35rpx;

color: #666;

}

.sendMessage view{

display: inline-block;

width: 80rpx;

height: 80rpx;

line-height: 80rpx;

font-size: 60rpx;

text-align: center;

color: #999;

border: 1rpx solid #ccc;

border-radius: 50%;

margin-left: 10rpx;

}

.sendMessage button {

float: right;

font-size: 35rpx;

}

.increased{

width:100%;

/* height: 150rpx; */

padding: 40rpx 30rpx;

background-color: #fff;

}

.increased .image{

width: 100rpx;

height: 100rpx;

border: 3rpx solid #ccc;

line-height: 100rpx;

text-align: center;

border-radius: 8rpx;

font-size:35rpx;

}

@keyframes slidedown {

from {

transform: translateY(0);

}

to {

transform: translateY(100%);

}

}

.slidedown {

animation: slidedown 0.5s linear ;

}

.slideup {

animation: slideup 0.5s linear ;

}

@keyframes slideup {

from {

transform: translateY(100%);

}

to {

transform: translateY(0);

}

}
后台代码(图片):
发布者:全栈程序员-用户IM,转载请注明出处:https://javaforall.cn/179155.html原文链接:https://javaforall.cn
【正版授权,激活自己账号】: Jetbrains全家桶Ide使用,1年售后保障,每天仅需1毛
【官方授权 正版激活】: 官方授权 正版激活 支持Jetbrains家族下所有IDE 使用个人JB账号...
