大家好,又见面了,我是你们的朋友全栈君。如果您正在找激活码,请点击查看最新教程,关注关注公众号 “全栈程序员社区” 获取激活教程,可能之前旧版本教程已经失效.最新Idea2022.1教程亲测有效,一键激活。
Jetbrains全系列IDE使用 1年只要46元 售后保障 童叟无欺
参考资料:
https://www.cnblogs.com/ytc6/p/7388654.html
http://docs.ceph.com/docs/kraken/start/
https://blog.csdn.net/changtao381/article/details/48015623
https://blog.csdn.net/litianze99/article/details/48438877
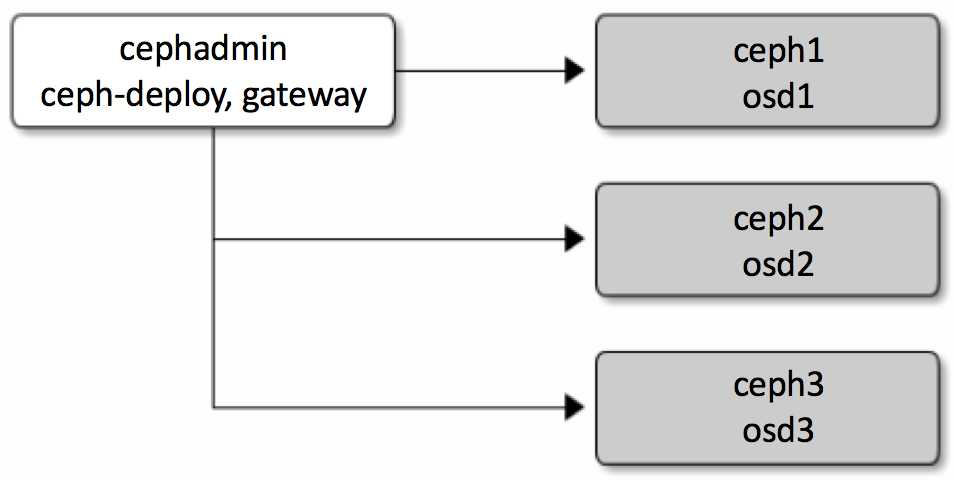
设计部署架构如下:

安装ceph集群
- 准备好4台机器,设置好机器名和hosts:
hostnamectl set-hostname cephadmin
...- 设置好cephadmin到ceph1…的无密码登录
ssh-keygen -t rsa
scp -p ~/.ssh/id_rsa.pub root@ceph1:/root/cephadmin.pub
... - 在cephadmin机器的/etc/yum.repos.d/目录下创建 ceph.repo:
[Ceph]
name=Ceph packages for $basearch
baseurl=http://mirrors.163.com/ceph/rpm-jewel/el7/$basearch
enabled=1
gpgcheck=0
type=rpm-md
gpgkey=https://mirrors.163.com/ceph/keys/release.asc
priority=1

[Ceph-noarch]
name=Ceph noarch packages
baseurl=http://mirrors.163.com/ceph/rpm-jewel/el7/noarch
enabled=1
gpgcheck=0
type=rpm-md
gpgkey=https://mirrors.163.com/ceph/keys/release.asc
priority=1

[ceph-source]
name=Ceph source packages
baseurl=http://mirrors.163.com/ceph/rpm-jewel/el7/SRPMS
enabled=1
gpgcheck=0
type=rpm-md
gpgkey=https://mirrors.163.com/ceph/keys/release.asc
priority=1- 在cephadmin上安装ceph-deploy
mkdir ~/ceph-cluster
cd ~/ceph-cluster
yum install ceph-deploy
若安装ceph后遇到麻烦可以使用以下命令进行清除包和配置
#ceph-deploy purge ceph1 ceph2 ceph3
#ceph-deploy purgedata ceph1 ceph2 ceph3
#ceph-deploy forgetkeys- 初始化,创建配置文件
cd ~/ceph-cluster
ceph-deploy new ceph1 ceph2 ceph3
在生成的ceph.conf中加入(写入[global] 段下)
osd pool default size = 2- 安装ceph
ceph-deploy install cephadmin ceph1 ceph2 ceph3- 配置初始monitors
ceph-deploy mon create-initial- 新建osd
分别在ceph1,ceph2,ceph3节点上创建osd1,osd2,osd3目录
ssh ceph1
mkdir /var/local/ceph1
...
从cephadmin节点执行 ceph-deploy 来准备 并激活OSD
ceph-deploy osd prepare ceph1:/var/local/osd1 ceph2:/var/local/osd2 ceph3:/var/local/osd3
ceph-deploy osd activate ceph1:/var/local/osd1 ceph2:/var/local/osd2 ceph3:/var/local/osd3
确保对 ceph.client.admin.keyring 有正确的操作权限。
chmod +r /etc/ceph/ceph.client.admin.keyringceph已经安装完毕!可以使用ceph -s来测试一下:
ceph -s安装radosgw
- 为radosgw创建用户和keyring
为网关服务器创建Keyring:
ceph-authtool --create-keyring /etc/ceph/ceph.client.radosgw.keyring
chmod +r /etc/ceph/ceph.client.radosgw.keyring
为网关实例client.radosgw.gateway生成一个名称和key:
ceph-authtool /etc/ceph/ceph.client.radosgw.keyring -n client.radosgw.gateway --gen-key为key添加权限
ceph-authtool -n client.radosgw.gateway --cap osd 'allow rwx' --cap mon 'allow rwx' /etc/ceph/ceph.client.radosgw.keyring将key添加到ceph storage cluster:
ceph -k /etc/ceph/ceph.client.admin.keyring auth add client.radosgw.gateway -i /etc/ceph/ceph.client.radosgw.keyring- 创建rgw相关的pool
ceph osd pool create .rgw 128 128
ceph osd pool create .rgw.root 128 128
ceph osd pool create .rgw.control 128 128
ceph osd pool create .rgw.gc 128 128
ceph osd pool create .rgw.buckets 128 128
ceph osd pool create .rgw.buckets.index 128 128
ceph osd pool create .log 128 128
ceph osd pool create .intent-log 128 128
ceph osd pool create .usage 128 128
ceph osd pool create .users 128 128
ceph osd pool create .users.email 128 128
ceph osd pool create .users.swift 128 128
ceph osd pool create .users.uid 128 128- 配置 /etc/ceph/ceph.conf里面关于rgw的部分:
[client.radosgw.gateway]
host = cephadmin
keyring = /etc/ceph/ceph.client.radosgw.keyring
log file = /var/log/ceph/client.radosgw.gateway.log
rgw_frontends =civetweb port=80
rgw print continue = false
注意:radosgw有两种方式运行,一种是直接用civetweb的方式,其内置了一个比较小巧的http服务器mongoose,这种方式配置比较简单,不需要配置Apache httpd服务器。
注意其中的:
keyring = /etc/ceph/ceph.client.radosgw.keyring
- 启动rgw
radosgw -c /etc/ceph/ceph.conf -n client.radosgw.gateway - 现在rgw已经安装成功!可以访问一下cephadmin的80端口。会看到如下信息:
<ListAllMyBucketsResult xmlns="http://s3.amazonaws.com/doc/2006-03-01/">
  <Owner>
    <ID>anonymous</ID>
    <DisplayName/>
  </Owner>
  <Buckets/>
</ListAllMyBucketsResult>
安装配置s3客户端工具
- 安装s3
yum install s3cmd验证安装是否成功:
s3cmd --version- 为s3访问创建一个用户
radosgw-admin user create --secret="123" --uid="s3" --display-name="s3 user"会得到返回信息,记住其中的access_key和secret_key,相当于s3用户的账号和密码。
如果发生错误需要删除用户,使用:
radosgw-admin user rm --uid="s3"- 配置s3cmd
s3cmd --configure注意输入以上生成的access_key和secret_key。
以上命令会生成/root/.s3cfg文件,需要进一步设置,主要是其中的:
* cloudfont_host
* host_base
* host_bucket
我在cephadmin上配置的.s3cfg内容如下:
[default]
access_key = APOQIZJAS0JV4GTN0AFF
access_token =
add_encoding_exts =
add_headers =
bucket_location = US
ca_certs_file =
cache_file =
check_ssl_certificate = True
check_ssl_hostname = True
cloudfront_host = cephadmin
default_mime_type = binary/octet-stream
delay_updates = False
delete_after = False
delete_after_fetch = False
delete_removed = False
dry_run = False
enable_multipart = True
encrypt = False
expiry_date =
expiry_days =
expiry_prefix =
follow_symlinks = False
force = False
get_continue = False
gpg_command = /usr/bin/gpg
gpg_decrypt = %(gpg_command)s -d --verbose --no-use-agent --batch --yes --passphrase-fd %(passphrase_fd)s -o %(output_file)s %(input_file)s
gpg_encrypt = %(gpg_command)s -c --verbose --no-use-agent --batch --yes --passphrase-fd %(passphrase_fd)s -o %(output_file)s %(input_file)s
gpg_passphrase =
guess_mime_type = True
host_base = cephadmin:80
host_bucket = %(bucket)s.cephadmin
human_readable_sizes = False
invalidate_default_index_on_cf = False
invalidate_default_index_root_on_cf = True
invalidate_on_cf = False
kms_key =
limit = -1
limitrate = 0
list_md5 = False
log_target_prefix =
long_listing = False
max_delete = -1
mime_type =
multipart_chunk_size_mb = 15
multipart_max_chunks = 10000
preserve_attrs = True
progress_meter = True
proxy_host =
proxy_port = 0
put_continue = False
recursive = False
recv_chunk = 65536
reduced_redundancy = False
requester_pays = False
restore_days = 1
restore_priority = Standard
secret_key = 123
send_chunk = 65536
server_side_encryption = False
signature_v2 = False
signurl_use_https = False
simpledb_host = sdb.amazonaws.com
skip_existing = False
socket_timeout = 300
stats = False
stop_on_error = False
storage_class =
urlencoding_mode = normal
use_http_expect = False
use_https = False
use_mime_magic = True
verbosity = WARNING
website_endpoint = http://%(bucket)s.s3-website-%(location)s.amazonaws.com/
website_error =
website_index = index.html
注意到:
host_base = cephadmin:80
host_bucket = %(bucket)s.cephadmin
4. 开始测试!创建一个bucket:
s3cmd mb s3://Aaa注意要修改一下/etc/hosts,将Aaa.cephadmin指向cephadmin本机地址!!!
10.0.83.41 cephadmin aaa.cephadmin另外注意,bucket的名字必须是大写字母开头!!!
5. 列举buckets:
s3cmd -v  ls
2018-04-17 10:25 s3://Aaa发布者:全栈程序员-用户IM,转载请注明出处:https://javaforall.cn/179150.html原文链接:https://javaforall.cn
【正版授权,激活自己账号】: Jetbrains全家桶Ide使用,1年售后保障,每天仅需1毛
【官方授权 正版激活】: 官方授权 正版激活 支持Jetbrains家族下所有IDE 使用个人JB账号...
