大家好,又见面了,我是你们的朋友全栈君。如果您正在找激活码,请点击查看最新教程,关注关注公众号 “全栈程序员社区” 获取激活教程,可能之前旧版本教程已经失效.最新Idea2022.1教程亲测有效,一键激活。
Jetbrains全系列IDE使用 1年只要46元 售后保障 童叟无欺
博主简介:原互联网大厂tencent员工,网安巨头Venustech员工,阿里云开发社区专家博主,微信公众号java基础笔记优质创作者,csdn优质创作博主,创业者,知识共享者,欢迎关注,点赞,收藏。
前些天发现了一个巨牛的人工智能学习网站,通俗易懂,风趣幽默,忍不住分享一下给大家。点击跳转到网站。”
https://www.cbedai.net/xander


一、在后台实现,利用java的poi
1、导入jar包,需要导入lib文件夹下如下包:
poi-3.11-20141221.jar
poi-ooxml.jar
poi-ooxml-schemas.jar
2、在util下写一个公共类,该类主要利用Jakarta POI HSSF API组件(用于操作Excel的组件),主要部分包括Excel对象,样式和格式,还有辅助操作。
 常用组件:
    HSSFWorkbook        excel的文档对象
    HSSFSheet           excel的表单
    HSSFRow             excel的行
    HSSFCell            excel的格子单元
    HSSFFont            excel字体
    HSSFDataFormat      日期格式
    HSSFHeader         sheet头
    HSSFFooter         sheet尾(只有打印的时候才能看到效果)

    样式:
    HSSFCellStyle                       cell样式
    辅助操作包括:
    HSSFDateUtil                        日期
    HSSFPrintSetup                      打印
    HSSFErrorConstants                  错误信息表
3、该类的操作代码如下:
package com.bdqn.util;

import java.io.OutputStream;
import java.util.ArrayList;
import java.util.List;

import org.apache.poi.hssf.usermodel.HSSFCell;
import org.apache.poi.hssf.usermodel.HSSFCellStyle;
import org.apache.poi.hssf.usermodel.HSSFFont;
import org.apache.poi.hssf.usermodel.HSSFRichTextString;
import org.apache.poi.hssf.usermodel.HSSFRow;
import org.apache.poi.hssf.usermodel.HSSFSheet;
import org.apache.poi.hssf.usermodel.HSSFWorkbook;
import org.apache.poi.hssf.util.HSSFColor;
import org.apache.poi.ss.util.CellRangeAddress;

public class ExportExcel {

  // 显示的导出表的标题
  private String title;
  // 导出表的列名
  private String[] rowName;
  private List<Object[]> dataList = new ArrayList<Object[]>();

  // 构造函数,传入要导出的数据
  public ExportExcel(String title, String[] rowName, List<Object[]> dataList) {
    this.dataList = dataList;
    this.rowName = rowName;
    this.title = title;
  }

  // 导出数据
  public void export(OutputStream out) throws Exception {
    try {
      HSSFWorkbook workbook = new HSSFWorkbook();
      HSSFSheet sheet = workbook.createSheet(title);

      // 产生表格标题行
      HSSFRow rowm = sheet.createRow(0);
      HSSFCell cellTitle = rowm.createCell(0);


      //sheet样式定义【】
      HSSFCellStyle columnTopStyle=this.getColumnTopStyle(workbook);
      HSSFCellStyle style=this.getStyle(workbook);
      sheet.addMergedRegion(new CellRangeAddress(0, 1, 0, (rowName.length - 1)));
      cellTitle.setCellStyle(columnTopStyle);
      cellTitle.setCellValue(title);

      // 定义所需列数
      int columnNum = rowName.length;
      HSSFRow rowRowName = sheet.createRow(2);

      // 将列头设置到sheet的单元格中
      for (int n = 0; n < columnNum; n++) {
        HSSFCell cellRowName = rowRowName.createCell(n);
        cellRowName.setCellType(HSSFCell.CELL_TYPE_STRING);
        HSSFRichTextString text = new HSSFRichTextString(rowName[n]);
        cellRowName.setCellValue(text);
        cellRowName.setCellStyle(columnTopStyle);

      }
      // 将查询到的数据设置到sheet对应的单元格中
      for (int i = 0; i < dataList.size(); i++) {
        Object[] obj = dataList.get(i);// 遍历每个对象
        HSSFRow row = sheet.createRow(i + 3);// 创建所需的行数

        for (int j = 0; j < obj.length; j++) {
          HSSFCell cell = null;
          if (j == 0) {
            cell = row.createCell(j, HSSFCell.CELL_TYPE_NUMERIC);
            cell.setCellValue(i + 1);
          } else {
            cell = row.createCell(j, HSSFCell.CELL_TYPE_STRING);
            if (!"".equals(obj[j]) && obj[j] != null) {
              cell.setCellValue(obj[j].toString());
            }
          }
          cell.setCellStyle(style);

        }

      }

      // 让列宽随着导出的列长自动适应
      for (int colNum = 0; colNum < columnNum; colNum++) {
        int columnWidth = sheet.getColumnWidth(colNum) / 256;
        for (int rowNum = 0; rowNum < sheet.getLastRowNum(); rowNum++) {
          HSSFRow currentRow;
          if (sheet.getRow(rowNum) == null) {
            currentRow = sheet.createRow(rowNum);
          } else {
            currentRow = sheet.getRow(rowNum);
          }
          if (currentRow.getCell(colNum) != null) {
            HSSFCell currentCell = currentRow.getCell(colNum);
            if (currentCell.getCellType() == HSSFCell.CELL_TYPE_STRING) {
              int length = currentCell.getStringCellValue().getBytes().length;
              if (columnWidth < length) {
                columnWidth = length;
              }
            }
          }
        }
        if (colNum == 0) {
          sheet.setColumnWidth(colNum, (columnWidth - 2) * 256);
        } else {
          sheet.setColumnWidth(colNum, (columnWidth + 4) * 256);
        }
      }

      if (workbook != null) {
        try {

          workbook.write(out);

        } catch (Exception e) {
          e.printStackTrace();
        }
      }

    } catch (Exception e) {

    }
  }
4、单元格样式:
/*
   * 列头单元格样式
   */
  public HSSFCellStyle getColumnTopStyle(HSSFWorkbook workbook) {
    // 设置字体
    HSSFFont font = workbook.createFont();

    // 设置字体大小
    font.setFontHeightInPoints((short) 11);
    // 字体加粗
    font.setBoldweight(HSSFFont.BOLDWEIGHT_BOLD);
    // 设置字体名字
    font.setFontName("Courier New");
    // 设置样式
    HSSFCellStyle style = workbook.createCellStyle();
    // 设置低边框
    style.setBorderBottom(HSSFCellStyle.BORDER_THIN);
    // 设置低边框颜色
    style.setBottomBorderColor(HSSFColor.BLACK.index);
    // 设置右边框
    style.setBorderRight(HSSFCellStyle.BORDER_THIN);
    // 设置顶边框
    style.setTopBorderColor(HSSFColor.BLACK.index);
    // 设置顶边框颜色
    style.setTopBorderColor(HSSFColor.BLACK.index);
    // 在样式中应用设置的字体
    style.setFont(font);
    // 设置自动换行
    style.setWrapText(false);
    // 设置水平对齐的样式为居中对齐;
    style.setAlignment(HSSFCellStyle.ALIGN_CENTER);
    style.setVerticalAlignment(HSSFCellStyle.VERTICAL_CENTER);
    return style;

  }

  public HSSFCellStyle getStyle(HSSFWorkbook workbook) {
    // 设置字体
    HSSFFont font = workbook.createFont();
    // 设置字体大小
    font.setFontHeightInPoints((short) 10);
    // 字体加粗
    font.setBoldweight(HSSFFont.BOLDWEIGHT_BOLD);
    // 设置字体名字
    font.setFontName("Courier New");
    // 设置样式;
    HSSFCellStyle style = workbook.createCellStyle();
    // 设置底边框;
    style.setBorderBottom(HSSFCellStyle.BORDER_THIN);
    // 设置底边框颜色;
    style.setBottomBorderColor(HSSFColor.BLACK.index);
    // 设置左边框;
    style.setBorderLeft(HSSFCellStyle.BORDER_THIN);
    // 设置左边框颜色;
    style.setLeftBorderColor(HSSFColor.BLACK.index);
    // 设置右边框;
    style.setBorderRight(HSSFCellStyle.BORDER_THIN);
    // 设置右边框颜色;
    style.setRightBorderColor(HSSFColor.BLACK.index);
    // 设置顶边框;
    style.setBorderTop(HSSFCellStyle.BORDER_THIN);
    // 设置顶边框颜色;
    style.setTopBorderColor(HSSFColor.BLACK.index);
    // 在样式用应用设置的字体;
    style.setFont(font);
    // 设置自动换行;
    style.setWrapText(false);
    // 设置水平对齐的样式为居中对齐;
    style.setAlignment(HSSFCellStyle.ALIGN_CENTER);
    // 设置垂直对齐的样式为居中对齐;
    style.setVerticalAlignment(HSSFCellStyle.VERTICAL_CENTER);
    return style;
  }
5、前台主要代码如下:
5.1 第一种,我们没有传入页面的查询参数,到后台我们无论怎么查询,都是把整个数据库不分条件的全部导出。不能够满足用户需求,体验不好,不推荐。
  <button type="button" class="btn btn-success" id="delPro" onclick="dao()">导出Excel</button>
function dao() {
  location.href="MedicineAdminServlet?a=dao&pageon="+${page.pageon};
}
5、2第二种,我们往后台传入时,把查询的参数一并传入后台,后台接收后作为条件去数据库找符合条件的,查到符合条件的导出,比较人性化。
<a href="SendMedicineServlet?a=dao&patientid=${param.patientid }&prescriptionid=${param.prescriptionid}&patientname=${param.patientname }&starttime=${param.starttime }&endtime=${param.endtime }">
          <button type="button" class="btn btn-success" id="delPro">导出Excel</button>
          </a>
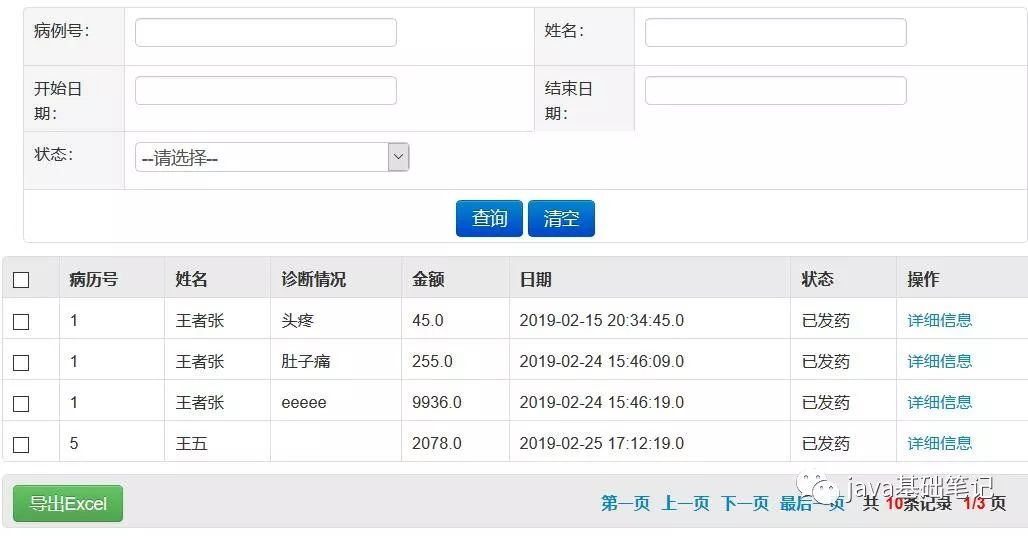
6、为了方便读者理解,前端页面如下:查询条件为病历号,姓名等,会根据曾经的查询条件导出。
7、后台servlet操作主要代码如下:(传入当前页将会只打印当前页)
/**
     * 导出excel文件
     */

else if (a.equals("dao")) {
  String patientid = request.getParameter("patientid");
  int patientid3 = 0;
  if (patientid != null && !patientid.equals("")) {
    patientid3 = Integer.parseInt(patientid);
  }

  String dname = request.getParameter("dname");
  String subjectroom = request.getParameter("subjectroom");
  String starttime = request.getParameter("starttime");
  String endtime = request.getParameter("endtime");

  // 页码
  int pageon = 1;
  String pageon1 = request.getParameter("pageon");
  if (pageon1 != null && !pageon1.equals("")) {
    pageon = Integer.parseInt(pageon1);
  }
  // 操作导出excel
  List<RegRum> selectlists = rs.querySelect2(patientid3, dname, subjectroom, starttime, endtime);
 //excel标题
  String title = "挂号信息表";
  //excel列头信息
  String[] rowsName = new String[] { "门诊编号", "主治医师", "挂号时间", "挂号科室", "状态" };
  List<Object[]> dataList = new ArrayList<Object[]>();
  Object[] objs = null;
  for (int i = 0; i < selectlists.size(); i++) {
    RegRum regRum = selectlists.get(i);
    objs = new Object[rowsName.length];
    objs[0] = regRum.getPatientid();
    objs[1] = regRum.getDoctor().getDname();
    SimpleDateFormat df = new SimpleDateFormat("yyyy-MM-dd HH:mm:ss");
    objs[2] = regRum.getDate();
    objs[3] = regRum.getDoctor().getSubroomname();
    objs[4] = regRum.getStatus();
    dataList.add(objs);

  }
8、下面这部分代码主要是把数据传给浏览器,前面部分告诉浏览器该数据流是什么类型的,本例传的是excel格式的,浏览器会自动判定为excel,提示是否保存。
//给文件命名。随机命名
String fileName = "Excel-" + String.valueOf(System.currentTimeMillis()).substring(4, 13) + ".xls";
     //告诉浏览器数据格式,将头和数据传到前台
      String headStr = "attachment; filename=\"" + fileName + "\"";
      response.setContentType("APPLICATION/OCTET-STREAM");
      response.setHeader("Content-Disposition", headStr);
      OutputStream out = response.getOutputStream();

//调用poi的工具类
      ExportExcel ex = new ExportExcel(title, rowsName, dataList);
      try {
        ex.export(out);
      } catch (Exception e) {
        e.printStackTrace();
      }
      out.flush();
      out.close();
      return;
    }
9、注意:如果从数据库查到的是数字,比如0代表男,1代表女,不加处理,会导出数字,处理方法如下:(主要代码),下面代码又没有的当前页的限制,根据条件查到多少打印多少。
String patientid1 = request.getParameter("patientid");
      int patientid = 0;
      if (patientid1 != null && !patientid1.equals("")) {
        patientid = Integer.parseInt(patientid1);
      }
      String prescriptionid1 = request.getParameter("prescriptionid");
      int prescriptionid = 0;
      if (prescriptionid1 != null && !prescriptionid1.equals("")) {
        prescriptionid = Integer.parseInt(prescriptionid1);
      }
      String patientname = request.getParameter("patientname");
      String starttime = request.getParameter("starttime");
      String endtime = request.getParameter("endtime");
      List<Prescription> prescriptions = new ArrayList<Prescription>();
      prescriptions = sm.queryDao(prescriptionid, patientid, patientname, starttime, endtime);
      String title = "发药信息表";
      String[] rowsName = new String[] { "处方号", "病历号", "姓名", "日期", "状态" };
      List<Object[]> dataList = new ArrayList<Object[]>();
      //导出excel
      Object[] objs = null;
      for (int i = 0; i < prescriptions.size(); i++) {
        Prescription regRum = prescriptions.get(i);
        objs = new Object[rowsName.length];
        objs[0] = regRum.getPrescriptionid();
        objs[1] = regRum.getPatientid();
        objs[2] = regRum.getName();
        objs[3] = regRum.getPrescriptiondate();
        //对数字的操作
        if(regRum.getStatus().equals("1")) {
          objs[4] = "已结算";
        }
        else {
          objs[4]="已发药";
        }
        dataList.add(objs);
      }
      //下面代码主要跟上面一致
10.数据库操作代码如下:(比较简单,只是把满足条件的list集合传到servlet,转变为数组,方便调用poi类)
@Override
  public List<Prescription> query(int prescriptionid,int patientid, String patientname, String starttime, String endtime, int pageon) {
    Connection con = Jndi.getConnection();
    ResultSet rs = null;
    PreparedStatement ps = null;
    String sql = "select p.patientid,p.prescriptionid,r.patientname, p.diagnose ,p.prescriptiondate,sum(chargemoney*number),p.`pstatus` \r\n"
        + "from prescription p,regnum r,chargeitem c,prescriptioncharge pc  \r\n" + "\r\n"
        + " where  p.patientid=r.patientid and pc.prescriptionid=p.prescriptionid\r\n" + "\r\n" + "\r\n"
        + " and c.chargeid=pc.chargeid   ";
    if (patientid != 0) {
      sql = sql + " and p.patientid=" + patientid;
    }
    if (prescriptionid != 0) {
      sql = sql + " and p.prescriptionid=" + prescriptionid;
    }
    if (patientname != null && !patientname.equals("")) {
      sql = sql + " and r.patientname like '%" + patientname + "%'";
    }
    if (starttime != null && !starttime.equals("")) {
      sql = sql + " and p.prescriptiondate>'" + starttime + "'";
    }
    if (endtime != null && !endtime.equals("")) {
      sql = sql + " and p.prescriptiondate<'" + endtime + "'";
    }


sql = sql + "  GROUP BY p.prescriptionid";
if (pageon != 0) {
  sql = sql + " limit " + (pageon - 1) * 4 + ",4";
}

List<Prescription> listregs = new ArrayList<Prescription>();
try {
  ps = con.prepareStatement(sql);
  rs = ps.executeQuery();

  while (rs.next()) {
    Prescription prescription = new Prescription();
    prescription.setPatientid(rs.getInt("patientid"));
    prescription.setPrescriptionid(rs.getInt("p.prescriptionid"));
    prescription.setDiagnose(rs.getString("diagnose"));
    prescription.setPrescriptiondate(rs.getString("prescriptiondate"));
    prescription.setStatus(rs.getString("pstatus"));
    prescription.setSummoney(rs.getDouble(6));
    prescription.setName(rs.getString(3));
    listregs.add(prescription);
  }

} catch (SQLException e) {
  e.printStackTrace();
} finally {
  Jndi.close(rs, ps, con);
}
return listregs;
第一种比较复杂,如果想很快搞定,可以用纯js在前端导出table表格,需要导入四个js文件。引入进去。

二、纯js实现前台导出excel。
1、导入js文件,可能也需要导入jquery文件,自行尝试。所需js文件地址。
链接:https://pan.baidu.com/s/14-riXUTElxWaLHRHLe04SA
提取码:fpnp
<script type="text/javascript" src="<%=path %>/Js/jszip.min.js"></script>
<script type="text/javascript" src="<%=path %>/Js/demo.page.js"></script>
<script type="text/javascript" src="<%=path %>/Js/excel-gen.js"></script>
<script type="text/javascript" src="<%=path %>/Js/FileSaver.js"></script>
2、js代码如下
<script type="text/javascript">
  $(document).ready(function(){
    alert()
    excel = new ExcelGen({
      "src_id":"test_table",//table的id
      "show_header":true
    });
    $("#generate-excel").click(function () {
      excel.generate();//执行导入包中的方法。
    })
  });
</script>
3、body中主要代码
<table class="table table-bordered table-hover definewidth m10" id="test_table">
//id在table中写
//调用方法名在button写
<button type="button" class="btn btn-success" id="generate-excel">导出Excel</button>
注意:第二种方式,只能导出当前页的信息,它是根据table里面tr的数量导的,不会打印下一页。如果希望打印下一页的内容,提供一种思路,可以在按钮上添加跳转页面,跳到另一个页面,让另一个页面返回数据库全查需要的数据,写入新建页的table中,打印新table,有兴趣的可以尝试。 到这儿,可能读累了吧,听懂的给个赞,thanks.
发布者:全栈程序员-用户IM,转载请注明出处:https://javaforall.cn/169210.html原文链接:https://javaforall.cn
【正版授权,激活自己账号】: Jetbrains全家桶Ide使用,1年售后保障,每天仅需1毛
【官方授权 正版激活】: 官方授权 正版激活 支持Jetbrains家族下所有IDE 使用个人JB账号...
