大家好,又见面了,我是你们的朋友全栈君。如果您正在找激活码,请点击查看最新教程,关注关注公众号 “全栈程序员社区” 获取激活教程,可能之前旧版本教程已经失效.最新Idea2022.1教程亲测有效,一键激活。
Jetbrains全系列IDE使用 1年只要46元 售后保障 童叟无欺
ALLURE
1.开始安装
1.1.安装命令行
目前支持 Allure 安装的几个选项:
1.1.1. Linux
对于基于 debian 的存储库,提供了 PPA:
sudo apt-add-repository ppa:qameta/allure
sudo apt-get update sudo
apt-get install allure
1.1.2. Mac OS X
对于 Mas OS,可通过 Homebrew 进行自动安装
brew install allure
1.1.3. Windows
对于 Windows,Allure 可从 Scoop 命令行安装程序获得。
要安装 Allure,请下载并安装 Scoop,然后在 Powershell 中执行:
scoop install allure
此外,Scoop 能够更新 Allure 发行版安装。 为此,导航到 Scoop 安装目录并执行。
\bin\checkver.ps1 allure -u
这将检查更新版本的 Allure,并更新清单文件。
scoop update allure
1.1.4. 手动安装
1.从 Maven Central 下载最新版本作为 zip 存档。
2.将存档解压到 allure-commandline 目录。
3.导航到 bin 目录。
4.在 Windows 上使用 allure.bat 或在其他 Unix 平台上使用 allure。
5.添加系统变量PATH。
2.报告结构
一旦您了解了报告的外观。 您可能希望获得更多数据丰富的报告。 您可能必须考虑为您的测试框架使用 Allure 适配器之一,这将允许收集更多信息。 跳转到集成部分以了解有关与测试框架集成的更多信息。
典型的报告由“概览”选项卡、导航栏、用于不同类型测试数据表示的几个选项卡和每个单独测试的测试用例页面组成。 每个 Allure 报告都由一个树状数据结构支持,代表一个测试执行过程。 不同的选项卡允许在原始数据结构的视图之间切换,从而提供不同的视角。 请注意,包括行为、类别、xUnit 和包在内的所有树状表示都支持过滤并且是可排序的。
2.1.总览页面
每个报告的入口点将是带有仪表板和小部件的“概览”页面:
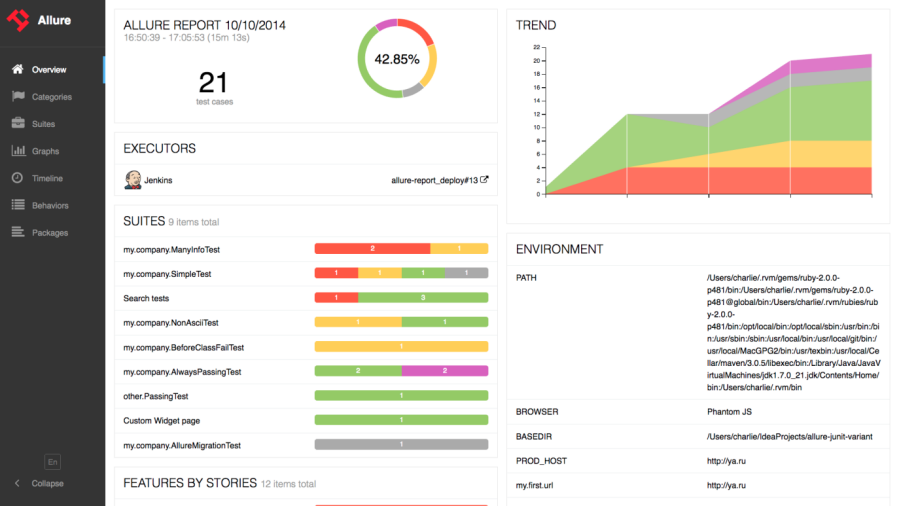

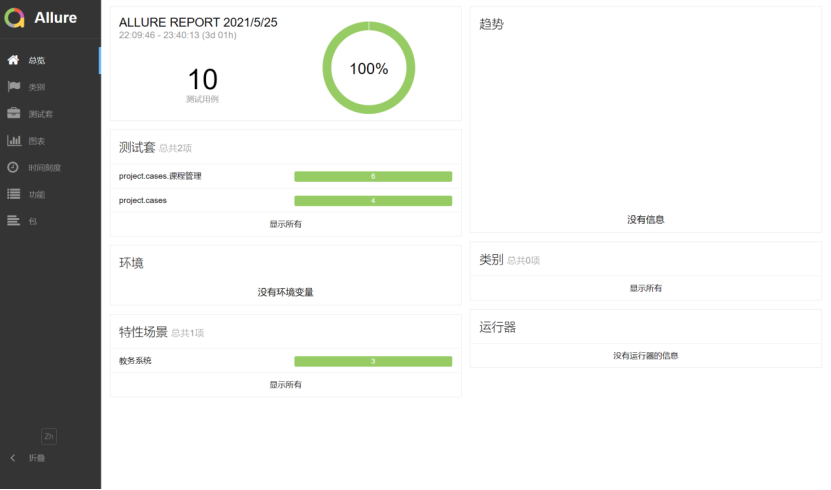
概览页面包含几个默认小部件,代表您的项目和测试环境的基本特征。
- 统计 – 总体报告统计。
- 发布 – 如果此报告代表多个测试发布,则每次发布的统计数据将显示在此处。
- 特性场景 – 根据故事和功能汇总的结果信息。 测试套- 有关用于运行测试的测试执行程序的信息。
- 趋势 -如果测试积累了一些历史数据,它的趋势将被计算并显示在图表上。
- 环境 – 有关测试环境的信息(请参阅如何定义环境)。
主页小部件是可拖动和可配置的。
此外,Allure支持它自己的插件系统,因此完全不同的小部件布局是可能的。导航栏是可折叠的,使您能够切换到几种基本的结果概览模式。
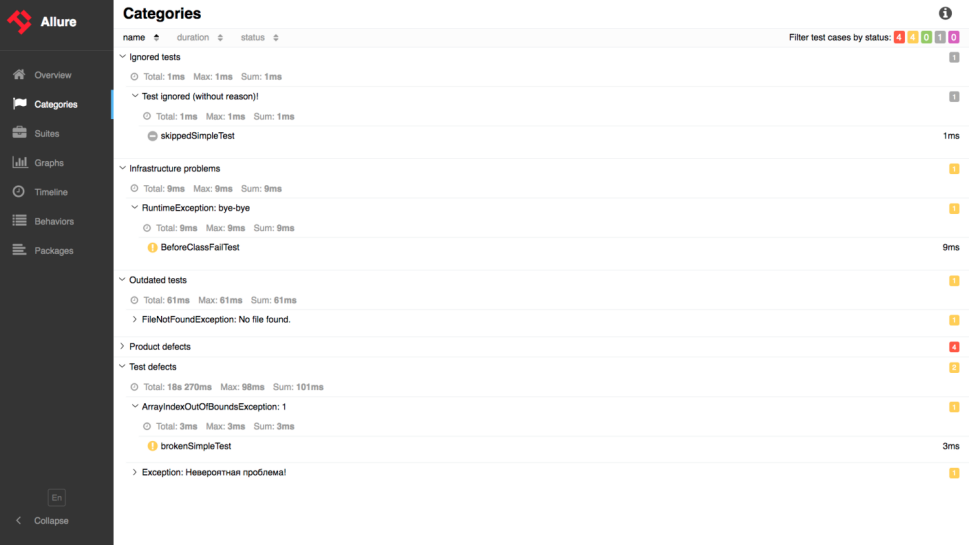
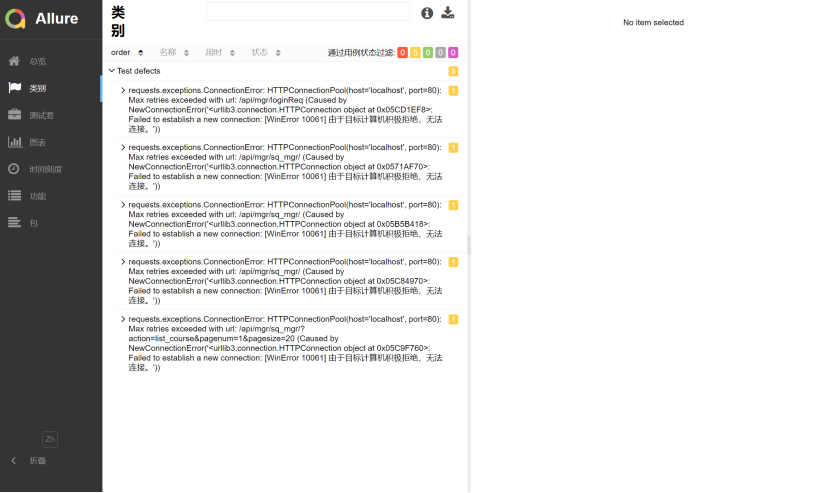
2.2.类别
类别选项卡为您提供了创建自定义缺陷分类以应用于测试结果的方法。
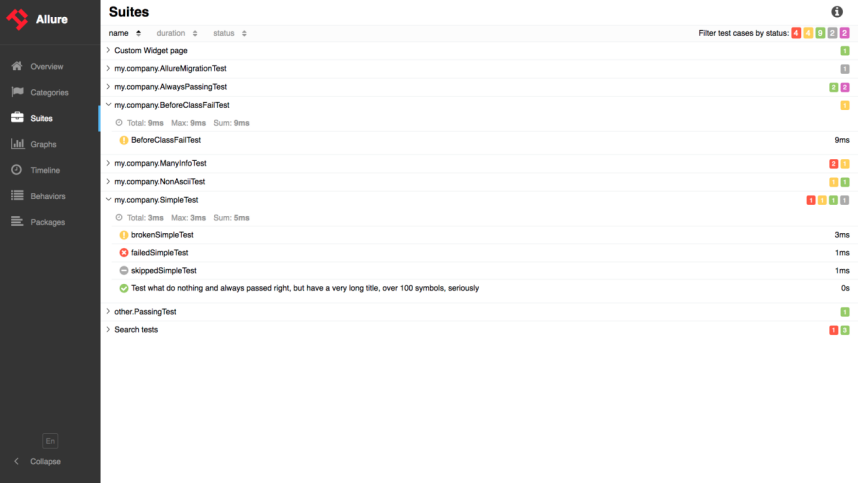
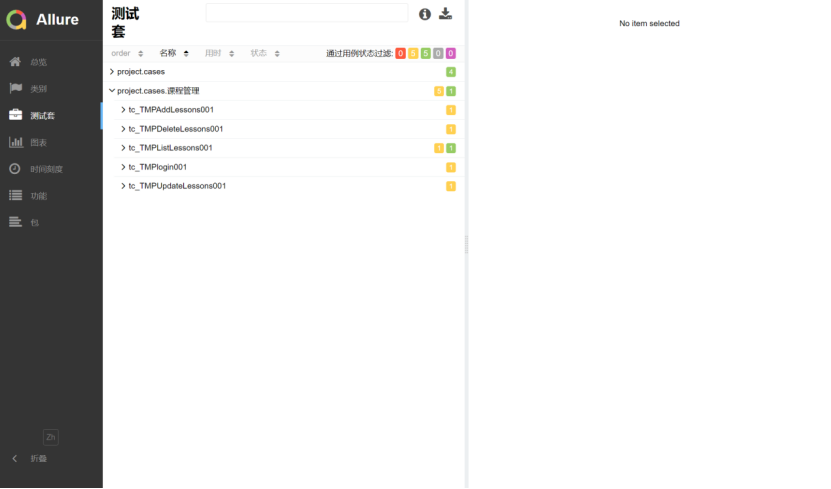
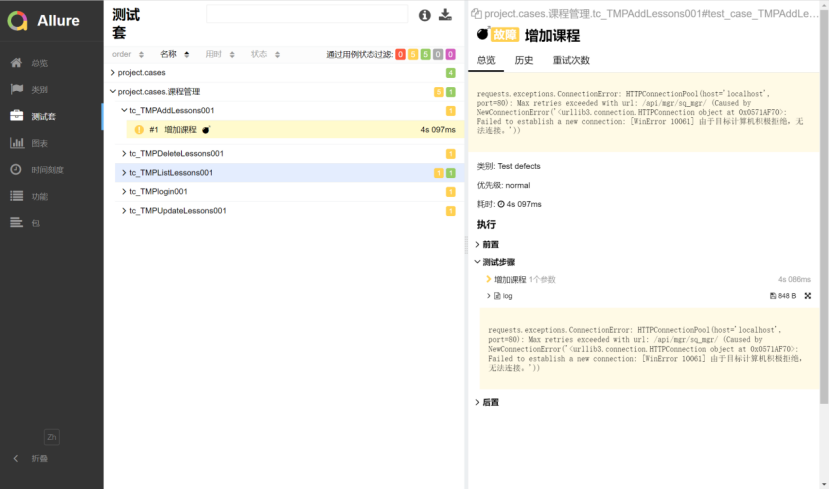
2.3.测试套
在套件选项卡上,可以找到按套件和类分组的已执行测试的标准结构表示。
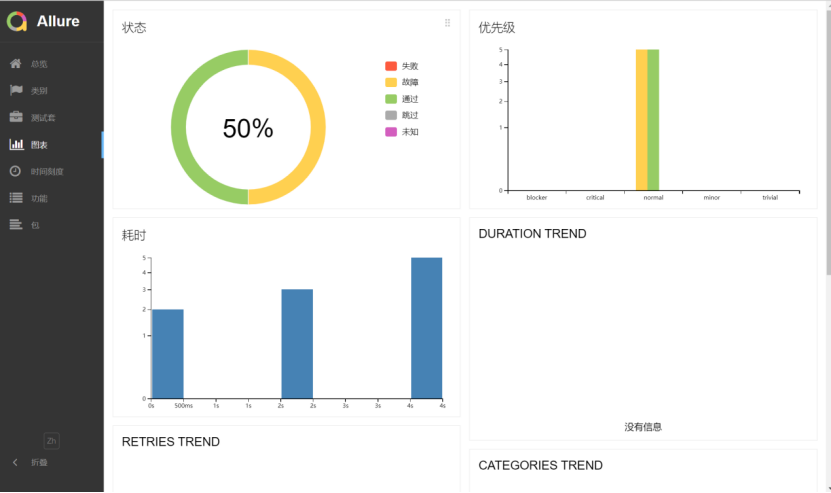
2.4.图表
图表允许您查看从测试数据收集的不同统计数据:状态细分或严重性和持续时间图。

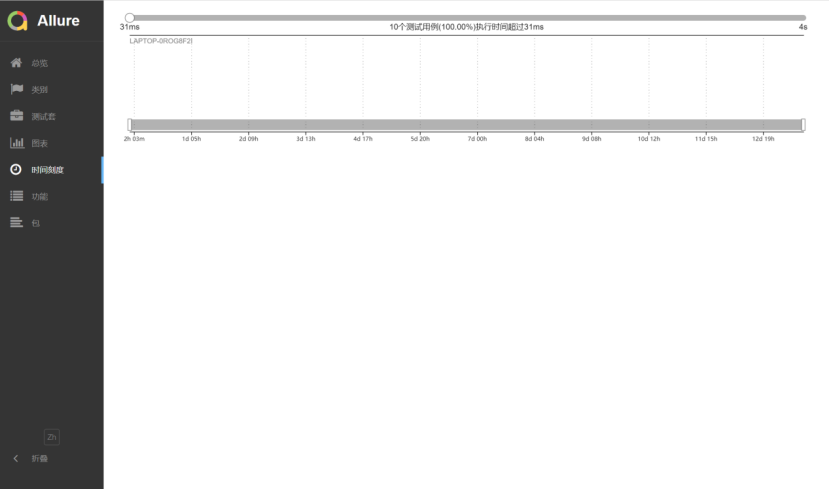
2.5.时间刻度
Timeline 选项卡可视化测试执行的回顾,allure 适配器收集测试的精确时间,并且在此选项卡上,它们根据其顺序或并行时间结构进行相应排列。

2.6.功能
对于行为驱动方法,此选项卡根据 Epic、Feature 和 Story 标签对测试结果进行分组。
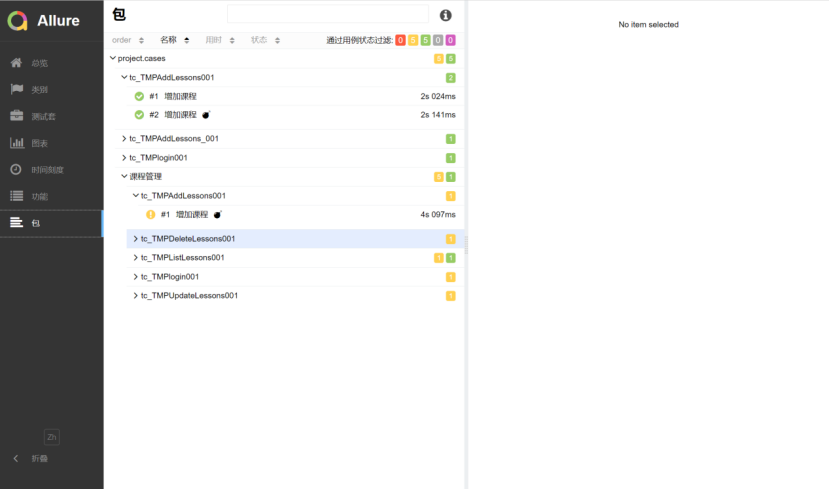
2.7.包
包选项卡表示测试结果的树状布局,按不同的包分组。
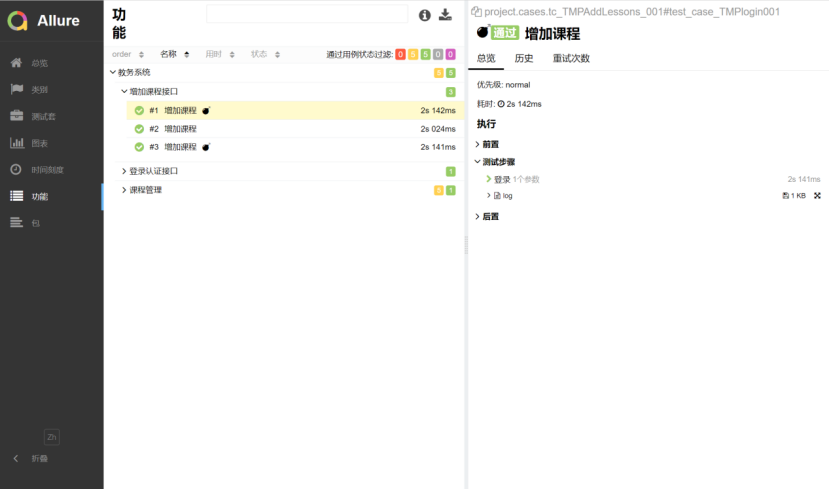
2.8测试用例页面
从上面描述的一些结果概览页面中,您可以在单击各个测试后转到测试用例页面。 该页面通常会包含许多与测试用例相关的个人数据:测试期间执行的步骤、时间安排、附件、测试分类标签、描述和链接。
3.Pytest与Allure
2.报告结构
2.报告结构
3.1. 安装
Pytest 可从 PyPI 安装,因此建议使用 pip 安装。 要安装最新版本,请从命令行执行:
$ pip install allure-pytest
这将安装 allure-pytest 和 allure-python-commons 包以生成与 Allure 2 兼容的报告数据。如果您使用的是早期版本的适配器来生成第一代 Allure 报告,那么您需要先卸载它。
3.2. 用法
要使 Allure 侦听器在测试执行期间收集结果,只需添加 –alluredir 选项并提供应存储结果的文件夹的路径。 例如。:
$ pytest –alluredir=/tmp/my_allure_results
要在测试完成后查看实际报告,您需要使用 Allure 命令行实用程序从结果生成报告。此命令将在默认浏览器中显示生成的报告。
$ allure serve /tmp/my_allure_results
示例:
if __name__ == '__main__':
        pytest.main(['-s','--alluredir=../tmpr/report'])
        #pytest.main(['-k tc_TMPAddLessons001','-s','--alluredir=../tmpr/report'])
        os.system('allure generate ../tmpr/report -o ../report/report --clean')
3.3. 基本报告
您可以在 Allure 报告中看到所有默认的 pytest 状态:只有由于断言错误之一而未成功的测试才会被标记为失败,任何其他异常都会导致测试处于损坏状态。
import pytest
def test_success():
    """this test succeeds"""
    assert True

def test_failure():
    """this test fails"""
    assert False

def test_skip():
    """this test is skipped"""
    pytest.skip('for a reason!')

def test_broken():
    raise Exception('oops')
3.4. 支持的 Pytest 功能
Allure 报告支持的一些常见 Pytest 功能包括 xfail、装置和终结器、标记、条件跳过和参数化。
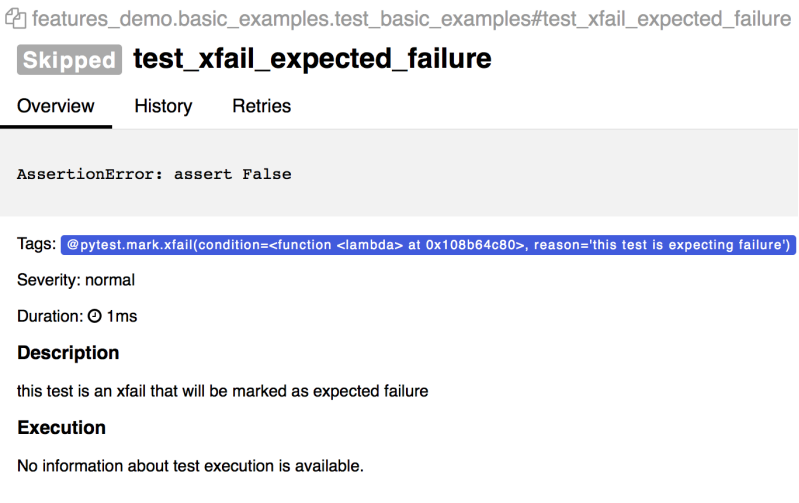
Xfail
这是标记预期失败的 pytest 方法:
@pytest.mark.xfail(condition=lambda: True, reason='this test is expecting failure')
def test_xfail_expected_failure():
    """this test is an xfail that will be marked as expected failure"""
    assert False

@pytest.mark.xfail(condition=lambda: True, reason='this test is expecting failure')
def test_xfail_unexpected_pass():
    """this test is an xfail that will be marked as unexpected success"""
    assert True
这会导致测试在预期失败时被跳过并用特殊标签标记。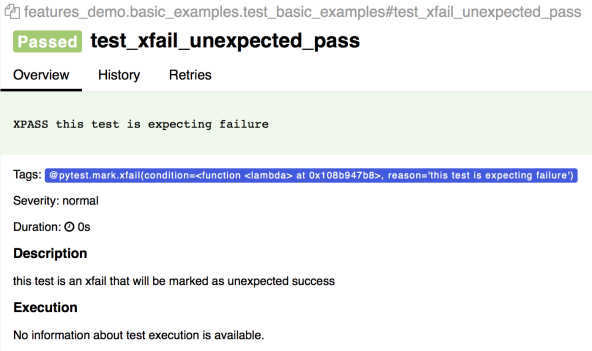
skipif
在 Pytest 中,您可以有条件地将测试标记为在某些特定条件下不执行 :
@pytest.mark.skipif('2 + 2 != 5', reason='This test is skipped by a triggered condition in @pytest.mark.skipif')
def test_skip_by_triggered_condition():
    pass
当条件被评估为真时,测试在报告中收到一个“跳过”状态、一个标签和来自装饰者的描述。
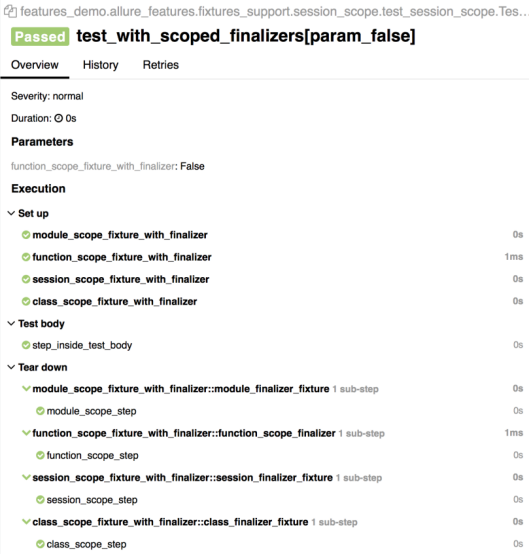
Fixtures 和 finalizers
Fixtures 和 finalizers 是 Pytest 将分别在测试开始之前和测试结束之后调用的实用函数。 Allure 跟踪每个装置的调用并详细显示调用了哪些方法和哪些参数,保留了调用的正确顺序。 :
您不需要标记您的灯具以使其在报告中可见,它们将被自动检测到不同的范围。
@pytest.fixture(params=[True, False], ids=['param_true', 'param_false'])
def function_scope_fixture_with_finalizer(request):
    if request.param:
        print('True')
    else:
        print('False')
    def function_scope_finalizer():
        function_scope_step()
    request.addfinalizer(function_scope_finalizer)


@pytest.fixture(scope='class')
def class_scope_fixture_with_finalizer(request):
    def class_finalizer_fixture():
        class_scope_step()
    request.addfinalizer(class_finalizer_fixture)


@pytest.fixture(scope='module')
def module_scope_fixture_with_finalizer(request):
    def module_finalizer_fixture():
        module_scope_step()
    request.addfinalizer(module_finalizer_fixture)


@pytest.fixture(scope='session')
def session_scope_fixture_with_finalizer(request):
    def session_finalizer_fixture():
        session_scope_step()
    request.addfinalizer(session_finalizer_fixture)


class TestClass(object):

    def test_with_scoped_finalizers(self,
                                    function_scope_fixture_with_finalizer,
                                    class_scope_fixture_with_finalizer,
                                    module_scope_fixture_with_finalizer,
                                    session_scope_fixture_with_finalizer):
        step_inside_test_body()
Parametrization
您可以使用@pytest.mark.parametrize 从输入参数集生成许多测试用例。
所有参数名称和值都将在报告中捕获,可选的参数名称将替换为 ids kwarg 中提供的字符串描述。
import allure
import pytest


@allure.step
def simple_step(step_param1, step_param2 = None):
    pass


@pytest.mark.parametrize('param1', [True, False], ids=['id explaining value 1', 'id explaining value 2'])
def test_parameterize_with_id(param1):
    simple_step(param1)


@pytest.mark.parametrize('param1', [True, False])
@pytest.mark.parametrize('param2', ['value 1', 'value 2'])
def test_parametrize_with_two_parameters(param1, param2):
    simple_step(param1, param2)


@pytest.mark.parametrize('param1', [True], ids=['boolean parameter id'])
@pytest.mark.parametrize('param2', ['value 1', 'value 2'])
@pytest.mark.parametrize('param3', [1])
def test_parameterize_with_uneven_value_sets(param1, param2, param3):
    simple_step(param1, param3)
    simple_step(param2)
使用不同的命名和未命名参数集捕获测试调用的示例。
3.5 Allure Features
Allure 目前支持几乎所有可用功能,除了带有 Pytest 的环境。
Steps
常详细的分步表示。 这是通过@allure.step 装饰器实现的,该装饰器将带注释的方法或函数的调用添加到报告中。
用@step 注释的方法可以存储在测试之外,并在需要时导入。 步骤方法可以具有任意深度的嵌套结构。
import allure
import pytest

from .steps import imported_step


@allure.step
def passing_step():
    pass


@allure.step
def step_with_nested_steps():
    nested_step()


@allure.step
def nested_step():
    nested_step_with_arguments(1, 'abc')


@allure.step
def nested_step_with_arguments(arg1, arg2):
    pass


def test_with_imported_step():
    passing_step()
    imported_step()


def test_with_nested_steps():
    passing_step()
    step_with_nested_steps()
每个步骤的状态显示在名称右侧的小图标中。 嵌套的步骤以树状可折叠结构进行组织。
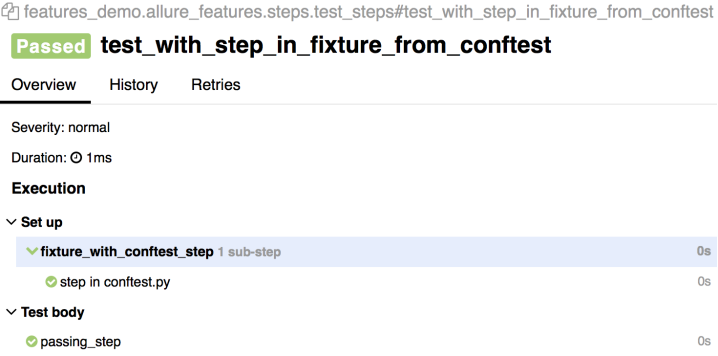
Step装置也支持fixture。 以下是使用 conftest.py 模块中定义的fixture进行测试的示例(即使不直接导入,此类夹具也会由 Pytest 解析):
conftest.py
import allure
import pytest


@allure.step('step in conftest.py')
def conftest_step():
    pass


@pytest.fixture
def fixture_with_conftest_step():
    conftest_step()
import allure

from .steps import imported_step


@allure.step
def passing_step():
    pass


def test_with_step_in_fixture_from_conftest(fixture_with_conftest_step):
    passing_step()
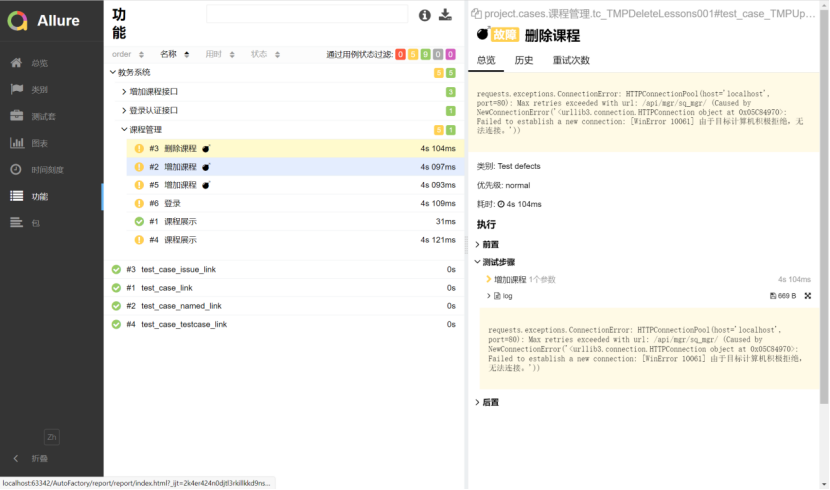
Attachments
报告可以显示许多不同类型的提供的附件,这些附件可以补充测试、步骤或夹具结果。 可以通过调用 allure.attach(body, name,attachment_type, extension) 来创建附件:
- body – 要写入文件的原始内容。
- name – 带有文件名的字符串
- attachment_type -allure.attachment_type 值之一
extension – 提供将用作创建文件的扩展名。或allure.attach.file(来源、名称、附件类型、扩展名):
source – 包含文件路径的字符串。
import allure
import pytest
@pytest.fixture
def attach_file_in_module_scope_fixture_with_finalizer(request):
allure.attach('A text attacment in module scope fixture', 'blah blah blah', allure.attachment_type.TEXT)
def finalizer_module_scope_fixture():
allure.attach('A text attacment in module scope finalizer', 'blah blah blah blah',
allure.attachment_type.TEXT)
request.addfinalizer(finalizer_module_scope_fixture)
def test_with_attacments_in_fixture_and_finalizer(attach_file_in_module_scope_finalizer):
pass
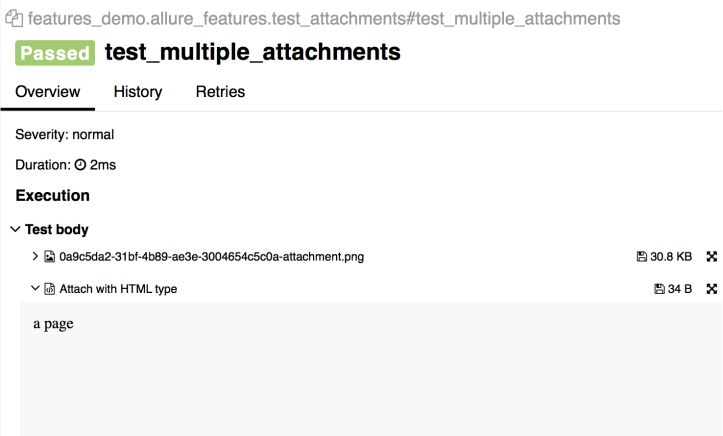
def test_multiple_attachments():
allure.attach.file('./data/totally_open_source_kitten.png', attachment_type=allure.attachment_type.PNG)
allure.attach('<head></head><body> a page </body>', 'Attach with HTML type', allure.attachment_type.HTML)
附件显示在它们所属的测试实体的上下文中。 HTML 类型的附件呈现并显示在报表页面上。 这是为您自己的测试结果表示提供一些自定义的便捷方式。
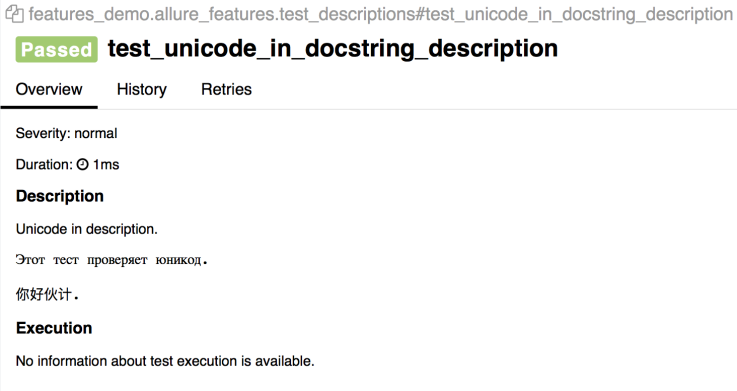
Descriptions
您可以添加测试的详细描述,以便根据需要为报告阅读器提供尽可能多的上下文。 这可以通过多种方式完成:您可以添加一个@allure.description 装饰器来提供一个描述字符串,或者您可以使用@allure.description_html 来提供一些要在测试用例的“描述”部分中呈现的 HTML。 或者,描述将简单地从测试方法的文档字符串中提取。
import allure

@allure.description_html(""" <h1>Test with some complicated html description</h1> <table style="width:100%"> <tr> <th>Firstname</th> <th>Lastname</th> <th>Age</th> </tr> <tr align="center"> <td>William</td> <td>Smith</td> <td>50</td> </tr> <tr align="center"> <td>Vasya</td> <td>Jackson</td> <td>94</td> </tr> </table> """)
def test_html_description():
    assert True


@allure.description(""" Multiline test description. That comes from the allure.description decorator. Nothing special about it. """)
def test_description_from_decorator():
    assert 42 == int(6 * 7)


def test_unicode_in_docstring_description():
    """Unicode in description. Этот тест проверяет юникод. 你好伙计. """
    assert 42 == int(6 * 7)
说明支持 unicode 字符串:
还可以使用 allure.dynamic.description 从测试主体内动态更新描述。
import allure
@allure.description("""This description will be replaced at the end of the test.""")
def test_dynamic_description():
    assert 42 == int(6 * 7)
    allure.dynamic.description('A final description.')
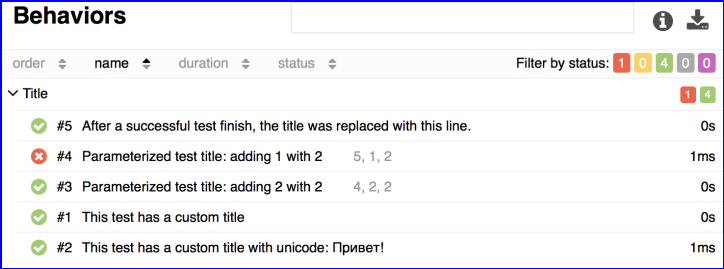
Titles
使用特殊的 @allure.title 装饰器可以使测试标题更具可读性。 标题支持参数占位符并支持动态替换。
import allure
import pytest


@allure.title("This test has a custom title")
def test_with_a_title():
    assert 2 + 2 == 4


@allure.title("This test has a custom title with unicode: Привет!")
def test_with_unicode_title():
    assert 3 + 3 == 6


@allure.title("Parameterized test title: adding {param1} with {param2}")
@pytest.mark.parametrize('param1,param2,expected', [
    (2, 2, 4),
    (1, 2, 5)
])
def test_with_parameterized_title(param1, param2, expected):
    assert param1 + param2 == expected


@allure.title("This title will be replaced in a test body")
def test_with_dynamic_title():
    assert 2 + 2 == 4
    allure.dynamic.title('After a successful test finish, the title was replaced with this line.')
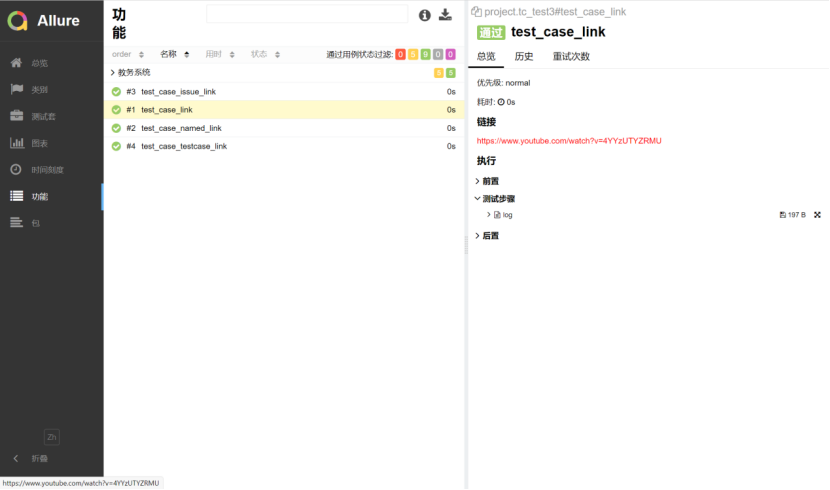
Links
要将报告与错误跟踪器或测试管理系统集成,Allure 具有 @allure.link、@allure.issue 和 @allure.testcase 描述符。
import allure
TEST_CASE_LINK = 'https://github.com/qameta/allure-integrations/issues/8#issuecomment-268313637'
@allure.link('https://www.youtube.com/watch?v=4YYzUTYZRMU')
def test_with_link():
pass
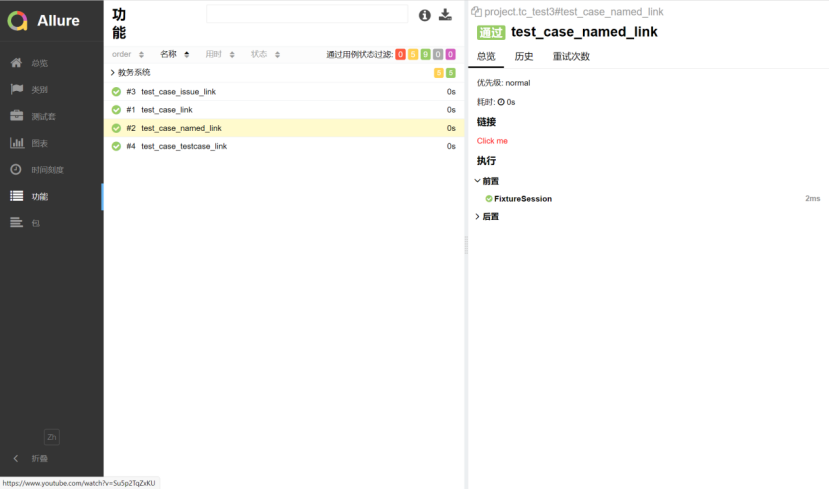
@allure.link('https://www.youtube.com/watch?v=Su5p2TqZxKU', name='Click me')
def test_with_named_link():
pass
@allure.issue('140', 'Pytest-flaky test retries shows like test steps')
def test_with_issue_link():
pass
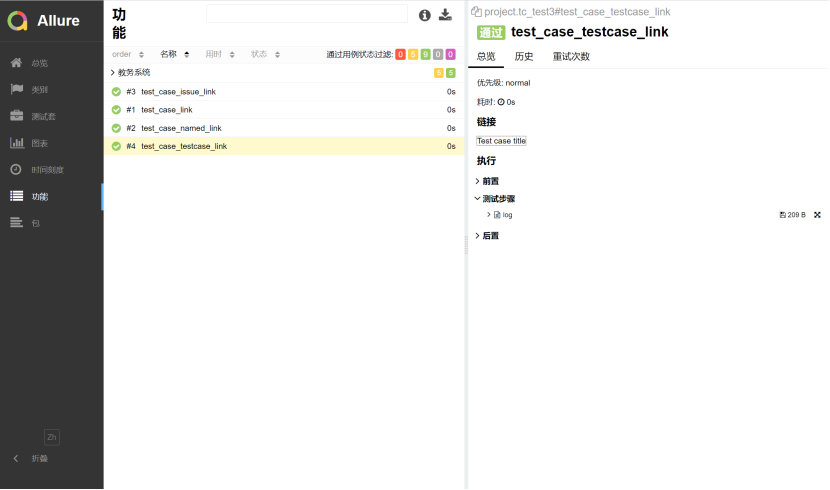
@allure.testcase(TEST_CASE_LINK, 'Test case title')
def test_with_testcase_link():
pass
Link的截图
Link传入参数name的截图
Issue的截图
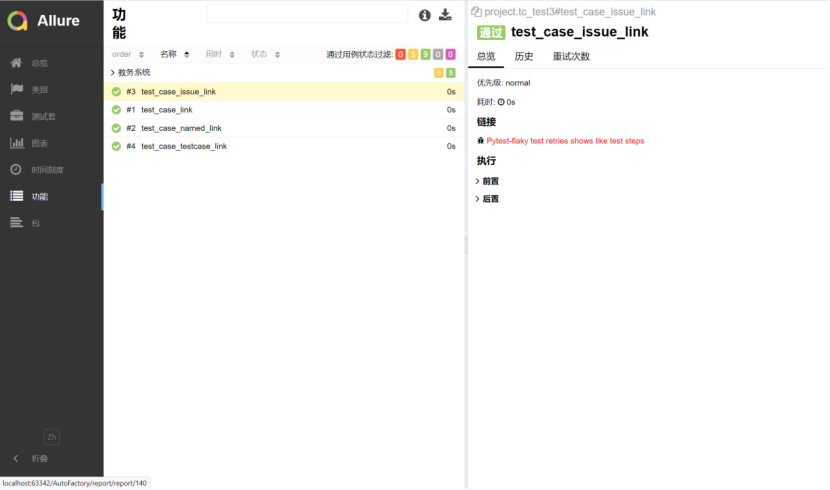
@allure.issue 将提供一个带有小错误图标的链接。 此描述符将测试用例 ID 作为输入参数,以将其与提供的链接模板一起用于问题链接类型。 链接模板在 Pytest 的 –allure-link-pattern 配置选项中指定。 必须使用冒号指定链接模板和类型:@allure.issue 将提供一个带有小错误图标的链接。 此描述符将测试用例 ID 作为输入参数,以将其与提供的链接模板一起用于问题链接类型。 链接模板在 Pytest 的 –allure-link-pattern 配置选项中指定。 必须使用冒号指定链接模板和类型:
$ pytest directory_with_tests/ –alluredir=/tmp/my_allure_report \
–allure-link-pattern=issue:http://www.mytesttracker.com/issue/{}
Testcase的截图
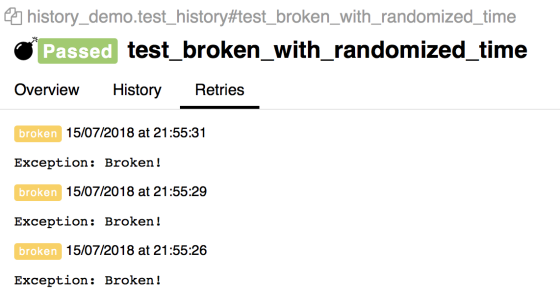
Retries
Allure 允许您汇总有关在单个测试运行期间重新执行的测试的信息以及一段时间内测试执行的历史记录。
对于重试,您可以使用 Pytest 重新运行失败插件。
例如,如果我们有一个经常失败的非常不可靠的 step 方法,在 Pytest 启动选项中指定 –reruns=5 后,我们将看到在 Retries 选项卡上显示运行此测试的所有不成功尝试。
import allure
import random
import time


@allure.step
def passing_step():
    pass


@allure.step
def flaky_broken_step():
    if random.randint(1, 5) != 1:
        raise Exception('Broken!')


def test_broken_with_randomized_time():
    passing_step()
    time.sleep(random.randint(1, 3))
    flaky_broken_step()
Tags
有时,您希望灵活处理要执行的测试。 Pytest 允许使用标记装饰器 @pytest.mark 。
Allure 允许使用 3 种标记装饰器以类似的方式标记您的测试,这些标记装饰器允许构建报告的表示形式:
BDD-style 标签表示Epics, Features and Stories
有两个装饰器:@allure.feature 和@allure.story,用于根据特定于您的项目的功能/故事细分来标记您的测试(有关背景,请参阅维基百科上的 BDD 文章)。 要标记某些功能或故事属于史诗,请使用以 epic_ 前缀开头的名称。
@allure.severity("normao")
@allure.feature("教务系统")
@allure.story("课程管理")
@allure.title("删除课程")
def test_case_TMPUpdateLessons001():
    GLB_LOG.INF("----------------------test_case_TMPUpdateLessons001------------------------------")
    """ 步骤1:登录 结果1:登录成功 """
您可以使用以下命令行选项指定不同的测试集来执行传递逗号分隔值列表:
–allure-epics
–allure-features
–allure-stories
例如:
$ pytest tests.py –allure-stories story_1,story_2
collected 5 items
tests.py …
[100%]============================== 3 passed in 0.01 seconds ==============================
Severity 标签
要按严重性级别标记您的测试,您可以使用 @allure.severity 装饰器。 它需要一个 allure.severity_level 枚举值作为参数。
-
blocker 阻塞缺陷(功能未实现,无法下一步)
-
critical 严重缺陷(功能点缺失)
-
normal 一般缺陷(边界情况,格式错误)
-
minor 次要缺陷(界面错误与ui需求不符)
-
trivial 轻微缺陷(必须项无提示,或者提示不规范)
import allure


def test_with_no_severity_label():
    pass


@allure.severity(allure.severity_level.TRIVIAL)
def test_with_trivial_severity():
    pass


@allure.severity(allure.severity_level.NORMAL)
def test_with_normal_severity():
    pass


@allure.severity(allure.severity_level.NORMAL)
class TestClassWithNormalSeverity(object):

    def test_inside_the_normal_severity_test_class(self):
        pass

    @allure.severity(allure.severity_level.CRITICAL)
    def test_inside_the_normal_severity_test_class_with_overriding_critical_severity(self):
        pass
严重性装饰器可以应用于函数、方法或整个类。
通过将 –allure-severities 命令行选项与以逗号分隔的严重性级别列表一起使用,只会运行具有相应严重性的测试。
$ pytest tests.py –allure-severities normal,critical
collected 5 items
bdd_annotations_demo/test_severity_labels.py …
[100%]================================ 3 passed in 0.01 seconds ============================
3.6 allure-behave
Allure 与作为外部格式化程序的行为集成。
3.6.1安装
$ pip install allure-behave
3.6.2使用
您可以直接在命令行中指定格式化程序:
$ behave -f allure_behave.formatter:AllureFormatter -o
%allure_result_folder% ./features
3.6.3 Features
Severity:
与严重性名称(如严重、琐碎等)匹配的标签将被解释为功能或场景严重性。 如果未提供,场景将继承功能严重性,或者在其他情况下覆盖它。 如果存在多个严重性定义标签,则仅使用最后一个。
Steps and Scenarious status:
具有断言异常的步骤将被标记为失败。 测试执行期间抛出的其他异常将导致其状态中断。 场景状态将由第一个不成功的步骤状态决定。 当所有步骤都通过时,则认为整个场景都通过了。
Step Data:
步骤数据文本或表格数据在报告中表示为步骤附件。
发布者:全栈程序员-用户IM,转载请注明出处:https://javaforall.cn/164431.html原文链接:https://javaforall.cn
【正版授权,激活自己账号】: Jetbrains全家桶Ide使用,1年售后保障,每天仅需1毛
【官方授权 正版激活】: 官方授权 正版激活 支持Jetbrains家族下所有IDE 使用个人JB账号...
