大家好,又见面了,我是你们的朋友全栈君。
网上安装tensorflow-gpu=2.2.0什么的一大推,而且最后还报错,一般问题出现在:
一、安装下载慢
二、cuda和cudnn版本不对
我最后实验了,很好解决上面的问题。
2021年1月26日更新,python版本最好是3.7,3.8版本安装有可能有问题,大概是conda没有完全匹配好。
2021年8月10号更新,上面的问题官方解决了,首先使用conda命令安装tensorflow-gpu=2.2.0,注意(需要已经换成清华源了)
清华源命令:
conda config --add channels https://mirrors.tuna.tsinghua.edu.cn/anaconda/pkgs/main/
conda config --add channels https://mirrors.tuna.tsinghua.edu.cn/anaconda/pkgs/free/
conda config --add channels https://mirrors.tuna.tsinghua.edu.cn/anaconda/pkgs/r/
conda config --add channels https://mirrors.tuna.tsinghua.edu.cn/anaconda/pkgs/pro/
conda config --add channels https://mirrors.tuna.tsinghua.edu.cn/anaconda/pkgs/msys2/
conda config --set show_channel_urls yes
安装命令:
conda install tensorflow-gpu==2.2.0
如果上面方式不行,就按下面方法来。
一、安装tensorflow-gpu=2.2.0使用清华源安装,代码如下:
pip install tensorflow-gpu==2.2.0 -i https://pypi.tuna.tsinghua.edu.cn/simple
这样下载速度飞起!
二、什么去官网下载cuda版本配置路径,感觉都不靠谱,我实验了,一个命令搞定,我的是1080Ti显卡,先通过GeForce Experience把驱动更新到最新,我的cuda信息如下:


我cuda的是11.0,这不重要,一般需要cuda是10.1或者以上就可以了。
然后一句代码安装:
conda install cudatoolkit=10.1 cudnn=7.6.5
注意:不要改上面的版本,不然安装成功了,使用时报错,这里就是个坑,我试过很多,这两个版本才是对应的,不管tensorflow-gpu=2.0/2.1/2.2,都适用
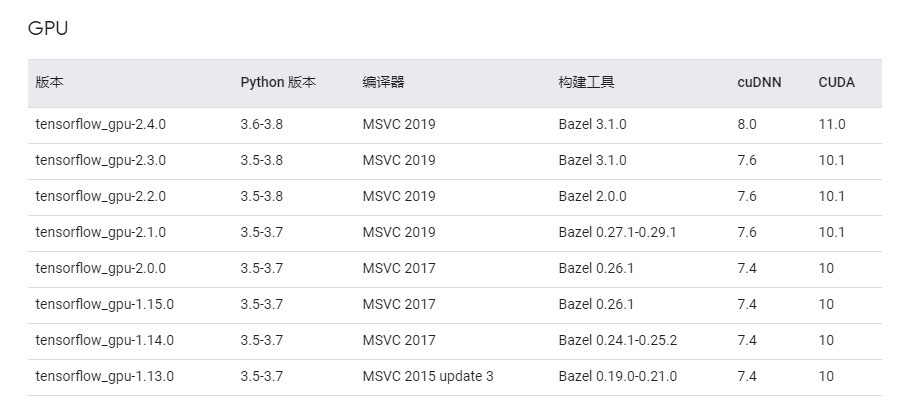
tensorflow-gpu对应的cuda版本网址:https://tensorflow.google.cn/install/source_windows
2021年5月18日更新,安装tensorflow-gpu=2.4.0,使用python版本为3.7或者3.8,cudatoolkit=11.0,cudnn=8.0
安装好后测试下,测试代码;
import tensorflow as tf
import timeit
import os

os.environ['TF_CPP_MIN_LOG_LEVEL'] = '2'  # 代码用于忽略级别 2 及以下的消息(级别 1 是提示,级别 2 是警告,级别 3 是错误)。

with tf.device('/cpu:0'):
    cpu_a = tf.random.normal([10000, 1000])
    cpu_b = tf.random.normal([1000, 2000])
    print(cpu_a.device, cpu_b.device)

with tf.device('/gpu:0'):
    gpu_a = tf.random.normal([10000, 1000])
    gpu_b = tf.random.normal([1000, 2000])
    print(gpu_a.device, gpu_b.device)


def cpu_run():
    with tf.device('/cpu:0'):
        c = tf.matmul(cpu_a, cpu_b)
    return c


def gpu_run():
    with tf.device('/gpu:0'):
        c = tf.matmul(gpu_a, gpu_b)
    return c


# warm up
cpu_time = timeit.timeit(cpu_run, number=10)
gpu_time = timeit.timeit(gpu_run, number=10)
print('warmup:', cpu_time, gpu_time)

cpu_time = timeit.timeit(cpu_run, number=10)
gpu_time = timeit.timeit(gpu_run, number=10)
print('run time:', cpu_time, gpu_time)

print('GPU', tf.test.is_gpu_available())
结果为:
warmup: 1.1624844 1.8189751
run time: 1.1631149999999995 0.0005907000000000551
GPU True
这样就安装成功了!
另外推荐个自动补全插件,很好用,TabNine,安装方法链接如下:
https://www.tabnine.com/
2020年10月11号更新
最近可能出现的版本问题报错,例如:
AttributeError: module ‘tensorflow’ has no attribute ‘compat’
解决方案:https://blog.csdn.net/weixin_45092662/article/details/106969426
有用请点个赞!!
本站所有文章均为原创,欢迎转载,请注明文章出处:https://blog.csdn.net/weixin_45092662。百度和各类采集站皆不可信,搜索请谨慎鉴别。技术类文章一般都有时效性,本人习惯不定期对自己的博文进行修正和更新,因此请访问出处以查看本文的最新版本。
发布者:全栈程序员-用户IM,转载请注明出处:https://javaforall.cn/147889.html原文链接:https://javaforall.cn
【正版授权,激活自己账号】: Jetbrains全家桶Ide使用,1年售后保障,每天仅需1毛
【官方授权 正版激活】: 官方授权 正版激活 支持Jetbrains家族下所有IDE 使用个人JB账号...
