大家好,又见面了,我是你们的朋友全栈君。
一. SpringApplication.run(Xxx.class, args) 源码分析
@SpringBootApplication
public class IndexApplication {
    public static void main(String[] args) {
        SpringApplication.run(IndexApplication.class, args);
    }
}
进入SpringApplication的run方法:


调用重载的方法run:

可以看出,核心分为两步,第一步new SpringApplication(),第二步调用run方法,所以启动类我们可以这样写:
@SpringBootApplication
public class IndexApplication {
    public static void main(String[] args) {
        SpringApplication application = new SpringApplication(IndexApplication.class);
        application.run(args);
    }
}
启动项目,可以发现能够正常启动,下面我们重点分析这两步:
1. new SpringApplication究竟做了什么?
核心分为3步:
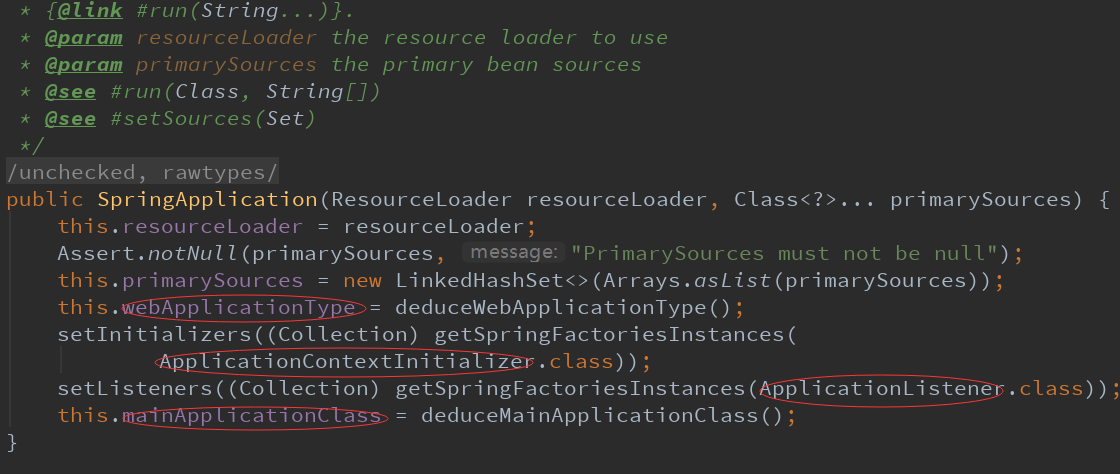
① this.webApplicationType
进入deduceWebApplicationType()方法,可以看出,该方法目的是拿到当前的webApplicationType。
private static final String REACTIVE_WEB_ENVIRONMENT_CLASS = "org.springframework."
    + "web.reactive.DispatcherHandler";
private static final String MVC_WEB_ENVIRONMENT_CLASS = "org.springframework."
    + "web.servlet.DispatcherServlet";
private static final String[] WEB_ENVIRONMENT_CLASSES = { "javax.servlet.Servlet",
    "org.springframework.web.context.ConfigurableWebApplicationContext" };
public enum WebApplicationType {
NONE,
SERVLET,
REACTIVE
}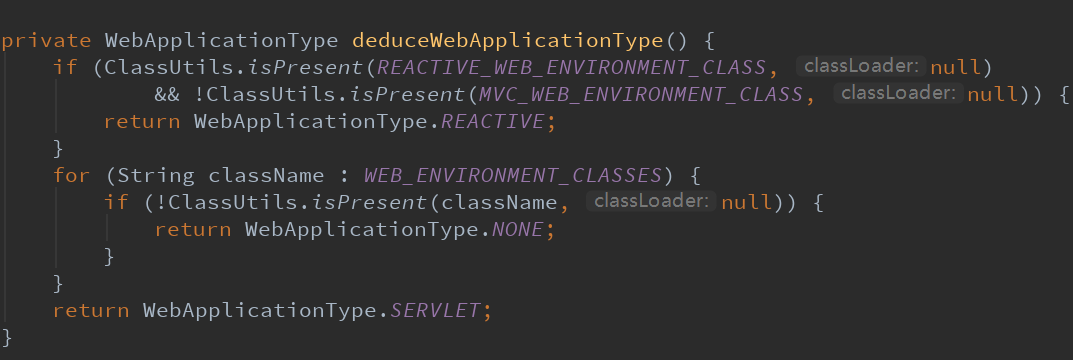
如果是当前所有jar包中,存在REACTIVE_WEB_ENVIRONMENT_CLASS,也就是DispatcherHandler,并且没有DispatcherServlet类,则返回REACTIVE(响应式编程);由于我们项目找不到该类 ,并且有DispatcherServlet类,所以不走第一个if; 下面进入for循环,代表当前环境中没有ConfigurableWebApplicationContext,则返回NONE,由于我们项目该类,所以跳出循环;最后返回SERVLET类型。
关于枚举WebApplicationType 有如下解读:
| NONE | 应用程序不应作为Web应用程序运行,也不应启动嵌入式Web服务器 |
| REACTIVE | 应用程序应作为响应式Web应用程序运行,并应启动嵌入响应式Web服务器 |
| SERVLET | 应用程序应作为基于servlet的Web应用程序运行,并应启动嵌入式Servlet Web服务器 |
② setInitializers((Collection) getSpringFactoriesInstances( ApplicationContextInitializer.class) );
setListeners((Collection) getSpringFactoriesInstances(ApplicationListener.class));
获取到当前需要加载的ApplicationContextInitializer.class和ApplicationListener.class。
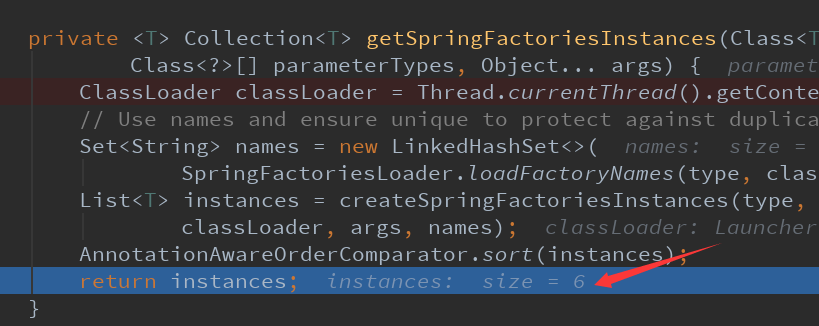
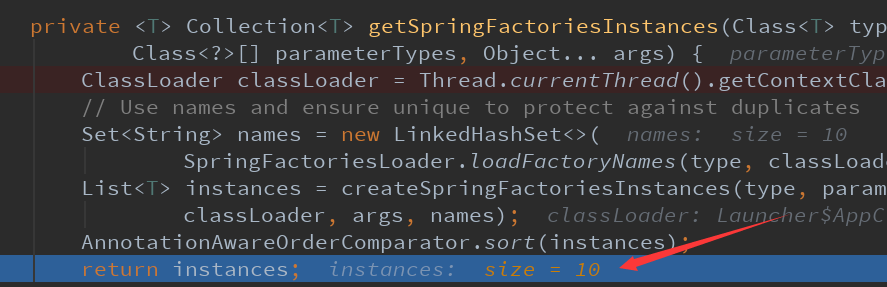
getSpringFactoriesInstances()作用是获取到当前需要加载的class文件
setInitializers,setListeners作用是把getSpringFactoriesInstances()获取的配置类放入List集合中去。
即会去spring-boot的jar包和spring-boot-autoconfigure的jar包下的spring.factories去查找上面两个标红的class对应的value。
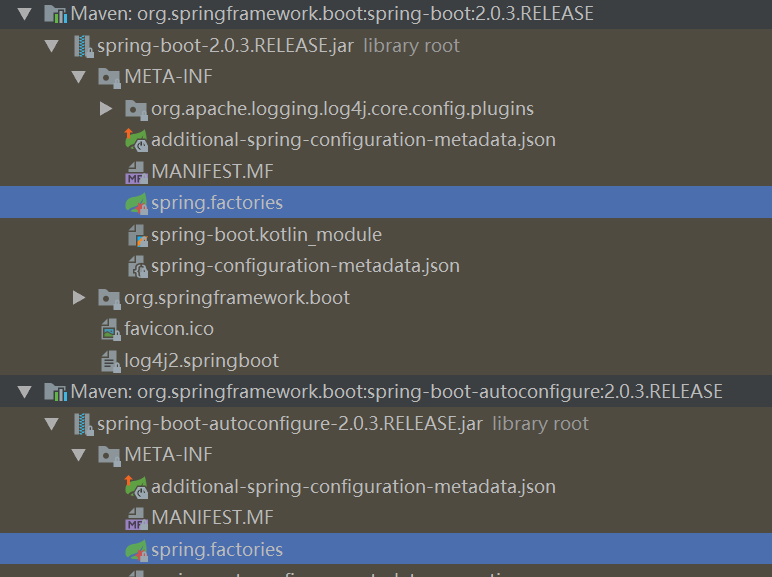
可以看到,ApplicationContextInitializer对应的value有:(下图依次为spring-boot,spring-boot-autoconfigure)


可以发现,一共获取到6个value,并且debug调试也可以得到总数:
ApplicationListener对应的value有,注意” \ “表示换行:(下图依次为spring-boot,spring-boot-autoconfigure)
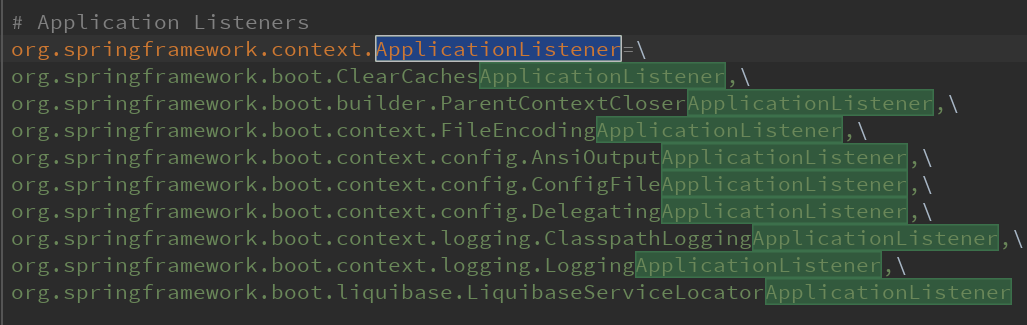

可以发现,一共获取到10个value,并且debug调试也可以得到总数:
获取到上述ApplicationContextInitializer和ApplicationListener对应的配置类之后,会分别调用setInitializers()和setListeners()
会分别放入相应的List集合中。
private List<ApplicationContextInitializer<?>> initializers;
public void setInitializers(Collection<? extends ApplicationContextInitializer<?>> initializers) {
    this.initializers = new ArrayList<>();
    this.initializers.addAll(initializers);
}
private List<ApplicationListener<?>> listeners;
public void setListeners(Collection<? extends ApplicationListener<?>> listeners) {
this.listeners = new ArrayList<>();
this.listeners.addAll(listeners);
}③ this.mainApplicationClass = deduceMainApplicationClass(); 获取到当前启动类,即IndexApplication。
至此,new SpringApplication就分析完毕。
2. run (该方法为SpringBoot的核心)
首先贴出run方法的全部代码:
public ConfigurableApplicationContext run(String... args) {
    StopWatch stopWatch = new StopWatch();
    stopWatch.start();
    ConfigurableApplicationContext context = null;
    Collection<SpringBootExceptionReporter> exceptionReporters = new ArrayList<>();
    configureHeadlessProperty();
    SpringApplicationRunListeners listeners = getRunListeners(args);
    listeners.starting();
    try {
        ApplicationArguments applicationArguments = new DefaultApplicationArguments(args);
        ConfigurableEnvironment environment = prepareEnvironment(listeners,applicationArguments);
        configureIgnoreBeanInfo(environment);
        Banner printedBanner = printBanner(environment);
        context = createApplicationContext();
        exceptionReporters = getSpringFactoriesInstances(
            SpringBootExceptionReporter.class,
            new Class[] { ConfigurableApplicationContext.class }, context);
        prepareContext(context, environment, listeners, applicationArguments,printedBanner);
        refreshContext(context);
        afterRefresh(context, applicationArguments);
        stopWatch.stop();
        if (this.logStartupInfo) {
            new StartupInfoLogger(this.mainApplicationClass).logStarted(getApplicationLog(), stopWatch);
        }
        listeners.started(context);
        callRunners(context, applicationArguments);
    }
    catch (Throwable ex) {
        handleRunFailure(context, ex, exceptionReporters, listeners);
        throw new IllegalStateException(ex);
    }

    try {
        listeners.running(context);
    }
    catch (Throwable ex) {
        handleRunFailure(context, ex, exceptionReporters, null);
        throw new IllegalStateException(ex);
    }
    return context;
}
流程分析:
① StopWatch stopWatch = new StopWatch(); 记录我们SpringBoot项目启动时间
② Collection<SpringBootExceptionReporter> exceptionReporters = new ArrayList<>();
异常收集器,SpringBootExceptionReporter是一个回调接口,用于支持对SpringApplication启动错误的自定义报告。
③ SpringApplicationRunListeners listeners = getRunListeners(args); 读取我们的META-INF/spring.factories


SpringApplicationRunListeners 类型存入到集合listeners 中,默认只有一个value,不过我们可以自定义,如:
/**
 * 读取配置文件
 */
public class MySpringApplicationRunListener implements SpringApplicationRunListener, Ordered {
    private SpringApplication application;
    private String[] args;
    @Override
    public void starting() {
        System.out.println(">>>>starting<<<<");
    }
    public MySpringApplicationRunListener(SpringApplication application, String[] args) {
        this.application = application;
        this.args = args;
    }
    @Override
    public void environmentPrepared(ConfigurableEnvironment environment) {
        // 配置文件读取到程序中 思路需要自己将本地文件读取到程序中,然后再放入到SpringBoot容器
        Properties properties = new Properties();
        try {
            //1.读取我们的my.properties文件
            properties.load(this.getClass().getClassLoader().
                    getResourceAsStream("my.properties"));
            //2.读取名称名称为my
            PropertySource propertySource = new
                    PropertiesPropertySource("my", properties);
            //3.将资源添加到SprigBoot项目中
            MutablePropertySources propertySources = environment.getPropertySources();
            //4.通过该api接口可以将配置文件读取 到SpringBoot项目中
            propertySources.addLast(propertySource);
        } catch (IOException e) {
            e.printStackTrace();
        }
    }
    @Override
    public void contextPrepared(ConfigurableApplicationContext context) {
    }
    @Override
    public void contextLoaded(ConfigurableApplicationContext context) {
    }
    @Override
    public void started(ConfigurableApplicationContext context) {
    }
    @Override
    public void running(ConfigurableApplicationContext context) {
    }
    @Override
    public void failed(ConfigurableApplicationContext context, Throwable exception) {
    }
    @Override
    public int getOrder() {
        return -1;//优先级,值越小优先级越高,application.yml/properties默认为0
    }
}

上述即为自定义配置文件的底层写法,加上了该文件后,则listeners的size变为2,这里仅作个理解,下面讲解默认无该类。
④ listeners.starting();

在此方法中,使用了上文取到的listeners,循环遍历(其实只有一个listener,就是EventPublishingRunListener),调用监听starting方法。
⑤ ConfigurableEnvironment environment = prepareEnvironment(listeners, applicationArguments);
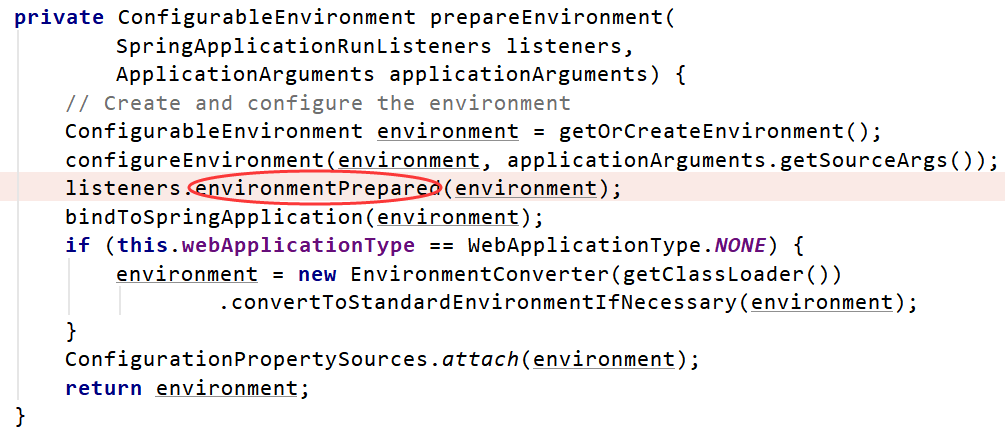
可以看到,和上面③中我们自定义读取配置文件一致,循环遍历调用environmentPrepared方法,读取配置文件,底层然后通过addLast放入SpringBoot容器。(该方法扩展很多,可以自己重点去研究)
⑥ Banner printedBanner = printBanner(environment);
打印我们springboot启动的的banner伪图片,没有业务作用。
⑦ context = createApplicationContext();
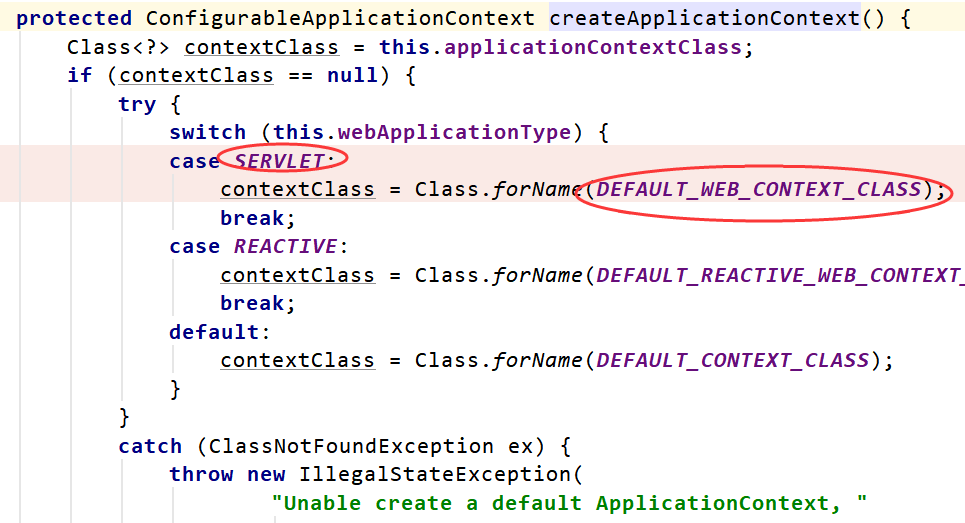
public static final String DEFAULT_WEB_CONTEXT_CLASS = "org.springframework.boot."
        + "web.servlet.context.AnnotationConfigServletWebServerApplicationContext";
会判断我们的webApplicationType(1-①中有说明),因为当前环境为Web环境,则类型为SERVLET类型,所以会返回上图红框中类型的context上下文,即这一步作用是:创建SpringBoot上下文AnnotationConfigServletWebServerApplicationContext对象。
⑧ refreshContext(context); 刷新我们上下文
这个方法其实是调用了AbstractApplicationContext的refresh()方法,但是有一点尤其注意,这也是springboot项目的重中之重,就是tomcat容器的启动也是在这里操作的,refresh()方法中的onfresh()方法被EmbeddedApplicationContext重写了,在此做了tomcat的启动加载,并且SpringMVC也是在这一步加载的。
⑨ afterRefresh(context, applicationArguments);
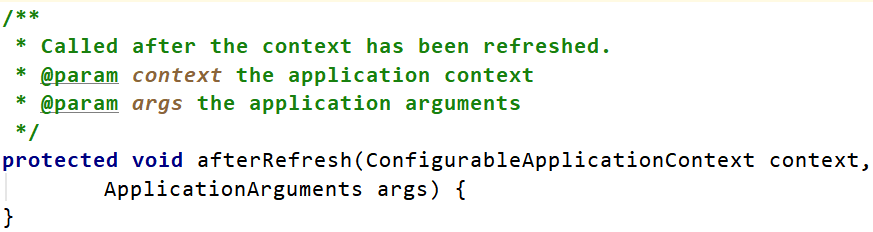
定义一个空的模版给其他子类实现重写。
⑩ listeners.started(context); 使用广播和回调机制通知监听器SpringBoot容器已经启动成功
spring容器已经刷新过且应用已经启动,但是CommandLineRunners和ApplicationRunners还未调用,直接通过spring容器自己发送(因为ApplicationListener已经加入spring容器)
⑪ listeners.running(context);
此步骤已经调用了CommandLineRunners(作用:在使用SpringBoot构建项目时,我们通常有一些预先数据的加载,实现该接口即可),该步骤表示SpringBoot正式启动完成。
⑫ return context; 最后返回当前上下文
拓展:CommandLineRunner和ApplicationRunner
在开发中可能会有这样的情景。需要在容器启动的时候执行一些内容,比如Spring启动加载且加载一次,比如初始化一些用户信息等。SpringBoot给我们提供了两个接口来帮助我们实现这种需求。这两个接口分别为CommandLineRunner和ApplicationRunner。他们的执行时机为容器启动完成的时候。
这两个接口中有一个run方法,我们只需要实现这个方法即可。这两个接口的不同之处在于:ApplicationRunner中run方法的参数为ApplicationArguments,而CommandLineRunner接口中run方法的参数为String数组。目前我在项目中用的是ApplicationRunner。是这么实现的:
@Component
public class LzPartnerInitialConfig implements ApplicationRunner {
    @Override
    public void run(ApplicationArguments args) throws Exception {
       // todo
    }
}
二. @SpringBootApplication注解源码分析
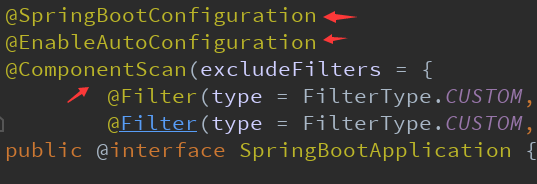
进入@SpringBootApplication注解,可以看到该注解又包装了3大注解:
@SpringBootConfiguration,@EnableAutoConfiguration,@ComponentScan
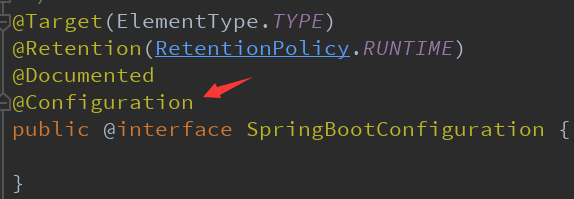
@SpringBootConfiguration,其实就是封装了@Configuration注解,目的是为了语义化
@Configuration注解用于定义配置类,可替换xml配置文件,结合AnnotationConfigApplicationContext可以通过注解方式启动Spring并初始化SpringIOC容器,该注解不在本文重点讨论范围之内。
@ComponentScan,即扫包,该注解主要就是定义扫描的路径从中找出标识了需要装配的类自动装配到spring的bean容器中。
上面两个注解通俗易通,下面我们重点分析@EnableAutoConfiguration注解:
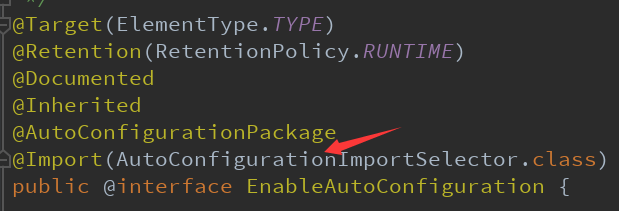
@EnableAutoConfiguration,说白了就是加载我们第三方配置类。
可以看到,该注解又引入了AutoConfigurationImportSelector类
那么我们进入AutoConfigurationImportSelector类,重点看到selectImports()方法:
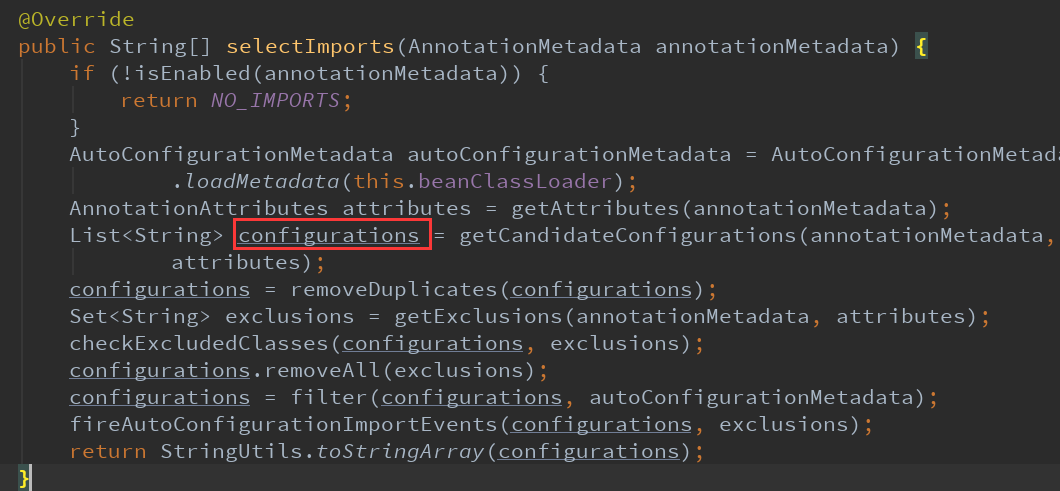
在标红处打断点,可以看到会注入112个配置类到IOC容器中:

那么问题来了,这些配置类是从何而来?
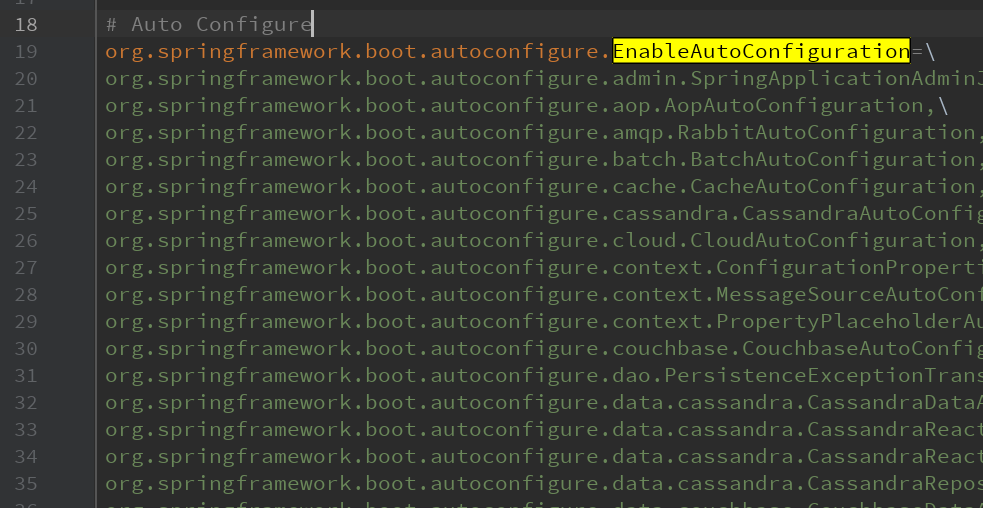
答案:上上图红框代码即代表读取spring-boot-autoconfigure/META-INF/spring.factories,找到EnableAutoConfiguration(即SpringBoot核心注解之一)对应的100多个配置类(这些全是配置类即都用@Configuration修饰),然后注册到IOC容器中,注意,并不是全部注入到IOC容器中,只是当前项目已经引入的maven/jar才会注册到IOC容器,如:当前项目并没有引入solr依赖,则solr并不会注册。
通过上面分析,可以得出结论,通过@EnableAutoConfiguration,Spring在启动的时候,会把上面100多个配置类加载到SpringIOC容器中去。
SpringBoot最终是如何创建tomcat和springmvc的呢?靠的就是@EnableAutoConfiguration加载的以下两个配置类:
ServletWebServerFactoryAutoConfiguration,DispatcherServletAutoConfiguration
org.springframework.boot.autoconfigure.web.servlet.DispatcherServletAutoConfiguration,\
org.springframework.boot.autoconfigure.web.servlet.ServletWebServerFactoryAutoConfiguration,\
【分析 ServletWebServerFactoryAutoConfiguration】
进入该配置类,贴出核心代码:
@Configuration
@AutoConfigureOrder(Ordered.HIGHEST_PRECEDENCE)
@ConditionalOnClass(ServletRequest.class)
@ConditionalOnWebApplication(type = Type.SERVLET)
@EnableConfigurationProperties(ServerProperties.class)
@Import({ ServletWebServerFactoryAutoConfiguration.BeanPostProcessorsRegistrar.class,
        ServletWebServerFactoryConfiguration.EmbeddedTomcat.class,
        ServletWebServerFactoryConfiguration.EmbeddedJetty.class,
        ServletWebServerFactoryConfiguration.EmbeddedUndertow.class })
public class ServletWebServerFactoryAutoConfiguration {
    @Bean
    public ServletWebServerFactoryCustomizer servletWebServerFactoryCustomizer(
        ServerProperties serverProperties) {
        return new ServletWebServerFactoryCustomizer(serverProperties);
    }
    @Bean
    @ConditionalOnClass(name = "org.apache.catalina.startup.Tomcat")
    public TomcatServletWebServerFactoryCustomizer tomcatServletWebServerFactoryCustomizer(
    ServerProperties serverProperties) {
    return new TomcatServletWebServerFactoryCustomizer(serverProperties);
    }
}进入return new TomcatServletWebServerFactoryCustomizer(serverProperties),
public TomcatServletWebServerFactoryCustomizer(ServerProperties serverProperties) {
this.serverProperties = serverProperties;
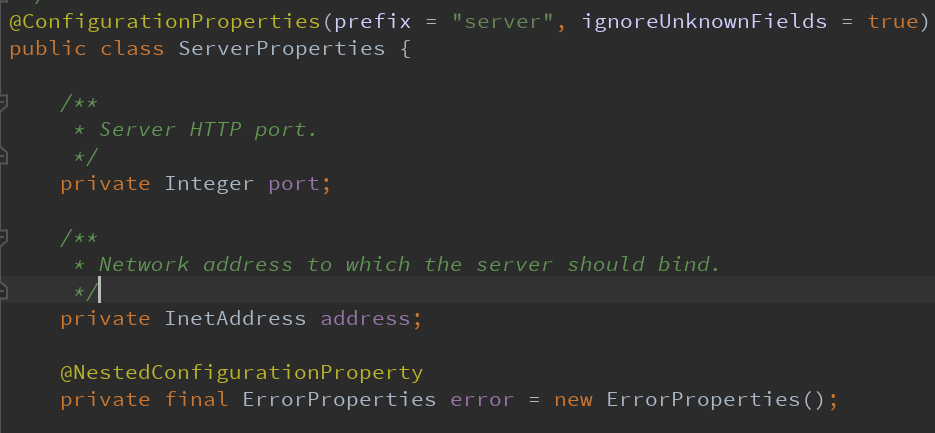
}可以看到该类封装了我们平时在yml的配置信息,最常用的如server.port,即我们可以在application.yml修改SpringBoot内嵌tomcat的端口号等信息。
下面我们继续分析,在ServletWebServerFactoryAutoConfiguration类中,会引入三个容器注入到IOC容器中,SpringBoot默认的WEB容器为Tomcat,所以我们重点分析Tomcat,进入EmbeddedTomcat类(Embedded英文意思为嵌入式的)

进入EmbeddedTomcat类后,可以看到该类定义一个bean,往SpringIOC容器注入了名为TomcatServletWebServerFactory的类

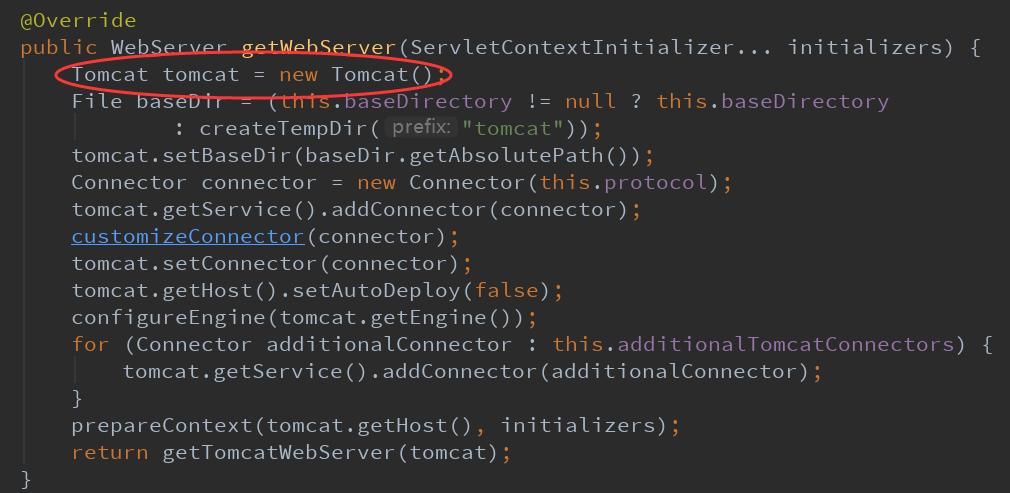
进入TomcatServletWebServerFactory类,可以发现Spring底层会执行:Tomcat tomcat = new Tomcat(),SpringBoot嵌入的Tomcat就是在这里创建的。
【分析 DispatcherServletAutoConfiguration】
进入该配置类,贴出核心代码:
@AutoConfigureOrder(Ordered.HIGHEST_PRECEDENCE)
@Configuration
@ConditionalOnWebApplication(type = Type.SERVLET)
@ConditionalOnClass(DispatcherServlet.class)
@AutoConfigureAfter(ServletWebServerFactoryAutoConfiguration.class)
@EnableConfigurationProperties(ServerProperties.class)
public class DispatcherServletAutoConfiguration {

    public static final String DEFAULT_DISPATCHER_SERVLET_BEAN_NAME = "dispatcherServlet";

    @Bean(name = DEFAULT_DISPATCHER_SERVLET_BEAN_NAME)
    public DispatcherServlet dispatcherServlet() {
        DispatcherServlet dispatcherServlet = new DispatcherServlet();
        dispatcherServlet.setDispatchOptionsRequest(
            this.webMvcProperties.isDispatchOptionsRequest());
        dispatcherServlet.setDispatchTraceRequest(
            this.webMvcProperties.isDispatchTraceRequest());
        dispatcherServlet.setThrowExceptionIfNoHandlerFound(
            this.webMvcProperties.isThrowExceptionIfNoHandlerFound());
        return dispatcherServlet;
    }

}
可以看到,@ConditionalOnClass(DispatcherServlet.class) && @Bean 把DispatcherServlet注入到IOC容器中,创建bean(即dispatcherServlet)后完后交给tomcat运行。其中@ConditionalOnClass注解是Springboot实现自动配置的重要支撑之一,其用途是判断当前classpath下是否存在指定类,若是则将当前的配置装载入spring容器。
通过Debug断点调试,可以得出结论,SpringBoot启动的时候,会先创建Tomcat,然后创建dispatcherServlet去加载SpringMVC

至此,SpringBoot核心原理及源码就分析完毕了 !~
发布者:全栈程序员-用户IM,转载请注明出处:https://javaforall.cn/145010.html原文链接:https://javaforall.cn
【正版授权,激活自己账号】: Jetbrains全家桶Ide使用,1年售后保障,每天仅需1毛
【官方授权 正版激活】: 官方授权 正版激活 支持Jetbrains家族下所有IDE 使用个人JB账号...
