大家好,又见面了,我是你们的朋友全栈君。
在windows10机器上安装部署人脸识别/安全帽识别<项目笔记
CPU版本安装
1.Anaconda的安装配置
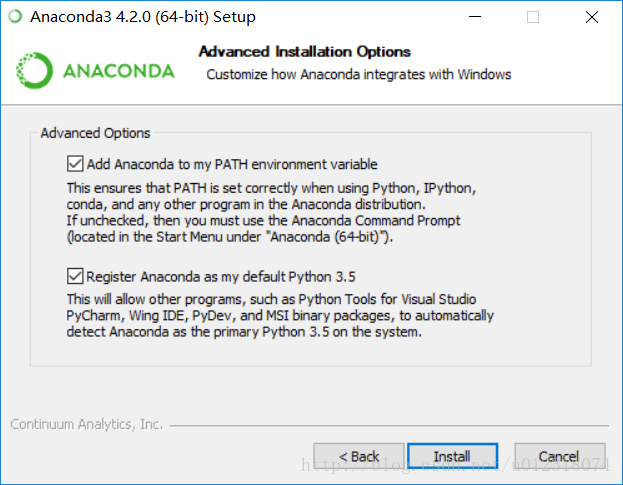
从官网https://www.anaconda.com/download/(但是官网上已经难找到python3.6版本了我这里有)下载Anaconda的安装程序,在该页面选择你电脑所对应的系统(Windows、macOS or Linux)以及操作系统位数(64位 or 32位)。至于是Python的版本是3.6还是2.7,这里推荐你使用Python 3.6 version,因为Python2终究会停止维护。以Windows及64位系统为例,下载Python 3.6 version的选择界面如图1所示。


这里有几点需要注意:
- 将Anaconda添加到环境变量,为了避免之后的不必要的麻烦,建议添加。具体如下图:
- 安装完了会问你需不需要安装C++的一个环境!一定要选,能避免好多好多C++依赖的有关报错,这里找不到截图。小主也懒得重新安装一遍,所以就只能描述了 = = 、
- Anaconda安装完成之后,相应版本的python也就直接安装完成了,所以不用再装一遍。
2.Pycharm的安装配置
PyCharm是一种Python IDE,带有一整套可以帮助用户在使用Python语言开发时提高其效率的工具,比如调试、语法高亮、Project管理、代码跳转、智能提示、自动完成、单元测试、版本控制。
- 在服务器上安装PyCharm其实也算是多此一举,但是主要也是有个小插曲导致下载了PyCharm:
用cmd进入项目之后执行程序:python xxx.py之后会报ImportError: No module named 'xxx',这个主要是因为没有将工程的目录添加到环境变量。
具体解决方法如下:
打开环境变量,在系统变量里面添加%PYTHONPATH%,值为:&你的工程的根目录!这样的话就可以解决命令行运行py文件,报错的问题了。 - 下载PyCharm:
从官网https://www.jetbrains.com/pycharm/download/下载PyCharm安装程序,在该页面选择你电脑所对应的系统(Windows、macOS or Linux)。由于专业版(Professional)需要激活,并且社区版(Community)已经包含了我们所需要的基本功能,所以这里我们选择社区版(Community)下载(当然,网上有Professional版本的激活码,但不是所有的都能用,如果想使用Professional版本可以自行上网查询破解方法)。以Windows为例,下载界面如图3所示。
- 具体的安装步骤就不说了:
这里只需要注意选择多少位的程序就行,建议最底下的,Download and install JRE x86 by JetBrains 勾上,就是为了莫名其妙的错误再来重新配置这个。


3.pip 命令安装相关依赖
pip install keras
pip install tensorflow
pip install ...
这些都没有出现错误,主要只说两个比较坑的依赖包(也不能说坑,只是在我这个环境下报错了)
-
mxnet
报错原因:部署的环境没有cuda
解决方法:pip install mxnet==1.2.1。安装完之后将代码中的
??=mxnet.gpu()改为??=mxnet.cpu()这里是自己没找到相关代码中的gpu的调用,我的锅。 -
face-recognition
这个就是真的坑了!!!错误的演示:
首先:pip install face-recognition
报错:dlib 包安装失败(反正就这个意思)
接着:pip install dlib
失败:cmake,can't build wheel等
于是:上网搜windows下如何安装dlib
然后:下载cmake,下载boost,下载VS
然后:自己也不知道为什么还没好?正确的演示:
首先:pip install cmake
然后:pip install dlib==19.8.1这版本很关键,直接pip install dlib的话,会下载未编译的版本进行setup就会报各种编译错误,这个版本有编译好的.whl文件,所以自然避免了很多编译环境的Error。
最后:pip install face-recognition==1.0.0
这一步可以直接下载
face-recognition 1.0.0 和 face-recognition-models 0.3.0之后在代码中:
import face-recognition就不会再报错了。
注意!!!
本地视频流地址为:
‘rtsp://usr_name:xxxx#@172.17.58.252’
“rtsp://admin:admin@192.168.2.64:554//Streaming/Channels/1”
这样的本地视频流地址的获取,总是在现场会崩掉。
搜了解决方法之后,本地视频流地址改为:
‘rtsp://usr_name:xxxx#@172.17.58.252/ch1-s1?tcp’
‘rtsp://usr_name:xxxx#@172.17.58.252/ch1/1’
这样的话,还是会崩掉,只是提供了一种思路
GPU版本安装
提前准备(windows10)
python3.6版本的anaconda
cuda8.0,cudnn6.0
1. 下载安装Cuda8.0,一定要是8.0版本!下载地址,并按照下图选择下载本地安装包。
如果安装错了记得要把之前的删除卸载干净。

2. 安装完成后配置系统环境变量Path
TensorFlow 是一个编程系统, 使用图来表示计算任务,图必须在Session(会话)里被启动. Session将图的op(操作)分发到诸如CPU或GPU之类的设备上运行。所以,这个时候你运行python然后import tensorflow as tf是不会报错的,但是当你要执行tf.Session()的时候可能就有问题了。这个时候将会调用cuda,我在这里遇到的问题是各种lib,dll加载不了。经过一番检查,定位到问题,Cuda安装完成后默认的环境变量配置不对,不能直接访问到bin和lib\x64下的程序包,在path中加上这两个路径即可。
原本安装好之后并不会有以上四个环境变量,有两个需要自己加上。
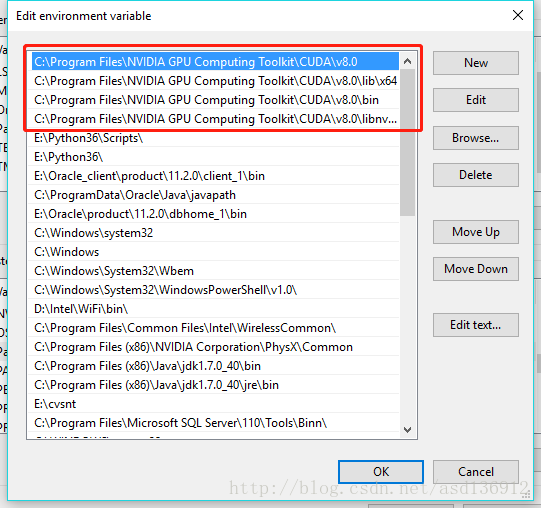
C:\Program Files\NVIDIA GPU Computing Toolkit\CUDA\v8.0
C:\Program Files\NVIDIA GPU Computing Toolkit\CUDA\v8.0\bin
C:\Program Files\NVIDIA GPU Computing Toolkit\CUDA\v8.0\lib\x64
C:\Program Files\NVIDIA GPU Computing Toolkit\CUDA\v8.0\libnvvp
附:配置环境变量教程
最后在cmd里输入 echo %path% 就能查看你的是否添加进环境变量了.
3. 下载Cudnn6.0,下载地址,需要注册并填问卷,下载后解压压缩包,将包内文件夹里面的内容分别拷贝到C:\Program Files\NVIDIA GPU Computing Toolkit\CUDA\v8.0里面的三个文件夹中去。

4. 最后测试和检查一下,代码如下:
import ctypes
import imp
import sys


def main():
    try:
        import tensorflow as tf
        print("TensorFlow successfully installed.")
        if tf.test.is_built_with_cuda():
            print("The installed version of TensorFlow includes GPU support.")
        else:
            print("The installed version of TensorFlow does not include GPU support.")
        sys.exit(0)
    except ImportError:
        print("ERROR: Failed to import the TensorFlow module.")

    candidate_explanation = False

    python_version = sys.version_info.major, sys.version_info.minor
    print("\n- Python version is %d.%d." % python_version)
    if not (python_version == (3, 5) or python_version == (3, 6)):
        candidate_explanation = True
        print("- The official distribution of TensorFlow for Windows requires "
              "Python version 3.5 or 3.6.")

    try:
        _, pathname, _ = imp.find_module("tensorflow")
        print("\n- TensorFlow is installed at: %s" % pathname)
    except ImportError:
        candidate_explanation = False
        print(""" - No module named TensorFlow is installed in this Python environment. You may install it using the command `pip install tensorflow`.""")

    try:
        msvcp140 = ctypes.WinDLL("msvcp140.dll")
    except OSError:
        candidate_explanation = True
        print(""" - Could not load 'msvcp140.dll'. TensorFlow requires that this DLL be installed in a directory that is named in your %PATH% environment variable. You may install this DLL by downloading Microsoft Visual C++ 2015 Redistributable Update 3 from this URL: https://www.microsoft.com/en-us/download/details.aspx?id=53587""")

    try:
        cudart64_80 = ctypes.WinDLL("cudart64_80.dll")
    except OSError:
        candidate_explanation = True
        print(""" - Could not load 'cudart64_80.dll'. The GPU version of TensorFlow requires that this DLL be installed in a directory that is named in your %PATH% environment variable. Download and install CUDA 8.0 from this URL: https://developer.nvidia.com/cuda-toolkit""")

    try:
        nvcuda = ctypes.WinDLL("nvcuda.dll")
    except OSError:
        candidate_explanation = True
        print(""" - Could not load 'nvcuda.dll'. The GPU version of TensorFlow requires that this DLL be installed in a directory that is named in your %PATH% environment variable. Typically it is installed in 'C:\Windows\System32'. If it is not present, ensure that you have a CUDA-capable GPU with the correct driver installed.""")

    cudnn5_found = False
    try:
        cudnn5 = ctypes.WinDLL("cudnn64_5.dll")
        cudnn5_found = True
    except OSError:
        candidate_explanation = True
        print(""" - Could not load 'cudnn64_5.dll'. The GPU version of TensorFlow requires that this DLL be installed in a directory that is named in your %PATH% environment variable. Note that installing cuDNN is a separate step from installing CUDA, and it is often found in a different directory from the CUDA DLLs. You may install the necessary DLL by downloading cuDNN 5.1 from this URL: https://developer.nvidia.com/cudnn""")

    cudnn6_found = False
    try:
        cudnn = ctypes.WinDLL("cudnn64_6.dll")
        cudnn6_found = True
    except OSError:
        candidate_explanation = True

    if not cudnn5_found or not cudnn6_found:
        print()
        if not cudnn5_found and not cudnn6_found:
            print("- Could not find cuDNN.")
        elif not cudnn5_found:
            print("- Could not find cuDNN 5.1.")
        else:
            print("- Could not find cuDNN 6.")
            print(""" The GPU version of TensorFlow requires that the correct cuDNN DLL be installed in a directory that is named in your %PATH% environment variable. Note that installing cuDNN is a separate step from installing CUDA, and it is often found in a different directory from the CUDA DLLs. The correct version of cuDNN depends on your version of TensorFlow: * TensorFlow 1.2.1 or earlier requires cuDNN 5.1. ('cudnn64_5.dll') * TensorFlow 1.3 or later requires cuDNN 6. ('cudnn64_6.dll') You may install the necessary DLL by downloading cuDNN from this URL: https://developer.nvidia.com/cudnn""")

    if not candidate_explanation:
        print(""" - All required DLLs appear to be present. Please open an issue on the TensorFlow GitHub page: https://github.com/tensorflow/tensorflow/issues""")

    sys.exit(-1)


if __name__ == "__main__":
    main()
如果失败的话记得检查一下报错信息,没有安装CUDA8.0或者环境配置不对:
Could not load ‘cudart64_80.dll’. The GPU version of TensorFlow
requires that this DLL be installed in a directory that is named in
your %PATH% environment variable. Download and install CUDA 8.0 from
this URL: https://developer.nvidia.com/cuda-toolkit
pycharm 报错:
ImportError: Could not find ‘nvcuda.dll’. TensorFlow requires that this DLL be installed in a directory that is named in your %PATH% environment variable. Typically it is installed in ‘C:\Windows\System32’. If it is not present, ensure that you have a CUDA-capable GPU with the correct driver installed.
用python跑数据库脚本时,python报错”DatabaseError: DPI-1047: 64-bit Oracle Client library cannot be loaded: “
安装64bit的oracle-client即可解决这个问题。并且pip install cx-Oracle==7.0.0
安装成功:
TensorFlow successfully installed. The installed version of TensorFlow
includes GPU support.
注意几点:
CUDA一定要安装8.0版本!CUDA一定要安装8.0版本!CUDA一定要安装8.0版本!
Anaconda并不是必需,可以使用,也可以不使用
Cudnn的版本我这里提示的是Cudnn6,大家看提示安装
这一篇博客其实就是这一次远程安装部署的一个笔记,有些部分可能说的不是很细致。~ ~
发布者:全栈程序员-用户IM,转载请注明出处:https://javaforall.cn/144611.html原文链接:https://javaforall.cn
【正版授权,激活自己账号】: Jetbrains全家桶Ide使用,1年售后保障,每天仅需1毛
【官方授权 正版激活】: 官方授权 正版激活 支持Jetbrains家族下所有IDE 使用个人JB账号...
