大家好,又见面了,我是你们的朋友全栈君。
这里使用的SDK为AMap_Location_V2.5.0_20160526.jar
没有接触过高德地图的同学,请参考
加载一张高德地图
1.获取我的位置
package com.pansoft.oilgas.gaodenavigation;

import android.os.Bundle;
import android.support.v7.app.AppCompatActivity;
import android.util.Log;

import com.amap.api.location.AMapLocation;
import com.amap.api.location.AMapLocationClient;
import com.amap.api.location.AMapLocationClientOption;
import com.amap.api.location.AMapLocationListener;

import java.text.SimpleDateFormat;
import java.util.Date;

public class QueryCurrentLocationActivity extends AppCompatActivity implements AMapLocationListener {

    private AMapLocationClientOption mLocationOption = null;
    private AMapLocationClient mLocationClient = null;

    @Override
    protected void onCreate(Bundle savedInstanceState) {
        super.onCreate(savedInstanceState);
        mLocationClient = new AMapLocationClient(this);
//初始化定位参数
        mLocationOption = new AMapLocationClientOption();
//设置定位监听
        mLocationClient.setLocationListener(this);
/*设置定位模式为高精度模式,Battery_Saving为低功耗模式,Device_Sensors是仅设备模式*/
        mLocationOption.setLocationMode(AMapLocationClientOption.AMapLocationMode.Hight_Accuracy);
//设置定位间隔,单位毫秒,默认为2000ms
        mLocationOption.setInterval(2000);
//设置定位参数
mLocationClient.setLocationOption(mLocationOption);
/* 此方法为每隔固定时间会发起一次定位请求,为了减少电量消耗或网络流量消耗,注意设置合适的定位时间的间隔(最小间隔支持为2000ms),并且在合适时间调用stopLocation()方法来取消定位请求,在定位结束后,在合适的生命周期调用onDestroy()方法 在单次定位情况下,定位无论成功与否,都无需调用stopLocation()方法移除请求,定位sdk内部会移除启动定位*/
        mLocationClient.startLocation();

    }

    @Override
    public void onLocationChanged(AMapLocation amapLocation) {
        if (amapLocation != null) {
            if (amapLocation.getErrorCode() == 0) {
                //定位成功回调信息,设置相关消息
                amapLocation.getLocationType();
         //获取当前定位结果来源,如网络定位结果,详见定位类型表
                amapLocation.getLatitude();//获取纬度
                amapLocation.getLongitude();//获取经度
                amapLocation.getAccuracy();//获取精度信息
                SimpleDateFormat df = new SimpleDateFormat("yyyy-MM-dd HH:mm:ss");
                Date date = new Date(amapLocation.getTime());
                df.format(date);//定位时间
            } else {
                //显示错误信息ErrCode是错误码,errInfo是错误信息,详见错误码表。
                Log.e("AmapError", "location Error, ErrCode:"
                        + amapLocation.getErrorCode() + ", errInfo:"
                        + amapLocation.getErrorInfo());
            }
        }
    }


}
ok,执行以下!

不好了,缺少定位权限,是没有在AndroidManifest文件中声明定位权限吗?不是,是Android6.0中将用户权限分为普通权限和危险权限,这里定位权限属于危险权限,需要在使用的时候进行动态申请。
对Android6定位权限不熟悉的同学请参考

2.动态申请定位权限
   public void requestLocationPermission(){
        ActivityCompat.requestPermissions(this,new String[]{android.Manifest.permission.ACCESS_FINE_LOCATION},REQ_LOCATION);
    }

    @Override
    public void onRequestPermissionsResult(int requestCode, @NonNull String[] permissions, @NonNull int[] grantResults) {
        if(requestCode==REQ_LOCATION){
            if(grantResults!=null&&grantResults.length>0){
                if(grantResults[0]== PackageManager.PERMISSION_GRANTED){
                    mLocationClient.startLocation();
                }else{
                    Toast.makeText(QueryCurrentLocationActivity.this,"缺少定位权限,无法完成定位~",Toast.LENGTH_LONG).show();
                }
            }
        }
        super.onRequestPermissionsResult(requestCode, permissions, grantResults);
    }
3.展示获取到的位置数据
定义一个DialogFragment展示数据,不熟悉DialogFragment的同学请参考
AltertDialog在DialogFragment中的使用
package com.pansoft.oilgas.gaodenavigation;

import android.app.AlertDialog;
import android.app.Dialog;
import android.app.DialogFragment;
import android.content.DialogInterface;
import android.os.Bundle;

import com.amap.api.location.AMapLocation;


public class ShowLocationFragment extends DialogFragment {

    public static final String KEY_MSG = "location msg";
    private AMapLocation currentLocation;
    public ShowLocationFragment() {
        // Required empty public constructor
    }

    public static ShowLocationFragment newInstance(AMapLocation currentLocation) {
        ShowLocationFragment fragment = new ShowLocationFragment();
        Bundle args = new Bundle();
        args.putParcelable(KEY_MSG,currentLocation);
        fragment.setArguments(args);
        return fragment;
    }

    @Override
    public void onCreate(Bundle savedInstanceState) {
        super.onCreate(savedInstanceState);
        if (getArguments() != null) {
            currentLocation =getArguments().getParcelable(KEY_MSG);
        }
    }

    @Override
    public Dialog onCreateDialog(Bundle savedInstanceState) {
        AlertDialog.Builder builder=new AlertDialog.Builder(getActivity());

        builder.setTitle("当前位置信息");
        builder.setMessage(currentLocation.getCity()+"\n"
        +currentLocation.getAddress()+"\n"
        +"当前经纬度: "+currentLocation.getLatitude()+","+currentLocation.getLongitude()+"\n"
        );
        builder.setPositiveButton("知道了", new DialogInterface.OnClickListener() {
            @Override
            public void onClick(DialogInterface dialogInterface, int i) {
                dialogInterface.dismiss();
            }
        });
     return builder.create();
    }
}
在onLocationChange成功获取数据后,调用
     ShowLocationFragment showFragment=ShowLocationFragment.newInstance(amapLocation);
               showFragment.show(getFragmentManager(),"xxxx");
展示数据
ok,初见成效!

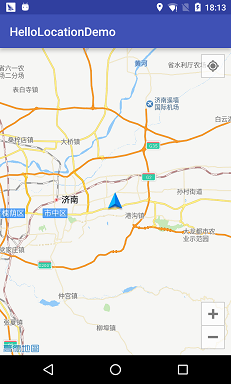
4.在地图上标注我的位置
在原来代码的基础上,添加地图MapView
不熟悉的同学,请参考
加载一张高德地图
在onCreate中添加,获取我的位置的相关部分
   // show my location
        aMap.setLocationSource(this);
        aMap.getUiSettings().setMyLocationButtonEnabled(true);
        aMap.setMyLocationEnabled(true);
        aMap.setMyLocationType(AMap.LOCATION_TYPE_MAP_FOLLOW);
在QueryCurrentLocationActivity 中实现LocationSource接口
  @Override
    public void activate(OnLocationChangedListener onLocationChangedListener) {
        this.onLocationChangedListener=onLocationChangedListener;

    }
  @Override
    public void deactivate() {
        if(mLocationClient!=null){
            mLocationClient.stopLocation();
            mLocationClient.onDestroy();
        }
    }
在定位成功后——onLocationChanged内刷新位置
    if(onLocationChangedListener!=null){
                    onLocationChangedListener.onLocationChanged(amapLocation);
                }
ok!
5.完整代码
package com.pansoft.oilgas.gaodenavigation;

import android.content.pm.PackageManager;
import android.os.Bundle;
import android.support.annotation.NonNull;
import android.support.v4.app.ActivityCompat;
import android.support.v7.app.AppCompatActivity;
import android.util.Log;
import android.widget.Toast;

import com.amap.api.location.AMapLocation;
import com.amap.api.location.AMapLocationClient;
import com.amap.api.location.AMapLocationClientOption;
import com.amap.api.location.AMapLocationListener;
import com.amap.api.maps.AMap;
import com.amap.api.maps.LocationSource;
import com.amap.api.maps.MapView;

import java.text.SimpleDateFormat;
import java.util.Date;

public class QueryCurrentLocationActivity extends AppCompatActivity implements AMapLocationListener,LocationSource {

    private AMapLocationClientOption mLocationOption = null;
    private AMapLocationClient mLocationClient = null;
    private final int REQ_LOCATION=0x12;
    private MapView mapView;
    private AMap aMap;
    private OnLocationChangedListener onLocationChangedListener;
    @Override
    public void activate(OnLocationChangedListener onLocationChangedListener) {
        this.onLocationChangedListener=onLocationChangedListener;
    }
    @Override
    public void deactivate() {
        if(mLocationClient!=null){
            mLocationClient.stopLocation();
            mLocationClient.onDestroy();
        }
    }

    @Override
    protected void onCreate(Bundle savedInstanceState) {
        super.onCreate(savedInstanceState);
        mapView=new MapView(this);
        setContentView(mapView);
        aMap=mapView.getMap();
        mapView.onCreate(savedInstanceState);

        mLocationClient = new AMapLocationClient(this);
//初始化定位参数
        mLocationOption = new AMapLocationClientOption();
//设置定位监听
        mLocationClient.setLocationListener(this);
//设置定位模式为高精度模式,Battery_Saving为低功耗模式,Device_Sensors是仅设备模式
        mLocationOption.setLocationMode(AMapLocationClientOption.AMapLocationMode.Hight_Accuracy);
//设置定位间隔,单位毫秒,默认为2000ms
        mLocationOption.setInterval(2000);
//设置定位参数
        mLocationClient.setLocationOption(mLocationOption);
/* 此方法为每隔固定时间会发起一次定位请求,为了减少电量消耗或网络流量消耗, 注意设置合适的定位时间的间隔(最小间隔支持为2000ms),并且在合适时间调用stopLocation()方法来取消定位请求 在定位结束后,在合适的生命周期调用onDestroy()方法 在单次定位情况下,定位无论成功与否,都无需调用stopLocation()方法移除请求,定位sdk内部会移除 启动定位*/

        requestLocationPermission();
    }
    public void requestLocationPermission(){
        ActivityCompat.requestPermissions(this,new String[]{android.Manifest.permission.ACCESS_FINE_LOCATION},REQ_LOCATION);
    }

    @Override
    public void onRequestPermissionsResult(int requestCode, @NonNull String[] permissions, @NonNull int[] grantResults) {
        if(requestCode==REQ_LOCATION){
            if(grantResults!=null&&grantResults.length>0){
                if(grantResults[0]== PackageManager.PERMISSION_GRANTED){
                   mLocationClient.startLocation();


                }else{
                    Toast.makeText(QueryCurrentLocationActivity.this,"缺少定位权限,无法完成定位~",Toast.LENGTH_LONG).show();
                }
            }
        }
        super.onRequestPermissionsResult(requestCode, permissions, grantResults);
    }

    @Override
    public void onLocationChanged(AMapLocation amapLocation) {
        if (amapLocation != null) {
            if (amapLocation.getErrorCode() == 0) {
                if(onLocationChangedListener!=null){
                    onLocationChangedListener.onLocationChanged(amapLocation);
                }
            } else {
                //显示错误信息ErrCode是错误码,errInfo是错误信息,详见错误码表。
                Log.e("AmapError", "location Error, ErrCode:"
                        + amapLocation.getErrorCode() + ", errInfo:"
                        + amapLocation.getErrorInfo());
            }
        }
    }
    @Override
    protected void onResume() {
        super.onResume();
        mapView.onResume();
    }

    @Override
    protected void onPause() {
        super.onPause();
        mapView.onPause();
    }

    @Override
    protected void onDestroy() {
        super.onDestroy();
        mapView.onDestroy();
    }

    @Override
    public void onSaveInstanceState(Bundle outState) {
        super.onSaveInstanceState(outState);
        mapView.onSaveInstanceState(outState);
        if(mLocationClient!=null){
            mLocationClient.stopLocation();
            mLocationClient.onDestroy();
        }
    }
}
版权声明:本文内容由互联网用户自发贡献,该文观点仅代表作者本人。本站仅提供信息存储空间服务,不拥有所有权,不承担相关法律责任。如发现本站有涉嫌侵权/违法违规的内容, 请发送邮件至 举报,一经查实,本站将立刻删除。
发布者:全栈程序员-用户IM,转载请注明出处:https://javaforall.cn/143216.html原文链接:https://javaforall.cn
【正版授权,激活自己账号】: Jetbrains全家桶Ide使用,1年售后保障,每天仅需1毛
【官方授权 正版激活】: 官方授权 正版激活 支持Jetbrains家族下所有IDE 使用个人JB账号...
