大家好,又见面了,我是你们的朋友全栈君。
单点登录是什么
SSO(Single Sign On)SSO的定义是在多个应用系统中,用户只需要登录一次就可以访问所有相互信任的应用系统。
为什么需要单点登录
以前分布式系统的多个相关的应用系统,都需要分别进行登录,非常繁琐。
原来登录的过程:
1)用户输入账号密码
2)提交到后台验证,成功后将用户存在Session中
3)需要进行登录状态判断时,判断Session中是否存在该对象


存在问题:分布式系统有N个服务器,每个服务器有自己的Session,无法登录一次,所有服务器能判断用户登录状态。
单点登录的解决方案
SSO有哪些常见的解决方案
1)使用Redis实现Session共享
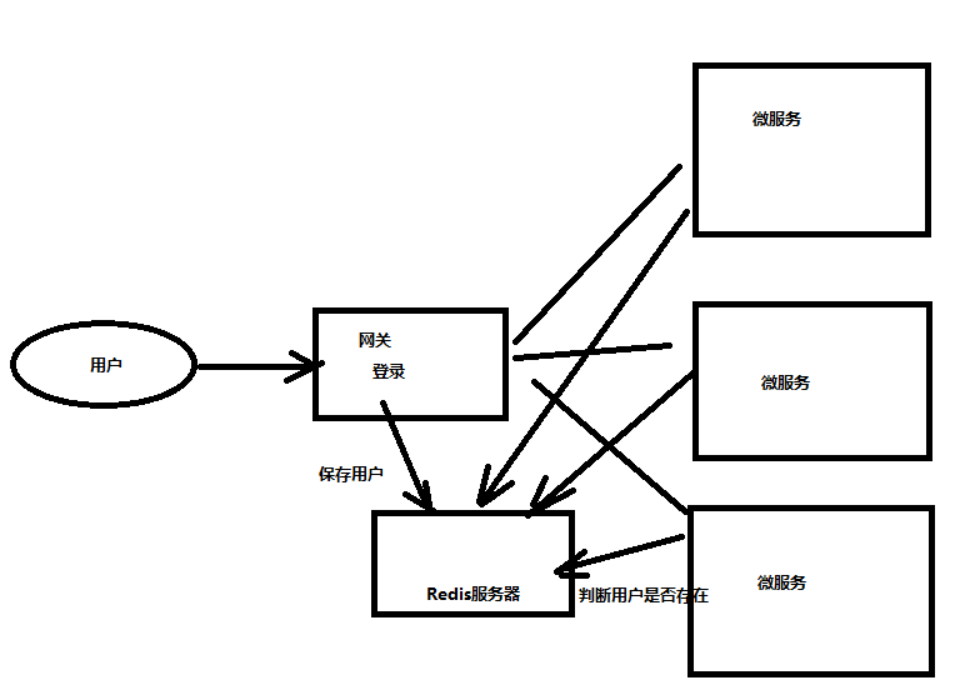
有状态的登录,需要在服务器中保存用户的数据;REST架构推荐使用无状态通信,不在服务器端保存用户状态,服务器压力更小,成本更低,扩展更加容器。
2)使用Token机制实现
将用户的状态保存到客户端的cookie中,每次请求服务器时,都会携带用户信息,服务器对用户信息进行解析和判断,来进行登录鉴权。
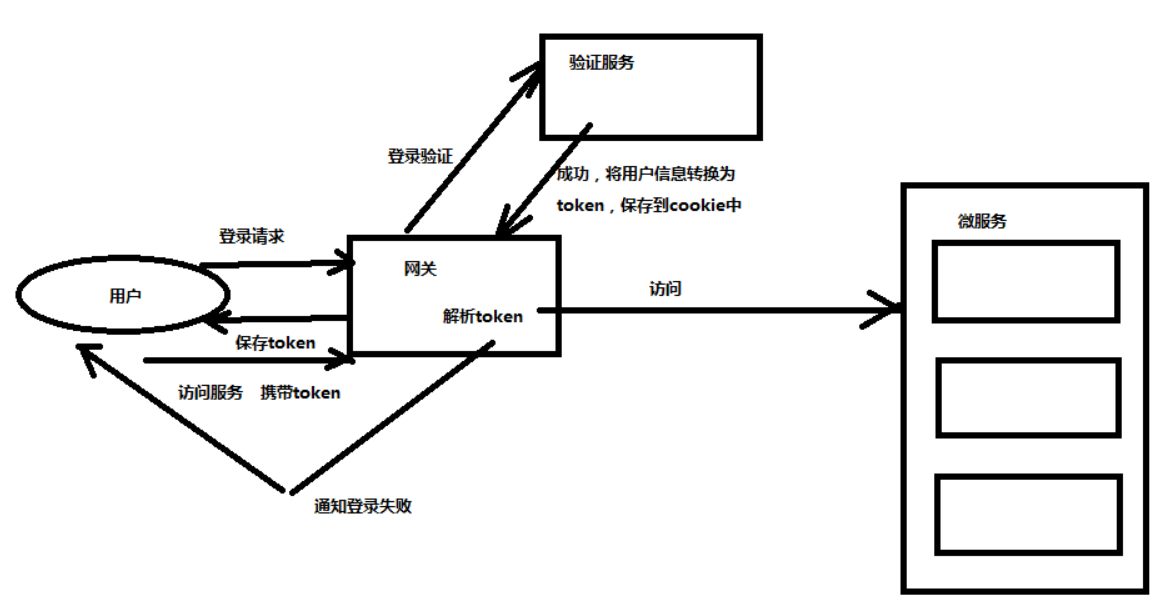
1)用户输入账号密码,通过网关,进入验证服务
2)验证服务进行登录验证
3)验证成功后,将用户信息保存到token字符串,将token写入cookie
4)cookie被保存到用户浏览器中
5)用户再访问微服务时,经过网关,网关对token进行解析
6)解析成功,允许访问其他微服务
7)解析失败,不允许访问
这种方式是无状态登录,服务器不保存用户状态,状态保存到客户端,信息存在安全性问题,需要加密。
加密算法
加密算法可以分为:
- 对称式加密技术
对称式加密就是加密和解密使用同一个密钥,通常称之为“Session Key ”这种加密技术在当今被广泛采用,如美国政府所采用的DES加密标准就是一种典型的“对称式”加密法,它的Session Key长度为56bits。
常见对称式加密技术:DES、3DES、TDEA、Blowfish、RC5、IDEA算法。 - 非对称式加密技术
非对称式加密就是加密和解密所使用的不是同一个密钥,通常有两个密钥,称为“公钥”和“私钥”,它们两个必需配对使用,否则不能打开加密文件。这里的“公钥”是指可以对外公布的,“私钥”则不能,只能由持有人一个人知道。它的优越性就在这里,因为对称式的加密方法如果是在网络上传输加密文件就很难不把密钥告诉对方,不管用什么方法都有可能被别窃听到。而非对称式的加密方法有两个密钥,且其中的“公钥”是可以公开的,也就不怕别人知道,收件人解密时只要用自己的私钥即可以,这样就很好地避免了密钥的传输安全性问题。
常见的非对称式加密技术:RSA、Elgamal、背包、Rabin、D-H、ECC算法。
其中最常用的是RSA算法,单点登录采用的是JWT+RSA实现。 - 不可逆的加密技术
加密后的数据是无法被解密的,无法根据密文推算出明文
常见的不可逆的加密技术:MD5、SHA
JWT
Json web token (JWT), 是为了在网络应用环境间传递声明而执行的一种基于JSON的开放标准((RFC 7519).该token被设计为紧凑且安全的,特别适用于分布式站点的单点登录(SSO)场景。JWT的声明一般被用来在身份提供者和服务提供者间传递被认证的用户身份信息,以便于从资源服务器获取资源,也可以增加一些额外的其它业务逻辑所必须的声明信息,该token也可直接被用于认证,也可被加密。
官网:https://jwt.io
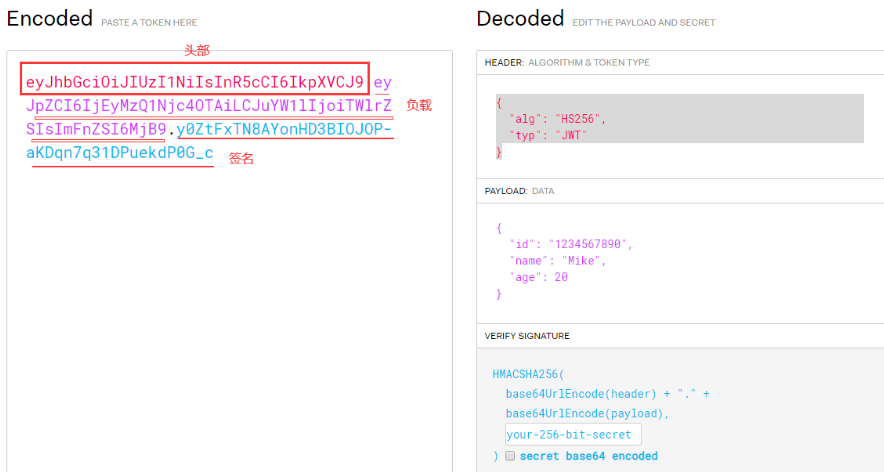
可以在官网测试保存信息到JWT中,可以看到JWT分为三个部分:
- header 头部,包含声明类型和加密算法
- payload 负载,就是有效数据,一般是用户信息
- signature 签名,数据的认证信息
JWT的交互流程
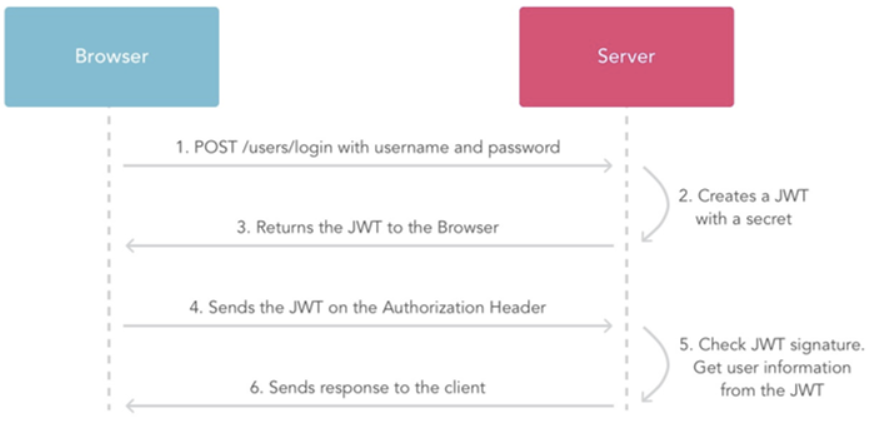
- 用户登录,发送账号密码
- 服务的认证,通过后根据secret生成token
- 将生成的token返回给浏览器
- 用户每次请求携带token
- 服务端利用公钥解读jwt签名,判断签名有效后,从Payload中获取用户信息
- 处理请求,返回响应结果
实现JWT单点登录
1)创建登录鉴权服务,引入依赖
<dependency>
    <groupId>org.apache.commons</groupId>
    <artifactId>commons-lang3</artifactId>
    <version>3.4</version>
</dependency>

<dependency>
    <groupId>io.jsonwebtoken</groupId>
    <artifactId>jjwt</artifactId>
    <version>0.9.0</version>
</dependency>

<dependency>
    <groupId>joda-time</groupId>
    <artifactId>joda-time</artifactId>
    <version>2.9.9</version>
</dependency>
2)配置文件的工具类
/**
 * 读取配置文件的配置类
 */
@Data
@Configuration
//读取配置文件的注解
@ConfigurationProperties(prefix = "blb.jwt")
public class JwtProperties {

    private String secret;//秘钥
    private String pubKeyPath;//公钥路径
    private String priKeyPath;//私钥路径
    private String cookieName;//cookie名称
    private Integer expire;//cookie过期时间
    private Integer cookieMaxAge;//cookie生命周期
    private PublicKey publicKey;//公钥
    private PrivateKey privateKey;//私钥

    //在构造方法之后自动执行
    @PostConstruct
    public void init(){
        File pubKey = new File(pubKeyPath);
        File priKey = new File(priKeyPath);
        try {
            //判断公钥和私钥如果不存在就创建
            if (!priKey.exists() || !pubKey.exists()) {
                //创建公钥和私钥文件
                RsaUtils.generateKey(this.pubKeyPath, this.priKeyPath, this.secret);
            }
            //读取公钥和私钥内容
            this.publicKey = RsaUtils.getPublicKey(this.pubKeyPath);
            this.privateKey = RsaUtils.getPrivateKey(this.priKeyPath);
        }catch (Exception ex){
            ex.printStackTrace();
            throw new RuntimeException(ex);
        }
    }
}
application.properties
#秘钥
blb.jwt.secret=chenheng0611@#$%
#公钥路径
blb.jwt.pubKeyPath=D:\\java_code\\pub.rsa
#私钥路径
blb.jwt.priKeyPath=D:\\java_code\\pri.rsa
#cookie名称
blb.jwt.cookieName=token
#cookie过期时间
blb.jwt.expire=30
#cookie生命周期
blb.jwt.cookieMaxAge=1800
UserService
@Service
public class UserServiceImpl extends ServiceImpl<UserMapper, UserInfo> implements IUserService {


    @Override
    public UserInfo login(String username, String password) {

    	//查询用户
        UserInfo user = this.getOne(new QueryWrapper<UserInfo>().lambda().eq(UserInfo::getUsername, username));
        if(user == null){

            return null;
        }
        //将密码加密加盐后进行匹配
        String encrypt = Md5Utils.encrypt(password, user.getSalt());
        if(encrypt.equals(user.getPassword())){

            return user;
        }
        return null;
    }
}
UserController
/**
 * 登录验证控制器
 */
@RestController
@RequestMapping("/user")
public class UserController {


    @Autowired
    private IUserService userService;
    @Autowired
    private JwtProperties properties;

    @PostMapping("/login")
    public JsonResult<UserInfo> login(HttpServletRequest request, HttpServletResponse response) throws Exception {

        String username = request.getParameter("username");
        String password = request.getParameter("password");
        UserInfo info = userService.login(username, password);
        if(info != null){

            //验证通过,将用户加密为token
            String token = JwtUtils.generateToken(info, properties.getPrivateKey(), properties.getExpire());
            //保存token到cookie中
            CookieUtils.setCookie(request,response,properties.getCookieName(),token,
                    properties.getCookieMaxAge(),null,true);
            return new JsonResult<>(1,info);
        }
        return new JsonResult<>(0,null);
    }
}
登录页面
<template>
    <el-card style="width: 480px">
        <span style="color:red">{
   {
   msg}}</span>
        <el-form v-model="form">
            <el-input v-model="form.username" placeholder="请输入账号"></el-input>
            <el-input type="password" v-model="form.password" placeholder="请输入密码"></el-input>
            <el-button @click="login">登录</el-button>
        </el-form>
    </el-card>
</template>

<script>
    export default {

        name: "Login",
        data(){

            return{

                msg:"",
                form:{
   username:"",password:""}
            }
        },
        methods:{

            login(){

                this.$http.post("http://api.blb.com/api/auth-api/user/login",this.$qs.stringify(this.form))
                    .then(res => {

                        if(res.data.code == 1){

                            this.$message.info("登录成功");
                            this.$router.push("/index");
                        }else{

                            this.msg = "账号或密码错误";
                        }
                    });
            }
        }
    }
</script>
解决cookie写入失败的问题
原因1:出现跨域,导致Cookie不能写入
1)CORS的配置
2)axios的配置

原因2:Nginx转发域名不一致的问题
Nginx转发配置 : proxy_set_header Host $host;
原因3:zuul的敏感头过滤
关闭敏感头过滤

解决Cookie写入问题后,将公钥复制到网关服务器上,在网关中进行token解析实现统一的访问鉴权
网关判断用户登录状态
1)配置白名单,直接通过不进行登录验证
2)创建过滤器ZuulFilter
3)过滤到白名单就直接放行
4)非白名单的请求,获得cookie中的token,解析token
5)如果解析成功,放行,解析失败,就进行拦截
网关的配置文件工具类
@Data
@Configuration
//读取配置文件的注解
@ConfigurationProperties(prefix = "blb.jwt")
public class JwtProperties {


    private List<String> whiteList;//白名单
    private String pubKeyPath;//公钥路径
    private String cookieName;//cookie名称
    private PublicKey publicKey;//公钥

    //在构造方法之后自动执行
    @PostConstruct
    public void init(){

        try {

            //读取公钥内容
            this.publicKey = RsaUtils.getPublicKey(this.pubKeyPath);
        }catch (Exception ex){

            ex.printStackTrace();
            throw new RuntimeException(ex);
        }
    }
}
application.properties
# 白名单
blb.jwt.whiteList=/api/auth-api
# 公钥路径
blb.jwt.pubKeyPath=D:\\java_code\\pub.rsa
# cookie名称
blb.jwt.cookieName=token
鉴权过滤器
/**
 * 登录鉴权的过滤器
 */
@Component
public class AuthFilter extends ZuulFilter {


    @Autowired
    private JwtProperties properties;

    @Override
    public String filterType() {

        //前置过滤器
        return "pre";
    }

    @Override
    public int filterOrder() {

        return 99;
    }

    //是否进行过滤,true过滤(执行run方法),false(跳过run)
    @Override
    public boolean shouldFilter() {

        //读取当前请求的地址
        String uri = RequestContext.getCurrentContext().getRequest().getRequestURI();
        List<String> whiteList = properties.getWhiteList();
        //如果地址以白名单中的地址为开头,就不过滤
        for(String str : whiteList){

            if(uri.startsWith(str)){

                return false;
            }
        }
        //不是白名单就过滤
        return true;
    }

    //过滤逻辑
    @Override
    public Object run() throws ZuulException {

        //先从cookie中读取token
        RequestContext currentContext = RequestContext.getCurrentContext();
        HttpServletRequest request = currentContext.getRequest();
        String token = CookieUtils.getCookieValue(request, properties.getCookieName());
        //使用公钥对token进行解析
        try {

            UserInfo user = JwtUtils.getInfoFromToken(token, properties.getPublicKey());
            return user;
        }catch (Exception ex){

            ex.printStackTrace();
            //登录拦截
            currentContext.setSendZuulResponse(false);
            currentContext.setResponseStatusCode(401);
        }
        return null;
    }
}
发布者:全栈程序员-用户IM,转载请注明出处:https://javaforall.cn/143154.html原文链接:https://javaforall.cn
【正版授权,激活自己账号】: Jetbrains全家桶Ide使用,1年售后保障,每天仅需1毛
【官方授权 正版激活】: 官方授权 正版激活 支持Jetbrains家族下所有IDE 使用个人JB账号...
