大家好,又见面了,我是你们的朋友全栈君。
| 初衷 |
|---|
| 我相信每个人都想要创造一点个人的小空间,存放某种东西(你懂的)。 |
| 为了达到这个目的,顺便学习一下服务器的搭建,折腾了几天,终于算是搞定了,便记录如下。 |
一 准备
思路:使用腾讯云服务器,部署LAMP。其实使用本地的电脑也是可以的,只是为了方便跨局域网访问,因为还没有学会如何绑定域名,如何用Nginx穿透局域网,所以只能借助别人的方便了。
购买云服务器,略;
给云服务器安装Ubuntu16的操作系统;
更新一下软件源,一路往下即可;
sudo apt-get update
sudo apt-get upgrade
这时候你可能会发现腾讯云的网页终端会在一定的时候后掉线,很是烦躁。更新一半掉线,就更麻烦了,会出现很多线程报错。为根除这个问题,我尝试了N种修改SSH配置的方法,都不尽人意。最终找到了最简单粗暴的方法,用putty软件远程终端,利用软件上的配置,定时发送心跳维持终端不掉线。这个方法彻底解决掉线的问题。
配置putty软件;
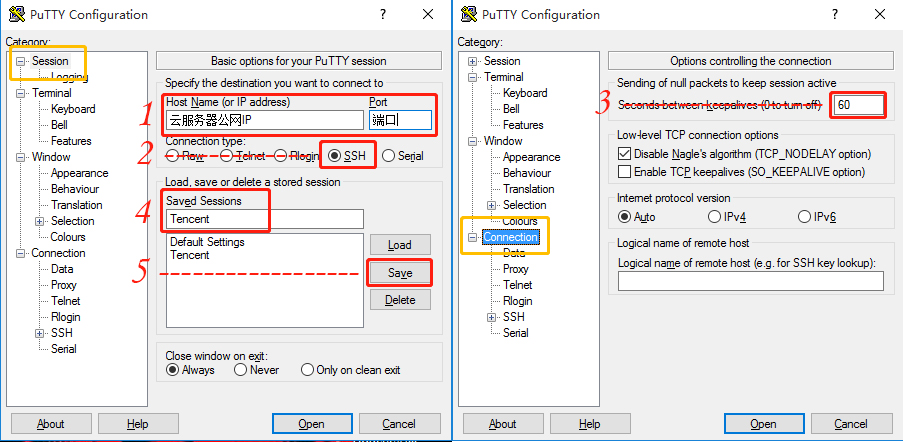

1 填写腾讯云服务器的公网IP跟端口。IP是腾讯分配的,端口是安装系统时自己设定的。
2 选择SSH连接方式。系统默认安装并开启SSH服务端,不用我们自己安装。
3 (切换左边的配置内容选项)填写心跳间隔时间,单位秒。
4 (切换回最初配置内容)填写该配置的名称,方便下次不用重新配置。
5 保存该配置。下次进入putty直接双击框中的名称,自动连接。
如果你先选择putty连接,那么更新软件源的时候,就不用担心会掉线了。
二 部署LAMP服务器
安装Apache2
sudo apt install -y apache2 apache2-utils
安装php
sudo apt-get install php
安装php插件
sudo apt install -y php7.0-gd php7.0-json php7.0-mysql php7.0-curl php7.0-mbstring php7.0-intl php7.0-mcrypt php-imagick php7.0-xml php7.0-zip
安装Mysql
装完会提示输入管理员密码(数据库的管理员帐号为root,不是ubuntu的root),用于登入数据库。
sudo apt-get install mysql-server
三 部署NextCloud
为NextCloud创建帐号数据库
以管理员权限打开数据库
mysql -u root -p (运行后需要输入管理员密码)
#创建NextCloud数据库
mysql> create database nextcloud;

#创建NextCloud账户,帐号名跟密码可自己定义,如帐号名:cloudmanager,密码:admin123
mysql> create user '帐号名'@'localhost' identified by '密码';

#给刚创建的账户赋予管理权限
mysql> grant all privileges on nextcloud.* to '帐号名'@'localhost' identified by '密码';

#刷新数据库
mysql> flush privileges;

#退出数据库
mysql> exit
为NextCloud创建Apache配置文件
新建一个文件
sudo vim /etc/apache2/sites-available/nextcloud.conf
粘贴下列内容
Alias /nextcloud "/var/www/html/nextcloud/"
<Directory /var/www/html/nextcloud/>
	Options +FollowSymlinks
	AllowOverride All

	<IfModule mod_dav.c>
		Dav off
	</IfModule>

	SetEnv HOME /var/www/nextcloud
	SetEnv HTTP_HOME /var/www/nextcloud
</Directory>
更改Apache2端口(加密)
sudo vim /etc/apache2/ports.conf
# If you just change the port or add more ports here, you will likely also
# have to change the VirtualHost statement in
# /etc/apache2/sites-enabled/000-default.conf

Listen 81

<IfModule ssl_module>
        Listen 5005
</IfModule>

<IfModule mod_gnutls.c>
        Listen 5005
</IfModule>

# vim: syntax=apache ts=4 sw=4 sts=4 sr noet
sudo vim /etc/apache2/sites-enabled/000-default.conf
<VirtualHost *:81>
        # The ServerName directive sets the request scheme, hostname and port that
        # the server uses to identify itself. This is used when creating
        # redirection URLs. In the context of virtual hosts, the ServerName
        # specifies what hostname must appear in the request's Host: header to
        # match this virtual host. For the default virtual host (this file) this
        # value is not decisive as it is used as a last resort host regardless.
        # However, you must set it for any further virtual host explicitly.
        #ServerName www.example.com

        ServerAdmin webmaster@localhost
        DocumentRoot /var/www/html

        # Available loglevels: trace8, ..., trace1, debug, info, notice, warn,
        # error, crit, alert, emerg.
        # It is also possible to configure the loglevel for particular
        # modules, e.g.
        #LogLevel info ssl:warn

        ErrorLog ${
   APACHE_LOG_DIR}/error.log
        CustomLog ${
   APACHE_LOG_DIR}/access.log combined

        # For most configuration files from conf-available/, which are
        # enabled or disabled at a global level, it is possible to
        # include a line for only one particular virtual host. For example the
        # following line enables the CGI configuration for this host only
        # after it has been globally disabled with "a2disconf".
        #Include conf-available/serve-cgi-bin.conf
</VirtualHost>

# vim: syntax=apache ts=4 sw=4 sts=4 sr noet
启用必要的Apache模块
sudo a2enmod rewrite
sudo a2enmod headers
sudo a2enmod env
sudo a2enmod dir
sudo a2enmod mime
重启Apache2服务器
sudo systemctl restart apache2
安装NextCloud软件
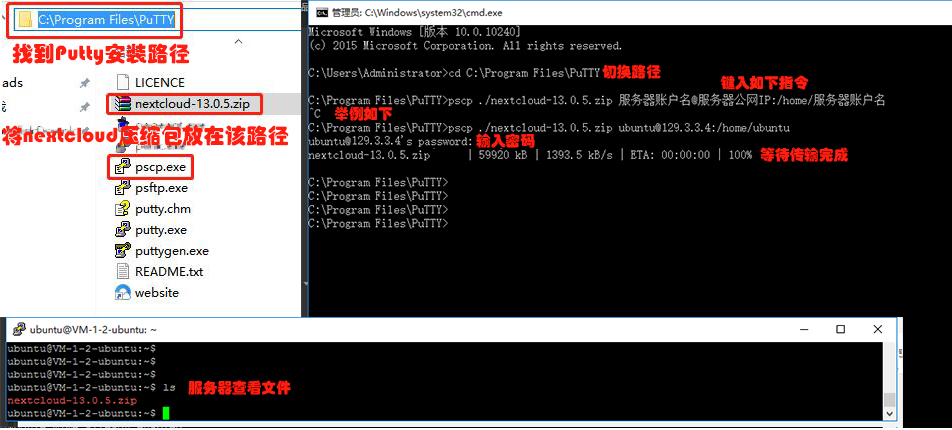
wget https://download.nextcloud.com/server/releases/nextcloud-13.0.5.zip
这里下载会很慢,推荐下载到本地电脑,然后上传到服务器上。前提是本地的系统是Windows系统,已经安装putty软件以及插件pscp。方法如下。
解压并部署
unzip nextcloud-13.0.5.zip
sudo mv nextcloud /var/www/html //移动到所在目录(安装)
sudo chown -R www-data:www-data /var/www/html/nextcloud //授权
安装完成后,在地址栏中输入如下IP,浏览内容
| IP | 显示 |
|---|---|
| http://服务器公网IP:81 | 访问Apache2页面 |
| http://服务器公网IP:81/nextcloud | 访问NextCloud页面 |
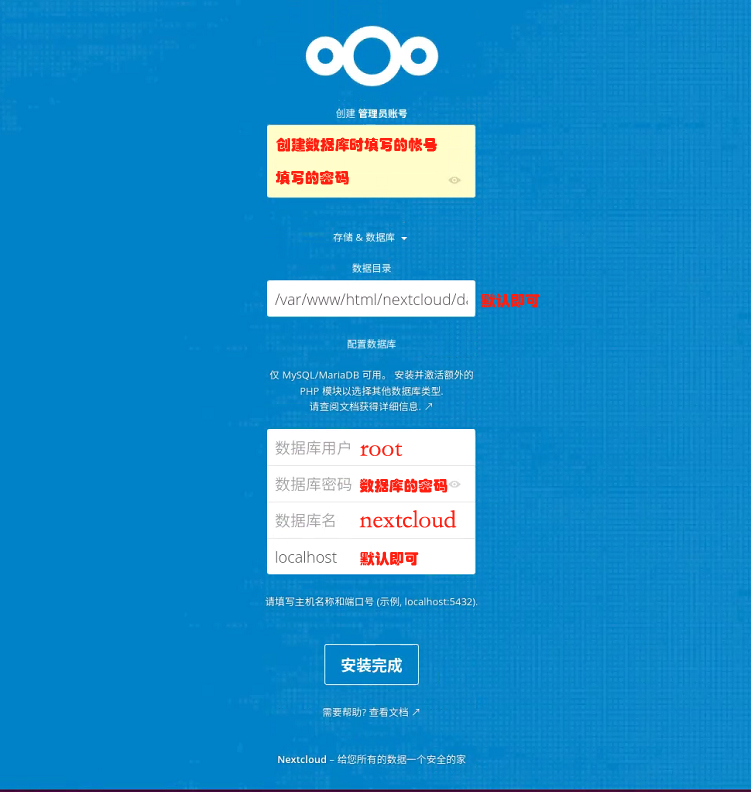
第一次访问NextCloud需要设置相关内容
四 制作SSL证书
到上面已经是可以正常访问NextCloud了。但是为了让其支持HTTPS,需要给它制作证书。
创建证书存放路径
sudo mkdir /etc/apache2/cert
生成证书到指定路径
sudo openssl req -new -x509 -days 3650 -nodes -out /etc/apache2/cert/cert.pem -keyout /etc/apache2/cert/cert.key
修改配置读取证书
sudo vim /etc/apache2/sites-available/default-ssl.conf
<IfModule mod_ssl.c>
	#修改端口
	<VirtualHost _default_:5005>
		ServerAdmin webmaster@localhost
		DocumentRoot /var/www/html

		ErrorLog ${
   APACHE_LOG_DIR}/error.log
		CustomLog ${
   APACHE_LOG_DIR}/access.log combined

		SSLEngine on

		# 将原来的证书注释
		# SSLCertificateFile /etc/ssl/certs/ssl-cert-snakeoil.pem
		# SSLCertificateKeyFile /etc/ssl/private/ssl-cert-snakeoil.key

		# 添加新的证书
		SSLCertificateFile  /etc/apache2/cert/cert.pem
		SSLCertificateKeyFile /etc/apache2/cert/cert.key

		<FilesMatch "\.(cgi|shtml|phtml|php)$">
			SSLOptions +StdEnvVars
		</FilesMatch>
		<Directory /usr/lib/cgi-bin>
			SSLOptions +StdEnvVars
		</Directory>

	</VirtualHost>
</IfModule>
启动证书
sudo a2enmod ssl
sudo a2ensite default-ssl
添加可信域
sudo vim /var/www/html/nextcloud/config/config.php
<?php
$CONFIG = array (
  'instanceid' => 'ocwqy1xqnefk',
  'passwordsalt' => 'olzxzZpxYsRY3vFtdhUXo+m/gpoxHx',
  'secret' => 'vIPva4n9JKM5iuyZj0hX05c8+axlvkDk089hWKU8ddal0vzf',
  'trusted_domains' =>
  array (
  	#添加两个内容
    0 => '服务器公网IP',1 =>'IP:5005',2=>'IP',
  ),
  'datadirectory' => '/var/www/html/nextcloud/data',
  'overwrite.cli.url' => 'http://服务器公网IP/nextcloud',
  'dbtype' => 'mysql',
  'version' => '13.0.5.2',
  'dbname' => 'nextcloud',
  'dbhost' => 'localhost',
  'dbport' => '',
  'dbtableprefix' => 'oc_',
  'mysql.utf8mb4' => true,
  'dbuser' => 'oc_cloudmanager',
  'dbpassword' => 'ZBF6HI1xK2ZAdxlJLyxE50gga0RniD',
  'installed' => true,
);
重启apache2
sudo /etc/init.d/apache2 restart
完成后,在地址栏中输入如下IP,浏览内容
| IP | 显示 |
|---|---|
| https://服务器公网IP:5005 | 访问Apache2页面 |
| https://服务器公网IP:5005/nextcloud | 访问NextCloud页面 |
五 优化
你应该发现了,每次要进入NextCloud页面总是要打一大串的内容。有没有办法少打一点,就像输入www.baidu.com一样,直接跳转到百度的页面。由于我学术不精,还在摸索。
1 少打/nextcloud
修改配置读取证书
sudo vim /etc/apache2/sites-available/default-ssl.conf
<IfModule mod_ssl.c>
	<VirtualHost _default_:5005>
		ServerAdmin webmaster@localhost

		#修改访问路径
		DocumentRoot /var/www/html/nextcloud

		ErrorLog ${
   APACHE_LOG_DIR}/error.log
		CustomLog ${
   APACHE_LOG_DIR}/access.log combined

		SSLEngine on

		# 将原来的证书注释
		# SSLCertificateFile /etc/ssl/certs/ssl-cert-snakeoil.pem
		# SSLCertificateKeyFile /etc/ssl/private/ssl-cert-snakeoil.key

		# 添加新的证书
		SSLCertificateFile  /etc/apache2/cert/cert.pem
		SSLCertificateKeyFile /etc/apache2/cert/cert.key

		<FilesMatch "\.(cgi|shtml|phtml|php)$">
			SSLOptions +StdEnvVars
		</FilesMatch>
		<Directory /usr/lib/cgi-bin>
			SSLOptions +StdEnvVars
		</Directory>

	</VirtualHost>
</IfModule>
效果
| IP | 显示 |
|---|---|
| https://服务器公网IP:5005 | 访问NextCloud页面 |
发布者:全栈程序员-用户IM,转载请注明出处:https://javaforall.cn/142595.html原文链接:https://javaforall.cn
【正版授权,激活自己账号】: Jetbrains全家桶Ide使用,1年售后保障,每天仅需1毛
【官方授权 正版激活】: 官方授权 正版激活 支持Jetbrains家族下所有IDE 使用个人JB账号...
