大家好,又见面了,我是你们的朋友全栈君。
本文博客地址:http://blog.csdn.net/qq1084283172/article/details/54562606
网上关于编译Android源码的教程已经很多了,但是讲怎么编译Android源码刷到真机上的教程不是很多并且也没有讲清楚,仅仅编译Android源码不部署到真机上折腾一下是不愉快的。在Android安全学习的过程不免涉及到修改Android源码过各种对抗的事情,今天有空来学习一下如何编译Android源码部署到谷歌的Nexus 5 手机上,以Android 4.4.4 r1的源码为例子,在Ubuntu 14.04.5版本系统上编译Android 4.4.4 r1 的镜像文件刷到Nexus 5手机上。
一、获取Android源码对应的驱动设备
1.)从谷歌网址 https://source.android.com/source/build-numbers.html 知道 Android 4.4.4 r1 源码编译成功后的镜像文件的编号为 KTU84P。

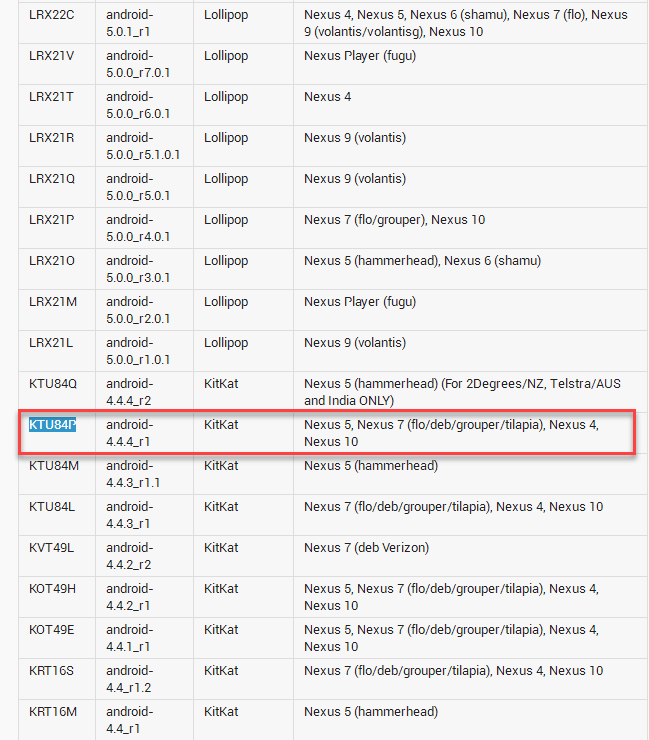
2.)通过获取到的Android 4.4.4 r1源码的编号 KTU84P ,在谷歌网址 https://developers.google.com/android/drivers 上,查询到编号 KTU84P 对应的Nexus 5设备刷机需要的驱动设备文件的下载地址 https://developers.google.com/android/drivers#hammerheadktu84p 。
Nexus 5 (GSM/LTE) binaries for Android 4.4.4 (KTU84P)
| Hardware Component | Company | Download | SHA-256 Checksum |
|---|---|---|---|
| NFC, Bluetooth, Wi-Fi | Broadcom | Link | f258605e24c9c3d4e78c9af934f3516a4f8d3410da697005fad42cad36c5ed5c |
| Camera, Sensors, Audio | LG | Link | fc72704e0fba9c51c6505ae009e474570de27ee8565d51483368d8dae6c0f44e |
| Graphics, GSM, Camera, GPS, Sensors, Media, DSP, USB | Qualcomm | Link | 8603d85ad511346d65c27c3747919da280523b86d55a39dfce657a4ca1b0685b |
通过上面的下载链接下载到编号 KTU84P 对应的Nexus 5的驱动文件 broadcom-hammerhead-ktu84p-5a5bf60e.tgz、lge-hammerhead-ktu84p-49419c39.tgz、qcom-hammerhead-ktu84p-f159eadf.tgz,将这3个文件解压到Android 4.4.4 r1源码的根目录下,其实该怎么使用这些驱动文件,在谷歌官方网址 https://source.android.com/source/building.html 中已经提到并说的很清楚了。
Obtain proprietary binaries
AOSP cannot be used from pure source code only and requires additional hardware-related proprietary libraries to run, such as for hardware graphics acceleration. See the sections below for download links and Device binaries requirements for additional resources.
Download proprietary binaries
You can download official binaries for the supported devices running tagged AOSP release branches from Google’s Nexus driver page. These binaries add access to additional hardware capabilities with non-open source code. To instead build the AOSP master branch, use the Binaries Preview for Nexus Devices. When building the master branch for a device, use the binaries for themost recent numbered release or with the most recent date.
Extract proprietary binaries
Each set of binaries comes as aself-extracting script in a compressed archive.Uncompress each archive,run the included self-extracting script from the root of the source tree, thenconfirm that you agree to the terms of the enclosed license agreement.The binaries and their matching makefiles will be installed in the vendor/ hierarchy of the source tree
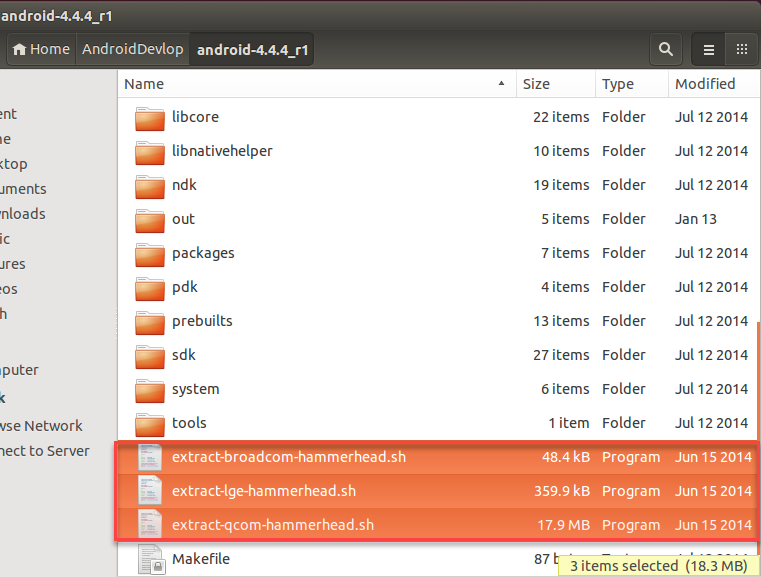
3.)解压下载的驱动文件 broadcom-hammerhead-ktu84p-5a5bf60e.tgz、lge-hammerhead-ktu84p-49419c39.tgz、qcom-hammerhead-ktu84p-f159eadf.tgz 到Android 4.4.4 r1源码的根目录下得到3个.sh的脚本文件。
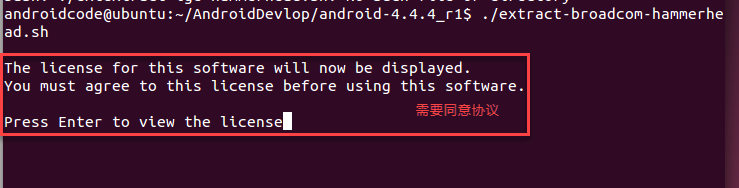
4.)先 sudo chmod u+x 赋予3个脚本以可执行权限,然后执行3个脚本文件;在脚本的执行过程中需要同意相关的协议,按照执行的提示在协议的结束位置输入 I ACCEPT 即可完成脚本的运行。
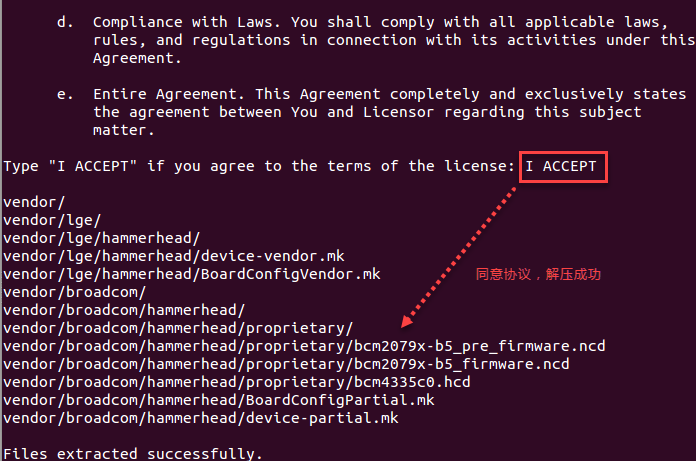
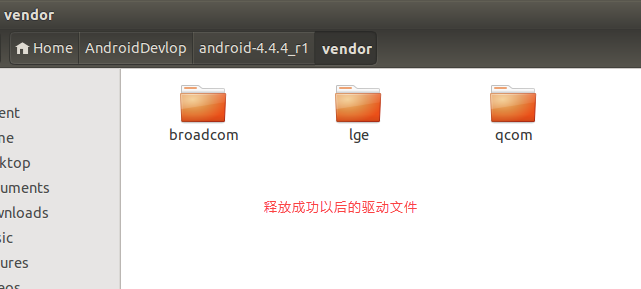
5.)3个驱动相关的脚本文件执行解压缩成功,会在Android 4.4.4 r1源码的根目录下创建 vendor 文件,将编译需要的驱动文件释放到 vendor 文件中。
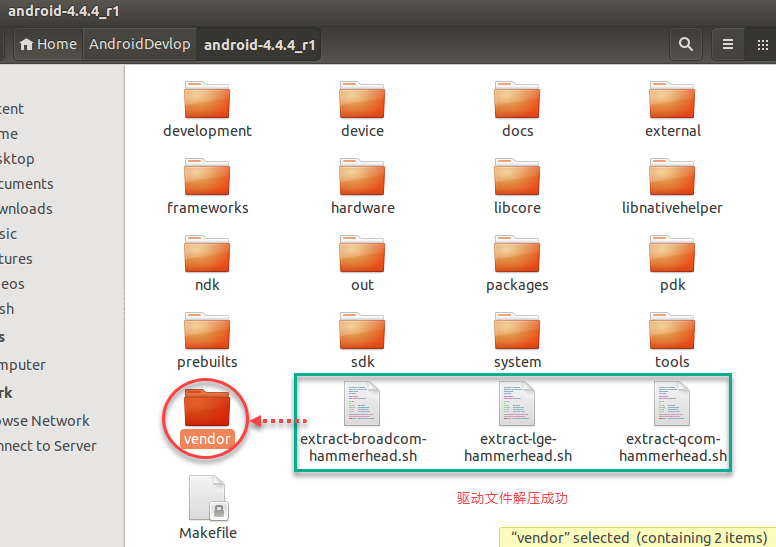
驱动文件释放成功以后的截图:
二、Android源码的编译
1.)关于Android源码编译环境的配置,可以参考谷歌官方的链接:https://source.android.com/source/initializing.html 和 https://source.android.com/source/requirements.html 进行操作也可以参考前面的博客 ubuntu 14.04.5 编译Android 4.4.4 r1源码(最新) 的步骤进行Android源码编译环境的配置也可以参考其他大牛的博客。不想走弯路,最好还是按照google官方的说明文档来进行配置操作。
2.)Android 4.4.4 r1源码的编译步骤按照google官方的操作来
Android源码编译的步骤可以参考谷歌官方的文档:https://source.android.com/source/building.html 。
Clean up
To ensure the newly installed binaries are properly taken into account after being extracted, delete the existing output of any previous build using:
$ make clobber注意:这一步一定要,否则在后面的源码编译中就会掉坑里爬不起来;具体的错误,后面我会单独拿出来说。
Set up environment
Initialize the environment with the envsetup.sh script. Note that replacing source with . (a single dot) saves a few characters, and the short form is more commonly used in documentation.
$ source build/envsetup.sh or
$ . build/envsetup.shChoose a target
Choose which target to build with lunch. The exact configuration can be passed as an argument. For example, the following command:
$ lunch aosp_arm-eng refers to a complete buildfor the emulator, with all debugging enabled.
If run with no arguments lunch will prompt you to choose a target from the menu.
All build targets take the form BUILD-BUILDTYPE, where the BUILD isa codename referring to the particular feature combination.
The BUILDTYPE is one of the following:
| Buildtype | Use |
|---|---|
| user | limited access; suited for production |
| userdebug | like “user” but with root access and debuggability; preferred for debugging |
| eng | development configuration with additional debugging tools |
For more information about building for and running on actual hardware, see Running Builds.
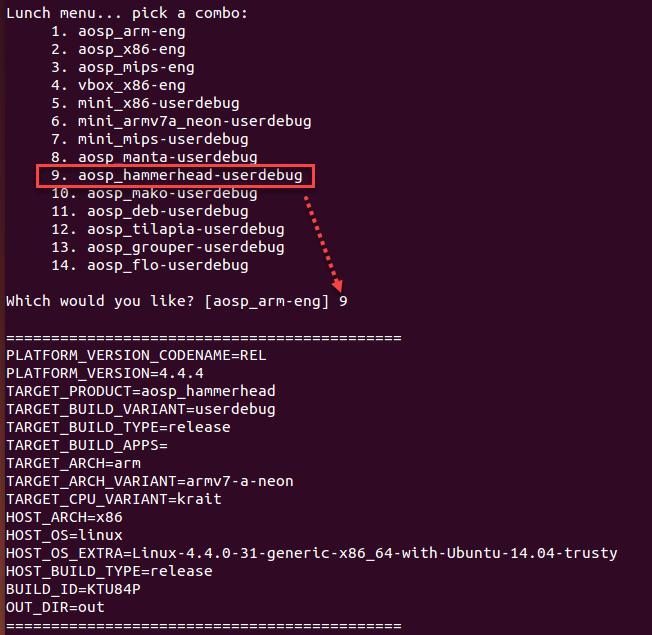
基于Nexus 5手机的机型考虑,lunch 9 选择 编译类型为 aosp_hammerhead-userdebug ,为什么选择该编译类型呢?可以参考google官方文档 https://source.android.com/source/running.html 给出的说明。
Selecting a device build
The recommended builds for devices are available from the lunch menu, accessed when running the lunch command with no arguments. You can download factory images and binaries for Nexus devices from developers.google.com:
- Preview binaries (blobs)
- Factory images for released devices
- Support binaries (drivers) for release devices
See Obtaining proprietary binaries for more details and Device binaries requirements for other resources.
| Device | Code name | Build configuration |
|---|---|---|
| HiKey | hikey | hikey-userdebug |
| Nexus 6P | angler | aosp_angler-userdebug |
| Nexus 5X | bullhead | aosp_bullhead-userdebug |
| Nexus 6 | shamu | aosp_shamu-userdebug |
| Nexus Player | fugu | aosp_fugu-userdebug |
| Nexus 9 | volantis (flounder) | aosp_flounder-userdebug |
| Nexus 5 (GSM/LTE) | hammerhead | aosp_hammerhead-userdebug |
| Nexus 7 (Wi-Fi) | razor (flo) | aosp_flo-userdebug |
| Nexus 7 (Mobile) | razorg (deb) | aosp_deb-userdebug |
| Nexus 10 | mantaray (manta) | full_manta-userdebug |
| Nexus 4 | occam (mako) | full_mako-userdebug |
| Nexus 7 (Wi-Fi) | nakasi (grouper) | full_grouper-userdebug |
| Nexus 7 (Mobile) | nakasig (tilapia) | full_tilapia-userdebug |
| Galaxy Nexus (GSM/HSPA+) | yakju (maguro) | full_maguro-userdebug |
| Galaxy Nexus (Verizon) | mysid (toro) | aosp_toro-userdebug |
| Galaxy Nexus (Experimental) | mysidspr (toroplus) | aosp_toroplus-userdebug |
| PandaBoard (Archived) | panda | aosp_panda-userdebug |
| Motorola Xoom (U.S. Wi-Fi) | wingray | full_wingray-userdebug |
| Nexus S | soju (crespo) | full_crespo-userdebug |
| Nexus S 4G | sojus (crespo4g) | full_crespo4g-userdebug |
Note: Do not use Android 4.1.1 on a Nexus 7 originally sold with Android 4.1.2 or newer.
选择 Android 4.4.4 r1 源码编译的类型为 aosp_hammerhead-userdebug。
执行下面的命令编译Android 4.4.4 r1 的源码.
Build the code
Please note, this section is merely a summary to ensure setup is complete. See Running Builds for detailed instructions on building Android.
Build everything with make.GNU make can handle parallel tasks with a -jN argument, and it’s common to use a number of tasks N that’s between 1 and 2times the number of hardware threads on the computer being used for the build. For example, on a dual-E5520 machine (2 CPUs, 4 cores per CPU, 2 threads per core), the fastest builds are made with commands between make -j16 and make -j32.
$ make -j4

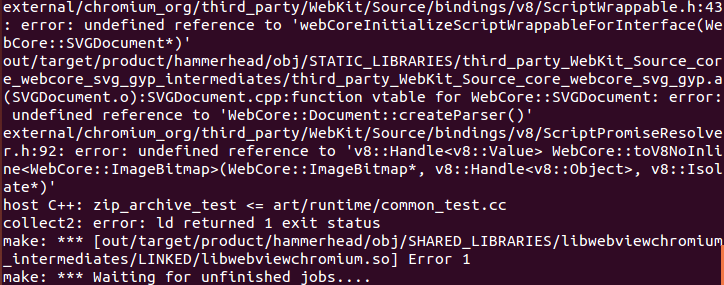
3.)Android 4.4.4 r1源码编译中遇到的坑 /LINKED/libwebviewchromium.so 错误
out/target/product/hammerhead/obj/STATIC_LIBRARIES/third_party_WebKit_Source_core_webcore_remaining_gyp_intermediates/third_party_WebKit_Source_core_webcore_remaining_gyp.a(SinkDocument.o):SinkDocument.cpp:function vtable for WebCore::SinkDocument: error: undefined reference to 'non-virtual thunk to WebCore::Document::virtualCompleteURL(WTF::String const&) const'
out/target/product/hammerhead/obj/STATIC_LIBRARIES/third_party_WebKit_Source_core_webcore_remaining_gyp_intermediates/third_party_WebKit_Source_core_webcore_remaining_gyp.a(SinkDocument.o):SinkDocument.cpp:function vtable for WebCore::SinkDocument: error: undefined reference to 'non-virtual thunk to WebCore::Document::addMessage(WebCore::MessageSource, WebCore::MessageLevel, WTF::String const&, WTF::String const&, unsigned int, WebCore::ScriptState*)'
out/target/product/hammerhead/obj/STATIC_LIBRARIES/third_party_WebKit_Source_core_webcore_remaining_gyp_intermediates/third_party_WebKit_Source_core_webcore_remaining_gyp.a(SinkDocument.o):SinkDocument.cpp:function vtable for WebCore::SinkDocument: error: undefined reference to 'non-virtual thunk to WebCore::Document::reportBlockedScriptExecutionToInspector(WTF::String const&)'
out/target/product/hammerhead/obj/STATIC_LIBRARIES/third_party_WebKit_Source_core_webcore_remaining_gyp_intermediates/third_party_WebKit_Source_core_webcore_remaining_gyp.a(SinkDocument.o):SinkDocument.cpp:function vtable for WebCore::SinkDocument: error: undefined reference to 'non-virtual thunk to WebCore::Document::errorEventTarget()'
out/target/product/hammerhead/obj/STATIC_LIBRARIES/third_party_WebKit_Source_core_webcore_remaining_gyp_intermediates/third_party_WebKit_Source_core_webcore_remaining_gyp.a(SinkDocument.o):SinkDocument.cpp:function vtable for WebCore::SinkDocument: error: undefined reference to 'non-virtual thunk to WebCore::Document::logExceptionToConsole(WTF::String const&, WTF::String const&, int, int, WTF::PassRefPtr<WebCore::ScriptCallStack>)'
out/target/product/hammerhead/obj/STATIC_LIBRARIES/third_party_WebKit_Source_core_webcore_remaining_gyp_intermediates/third_party_WebKit_Source_core_webcore_remaining_gyp.a(SinkDocument.o):SinkDocument.cpp:function vtable for WebCore::SinkDocument: error: undefined reference to 'non-virtual thunk to WebCore::Document::timerAlignmentInterval() const'
out/target/product/hammerhead/obj/STATIC_LIBRARIES/third_party_WebKit_Source_core_webcore_remaining_gyp_intermediates/third_party_WebKit_Source_core_webcore_remaining_gyp.a(SinkDocument.o):SinkDocument.cpp:function vtable for WebCore::SinkDocument: error: undefined reference to 'non-virtual thunk to WebCore::Document::didUpdateSecurityOrigin()'
out/target/product/hammerhead/obj/STATIC_LIBRARIES/third_party_WebKit_Source_core_webcore_remaining_gyp_intermediates/third_party_WebKit_Source_core_webcore_remaining_gyp.a(SinkDocument.o):SinkDocument.cpp:function vtable for WebCore::SinkDocument: error: undefined reference to 'non-virtual thunk to WebCore::Document::tasksWereSuspended()'
out/target/product/hammerhead/obj/STATIC_LIBRARIES/third_party_WebKit_Source_core_webcore_remaining_gyp_intermediates/third_party_WebKit_Source_core_webcore_remaining_gyp.a(SinkDocument.o):SinkDocument.cpp:function vtable for WebCore::SinkDocument: error: undefined reference to 'non-virtual thunk to WebCore::Document::tasksWereResumed()'
out/target/product/hammerhead/obj/STATIC_LIBRARIES/third_party_WebKit_Source_core_webcore_remaining_gyp_intermediates/third_party_WebKit_Source_core_webcore_remaining_gyp.a(SinkDocument.o):SinkDocument.cpp:function vtable for WebCore::SinkDocument: error: undefined reference to 'non-virtual thunk to WebCore::Document::isContextThread() const'
external/chromium_org/third_party/WebKit/Source/bindings/v8/ScriptWrappable.h:43: error: undefined reference to 'webCoreInitializeScriptWrappableForInterface(WebCore::DedicatedWorkerGlobalScope*)'
external/chromium_org/third_party/WebKit/Source/core/svg/SVGDocument.h:31: error: undefined reference to 'WebCore::Document::~Document()'
external/chromium_org/third_party/WebKit/Source/core/svg/SVGDocument.cpp:38: error: undefined reference to 'WebCore::Document::Document(WebCore::DocumentInit const&, unsigned char)'
external/chromium_org/third_party/WebKit/Source/bindings/v8/ScriptWrappable.h:43: error: undefined reference to 'webCoreInitializeScriptWrappableForInterface(WebCore::SVGDocument*)'
out/target/product/hammerhead/obj/STATIC_LIBRARIES/third_party_WebKit_Source_core_webcore_svg_gyp_intermediates/third_party_WebKit_Source_core_webcore_svg_gyp.a(SVGDocument.o):SVGDocument.cpp:function vtable for WebCore::SVGDocument: error: undefined reference to 'WebCore::Document::createParser()'
external/chromium_org/third_party/WebKit/Source/bindings/v8/ScriptPromiseResolver.h:92: error: undefined reference to 'v8::Handle<v8::Value> WebCore::toV8NoInline<WebCore::ImageBitmap>(WebCore::ImageBitmap*, v8::Handle<v8::Object>, v8::Isolate*)'
host C++: zip_archive_test <= art/runtime/common_test.cc
collect2: error: ld returned 1 exit status
make: *** [out/target/product/hammerhead/obj/SHARED_LIBRARIES/libwebviewchromium_intermediates/LINKED/libwebviewchromium.so] Error 1
make: *** Waiting for unfinished jobs....
androidcode@ubuntu:~/AndroidDevlop/android-4.4
错误截图如下:
++++++++++++++++++++++++++++++++++++++++++++++++++++++++++++++++++++++++++++++++++++++++++++++++++
google查了一下发现网上也有人遇到了这个错误,但是都没给出好的解决方法 ,具体的讨论如下:
<1> 有网友讲是Android源码编译的过程运行内存不够的原因,需要设置ubuntu系统的运行内存和物理内存的交换缓冲。
错误1
PRODUCT_COPY_FILES device/generic/goldfish/data/etc/apns-conf.xml:system/etc/apns-conf.xml ignored.
target SharedLib: libwebviewchromium (out/target/product/hammerhead/obj/SHARED_LIBRARIES/libwebviewchromium_intermediates/LINKED/libwebviewchromium.so)
collect2: error: ld terminated with signal 9 [Killed]
make: *** [out/target/product/hammerhead/obj/SHARED_LIBRARIES/libwebviewchromium_intermediates/LINKED/libwebviewchromium.so] エラー 1
解决办法
sudo dd if=/dev/zero of=/var/swapfile bs=1M count=2048
sudo chmod 600 /var/swapfile
sudo mkswap /var/swapfile
echo /var/swapfile none swap defaults 0 0 | sudo tee -a /etc/fstab
sudo swapon -a

# 此方法对上面我提到的错误无效,和上面我提到的错误根本就不是一回事,忽略
# 参考链接:http://none53.hatenablog.com/entry/20131128/1385601681
错误2
build/core/shared_library_internal.mk:68 recipe for target 'out/target/product/generic/obj/SHARED_LIBRARIES/libwebviewchromium_intermediates/LINKED/libwebviewchromium.so' failed

make: ** [out/target/product/generic/obj/SHARED_LIBRARIES/libwebviewchromium_intermediates/LINKED/libwebviewchromium.so] Error 1

make: ** Deleting file 'out/target/product/generic/obj/SHARED_LIBRARIES/libwebviewchromium_intermediates/
解决办法
设置两个swap文件,每个swap的大小都设置为1G,使用了下面的命令:
1.sudo dd if=/dev/zero of=/opt/swap1 bs=1024 count=1024000
  (count的值等于1024 x 你想要的文件大小, 4096000是4G,1024000是1G)
2.sudo mkswap /opt/swap1
 (把这个文件变成swap文件)
3.sudo swapon /opt/swap1
 (启用这个swap文件)
4.为了使每次开机时都能正常使用swap文件,所以这里需要把swap文件增加到fstab文件中
  sudo gedit /etc/fstab

 在最后一行增加如下内容
 /opt/swap1 swap swap defaults 0 0
重复上述4步,再次增加一个/opt/swap2的文件。

# 参考链接:http://jileniao.net/ubunt-add-swap-to-build-libwebviewchromium.html
# 参考链接:http://www.cnblogs.com/ksmile/p/4596036.html
# 参考链接:http://blog.csdn.net/fantasy_wxe/article/details/18000159

# 说明:还没能解决我的问题,忽略
<2> chromium-os项目组一位开发者也遇到了类似的问题
参考链接:https://groups.google.com/a/chromium.org/forum/#!topic/chromium-os-discuss/tGeRjAI1x6s
c/Release/obj.target/third_party/WebKit/Source/core/core.gyp/libwebcore_remaining.a(c/Release/obj.target/third_party/WebKit/Source/core/core.gyp/../../../../../webcore_remaining/third_party/WebKit/Source/core/workers/Worker.o):Worker.cpp:function WebCore::Worker::notifyFinished(): error: undefined reference to 'WebCore::InspectorInstrumentation::scriptImportedImpl(WebCore::InstrumentingAgents*, unsigned long, WTF::String const&)'
c/Release/obj.target/third_party/WebKit/Source/core/core.gyp/libwebcore_remaining.a(c/Release/obj.target/third_party/WebKit/Source/core/core.gyp/../../../../../webcore_remaining/third_party/WebKit/Source/core/workers/Worker.o):Worker.cpp:function WebCore::Worker::didReceiveResponse(unsigned long, WebCore::ResourceResponse const&): error: undefined reference to 'WebCore::InspectorInstrumentation::didReceiveScriptResponseImpl(WebCore::InstrumentingAgents*, unsigned long)'
collect2: error: ld returned 1 exit status
make: *** [c/Release/chrome] Error 1
 * ERROR: chromeos-base/chromeos-chrome-29.0.1517.0_rc-r2 failed (compile phase):
 *   emake failed
 *
 * If you need support, post the output of 'emerge --info =chromeos-base/chromeos-chrome-29.0.1517.0_rc-r2',
 * the complete build log and the output of 'emerge -pqv =chromeos-base/chromeos-chrome-29.0.1517.0_rc-r2'.
 * This ebuild is from an overlay named 'chromiumos': '/mnt/host/source/src/third_party/chromiumos-overlay/'
 * The complete build log is located at '/build/amd64-generic/tmp/portage/logs/chromeos-base:chromeos-chrome-29.0.1517.0_rc-r2:20130531-041701.log'.
 * The ebuild environment file is located at '/build/amd64-generic/tmp/portage/chromeos-base/chromeos-chrome-29.0.1517.0_rc-r2/temp/environment'.
 * S: '/build/amd64-generic/tmp/portage/chromeos-base/chromeos-chrome-29.0.1517.0_rc-r2/work/chromeos-chrome-29.0.1517.0_rc'
解决方法
iirc, the webkit->blink transition did not go as cleanly as hoped.  you should manually `rm -rf` the partial build dir and try again:

sudo rm -rf /var/cache/chromeos-chrome/chrome-src/*

-mike

# 遗憾的是,对我遇到的问题仍然没有用
++++++++++++++++++++++++++++++++++++++++++++++++++++++++++++++++++++++++++++++++++++++++++++++++++
但是受到上面这个解决方法的启发,由于在拷贝驱动文件到Android 4.4.4 r1源码的根目录之前,我已经编译成功了一次Andriod源码,后面添加了驱动文件 vendor 以后,直接再次 make 编译源码,很有可能是前面编译生成的Android源码模块已经编译生成,再次编译的时候就不再编译了,导致驱动文件 vendor 没有很好的和驱动文件 vendor衔接起来,因此执行一次 make clobber 命令后再重新编译添加了驱动文件 vendor 的Android 4.4.4 r1的源码,编译成功。
make clobber
<3> Android 4.4.4 r1的源码编译成功
Export includes file: bootable/recovery/applypatch/Android.mk -- out/host/linux-x86/obj/EXECUTABLES/imgdiff_intermediates/export_includes
host Executable: imgdiff (out/host/linux-x86/obj/EXECUTABLES/imgdiff_intermediates/imgdiff)
Notice file: bootable/recovery/applypatch/NOTICE -- out/host/linux-x86/obj/NOTICE_FILES/src//bin/imgdiff.txt
Notice file: external/bzip2/NOTICE -- out/host/linux-x86/obj/NOTICE_FILES/src//lib/libbz.a.txt
Install: out/host/linux-x86/bin/imgdiff
Import includes file: out/host/linux-x86/obj/EXECUTABLES/bsdiff_intermediates/import_includes
host C: bsdiff <= external/bsdiff/bsdiff.c
external/bsdiff/bsdiff.c: In function 'main':
external/bsdiff/bsdiff.c:196:5: warning: 'pos' may be used uninitialized in this function [-Wmaybe-uninitialized]
Export includes file: external/bsdiff/Android.mk -- out/host/linux-x86/obj/EXECUTABLES/bsdiff_intermediates/export_includes
host Executable: bsdiff (out/host/linux-x86/obj/EXECUTABLES/bsdiff_intermediates/bsdiff)
Install: out/host/linux-x86/bin/bsdiff
Construct recovery from boot
mkdir -p out/target/product/hammerhead/obj/PACKAGING/recovery_patch_intermediates/
PATH=out/host/linux-x86/bin:$PATH out/host/linux-x86/bin/imgdiff out/target/product/hammerhead/boot.img out/target/product/hammerhead/recovery.img out/target/product/hammerhead/obj/PACKAGING/recovery_patch_intermediates/recovery_from_boot.p
failed to reconstruct target deflate chunk 1 [(null)]; treating as normal
chunk 0: type 0 start 0 len 8409098
chunk 1: type 2 start 8409098 len 900864
chunk 2: type 0 start 8908075 len 725
Construct patches for 3 chunks...
patch 0 is 204 bytes (of 8409098)
patch 1 is 445991 bytes (of 498977)
patch 2 is 186 bytes (of 725)
chunk 0: normal ( 0, 8409098) 204
chunk 1: deflate ( 8409098, 1096516) 445991 (null)
chunk 2: normal ( 9505614, 1202) 186
Install system fs image: out/target/product/hammerhead/system.img
out/target/product/hammerhead/system.img+out/target/product/hammerhead/obj/PACKAGING/recovery_patch_intermediates/recovery_from_boot.p maxsize=1096212480 blocksize=135168 total=298434837 reserve=11083776
Target userdata fs image: out/target/product/hammerhead/userdata.img
Running: mkuserimg.sh -s out/target/product/hammerhead/data out/target/product/hammerhead/userdata.img ext4 data 13725837312 out/target/product/hammerhead/root/file_contexts
+ echo 'in mkuserimg.sh PATH=out/host/linux-x86/bin/:/home/androidcode/AndroidDevlop/jdk1.6.0_45/bin:/home/androidcode/AndroidDevlop/android-4.4.4_r1/out/host/linux-x86/bin:/home/androidcode/AndroidDevlop/android-4.4.4_r1/prebuilts/gcc/linux-x86/arm/arm-linux-androideabi-4.7/bin:/home/androidcode/AndroidDevlop/android-4.4.4_r1/prebuilts/gcc/linux-x86/arm/arm-eabi-4.7/bin:/home/androidcode/AndroidDevlop/android-4.4.4_r1/prebuilts/gcc/linux-x86/mips/mipsel-linux-android-4.7/bin:/home/androidcode/AndroidDevlop/android-4.4.4_r1/development/emulator/qtools:/home/androidcode/AndroidDevlop/android-4.4.4_r1/prebuilts/gcc/linux-x86/arm/arm-linux-androideabi-4.7/bin:/home/androidcode/AndroidDevlop/android-4.4.4_r1/prebuilts/gcc/linux-x86/arm/arm-eabi-4.7/bin:/home/androidcode/AndroidDevlop/android-4.4.4_r1/development/scripts:/home/androidcode/AndroidDevlop/android-4.4.4_r1/prebuilts/devtools/tools:/usr/local/sbin:/usr/local/bin:/usr/sbin:/usr/bin:/sbin:/bin:/usr/games:/usr/local/games:/home/androidcode/AndroidDevlop/jdk1.6.0_45/bin:/home/androidcode/AndroidDevlop/adt-bundle-linux-x86_64-20140702/sdk/platform-tools:/home/androidcode/AndroidDevlop/adt-bundle-linux-x86_64-20140702/sdk/tools:/home/androidcode/AndroidDevlop/android-ndk-r10d'
in mkuserimg.sh PATH=out/host/linux-x86/bin/:/home/androidcode/AndroidDevlop/jdk1.6.0_45/bin:/home/androidcode/AndroidDevlop/android-4.4.4_r1/out/host/linux-x86/bin:/home/androidcode/AndroidDevlop/android-4.4.4_r1/prebuilts/gcc/linux-x86/arm/arm-linux-androideabi-4.7/bin:/home/androidcode/AndroidDevlop/android-4.4.4_r1/prebuilts/gcc/linux-x86/arm/arm-eabi-4.7/bin:/home/androidcode/AndroidDevlop/android-4.4.4_r1/prebuilts/gcc/linux-x86/mips/mipsel-linux-android-4.7/bin:/home/androidcode/AndroidDevlop/android-4.4.4_r1/development/emulator/qtools:/home/androidcode/AndroidDevlop/android-4.4.4_r1/prebuilts/gcc/linux-x86/arm/arm-linux-androideabi-4.7/bin:/home/androidcode/AndroidDevlop/android-4.4.4_r1/prebuilts/gcc/linux-x86/arm/arm-eabi-4.7/bin:/home/androidcode/AndroidDevlop/android-4.4.4_r1/development/scripts:/home/androidcode/AndroidDevlop/android-4.4.4_r1/prebuilts/devtools/tools:/usr/local/sbin:/usr/local/bin:/usr/sbin:/usr/bin:/sbin:/bin:/usr/games:/usr/local/games:/home/androidcode/AndroidDevlop/jdk1.6.0_45/bin:/home/androidcode/AndroidDevlop/adt-bundle-linux-x86_64-20140702/sdk/platform-tools:/home/androidcode/AndroidDevlop/adt-bundle-linux-x86_64-20140702/sdk/tools:/home/androidcode/AndroidDevlop/android-ndk-r10d
+ ENABLE_SPARSE_IMAGE=
+ '[' -s = -s ']'
+ ENABLE_SPARSE_IMAGE=-s
+ shift
+ '[' 6 -ne 5 -a 6 -ne 6 ']'
+ SRC_DIR=out/target/product/hammerhead/data
+ '[' '!' -d out/target/product/hammerhead/data ']'
+ OUTPUT_FILE=out/target/product/hammerhead/userdata.img
+ EXT_VARIANT=ext4
+ MOUNT_POINT=data
+ SIZE=13725837312
+ FC=out/target/product/hammerhead/root/file_contexts
+ case $EXT_VARIANT in
+ '[' -z data ']'
+ '[' -z 13725837312 ']'
+ '[' -n out/target/product/hammerhead/root/file_contexts ']'
+ FCOPT='-S out/target/product/hammerhead/root/file_contexts'
+ MAKE_EXT4FS_CMD='make_ext4fs -s -S out/target/product/hammerhead/root/file_contexts -l 13725837312 -a data out/target/product/hammerhead/userdata.img out/target/product/hammerhead/data'
+ echo make_ext4fs -s -S out/target/product/hammerhead/root/file_contexts -l 13725837312 -a data out/target/product/hammerhead/userdata.img out/target/product/hammerhead/data
make_ext4fs -s -S out/target/product/hammerhead/root/file_contexts -l 13725837312 -a data out/target/product/hammerhead/userdata.img out/target/product/hammerhead/data
+ make_ext4fs -s -S out/target/product/hammerhead/root/file_contexts -l 13725837312 -a data out/target/product/hammerhead/userdata.img out/target/product/hammerhead/data
Creating filesystem with parameters:
Size: 13725835264
Block size: 4096
Blocks per group: 32768
Inodes per group: 8144
Inode size: 256
Journal blocks: 32768
Label:
Blocks: 3351034
Block groups: 103
Reserved block group size: 823
Created filesystem with 11/838832 inodes and 93654/3351034 blocks
+ '[' 0 -ne 0 ']'
out/target/product/hammerhead/userdata.img maxsize=14013113664 blocksize=135168 total=140614516 reserve=141656064
Target cache fs image: out/target/product/hammerhead/cache.img
Running: mkuserimg.sh -s out/target/product/hammerhead/cache out/target/product/hammerhead/cache.img ext4 cache 734003200 out/target/product/hammerhead/root/file_contexts
+ echo 'in mkuserimg.sh PATH=out/host/linux-x86/bin/:/home/androidcode/AndroidDevlop/jdk1.6.0_45/bin:/home/androidcode/AndroidDevlop/android-4.4.4_r1/out/host/linux-x86/bin:/home/androidcode/AndroidDevlop/android-4.4.4_r1/prebuilts/gcc/linux-x86/arm/arm-linux-androideabi-4.7/bin:/home/androidcode/AndroidDevlop/android-4.4.4_r1/prebuilts/gcc/linux-x86/arm/arm-eabi-4.7/bin:/home/androidcode/AndroidDevlop/android-4.4.4_r1/prebuilts/gcc/linux-x86/mips/mipsel-linux-android-4.7/bin:/home/androidcode/AndroidDevlop/android-4.4.4_r1/development/emulator/qtools:/home/androidcode/AndroidDevlop/android-4.4.4_r1/prebuilts/gcc/linux-x86/arm/arm-linux-androideabi-4.7/bin:/home/androidcode/AndroidDevlop/android-4.4.4_r1/prebuilts/gcc/linux-x86/arm/arm-eabi-4.7/bin:/home/androidcode/AndroidDevlop/android-4.4.4_r1/development/scripts:/home/androidcode/AndroidDevlop/android-4.4.4_r1/prebuilts/devtools/tools:/usr/local/sbin:/usr/local/bin:/usr/sbin:/usr/bin:/sbin:/bin:/usr/games:/usr/local/games:/home/androidcode/AndroidDevlop/jdk1.6.0_45/bin:/home/androidcode/AndroidDevlop/adt-bundle-linux-x86_64-20140702/sdk/platform-tools:/home/androidcode/AndroidDevlop/adt-bundle-linux-x86_64-20140702/sdk/tools:/home/androidcode/AndroidDevlop/android-ndk-r10d'
in mkuserimg.sh PATH=out/host/linux-x86/bin/:/home/androidcode/AndroidDevlop/jdk1.6.0_45/bin:/home/androidcode/AndroidDevlop/android-4.4.4_r1/out/host/linux-x86/bin:/home/androidcode/AndroidDevlop/android-4.4.4_r1/prebuilts/gcc/linux-x86/arm/arm-linux-androideabi-4.7/bin:/home/androidcode/AndroidDevlop/android-4.4.4_r1/prebuilts/gcc/linux-x86/arm/arm-eabi-4.7/bin:/home/androidcode/AndroidDevlop/android-4.4.4_r1/prebuilts/gcc/linux-x86/mips/mipsel-linux-android-4.7/bin:/home/androidcode/AndroidDevlop/android-4.4.4_r1/development/emulator/qtools:/home/androidcode/AndroidDevlop/android-4.4.4_r1/prebuilts/gcc/linux-x86/arm/arm-linux-androideabi-4.7/bin:/home/androidcode/AndroidDevlop/android-4.4.4_r1/prebuilts/gcc/linux-x86/arm/arm-eabi-4.7/bin:/home/androidcode/AndroidDevlop/android-4.4.4_r1/development/scripts:/home/androidcode/AndroidDevlop/android-4.4.4_r1/prebuilts/devtools/tools:/usr/local/sbin:/usr/local/bin:/usr/sbin:/usr/bin:/sbin:/bin:/usr/games:/usr/local/games:/home/androidcode/AndroidDevlop/jdk1.6.0_45/bin:/home/androidcode/AndroidDevlop/adt-bundle-linux-x86_64-20140702/sdk/platform-tools:/home/androidcode/AndroidDevlop/adt-bundle-linux-x86_64-20140702/sdk/tools:/home/androidcode/AndroidDevlop/android-ndk-r10d
+ ENABLE_SPARSE_IMAGE=
+ '[' -s = -s ']'
+ ENABLE_SPARSE_IMAGE=-s
+ shift
+ '[' 6 -ne 5 -a 6 -ne 6 ']'
+ SRC_DIR=out/target/product/hammerhead/cache
+ '[' '!' -d out/target/product/hammerhead/cache ']'
+ OUTPUT_FILE=out/target/product/hammerhead/cache.img
+ EXT_VARIANT=ext4
+ MOUNT_POINT=cache
+ SIZE=734003200
+ FC=out/target/product/hammerhead/root/file_contexts
+ case $EXT_VARIANT in
+ '[' -z cache ']'
+ '[' -z 734003200 ']'
+ '[' -n out/target/product/hammerhead/root/file_contexts ']'
+ FCOPT='-S out/target/product/hammerhead/root/file_contexts'
+ MAKE_EXT4FS_CMD='make_ext4fs -s -S out/target/product/hammerhead/root/file_contexts -l 734003200 -a cache out/target/product/hammerhead/cache.img out/target/product/hammerhead/cache'
+ echo make_ext4fs -s -S out/target/product/hammerhead/root/file_contexts -l 734003200 -a cache out/target/product/hammerhead/cache.img out/target/product/hammerhead/cache
make_ext4fs -s -S out/target/product/hammerhead/root/file_contexts -l 734003200 -a cache out/target/product/hammerhead/cache.img out/target/product/hammerhead/cache
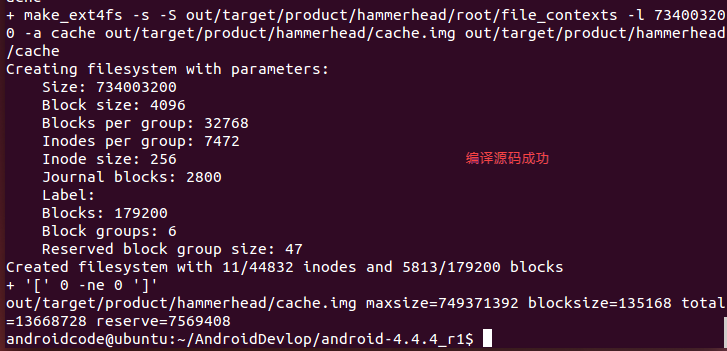
+ make_ext4fs -s -S out/target/product/hammerhead/root/file_contexts -l 734003200 -a cache out/target/product/hammerhead/cache.img out/target/product/hammerhead/cache
Creating filesystem with parameters:
Size: 734003200
Block size: 4096
Blocks per group: 32768
Inodes per group: 7472
Inode size: 256
Journal blocks: 2800
Label:
Blocks: 179200
Block groups: 6
Reserved block group size: 47
Created filesystem with 11/44832 inodes and 5813/179200 blocks
+ '[' 0 -ne 0 ']'
out/target/product/hammerhead/cache.img maxsize=749371392 blocksize=135168 total=13668728 reserve=7569408
源码编译成功的截图
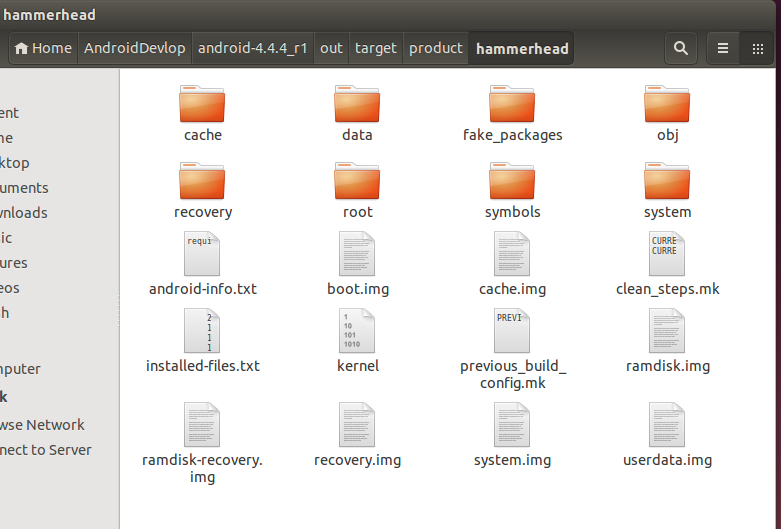
<4> Android 4.4.4 r1的源码编译成功后产生的刷机文件
<5> 有关Android 4.4.4 r1的源码编译成功后产生的刷机文件的相关的说明
Build 结果的目录结构
所有的编译产物都将位于 /out 目录下,该目录下主要有以下几个子目录:
- /out/host/:该目录下包含了针对主机的 Android 开发工具的产物。即 SDK 中的各种工具,例如:emulator,adb,aapt 等。
- /out/target/common/:该目录下包含了针对设备的共同的编译产物,主要是 Java 应用代码和 Java 库。
- /out/target/product/<product_name>/:包含了针对特定设备的编译结果以及平台相关的 C/C++ 库和二进制文件。其中,<product_name>是具体目标设备的名称。
- /out/dist/:包含了为多种分发而准备的包,通过“make disttarget”将文件拷贝到该目录,默认的编译目标不会产生该目录。
Build 生成的镜像文件
Build 的产物中最重要的是三个镜像文件,它们都位于 /out/target/product/<product_name>/ 目录下。
这三个文件是:
- system.img:包含了 Android OS 的系统文件库,可执行文件以及预置的应用程序,将被挂载为根分区。 ?
- ramdisk.img:在启动时将被 Linux 内核挂载为只读分区,它包含了 /init 文件和一些配置文件。它用来挂载其他系统镜像并启动 init 进程。
- userdata.img:将被挂载为 /data,包含了应用程序相关的数据以及和用户相关的数据。
img文件:
system.img:由out/target/product/PRODUCT_OUT/system目录生成
ramdisk.img:由out/target/product/PRODUCT_OUT/root目录生成
userdata.img:由out/target/product/PRODUCT_OUT/data目录生成
boot.img:包含kernel.img和ramdisk.img
recovery.img:我们可以通过boot.img和recovery_from_boot.p文件生成一个recovery.img文件 ?
参考链接:http://www.cnblogs.com/vendanner/p/4881720.html
三、对Nexus 5设备进行刷机
1)如果Ubuntu系统中没有 fastboot 和 adb 工具的话,可以使用下面的方法编译获得(先把前面Android源码编译得到的刷机镜像文件备份一下),因为刷机的时候,需要用到这两个工具。当然了,安装了adt-bundle-linux-x86_64 工具的就不用再编译了,直接使用就行。
Building fastboot and adb
If you don’t already have fastboot and adb, you can build them with the regular build system. Use the instructions in Building a System and replace the main make command with:
$ make fastboot adb
2)默认情况下,Nexus 5 手机通过usb连接上电脑 (此处为 ubuntu 14.04.5系统)之后,使用adb devices 是没有权限访问手机设备的,如下图(转载的,用于示意):
注意:这里要使用到 adb 工具,如果ubuntu系统安装了adt-bundle-linux-x86_64 开发工具,默认是自带adb工具的,下面这几步也可以省了。

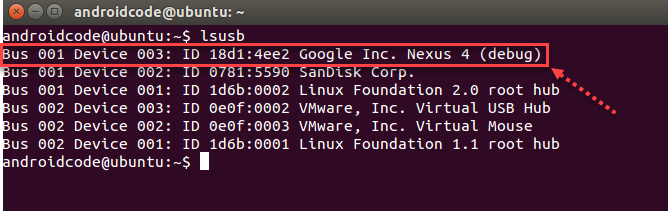
将Nexus 5设备连接上电脑(此处为 ubuntu 14.04.5系统),查看Nexus 5 手机的usb设备:
androidcode@ubuntu:~$ lsusb

# 竟然将Nexus 5 手机识别为 Nexus 4
Bus 001 Device 003: ID 18d1:4ee2 Google Inc. Nexus 4 (debug)
执行 sudo gedit /etc/udev/rules.d/51-android.rules 命令,创建并打开 51-android.rules 文件添加下面的内容到 51-android.rules 文件中。
# adb protocol on passion (Nexus One)
SUBSYSTEM=="usb", ATTR{idVendor}=="18d1", ATTR{idProduct}=="4e12", MODE="0600", OWNER="username"
# fastboot protocol on passion (Nexus One)
SUBSYSTEM=="usb", ATTR{idVendor}=="0bb4", ATTR{idProduct}=="0fff", MODE="0600", OWNER="username"
# adb protocol on crespo/crespo4g (Nexus S)
SUBSYSTEM=="usb", ATTR{idVendor}=="18d1", ATTR{idProduct}=="4e22", MODE="0600", OWNER="username"
# fastboot protocol on crespo/crespo4g (Nexus S)
SUBSYSTEM=="usb", ATTR{idVendor}=="18d1", ATTR{idProduct}=="4e20", MODE="0600", OWNER="username"
# adb protocol on stingray/wingray (Xoom)
SUBSYSTEM=="usb", ATTR{idVendor}=="22b8", ATTR{idProduct}=="70a9", MODE="0600", OWNER="username"
# fastboot protocol on stingray/wingray (Xoom)
SUBSYSTEM=="usb", ATTR{idVendor}=="18d1", ATTR{idProduct}=="708c", MODE="0600", OWNER="username"
# adb protocol on maguro/toro (Galaxy Nexus)
SUBSYSTEM=="usb", ATTR{idVendor}=="04e8", ATTR{idProduct}=="6860", MODE="0600", OWNER="username"
# fastboot protocol on maguro/toro (Galaxy Nexus)
SUBSYSTEM=="usb", ATTR{idVendor}=="18d1", ATTR{idProduct}=="4e30", MODE="0600", OWNER="username"
# adb protocol on panda (PandaBoard)
SUBSYSTEM=="usb", ATTR{idVendor}=="0451", ATTR{idProduct}=="d101", MODE="0600", OWNER="username"
# adb protocol on panda (PandaBoard ES)
SUBSYSTEM=="usb", ATTR{idVendor}=="18d1", ATTR{idProduct}=="d002", MODE="0600", OWNER="username"
# fastboot protocol on panda (PandaBoard)
SUBSYSTEM=="usb", ATTR{idVendor}=="0451", ATTR{idProduct}=="d022", MODE="0600", OWNER="username"
# usbboot protocol on panda (PandaBoard)
SUBSYSTEM=="usb", ATTR{idVendor}=="0451", ATTR{idProduct}=="d00f", MODE="0600", OWNER="username"
# usbboot protocol on panda (PandaBoard ES)
SUBSYSTEM=="usb", ATTR{idVendor}=="0451", ATTR{idProduct}=="d010", MODE="0600", OWNER="username"
# adb protocol on grouper/tilapia (Nexus 7)
SUBSYSTEM=="usb", ATTR{idVendor}=="18d1", ATTR{idProduct}=="4e42", MODE="0600", OWNER="username"
# fastboot protocol on grouper/tilapia (Nexus 7)
SUBSYSTEM=="usb", ATTR{idVendor}=="18d1", ATTR{idProduct}=="4e40", MODE="0600", OWNER="username"
# adb protocol on manta (Nexus 10)
SUBSYSTEM=="usb", ATTR{idVendor}=="18d1", ATTR{idProduct}=="4ee2", MODE="0600", OWNER="username"
# fastboot protocol on manta (Nexus 10)
SUBSYSTEM=="usb", ATTR{idVendor}=="18d1", ATTR{idProduct}=="4ee0", MODE="0600", OWNER="username"
接着执行如下命令,将上述文件中的 username 替换为自己的ubuntu系统的用户名,其中 androidcode 为我的ubuntu 14.04.5系统的账号用户名。
sudo sed -i 's/username/androidcode/g' /etc/udev/rules.d/51-android.rules
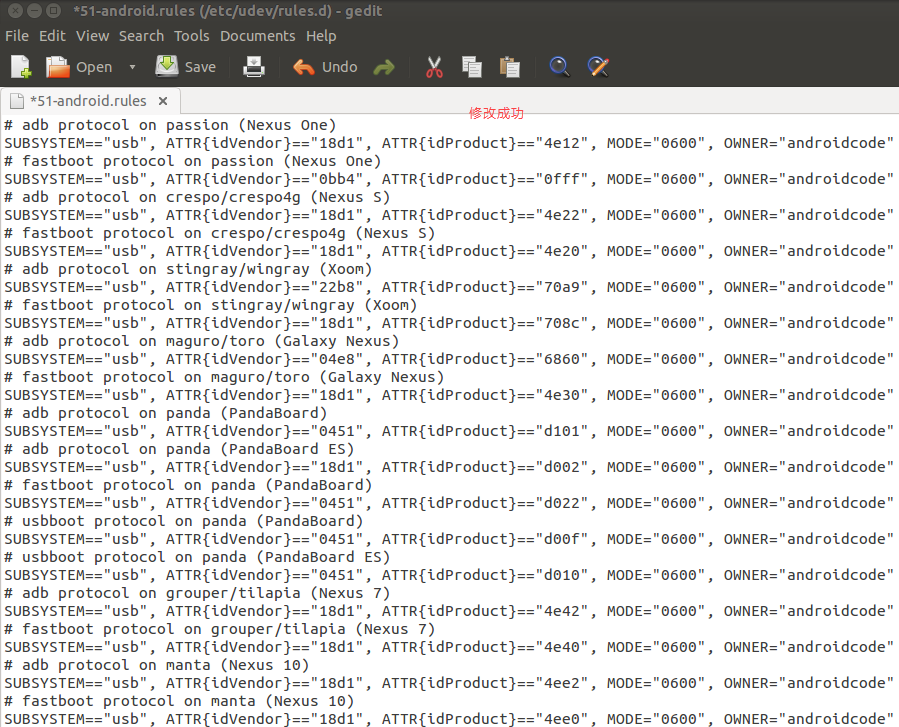
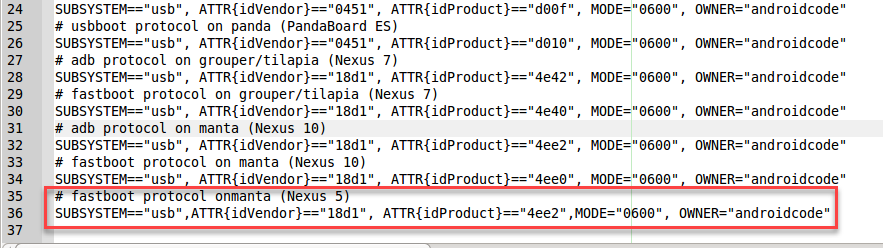
很显然上面51-android.rules文件中,没有Nexus 5设备的usb的配置信息。因此,执行 sudo geany /etc/udev/rules.d/51-android.rules打开51-android.rules文件,添加一行信息,特别注意,ATTR{idVendor} 与ATTR{idProduct} 的值分别于 ID 18d1:4ee2 对应并且sudo chmod a+rx /etc/udev/rules.d/51-android.rules赋予51-android.rules文件可读可写可执行权限(无语,竟然和Nexcus 10的一样,尴尬不知道什么原因)。
# fastboot protocol onmanta (Nexus 5) SUBSYSTEM=="usb",ATTR{idVendor}=="18d1", ATTR{idProduct}=="4ee2",MODE="0600", OWNER="androidcode"
保存/etc/udev/rules.d/51-android.rules文件后,重新将手机连接到电脑,使用 adb devices 查看设备的连接状态,可发现已经拥有了访问usb的权限。

参考地址:
http://blog.csdn.net/heiding215/article/details/44565673
http://blog.csdn.net/andie_guo/article/details/16879443
3)谷歌官方给出的配置usb访问权限的方法
Configuring USB Access
Under GNU/Linux systems (and specifically under Ubuntu systems),regular users can’t directly access USB devices by default.The system needs to be configured to allow such access.
The recommended approach is to create a file at /etc/udev/rules.d/51-android.rules (as the root user).
To do this, run the following command to download the 51-android.rules file attached to this site, modify it to include your username, andplace it in the correct location:
$ wget -S -O - http://source.android.com/source/51-android.rules | sed "s/<username>/$USER/" | sudo tee >/dev/null /etc/udev/rules.d/51-android.rules; sudo udevadm control --reload-rules
Those new rulestake effect the next time a device is plugged in. It might therefore be necessary to unplug the device and plug it back into the computer.
按照谷歌的方法就是从google网址下载一个 /etc/udev/rules.d/51-android.rules 文件,放到系统中,执行下面的命令:
wget -S -O - http://source.android.com/source/51-android.rules | sed "s/<username>/androidcode/" | sudo tee >/dev/null /etc/udev/rules.d/51-android.rules; sudo udevadm control --reload-rules
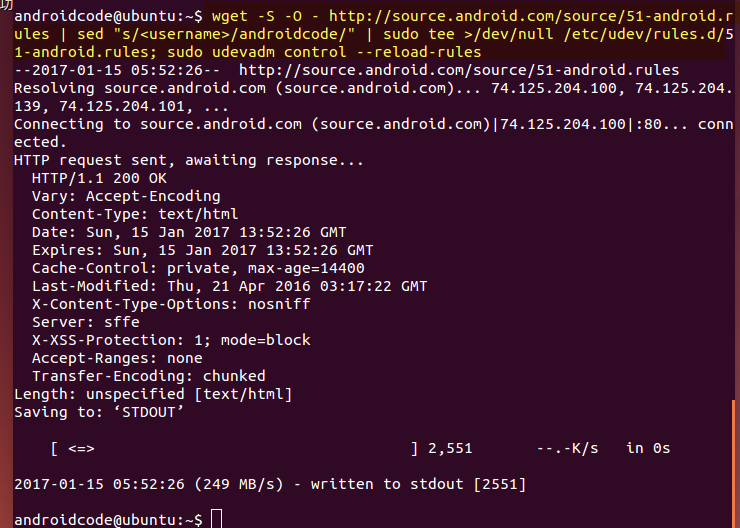
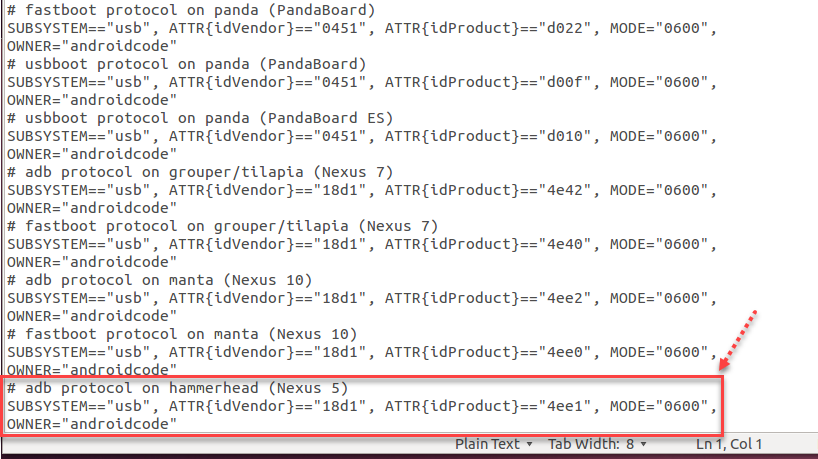
谷歌提供的方法得到的 /etc/udev/rules.d/51-android.rules 文件的结果中 ATTR{idProduct}==”4ee1″ 靠谱一点。
参考链接:http://source.android.com/source/initializing.html#configuring-usb-access
++++++++++++++++++++++++++++++++++++++++++++++++++++++++++++++++++++++++++++++++++++++++
4)有关 51-android.rules 文件的扩展学习
什么是“51-android.rules”?
在Linux下进行Android开发,连接Android手机,可能会编辑到/etc/udev/rules.d/51-android.rules文件。
那么,为什么这个文件要命名成51-android.rules,而不是其它的名字呢?
详细的解释要求对udev子系统有一定了解。下面简要介绍一下udev。
udev是Linux下的设备管理器,它支持即插即用,即自动识别新加入到系统中的外部设备,特别是USB设备。
用惯Windows的人可能没有这个意识,因为Windows很早就支持即插即用,加入新设备一直都很方便。
udev的一个特点是,它允许指定一系列响应规则,在它侦测到新设备加入的时侯,执行它们。
udev要求将这些规则存储在/etc/udev/rules.d/目录下的文件中,该文件名必须以.rules结束。
一些系统之中,udev默认的规则存储在/etc/udev/rules.d/50-udev.rules文件中。
udev按照字母排序依次解释这些文件中的规则,因此,如果你希望自己添加的规则在默认规则之后处理,那么文件名开头必须大于50,比如51。
这就是51-android.rules命名的缘由,它希望自己在默认的udev规则之后处理。
另外,简要说一下USB的知识:
一个USB设备由两个ID来标识,Vender ID和Product ID,Vender ID由设备制造商向USB执行论坛申请,Product ID则由设备制造商自行分配。
参考链接:http://www.cnblogs.com/frydsh/archive/2013/03/07/2949089.html
++++++++++++++++++++++++++++++++++++++++++++++++++++++++++++++++++++++++++++++++++++++++
5)给Nexus 5 刷机需要首先对Nexus 5手机进行解锁,解锁以后才能刷机。一般情况,在Nexus 5手机连接电脑正常的情况下,执行 fastboot oem unlock 命令,即完成对Nexus 5手机设备进行解锁处理。
Unlocking the bootloader
It’s possible to flash a custom system only if the bootloader allows it, andthe bootloader is locked by default. You can unlock the bootloader, but be aware that doing so deletes the user data for privacy reasons (the unlock operation needs to run only once). After unlocking, all data on the device is erased, i.e. both the applications’ private data and the shared data that is accessible over USB, including photos and movies. Be sure to back up any precious files before unlocking the bootloader.
With the device in fastboot mode, unlock the bootloader using:(刷机模式下进行手机设备的解锁)
$ fastboot oem unlock
The procedure must be confirmed on-screen.
On Nexus 10, after unlocking the bootloader, the internal storage remains unformatted. You can format the device using:
$ fastboot format cache
$ fastboot format userdata
To re-lock the bootloader, use:(给手机设备上锁)
$ fastboot oem lock
Note: Re-locking the bootloading on a Motorola Xoom erases user data (including the shared USB data).
6)在对Nexus 5 进行刷机的时候,需要先进入刷机模式,Nexus 5手机连接电脑正常的情况下,执行 adb reboot bootloader 命令,即可使Nexus 5进入刷机模式。
Booting into fastboot mode
During a cold boot of a device, use the following key combinations to boot into fastboot mode, which isa mode in the bootloader that can be used to flash the device:
| Device | Keys |
|---|---|
| hikey | Link pins 1 – 2 and 5 – 6 of J15 |
| angler | Press and hold Volume Down, then press and hold Power |
| bullhead | Press and hold Volume Down, then press and hold Power |
| shamu | Press and hold Volume Down, then press and hold Power |
| fugu | Press and hold Power |
| volantis | Press and hold Volume Down, then press and hold Power |
| hammerhead | Press and hold both Volume Up and Volume Down, then press and hold Power |
| flo | Press and hold Volume Down, then press and hold Power |
| deb | Press and hold Volume Down, then press and hold Power |
| manta | Press and hold both Volume Up and Volume Down, then press and hold Power |
| mako | Press and hold Volume Down, then press and hold Power |
| grouper | Press and hold Volume Down, then press and hold Power |
| tilapia | Press and hold Volume Down, then press and hold Power |
| phantasm | Power the device, cover it with one hand after the LEDs light up and until they turn red |
| maguro | Press and hold both Volume Up and Volume Down, then press and hold Power |
| toro | Press and hold both Volume Up and Volume Down, then press and hold Power |
| toroplus | Press and hold both Volume Up and Volume Down, then press and hold Power |
| panda | Press and hold Input, then press Power |
| wingray | Press and hold Volume Down, then press and hold Power |
| crespo | Press and hold Volume Up, then press and hold Power |
| crespo4g | Press and hold Volume Up, then press and hold Power |
You can also use the command adb reboot bootloader to reboot from Android directly into the bootloader with no key combinations.
参考链接:https://source.android.com/source/running.html#booting-into-fastboot-mode
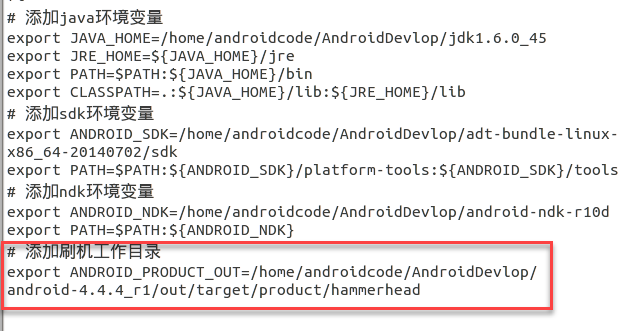
7)添加 Nexus 5 刷机的工作目录 /home/androidcode/AndroidDevlop/android-4.4.4_r1/out/target/product/hammerhead 到ubuntu 14.04.5系统的环境变量 ANDROID_PRODUCT_OUT 中,然后执行刷机命令。
Flashing a device
You can flash an entire Android system in a single command; doing so verifies the system being flashed iscompatible with the installedbootloaderandradio,writes theboot,recovery, and systempartitions together, andthen reboots the system.Flashing also erases all user data, similarly to fastboot oem unlock.
Place the device in fastboot mode either manually by holding the appropriate key combination at boot, or from the shell with:
$ adb reboot bootloader
Once the device is in fastboot mode, run:
$ fastboot flashall -w
The -w option wipes the /data partition on the device; this is useful for your first time flashing a particular device but is otherwise unnecessary.
Note: Filesystems created via fastboot on Motorola Xoom do not function optimally. We recommend re-creating filesystems through recovery, using: $ adb reboot recovery. While in recovery, open the menu (press Power + Volume Up), wipe the cache partition, then wipe data.
刷机模式下,直接执行 fastboot flashall -w 会提示没有设置刷机工作目录的错误,意思是需要 -p 指定刷机的工作目录或者将刷机的工作目录添加到环境变量 ANDROID_PRODUCT_OUT中。
androidcode@ubuntu:~$ fastboot flashall -w
error: neither -p product specified nor ANDROID_PRODUCT_OUT set
androidcode@ubuntu:~$
执行下面的命令进行刷机:
fastboot flashall -w -p /home/androidcode/AndroidDevlop/android-4.4.4_r1/out/target/product/hammerhead
或者添加刷机工作目录 /home/androidcode/AndroidDevlop/android-4.4.4_r1/out/target/product/hammerhead 到环境变量 ANDROID_PRODUCT_OUT 中。
# 添加环境变量到/etc/profile中
sudo gedit /etc/profile

export ANDROID_PRODUCT_OUT=/home/androidcode/AndroidDevlop/android-4.4.4_r1/out/target/product/hammerhead

# 刷新文件
source /etc/profile
按照的google官方的方法,对Nexus 5手机进行刷机操作。
androidcode@ubuntu:~$ adb reboot bootloader
* daemon not running. starting it now on port 5037 *
* daemon started successfully *
androidcode@ubuntu:~$ fastboot flashall -w
Creating filesystem with parameters:
    Size: 13725835264
    Block size: 4096
    Blocks per group: 32768
    Inodes per group: 8144
    Inode size: 256
    Journal blocks: 32768
    Label:
    Blocks: 3351034
    Block groups: 103
    Reserved block group size: 823
Created filesystem with 11/838832 inodes and 93654/3351034 blocks
Creating filesystem with parameters:
    Size: 734003200
    Block size: 4096
    Blocks per group: 32768
    Inodes per group: 7472
    Inode size: 256
    Journal blocks: 2800
    Label:
    Blocks: 179200
    Block groups: 6
    Reserved block group size: 47
Created filesystem with 11/44832 inodes and 5813/179200 blocks
--------------------------------------------
Bootloader Version...: HHZ11k
Baseband Version.....: M8974A-2.0.50.1.16
Serial Number........: 03150dde09380642
--------------------------------------------
checking product...
OKAY [  0.096s]
sending 'boot' (8700 KB)...
OKAY [  1.432s]
writing 'boot'...
OKAY [  0.750s]
sending 'recovery' (9284 KB)...
OKAY [  1.627s]
writing 'recovery'...
OKAY [  0.777s]
erasing 'system'...
OKAY [  1.172s]
sending 'system' (291004 KB)...
OKAY [ 37.996s]
writing 'system'...
OKAY [ 21.097s]
erasing 'userdata'...
OKAY [ 10.255s]
sending 'userdata' (137318 KB)...
OKAY [ 19.143s]
writing 'userdata'...
OKAY [  9.124s]
erasing 'cache'...
OKAY [  0.634s]
sending 'cache' (13348 KB)...
OKAY [  1.999s]
writing 'cache'...
OKAY [  1.068s]
rebooting...

finished. total time: 107.665s
androidcode@ubuntu:~$
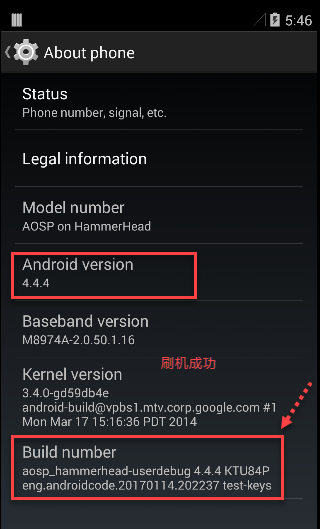
8)Nexus 5手机刷机成功的截图
感谢链接:
https://source.android.com/source/running.html#booting-into-fastboot-mode
http://blog.csdn.net/andie_guo/article/details/16879443
http://blog.csdn.net/heiding215/article/details/44565673
http://www.cnblogs.com/helloZQP/p/4198588.html
http://www.ibm.com/developerworks/cn/opensource/os-cn-android-build/index.html
http://blog.csdn.net/dd864140130/article/details/51718187
http://www.cnblogs.com/wxishang1991/p/5649517.html
http://blog.csdn.net/liuhaoyutz/article/details/8485820
发布者:全栈程序员-用户IM,转载请注明出处:https://javaforall.cn/142059.html原文链接:https://javaforall.cn
【正版授权,激活自己账号】: Jetbrains全家桶Ide使用,1年售后保障,每天仅需1毛
【官方授权 正版激活】: 官方授权 正版激活 支持Jetbrains家族下所有IDE 使用个人JB账号...
