大家好,又见面了,我是你们的朋友全栈君。
2015年02月26日 13:59:11
阅读数:81047
转:http://blog.csdn.net/wangjia55/article/details/8818845
在使用git来进行版本控制时,为了得一个项目的拷贝(copy),我们需要知道这个项目仓库的地址(Git URL). Git能在许多协议下使用,所以Git URL可能以ssh://, http(s)://, git://,或是只是以一个用户名(git 会认为这是一个ssh 地址)为前辍.
有些仓库可以通过不只一种协议来访问,例如,Git本身的源代码你既可以用 git:// 协议来访问:
git clone git://git.kernel.org/pub/scm/git/git.git
也可以通过http 协议来访问:
git clone http://www.kernel.org/pub/scm/git/git.git
git://协议较为快速和有效,但是有时必须使用http协议,比如你公司的防火墙阻止了你的非http访问请求.如果你执行了上面两行命令中的任意一个,你会看到一个新目录: ‘git’,它包含有所的Git源代码和历史记录.
在默认情况下,Git会把”Git URL”里最后一级目录名的’.git’的后辍去掉,做为新克隆(clone)项目的目录名: (例如. git clone http://git.kernel.org/linux/kernel/git/torvalds/linux-2.6.git 会建立一个目录叫’linux-2.6′)
另外,如果访问一个Git URL需要用法名和密码,可以在Git URL前加上用户名,并在它们之间加上@符合以表示分割,然后执行git clone命令,git会提示你输入密码。
示例
git clone robin.hu@http://www.kernel.org/pub/scm/git/git.git
这样将以作为robin.hu用户名访问http://www.kernel.org/pub/scm/git/git.git,然后按回车键执行git clone命令,git会提示你输入密码。
另外,我们可以通过-b <name>来指定要克隆的分支名,比如
$ git clone -b master2 ../server .
表示克隆名为master2的这个分支,如果省略-b <name>表示克隆master分支。
GIT URLS
In general, URLs contain information about the transport protocol, the address of the remote server, and the path to the repository. Depending on the transport protocol, some of this information may be absent.
Git natively supports ssh, git, http, https, ftp, ftps, and rsync protocols. The following syntaxes may be used with them:
-
ssh://[user@]host.xz[:port]/path/to/repo.git/
-
git://host.xz[:port]/path/to/repo.git/
-
http[s]://host.xz[:port]/path/to/repo.git/
-
ftp[s]://host.xz[:port]/path/to/repo.git/
-
rsync://host.xz/path/to/repo.git/
An alternative scp-like syntax may also be used with the ssh protocol:
-
[user@]host.xz:path/to/repo.git/
The ssh and git protocols additionally support ~username expansion:
-
ssh://[user@]host.xz[:port]/~[user]/path/to/repo.git/
-
git://host.xz[:port]/~[user]/path/to/repo.git/
-
[user@]host.xz:/~[user]/path/to/repo.git/
For local repositories, also supported by git natively, the following syntaxes may be used:
-
/path/to/repo.git/
-
file:///path/to/repo.git/
Examples
-
Clone from upstream:
$ git clone git://git.kernel.org/pub/scm/.../linux-2.6 my2.6 $ cd my2.6 $ make -
Make a local clone that borrows from the current directory, without checking things out:
$ git clone -l -s -n . ../copy $ cd ../copy $ git show-branch -
Clone from upstream while borrowing from an existing local directory:
$ git clone --reference my2.6 \ git://git.kernel.org/pub/scm/.../linux-2.7 \ my2.7 $ cd my2.7 -
Create a bare repository to publish your changes to the public:
$ git clone --bare -l /home/proj/.git /pub/scm/proj.git -
Create a repository on the kernel.org machine that borrows from Linus:
$ git clone --bare -l -s /pub/scm/.../torvalds/linux-2.6.git \ /pub/scm/.../me/subsys-2.6.git
-
在公司项目实际开发过程中,大多数情况是先创建远程库,将项目一些内容在远程库中建立,之后员工们将远程库中内容clone到各自的本地GIT仓库中通过协同努力共同开发项目!所以这篇博客就简单介绍了一下如何将GIT远程库clone一份到本地!
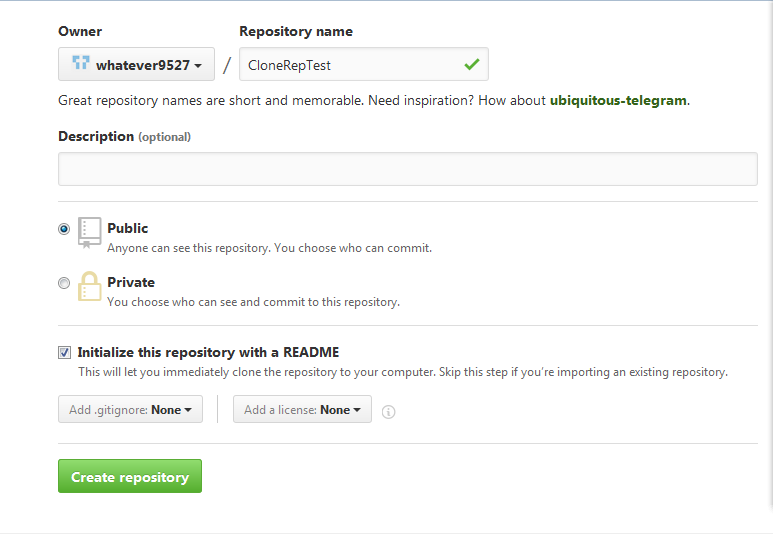
首先我们登录到自己的github网站,如下图创建一个新的GIT仓库repository起名为CloneRapTest,在创建时勾选Initialize this repository with a README,这样创建此仓库后会默认创建一个README.md文件在仓库中。

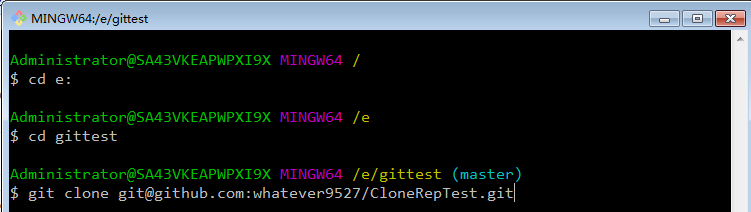
然后打开Git-Bash工具,进入到某个cd目录下,想要将远程库clone到哪就进入到哪个cd目录下,这里我们进入到/e/gittest目录下,(/e/gittest目录本身是一个本地仓库的工作目录,这里是为了测试可不可以clone一个远程库到一个本地仓库目录下)接着使用命令git clone 后面跟相应远程库地址即可,如下图。
需要说明的是远程库地址不必自己编辑也最好不要自己编辑,容易输入错误,只需要在github中找到相应远程库点击后在右上角如下图部分找到Clone or download,点击下拉按钮就可以显示此远程库的地址了
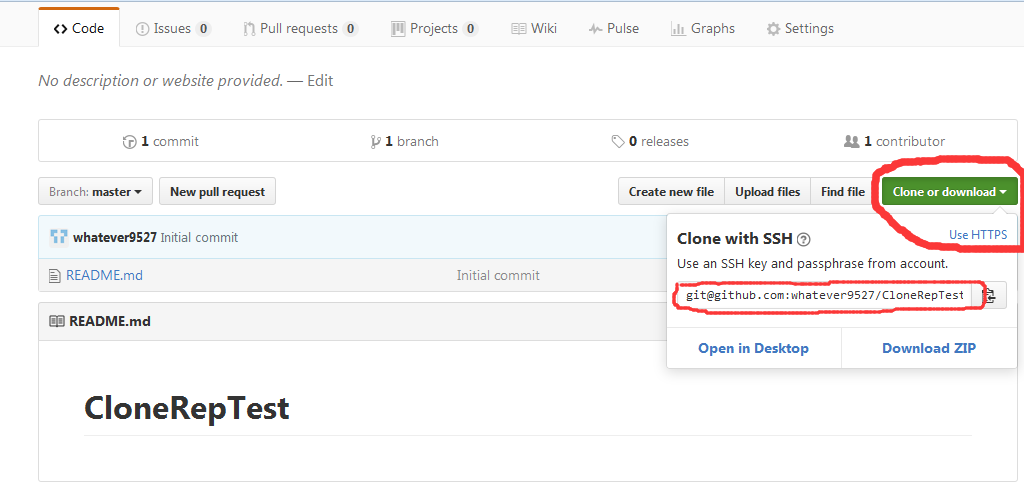
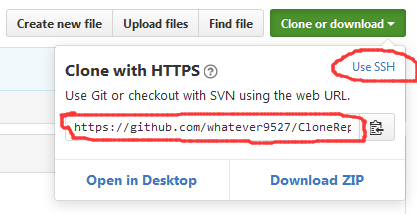
点击Use HTTPs,就可以显示此远程库对应的支持http协议的地址,但我们默认使用ssh支持的git原生协议,速度较快,且不必每次推送都使用命令!
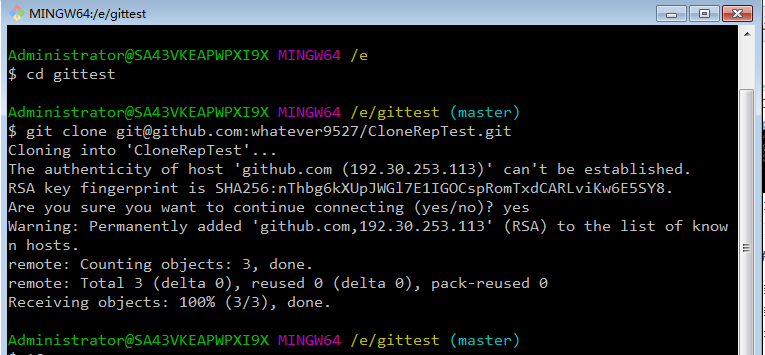
回到Git-Bash,当我们输入git clone命令点击回车之后,就开始从远程库clone到本地库了,这期间有时会提示你The authenticity of host ‘github.com (192.30.253.113)’ can’t be established,即github.com存在可靠性问题,然后提示你输入yes继续。这里我们直接输入yes,之后clone工作就完成了,去到/e/gittest目录下会发现多出了一个CloneRepTest文件夹,且文件夹中有一个REAEME.md文件,表名远程库已经成功clone了一份到本地!
原文链接:http://www.yyztech.com/archives/45/
首先来回顾一下,在上一篇git系列文章中,我们讲了如何创建本地git仓库并把文件push到远程仓库,也就是先有本地仓库,后有远程仓库。那么,这次我们来讲一个新的玩法,就是先有远程仓库,后有本地仓库,即把远程仓库“克隆(clone)”到本地。
假设现在你的团队其他成员已经在git上建好了仓库,并且也push过代码,这个远程git仓库还叫“StudyGit”,有两个文件:a.txt和README.md,现在,您也要开始贡献代码了,那么,您首先需要把团队其他成员提交的所有东西都拉取到你的本地目录,这个时候就会用到“clone”命令了:
git clone git@github.com:onlyanyz/StudyGit.git
只要执行这句指令,就可以把远程仓库的所有东西都拉取到本地工作目录了,当然生成的本地目录名和远程仓库名字是一样的。
如果您现在查看下当前本地git仓库的状态,如下:
-
yanyaozhen@macbookpro:~/Coding/StudyGit$ git status -
On branch master -
Your branch is up-to-date with 'origin/master'. -
nothing to commit, working directory clean
命令回显表示,我的本地分支已经更新为最新的远程master分支了。此后,我们就可以按照“git快速入门之一”这篇文章所述进行添加代码并提交了。
现在,让我们再看下刚才clone到本地的git项目,现在有两个文件,如下:
-
yanyaozhen@macbookpro:~/Coding/StudyGit$ ll -
total 16 -
-rw-r--r-- 1 yanyaozhen staff 21B 11 19 00:04 README.md -
-rw-r--r-- 1 yanyaozhen staff 4B 11 19 00:04 a.txt
接下来,假如A同学在github上的这个仓库中又新增了一个文件b.txt,那现在github远程仓库中就有三个文件(注意,现在本地仓库中的文件就已经与远程仓库不同了)。
接下来,我们在本地继续我们的开发工作,假如新建了一个文件“c.txt”,现在,让我们来把”c.txt”文件加入暂存区,然后commit到本地仓库,这时,我们想把刚才的工作成果再push到远程,执行如下:
-
yanyaozhen@macbookpro:~/Coding/StudyGit$ git push origin master -
To git@github.com:onlyanyz/StudyGit.git -
! [rejected] master -> master (fetch first) -
error: failed to push some refs to 'git@github.com:onlyanyz/StudyGit.git' -
hint: Updates were rejected because the remote contains work that you do -
hint: not have locally. This is usually caused by another repository pushing -
hint: to the same ref. You may want to first integrate the remote changes -
hint: (e.g., 'git pull ...') before pushing again. -
hint: See the 'Note about fast-forwards' in 'git push --help' for details.
阿欧,报错了,懂点英文的同学可以从提示信息看出问题所在,因为我们的远程已经有更新了,我们在push到远程的时候,必须先把远程的改动拉到本地合并起来,才能再次提交我的修改。所以,以下的命令就出场了:
$ git fetch origin master
该指令意思是从远程origin仓库的master主分支更新最新的版本到origin/master分支上。
然后我们比对下当前本地master分支和origin/master分支的区别:
$ git log -p master..origin/master
执行的回显结果会详细列出这两个分支的差异。
然后,我们需要把origin/master分支上的内容合并到本地master分支:
git merge origin/master
执行该指令后,可能会要求输入合并的理由,填写后,我们就合并成功了。这个时候,我们就可以再次push了:
-
yanyaozhen@macbookpro:~/Coding/StudyGit$ git push origin master -
Counting objects: 5, done. -
Delta compression using up to 4 threads. -
Compressing objects: 100% (4/4), done. -
Writing objects: 100% (5/5), 543 bytes | 0 bytes/s, done. -
Total 5 (delta 2), reused 0 (delta 0) -
To git@github.com:onlyanyz/StudyGit.git -
6b3662f..6036a05 master -> master
表示push成功,现在你可以去github上看到我们在本地新建的b.txt文件啦!
后记:有同学可能查了网上的资料,说“git fetch”和“git merge”指令可以合二为一,叫“git pull”,在此强烈建议大家使用分开的指令,因为“git pull”会直接合并,而不会等你确认,如果一旦合并错了,还是比较麻烦的。宁可慢一点,也别重头再来。
发布者:全栈程序员-用户IM,转载请注明出处:https://javaforall.cn/141060.html原文链接:https://javaforall.cn
【正版授权,激活自己账号】: Jetbrains全家桶Ide使用,1年售后保障,每天仅需1毛
【官方授权 正版激活】: 官方授权 正版激活 支持Jetbrains家族下所有IDE 使用个人JB账号...
