大家好,又见面了,我是你们的朋友全栈君。
Okio是什么
在OkHttp的源码中经常能看到Okio的身影,所以单独拿出来学习一下,作为OkHttp的低层IO库,Okio确实比传统的java输入输出流读写更加方便高效。Okio补充了java.io和java.nio的不足,使访问、存储和处理数据更加容易,它起初只是作为OKHttp的一个组件,现在你可以独立的使用它来解决一些IO问题。
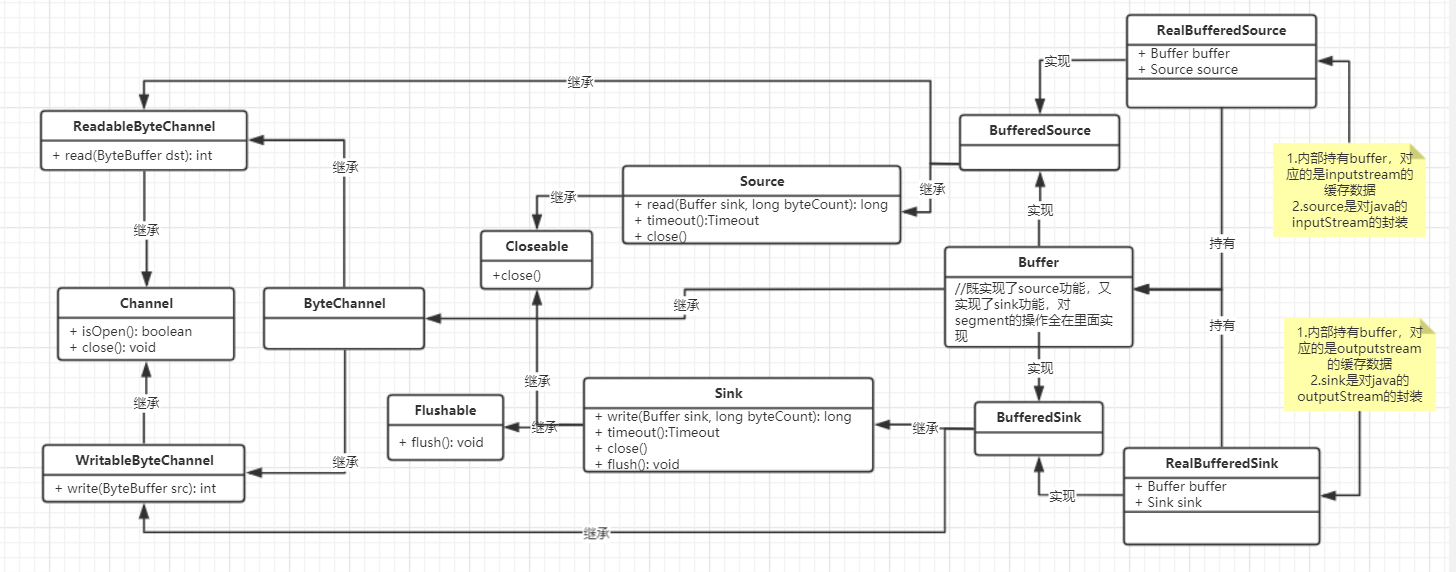
先看下okio库中类之间的关系:

来看一段okio拷贝文件的操作demo:
   File src = new File("hello.txt");
   File dest = new File("hellocopied.txt");
   BufferedSource bufferedSource = null;
   try {

       bufferedSource = Okio.buffer(Okio.source(src));
       BufferedSink bufferedSink = Okio.buffer(Okio.sink(dest));
       bufferedSink.writeAll(bufferedSource);
       bufferedSink.close();
   } catch (FileNotFoundException e) {

       e.printStackTrace();
   } catch (IOException e) {

       e.printStackTrace();
   }
输入流Source
bufferedSource = Okio.buffer(Okio.source(src));
我们顺着代码进去看,Okio.source(src)的实现如下:
  /** Returns a source that reads from {@code file}. */
  public static Source source(File file) throws FileNotFoundException {

    if (file == null) throw new IllegalArgumentException("file == null");
    return source(new FileInputStream(file));
  }
可以看到okio的输入流最底层还是使用的FIleinputStream类实现的,创建了一个文件输入流对象作为参数传入到source构造函数中。
我们在进去看下source对象如何创建的:
private static Source source(final InputStream in, final Timeout timeout) {

  	...省略
    return new Source() {

      @Override public long read(Buffer sink, long byteCount) throws IOException {

   		...省略
        try {

          timeout.throwIfReached();
          Segment tail = sink.writableSegment(1);
          int maxToCopy = (int) Math.min(byteCount, Segment.SIZE - tail.limit);
          int bytesRead = in.read(tail.data, tail.limit, maxToCopy);
          if (bytesRead == -1) return -1;
          tail.limit += bytesRead;
          sink.size += bytesRead;
          return bytesRead;
        } catch (AssertionError e) {

          if (isAndroidGetsocknameError(e)) throw new IOException(e);
          throw e;
        }
      }
      @Override public void close() throws IOException {

        in.close();
      }
      ...省略
    };
  }
返回了一个source对象,该对象实现了read函数,参数是buffer对象(输出流的缓存容器)。bytecount(读取的长度),最关键是这几句话:
     Segment tail = sink.writableSegment(1);
     int maxToCopy = (int) Math.min(byteCount, Segment.SIZE - tail.limit);
     int bytesRead = in.read(tail.data, tail.limit, maxToCopy);
首先从sink输出流中取出一个片段segment,这个获取segment的操作分为三种情况,
第一种就是buffer是空的,那么直接从segmentPool中取出一个segment的;
第二种情况就是tail的segment还有空余空间存储数据那么直接返回tail节点;
第三种情况是,尾结点tail没有空余空间,那么从segmentPool中取出一个节点插入到tail节点之后。
代码如下:
  Segment writableSegment(int minimumCapacity) {

    if (minimumCapacity < 1 || minimumCapacity > Segment.SIZE) throw new IllegalArgumentException();
	//第一种情况
    if (head == null) {

      head = SegmentPool.take(); // Acquire a first segment.
      return head.next = head.prev = head;
    }

    Segment tail = head.prev;
    //第二种情况
    if (tail.limit + minimumCapacity > Segment.SIZE || !tail.owner) {

      tail = tail.push(SegmentPool.take()); // Append a new empty segment to fill up.
    }
    //第三种情况直接返回
    return tail;
  }
segmentPool其实也不复杂,就是segment组成的链表,每个segment的pos == limit = 0,整个segment被置空;调用take()从链表中获取头结点,recycle()回收插入到链表头部。
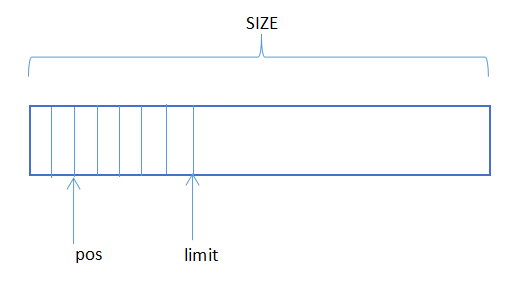
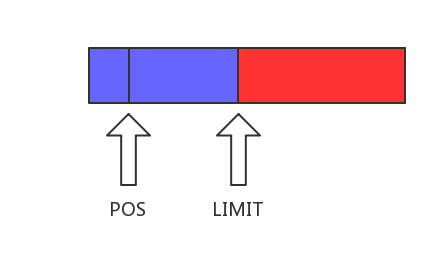
然后从输入流中读取出maxToCopy长度的数据到segment片段中,这里面出现了两个模式的对象,buffer和segment类的结构,如下图所示:
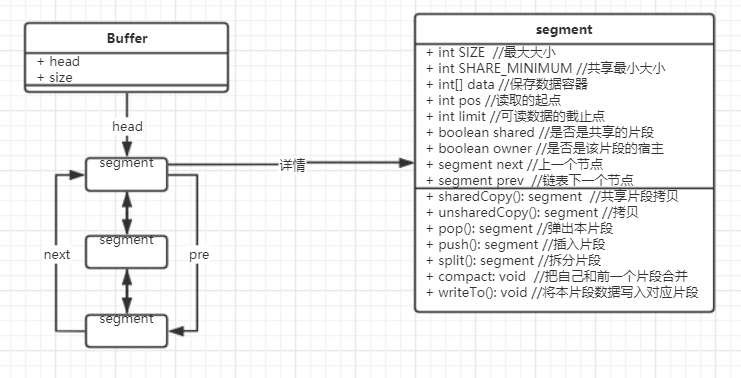
segment的结构如下:
接下来,如下的变量被赋值了:
   tail.limit += bytesRead;
   sink.size += bytesRead;
   return bytesRead;
如上图所示,limit代表着可读数据截止点,因为刚刚向segment中写入了bytesRead 的数据,所以tail这个segment的limit也会向后移动bytesRead长度,所以需要做加法。sink是个buffer对象,里面是个segment的链表,刚刚链表的尾部tail新增了bytesRead这多的数据,那么sink的总大小size也会相应的增加bytesRead。
在继续看:
bufferedSource = Okio.buffer(Okio.source(src));
里面返回了source,又将其作为参数传给了buffer()函数,看下里面是怎么实现的:
  public static BufferedSource buffer(Source source) {

    return new RealBufferedSource(source);
  }
创建了RealBufferedSource对象,返回了BufferedSource接口示例,这是一种接口编程的好处,用户api不用在乎是怎么实现,只需要关心有哪些功能就行,所以创建了RealBufferedSource,只返回了BufferedSource接口,这样可以隐藏内部实现,也只会暴露接口的方法,其他方法都隐藏掉了。进行看下里面是怎么创建的:
final class RealBufferedSource implements BufferedSource {

  public final Buffer buffer = new Buffer();
  public final Source source;
  boolean closed;

  RealBufferedSource(Source source) {

    if (source == null) throw new NullPointerException("source == null");
    this.source = source;
  }
source作为成员变量,内部新建一个Buffer对象。
输出流sink
BufferedSink bufferedSink = Okio.buffer(Okio.sink(dest));
我们来看下输出流是怎么创建的,
  /** Returns a sink that writes to {@code file}. */
  public static Sink sink(File file) throws FileNotFoundException {

    if (file == null) throw new IllegalArgumentException("file == null");
    return sink(new FileOutputStream(file));
  }
嗯,一样的,输出流也是okio封装了一下java原生的FileoutputStream对象。作为参数传入到sink构造函数中。
private static Sink sink(final OutputStream out, final Timeout timeout) {

	...省略
    return new Sink() {

      @Override public void write(Buffer source, long byteCount) throws IOException {

        checkOffsetAndCount(source.size, 0, byteCount);
        while (byteCount > 0) {

          timeout.throwIfReached();
          Segment head = source.head;
          int toCopy = (int) Math.min(byteCount, head.limit - head.pos);
          out.write(head.data, head.pos, toCopy);
          head.pos += toCopy;
          byteCount -= toCopy;
          source.size -= toCopy;
          if (head.pos == head.limit) {

            source.head = head.pop();
            SegmentPool.recycle(head);
          }
        }
      }
      @Override public void flush() throws IOException {

        out.flush();
      }
      @Override public void close() throws IOException {

        out.close();
      }
      ...省略
    };
  }
然后创建了一个实现了write方法的sink对象。看下write方法:
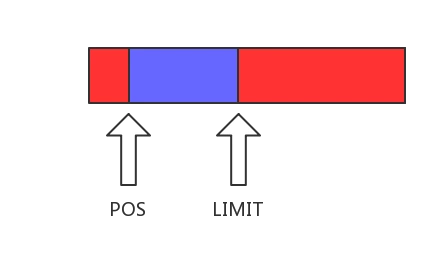
    Segment head = source.head;
	int toCopy = (int) Math.min(byteCount, head.limit - head.pos);
	out.write(head.data, head.pos, toCopy);
从source中取出头部segment,然后从头部数据中读取toCopy 长度的数据写入到out输出流中,这个out输出流我们知道,就是从外面作为参数的FIleoutputStream输出流(这个java原生的写入读出操作也就是从流中for循环一个字节一个字节的读出写入数据到对应的数据容器中,然后结束)。
    head.pos += toCopy;
    byteCount -= toCopy;
    source.size -= toCopy;
    if (head.pos == head.limit) {

      source.head = head.pop();
      SegmentPool.recycle(head);
    }
下面这个就是,刚刚已经向输出流中写入了toCopy的数据,那么source的size就会变小toCopy,因为读完数据后剩下的有效数据就会减少;head是segment,根据它的结构知道,pos代表可读数据的起点位置,刚刚已经读了toCopy长度,那么pos需要向后移动toCopy长度,所以是加上。最后一个判断的意思是,假如head这个segment的数据已经读完了(pos==limit)的话,那么就将这个segment回到到pool中。
创建的sink对象作为参数传入到Okio.buffer()中。
public static BufferedSink buffer(Sink sink) {

  return new RealBufferedSink(sink);
}

final class RealBufferedSink implements BufferedSink {

  public final Buffer buffer = new Buffer();
  public final Sink sink;
  boolean closed;

  RealBufferedSink(Sink sink) {

    if (sink == null) throw new NullPointerException("sink == null");
    this.sink = sink;
  }
sink对象作为RealBufferedSink 成员变量,内部创建一个空的Buffer对象作为数据容器。
输入 写入到 输出
就下面一句话就完成了拷贝动作。
    bufferedSink.writeAll(bufferedSource);

    class BufferedSink {

		...省略
		long writeAll(Source source) throws IOException;
		...省略
	}
我们的realBufferSink实现了writeAll方法,我们进去看下怎么实现的:
  @Override public long writeAll(Source source) throws IOException {

    if (source == null) throw new IllegalArgumentException("source == null");
    long totalBytesRead = 0;
    for (long readCount; (readCount = source.read(buffer, Segment.SIZE)) != -1; ) {

      totalBytesRead += readCount;
      emitCompleteSegments();
    }
    return totalBytesRead;
  }
SInk对象将source中的数据写入到自身的buffer对象中,通过for循环,每次写入Segment.SIZE大小数据,直到source为空为止。
我们再进去看下source.read(buffer, Segment.SIZE))怎么实现的,我们知道realBufferSource实现了source的接口,所以这句话是realBufferSource的实现:
  @Override public long read(Buffer sink, long byteCount) throws IOException {

 	...省略
    if (buffer.size == 0) {

      long read = source.read(buffer, Segment.SIZE);
      if (read == -1) return -1;
    }
    long toRead = Math.min(byteCount, buffer.size);
    return buffer.read(sink, toRead);
  }
首先是if判断realBufferSource自己的Buffer对象大小是否为空,空的话,就需要从source的inputStream流中读取数据保存到Buffer对象中,如果读不出来数据,那么直接返回,否则,接下来就是讲Buffer中读取出来的大小toRead数据写入到sink的Buffer中,然后返回。
接下来就要跟踪,buffer的read函数是怎么实现的了,代码如下:
  @Override public long read(Buffer sink, long byteCount) {

	...省略
    if (size == 0) return -1L;
    if (byteCount > size) byteCount = size;
    sink.write(this, byteCount);
    return byteCount;
  }
首先就是大小为0的话,没有数据直接返回。有数据的情况下,参数byteCount大于buffer的大小size的话,那么只能读取size大小的数据,接下来sink.write(this, byteCount);就是sink的buffer从this的buffer中读取byteCount大小的数据了(Bufer实现了source和sink的接口方法,所以读写功能的函数都有)。进去看看怎么实现的(下面有很大一块注释舍不得删除,翻译过来就能直接理解okio的复用操作,很详细):
@Override public void write(Buffer source, long byteCount) {
// Move bytes from the head of the source buffer to the tail of this buffer
// while balancing two conflicting goals: don't waste CPU and don't waste
// memory.
//
//
// Don't waste CPU (ie. don't copy data around).
//
// Copying large amounts of data is expensive. Instead, we prefer to
// reassign entire segments from one buffer to the other.
//
//
// Don't waste memory.
//
// As an invariant, adjacent pairs of segments in a buffer should be at
// least 50% full, except for the head segment and the tail segment.
//
// The head segment cannot maintain the invariant because the application is
// consuming bytes from this segment, decreasing its level.
//
// The tail segment cannot maintain the invariant because the application is
// producing bytes, which may require new nearly-empty tail segments to be
// appended.
//
//
// Moving segments between buffers
//
// When writing one buffer to another, we prefer to reassign entire segments
// over copying bytes into their most compact form. Suppose we have a buffer
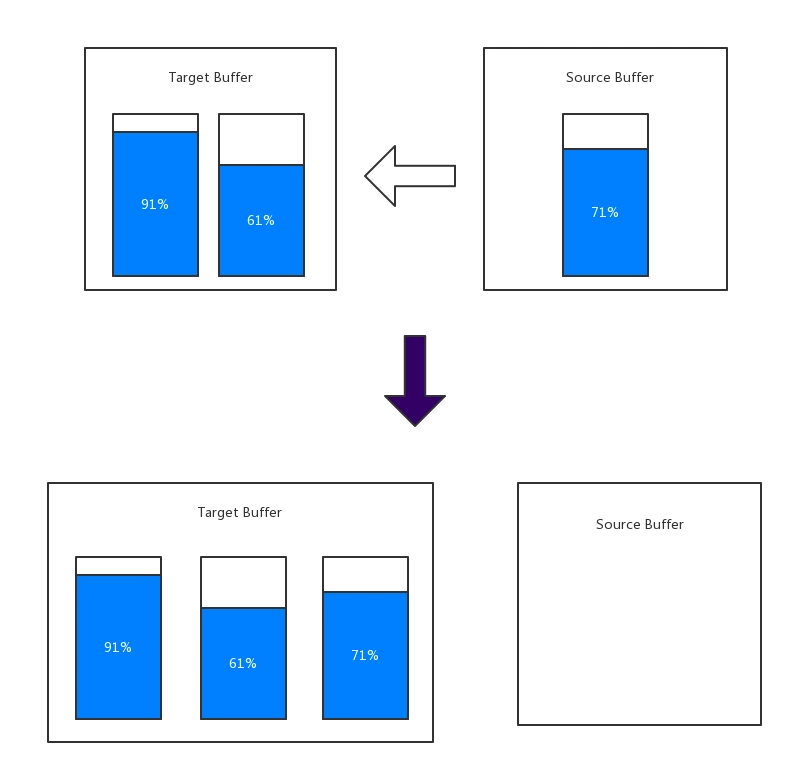
// with these segment levels [91%, 61%]. If we append a buffer with a
// single [72%] segment, that yields [91%, 61%, 72%]. No bytes are copied.
//
// Or suppose we have a buffer with these segment levels: [100%, 2%], and we
// want to append it to a buffer with these segment levels [99%, 3%]. This
// operation will yield the following segments: [100%, 2%, 99%, 3%]. That
// is, we do not spend time copying bytes around to achieve more efficient
// memory use like [100%, 100%, 4%].
//
// When combining buffers, we will compact adjacent buffers when their
// combined level doesn't exceed 100%. For example, when we start with
// [100%, 40%] and append [30%, 80%], the result is [100%, 70%, 80%].
//
//
// Splitting segments
//
// Occasionally we write only part of a source buffer to a sink buffer. For
// example, given a sink [51%, 91%], we may want to write the first 30% of
// a source [92%, 82%] to it. To simplify, we first transform the source to
// an equivalent buffer [30%, 62%, 82%] and then move the head segment,
// yielding sink [51%, 91%, 30%] and source [62%, 82%].
...省略
while (byteCount > 0) {
// Is a prefix of the source's head segment all that we need to move?
if (byteCount < (source.head.limit - source.head.pos)) {
Segment tail = head != null ? head.prev : null;
if (tail != null && tail.owner
&& (byteCount + tail.limit - (tail.shared ? 0 : tail.pos) <= Segment.SIZE)) {
// Our existing segments are sufficient. Move bytes from source's head to our tail.
source.head.writeTo(tail, (int) byteCount);
source.size -= byteCount;
size += byteCount;
return;
} else {
// We're going to need another segment. Split the source's head
// segment in two, then move the first of those two to this buffer.
source.head = source.head.split((int) byteCount);
}
}
// Remove the source's head segment and append it to our tail.
Segment segmentToMove = source.head;
long movedByteCount = segmentToMove.limit - segmentToMove.pos;
source.head = segmentToMove.pop();
if (head == null) {
head = segmentToMove;
head.next = head.prev = head;
} else {
Segment tail = head.prev;
tail = tail.push(segmentToMove);
tail.compact();
}
source.size -= movedByteCount;
size += movedByteCount;
byteCount -= movedByteCount;
}
}
内存拷贝策略
每个 Segment 管理了 8k 左右的缓冲区,如果 Segment 过多,负载不高的话(即内存使用率低)会造成内存的浪费,为了解决这个问题,Buffer 里面对于 Segment 做了一些分类, Segment 被分成两种类型:可写和只读,如果可变的话意味着内部的字节可能会用 System.arraycopy 进行写入; 不可变意味着它只读,在 Buffer 间的拷贝只能通过重新 assign 的方式从一个 Buffer 移动到另外一个 Buffer 里。如何确定一个 Segment 是变量还是不可变量呢?它的策略如下:
非头尾节点且 Segment 内部缓冲区利用率到达 50% 以上,或者不是内部缓冲区的 owner,那么这个 Segment 一定是只读的
首先,这个 Segment 一定是内部缓冲区的 owner,如果它是头尾节点且内部缓冲区利用率不足 50%,那么这个 Segment 就是可写的。
基于以上对于 Segment 类别的划分,我们在移动 Segement 上的策略也不太一样,我们可以来解释下注释里的几个例子:
例子1:
如果要往一个 Buffer 写入数据, 它包含两个 Segment,使用率为 [91%, 61%],为了简单化,直接表示为 [91%, 61%]。这时被写入的buffer为 [72%],那么我们会把这个 Segment 从它原先的链表中移除,直接加入到写入的 Buffer 中。这个过程内存拷贝的操作为0。
例子 2:
往一个 Buffer [100%, 2%] 中写入另一个 Buffer [99%, 3%],那么先使用第一步的操作,使得内存结构为 [100%, 2%, 99%,],这时候如果把 99% 的 Segment 拷贝到 2% 上,会导致其负荷超过 100%,因此 okio 就不在拷贝内存上花费过多的时间,这时候把 [3%] 再移动一下,使得 Segement 序列变成 [100%, 2%, 99%, 3%]
例子 3:
往一个 Buffer [100%, 40%] 中写入另一个 Buffer [30%, 80%],那么会先把 30% 的那部分移动到前面一个 Buffer 中,变成 [100%, 40%, 30%],然后做归集操作的时候,发现 30% 部分的 Segment 可以合并到前面的 40% 中,内存分布会变成 [100%, 70%],再写入 80% 的数据的时候,因为 80% + 70% > 100%,因此不再做归集,最终的内存分布就是 [100%, 70%, 80%]。
例子 4:
如果我们的需要移动的数据少于第一个 Segment 拥有的数据的话,我们首先会做一个分割操作 (split),在头部分出一个新的 Segment,然后再移动到目标 Segment 中,然后做归集操作。
使用这样的策略方式,在时间和空间的优化点上找到了合理的最优解。
除这几个策略意外,我们的 Segment 里面记录了是否底层共享内存缓存的标志位(shared),和对内存的控制权标志位 (owner)。
final class Segment {

  final byte[] data;

  /** The next byte of application data byte to read in this segment. */
  int pos;

  /** The first byte of available data ready to be written to. */
  int limit;

  /** True if other segments or byte strings use the same byte array. */
  boolean shared;

  /** True if this segment owns the byte array and can append to it, extending {@code limit}. */
  boolean owner;

  /** Next segment in a linked or circularly-linked list. */
  Segment next;

  /** Previous segment in a circularly-linked list. */
  Segment prev;

    ...
}
因为我们在进行大内存的拷贝时,是使用浅拷贝的方式,这种拷贝方式并没有拷贝底层的数据,只是新生成一个 Segment 对象,这个 Segment 对象是只读的。目标 如果获得了对该 Segment 的引用,就可以直接读取它内部的数据。
共享内存和读写权限
我们可以在源码 (Segment.java) 中找到两个拷贝函数shadowCopy和unshadowCopy,分别是浅拷贝和深拷贝,浅拷贝出来的 Segment ,因为共享了一块内存,所以它是只读的。但是读游标 (pos) 的变化没有影响,可以独立。同时原来的 Segment 会被标记为 shared。
浅拷贝和深拷贝对于底层数据的读写也有几条策略,这里的策略如下,第一条是最简单的策略:
如果是一个只读的 Segment,那么它是不能进行写操作的。
第二条是调用了浅拷贝之后的原 Segment,它是可写的,现在又变成共享的
如果是一个可写的共享 Segment (shared == true && owner == true),那么它可以追加数据,但是不能覆盖游标 pos 以前的数据,具体详情可以看图
其中,蓝色为只读部分,红色为可写部分。
如果是一个独立的 Segment (shared == false && owner == true),那么可以对它进行追加数据,同时因为已经有 pos 来指定已读部分,因此已读部分之前的数据可被覆盖。
Segment 池
通过查看源码,我们知道,每个 Segment 在构造的时候,会分配 8k 的内存
  Segment() {

    this.data = new byte[SIZE];
    this.owner = true;
    this.shared = false;
  }
分配内存的动作非常消耗 CPU,因此,我们应该把已经分配的内存管理起来。SegmentPool这个类是一个灵活的内存池,代码很少,我们可以贴上来看一下。
/** * A collection of unused segments, necessary to avoid GC churn and zero-fill. * This pool is a thread-safe static singleton. */
final class SegmentPool {

  /** The maximum number of bytes to pool. */
  // TODO: Is 64 KiB a good maximum size? Do we ever have that many idle segments?
  static final long MAX_SIZE = 64 * 1024; // 64 KiB.

  /** Singly-linked list of segments. */
  static @Nullable Segment next;

  /** Total bytes in this pool. */
  static long byteCount;

  private SegmentPool() {

  }

  static Segment take() {

    synchronized (SegmentPool.class) {

      if (next != null) {

        Segment result = next;
        next = result.next;
        result.next = null;
        byteCount -= Segment.SIZE;
        return result;
      }
    }
    return new Segment(); // Pool is empty. Don't zero-fill while holding a lock.
  }

  static void recycle(Segment segment) {

    if (segment.next != null || segment.prev != null) throw new IllegalArgumentException();
    if (segment.shared) return; // This segment cannot be recycled.
    synchronized (SegmentPool.class) {

      if (byteCount + Segment.SIZE > MAX_SIZE) return; // Pool is full.
      byteCount += Segment.SIZE;
      segment.next = next;
      segment.pos = segment.limit = 0;
      next = segment;
    }
  }
}
如果池子里面缓存的内存足够大(64KB)就不会继续缓存了,注意,池子里的内存全部都是空闲内存 (idle)
随机读写
我们花了很大篇幅讲了 okio 的内存和 CPU 优化的策略,之前说了,这是牺牲了随机读写性能来达到目标的,那么随机读写有那些功能呢?我们可以在 Buffer 类中找到答案。
indexOf Buffer
Buffer 类中有几个 indexOf 开头的方法,故名思义,是查询某个字节(或者某段字节)在这个 Buffer 中的索引的。因为使用了 Segment 来管理缓冲区,因此每次的随机读写都要进行内存寻址,重复劳动很多,效率也不是特别高,各位如果有兴趣的话可以自行查阅。
题外话
拷贝操作,在java原生api中是这样的过程:(1)从文件中获取流(inputStream),(2)从流中读取二进制流到缓存buff中(BufferedInputStream),(3)将buff中的流写入到我们自定义的数组buff中,(4)将自定义数据的buff写入到输出流缓存buff中(BufferedOutputStream),(5)将缓存buff数据写入到对应文件中。
在okio中,会省略其中的第三步,因为okio是将原生的inputStream自己进行了封装到source对象中,然后将数据缓存到buffer中,然后写入目标文件的时候,是封装了outputStream到sink对象中,然后将source的buffer中写入到outputStream的buffer中,这其中的数据转移是通过链表节点的摘取和插入完成的,并没有二次拷贝操作,所以节省了很多cpu的io操作。buffer是由segment链表结构组成的,在数据拷贝的时候不用去拷贝数据,直接节点移动就行了。
通过调用sink.write(this, byteCount);来完成具体实现,实现原理会根据Source和Sink中Segment的不同状态实现策略会相应不同。有这种几种情况:
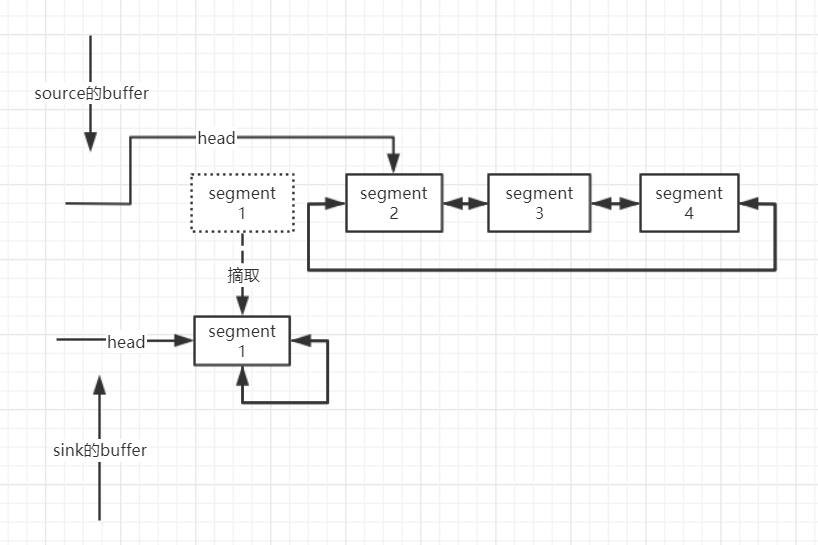
(1)Source中需要传递的数据是”满”的情况,也就是8k都是有效数据,这种情况直接从source的buffer中拿到Segment,然后添加到sink的buffer上即可,和java io流相比,省去了中间的一次临时buffer拷贝,从而提高的读写效率:
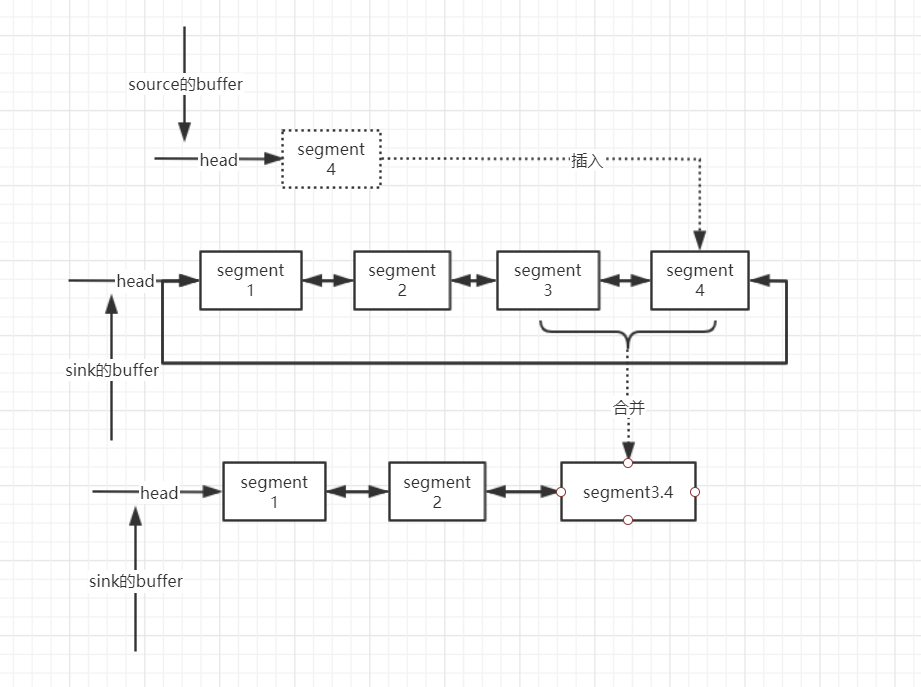
(2)Source中需要传递的数据不”满”的情况,通过pos和limit可以定位到有效数据区间,和Sink中buffer的尾Segment有效数据进行对比,如果两个Segment中的有效数据可以合并到一个Segment中那么会进行数据整理,多余的Segment会被回收到。
如果两个Segment的有效数据总和超过8k,那么直接将Source中的Segment链接到Sink中buffer的尾部即可:
(3)Source的buffer中的Segment只是传递部分数据,如5K的数据值传递其中2K,okio内部会通过split方法将Segment分成2K和3K两个Segment,然后将2K的Segment参照第二种情况和Sink中的Segment进行合并:
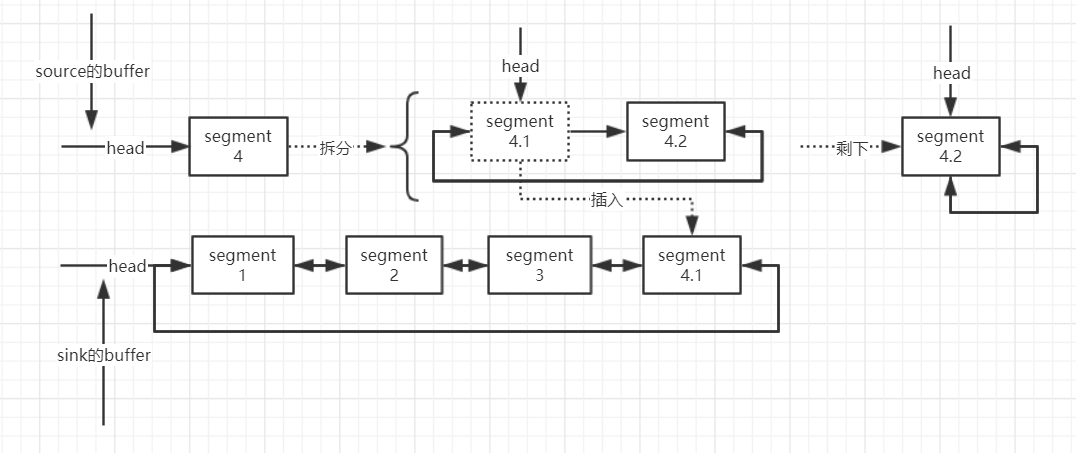
以上的合并,拆分操作,都是基于segment的pos和limit变量来权衡的,拆分分为共享拆分和拷贝拆分。详见代码。
发布者:全栈程序员-用户IM,转载请注明出处:https://javaforall.cn/140700.html原文链接:https://javaforall.cn
【正版授权,激活自己账号】: Jetbrains全家桶Ide使用,1年售后保障,每天仅需1毛
【官方授权 正版激活】: 官方授权 正版激活 支持Jetbrains家族下所有IDE 使用个人JB账号...
