大家好,又见面了,我是你们的朋友全栈君。
一、概述
最近由于课题需要数据源,但是没有直接获取的方法,所以只能在周老师http://www.qianyi.info/的网站上自己下载深度图转换成点云数据,大概花了三天的时间,终于弄得差不多了,这里做个记录。
二、数据准备和环境配置
1、数据下载
在 http://redwood-data.org/indoor/dataset.html 上下载Clean Depth Sequence和Ground-truth Trajectory下的文件,如图:
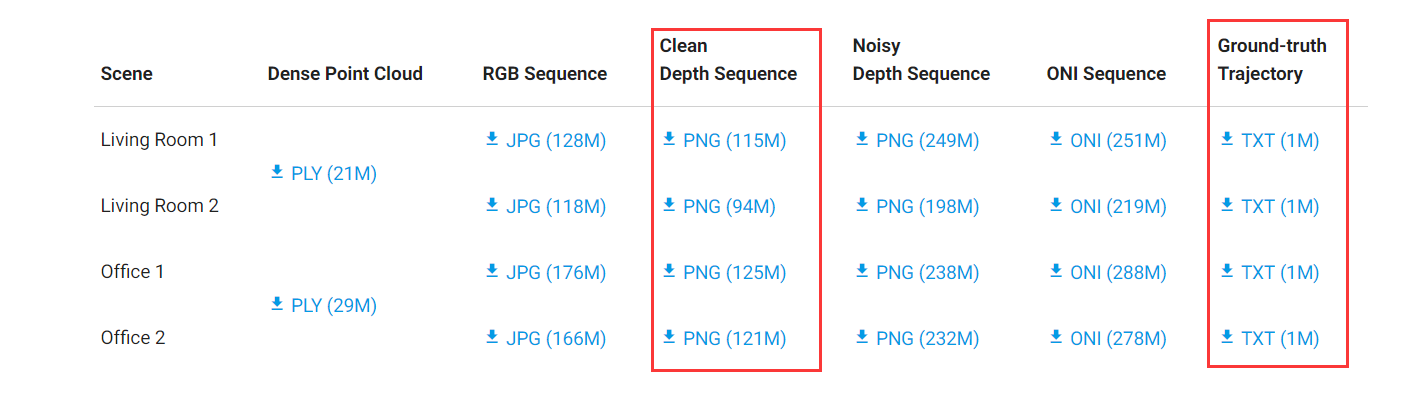

本文以Living Room 1作为示例。
2、环境配置
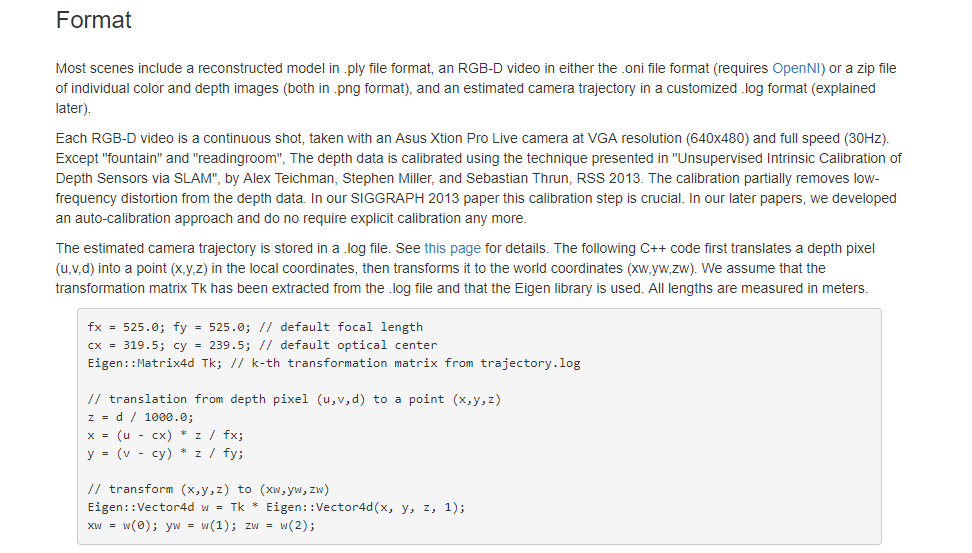
开发工具为QT。根据网站介绍,在进行空间坐标计算的时候需要使用到一个转换矩阵Tk,而这个Tk则是需要在相机的轨迹文件中提取的,而相机的轨迹文件需要使用第1步中的txt文件进行解析得到。解析代码在http://redwood-data.org/indoor/fileformat.html中,提供了C++、Python和MATLAB的版本。
因为使用工具是QT,所以首选了C++版本的解析代码(C++版本需要配置PCL环境,具体配置方案见QT+PCL配置过程),但是在编译时发生错误,经过摸索后发现可能是Eigen与C++版本的问题,暂时没有找到好的解决办法,所以就改成了Python代码,这就涉及到了如何在QT中调用Python的问题,具体方法见QT调用Python模块。
3、轨迹文件解析
直接利用Python代码进行解析。
.py文件:
import numpy as np
import numpy.linalg
#import cv2
#import math
#from numpy import array as matrix, arange

class CameraPose:
    def __init__(self, meta, mat):
        self.metadata = meta
        self.pose = mat

    def __str__(self):
        return 'Metadata : ' + ' '.join(map(str, self.metadata)) + '\n' + \
            "Pose : " + "\n" + np.array_str(self.pose)

def read_trajectory(filename):
    traj = []
    with open(filename, 'r') as f:
        metastr = f.readline();
        while metastr:
            metadata = map(int, metastr.split())
            mat = np.zeros(shape = (4, 4))
            for i in range(4):
                matstr = f.readline();
                mat[i, :] = np.fromstring(matstr, dtype = float, sep=' \t')
            traj.append(CameraPose(metadata, mat))
            metastr = f.readline()
    return traj

def write_trajectory(traj, filename):
    with open(filename, 'w') as f:
        for x in traj:
            p = x.pose.tolist()
            f.write(' '.join(map(str, x.metadata)) + '\n')
            f.write('\n'.join(' '.join(map('{0:.12f}'.format, p[i])) for i in range(4)))
            f.write('\n')


def ext():
    write_trajectory(read_trajectory("livingroom1-traj.txt"), "extraction_file.txt")
    print('extraction file successfully')
main.cpp文件:
#include <stdio.h>
#include <stdlib.h>
#include <iostream>

#include <vector>
#include <fstream>
#include <Eigen/Core>
#include <Eigen/StdVector>
#include <Python.h>
using namespace std;

int main()
{

    Py_Initialize();
    if(!Py_IsInitialized())
    {

        return -1;
    }
    PyObject* pModule = PyImport_ImportModule("transformMatrixExt");
    if(!pModule)
    {

        cout<<"open fail"<<endl;
        return -1;
    }
    PyObject* pFunhello = PyObject_GetAttrString(pModule,"ext");
    if(!pFunhello)
    {

// cout<<"get function ext failed"<<endl;
        return -1;
    }
    PyObject_CallFunction(pFunhello, NULL);
    Py_Finalize();

}
这样就会得到轨迹txt文件了。
三、深度图转换
第二步已经将轨迹文件提取,但是里面的数据非常多,而用C++进行字符串操作远不如使用Python简单,所以这里继续使用Python进行相关文件操作。另外,在http://qianyi.info/scenedata.html中已经给出深度图转换方法,
所以这里直接上代码。
.py文件:
import numpy as np
import numpy.linalg
import cv2
import math
from numpy import array as matrix, arange
def generate_XYZ(depthBuffer, res, u, v, T):
    fx = 525.0
    fy = 525.0
    cx = 319.5
    cy = 239.5
    z = depthBuffer[res[1]*u+v]/1000
    x = (v-cx)*z/fx
    y = (u-cy)*z/fy
    w = np.array([x, y, z, 1], dtype='f')

    x = T[0,0]*w[0]+T[0,1]*w[1]+T[0,2]*w[2]+T[0,3]*w[3]
    y = T[1,0]*w[0]+T[1,1]*w[1]+T[1,2]*w[2]+T[1,3]*w[3]
    z = T[2,0]*w[0]+T[2,1]*w[1]+T[2,2]*w[2]+T[2,3]*w[3]

    return x, y, z

def readimg():
# img = cv2.imread('00000.png', -1)
# img = cv2.imread('01500.png', -1)
    img = cv2.imread('02869.png', -1)
    res = img.shape
    print(img[1,1])

# print(img[0])
# img = cv2.flip(img, 0)
# cv2.imshow('hh',img)
# cv2.waitKey(0)
    depth_buffer = np.array(np.array(img,dtype=np.float32).flatten())#img.flatten().astype(float32)/255

    T1 = arange(16, dtype='f').reshape(4,4)
    i = 0

    with open("extraction_file.txt", 'r') as f:
        content = f.read().splitlines()
# for stringline in content[7496:7500]:
# for stringline in content[1:5]:
        for stringline in content[14346:14350]:
            j = 0
            for number in stringline.split(' '):
                T1[i,j] = float(number)
                j = j+1
            i = i+1
    print(T1)
    flag = []
    print(res[1])
    for u in range(res[0]):
        for v in range(res[1]):
            x, y, z = generate_XYZ(depth_buffer, res, u, v, T1)
            flag.append([x, y, z])

    with open('02869.ply', 'w') as f:
        f.write('ply\nformat ascii 1.0\nelement vertex '+str(len(flag))+'\nproperty float x\nproperty float y\nproperty float z\nend_header\n')
        for loc in flag:
            f.write(str(loc[0])+' '+str(loc[1])+' '+str(loc[2])+'\n')

    print('finish')
这里需要注意的是,在读取深度图时,需要使用imread( , -1)方法,这样才是读取深度图,而在转换时,网站提到的深度图(u, v, d)坐标分别就是横坐标,纵坐标和深度值(像素值)。另外,在需要用到OpenCV时,发现在python中直接安装cv2库即可,比C++环境下的配置简单很多,暂时还没有发现在功能上太大的区别。
main.cpp文件:
#include <stdio.h>
#include <stdlib.h>
#include <iostream>

#include <vector>
#include <fstream>
#include <Eigen/Core>
#include <Eigen/StdVector>
#include <Python.h>
using namespace std;

int main()
{

    Py_Initialize();
    if(!Py_IsInitialized())
    {

        return -1;
    }
    PyObject* pModule = PyImport_ImportModule("transformMatrixExt");
    if(!pModule)
    {

        cout<<"open fail"<<endl;
        return -1;
    }
    PyObject* pFunhello = PyObject_GetAttrString(pModule,"readimg");
    if(!pFunhello)
    {

// cout<<"get function ext failed"<<endl;
        return -1;
    }
    PyObject_CallFunction(pFunhello, NULL);
    Py_Finalize();

}
转换结果截图:
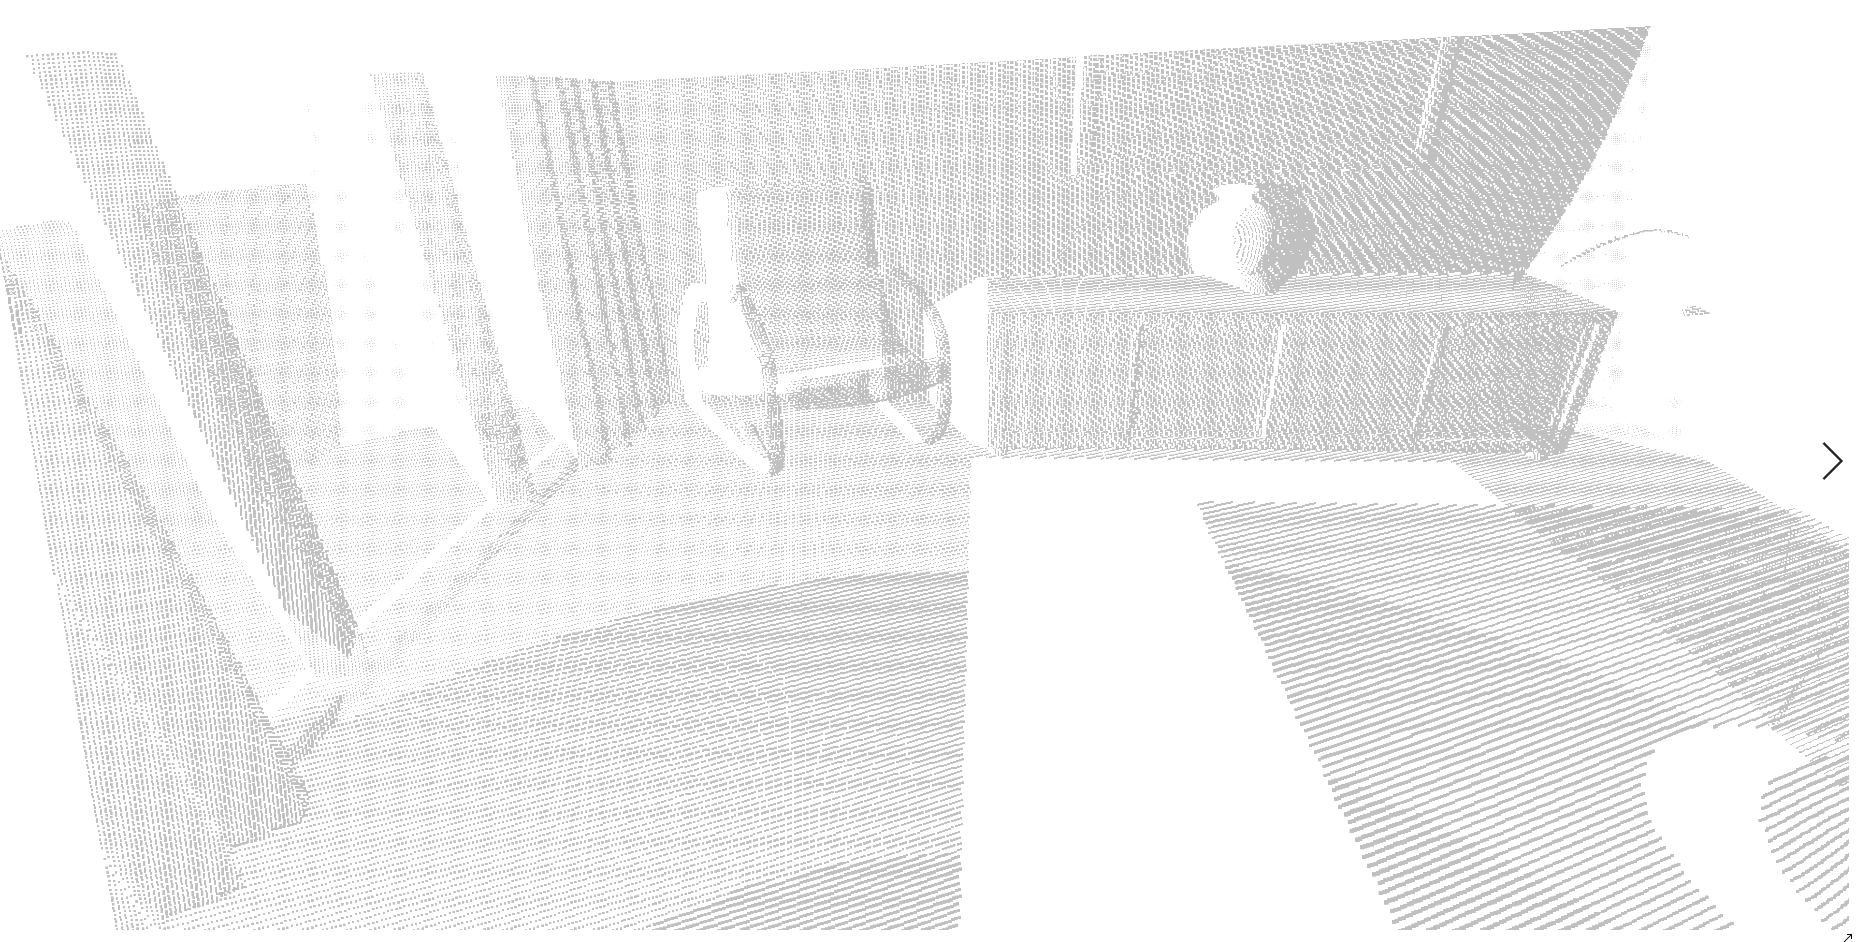
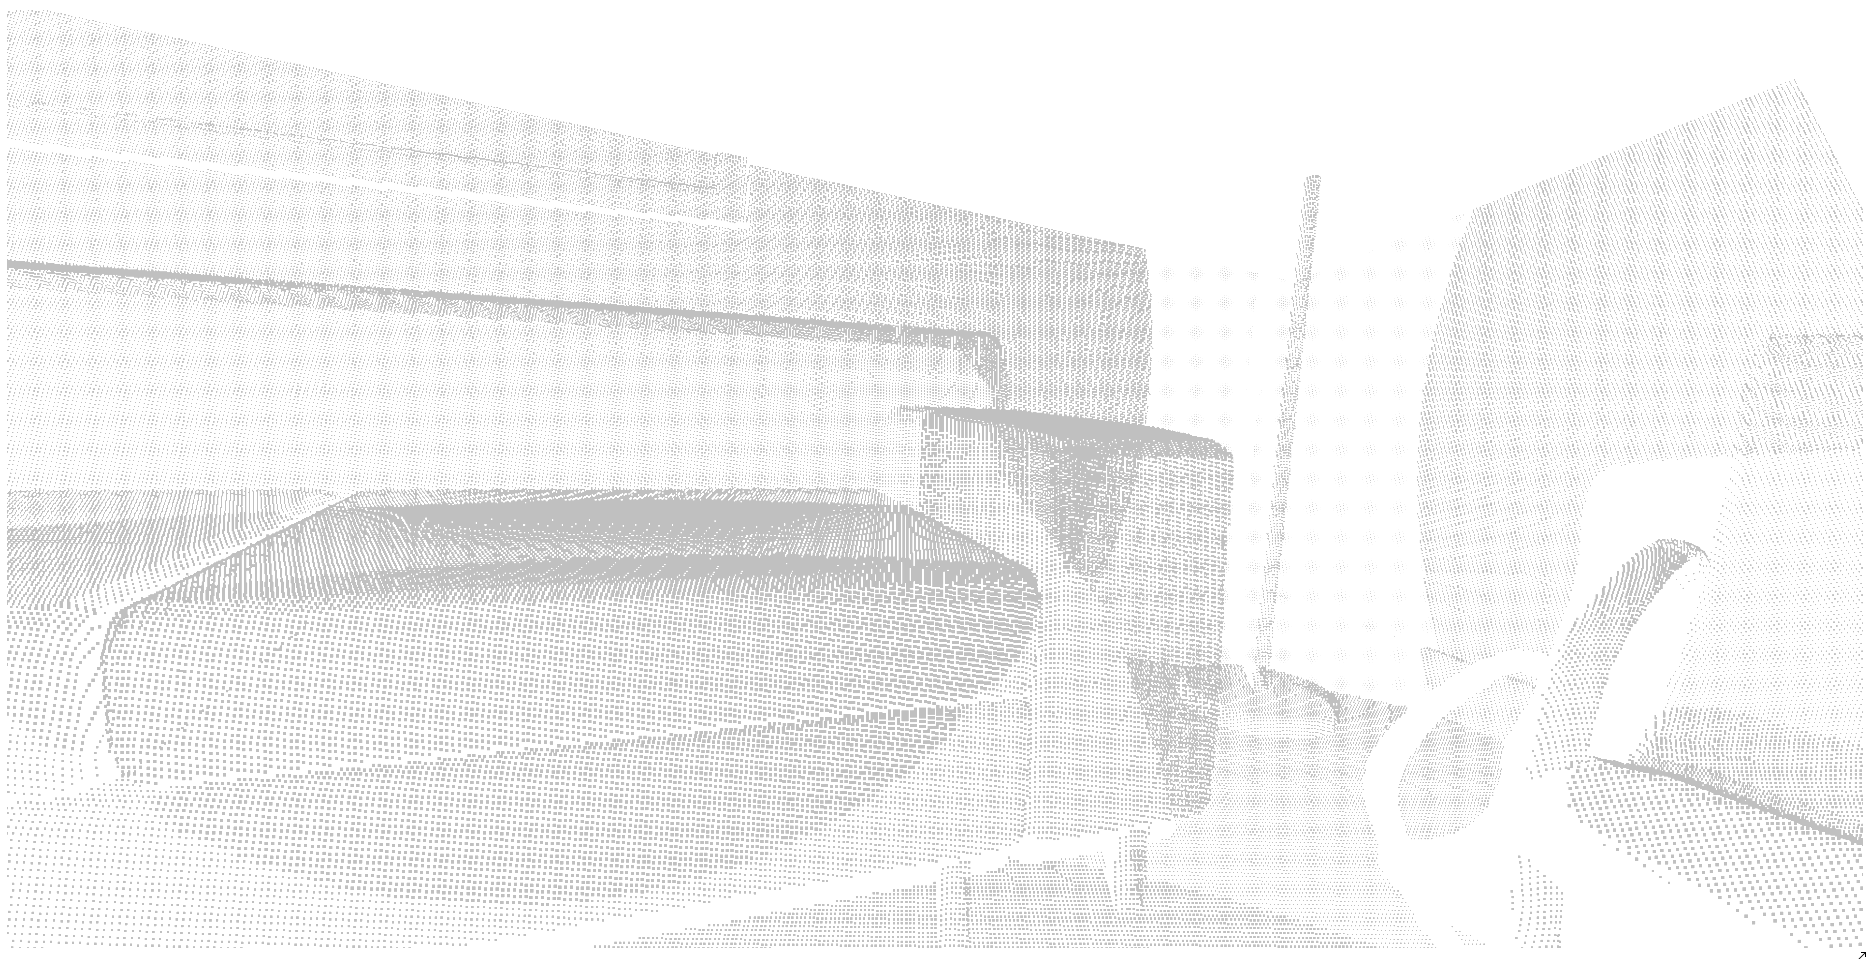
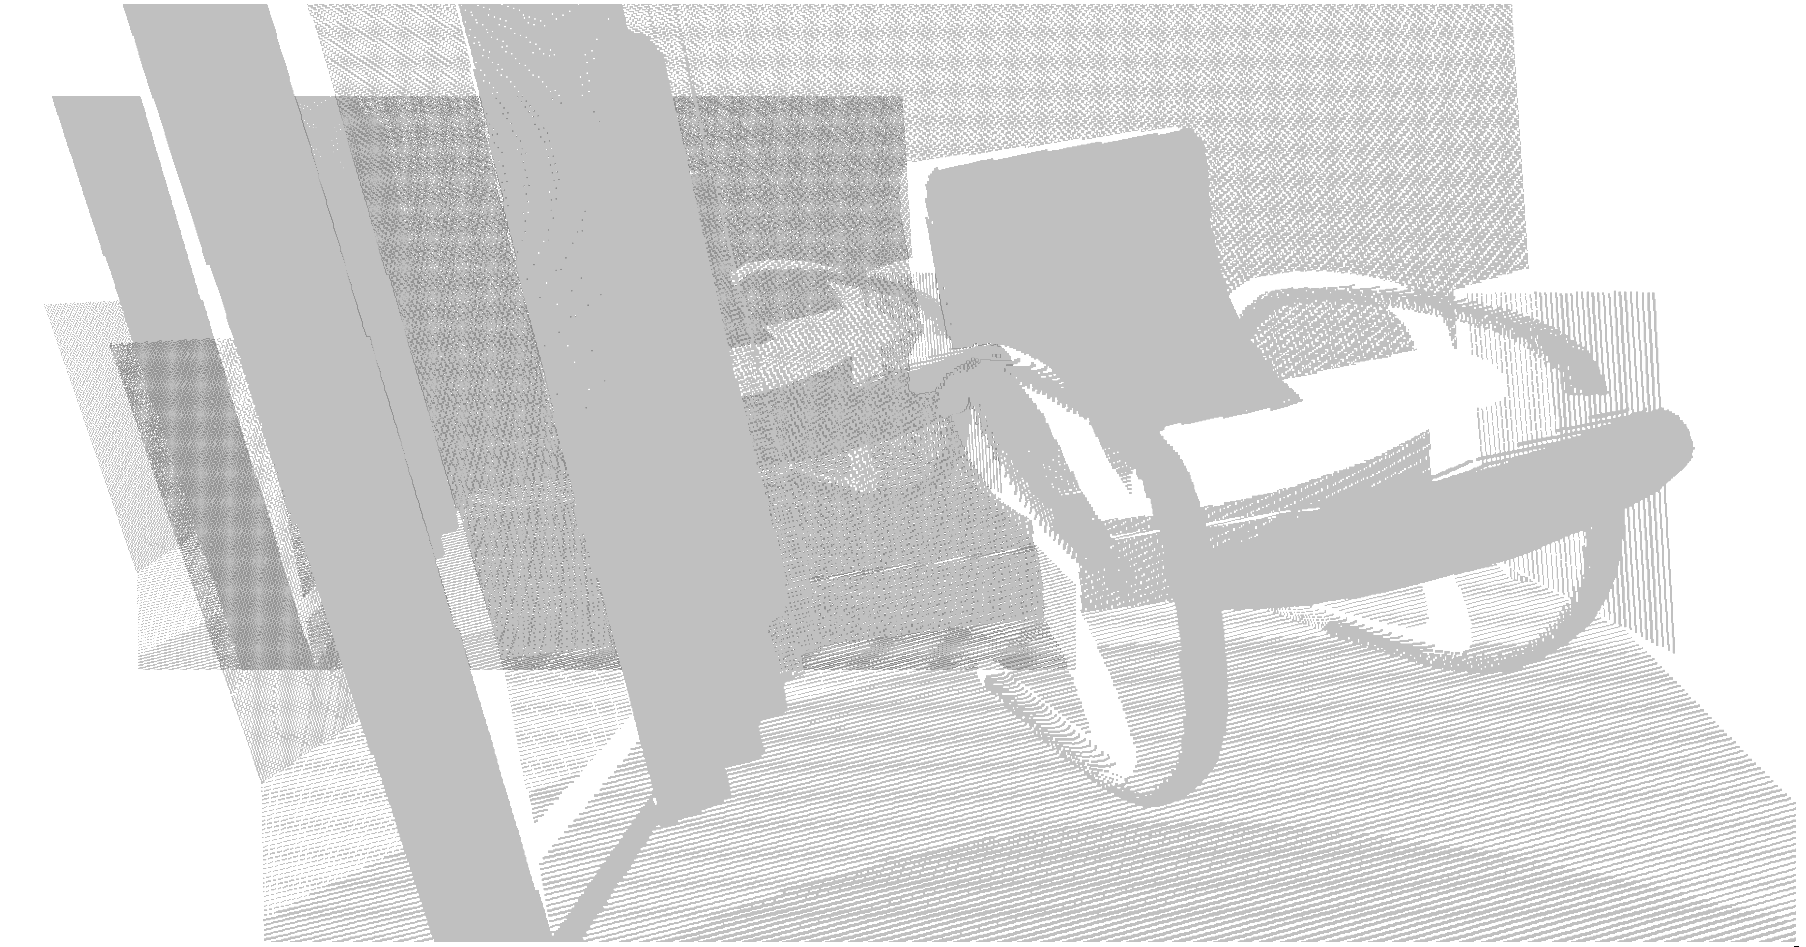
这三个分别是http://qianyi.info上面的livingroom1-depth-clean里面的00000.png,01500.png和02869.png三张深度序列图转换成点云的场景截图,如果要还原成一个完整的场景,好像需要把一共2870序列图都要转换。但是这里有个疑问,每张深度图转换出的点云数量是307200个,在网站上可以看到一个完整的点云数量是200多万个,而完整的序列是2870张,所以这个数量最终无法对上,需要继续探索。
发布者:全栈程序员-用户IM,转载请注明出处:https://javaforall.cn/138949.html原文链接:https://javaforall.cn
【正版授权,激活自己账号】: Jetbrains全家桶Ide使用,1年售后保障,每天仅需1毛
【官方授权 正版激活】: 官方授权 正版激活 支持Jetbrains家族下所有IDE 使用个人JB账号...
