大家好,又见面了,我是你们的朋友全栈君。
在上篇文章中,我们知道了一些 Java IO 的概念,也了解了 okio 的用法,现在我们来分析一下源码
Okio
我们回到上篇的代码:
 Source source = Okio.source(new File(mPath));
 String read = Okio.buffer(source).readString(Charset.forName("utf-8"));
显而易见 Okio 是个入口类,里面方法如下:
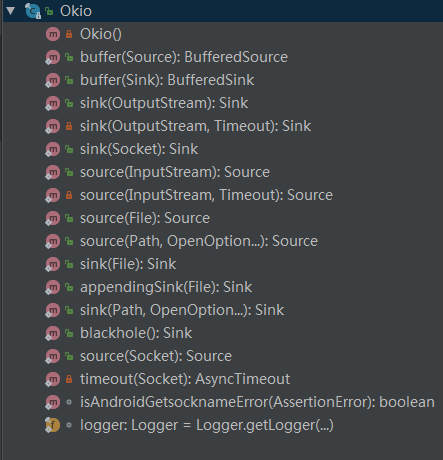

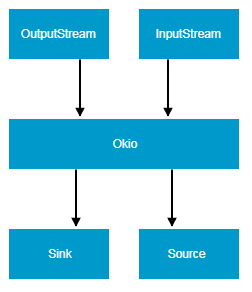
将 Okio 里面的代码过一遍的话,就会发现其实 Okio 就是个工厂类,它的主要工作就是将 OutputStream 和InputStream 转成 Sink和 Source
转换方法也是十分简单粗暴,就是直接 new 出来,这里就只贴 Source 的生成方法:
private static Source source(final InputStream in, final Timeout timeout) {

        if (in == null) throw new IllegalArgumentException("in == null");
        if (timeout == null) throw new IllegalArgumentException("timeout == null");

        return new Source() {

            @Override
            public long read(Buffer sink, long byteCount) throws IOException {

                if (byteCount < 0)
                    throw new IllegalArgumentException("byteCount < 0: " + byteCount);
                if (byteCount == 0) return 0;
                try {

                    timeout.throwIfReached();
                    Segment tail = sink.writableSegment(1);
                    int maxToCopy = (int) Math.min(byteCount, Segment.SIZE - tail.limit);
                    int bytesRead = in.read(tail.data, tail.limit, maxToCopy);
                    if (bytesRead == -1) return -1;
                    tail.limit += bytesRead;
                    sink.size += bytesRead;
                    return bytesRead;
                } catch (AssertionError e) {

                    if (isAndroidGetsocknameError(e)) throw new IOException(e);
                    throw e;
                }
            }

            @Override
            public void close() throws IOException {

                in.close();
            }

            @Override
            public Timeout timeout() {

                return timeout;
            }

            @Override
            public String toString() {

                return "source(" + in + ")";
            }
        };
    }
Sink 和 Source
在 okio 中 ,Sink 和 Source 分别是用来替代 Java 的 OutputStream 和 InputStream ,我们可以理解为
Sink 就是 输出流,Source 就是输入流,它们基本都是对称的,因此这里就继续用 Source 来进行分析了
先来看下 Source 的代码:
public interface Source extends Closeable {

  /** * 读取流里面的数据 * 返回读取的字节数,如果是-1则说明已经读取完成 */
  long read(Buffer sink, long byteCount) throws IOException;

  /** 超时机制 */
  Timeout timeout();

  /** * 关闭流并释放流所拥有的资源 */
  @Override void close() throws IOException;
}
Source 中只包括了一些简单的方法,不过有一个需要注意的 timeout() ,这个是超时机制,后面再讲
我们来看下它的子类有那些:
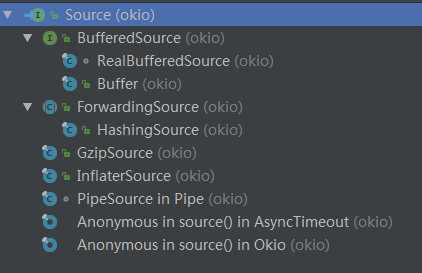
可以看到还是有不少子类的,我们先来看一些熟悉的吧,BufferedSource 和 Buffer 都是上篇文章出现过的,那就先从这两个开始吧
BufferedSource
BufferedSource 接口在 Source 接口的基础上 多了下面这一堆方法:

BufferedSource 增加了许多读的方法,但是它依然还是个接口,它的真正实现类是 RealBufferedSource
这一点,可以在 okio 这个类里面找到依据:
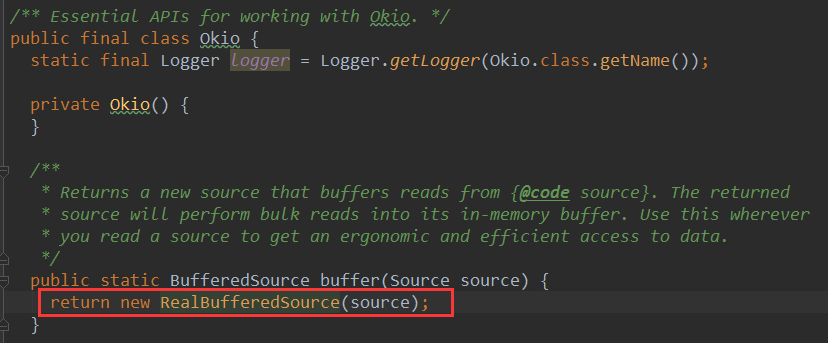
buffer 是 okio 的入口方法,它的作用就是生成一个 RealBufferedSource
###RealBufferedSource
虽然 RealBufferedSource 这个类名带有 real 这个单词,但是实际上它只是一个代理类和 Source 的一个装饰类,可以从下面的代码看出(下面的 Source 在 Okio 中生成的):
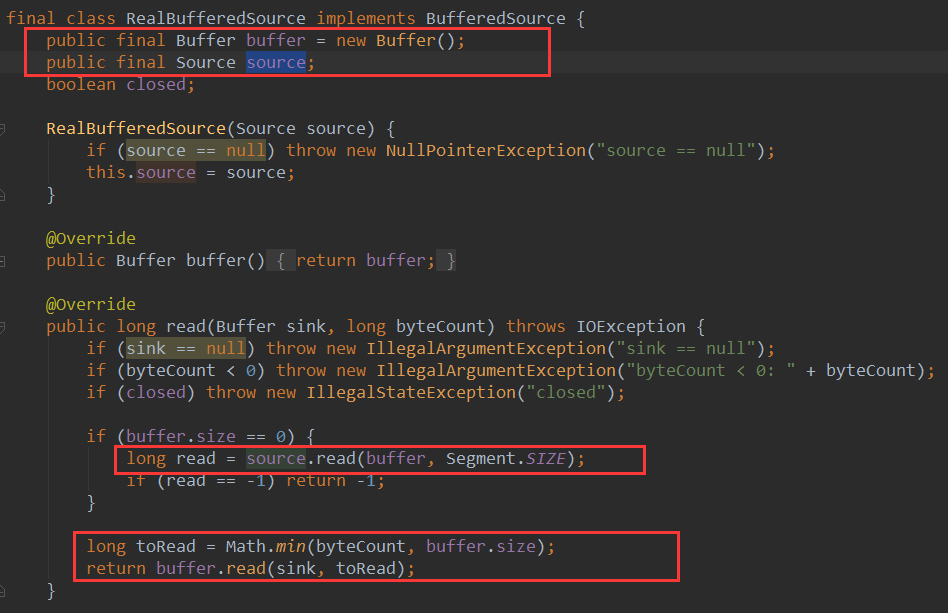
基本上,在 RealBufferedSource 实现了 BufferedSource 接口的方法,实际上都是调用了 Buffer 类中的对应方法,因此 RealBufferedSource 就仅是 Buffer 的一个代理类而已
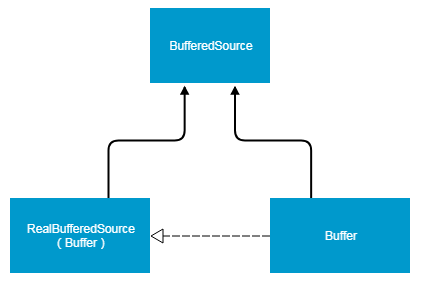
BufferedSource 和 RealBufferedSource ,Buffer 的关系如下图
Buffer
查看这个 Buffer 类,会发现它还同时继承了 BufferedSink ,也就是不管是 Source 还是 Sink ,最终都是要转换为 Buffer 的:
public final class Buffer implements BufferedSource, BufferedSink, Cloneable {

   .......
   //全局对象
   Segment head;
   //全局对象,用于记录流的大小,下面会用到的
   long size;
}
现在我们知道了 okio 最终都是要调用 Buffer 类里面方法,那我们先来看 RealBufferedSource 里面的 readString 方法吧,这个就是我们上篇调用的方法的底层实现:
String read = Okio.buffer(source).readString(Charset.forName("utf-8"));
........
//RealBufferedSource 最终调用的 buffer 类的方法
 @Override
public String readString(Charset charset) throws IOException {

    //判断编码对象是否为null
    if (charset == null) throw new IllegalArgumentException("charset == null");
    //写入内存缓冲区中
    buffer.writeAll(source);
    //从内存内存缓冲区中读取数据
    return buffer.readString(charset);
}
我们先去看下 buffer.writeAll(source) 方法吧,它到底是干了什么:
@Override
public long writeAll(Source source) throws IOException {

      if (source == null) throw new IllegalArgumentException("source == null");
      long totalBytesRead = 0;
      //source.read(this,Segment.SIZE),这里是获取sink来进入写入操作,写入大小为Segment.SIZE
      for (long readCount; (readCount = source.read(this, Segment.SIZE)) != -1; ) {

          totalBytesRead += readCount;
       }
       return totalBytesRead;
}
这里的 source 在 Okio 类中的生成的,我们再回顾一下具体的方法代码:
@Override
public long read(Buffer sink, long byteCount) throws IOException {

      if (byteCount < 0)
            throw new IllegalArgumentException("byteCount < 0: " + byteCount);
      if (byteCount == 0) return 0;
      try{

            timeout.throwIfReached();
            //得到一个Segment对象
            Segment tail = sink.writableSegment(1);
            //获取InputStream每次读取数据的长度
            int maxToCopy = (int) Math.min(byteCount, Segment.SIZE - tail.limit);
            //InputStream.read(byte b[], int off, int len),熟悉的读取方法
            //tail.data,这个是数组就是一个内存缓冲区
            int bytesRead = in.read(tail.data, tail.limit, maxToCopy);
            //-1表示流读取完成了
            if (bytesRead == -1) return -1;
            tail.limit += bytesRead;
            //记录读取完成的流的数据大小
            sink.size += bytesRead;
            return bytesRead;
          } catch (AssertionError e) {

             if (isAndroidGetsocknameError(e)) throw new IOException(e);
             throw e;
          }
}
接着看下 buffer.readString(charset) 方法:
@Override
    public String readString(Charset charset) {

        try {

            //又看到全局的size,这里已经记录下刚才读取的流的打下了
            return readString(size, charset);
        } catch (EOFException e) {

            throw new AssertionError(e);
        }
    }

    @Override
    public String readString(long byteCount, Charset charset) throws EOFException {

        checkOffsetAndCount(size, 0, byteCount);
        if (charset == null) throw new IllegalArgumentException("charset == null");
        if (byteCount > Integer.MAX_VALUE) {

            throw new IllegalArgumentException("byteCount > Integer.MAX_VALUE: " + byteCount);
        }
        if (byteCount == 0) return "";
        //获取全局的Segment对象
        Segment s = head;
        if (s.pos + byteCount > s.limit) {

            //如果内存缓冲区的流的长度超过了限制,那么使用readByteArray方法
            return new String(readByteArray(byteCount), charset);
        }
        //将内存缓冲区的流(二进制数组)转为String
        String result = new String(s.data, s.pos, (int) byteCount, charset);
        s.pos += byteCount;
        size -= byteCount;
        //回收Segment
        if (s.pos == s.limit) {

            head = s.pop();
            SegmentPool.recycle(s);
        }
        //得到文本内容
        return result;
    }
我们看到如果超过了某个限制,会调用其他的方法,我们再追下去:
@Override
public byte[] readByteArray(long byteCount) throws EOFException {

   checkOffsetAndCount(size, 0, byteCount);
   if (byteCount > Integer.MAX_VALUE) {

       throw new IllegalArgumentException("byteCount > Integer.MAX_VALUE: " + byteCount);
   }
   //生成和流一样大小的byte数组
   byte[] result = new byte[(int) byteCount];
   //读取流并填入byte数组中
   readFully(result);
   return result;
}
............
@Override
public void readFully(byte[] sink) throws EOFException {

   int offset = 0;
   while (offset < sink.length) {

   //循环去将内存缓冲区的内存填入byte数组
   int read = read(sink, offset, sink.length - offset);
   if (read == -1) throw new EOFException();
       offset += read;
   }
}
.....
@Override
public int read(byte[] sink, int offset, int byteCount) {

   checkOffsetAndCount(sink.length, offset, byteCount);

   Segment s = head;
   if (s == null) return -1;
       int toCopy = Math.min(byteCount, s.limit - s.pos);
       //数组的内容复制方法
       //将Segment中的缓存的流的数据复制到byte数组中
       System.arraycopy(s.data, s.pos, sink, offset, toCopy);

       s.pos += toCopy;
       size -= toCopy;

       if (s.pos == s.limit) {

           head = s.pop();
           SegmentPool.recycle(s);
       }
       return toCopy;
}
整个 Okio 读取本地文本的数据的流程就是以上的过程了,这里我们看到了一个新的内容:Segment
它是一个内存的数据缓冲区,我们将会在下篇去分析
发布者:全栈程序员-用户IM,转载请注明出处:https://javaforall.cn/136369.html原文链接:https://javaforall.cn
【正版授权,激活自己账号】: Jetbrains全家桶Ide使用,1年售后保障,每天仅需1毛
【官方授权 正版激活】: 官方授权 正版激活 支持Jetbrains家族下所有IDE 使用个人JB账号...
