大家好,又见面了,我是你们的朋友全栈君。
前言
MyBatis相信很多人都会使用,但是当MyBatis整合到了Spring中,我们发现在Spring中使用更加方便了。例如获取Dao的实例,在Spring的我们只需要使用注入的方式就可以了使用Dao了,完全不需要调用SqlSession的getMapper方法去获取Dao的实例,更不需要我们去管理SqlSessionFactory,也不需要去创建SqlSession之类的了,对于插入操作也不需要我们commit。
既然那么方便,Spring到底为我们做了哪些工作呢,它如何将MyBatis整合到Spring中的呢,Spring在整合MyBatis时候做了哪些封装,以及做了哪些拓展,又是怎么实现这些封装以及拓展的,让我们来打开这一部分的源代码,一探究竟。
首先我们来先回顾下MyBatis的用法,以及Spring中MyBatis的使用方法。
MyBatis使用介绍
建立PO
po用于对于数据库中数据的映射,使得开发者更加专注于Java类的使用,而不是对数据库的操作
/**
 * @author: Fighter168
 */
public class Person {
	private String id;
	private String name;
//set get 方法、、、
}
建立Mapper
mapper是数据库操作的映射文件,也就是我们常说的dao文件
/**
 * @author: Fighter168
 */
public interface PersonDao {

	public List<Person> query();

	public void save(Person p);

	public void delete(String id);
}
建立配置文件
配置文件主要用于程序中可变性高的设置,Mybatis的配置文件主要存在于configuration.xml中,当然configuration.xml中省略了其他mybatis的配置,例如settings里面的配置等等,如果没有玩过MyBatis的同学可以去参考网上MyBatis的教程自己去了解了解。
<?xml version="1.0" encoding="UTF-8" ?>
<!DOCTYPE configuration
  PUBLIC "-//mybatis.org//DTD Config 3.0//EN"
  "http://mybatis.org/dtd/mybatis-3-config.dtd">
<configuration>
    <!-- 对事务的管理和连接池的配置 -->
    <environments default="development">
        <environment id="development">
            <transactionManager type="JDBC" />
            <dataSource type="POOLED">
                   <property name="driver" value="com.mysql.jdbc.Driver" />
                   <property name="url" value="jdbc:mysql://localhost:3306/test" />
                   <property name="username" value="root" />
                   <property name="password" value="root" />
            </dataSource>
        </environment>
    </environments>

    <!-- mapping 文件路径配置 -->
    <mappers>
        <mapper resource="resource/PersonMapper.xml" />
    </mappers>
</configuration>
建立映射文件
映射文件对应于Mybatis全局配置中的mappers配置属性,主要用于建立对应数据库操作接口的SQL映射。
<?xml version="1.0" encoding="UTF-8" ?>
<!DOCTYPE mapper PUBLIC "-//mybatis.org//DTD Mapper 3.0//EN" "http://www.mybatis.org/dtd/mybatis-3-mapper.dtd" >
<mapper namespace="net.itaem.dao.PersonDao" >

  <resultMap id="resultMap" type="net.itaem.po.Person" >
	    <result column="id" property="id" jdbcType="CHAR" />
	    <result column="name" property="name" jdbcType="CHAR" />
  </resultMap>
<!--添加-->
 <insert id="save"  parameterType="net.itaem.po.Person">
 insert into person(id,name) value(#{id,jdbcType=CHAR},#{name,jdbcType=CHAR})
 </insert>
<!--查询-->
 <select id="query"  resultMap="resultMap">
 select * from person
 </select>
 <!--删除-->
<delete id="delete" parameterType="java.lang.String">
 delete from person  where id=#{id,jdbcType=CHAR}
</delete>
</mapper>
建立测试类
/**
 * @author: Fighter168
 */
public class Test {

	public static void main(String[] args) throws Exception {
		Reader reader=Resources.getResourceAsReader("resource/configuration.xml");
		SqlSessionFactory sessionFactory=new SqlSessionFactoryBuilder().build(reader);
		SqlSession session=sessionFactory.openSession();
		PersonDao personDao=session.getMapper(PersonDao.class);
		Person person=new Person("11","Fighter168");
		personDao.save(person);
		//这里一定要提交,不然数据无法插入
		session.commit();
		session.close();
	}
}
Spring中使用MyBatis介绍
创建Spring配置文件
<?xml version="1.0" encoding="UTF-8"?>
<beans xmlns="http://www.springframework.org/schema/beans"
	xmlns:xsi="http://www.w3.org/2001/XMLSchema-instance"
	xsi:schemaLocation="http://www.springframework.org/schema/beans http://www.springframework.org/schema/beans/spring-beans-3.0.xsd">
	 <bean id="dataSource" class="org.apache.commons.dbcp.BasicDataSource" destroy-method="close">
	     <property name="driverClassName" value="com.mysql.jdbc.Driver"/>
	     <property name="url" value="jdbc:mysql://localhost:3306/test"/>
	     <property name="username" value="root"/>
	     <property name="password" value="123abc"/>
	     <!-- 连接池启动时候的初始连接数 -->
	     <property name="initialSize" value="10"/>
	     <!-- 最小空闲值 -->
	     <property name="minIdle" value="5"/>
	     <!-- 最大空闲值 -->
	     <property name="maxIdle" value="20"/>
	     <property name="maxWait" value="2000"/>
	     <!-- 连接池最大值 -->
	     <property name="maxActive" value="50"/>
	     <property name="logAbandoned" value="true"/>
	     <property name="removeAbandoned" value="true"/>
	     <property name="removeAbandonedTimeout" value="180"/>
	</bean>

	<bean id="sqlSessionFactory" class="org.mybatis.spring.SqlSessionFactoryBean">
		<property name="configLocation" value="classpath:/resource/cfg.xml"/>
		<property name="dataSource" ref="dataSource"/>
	</bean>

	<bean id="personDao" class="org.mybatis.spring.mapper.MapperFactoryBean">
		<property name="mapperInterface" value="net.itaem.dao.PersonDao"/>
		<property name="sqlSessionFactory" ref="sqlSessionFactory"/>
	</bean>
</beans>
创建MyBatis配置文件
<?xml version="1.0" encoding="UTF-8" ?>
<!DOCTYPE configuration
  PUBLIC "-//mybatis.org//DTD Config 3.0//EN"
  "http://mybatis.org/dtd/mybatis-3-config.dtd">
<configuration>
    <!-- mapping 文件路径配置 -->
    <mappers>
        <mapper resource="resource/PersonMapper.xml" />
    </mappers>
</configuration>
创建映射文件
<?xml version="1.0" encoding="UTF-8" ?>
<!DOCTYPE mapper PUBLIC "-//mybatis.org//DTD Mapper 3.0//EN" "http://www.mybatis.org/dtd/mybatis-3-mapper.dtd" >
<mapper namespace="net.itaem.dao.PersonDao" >

  <resultMap id="resultMap" type="net.itaem.po.Person" >
	    <result column="id" property="id" jdbcType="CHAR" />
	    <result column="name" property="name" jdbcType="CHAR" />
  </resultMap>
<!--添加-->
 <insert id="save"  parameterType="net.itaem.po.Person">
 insert into person(id,name) value(#{id,jdbcType=CHAR},#{name,jdbcType=CHAR})
 </insert>
<!--查询-->
 <select id="query"  resultMap="resultMap">
 select * from person
 </select>
 <!--删除-->
<delete id="delete" parameterType="java.lang.String">
 delete from person  where id=#{id,jdbcType=CHAR}
</delete>
</mapper>
Spring使用MyBatis测试
/**
 * @author: Fighter168
 */
public class SpringTest {

	public static void main(String[] args) {
		ApplicationContext context=new ClassPathXmlApplicationContext("resource/ApplicationContext.xml");
		PersonDao personDao=(PersonDao) context.getBean("personDao");
		Person person=new Person("12","Fighter168");
		personDao.save(person);
	}
}spring整合mybatis实现
SqlSessionFactoryBean的创建
SqlSessionFactoryBean的初始化
  /**
   * {@inheritDoc}
   */
  public void afterPropertiesSet() throws Exception {
    notNull(dataSource, "Property 'dataSource' is required");
    notNull(sqlSessionFactoryBuilder, "Property 'sqlSessionFactoryBuilder' is required");

    this.sqlSessionFactory = buildSqlSessionFactory();
  }
获取SqlSessionFactoryBean实例
/** * {@inheritDoc} */ public SqlSessionFactory getObject() throws Exception { if (this.sqlSessionFactory == null) { afterPropertiesSet(); } return this.sqlSessionFactory; }所以我们在给dao注入sqlSessionFactory的时候,依赖填写SqlSessionFactoryBean 的实例就可以了。
MapperFactoryBean的创建
		SqlSession session=sessionFactory.openSession();
		PersonDao personDao=session.getMapper(PersonDao.class);
但在我们在spring的测试用例中使用mybatis的时候是这样使用的:
PersonDao personDao=(PersonDao) context.getBean("personDao");为什么spring可以这样做呢,答案就在MapperFactoryBean这里
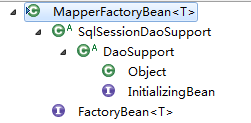

MapperFactoryBean初始化
	public final void afterPropertiesSet() throws IllegalArgumentException, BeanInitializationException {
		// Let abstract subclasses check their configuration.
		checkDaoConfig();

		// Let concrete implementations initialize themselves.
		try {
			initDao();
		}
		catch (Exception ex) {
			throw new BeanInitializationException("Initialization of DAO failed", ex);
		}
	}
该方法主要包含两个功能,一个是调用checkDaoConfig()方法,一个是调用initDao方法。checkDaoConfig方法在DaoSupport是抽象方法,让我看看它在MapperFactoryBean的实现:
 /**
   * {@inheritDoc}
   */
  @Override
  protected void checkDaoConfig() {
    super.checkDaoConfig();

    notNull(this.mapperInterface, "Property 'mapperInterface' is required");

    Configuration configuration = getSqlSession().getConfiguration();
    if (this.addToConfig && !configuration.hasMapper(this.mapperInterface)) {
      try {
        configuration.addMapper(this.mapperInterface);
      } catch (Throwable t) {
        logger.error("Error while adding the mapper '" + this.mapperInterface + "' to configuration.", t);
        throw new IllegalArgumentException(t);
      } finally {
        ErrorContext.instance().reset();
      }
    }
}获取MapperFactoryBean的实例
  /**
   * {@inheritDoc}
   */
  public T getObject() throws Exception {
    return getSqlSession().getMapper(this.mapperInterface);
  }
MapperScannerConfigurer介绍
	<!-- 去掉该配置
	<bean id="personDao" class="org.mybatis.spring.mapper.MapperFactoryBean">
		<property name="mapperInterface" value="net.itaem.dao.PersonDao"/>
		<property name="sqlSessionFactory" ref="sqlSessionFactory"/>
	</bean>
	 -->
	 <!-- 如果 net.itaem.dao 包下面有很多dao需要注册,那么可以使用这种扫描的方式添加dao-->
	<bean class="org.mybatis.spring.mapper.MapperScannerConfigurer">
		<property name="basePackage" value="net.itaem.dao"/>
	</bean>
看到上面的配置,我们会很好奇,在spring这样添加就可以扫描的方式添加dao配置,怎么做到的?让我打开类实现,具体看一下。
/** * {@inheritDoc} * * @since 1.0.2 */ public void postProcessBeanDefinitionRegistry(BeanDefinitionRegistry registry) throws BeansException { if (this.processPropertyPlaceHolders) { processPropertyPlaceHolders(); } ClassPathMapperScanner scanner = new ClassPathMapperScanner(registry); scanner.setAddToConfig(this.addToConfig); scanner.setAnnotationClass(this.annotationClass); scanner.setMarkerInterface(this.markerInterface); scanner.setSqlSessionFactory(this.sqlSessionFactory); scanner.setSqlSessionTemplate(this.sqlSessionTemplate); scanner.setSqlSessionFactoryBeanName(this.sqlSessionFactoryBeanName); scanner.setSqlSessionTemplateBeanName(this.sqlSessionTemplateBeanName); scanner.setResourceLoader(this.applicationContext); scanner.setBeanNameGenerator(this.nameGenerator); scanner.registerFilters(); scanner.scan(StringUtils.tokenizeToStringArray(this.basePackage, ConfigurableApplicationContext.CONFIG_LOCATION_DELIMITERS)); }这里我们重点关注三个主要的方法,分别是
scanner.scan(StringUtils.tokenizeToStringArray(this.basePackage, ConfigurableApplicationContext.CONFIG_LOCATION_DELIMITERS));
processPropertyPlaceHolders属性处理
根据配置属性生成过滤器
扫描java文件
总结
发布者:全栈程序员-用户IM,转载请注明出处:https://javaforall.cn/136333.html原文链接:https://javaforall.cn
【正版授权,激活自己账号】: Jetbrains全家桶Ide使用,1年售后保障,每天仅需1毛
【官方授权 正版激活】: 官方授权 正版激活 支持Jetbrains家族下所有IDE 使用个人JB账号...
