大家好,又见面了,我是你们的朋友全栈君。
spring整合Mybatis-plus
今天就随便说说spring整合mybatis-plus,就不再搭建一个web项目了,简单做一个测试类。
既然是spring,那就少不了各种xxx.xml配置文件。
那就先说说配置文件
<1>. application-dao.xml
dao层的配置,他的核心就是要产生Mapper代理对象
1、数据源的配置
<context:property-placeholder location="classpath:db.properties" system-properties-mode="FALLBACK" />
2、数据源的配置
<bean id="dataSource" class="org.springframework.jdbc.datasource.DriverManagerDataSource">
	<property name="driverClassName" value="${driver}"></property>
	<property name="url" value="${url}"></property>
	<property name="username" value="${user}"></property>
	<property name="password" value="${password}"></property>
</bean>
3、SqlSessionFactory
<bean id="sqlSessionFactory" class="com.baomidou.mybatisplus.extension.spring.MybatisSqlSessionFactoryBean">
		<property name="dataSource" ref="dataSource"></property>

		<property name="globalConfig" ref="globalConfig"></property>
		<!-- 加载xxMapper.xml -->
		<property name="mapperLocations">
			<array>
				<value>classpath:mapper/*Mapper.xml</value>
			</array>
		</property>
		<!-- 配置分页插件 -->
		<property name="plugins">
			<array>
				<bean class="com.baomidou.mybatisplus.extension.plugins.PaginationInterceptor">
				</bean>
			</array>
		</property>
	</bean>
	<!-- 声明全局配置 -->
	<bean id="globalConfig" class="com.baomidou.mybatisplus.core.config.GlobalConfig">
		<!-- 指定主键自动增长类型 -->
		<property name="dbConfig" ref="dbConfig"></property>
	</bean>
	<bean id="dbConfig" class="com.baomidou.mybatisplus.core.config.GlobalConfig.DbConfig">
		<property name="idType" value="AUTO"></property>
	</bean>
4、产生Mapper接口的代理对象
<bean class="org.mybatis.spring.mapper.MapperScannerConfigurer">
		<!-- 需要生成代理类对象的mapper接口包 -->
		<property name="basePackage" value="com.xieyunjie.mapper"></property>
		<!-- sqlSessionFactory 的name 用于为代理类中生成SqlSession -->
		<property name="sqlSessionFactoryBeanName" value="sqlSessionFactory"></property>
	</bean>
<2>. application-service.xml
<context:component-scan base-package="com.xieyunjie.service">
</context:component-scan>
<3>. applicationContext.xml
<!-- 引入dao层的配置 -->
<import resource="classpath:application-dao.xml"/>
<4>. db.properties
driver=com.mysql.cj.jdbc.Driver
url=jdbc:mysql://127.0.0.1:3306/test?useUnicode=true&characterEncoding=utf8&useSSL=true&serverTimezone=UTC
user=root
password=root
<5>. log4j.properties
# Global logging configuration
log4j.rootLogger=DEBUG, stdout
# MyBatis logging configuration...
log4j.logger.org.mybatis.example.BlogMapper=TRACE
# Console output...
log4j.appender.stdout=org.apache.log4j.ConsoleAppender
log4j.appender.stdout.layout=org.apache.log4j.PatternLayout
log4j.appender.stdout.layout.ConversionPattern=%5p [%t] - %m%n
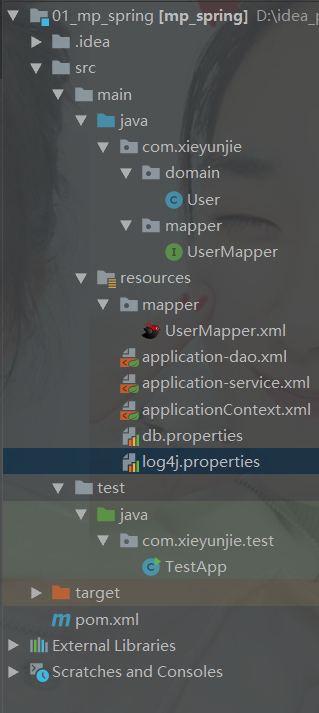
一、目录结构

二、创建一个实体类
@Data
@AllArgsConstructor
@NoArgsConstructor
@ToString
@TableName(value="sys_user")//建立User.class和数据的sys_user表的关系
public class User implements Serializable{


	private static final long serialVersionUID = 1L;

	//字段名和表中的名字一样时可以不加以下注解,不同时需要加上该注解
	@TableId(value="id")  //代表它是主键
	private Integer id;
	@TableField(value="name")
	private String name;
	private String address;
	private Date birth;
}
三、创建一个mapper接口(dao层)
public interface UserMapper extends BaseMapper<User> {

}
四、创建一个mapper.xml的映射文件
<?xml version="1.0" encoding="UTF-8" ?>
<!DOCTYPE mapper PUBLIC "-//mybatis.org//DTD Mapper 3.0//EN" "http://mybatis.org/dtd/mybatis-3-mapper.dtd" >
<mapper namespace="com.xieyunjie.mapper.UserMapper" >

</mapper>
五、进行测试
创建一个userMapper对象,进行测试
 ApplicationContext context=new ClassPathXmlApplicationContext("classpath:applicationContext.xml");
 UserMapper userMapper=context.getBean(UserMapper.class);
- 分页查询
private static void query5(UserMapper userMapper){

        IPage<User> page=new Page<>(1,5);
        userMapper.selectPage(page,null);
        long total=page.getTotal();
        System.out.println("总条数:"+total);
        List<User> list=page.getRecords();
        print(list);
    }
- 根据姓名进行查询
private static void query4(UserMapper userMapper,String name){

        Integer count=userMapper.selectCount(null);
        QueryWrapper<User> queryWrapper=new QueryWrapper<>();
        queryWrapper.like(name!=null,"name",name);
        Integer selectCount=userMapper.selectCount(queryWrapper);
        System.out.println(selectCount);
    }
- 根据Id进行查询
    private static void query1(UserMapper userMapper){

        User user=userMapper.selectById(3);
        System.out.println(user);
    }
- 将需要的数据放到一个Map集合里面进行查询
private static void query3(UserMapper userMapper){

        Map<String,Object> columnMap=new HashMap<>();
        columnMap.put("name","小荥");
        columnMap.put("address","南阳");
        List<User> list=userMapper.selectByMap(columnMap);
        print(list);
    }
- 将需要的数据放到一个List集合里面进行查询
private static void query2(UserMapper userMapper){

        //先放到一个集合里面,最后进行查询
        Collection<Serializable> idList=new ArrayList<Serializable>();
        idList.add(2);
        idList.add(3);
        idList.add(4);
        List<User> list=userMapper.selectBatchIds(idList);
        print(list);
    }
- 删除数据
private static void deleteUser(UserMapper userMapper){

        //根据主键删除
        userMapper.deleteById(1);
        //批量删除。先放到一个集合里面,然后删除
        Collection<Serializable> idList=new ArrayList<Serializable>();
        idList.add(22);
        idList.add(112);
        userMapper.deleteBatchIds(idList);
        //根据map集合进行删除
        Map<String,Object> columnMap=new HashMap<String,Object>();
        columnMap.put("id",6);
        columnMap.put("name","小明");
        userMapper.deleteByMap(columnMap);
        //根据wrapper进行删除
        QueryWrapper<User> wrapper=new QueryWrapper<>();
        userMapper.delete(wrapper);
    }
- 修改数据
private static void updateUser(UserMapper userMapper){

        //根据主键修改
        userMapper.updateById(new User(112,"小荥荥","北京",new Date()));
        UpdateWrapper<User> updateWrapper=new UpdateWrapper<>();
        updateWrapper.eq("name","小荥荥");
        updateWrapper.between("id",1,5);
        userMapper.update(new User(112,"小荥","武汉",new Date()),updateWrapper);
    }
测试的结果这里就不再进行展示了,大家可以自行去测试
附上个人博客:天涯志
版权声明:本文内容由互联网用户自发贡献,该文观点仅代表作者本人。本站仅提供信息存储空间服务,不拥有所有权,不承担相关法律责任。如发现本站有涉嫌侵权/违法违规的内容, 请发送邮件至 举报,一经查实,本站将立刻删除。
发布者:全栈程序员-用户IM,转载请注明出处:https://javaforall.cn/134637.html原文链接:https://javaforall.cn
【正版授权,激活自己账号】: Jetbrains全家桶Ide使用,1年售后保障,每天仅需1毛
【官方授权 正版激活】: 官方授权 正版激活 支持Jetbrains家族下所有IDE 使用个人JB账号...
