大家好,又见面了,我是你们的朋友全栈君。
源码地址:https://github.com/jitwxs/blog_sample
首先请检查下你的 Vue 版本,Vue2 和 Vue3 跨域方式不同:
$ vue -V
2.X or 3.X
一、Vue2 版本
这里以访问 Ve2x 的一个公告API为例,直接访问如下:
this.$axios.get("https://www.v2ex.com/api/site/info.json")
.then(res=>{

    console.log(res)
})
.catch(err=>{

    console.log(err)
})
当我们运行程序后,控制台报错如下:


可以看到浏览器拦截了我们的请求,因为我们跨域了,下面解决跨域问题。
Step1:配置BaseUrl
首先在main.js中,配置下我们访问的Url前缀:
import Vue from 'vue'
import App from './App'
import Axios from 'axios'

Vue.prototype.$axios = Axios
Axios.defaults.baseURL = '/api'
Axios.defaults.headers.post['Content-Type'] = 'application/json';

Vue.config.productionTip = false

/* eslint-disable no-new */
new Vue({

  el: '#app',
  components: {
    App },
  template: '<App/>'
})
关键代码是:Axios.defaults.baseURL = '/api',这样每次发送请求都会带一个/api的前缀。
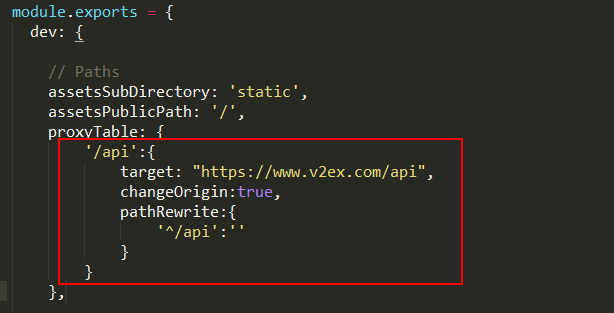
Step2:配置代理
修改config文件夹下的index.js文件,在proxyTable中加上如下代码:
'/api':{

    target: "https://www.v2ex.com/api",
    changeOrigin:true,
    pathRewrite:{

        '^/api':''
    }
}
Step3:修改请求Url
修改刚刚的axios请求,把url修改如下:
this.$axios.get("/site/info.json")
.then(res=>{

	console.log(res)
})
.catch(err=>{

	console.log(err)
})
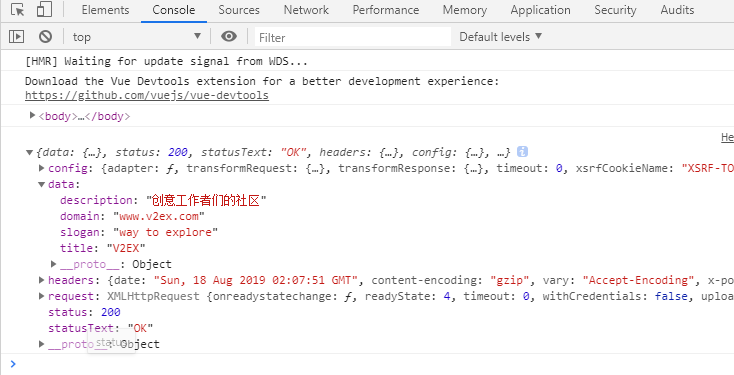
Step4:重启服务
重启服务后,此时已经能够访问了:
原理:
因为我们给url加上了前缀 /api,我们访问 http://127.0.0.1:19323/site/info.json 就当于访问了:http://127.0.0.1:19323/api/site/info.json。(假设本地访问端口号为 19323)
又因为在 index.js 中的 proxyTable 中拦截了 /api ,并把 /api 及其前面的所有替换成了 target 中的内容,因此实际访问 Url 是https://www.v2ex.com/api/site/info.json。
二、Vue3 版本
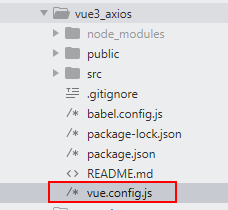
升级到 Vue3 后,会发现 Vue2 中存放配置的 config 文件夹没有了,大家不要慌张。可以在 package.json 文件的同级目录下创建 vue.config.js 文件。给出该文件的基础配置:
module.exports = {

    outputDir: 'dist',   //build输出目录
    assetsDir: 'assets', //静态资源目录(js, css, img)
    lintOnSave: false, //是否开启eslint
    devServer: {

        open: true, //是否自动弹出浏览器页面
        host: "localhost",
        port: '8081',
        https: false,   //是否使用https协议
        hotOnly: false, //是否开启热更新
        proxy: null,
    }
}
Vue3 解决跨域,内容只有第二步配置代理 和 Vue2 不同,其他的一致。
Step2:配置代理
修改 vue.config.js 中 devServer 子节点内容,添加一个 proxy:
devServer: {

    open: true, //是否自动弹出浏览器页面
    host: "localhost",
    port: '8081',
    https: false,
    hotOnly: false,
    proxy: {

        '/api': {

            target: 'https://www.v2ex.com/api', //API服务器的地址
            changeOrigin: true,
            pathRewrite: {

                '^/api': ''
            }
        }
    },
}
三、番外
当然,跨域问题也可以由后端解决,将下面这个过滤器加入程序即可。
import javax.servlet.*;
import javax.servlet.http.HttpServletRequest;
import javax.servlet.http.HttpServletResponse;
import java.io.IOException;

/** * 跨域过滤器 * @author jitwxs * @since 2018/10/16 20:53 */
public class CorsFilter implements Filter {

    @Override
    public void doFilter(ServletRequest req, ServletResponse res, FilterChain chain) throws IOException, ServletException {

        HttpServletResponse response = (HttpServletResponse) res;
        HttpServletRequest request = (HttpServletRequest) req;

        // 不使用*,自动适配跨域域名,避免携带Cookie时失效
        String origin = request.getHeader("Origin");
        if(StringUtils.isNotBlank(origin)) {

            response.setHeader("Access-Control-Allow-Origin", origin);
        }

        // 自适应所有自定义头
        String headers = request.getHeader("Access-Control-Request-Headers");
        if(StringUtils.isNotBlank(headers)) {

            response.setHeader("Access-Control-Allow-Headers", headers);
            response.setHeader("Access-Control-Expose-Headers", headers);
        }

        // 允许跨域的请求方法类型
        response.setHeader("Access-Control-Allow-Methods", "*");
        // 预检命令(OPTIONS)缓存时间,单位:秒
        response.setHeader("Access-Control-Max-Age", "3600");
        // 明确许可客户端发送Cookie,不允许删除字段即可
        response.setHeader("Access-Control-Allow-Credentials", "true");

        chain.doFilter(request, response);
    }

    @Override
    public void init(FilterConfig filterConfig) {


    }

    @Override
    public void destroy() {

    }

    /* 注册过滤器: @Bean public FilterRegistrationBean registerFilter() { FilterRegistrationBean<CorsFilter> bean = new FilterRegistrationBean<>(); bean.addUrlPatterns("/*"); bean.setFilter(new CorsFilter()); // 过滤顺序,从小到大依次过滤 bean.setOrder(Ordered.HIGHEST_PRECEDENCE); return bean; } */
}
发布者:全栈程序员-用户IM,转载请注明出处:https://javaforall.cn/134262.html原文链接:https://javaforall.cn
【正版授权,激活自己账号】: Jetbrains全家桶Ide使用,1年售后保障,每天仅需1毛
【官方授权 正版激活】: 官方授权 正版激活 支持Jetbrains家族下所有IDE 使用个人JB账号...
